IZotope Nectar Help Documentation
←
→
Page content transcription
If your browser does not render page correctly, please read the page content below

iZotope Nectar Help
     Documentation
Table of Contents
Introduction ............................................................................................................ 1
Welcome to iZotope Nectar ..................................................................................... 1
Quickstart ............................................................................................................ 2
iZotope Customer Support ...................................................................................... 4
Main View ............................................................................................................... 5
Interface .............................................................................................................. 5
Tracking and Mixing Modes ..................................................................................... 9
Advanced View ...................................................................................................... 10
Breath Control .................................................................................................... 10
Pitch ................................................................................................................. 13
Gate .................................................................................................................. 20
Saturation .......................................................................................................... 22
Equalizer............................................................................................................ 24
Compressors ...................................................................................................... 27
De-Esser ............................................................................................................ 32
Doubler ............................................................................................................. 34
Limiter............................................................................................................... 36
Reverb .............................................................................................................. 38
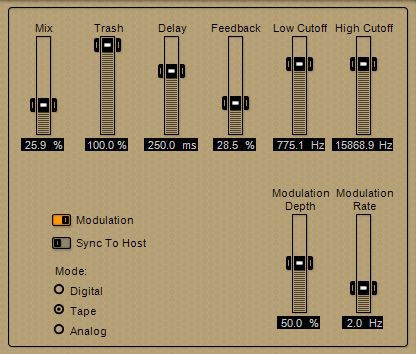
Delay ................................................................................................................ 41
General Functions .................................................................................................. 44
Input and Output Gain ......................................................................................... 44
Standard Module Controls..................................................................................... 46
Undo and History Comparisons .............................................................................. 48
Presets ................................................................................................................. 49
Working with Presets ........................................................................................... 49
Transferring Presets ............................................................................................ 50
Meters .................................................................................................................. 51
Spectrum ........................................................................................................... 51
Breath Control .................................................................................................... 52
Pitch ................................................................................................................. 53
Saturation .......................................................................................................... 55
Gate/Compressors ............................................................................................... 56
DeEsser ............................................................................................................. 57
Limiter............................................................................................................... 58
Reverb .............................................................................................................. 59
Input and Output ................................................................................................ 60
Options ................................................................................................................ 62
General ............................................................................................................. 62
Spectrum ........................................................................................................... 65
Meters ............................................................................................................... 67
EQ/Compressors/Pitch ......................................................................................... 69
Workflow .............................................................................................................. 70
CPU Optimization ................................................................................................ 70
Buffer Size Viewer ............................................................................................... 71
Automation ........................................................................................................ 73
Delay Compensation ............................................................................................ 74
Keyboard and Mouse Support ............................................................................... 75
ii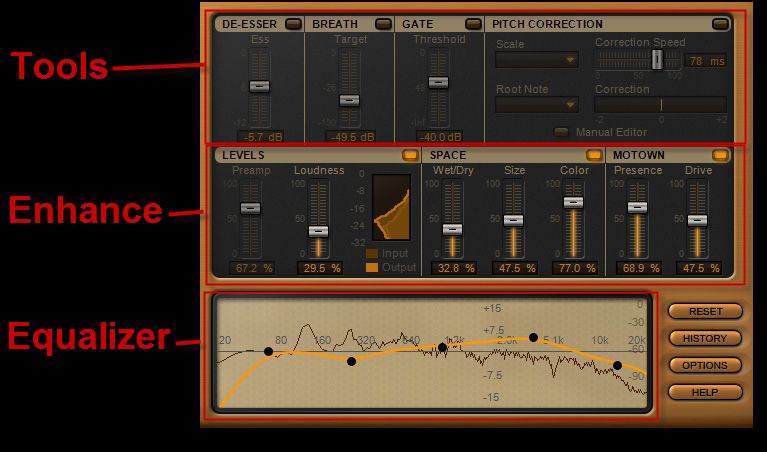
Introduction
 Welcome to iZotope Nectar

Nectar was created out of a desire to provide engineers, musicians, broadcasters and other
audio professionals with a complete vocal mixing and sound design tool. A great deal of
time and effort has gone into ensuring that Nectar delivers superior sound quality and an
innovative and complete feature set.

With multiple Genres and Styles to choose from, Nectar's Main view gives all the tools and
sliders you need to perfect and enhance your vocal takes. The Advanced view also gives you
under the hood access to each module, allowing you to tweak individual settings to fit any
project.

We hope that you enjoy working with Nectar and that it will bring a new creative edge to all
of your projects.

Thanks for using Nectar!
- the iZotope team

© 2001-2010 iZotope, Inc. All rights reserved. iZotope, iZotope.com, the iZotope logo, and Nectar are
either registered trademarks or trademarks of iZotope, Inc. in the United States and/or other countries.
V 1.0.0.772 V 1.0.0.776

                                                                                                           1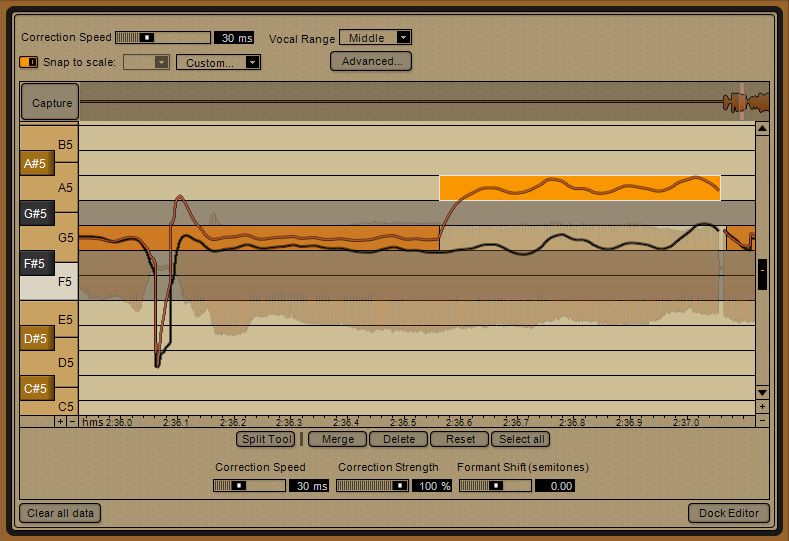
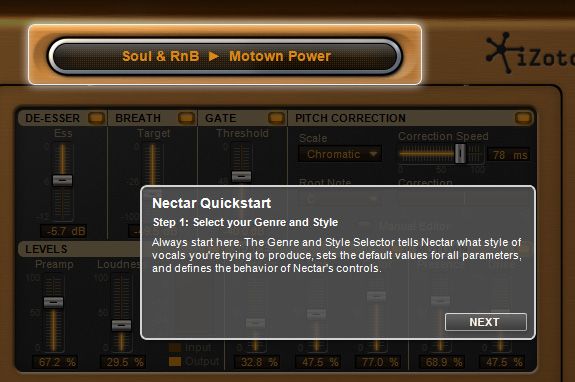
iZotope Nectar Help Documentation

1. INTRODUCTION

Quickstart

Nectar’s Styles are designed to give you a quick starting point for your own projects.
Every vocalist is different so no one preset will always work well for your audio. However we
have attempted to provide a wide range of Styles that will help you find a good starting
point for your own material.

Step 1: Select your Genre and Style
Always start here. The Genre and Style Selector tells Nectar what style of vocals you're
trying to produce, sets the default values for all parameters, and defines the behavior of
Nectar's controls.

Step 2: Tracking and Mixing
Nectar has two modes of operation: Tracking and Mixing. Use Mixing mode when you need
the full power of Nectar and Tracking mode to lower CPU usage and latency. Tracking mode
switches Pitch Correction, Doubler, and Limiter into streamlined modes and disables Breath
Control.

Step 3: Adjust Settings to Taste
The top row contains tools for polishing your vocal recording. The sections below contain
controls to modify the selected style and dial in the sound you are looking for, or to
experiment with creative variations.

Advanced View

2
Introduction

If the first three steps do not produce the vocal sound you want you can use the Advanced
View to reconfigure Nectar using the eleven underlying modules.

Using Styles in Nectar
By starting with a Style and tweaking the available controls in Nectar’s Macro window, you’ll
be able to make Nectar more closely fit the session you’re working on. If you want more
advanced control of any of Nectar’s modules, you can go deeper by clicking on the
Advanced View button.

Setting Your Input Level
Setting the input level in Nectar can make a huge difference in how the modules in Nectar
behave. Setting your input level is important when selecting Styles as the Styles will sound
drastically different if your input level is too loud or quiet.

In order to ensure that you have a good neutral level as a starting point, we recommend
setting Nectar’s input level so that the input meter is peaking within the recommended
range bracket.

Choosing a Starting Point
Start by listening through several of Nectar’s Styles. We’ve organized Styles into categories
that will let you search easily for Styles for every purpose. Because every vocal track is
different, we’ve aimed to give you a lot of starting points so that you can choose the best
one for your project. When you’ve found a Style that has what your track needs, further
tweak the Levels, Space and "Creative" block sliders to just to your liking.

                                                                                               3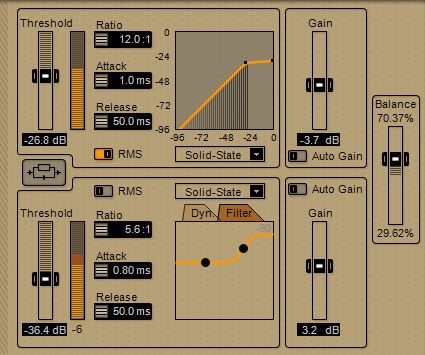
iZotope Nectar Help Documentation

1. INTRODUCTION

iZotope Customer Support
How to purchase the full version of Nectar
If you are using the demo version of Nectar and would like the full version, you can
purchase Nectar direct from the iZotope online store.

http://www.izotope.com/products/audio/nectar/

Once your purchase is complete you will be sent an email confirmation and a full version
serial number that can be used to fully authorize your current installation of Nectar.

Customer Support Policy
iZotope is happy to provide professional technical support to all registered users absolutely
free of charge. We also offer valuable pre-sales technical support to customers who may be
interested in purchasing an iZotope product. Before contacting iZotope support, you can
search our Product Knowledgebase to see if the solution to your problem has already been
published.

http://www.izotope.com/support/center

How to contact Technical Support
For additional help with Nectar, please check out the support pages on our web site at
http://www.izotope.com/support or contact our customer support department at
support@izotope.com.

iZotope's highly trained support team is committed to responding to all requests within one
(1) business day and frequently respond faster. Please try to explain your problem with as
much detail and clarity as possible. This will ensure our ability to solve your problem
accurately, the first time around. Please include all system specs and the build/version of
Nectar that you are using.

Once your support request is submitted, you should automatically receive a confirmation
email from iZotope support. If you do not receive this email within a few minutes please
check your spam folder and make sure our responses are not getting blocked. To prevent
this from happening please add support@izotope.com to your list of allowed email
addresses.

4
Main View
2. MAIN VIEW

Interface

Nectar's Main View provides all of the intuitive controls necessary to enhance your vocal
takes for any given vocal genre or style.

Basic Operation
Start by selecting a Genre and Style using the large button at the top of Nectar’s interface.
From here, you can adjust your settings to taste.

Instantiate Nectar directly on to your vocal tracks or use Nectar’s Space module on an Aux
track to add in extra reverb or delay on to your vocals.

Modules
Nectar’s Main View presents you with multiple modules and controls to clean up as well as
bring out your incoming audio.

                                                                                                5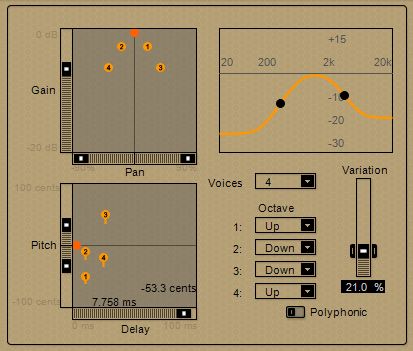
iZotope Nectar Help Documentation

Note: Depending on the chosen style, the “Creative” module’s controls may be hooked up
to processing that would be bypassed by the Levels or Space module power button. When
this is the case, the module power button will not be displayed for the “Creative” module.

You can engage or bypass Nectar's processing using the power buttons in the upper right
corner of each block in the Main View.

While holding the Alt/Option key, clicking on the orange power buttons will temporarily
bypass all modules except for the one module that was clicked on. This allows you to
audition the effect of one module without hearing the effect of the others.

While holding the Alt/Option key, clicking again on the module power icon will re-enable the
modules that were originally bypassed.

Tools
Use these modules to clean up and prepare your incoming audio for your session.

DE-ESSER
The Ess slider will allow you to define the amount of De-Essing that will be applied to your
incoming audio. Nectar's De-Esser will apply the same amount of Ess reduction regardless
of the incoming audio level and as such, there is no need for threshold or level based
controls.
More

BREATH
Allows you to set the Target level in decibels that any detected breaths will be reduced to.
More

GATE
You can raise the Threshold of Nectar's Gate in order to reduce the gain of any low level
signals in your audio.
More

6
Main View

PITCH CORRECTION
Allows you to access Nectar’s Automatic pitch correction. Use these controls to adjust the
correction speed as well as the scale and root note that your incoming vocals will be
corrected to.

Click the Manual Editor button in order to capture and manually edit any particular note in
your audio.
More

Enhance
Reconfigured depending on your chosen Genre and Style, use these modules to bring out
and sculpt your incoming vocals to fit your session and style.

LEVELS
Use the Preamp and Loudness sliders to adjust the settings and timbres created at the
beginning of your vocal chain.

Increase the Preamp control in order to bring up the initial gain of your vocals as well as
add in extra color to fit your chosen style. Depending on the Style, this can be achieved by
Saturating the signal with certain harmonic profiles, adjusting certain aspects of the EQ
contour, or with style appropriate compression controls.

The Loudness slider is most often used to bring up the overall comparative loudness of your
incoming vocal audio. In most styles, this is done by adjusting varied compression
parameters and other dynamics controls such as Limiting in order to even out your audio’s
dynamic range.

SPACE
Whether with added Reverb or Delay, the Space module’s controls can help to add depth
and shine to your dry incoming audio. The particular flavor and timbre of the spatial
processing that is added will be tailored to suit your particular chosen Genre and Style.

Use the controls to adjust how much processing will be added, the size of that processing,
and how dark or bright the added space will be.

"CREATIVE"
Unique to each Genre and Style, the “Creative” module of Nectar’s Main View can represent
any number of different audio processes, all designed to further enhance or bring your
particular style in a new direction. Using combinations of doubling processing, EQ contours,
creative delays and echoes, extra dynamics controls, or varied saturation profiles, the
“Creative” controls act as a compliment to the Levels and Space modules.

Equalizer
Adjust any of Nectar's EQ nodes in order to shape your sound to fit into your mix. Click and
drag to alter the frequency and gain of any node, and use the node brackets or the mouse-
wheel to adjust the Q of that particular node.

You can also click and drag a box in the Equalizer display in order to select and edit multiple
nodes simultaneously.

                                                                                               7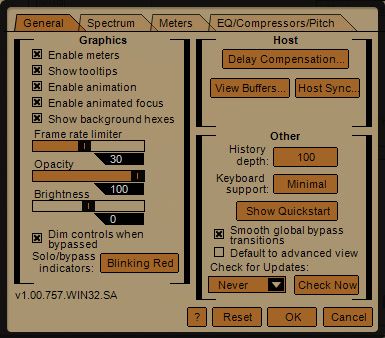
iZotope Nectar Help Documentation

Command or Right-Click on any particular node in order to change its filter type. Command
or Right-Clicking on the Equalizer background itself will allow you to Reset the EQ nodes to
their default values, and access extra Equalizer and Spectrum Options.

Note: Holding Alt/Option while clicking in the EQ's background will enable the Alt-Solo filter,
letting you hear only the frequencies that are under the mouse cursor, without affecting
your actual EQ settings.
More

8
Main View

2. MAIN VIEW

Tracking and Mixing Modes

iZotope Nectar can be used at any point in the entire vocal process. Whether you are
tracking (recording) your vocals into your session or giving them a final polish, the Tracking
and Mixing modes can help to configure Nectar's algorithms under the hood in order to give
you the desired performance.

In order to achieve accurate and high quality processing inside of Nectar, certain modules
require a larger amount of cpu usage and imposed latency (delay) upon your tracks. In
general, this imposed latency is compensated for by your host audio application, aligning
your tracks and preserving the timing of your audio with respect to your session.

Mixing
The default state of Nectar, all modules will be available for use and higher quality but more
cpu intensive processes will be used.

Tracking
If near zero latency processing and lighter cpu usage are required either in a recording or
live scenario, engaging Tracking mode will configure Nectar to run quickly and efficiently.

In Tracking mode, the following changes will occur:

      Pitch Correction - Only Automatic Pitch Correction will be available and a
      streamlined pitch correction algorithm will be used.

      Doubler - A lower latency and less cpu intensive doubling algorithm will be used.

      Limiter - The underlying algorithm is changed to a zero-latency Brickwall

      Breath Control - This module is disabled as a high latency is required for its
      operation.

                                                                                              9
Advanced View
3. ADVANCED VIEW
Breath Control
The Breath Control module will automatically detect breaths in your vocal takes and
suppress them. This can be an essential tool when trying to get a very intimate or
aggressive vocal sound that requires the singer to be very close to their microphone.
Once the vocal take is saturated, compressed or limited, the singers breathing can become
loud and abrasive while the vocal take itself might be just the sound you're looking for. The
Breath Control module can allow you to reduce the gain of these breaths, while keeping the
sung vocals untouched.
Detection
The Breath Control module automatically analyzes the incoming vocal take and distinguishes
breaths from sung vocals based on their harmonic structure. If any piece of the incoming
audio matches a harmonic profile similar to a breath, the module will suppress that portion
of the audio until sung vocals are detected.
Different from a 'Threshold' based process in which the module is only engaged once the
audio has risen to a certain volume, Breath Control will perform its analysis regardless of
level. This allows for accurate breath recognition with a multitude of quiet or loud vocal
styles with minimal adjustment of the module's controls.
Modes:
Gain
10Advanced View
When a breath is detected in Gain mode, the Breath Control module will reduce the gain of
that breath, regardless of the level of that particular portion of audio. With the 'Gain' slider
set to a reduction amount of -30dB, if the singer breaths in very quietly and then very
loudly, both the loud and quiet breaths will be reduced in gain by -30dB.
In some cases, this is desirable when trying to handle egregious breathing or as a way of
removing all breaths from a particular spoken or sung vocal take. Depending on your
settings however, this can result in unnatural sounding results as the very quiet breaths
may be inaudible, while the loud breaths will be reduced to a normal level.
Target
When in Target mode, the reduction amount of the 'Target' slider represents the desired
level that you wish all detected breaths to be reduced to. This means that if a singer breaths
in quietly and then loudly, both the loud and quiet breaths will be reduced only as much as
is necessary to have both breaths reach the desired level.
This can result in much more natural sounding breath reduction as the detected breaths in
your audio are only reduced when necessary. Loud and abrasive breaths will be reduced
heavily while quiet natural sounding breaths will be left at the same volume.
Note: By default, the Breath Control module will be in Target mode.
Tracking vs. Mixing
When in Tracking mode, the Breath Control module will automatically be bypassed.
In order for the Breath Control module to have time to perform its analysis, it must incur a
good deal of latency. The result of this latency is that the incoming audio is delayed in time
with respect to the other tracks in your session.
Most modern day host audio applications have a feature called 'Delay Compensation' which
will recognize the latency (delay) that Nectar is reporting and will adjust the tracks in your
session accordingly - making sure that all of your tracks are aligned and in time with each
other. This 'Delay Compensation' can only happen once the audio has been recorded into
your digital audio workstation however.
When tracking (recording) your incoming audio, if Nectar is in Mixing mode and the Breath
Control module is engaged, the latency of the Breath Control module will cause a delay
between when the audio comes in to your computer, and when it passes through Nectar. In
these instances, be sure to switch Nectar into Tracking mode.
Note: If your host has a limited number of samples of latency compensation, Breath
Control may still cause tracks to be played back out of sync with each other. In these
cases, we recommend processing your vocal takes with Breath Control as a separate offline
process, and then using the other modules in Nectar to enhance your vocals in real-time.
Sensitivity - This controls how sensitive the breath control module is when detecting the
harmonic structure of breaths in your incoming audio.
Gain (dB) - Sets the desired amount of gain reduction applied to all detected breaths,
regardless of level.
Target (dB) - Sets the resulting desired level of all detected breaths
11iZotope Nectar Help Documentation Breaths Only - When enabled, only the audio of the detected breaths will be passed to the output of the module. This can help when setting the Sensitivity control in order to make sure that only the breathing in your audio is being processed. 12
Advanced View
3. ADVANCED VIEW
Pitch
The Pitch Correction module contains both Automatic and Manual Pitch Correction that work
together in Nectar to get you the best vocal results possible.
Workflow
1. Start out by turning on Nectar's Pitch Correction module and specifying your scale and
root note as best you can from the Main or Advanced View. If working in the Advanced
view, you can engage the Automatic Correction checkbox as in many cases, this can get any
vocal most of the way there, very quickly.
2. Also, be sure to specify your incoming vocal range. In the Advanced button drop-down,
you can define the desired overall reference pitch, and whether or not you want to apply an
overall pitch or formant transposition.
These parameters, along with the specified root note and scale will impact both Automatic
Correction as well as how Nectar's Manual Editing and Capturing will behave so it is
important to set them as accurately as possible.
3. In the event that you wish to adjust the corrected notes of a particular section in order to
fit your music or style, launch the Manual Editor, enable the Capture button to begin
streaming audio in, and play in the audio you wish to edit.
4. The incoming vocal data will then be analyzed, displayed, and stored in to your captured
data directory on your computer, allowing you to now manually edit any of your newly
captured vocal material. When you have captured in all of the audio you wish to edit, click
the Capture button again to disable capturing and begin editing your vocals.
5. Any manual edits that are made will be remembered for your particular audio position
and will be applied to your incoming vocal takes whenever that audio is played back.
Note: Nectar's Manual Pitch Editing and Capturing is based upon the exact sample position
of your incoming audio. If you wish to adjust the timing of your vocal takes in your session
after capturing and editing pitches manually, use Nectar as an offline process in order to
print the pitch correction directly into the audio region.
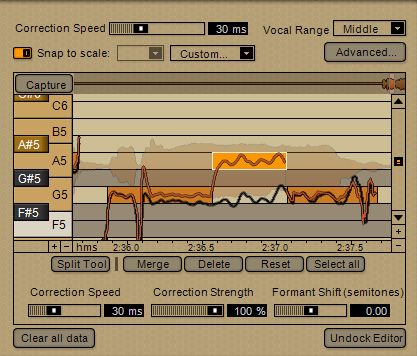
13iZotope Nectar Help Documentation Automatic Pitch Correction Snap to Scale When the Pitch Correction module is enabled in Nectar's Main View, or the Snap to Scale checkbox is enabled in the Advanced View , the incoming vocals will be corrected to the scale and root note specified in the appropriate drop-down menus. Correction Speed (ms) You can use the Correction Speed control in order to control how quickly your incoming vocals will be snapped to any particular note. Set your Correction Speed to 0ms in order to achieve robotic immediate pitch snapping, or use values from 30-60ms in order to obtain more natural transparent results. Root Note Here you can define the root note or key that your vocal takes are in. Even when using Manual Pitch Capturing, it is important to set a relatively accurate Root Note as this can help the algorithm to determine the best possible pitches for your particular session. Chromatic A scale in which every note of every octave will be available as a pitch your vocals could be corrected to. If you are not sure of the scale that your vocal takes are in, be sure to set your scale type to Chromatic in order to get the best results. Note: When in chromatic mode, as every pitched note is available for pitch correction, the defined root note has no effect. Major / Minor / Custom Here you can select to snap your incoming vocal pitches to either a Major, Minor or Custom scale of your choosing based upon your specified Root Note. 14
Advanced View

When defining a Custom scale, click one upon the notes of the keyboard you wish to enable
as options for pitch correction. When the individual notes are enabled, they will turn gold or
dark gold for black keys. White and black notes will be disabled and not used in pitch
correction.

Note: To specify a Custom scale from Nectar's Main View, launch the Manual Editor and
select Custom once more from the Scale drop-down menu at the top of the Editor.

Vocal Range
An important parameter to set to correctly, the specified Vocal Range will control how
Nectar will detect and analyze any incoming vocal data. Start with the Middle setting for
most audio applications, and if you notice any undesirable behavior in the detected pitches,
experiment with the Low and High options to suit your vocals.

Advanced
Use these controls to fine tune how Nectar's Automatic and Captured Pitch Correction will
perform.

Reference Pitch (Hz)
By default, all pitches will be based upon a standard A = 440Hz tuning reference. If your
audio is not based on this standard reference pitch, or has been moved slightly due to
analog tape recording, you can adjust your Nectar's Reference Pitch here.

Note: When changing Nectar's Reference Pitch after data has been captured, you must use
the Clear All Data option to erase and recapture your audio.

Transposition (semitones)
Here you can define anywhere in between an Octave Up or Down transposition of all
incoming audio. This pitch shift will be applied to both Automatically Corrected vocals as
well as Manually Captured vocals.

Formant Shift (semitones)
Use this control to specify the amount of Formant transposition you wish to apply to your
incoming vocal tracks. In general, this can be left at 0 as Nectar's Pitch Correction algorithm
will automatically preserve your audio's formants during pitch shifting. You can however use
this control to manually adjust your vocal formants. This shift will be applied to both
Automatically Corrected vocals as well as Manually Captured vocals.

Global Formant Scaling
Nectar's Pitch Correction algorithm will exactly preserve the formants of your incoming vocal
takes. These formants are what give the voice its timbre and are very important in keeping
your vocals sounding as natural as possible when pitch shifting.

It can however be desirable to shift the formants slightly in the direction of the desired pitch
shift, as this corresponds to what humans naturally do. When singers sing a higher note,
our vocal formants also shift slightly higher.

Global Formant Scaling can therefore help to allow for more natural results if necessary.

Note: Unlike other Advanced drop-down functions that will be written in to your audio data
when capturing your vocals, the Global Formant Scaling parameter will be applied in real-
time to all incoming and captured audio.

                                                                                             15
iZotope Nectar Help Documentation Note Sensitivity Use this control to adjust Nectar's behavior when 'accepting' notes during capture. With a low note sensitivity, fewer note changes will be recorded while a high sensitivity will result in more notes being captured. Manual Editor In the event that you wish to edit certain notes or sections of your vocal take, click on the Manual Editor button (Main View) or the Undock Editor (Advanced View) in order to view your Manual Editor as a separate floating window. Note: Manual Pitch editing is only available when Nectar is in Mixing mode Capture Clicking the Capture button will enable Nectar to be ready to receive and analyze any incoming pitched vocal data. After engaging the Capture button, begin playback in your host audio application of the specific audio portion that you wish to edit. The incoming vocals will automatically be analyzed and the detected pitches will be displayed in real-time in the Manual Editor window. A faded waveform display will also be present behind the detected pitches in order to give a reference for the position of the audio file. Nectar's Manual Pitch Editing and Capturing is based upon the exact sample position of your incoming audio. If you wish to adjust the timing of your vocal takes in your session after capturing and editing pitches manually, use Nectar as an offline process in your DAW in order to print the pitch correction directly into the audio region. 16
Advanced View

Do not set your host application to loop playback while Capturing audio into Nectar. In
some circumstances, this can cause the Capture process to fail.

Pro Tools AudioSuite: When using Nectar as an offline AudioSuite plug-in, Nectar's own
Capture button will be hidden. Instead, make use of the AudioSuite Capture button at the
bottom of the Pro Tools plug-in shell. When clicking the AudioSuite Capture button with the
Pitch module engaged and in Mixing mode, Nectar will automatically detect and capture
pitches for the entire audio selection.

Captured Data Folder
By default, Nectar will store all of its captured data in the directories listed below. In your
Captured Data Folder, each labeled folder will contain audio, layout and pitch data for each
individual instance of Nectar across multiple sessions.

In order to preserve any Captured pitch edits when moving any of your sessions to a new
machine, the corresponding Captured Data Folders containing that data for each instance of
Nectar must always move along with your session.

Note: Command or Right-Click on the Manual Editor piano roll background and select the
"Reveal Pitch Data Folder..." in order automatically find the specific data that corresponds
with that instance of Nectar.

Windows:
C:\Documents and Settings\\My Documents\iZotope Nectar\Captured
Pitch Data

Mac:
/Documents/iZotope Nectar/Captured Pitch Data

When moving your Captured Data Folders between machines in order to preserve any
sessions

Note: You can change your default Captured Data folder directory in Nectar's 'Options ->
EQ/Compressors/Pitch' tab.

Selections
Single-click on any detected note region in order to highlight that particular note for editing,
or click and drag in Nectar's Manual Editor interface in order to select multiple notes at any
one time.

Different from the Automatic Correction controls which are applied to all incoming audio,
you can use the sliders below to define independent values for each detected note.

Correction Speed (ms)
This controls how quickly the selected regions will be snapped to their specified pitches. This
control can be used to adjust Nectar's note transitions and can control how natural or
robotic sounding you wish the Pitch Correction to sound.

Correction Strength
Use this parameter to define how much the incoming vocal will be corrected to the specified
pitch. At %100, the incoming vocal will be snapped entirely to the desired pitch, whereas at

                                                                                               17
iZotope Nectar Help Documentation %50, the incoming vocal will only be corrected half of the way from the original pitch to the desired pitch. Formant Shift (semitones) This control allows you to adjust the vocal formants of your captured vocal audio. While in many cases, this can be left at 0 in order to preserve the formants as they were originally recorded, adjusting this parameter can aid in finding more natural results when performing larger pitch shifts beyond a few notes in a given direction. Split Tool Use the split tool in order to separate any existing note region into two note regions. Single-click on the Split Tool and then move your cursors to the note region and location in you which you would like to perform your cut. Single-click again on the desired note region in order to perform the cut. After splitting a desired note region, the Split Tool will automatically turn off and restore your cursor to its default state. Merge This will merge any of your selected notes into one note region. The pitch of the resulting region will be set to the note that has the most prominence in your original selection. Delete Deletes any selected manually edited note regions. Manual Pitch edits will only be applied to the incoming vocal audio in areas where captured manual note data has been captured. If the Automatic Correction checkbox is enabled, Nectar's Automatic Pitch Correction will be applied to any areas without captured note data. Reset When pressed, any selected notes will be moved back to their originally detected note pitches. Note: Double-clicking on any note selection will also perform a pitch reset. Select All Use this button to automatically select all notes that have been captured into Nectar's Manual Pitch Editor. This can be very helpful when you wish to adjust the Correction Speed or Strength for all of your captured pitch data without having to zoom out to encompass your entire vocal take Clear All Data Use the Clear All Data button to completely remove any captured audio and note data for that particular instance of Nectar. After clicking OK, clearing all data cannot be undone. Tracking Mode While in Tracking mode, only Nectar's Automatic real-time pitch correction will be available in both the Main and Advanced view. The screen below will be displayed when in working in the advanced view. 18
Advanced View

When working in the Main View in Tracking mode, the Manual Editor button will also be de-
activated.

                                                                                        19
iZotope Nectar Help Documentation 3. ADVANCED VIEW Gate The Gate can be thought of as performing the opposite task as the compressor. It takes program material below the threshold and reduces it by a factor determined by the ratio. Depending on the Ratio setting, this module can function as a noise gate (silencing quiet sections) or an upward expander (boosting quiet sections). This allows you to boost or cut (expand/gate) the level of soft signals while applying compression in the Compressors module to high level signals . The combination is such that you can tighten the dynamic range by compressing "from the top" or expanding/gating "from the bottom" or a combination of both. This can also be particularly useful when there is bleed in your vocal audio - noise in the room not coming from the vocalist. When the vocalist is singing or speaking, the signal is allowed to pass untouched. When the vocalist stops singing or speaking however, the ambient noise in the room is gated and reduced in gain. Controls Threshold (dB) - Set the point where the dynamics processing takes place. Ratio - Sets the ratio for the dynamics process. Higher ratios will result in more extreme gating. The Gate can have a ratio greater or less than 1.0. When the ratio is greater than 1, it is operating as a gate and any signals below the threshold will be decreased in volume. 20
Advanced View

With ratios less than 1 the Gate can act as an "upward compressor" by boosting the low
level signals. This is an effective technique for adding fullness to a track as you can bring up
the lower levels without compressing or limiting the upper levels.

Attack (ms) - This is the amount of time in milliseconds that Nectar will wait after the
incoming signal has passed the defined threshold value, to apply the specified ratio of gain
to the signal.

Shorter attack times will engage the Gate module much more quickly, while longer attack
times can result in slower more subtle processing.

Release (ms) - The release time is the amount of time in milliseconds that it takes for
Nectar to bring its gain reduction back to zero once the signal has fallen below the
threshold.

Shorter release times can tend to unnaturally pump on certain audio material, where longer
release times have a more subtle gradual feel to them.

Note: Auto-smoothing, available in the Options menu, causes Nectar to intelligently make
small changes in its attack and release times to reduce the amount of distortion generated
by the dynamics processing.

RMS Detection - When this option is enabled, instead of processing your audio based on
the incoming peak level of the signal, Nectar looks at the RMS average signal level. This can
allow for much gradual processing and may give more natural results depending on the
incoming audio.

Make-Up Gain (dB) - Adjusts the output gain of the signal after being processed by the
Gate module. This is useful for compensating for any change in volume caused by the
processing.

Auto Gain - When selected, Auto Gain calculates RMS levels of both the input and output
signal and applies the appropriate amount of gain to the output signal to compensate for
the difference. This allows you to not worry about manually applying make-up gain as you
set the module's controls.

                                                                                             21
iZotope Nectar Help Documentation 3. ADVANCED VIEW Saturation Nectar’s Saturation module can infuse your vocals with the subtle effects of tube, tape and other analog hardware by emphasizing even and odd harmonics in varying amounts. They can also be used in mid and even low frequencies to add a boost or presence to tracks and busses. Nectar’s Harmonic Scaling technology is designed to emulate the subtle effects of tube, tape and other analog hardware by emphasizing even and odd harmonics in varying amounts. Amount: Controls the amount of the harmonic excitation. Mix: Allows you to control the mix of the excited signal with the original mix. Highshelf Filter When saturating your vocals, often times the added harmonic content can make the sibilant frequencies in a vocal take harsh or biting. Click and drag on the Highshelf filter node in order to reduce the gain of these high frequencies. The highshelf filter will only reduce the high frequencies present of the saturated (wet) signal. Different saturation algorithms such as the Tube and Warm modes, rely on a strong dry signal in order to perform their saturation. As such, the highshelf filter will have varying amounts of perceived effect upon your vocals depending on the algorithm chosen. Modes Tape 22
Advanced View

Tape mode emphasizes odd harmonics but with a shorter harmonic slope than transistor,
and emulates the sound of analog tape when pushed to saturation.

Tube
Tube mode emulates the sound of tube saturation with a mix of even and odd harmonics. It
is characterized by its clear "tonal" excitation.

Warm
The Warm excitation mode generates only even harmonics with a steep slope and, as such,
may be used as a subtle warming effect.

Analog
The Analog mode emulates the sound of transistor type odd harmonics giving a driven grit
to your audio.

Retro
This algorithm is based on a row of odd harmonics characteristic of transistors resulting in a
sharp, somewhat aggressive sound.

                                                                                            23
iZotope Nectar Help Documentation 3. ADVANCED VIEW Equalizer Nectar’s versatile EQ allows you to add warmth and character with analog-modeled filters, and precisely boost and cut frequencies with its helpful frequency spectrum overlay. Frequency and Gain The black numbered circles mark each of the five EQ nodes. You can adjust an EQ band by clicking on a node and dragging the crosshairs to change the frequency and gain of the band. You can also use the arrow keys to adjust a selected band, or the Shift key in combination with the arrow keys to adjust in larger increments. Q/Bandwidth You can adjust the Q or bandwidth of the EQ by clicking and dragging on the "handles" on the side of the band, to widen the band. If you have a wheel mouse, you can use the mouse wheel to widen/narrow a selected band. 24
Advanced View

Selecting Filter Shapes
Nectar provides the ability to set the type or shape of any of the five EQ nodes. Any node
can be one of the filter types below:
  • Bell
  • Lowshelf
  • Highshelf
  • Lowpass
  • Highpass
  • Sharp Lowpass
  • Sharp Highpass

To change the shape of a particular node, click on the "Show Info" button.

From this table, you can specify a different filter shape by clicking through the
corresponding nodes’ filters. You can also use the Show Info dialog to enter values for the
EQ bands directly.

Either double-click on the value to manually type in your desired setting, or click and drag
on the value’s text to increase of decrease the value. You can also disable bands with this
table by clicking on the square checkbox to the left of a band.

Zooming

You can zoom in on the EQ curves by clicking the ‘1x’ button to magnify 1x, 2x, 3x or 6x.
This allows you to better see and position EQ nodes around the 0 dB line. The zoom
deliberately does not zoom the spectrum.

The purpose of the zoom is to give you better visibility and resolution for small tweaks of
the EQ around the 0 dB line. If the spectrum also zoomed in, well, the spectrum would be
ineffective as a visual aid since you'd only see the spectrum around the 0 dB line, when
what you probably want is a "stepped back" view of all the peaks and valleys.

Note: With Nectar, right-clicking (under OS X you can also ctrl-click) a button toggles it in
reverse - so for the zoom button a right click zooms back out - 6x to 3x to 2x to 1x.

Editing Multiple Nodes

When clicking and dragging in the EQ display, a shaded selection box will appear. You can
use this to select and edit multiple nodes simultaneously. Once you have your nodes
selected, you can proportionally adjust them by clicking and editing any one node in the
selected group.

Visuals
As you adjust a band you will see two EQ curves. The bright yellow curve is the composite
of all EQ bands while the darker yellow curve shows the EQ curve of the selected band.

A spectrum is overlaid by default on the EQ module for visual feedback of the mix. You can
turn off the spectrum to conserve CPU or if you just don't want to see it using the Options

                                                                                              25
iZotope Nectar Help Documentation
screen. You can also set options such as average or real time spectrum, show peak
spectrum, etc. These are available in the Spectrum Options screen.
In the background you'll see the gain scale for the EQ down the center in a light grey color.
This will change as you zoom the EQ in or out. You'll see the scale for the spectrum in gray
down the right side of the EQ display.
Note: The scales for the EQ and spectrum are different, by design. If they were made to
match, you wouldn't see enough of the spectrum for it to be useful. The frequency scale in
grey applies to both the EQ and the spectrum.
Alt-Solo
If you hold down the Alt key and click on the spectrum, you have an "audio magnifying
glass" that lets you hear only the frequencies that are under the mouse cursor, without
affecting your actual EQ settings.
This is useful for pinpointing the location of a frequency in the mix without changing your
actual EQ bands. Releasing the mouse button returns the sound to the actual EQ.
Note: You can set the default bandwidth of this filter in the Options screen under "Alt-Solo
Filter Q".
Additional Tips using Nectar's Equalizer
• If you hold down the Shift key and drag an EQ band, the EQ band will be "locked" in
the direction that you're dragging. So if you just want to change the gain without
affecting the frequency (or vice-versa) just hold the Shift Key while you drag.
• If you've chosen to display an averaging spectrum or a peak hold spectrum (using the
Spectrum Options screen) you can reset the peak hold or the averaging by clicking on
the spectrum.
• Right click on the spectrum to bring up an options dialog to control the spectrum
display.
26Advanced View
3. ADVANCED VIEW
Compressors
The Compressors module allows you to shape the dynamics of your audio by reducing the
dynamic range of a recording, make it more consistent in volume, and increase its average
level. When the audio input level is greater than its threshold setting, gain will be reduced
by an amount controlled by the ratio parameter.
Extremely versatile, Nectar’s Compressors module can range from smooth vocal
compression, extreme and aggressive pumping, and anything in between. Two independent
compressors modules can also be used in parallel giving you many creative possibilities for
shaping your audio.
Parallel Compressor
27iZotope Nectar Help Documentation Instead of Nectar’s compressors running one right after the other, with Parallel Processing enabled, the incoming audio will be split into two identical audio streams, each running independently into the top and bottom Compressor. What this allows for is to have two different compressors acting upon the incoming audio at the same time. To turn the parallel compressor ON, simply click the small “parallel” logo button in the middle left of the Compressors module. When enabled, the second parallel compressor will appear and the audio will now be routed into both compressors simultaneously. The benefits of parallel processing are such that, one Compressor can have very severe pumping settings, in order to create the effect of heavy compression and expansion, while the other module only has very light settings. This will therefore give your audio the sound of heavy dynamics processing without sacrificing your dynamic range entirely. With the parallel compressor turned OFF, the audio that would have previously run through the bottom parallel compressor, will now be passed as dry unprocessed audio to the output of the Compressors module. You can blend between the dry and compressed sound using the Mix control. Filter The parallel compressor features a post filter with low and high shelf EQ nodes. After the audio has been compressed by the parallel compressor, the audio will run through the filter, allowing you to either further shape the timbre of the sound. Boosting the high end of the parallel compressors audio for example, will give a very pleasing bright sound when mixed in with the top compressors audio, providing a more colorful alternative to a simple high end boost in the EQ module. This technique is known as the ‘Motown’ sound as many vocal sounds of the past have been created using this parallel filtered compression setup. 28
Advanced View

Threshold (dB)
Set the point where the dynamics processing takes place.

Ratio
This control sets the ratio for the dynamics process. Higher ratios will result in more
extreme compression or expansion/gating.

The Ratio determines how much gain reduction happens when audio levels pass the
threshold. For example, with a 4:1 ratio, for every 4 decibels the input signal increases, the
output will only increase 1 decibel.

Attack (ms)
This is the amount of time in milliseconds that Nectar will wait after the incoming signal has
passed the defined threshold value, to apply the specified ratio and compression algorithm,
Shorter attack times will result in much quicker compression and a clamping down on
incoming peaks in your audio, while longer attack times can result in much more subtle
processing.

Release (ms)
The release time is the amount of time in milliseconds that it takes for Nectar to reduce its
gain reduction back to zero once the signal has fallen below the threshold. Shorter release
times can tend to unnaturally pump on certain audio material, where longer release times
have a gradual feel to them.
Note: Auto-smoothing, available in the Options menu, causes Nectar to intelligently make
small changes in its attack and release times to reduce the amount of distortion generated
by the dynamics.

RMS detection
When this option is enabled, Nectar acts as an RMS compressor/gate/expander. This means
that instead of looking at the peak level of the incoming signal, Nectar looks at the average
signal level.
By default, this is Off and Nectar’s Dynamics will be triggered by incoming signal peaks. In
general, peak detection is useful when you're trying to even out sudden peaks in your
music. RMS detection is useful when you're trying to increase the overall volume level
without changing the character of the sound.

Compressor Modes
Nectar’s compressors contain multiple algorithms, tailored specifically for vocal processing,
that give you access to a range of sounds and timbres to choose from for any style of
music.

Digital
This compression mode is built upon modern compression techniques and is designed to
provide very clear, precise, and linear compression to give a great sounding but minimally
colored sound.

Available Parameter ranges
Ratio: 1:1 – 50:1
Attack: 0.10 – 300ms
Release: 1 – 1200ms

Vintage

                                                                                            29
iZotope Nectar Help Documentation This mode emulates the program-dependant compression and non-linear release characteristics of classic analog compressors. Available Parameter ranges Ratio: 1:1 – 50:1 Attack: 0.10 – 300ms Release: 1 – 1200ms Optical In this mode, Nectar’s compressors will emulate the smooth compression of hardware optical compressors. With non-linear attack and release characteristics and subtle harmonic coloration, Optical mode can provide transparent but pleasingly colored compression. Note: Turn RMS detection ON to further emulate the sound of hardware optical compressors which were based on this design. Available Parameter ranges Ratio: 4:1 fixed Attack: 1 – 100ms Release: 40 – 200ms Solid-State Based on early VCA transistor based hardware compressors, the Solid-State mode can give a clear but aggressive compression sound distinguished by the very fast attack and non- linear release times characteristic of the original hardware units. With its own unique harmonic coloration, the Solid-State can be a great mode for accentuating lyrics, or the transients in any vocal performance. Note: Leave RMS detection OFF to allow the Solid-State mode to react in a much quicker ‘peak’ detection mode to make the pleasing vocal sound of this algorithm more present. Available Parameter ranges Ratio: 4:1 – 12:1 Attack: 0.20 – 80ms Release: 50 – 1200ms Mix When the Parallel compressor is enabled, this control will allow you to blend how much of each compressor’s audio you would like to hear in the final output. With the parallel compressor disabled, the mix control can also be used to blend between the top compressor module and your dry audio passing through the module. Gain (dB) Adjusts the output gain of each compressor. This is useful for making up for any decrease in volume caused by the audio processing. Auto Gain When selected, Auto Gain calculates the RMS levels of both the input and output signals of the compressor and applies the appropriate gain to the output signal to compensate for the difference. This allows you to not worry about manually applying make-up gain as you set the compressor. 30
Advanced View

Auto Gain is also a useful tool for A/B'ing the compressed signal against your original audio.
 If you compare your original audio to the audio being processed by Nectar’s Compressors
section by hitting the module’s Bypass switch, having Auto Gain enabled will ensure you’re
really hearing the effect of the compression and expansion, not just a change in volume.

                                                                                            31
iZotope Nectar Help Documentation 3. ADVANCED VIEW De-Esser Nectar’s De-Esser is a powerful tool for controlling sibilance on vocal takes as well as other high frequency problems. Traditionally, De-Essing dynamically reduces loud sibilant noises by means of a threshold and ratio. As the sibilant audio in a particular frequency band pass a certain threshold, they are attenuated. This can work well with other instruments that are less dynamic in nature such as guitars. Vocals however, tend to be very dynamic and contain certain sections that are quieter in level than others. This can pose a problem with a threshold based De-Esser as settings that might work great for one section of audio, may be too drastic for another section. Controlling Sibilance Nectar's De-Esser performs its processing independent of the incoming audio level. Whether your vocals are loud or soft, the amount of De-Essing taking place will be the same. This is performed by analyzing the current level of your vocal take, and how loud it is in proportion to the audio above the specified frequency parameter. If a large difference is detected due to a sibilance, the amount of Ess gain reduction will be applied. Ess Controls the amount of gain reduction that is applied to the incoming vocal take when a sibilance is detected. This gain reduction is applied quickly and transparently to the entire incoming vocal take, instead of simply reducing the gain of a particular set of frequencies. 32
Advanced View

This allows for much more natural sibilant reduction and prevents strong processing from
creating the effect of the singer having a lisp.

Frequency
The frequency control is used to set how the De-Esser is going to detect any incoming
sibilant material. This control serves as a cutoff point in which everything above the
specified frequency will be used to detect sibilance, in proportion to the level of the entire
audio take.

In general, this control can be left at its default value of 2500 Hz and should not need to be
adjusted much in order to achieve excellent results on a wide variety of material.

                                                                                                 33
iZotope Nectar Help Documentation 3. ADVANCED VIEW Doubler Doubling, tripling or quadrupling of a vocalist can be an effective tool to fatten up your vocal take, add a little space to the track with a chorusing effect, or simply create interested vocal effects. Nectar's Doubler allows for intuitive graphical control over a maximum of 4 doubled copies of your vocal take. Note: Click and drag in the Doubler's graphs to select and edit multiple voices together. Gain/Pan Use this graph to adjust the individual gain and panning of each doubled voice. The sliders on the left and bottom of the graph serve as scalars to add more or less to each voices current position. Note: The unmarked orange dot is a representation of the dry incoming vocal signal. Only the gain of the incoming dry signal can be adjusted. Pitch/Delay This graph gives you control over the individual pitch and delay of each voice with respect to the original vocal take. The pitch and delay of the original dry signal (unmarked dot) cannot be edited. Octave 34
Advanced View

The Doubler allows each voice to be scaled up or down an octave, as well as remaining in
the same register as the original take.

Use the individual drop down menus to select either Up, Down, or None for each voice of
Nectar's Doubler.

If an octave shift is selected for a particular voice, the pitch value represented in the
pitch/delay graph will still be applied to the octave up voice, making it either a perfect in
tune octave, or a sharp or flat double of the original vocals.

Variation
As opposed to having simply static copies of the original vocal take, the Variation control
automatically adds in natural variation in pitch to each voice independently.

The variation itself is represented in the Pitch/Delay graph by the small vertical lines on
either side of each dotted voice.

Equalizer
In order to shape and color the doubled voices, use the low and high shelf EQ nodes in
upper right to boost or cut certain frequencies.

Note: The Equalizer will only process the doubled voices and not the original dry vocal take.

Polyphonic
Engaging this option will allow Nectar's Doubler to process incoming polyphonic material
(multiple voices of different pitch).

The Doubler's internal pitch shifting algorithms are designed to work with single voice
monophonic audio material and as such, engaging Polyphonic mode will disable any pitch
shifting or octave doubles.

                                                                                                35
You can also read