Interaction Web Tools - Genesys
←
→
Page content transcription
If your browser does not render page correctly, please read the page content below
PureConnect®
        2021 R1

         Generated:
      12-February-2021

    Content last updated:
                                          Interaction Web Tools
      08-October-2020
See Change Log for summary of
                                                       Technical Reference
          changes.

                                                                       Abstract
                                    This document contains information about Interaction Web Tools for
                                    Customer Interaction Center (CIC). It includes the instructions
                                    necessary to install, con gure, and use Interaction Web Tools. It
                                    includes a list of Interaction Web Tools handlers and their parameters.
                                    This document contains code and HTML samples throughout.
                                    For the latest version of this document, see the PureConnect
                                    Documentation Library at: http://help.genesys.com/pureconnect.

                                For copyright and trademark information, see
                                https://help.genesys.com/pureconnect/desktop/copyright_and_trademark_information.htm.

                                                      1
Table of Contents
Table of Contents                                                                        2
Introduction to Interaction Web Tools                                                    5
  Audience                                                                               5
  CIC clients                                                                            5
  Licensing                                                                              5
    Server licensing                                                                     5
    Client licensing                                                                     5
  Requirements                                                                           5
    CIC server                                                                           6
    Web Server                                                                           6
    Browsers                                                                             6
Interaction Web Tools Features                                                           7
Interaction Web Tools Network Architecture                                               8
  Web server                                                                             8
  CIC server                                                                             8
  WebProcessor                                                                           8
  WebProcessorBridge                                                                     8
  Web HTML plug-in                                                                       8
  Database server                                                                        9
  Visitor's Browser                                                                      9
  Agent's CIC client                                                                     9
  Registration and authentication                                                        9
Installing and Configuring Interaction Web Tools                                        10
  Installation Overview                                                                 10
  Web Tools Files                                                                       12
  Interaction Web Tools Installation Prerequisites                                      12
  Tested Configurations                                                                 12
  HTML Configuration Utility                                                            13
  CIC configuration for all web server types                                            13
    Configure workgroup as ACD                                                          13
    Configure Web Services                                                              13
    Restart WebProcessorBridge                                                          14
  Installation and Configuration for Windows and IIS                                    14
    Unzip Interaction Web Tools files                                                   15
    Run Interaction Web Tools Configuration Utility                                     15
    Use Relative URLs                                                                   17
    Configure IIS                                                                       17
  Installation and Configuration for Apache                                             19
    Edit config.js                                                                      20
    Non-SSL both for browser and CIC connection                                         20
    Non-SSL for browser but SSL for CIC connection                                      21
    SSL both for browser and CIC connection                                             22
  Reverse Proxy Directory                                                               23
    Example 1:                                                                          23
    Example 2:                                                                          23
  Setting up SSL                                                                        23
    To use SSL between the web user and the web server                                  23
    To use SSL between the web server and the CIC server, if the web server is IIS      24
    To use SSL between the web server and the CIC server, if the web server is Apache   24
  Language                                                                              25
    Language settings                                                                   25
    Using language settings                                                             25
  Web Services Parameters on the CIC Server                                             26
  Troubleshooting Chats and Callbacks                                                   26
  Troubleshooting Gateway Communications                                                27
  Problem Reports                                                                       29
Configuring Default Web Functionality                                                   30
  Included Interaction Types                                                            30
  Automatic Web Pages                                                                   30
  Handlers                                                                              30
  Automatic Web Handlers                                                                30
                                                                     2
System_WebSearch.ihd                                           30
    Enabling Queries to Work with a Switchover Pair                32
  Install and Configure Automatic Web Pages                        33
    Designating which Agents Appear on the Agent Search Page       34
    Troubleshooting the Search page                                34
Skill-based Routing                                                36
  Overview of using skill-based routing                            36
  Create and assign skills                                         36
  Map internal skill names to external names                       38
  Default skill categories                                         39
  Set routing contexts in index.html                               40
  Modify handler to parse the routing context                      41
Configuring Web Services Parameters                                42
  Web Processor Parameters                                         42
  Web Processor Bridge Parameters                                  43
  Denial of Service Parameters                                     46
  Idle/Timeout Parameters                                          48
Administering Chat                                                 50
  Website visitor requirements                                     50
  How a chat session works                                         50
  Configuration Settings                                           50
  Enable Chat Transcripts                                          53
    Mailboxes                                                      53
  Chat Session Flow                                                54
    Chat Session via HTTP or HTTPS                                 54
    Testing the Chat Feature                                       59
  Chat Configuration and Administration                            59
    ACD configuration                                              59
    Agent photo                                                    59
Administering Callback                                             62
  What the Visitor Sees                                            62
    Callback link                                                  62
    Callback form                                                  62
    Callback Status page                                           63
    What the agent sees                                            63
  Callback Retry                                                   64
    Licensing                                                      64
    Callback retry configuration                                   64
    Callback retry handlers                                        65
    Callback retry and statistics                                  66
    Callback retry and the Tracker database                        66
    Callback retry and Switchover                                  66
  Testing the Callback Feature                                     67
Default Page and Customization Examples                            68
  Interaction Web Tools default page                               68
  Using the Interaction Web Tools default page                     68
  Setting up the examples                                          68
  Exploring the examples                                           69
    BypassLoginForm                                                69
    CallbackStatusField                                            69
    ClickOnFlagsForDifferentLanguages                              69
    DifferentLayout                                                69
    DifferentLayout2                                               70
    Directory                                                      70
    EmbeddedWithinOtherPage                                        70
    NoRegistrationTab                                              71
    Notifications                                                  71
    RegistrationFormPanelFields                                    71
Response Management                                                73
  Response libraries                                               73
  Requirements                                                     74
  What the agent sees                                              74
  Testing the Response Management feature                          74
  Enabling the Response Management feature                         74
                                                               3
e-FAQ                                                                                                 75
  What the agent sees                                                                                 75
  Requirements                                                                                        76
Other Features                                                                                        77
  Registration                                                                                        77
  Switchover                                                                                          77
Appendix A: Frequently Asked Questions (FAQ)                                                          78
  Security                                                                                            79
    How can a web server be made secure?                                                              79
    Is SSL supported by Interaction Web Tools?                                                        79
    Where can I find out about security for Microsoft IIS users?                                      79
    How exposed is CIC Internet functionality to Windows security holes?                              79
    Are handler-generated webpages at risk?                                                           79
  Web Servers                                                                                         80
    What web servers are supported?                                                                   80
    Can the web server be on an ISP or does it have to be local to the CIC server?                    80
    How do I configure Interaction Web Tools to run in a web server fault- tolerant/redundant mode?   80
    Should the web server be in the same domain as the CIC server?                                    80
    Should the web server be inside or outside a firewall?                                            80
  Chat                                                                                                81
    Does chat use an IRC or proprietary communication protocol?                                       81
    From the web server perspective, what determines a visitor session?                               81
    Why would a website visitor see agent chat messages in a different order than they were sent?     81
  Port Numbers                                                                                        81
    What port numbers does Interaction Web Tools use?                                                 81
Appendix B: Upgrading from Interaction Web Services 3.0 to Interaction Web Tools 2015 R1 +            82
Glossary                                                                                              83
Change Log                                                                                            85

                                                                     4
Introduction to Interaction Web Tools
Interaction Web Tools enables Customer Interaction Center (CIC) agents to interact with visitors to your company's website or use
chat functionality to communicate with other CIC agents. These tools enable handlers to send and receive information from
webpages and make it possible to register and authenticate website visitors against the Interaction Tracker database.
Interaction Web Tools supports the following CIC client features:
     Web Chat: An agent can engage in text-based, one-on-one communication online with a website visitor or create a chat
     conference between multiple agents and a website visitor.
     Intercom Chat: An agent can chat online with fellow employees or a group of fellow employees.
     Callback: Individuals can visit your website and request that an agent or member of a workgroup call them back. CIC routes the
     request to the appropriate agent or workgroup.
     Response Management: Agents can use Response Management during a chat to send pre-defined messages, URLs, or files to a
     website visitor. An agent can also use Response Management for guidance in answering a website visitor's questions during a
     call made as a result of a callback request.
     e-FAQ: e-FAQ is a centrally managed database of Frequently Asked Questions and responses. If your company has the e-FAQ
     knowledge management program and your agents have the appropriate user rights, agents can use e-FAQ to chat to respond to
     requests for information.

  Note:
  To use web chat or callback, Interaction Web Tools requires a web server. Intercom chat, Response Management, and e-FAQ do
  not require a web server.

Audience
The audience for the Interaction Web Tools Technical Reference includes:
    CIC Administrators who want to connect the CIC server to a web server and to install and configure Interaction Web Tools.
    Webmasters who want to display custom webpages from CIC or implement CIC Chat.
    Handler authors who want to write handlers that interact with people browsing a website.
    Anyone who wants to learn more about the Internet capabilities of CIC.
The technical reference reflects the Interaction Web Tools functionality available in CIC. It includes the installation, configuration,
and setup information necessary to use Interaction Web Tools.

CIC clients
CIC supports two interaction management client applications. This documentation uses the term CIC client to refer to Interaction
Connect and Interaction Desktop. Some features are not available in both CIC clients. Specific versions are noted where applicable.

Licensing
Following are the licensing requirements for Interaction Web Tools.

Server licensing
All CIC products include Intercom Chat (CIC agent to CIC agent chat). The other Interaction Web Tools features require more
licenses.
The full functionality of Interaction Web Tools requires the CIC Advanced Server license or the Interaction Web Services add-on
license.

Client licensing
CIC client users need the Client Access license or ACD Access license.

Requirements
                                                                    5
CIC server
Interaction Web Tools requires a CIC server.

Web Server
In a production environment, run the web server on a different machine than the CIC server. The Genesys Testlab site lists
supported web servers. For more information, see http://testlab.genesys.com/ProductsPage.aspx?ProductType=14.

Browsers
The Genesys Testlab site also lists the browsers supported for your website visitors. For more information, see
http://testlab.genesys.com/ProductsPage.aspx?ProductType=36.

                                                                 6
Interaction Web Tools Features
The following table lists the Web Tools features and their description.
   Feature                                                          Description
 Web Chat      Using the web chat feature, an agent can engage in text-based, one-on-one communication online with a website
               visitor or create a chat conference between multiple agents and a website visitor. Chats between an agent using
               the CIC client and a website visitor are web chats. Agents can record web chats.
               If enabled by an administrator, visitors can choose to have a transcript of the chat emailed to themselves.
 Intercom      This basic variation of chat, available with all CIC installations, lets agents chat online with fellow employees or a
 Chat          group of fellow employees. Intercom chats enable agents to get an answer to a question from a fellow employee,
               or to pull remote agents together for a quick discussion, fostering team cooperation. Agents can record intercom
               chats.
               CIC client users can create an intercom chat only with other internal users that reside on the same server. The CIC
               administrator must also assign the Intercom Chat security rights to users who want to participate in intercom
               chats.
 Callback      Using this feature, a website visitor can leave a message for an agent to call back. After CIC routes the callback
               request to a workgroup or specific agent queue, the callback request appears in the CIC client in a Workgroup
               queue or in the My Interactions view.
               When an agent picks up a callback request, a full-featured callback window appears. This window contains the
               name of the person requesting the callback and the number at which an agent can contact website visitor. The
               agent can then call directly from the callback window, interact with the website visitor if connected, and then mark
               whether the callback was a success or a failure.
 Response   Agents can use Response Management during a chat to send pre-defined messages, URLs, or files to a website
 Management visitor. An agent can also use Response Management for guidance in answering a website visitor’s questions
            during a call made as a result of a callback request.
               The CIC administrator can create standard responses in Interaction Administrator and make them available to CIC
               client users. In addition, CIC client users can create, organize, view, and use their own standardized responses. CIC
               client users can also maintain a list of favorite responses for quick access to frequently used responses. See the
               help for your version of the CIC client for more details.
 e-FAQ         e-FAQ is a centrally managed database of Frequently Asked Questions and responses. If your company has the e-
               FAQ knowledge management program and your agents have the appropriate user rights, agents can use e-FAQ
               during a chat to respond to requests for information.

  Note:
  To use web chat or callback, Interaction Web Tools requires a web server. Intercom chat, Response Management, and e-FAQ do
  not require a web server.

                                                                  7
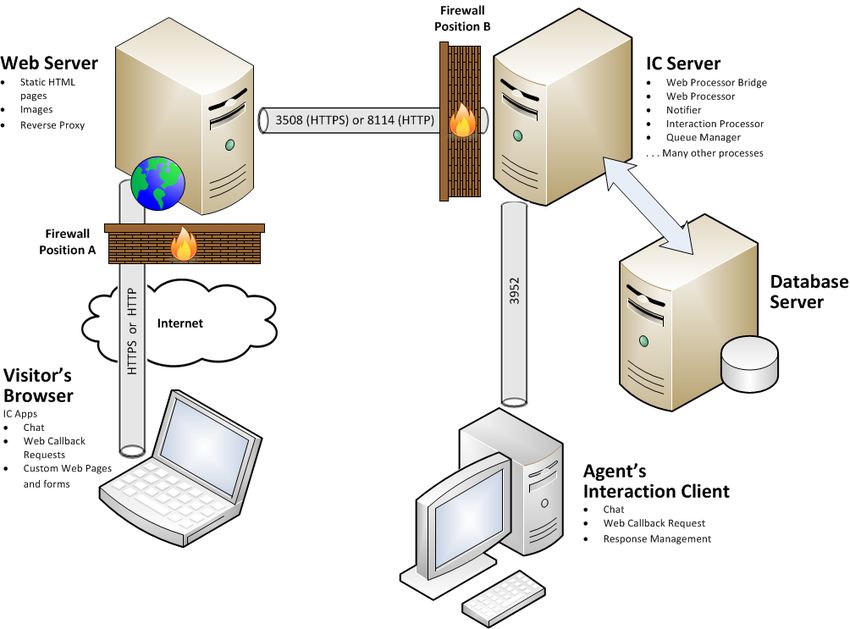
Interaction Web Tools Network Architecture
The following information describes the Interaction Web Tools architecture and the roles of the different servers and of the visitor's
browser. The illustration shows the architecture of the Interaction Web Tools network. It consists of the following computers:

Web server
The web server runs Microsoft IIS or other compatible web server software and connects to the CIC server over port 3508 (HTTPS)
and 8114 (HTTP). The default port numbers are 3508 and 8114, but you can configure other port numbers. You can enable either
HTTPS or HTTP or both.

CIC server
The CIC server runs various other subsystems including WebProcessorBridge, WebProcessor, Notifier, Interaction Processor, and
Queue Manager. The visitor's browser tells Interaction Web Tools to send data, to create and manage chats and callback requests
on agent and workgroup queues, and (optionally) to create visitor registration records. Interaction Web Tools is similar to
Telephony Services. The difference is that it generates and controls web interactions instead of telephone interactions. The
WebProcessorBridge communicates to the WebProcessor on the CIC server to create and manipulate objects and events.

WebProcessor
    Sends requests to other CIC components.
    Manages intercom chats between internal CIC Client users residing on the same CIC server.
    Creates and controls web chat sessions between website visitors users and your agents.
    Manages callback requests started by visitors to your website.

WebProcessorBridge
    Registers visitors by creating Interaction Tracker records.
    Authenticates website visitors by looking up their visitor name and password in the Interaction Tracker tables.
    Forwards callback requests to WebProcessor.

Web HTML plug-in
This plug-in resides on the CIC server. It processes requests and responses between the web server and the CIC server. For
example, you can employ a custom handler to enable your website visitors to query a particular agent's availability before starting a
chat or making a callback request.
                                                                  8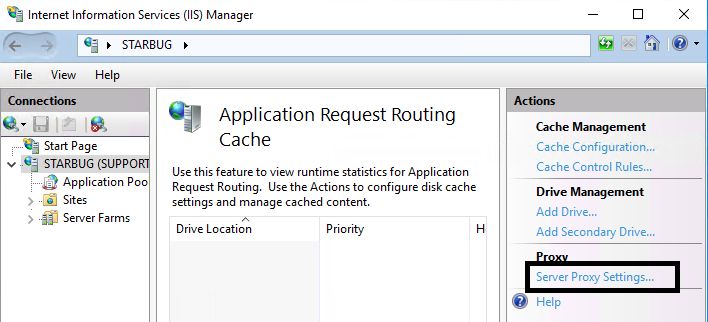
1.   The web server sends a request to the Web HTML plug-in on the CIC server.
2.   The CIC server invokes a custom handler which processes the request.
3.   The handler passes the result to the Web HTML plug-in which formulates a response and sends it to the web server.
4.   The web server forwards the response to the visitor.

Database server
When visitors register on your website, Interaction Tracker tables store their registration information. The database configuration
portion of the CIC installation creates these tables and prompts you to select a reporting package to create these tables.

Visitor's Browser
Visitors connect to your website and start web interactions. The interactions are queued and processed similarly to telephone
calls, including ACD processing. You can enable access to one or more interaction types either through the default released version
of handlers, or through custom pages that adopt your site's look and feel. You can create software to send the same types of
messages that the visitor's browser sends in a standard installation and start web interactions. Your custom applications can
include this functionality. For more information about customizing the Interaction Web Tools interface, see the Interaction Web
Tools Developer's Guide at https://help.genesys.com/cic/mergedProjects/wh_tr/desktop/pdfs/web_tools_dg.pdf.

Agent's CIC client
Through the CIC client, agents can monitor and control the various web interaction types. These actions are achieved through the
following features:
     Chat
     Web Callback request
     Response Management

Registration and authentication
Interaction Web Tools registers and authenticates visitor information it stores in Tracker tables on the CIC server. Setup Assistant
creates these Tracker tables as part of the database configuration.

                                                                  9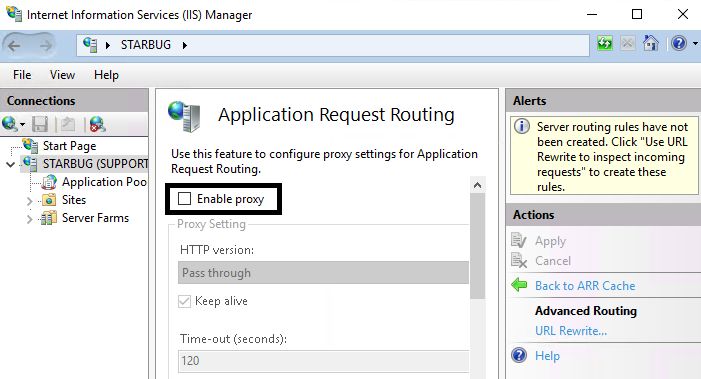
Installing and Configuring Interaction Web Tools
Installation Overview
The following summarizes the installation process required on the web server to enable it to run Interaction Web Tools.
To install Interaction Web Tools on the web server
 1. Perform the necessary configuration in Interaction Administrator.
 2. Install Application Request Routing (IIS only).
 3. Verify that the Application Request Routing proxy functionality is enabled:

      Video:
      https://player.vimeo.com/video/442276438

    a. Open the IIS Manager navigation page and select the desired server. Double-click Application Request Routing Cache.

    b. Under Actions, click Server Proxy Settings.

                                                                 10
c. Make sure Enable proxy is selected.
4. Unzip the Web Tools files from the CIC server shared directory, IC_WebServicesChat, to the web server.
5. Run the Interaction Web Tools Configuration utility to designate your website, select connection type, and choose the target
queues for chats and callbacks.
6. Configure Interaction Web Tools.
7. Configure your web server as a reverse proxy.
8. Test your installation.
11Web Tools Files
The CIC server installation places the required Web Tools files in a share on the CIC server. For information about installing the CIC
server, see the PureConnect Installation and Configuration Guide at
https://help.genesys.com/cic/mergedProjects/wh_tr/desktop/pdfs/Installation_Configuration_Guide.pdf.
The CIC server installation places these files in \\icservername\IC_WebServicesChat, where X-X is the version number.
IWT_Configuration-X-X.zip
This file contains the files necessary to run the Interaction Web Tools Configuration Utility.
IWT_Examples-X-X.zip
This file contains examples that walk you through the process of customizing the chat and callback controls and forms you
can use on your website. These controls and forms enable your website visitors to request a chat or open a callback request.
For more information, see Default Page and Customization Examples.
IWT_I3Root-X-X.zip
This file contains HTML, JavaScript, and PNG files in various subdirectories that make chats and callbacks work out of the box
with a standard look and feel. Place these files in the I3Root directory underneath your website's root directory.
You can place the files in another directory. Adjust the reverse proxy configuration accordingly.
Interaction Web Tools Installation Prerequisites
Meet these prerequisites before installing Interaction Web Tools on a web server that meets the requirements listed on the
Genesys Testlab site. For more information, see http://testlab.genesys.com/ProductsPage.aspx?ProductType=14.
TCP/IP
(optional)SNMP service.
A dedicated and configured communications port.
By default, Interaction Web Tools uses SSL on port 3508. You can change the port to whatever number you want. You can even
run with SSL on one port and without SSL on another port simultaneously.
Tip:
To ensure that a specific port is not already in use, at the command prompt, type netstat –a. The system lists all the
ports in use, including the listening ports.
The Interaction Web Tools Configuration Utility requires Microsoft .NET Framework 4.0.
Note:
Alternatively, you can edit the configuration file in an ASCII editor like Notepad.
Tested Configurations
The basic requirement for the web server is to manage a reverse proxy of the AJAX calls from the JavaScript client. If you use a
web server that we have not tested, it is your responsibility to ensure that your configuration supports this functionality.
For information about the latest tested web servers for CIC, see the Genesys Testlab site at
http://testlab.genesys.com/ProductsPage.aspx?ProductType=14.
Operating System Web Server
Microsoft Windows 2019 (CIC 2020R1 and higher) Microsoft IIS 10
Microsoft Windows 2016 (CIC 2018R2 and higher) Microsoft IIS 10
12HTML Configuration Utility
If you are using an operating system not based on Windows, you can use configuration.html in place of
IWT_ConfigUtility.exe.
To use the HTML Configuration Utility:
1. In a browser, open configuration.html.
Tip:
The file is in the directory where you unzipped IWT_Configuration-X-X.zip.
2. If necessary, click the Allow blocked content button to enable the webpage to run scripts and ActiveX controls.
3. In the Site's webroot text box, type the webroot directory path.
Example: C:/inetpub/wwwroot.
4. Click Load.
5. Make the selections described in Run Interaction Web Tools Configuration Utility.
6. Click Generate Configuration.
CIC configuration for all web server types
Complete the following tasks on your CIC server.
Configure workgroup as ACD
On the CIC server, in Interaction Administrator:
1. Click Workgroups.
2. Select or create a workgroup.
3. In the Workgroup Configuration dialog box, on the Configuration tab, select the Workgroup has Queue check box, then select
ACD from the drop-down list.
4. In the Workgroup Configuration dialog box, select the ACD tab and ensure that Max Assign is >= 1 for Chats and Callbacks.
This configuration creates a queue that is able to receive ACD chats and callbacks.
To create chats or callback requests to more than one queue, repeat steps 2-4 in Interaction Administrator for the additional
queues. For more information, see the extra instructions in the readme.html file in the Directory folder in
IWT_Examples-X-X.zip.
Configure Web Services
On the CIC server, in Interaction Administrator:
1. Click System Configuration, then Web Services.
2. Double-click Configuration.
The Web Services Configuration dialog box appears.
Note:
This setting specifies the port numbers used by the WebProcessorBridge running on the CIC server. If you do not specify
port numbers, they default to 8114 (HTTP) and 3508 (HTTPS).
133. Do either or both of the following:
Check Enable HTTP and select a port number.
Check Enable HTTPS and select a port number.
Restart WebProcessorBridge
1. On the CIC server, in IC System Manager, stop and restart WebProcessorBridge.
2. If using Switchover, stop and restart WebProcessorBridge on the backup CIC server.
Note:
If you are configuring for Apache, skip the rest of the steps in this procedure and go to Installation and Configuration for
Apache.
Installation and Configuration for Windows and IIS
Note:
The installation and configuration instructions are for IIS 8.5. There are many possible combinations of operating system and
web server software. If you need assistance for other platforms, contact Customer Care.
Complete the following tasks to install and configure Interaction Web Tools for Windows and IIS:
1. On the web server, install Application Request Routing from http://www.iis.net/downloads/microsoft/application-request-
routing.
2. Unzip Interaction Web Tools files
3. Run Interaction Web Tools Configuration Utility
4. Use Relative URLs
5. Configure IIS
14Unzip Interaction Web Tools files
1. Locate the following zip files, where X-X is the version number, at \\ICServer\IC_WebServicesChat:
IWT_Configuration-X-X.zip
IWT_I3Root-X-X.zip
IWT_Examples-X-X.zip
2. Create a folder named I3Root in the web root directory of your web server (most likely C:\inetpub\wwwroot).
3. Extract the contents of the three zip folders listed previously into the I3Root directory.
4. Copy the contents of IWT_I3Root-X-X into the I3Root directory.
The following image shows the directory structure:
Run Interaction Web Tools Configuration Utility
1. Run IWT_Configuration_-X-X\IWT_ConfigUtility.exe.
Note:
If you are using an operating system not based on Windows, hand-edit config.js in any text editor or use
configuration.html in place of IWT_ConfigUtility.exe. For more information, see HTML Configuration Utility.
2. Select I3Root/js/config.js and click Open.
153. Make the following selections:
a. Sites: Do not change this setting. It defaults to the full path and file name of the configuration file selected in the previous
step.
b. Number of CIC servers: select 2 if you are using Switchover, otherwise 1.
c. Secure Connection: Select this option if web users access Interaction Web Tools using HTTPS. If they access it using
HTTP, clear this check box.
d. Default Language: Select the language of last resort in which the login, chat, and callback forms appear to your website
visitors.
Note:
Interaction Web Tools uses this setting only if there is no match between other language settings and the languages in
which pages are available on the web server. For more information about the settings that can affect the language in
which these forms appear, see Language.
Tip:
This setting does not affect the language in which Handler text appears (that is, "Welcome to CIC" and "Alerting John
Doe") without Handler customization. Also, it doesn't affect anything the agent sees (other than system text provided
by customized handlers.) Finally, this language setting causes a chat interaction to route to an agent with a particular
language skill only if you customize a Handler.
e. Interaction Type: Select the interaction types you want Interaction Web Tools to support.
164. In the Chat and Callback sections:
a. Target: Select the Workgroup or User queue for this interaction type. You can specify the same queue for both interaction
types.
Note:
If you don't want to use ACD, specify a User queue as the target.
b. Target Type: Select the appropriate queue type.
c. Click Save & Close.
Use Relative URLs
By default, Interaction Web Tools prepends URLs for Web Tools functionality with http://server:port/ using the server information
set in config.js. You can change this default behavior by setting the UrlsAreRelative parameter to true.
Using relative URLs instead allows the reverse proxies to be set up somewhere other than I3Root/Server1 and
I3Root/Server2.
To use relative URLs, add the following parameter to the setInteractionWebToolsParams function in index.html:
"urlsAreRelative": true
Configure IIS
The following steps create a new inbound rule.
1. On the web server, use Windows Explorer to create webroot directory\I3Root\Server1.
Example: C:\inetpub\wwwroot\I3Root\Server1
Note:
The following steps create the web.config file in this directory. Use Server1 and Server2 (if using switchover) as the
subdirectory names. You can unzip the IWT_I3Root-X-X.zip files to a location other than the I3Root directory
underneath your website's root directory. However, if the reverse proxy points to a directory other than
\I3Root\Server1 (and \I3Root\Server2, if using switchover), hand-edit index.html to
make the reverse proxy work. For more information, see Reverse Proxy Directory.
2. On the web server, open IIS Manager (in Administrative Tools).
3. In the Connections navigation pane, under Sites, locate (webroot directory)/I3Root/Server1.
Note:
If you have multiple websites on your web server, "webroot directory" is the root directory for the website where you install
Interaction Web Tools.
4. In the middle pane, under IIS, double-click URL Rewrite.
5. Click Add Rule(s) in the Actions pane on the right.
6. In the Add Rules dialog box, under Inbound and Outbound Rules, select Reverse Proxy and click OK.
7. In the Add Reverse Proxy Rules dialog box, type the name of your CIC server in the Enter the server name or the IP address
where HTTP requests will be forwarded text box.
Note:
If using SSL, use the fully qualified domain name (for example, abc-ic1.company.com) and not the host name (abc-ic1) or
the IP address.
8. Do one of the following:
If the visitor's web browser to web server connection is SSL, but the web server to CIC server connection is not SSL, select
the Enable SSL OffLoading check box.
If the visitor's web browser to web server connection is SSL and the web server to CIC server connection is also SSL, clear
the Enable SSL OffLoading check box.
If the visitor's web browser to web server connection is not SSL, this check box does not apply. Its setting makes no
difference as there is no SSL to offload (decrypt at the web server and send to the CIC server as plain text).
Note:
For more information about this check box and SSL offloading, see the description in step 1.6 at
http://www.iis.net/learn/extensions/configuring-application-request-routing-(arr)/http-load-balancing-using-application-
request-routing.
9. Click OK.
1710. In the center section of the Internet Information Services (IIS) Manager window, double-click the rule you just created.
11. In the Action Properties section of the Edit Inbound Rule pane, in the Rewrite URL text box, you see http://ICServer/{R:1}. Add
the appropriate port number by doing one of the following:
Change the property to http://ICServer:8114/{R:1}.
If using SSL, change the property to https://ICServer:3508/{R:1}.
Note:
For more information, see Setting up SSL.
12. In the Actions pane, click Apply.
13. Optionally, if you have both an HTTP port (8114) and an HTTPS port (3508) open on the CIC server, you can create 2 URL
Rewrite rules. Add a condition to each that directs selected traffic from the web server to a specific port on the CIC server.
Note:
Without conditions, traffic is directed to the port specified in the rule. With conditions, the applicable condition redirects
the traffic. Here is an example that redirects web server traffic based on the URL used by your website visitor.
a. Create two URL Rewrite rules by following the instructions in Configure IIS twice. Create one rule for the CIC server's HTTP
port and a second for the HTTPS port.
b. Edit the rule that directs traffic to the HTTP port (8114). The following steps direct HTTP traffic to the port specified in the
rule.
i. Expand the Conditions section of the Edit Inbound Rule pane.
ii. Click Add.
iii. In the Add Condition dialog box, in the Condition Input text box, type {HTTPS}.
iv. In the Pattern text box, type Off.
v. Click OK.
18c. Edit the rule that directs traffic to the HTTPS port (3508). The following steps direct HTTPS traffic to the port specified in
the rule.
i. Expand the Conditions section of the Edit Inbound Rule pane.
ii. Click Add.
iii. In the Add Condition dialog box, in the Condition Input text box, type {HTTPS}.
iv. In the Pattern text box, type On.
v. Click OK.
14. If using Switchover, do the following:
a. Create a directory called (webroot directory)\I3Root\Server2.
b. In IIS Manager, repeat steps 3-12. Create a Reverse Proxy rule or rules for that directory, but specify the host name or IP
address of the other CIC server.
15. Configure IIS to treat index.html as an acceptable name for the default document or rename index.html to
default.htm.
To set index.html as the default document:
a. In IIS Manager, still under Sites in the I3Root\Server1 Home view, under IIS, double-click Default Document.
b. In the Actions pane on the right, click Add.
c. In the Add Default Document dialog box, in the Name text box, type index.html and click OK.
16. Exit IIS Manager.
17. Open a browser and go to http://webserver/I3Root and create a chat or callback.
Installation and Configuration for Apache
Note: The steps documented below assume a default installation of Apache on Microsoft Windows. Configuration steps for
newer versions of Apache or for alternative operating systems may differ.
1. Locate the following zip files, where X-X is the version number, at \\ICServer\IC_WebServicesChat:
IWT_Configuration-X-X.zip
IWT_Examples-X-X.zip
IWT_I3Root-X-X.zip
2. Extract the contents of the three zip folders listed previously into \htdocs\I3Root\
3. Copy the contents of IWT_I3Root-X-X into I3Root.
4. Edit config.js
5. Do one of the following:
a. Non-SSL both for browser and CIC connection
b. Non-SSL for browser but SSL for CIC connection
c. SSL both for browser and CIC connection
19Edit config.js
Edit htdocs\I3Root\js\config.js for your environment. For a description of the options, see Run Interaction Web Tools
Configuration Utility.
An example config.js:
/*global ININ: true */
// Register namespaces
ININ.Web.Common.Type.registerNamespace("ININ.Web.Chat");
// Config class
ININ.Web.Chat.Config =
{
"ConfigVersion": 0,
"ChatTarget": "Marketing",
"CallbackTarget": "Marketing",
"ChatTargetType": "Workgroup",
"CallbackTargetType": "Workgroup",
"InteractionTypes": [ "Chat", "Callback"
],
"UseEncryption": true,
"ICServerCount": 2,
"DefaultLanguageCode": "en-us"
};
Non-SSL both for browser and CIC connection
1. Edit the config.js file located in the \htdocs\I3Root\js folder.
Locate the ININ.Web.Chat.Config section and then find the part that says "UseEncryption":true. Set the value to
false.
2. Edit the \conf\httpd.conf file.
Uncomment the following lines:
LoadModule proxy_module modules/mod_proxy.so
LoadModule proxy_http_module modules/mod_proxy_http.so
LoadModule proxy_connect_module modules/mod_proxy_connect.so
Add the following lines at the end of the file:
Order deny,allow
Allow from all
ProxyPass /I3Root/Server1/ http://icserver:8114/
ProxyPassReverse /I3Root/Server1/ http://icserver:8114/
3. Restart Apache to implement the changes.
If it does not start, then check the app event log. It is easy to make a mistake editing these configuration files. If everything is
correct and the page still loads with an error, try clearing the browser cache.
20Non-SSL for browser but SSL for CIC connection
1. Edit the config.js file located in the \htdocs\I3Root\js folder.
Locate the ININ.Web.Chat.Config section and then find the part that says "UseEncryption":true. Set the value to
false.
2. Edit the \conf\httpd.conf file.
Uncomment the following lines:
LoadModule proxy_module modules/mod_proxy.so
LoadModule proxy_http_module modules/mod_proxy_http.so
LoadModule proxy_connect_module modules/mod_proxy_connect.so
LoadModule ssl_module modules/mod_ssl.so
Add the following lines at the end of the file:
Order deny,allow
Allow from all
ProxyPass /I3Root/Server1/ https://icserver:3508/
ProxyPassReverse /I3Root/Server1/ https://icserver:3508/
include conf/extra/httpd-ssl.conf
3. Copy the Server Group Certificate from the CIC server to the web server.
The certificate is here:
\I3\IC\Certificates\ServerGroup\ServerGroupCertificate.cer
4. Create the certificate and key for Apache
Open a command prompt and navigate to the bin directory:
InstallPath\Apache Software Foundation\Apache2.2\bin
Modify the following command to match your configuration and run it. It will prompt for a number of pieces of information.
Your answers do not affect the functionality at issue:
openssl req -new -x509 -days 365 -sha1 -newkey rsa:1024 -nodes -in ServerGroupCertificate.cer -keyout
testserver.key -out testserver.crt -config "\InstallPath\Apache Software
Foundation\Apache2.2\conf\openssl.cnf"
Edit httpd-ssl.conf and find the lines below and modify them to point to the key and crt files:
SSLCertificateFile "C:/Program Files/Apache Software Foundation/Apache2.2/bin/cert/ICServer-
Certificate.crt"
SSLCertificateKeyFile "C:/Program Files/Apache Software Foundation/Apache2.2/bin/cert/ICServer-
Server.key"
Edit the following lines in the same httpd-ssl.conf file to add SSLProxyEngine and match the following values:
ServerName webserver.domain.com:80
SSLEngine off
SSLProxyEngine on
5. Restart Apache to implement the changes.
If it does not start, then check the app event log. It is easy to make a mistake editing these configuration files. If everything is
correct and the page still loads with an error, try clearing the browser cache.
21SSL both for browser and CIC connection
1. Edit the config.js file located in the \htdocs\I3Root\js folder.
Locate the ININ.Web.Chat.Config section and find the part that says "UseEncryption":false. Set the value to true.
2. Edit the \conf\httpd.conf file.
Uncomment the following lines:
LoadModule proxy_module modules/mod_proxy.so
LoadModule proxy_http_module modules/mod_proxy_http.so
LoadModule proxy_connect_module modules/mod_proxy_connect.so
LoadModule ssl_module modules/mod_ssl.so
Add the following lines at the end of the file:
Order deny,allow
Allow from all
ProxyPass /I3Root/Server1/ https://icserver:3508/
ProxyPassReverse /I3Root/Server1/ https://icserver:3508/
include conf/extra/httpd-ssl.conf
3. Copy the Server Group Certificate from the CIC server to the web server. The file is here:
\I3\IC\Certificates\ServerGroup\ServerGroupCertificate.cer
4. Create the certificate and key for Apache.
Open a command prompt and navigate to the bin directory:
InstallPath\Apache Software Foundation\Apache2.2\bin
Modify the following command to match your configuration and run it. It will prompt for a number of pieces of information.
Your answers do not affect the functionality at issue.
openssl req -new -x509 -days 365 -sha1 -newkey rsa:1024 -nodes -in ServerGroupCertificate.cer -keyout
testserver.key -out testserver.crt -config "\InstallPath\Apache Software
Foundation\Apache2.2\conf\openssl.cnf"
Edit httpd-ssl.conf. Find the following lines and modify them to point to the key and crt files.
SSLCertificateFile "C:/Program Files/Apache Software Foundation/Apache2.2/bin/cert/ICServer-
Certificate.crt"
SSLCertificateKeyFile "C:/Program Files/Apache Software Foundation/Apache2.2/bin/cert/ICServer-
Server.key"
Modify the following lines in the same httpd-ssl.conf file:
ServerName webserver.domain.com:443
SSLEngine on
SSLProxyEngine on
5. Restart Apache to implement the changes.
If it does not start, then check the app event log. It is easy to make a mistake editing these configuration files. If everything is
correct and the page still loads with an error, try clearing the browser cache.
22Reverse Proxy Directory
Modify the configuration parameters in index.html if you used different installation and proxy directories than the defaults
described in this document ( /I3Root and \I3Root\Server1 and \I3Root\Server2, if
using switchover).
To edit the Interaction Web Tools parameters in index.html to make the reverse proxy work:
1. Locate the function setInteractionWebToolsParams in index.html.
2. Change the values of currentUriFragement and uriFragment to the correct values for your configuration. See the
examples that follow.
Example 1:
If instead of setting up the reverse proxy at /I3Root/Server1, you put it at /SomeDirectory/ICProxy,
and are not using switchover, use the values listed in the non-Switchover example.
Example 2:
If you are using switchover, and the reverse proxy to the primary CIC server is at /SomeDirectory/ICProxy, and the
reverse proxy to the second CIC server is at /SomeDirectory/ICProxy_B, use the values listed in the switchover
example column.
non-switchover example
"currentUriFragment" : "/SomeDirectory/ICProxy",
"uriFragments" : ["/SomeDirectory/ICProxy" ],
switchover example
"currentUriFragment" : "/SomeDirectory/ICProxy",
"uriFragments" : ["/SomeDirectory/ICProxy", "/SomeDirectory/ICProxy_B" ],
Setting up SSL
The following table lists the possible SSL configurations. The configuration settings for these connections are independent of each
other.
browser to web server web server to CIC server
SSL non-SSL
non-SSL SSL
non-SSL non-SSL
SSL SSL
You can use SSL for the front-end connection from the web browser to the web server or for the back-end connection from the web
server to the CIC server. Alternatively, you can use SSL for both the front and back-end connections or for neither.
To use SSL between the web user and the web server
Enable this according to your web server software's instructions. Pay particular attention to these points:
In the Interaction Web Tools Configuration Utility, Secure Connection refers to this front-end connection between the web
browser and the web server. If web users access Interaction Web Tools using HTTPS, select Secure Connection. If they access
it using HTTP, clear the Secure Connection check box.
If you changed settings in config.js and deployed examples, recopy C:\inetpub\wwwroot\i3root\js\config.js into
each example's js directory.
23To use SSL between the web server and the CIC server, if the web server is IIS
1. In Interaction Administrator, select System Configuration, then select Web Services. Double-click Configuration. Select the
Enable HTTPS check box. When using HTTPS, it is usually desirable to clear the Enable HTTP check box.
2. Ensure that, by means of DNS or the web server's hosts file (C:\windows\system32\drivers\etc\hosts), the web server
can refer to the CIC server using the CIC server's host name.
3. Ensure that you used the CIC server's host name, not its IP address, in the Reverse Proxy configuration.
4. Find the CA certificate on the CIC Server. It is in
D:\I3\IC\Certificates\ServerGroup\ServerGroupCertificate.cer.
Note:
If the CIC Server's host name has changed since you generated the certificate, regenerate the certificate before following
the remaining steps in this procedure.
5. Copy ServerGroupCertificate.cer to the web server's file system. Do not place it in a location that is visible on the web.
6. Import the certificate to the web server.
a. On the web server, from the Windows Start menu, select Run. In the Run dialog box, type mmc, and click OK.
b. In the Console window, from the File menu, select Add/Remove Snap-in.
c. In the Add or Remove Snap-Ins dialog box, from the Available snap-ins list, select Certificates and click Add Certificates
and click Add.
d. In the Certificate snap-in dialog box, select Computer Account and click Next.
e. In the Select Computer dialog box, select Local computer and click Next.
In the Certificate snap-in dialog box, click Finish.
f. In the Add or Remove Snap-Ins dialog box, click OK.
g. In the Console window, in the left pane, expand Certificates, expand Trusted Root Certification Authorities, and then click
the Certificates node that is a child of Trusted Root Certification Authorities.
h. Right-click this lower Certificates node and select All Tasks, then select Import.
i. In the Certificate Import Wizard, click Next.
j. In the File to Import page, browse to the CA certificate on the CIC Server and click Open.
k. Back in the Certificate Import Wizard, in the File to Import page, click Next.
l. In the Certificate Store page, click Next.
m. In the Completing the Certificate Import Wizard page, click Finish.
n. In the Import was successful dialog box, click OK.
o. Close the Microsoft Management Console. There is no need to save console settings.
To use SSL between the web server and the CIC server, if the web server is Apache
1. In Interaction Administrator, select System Configuration, then select Web Services. Double-click Configuration. Select the
Enable HTTPS check box. When using HTTPS, it is usually desirable to clear the Enable HTTP check box.
2. Ensure that, by means of DNS or the web server's hosts file, the web server can refer to the CIC server's host name.
Tip:
A Windows hosts file is C:\windows\system32\drivers\etc\hosts. A Unix hosts file is /etc/hosts.
3. Edit \conf\httpd.conf:
Uncomment the following lines. They are near each other, but not necessarily consecutive:
LoadModule proxy_module modules/mod_proxy.so
LoadModule proxy_http_module modules/mod_proxy_http.so
LoadModule proxy_connect_module modules/mod_proxy_connect.so
LoadModule ssl_module modules/mod_ssl.so
Add the following (if in doubt, add to either the bottom of the file, or within the applicable directive):
ProxyPass /I3Root/Server1/ https://ICServer:3508/
ProxyPassReverse /I3Root/Server1/ https://ICServer:3508/
SSLProxyEngine on
4. If using Switchover, also add ProxyPass and ProxyPassReverse directives mapping /I3Root/Server2 to the other CIC
server.
245. Restart Apache.
Language
One of the following settings determines the language in which the login, chat, and callback forms appear to your visitors.
Note:
Interaction Web Tools supports IME for the entry of Asian characters on a Latin keyboard.
Language settings
The JavaScript code executing in the visitor's web browser evaluates these settings in the following order from highest to lowest
priority:
1. An override value. For example, a visitor clicking an image of the French flag on your company's website can determine this
value.
Tip:
See the ClickOnFlagsForDifferentLanguages JavaScript example provided in IWT_Examples-X-X.zip.
2. The visitor's browser language setting.
3. The visitor's operating system language settings.
4. The default language specified in the Interaction Web Tools Configuration Utility during the installation and configuration
process.
Note:
If you modify config.js manually, be aware that language code tags are all lower case. For example, if you replace en-us
with the more commonly accepted de-CH rather than de-ch, the Language Code Converter compares it to de-ch. The
comparison fails and the language defaults to English.
Using language settings
Handler text
If you want to use languages in addition to the default, you need to modify handlers. If a matching language pack is on the
CIC server and you have modified the appropriate handlers, the first valid setting for which CIC can locate a resource file
becomes the language in which Handler text appears. The CIC server selects the language and then WebProcessorBridge
passes the handler text in the selected language to the client.
Chat request routing
If Handler customization is done, CIC routes the chat to an agent with a language skill matching the first valid language
setting for which CIC can locate a resource file. (A matching language pack is not necessary for chat request routing.)
Webpages only
If no Handler customization is done, language settings affect only the language on the visitor's webpage (the text on the
Send button, for example). These settings do not affect Handler text and the actual content of the chat.
Example: A visitor sees the webpage in French, but "Welcome to CIC!" in English. An agent then types "Hello, may I help
you? "in English, and then the visitor has to type "Parlez-vous Français?" in order to indicate to the agent that they would like
to proceed in French.
25Web Services Parameters on the CIC Server
To minimize network impact and memory use, CIC has two web services parameters that control how the server compresses chat
logs. Set the parameters in the Web Services Parameters container of Interaction Administrator:
EnableChatHistoryCompression
Values are 1 (on, by default) and 0 (off).
ChatHistoryCompressionStartSize
Controls the file size at and over which the CIC server compresses chat logs. The default is 5K (5,120 bytes).
Restart WebProcessor for these parameters to take effect.
Troubleshooting Chats and Callbacks
These troubleshooting steps check typical configuration problems with the CIC server, web server, or your firewall that prevent
chats or callbacks from working correctly.
1. In Interaction Administrator, in the Web Services Configuration dialog box, do one of the following or both:
Verify that you checked Enable HTTP and the HTTP port is 8114.
Note:
If you want to use a different port for HTTP, change the URL in the step 3 to use that port.
And/or
If you prefer to use HTTPS, verify that you checked Enable HTTPS and the HTTPS port is 3508.
Note:
If you want to use a different port for HTTPS, change the URL to use that port.
2. On the CIC server, in IC System Manager, stop and restart WebProcessorBridge.
3. Open your web browser on the web server. Do one or both of the following, depending on whether you selected HTTP or HTTPS
or both in Interaction Administrator. Open:
http://icservername:8114/websvcs/serverConfiguration
or
https://icservername:3508/websvcs/serverConfiguration
Note:
If you are using HTTPS and see a certificate warning, ignore it. If you are using different port numbers, change the URL
to use that port.
Result: If you see some XML, go to the next step. If not, there is a problem with either CIC or the firewall. Repeat this step using
your browser on the CIC server.
If you still do not see any XML, verify that WebProcessorBridge and WebProcessor are running. Verify your settings in
Interaction Administrator. Restart WebProcessorBridge and WebProcessor. Repeat this step.
If XML appears when running your browser on the CIC server, but not when running it on the web server, it is most likely a
firewall problem. Change the firewall so that it allows traffic through on port 8114 or 3508, depending on whether you are
using HTTP or HTTPS. Allow traffic only from the web server, not from everywhere.
4. If you verified in step 3 that the CIC server and firewall are working correctly, the problem is most likely something to do with
the reverse proxy configuration. Or, if using HTTPS, the problem could be with certificates. Go to one of the following:
http://webserver/I3Root/Server1/websvcs/serverConfiguration
Or
https://webserver/I3Root/Server1/websvcs/serverConfiguration
Result: You see the same XML. If not, you could see "error 502" or "error 502.3". Verify everything that you did to configure the
reverse proxy. Check the following:
Apply the reverse proxy to "Server1" and "Server2", if using switchover, instead of some other directory like "Default Web
Site".
Check encryption settings by verifying the value of "UseEncryption" in i3root/js/config.js.
Important!
This value is independent of whether the back-end connection (web server to CIC) uses HTTP or HTTPS.
26Visitor accesses website via Encryption setting in config.js
HTTP "UseEncryption" set to false.
HTTPS "UseEncryption" set to true.
If you are using IIS, be sure to add an empty Server1 folder in your C:/inetpub/wwwroot/I3Root directory. Add
Server2 also, if using switchover.
Note:
This folder allows the reverse proxy instructions to be completed successfully.
If you installed the web server on the same machine as your CIC server, for the reverse proxy setup, use "localhost" instead
of the machine's name or IP address.
5. If the previous steps have not resolved the problem:
a. Open the web developer tools in your web browser.
b. Enable the Net and Console tabs, and reload one of the following:
http://webserver/I3Root/Server1/websvcs/serverConfiguration
Or
https://webserver/I3Root/Server1/websvcs/serverConfiguration
c. If the attempt to load serverConfiguration uses HTTPS and everything else uses HTTP (or the reverse), or if you see
"OPTIONS serverConfiguration" rather than "GET serverConfiguration", then re-examine i3root/js/config.js.
d. Check the Console tab for anything printed in red, especially if you have customized the JavaScript. JavaScript errors
appear in red text.
6. If using HTTPS on the back-end connection (web server to CIC server) and none of the previous steps fixed the problem, it's
probably a certificate issue. Ensure that the web server trusts the CIC server.
a. Revisit the installation steps concerning importing the certificate in SSL both for browser and CIC connection. The easiest
way is to make the web server trust the Certificate Authority that issued the CIC server's certificate.
b. Ensure that the web server is referencing the CIC server via its fully qualified domain name, not just by its hostname or its
IP address.
7. Examine log message for any text in red or the word "Exception".
To obtain log messages from the chat software running in the visitor's browser:
a. If you are using Firefox and have not already installed the Firebug plugin, install it from http://getfirebug.com.
b. Press F12 to make the Firebug plugin or the Chrome built-in Developer Tools console visible.
c. Modify customizations.js. Just before the following line:
var customizations = common.Type.registerLocalNamespace("customizations");
add this line:
common.Debug.setTraceLevel(common.TraceLevels.ALL);
d. Point your browser to http://webserver/I3Root and then open the developer console.
As an alternative to modifying index.html, begin a chat and have any party type one of the following:
set tracelevel all
set tracelevel verbose
set tracelevel note
set tracelevel status
set tracelevel warning
set tracelevel error
set tracelevel critical
Note:
The downside here is that these tracelevel settings do not display the log messages pertaining to creating or connecting
the chat.
Troubleshooting Gateway Communications
This diagram of network architecture presents a simplified view of an Interaction Web Tools production environment. In a typical
environment, the CIC server is in a secure internal network. The web server is in an area that is at least partially secure. Also,
multiple web servers could share communications load, which introduces proxy servers and load balancers into the mix.
27Sometimes, a proxy server, load balancer (F5), or firewall discards or changes HTTP header information in the messages sent from
a website visitor's browser to the CIC server. If anything changes this HTTP header information, website visitors cannot submit a
chat request.
It is critical that you do not set up a proxy server, load balancer, firewall or any other network element in such a way that makes it
appear that all communications originate from a network IP address and not the visitor's IP address. Hundreds of communications
coming from the same IP address look like a Denial of Service attempt to the CIC server.
By default, Interaction Web Tools expects this header information to contain the CIC server name (as host) and its proper port
number. It does not expect the header to contain the web server name and its outside world port number.
Note:
The Interaction Web Tools Developer's Guide describes the other elements of this message header: Content_Range, Accept,
Accept-CharSet, and Content-type.
The critical elements in this header are:
X-FORWARDED-FOR
This HTTP header field identifies the originating IP address of a client connecting to a web server through an HTTP proxy or
load balancer.
Interaction Web Tools uses the information in X-FORWARDED-FOR to get the website visitor's IP address, as multiple
proxies and load-balancers might have been used. Interaction Web Tools uses this address to identify the website visitor's
IP address and to perform DoS protection based on IP-specific DoS settings.
Example: client, proxy1, proxy2
Host
The Host HTTP header field specifies the Internet host and port number of the requested resource, as obtained from the
original URI given by the user or referring resource.
28Interaction Web Tools expects this Host field to contain the CIC server name or IP address and its proper port number.
Interaction Web Tools never uses default port 80 in place of the information expected in this field.
Problem Reports
You can enable problem reporting for errors that occur in a website visitor's browser during chat sessions. These problem reports
are stored in the WebProcessorBridge logs. Support can use these logs to diagnose the reason for failure when a website visitor's
browser loses connection, then recovers and sends a problem report.
You enable problem reporting by setting the Web Services parameter AllowClientProblemReport to 1. Optionally, you can include
only selected problem reports in the WebProcessorBridge logs by configuring the Web Services parameter
ProblemReportControlExpression.
Note:
Enabling problem reporting helps diagnose problems, but increases CPU load. Do not enable it as a routine practice.
{
"version": 1,
"attemptedWork": "https://xyzcorp/I3Root/Server1/websvcs/serverConfiguration",
"userAgent": "Mozilla/5.0 (Windows NT 6.1; WOW64) AppleWebKit/537.31 (KHTML, like Gecko)
Chrome/26.0.1410.43 Safari/537.31",
"failedRequestHistory":
[
{"status": 0, "url": "https://xyzcorp/I3Root/Server1/websvcs/serverConfiguration", "sendTimestamp":
"2013-04-12T15:16:50Z", "duration": 12001}
],
"timedOutRequestHistory":
[
{"status": 0, "url": "https://xyzcorp/I3Root/Server1/websvcs/chat/poll/f3e5af5b-9140-4ec5-a8f0-
e5a269e26207", "sendTimestamp": "2013-04-12T15:16:46Z", "duration": 12005}
],
"connectivityFailureHistory":
[
{"activity": "failover", "timestamp": "2013-04-12T15:16:50Z"}
],
"exceptions": "Failed request"
}
In this example, "status": 0 means that the website visitor received a timeout error when the visitor tried to access the given
URL. "Duration" is the time in milliseconds it took to get that response.
29You can also read