TeamDrive Host Server Virtual Appliance Installation and Configuration - Release 3.7.10.0
←
→
Page content transcription
If your browser does not render page correctly, please read the page content below

TeamDrive Host Server Virtual
      Appliance Installation and
                  Configuration
                             Release 3.7.10.0

Barry Leslie, Paul McCullagh, Eckhard Pruehs

                                         2020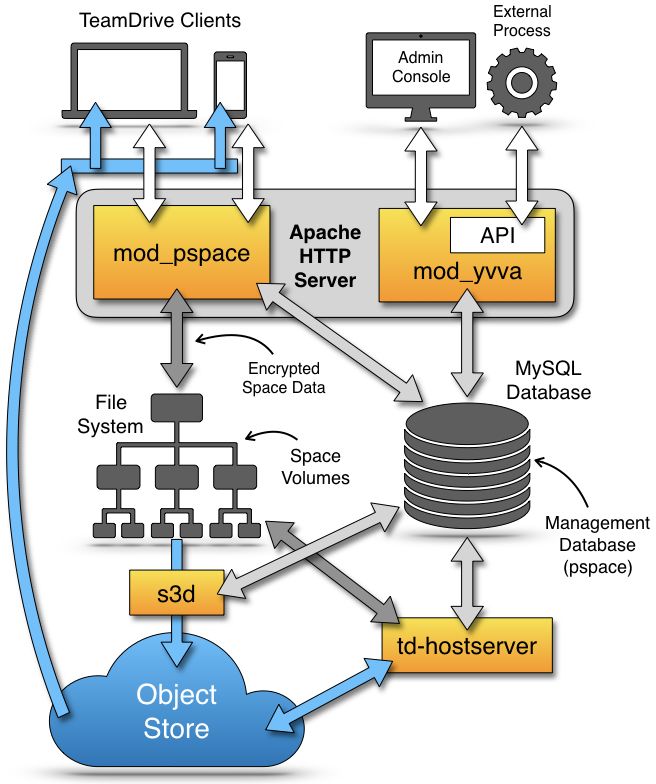
CONTENTS

1   Copyright Notice                                                                                                                                                                         1

2   Trademark Notice                                                                                                                                                                         3

3   Introduction                                                                                                                                                                             5
    3.1 System Requirements . . .       .   .   .   .   .   .   .   .   .   .   .   .   .   .   .   .   .   .   .   .   .   .   .   .   .   .   .   .   .   .   .   .   .   .   .   .   .    5
    3.2 Main Software components        .   .   .   .   .   .   .   .   .   .   .   .   .   .   .   .   .   .   .   .   .   .   .   .   .   .   .   .   .   .   .   .   .   .   .   .   .    5
    3.3 Required Skills . . . . . . .   .   .   .   .   .   .   .   .   .   .   .   .   .   .   .   .   .   .   .   .   .   .   .   .   .   .   .   .   .   .   .   .   .   .   .   .   .    6
    3.4 Storage Requirements . . .      .   .   .   .   .   .   .   .   .   .   .   .   .   .   .   .   .   .   .   .   .   .   .   .   .   .   .   .   .   .   .   .   .   .   .   .   .    6
    3.5 Network Requirements . . .      .   .   .   .   .   .   .   .   .   .   .   .   .   .   .   .   .   .   .   .   .   .   .   .   .   .   .   .   .   .   .   .   .   .   .   .   .    6

4   Introduction to the TeamDrive Hosting Service                                                                                                                                            9
    4.1 TeamDrive Hosting Service Overview . . . . . . . .                                  .   .   .   .   .   .   .   .   .   .   .   .   .   .   .   .   .   .   .   .   .   .   .   .    9
    4.2 TeamDrive Hosting Basics . . . . . . . . . . . . . .                                .   .   .   .   .   .   .   .   .   .   .   .   .   .   .   .   .   .   .   .   .   .   .   .   10
    4.3 Directory Structure of Hosted Data . . . . . . . . .                                .   .   .   .   .   .   .   .   .   .   .   .   .   .   .   .   .   .   .   .   .   .   .   .   10
    4.4 Spaces, Owners, and Depots . . . . . . . . . . . . .                                .   .   .   .   .   .   .   .   .   .   .   .   .   .   .   .   .   .   .   .   .   .   .   .   14
    4.5 Background Tasks Performed by td-hostserver                                         .   .   .   .   .   .   .   .   .   .   .   .   .   .   .   .   .   .   .   .   .   .   .   .   14

5   Virtual Appliance Installation and Configuration                                                                                                                                        15
    5.1 Download and Verify the Virtual Appliance Image . . .                                       .   .   .   .   .   .   .   .   .   .   .   .   .   .   .   .   .   .   .   .   .   .   15
    5.2 Import the Virtual Appliance . . . . . . . . . . . . . . .                                  .   .   .   .   .   .   .   .   .   .   .   .   .   .   .   .   .   .   .   .   .   .   16
    5.3 First Boot and Initial Configuration . . . . . . . . . . .                                  .   .   .   .   .   .   .   .   .   .   .   .   .   .   .   .   .   .   .   .   .   .   16
    5.4 Updating the Installed Software Packages . . . . . . . .                                    .   .   .   .   .   .   .   .   .   .   .   .   .   .   .   .   .   .   .   .   .   .   16
    5.5 Changing default passwords . . . . . . . . . . . . . . .                                    .   .   .   .   .   .   .   .   .   .   .   .   .   .   .   .   .   .   .   .   .   .   17
    5.6 Updating the MySQL Database Connection Information                                          .   .   .   .   .   .   .   .   .   .   .   .   .   .   .   .   .   .   .   .   .   .   18
    5.7 Firewall Configuration . . . . . . . . . . . . . . . . . .                                  .   .   .   .   .   .   .   .   .   .   .   .   .   .   .   .   .   .   .   .   .   .   18
    5.8 SELinux Configuration . . . . . . . . . . . . . . . . . .                                   .   .   .   .   .   .   .   .   .   .   .   .   .   .   .   .   .   .   .   .   .   .   18

6   Pre-Installation Tasks                                                                                                                                                                  19
    6.1 Mount the Space Storage Volume . . . . . . . . . . . . . . . . . . . . . . . . . . . . . . . . . .                                                                                  19
    6.2 Replacing the self-signed SSL certificates with proper certificates . . . . . . . . . . . . . . . . .                                                                               20
    6.3 Starting the Host Server Instance . . . . . . . . . . . . . . . . . . . . . . . . . . . . . . . . . .                                                                               20

7   Initial Host Server Configuration                                                                                                                                                       23
    7.1 Registering and Activating the Host Server                      .   .   .   .   .   .   .   .   .   .   .   .   .   .   .   .   .   .   .   .   .   .   .   .   .   .   .   .   .   23
    7.2 Setup and Administration . . . . . . . . .                      .   .   .   .   .   .   .   .   .   .   .   .   .   .   .   .   .   .   .   .   .   .   .   .   .   .   .   .   .   25
    7.3 Associating the Host Server with a Provider                     .   .   .   .   .   .   .   .   .   .   .   .   .   .   .   .   .   .   .   .   .   .   .   .   .   .   .   .   .   28
    7.4 Testing Client Access . . . . . . . . . . .                     .   .   .   .   .   .   .   .   .   .   .   .   .   .   .   .   .   .   .   .   .   .   .   .   .   .   .   .   .   28

8   Post-Installation Tasks                                                                                                                                                                 29
    8.1 Startup Sequence / Dependencies . . . . . . .                           .   .   .   .   .   .   .   .   .   .   .   .   .   .   .   .   .   .   .   .   .   .   .   .   .   .   .   29
    8.2 Starting the Apache HTTP Server at Boot Time                            .   .   .   .   .   .   .   .   .   .   .   .   .   .   .   .   .   .   .   .   .   .   .   .   .   .   .   29
    8.3 Starting TeamDrive Service at Boot Time . . .                           .   .   .   .   .   .   .   .   .   .   .   .   .   .   .   .   .   .   .   .   .   .   .   .   .   .   .   29
    8.4 Next steps . . . . . . . . . . . . . . . . . . .                        .   .   .   .   .   .   .   .   .   .   .   .   .   .   .   .   .   .   .   .   .   .   .   .   .   .   .   30

                                                                                                                                                                                             i
9    Troubleshooting                                                                                                                                                                                 31
     9.1 List of relevant configuration files . . . . .                          .   .   .   .   .   .   .   .   .   .   .   .   .   .   .   .   .   .   .   .   .   .   .   .   .   .   .   .   .   31
     9.2 List of relevant log files . . . . . . . . . .                          .   .   .   .   .   .   .   .   .   .   .   .   .   .   .   .   .   .   .   .   .   .   .   .   .   .   .   .   .   31
     9.3 Enable Logging with Syslog . . . . . . . .                              .   .   .   .   .   .   .   .   .   .   .   .   .   .   .   .   .   .   .   .   .   .   .   .   .   .   .   .   .   32
     9.4 Tracing Client Accesses to a Single Space .                             .   .   .   .   .   .   .   .   .   .   .   .   .   .   .   .   .   .   .   .   .   .   .   .   .   .   .   .   .   33
     9.5 Common errors . . . . . . . . . . . . . . .                             .   .   .   .   .   .   .   .   .   .   .   .   .   .   .   .   .   .   .   .   .   .   .   .   .   .   .   .   .   33

10 Appendix                                                                                                                                                                                          39
   10.1 Abbreviations . . . . . . . . . . . . . . . . . . . . . . . . . . . . . . . . . . . . . . . . . . . . .                                                                                      39

11 Release Notes - Version 3.7                                                                                                                                                                       41
   11.1 Key features and changes . . . . . . . . . . . . . . . . . . . . . . . . . . . . . . . . . . . . . .                                                                                         41

12 Change Log - Version 3.7                                                                                                                                                                          43
   12.1 3.7.10 (2020-05-15)      .   .   .   .   .   .   .   .   .   .   .   .   .   .   .   .   .   .   .   .   .   .   .   .   .   .   .   .   .   .   .   .   .   .   .   .   .   .   .   .   .   43
   12.2 3.7.9 (2019-07-19) .     .   .   .   .   .   .   .   .   .   .   .   .   .   .   .   .   .   .   .   .   .   .   .   .   .   .   .   .   .   .   .   .   .   .   .   .   .   .   .   .   .   43
   12.3 3.7.8 (2019-03-29) .     .   .   .   .   .   .   .   .   .   .   .   .   .   .   .   .   .   .   .   .   .   .   .   .   .   .   .   .   .   .   .   .   .   .   .   .   .   .   .   .   .   43
   12.4 3.7.7 (2019-02-26) .     .   .   .   .   .   .   .   .   .   .   .   .   .   .   .   .   .   .   .   .   .   .   .   .   .   .   .   .   .   .   .   .   .   .   .   .   .   .   .   .   .   43
   12.5 3.7.6 (2018-10-22) .     .   .   .   .   .   .   .   .   .   .   .   .   .   .   .   .   .   .   .   .   .   .   .   .   .   .   .   .   .   .   .   .   .   .   .   .   .   .   .   .   .   44
   12.6 3.7.5 (2018-10-11) .     .   .   .   .   .   .   .   .   .   .   .   .   .   .   .   .   .   .   .   .   .   .   .   .   .   .   .   .   .   .   .   .   .   .   .   .   .   .   .   .   .   44
   12.7 3.7.4 (2018-07-17) .     .   .   .   .   .   .   .   .   .   .   .   .   .   .   .   .   .   .   .   .   .   .   .   .   .   .   .   .   .   .   .   .   .   .   .   .   .   .   .   .   .   45
   12.8 3.7.3 (2017-11-01) .     .   .   .   .   .   .   .   .   .   .   .   .   .   .   .   .   .   .   .   .   .   .   .   .   .   .   .   .   .   .   .   .   .   .   .   .   .   .   .   .   .   45
   12.9 3.7.2 (2017-08-14) .     .   .   .   .   .   .   .   .   .   .   .   .   .   .   .   .   .   .   .   .   .   .   .   .   .   .   .   .   .   .   .   .   .   .   .   .   .   .   .   .   .   46
   12.10 3.7.1 (2017-06-20) .    .   .   .   .   .   .   .   .   .   .   .   .   .   .   .   .   .   .   .   .   .   .   .   .   .   .   .   .   .   .   .   .   .   .   .   .   .   .   .   .   .   46

13 Release Notes - Version 3.6                                                                                                                                                                       47
   13.1 Key features and changes . . . . . . . . . . . . . . . . . . . . . . . . . . . . . . . . . . . . . .                                                                                         47

14 Change Log - Version 3.6                                                                                                                                                                          49
   14.1 3.6.3 (2017-02-15) .     .   .   .   .   .   .   .   .   .   .   .   .   .   .   .   .   .   .   .   .   .   .   .   .   .   .   .   .   .   .   .   .   .   .   .   .   .   .   .   .   .   49
   14.2 3.6.2 (2017-01-24) .     .   .   .   .   .   .   .   .   .   .   .   .   .   .   .   .   .   .   .   .   .   .   .   .   .   .   .   .   .   .   .   .   .   .   .   .   .   .   .   .   .   49
   14.3 3.6.1 (2016-11-15) .     .   .   .   .   .   .   .   .   .   .   .   .   .   .   .   .   .   .   .   .   .   .   .   .   .   .   .   .   .   .   .   .   .   .   .   .   .   .   .   .   .   49
   14.4 3.6.0 (2016-09-01) .     .   .   .   .   .   .   .   .   .   .   .   .   .   .   .   .   .   .   .   .   .   .   .   .   .   .   .   .   .   .   .   .   .   .   .   .   .   .   .   .   .   50

15 Release Notes - Version 3.5                                                                                                                                                                       51
   15.1 Key features and changes . . . . . . . . . . . . . . . . . . . . . . . . . . . . . . . . . . . . . .                                                                                         51
   15.2 Change Log - Version 3.5 . . . . . . . . . . . . . . . . . . . . . . . . . . . . . . . . . . . . . .                                                                                         53

16 Release Notes - Version 3.0.013                                                                                                                                                                   57
   16.1 Change Log - Version 3.0.013 . . . . . . . . . . . . . . . . . . . . . . . . . . . . . . . . . . . .                                                                                         58

17 Release Notes - Version 3.0.011 and older                                                                                                                                                         63

ii
CHAPTER

                                                                                  ONE

                                                                      COPYRIGHT NOTICE

Copyright © 2014-2020, TeamDrive Systems GmbH. All rights reserved.

TeamDrive Systems GmbH
https://www.teamdrive.com
Max-Brauer-Allee 50
22765 Hamburg, Germany
Email: info@teamdrive.com

                                                                                      1
TeamDrive Host Server Virtual Appliance Installation and Configuration, Release 3.7.10.0

2                                                                 Chapter 1. Copyright Notice
CHAPTER

                                                                                                       TWO

                                                                            TRADEMARK NOTICE

Linux is the registered trademark of Linus Torvalds in the U.S. and other countries.
Apache HTTP Server, Apache, and the Apache feather logo are trademarks of The Apache Software Foundation.
MySQL is a registered trademark of Oracle and/or its affiliates.
Intel and Intel Xeon are trademarks or registered trademarks of Intel Corporation.
AMD, Opteron, the AMD logo, and the AMD Opteron logo are trademarks or registered trademarks of Advanced
Micro Devices.
VMware is a trademark or registered trademark of VMware, Inc. in the United States and/or other jurisdictions.
“Amazon Web Services”, “Amazon S3” are trademarks of Amazon.com, Inc. or its affiliates in the United States
and/or other countries.
“Azure” is a trademarks of Microsoft Corporation.
“Red Hat Linux” and “CentOS” are trademarks of Red Hat, Inc. in the U.S. and other countries.
All other names and trademarks used herein are the property of their respective owners.

                                                                                                                 3
TeamDrive Host Server Virtual Appliance Installation and Configuration, Release 3.7.10.0

4                                                                Chapter 2. Trademark Notice
CHAPTER

                                                                                                       THREE

                                                                                       INTRODUCTION

The TeamDrive Host Server Virtual Appliance offers a pre-installed and ready-to-run TeamDrive Host Server
Version 3.7 suitable for deployment in a VMware environment.
This document will guide you through the deployment and initial installation and configuration of a TeamDrive
Host Server.

 Warning: The TeamDrive Host Server installation requires a running TeamDrive Registration Server in-
 stance. If you are setting up both components on your own premises, please start with setting up the Registra-
 tion Server as outlined in the TeamDrive Registration Server installation guides. If you are using a Registration
 Server instance hosted by some other service provider, make sure you can access it and you have performed
 an initial setup/configuration already.

3.1 System Requirements

The TeamDrive Host Server Virtual Appliance is delivered in the form of a virtual machine image.
Its main technical specifications are:
    • Supported platforms: VMWare vSphere 4, 5 or 6 (VMWare Workstation 7 or Oracle VM VirtualBox can be
      used for testing purposes)
    • Minimum Memory: 4 GB
    • vCPUs: 2
    • HDD: 100GB
The exact sizing depends heavily on the anticipated number of concurrent client connections, the bandwidth
required and the amount of space data to be stored. Please contact us via sales@teamdrive.net for assistance.

3.2 Main Software components

The TeamDrive Host Server Virtual Appliance comprises the following components and modules:
    • Operating System: CentOS 6/7 (64-bit)
    • Apache Web Server 2.2 (CentOS 6) or 2.4 (CentOS 7)
    • MySQL 5.x Database Server
    • Host Server-specific Modules for the Apache HTTP Server
    • Yvva Runtime Environment version 1.4
The Yvva Runtime Environment is a standard software package that is not TeamDrive-specific. TeamDrive uses
the Yvva Runtime Environment as the foundation for providing the Host Server background services, Adminis-
tration Console and API.

                                                                                                                     5
TeamDrive Host Server Virtual Appliance Installation and Configuration, Release 3.7.10.0
3.3 Required Skills
When installing the TeamDrive Hosting Service, we assume that you have basic knowledge of:
• VMware: importing and deploying virtual machines, configuring virtual networking and storage (when
using a pre-installed Virtual Appliance)
• Linux system administration:
– Adding/configuring software packages
– Editing configurations files
– Starting/stopping services
– Creating user accounts
– Assigning file ownerships and privileges
– Creating and mounting file systems
– Setting up environment variables
• Apache Web Server: installation and configuration, adding and enabling modules, modifying configuration
files
• MySQL Database: installation and configuration, administration/maintenance, using the MySQL command
line client, basic SQL
• Basic knowledge of application server technology
3.4 Storage Requirements
Storage Volumes are used to store the TeamDrive Clients’ Space data, so they can grow quite significantly in size.
We strongly suggest to place them on a dedicated file system/storage volume or an NFS mount that supports proper
file locking (e.g. NFSv4). See Verifying File Locking (page 19) for a description of how to verify file locking on a
Storage Volume.
When using a block device like a local/virtual hard disk or an iSCSI target, we suggest using ext3, ext4 or XFS
on top of a logical volume (LVM) as the file system for this storage area. Using LVM provides some additional
flexibility for increasing the storage capacity of a single volume dynamically.
It should be ensured that the Space storage volumes that are mounted on the servers are equipped with sufficient
security measures against failure and data loss. Strategies could include mirrored drives or some form of RAID at
the minimum; even better is a SAN system with upstream NAS heads. Alternatively, block-by-block replication
(as provided by many enterprise storage systems) can be implemented.
3.5 Network Requirements
The bandwidth of the Host Server’s network interface plays a vital role in defining the overall performance and
responsiveness of the TeamDrive Service. Clients need to be able to quickly upload new Space data, so it is avail-
able for download for all other Clients invited to that Space. Usually, the amount of outgoing traffic (delivering
Space data to clients) exceeds the inbound traffic.
The system must have IP connectivity, using a fixed IP address and a resolvable fully qualified domain name. This
host name becomes part of the URLs used by the TeamDrive clients to access the TeamDrive Spaces and can not
be changed once the service is in operation. The Host Server itself needs to be able to properly resolve host names,
too.
If the Host Server is located behind a firewall, please ensure that it is reachable via HTTP (TCP port 80) and
HTTPS (TCP port 443) by the TeamDrive Clients.
6 Chapter 3. IntroductionTeamDrive Host Server Virtual Appliance Installation and Configuration, Release 3.7.10.0
Fig. 3.1: TeamDrive Hosting Service Networking Overview
For the initial registration and the exchange of cryptographic keys, the Host Server must be able to establish HTTP
connections (TCP port 80) to the Registration Server. After the registration and activation, no further connections
from the Host Server to the Registration Server will be established.
To perform API calls (e.g. to create new Space Depots or to query for existing Spaces for a particular user), the
TeamDrive Registration Server must be able to establish outgoing HTTP/HTTPS connections to the TeamDrive
Hosting Service.
3.5. Network Requirements 7TeamDrive Host Server Virtual Appliance Installation and Configuration, Release 3.7.10.0 8 Chapter 3. Introduction
CHAPTER
FOUR
INTRODUCTION TO THE TEAMDRIVE HOSTING SERVICE
4.1 TeamDrive Hosting Service Overview
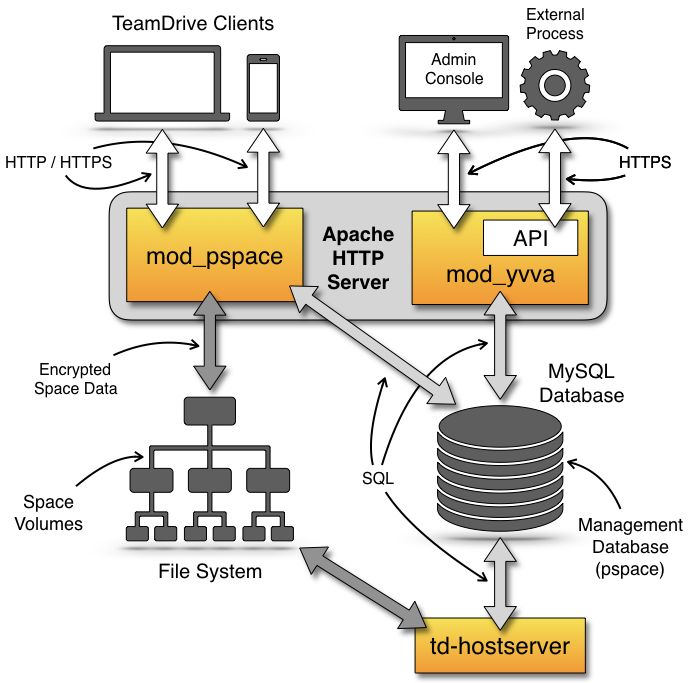
The TeamDrive Hosting Service consists of a number of components which are illustrated below:
Fig. 4.1: TeamDrive Hosting Service Overview
9TeamDrive Host Server Virtual Appliance Installation and Configuration, Release 3.7.10.0 The TeamDrive Apache module mod_pspace handles the communication and exchange of data with the Team- Drive Clients. In the default configuration, Space data is stored on a regular file system or an NFSv4 share. The TeamDrive Hosting Service Administration Console and TeamDrive Hosting Service API is served by the Yvva Apache module mod_yvva. The list of Spaces, access data, usage statistics and other administrative information is stored in the Management MySQL Database called pspace. Additionally, an Amazon S3/Azure BLOB Storage/Ceph Object Storage-compatible object store can be used as second tier storage. This significantly reduces the load on the first tier storage with regards to disk space utilization and I/O. In this case, only data “in flight” like the files being uploaded by the TeamDrive Clients and the Space log files are stored temporarily on the first tier storage until the upload completed. Only the so-called last.log files reside permanently on the first tier storage in this configuration. Afterwards, the files are moved to the object store asynchronously, using the TeamDrive Daemon s3d. Once they have been transferred to the object store, mod_pspace fetches the objects in question from there before serving them to the Clients, thus acting as a proxy. Alternatively, the Hosting Service can be configured in such a way that Clients requesting these objects will receive a redirect to the object store by mod_pspace for obtaining them directly. This helps to offload network traffic from the Host Server to the object store. See the chapter Setting up an Object Store in the TeamDrive Hosting Service Administration Guide for details. A storage system combined with the associated web servers is called a TeamDrive Hosting Service. Externally, i.e. from the Registration Server or user’s perspective, the Hosting Service is referred to as a TeamDrive Host Server. However, in this documentation references to TeamDrive Host Server refer to single host instance running an Apache Web Server and the TeamDrive Hosting Service software. The illustration above shows a “scaled-out” solution, with several Apache Webservers attached to a TeamDrive Scalable Hosting Storage (TSHS) cluster. See the chapter TeamDrive Scalable Hosting Storage in the TeamDrive Hosting Service Administration Guide for details. As an alternative to TSHS, a shared file system like NFSv4 or a distributed file system can also be used to store the data. 4.2 TeamDrive Hosting Basics When using file system based storage, the data is stored on one or multiple volumes. When using the TSHS cluster for storage, the volume component is ignored. When using a file system, Spaces may be created on any volume that is “operational”. A TeamDrive Hosting Service requires a unique domain name. The domain name becomes part of the Space URL that is returned to the TeamDrive Client when a Space is created on the service. The domain name is also part of the URL used by the clients to create Spaces, and by the Registration Server to create new Space Depots. This URL is stored in the ServiceHostURL system setting. The Same domain name is also used to access Hosting Administration Console Hosting Service API. The default Hosting Administration Console URL is: https://tdhostserver.yourdomain.com/admin/ Note: Note that it is not possible to change the domain name of a Host Server, once the TeamDrive Clients have contacted it to create and access Spaces — the location of Spaces is tied to the Host Server’s host name. However, it is possible to change a Host Server’s IP address, if required. 4.3 Directory Structure of Hosted Data The directory structure for space data stored on local storage is as follows: 10 Chapter 4. Introduction to the TeamDrive Hosting Service
TeamDrive Host Server Virtual Appliance Installation and Configuration, Release 3.7.10.0

                      Fig. 4.2: TeamDrive Hosting Service using an object store

4.3. Directory Structure of Hosted Data                                                    11
TeamDrive Host Server Virtual Appliance Installation and Configuration, Release 3.7.10.0
Fig. 4.3: TeamDrive Scalable Hosting Storage (TSHS)
12 Chapter 4. Introduction to the TeamDrive Hosting ServiceTeamDrive Host Server Virtual Appliance Installation and Configuration, Release 3.7.10.0
spacedata
`-- vol01
|-- 1
| |-- protolog
| | |-- last.log
| | |-- last.log.lock
| | `-- 0.log
| `-- data
| |-- D41D8CD98F00B204E9800998ECF8427E
| |-- 7D0F97FC38AE3B2666435D03AA91F352
| `-- 253F19AA30D5346662B3EA83CF79F0D7
`-- 2
|-- data
| |-- 5ACDD4Z000004004U8RGKHSZM2592M8H
| |-- F3XG47Z000004004U8RG1214Z2592M80
| `-- NYFBTSZ000004004U8RFT7Q8A2592M7Y
|-- protolog
| |-- last.log
| `-- last.log.lock
|-- public
| `-- 8CN7S0800000A004UH0Q9TP323BBNZ8E
| `-- Familypicture.jpg
`-- snapshot
|-- last.log
`-- last.log.lock
When Spaces are created, they are evenly distributed across individual volumes, based on the relative disk space
utilization ratio of each available volume. A Space is identified in the file system by its unique database ID. The
TeamDrive Clients store the data for a Space separated according to metadata (protolog-directory) and contents
(data-directory).
Metadata is appended to a log file and reflects the history of the Space by storing all events (invitations of users,
creation of directories, files and all modifications, etc.). All data stored on the Hosting Service is encrypted and
only the TeamDrive Clients can decrypt it. It is not possible to read the original space data in the log.
New data is continually added to the data directory in each Space directory. Existing data is never overwritten,
with the exception of data that has not been uploaded fully and where the upload may restart. File names are
created using a Global Unique ID algorithm in the TeamDrive Clients that prevents two different clients from
creating the same name. When permanently deleting files (e.g. when emptying the recycle bin of a Space), these
files are deleted on the server, to free up storage space.
Note: Note that files will not be deleted immediately, if the Point-in-Time Recovery is active for a space. Deleted
files are associated with a particular Snapshot, and are only removed when the Snapshot is deleted. For details see
snapshot_backups_and_pit_recovery.
The last.log.lock file in each Space is used internally for providing a reliable locking mechanism to prevent
multiple clients from appending data to the last.log file at the same time. Hence, the underlying storage or file
system needs to support proper file locking (the mod_space Apache module depends on flock(LOCK_EX)
to be reliable).
The public folder contains unencrypted files that have been published (uploaded) by the TeamDrive Clients.
Published files are read-accessible via HTTP or HTTPS (depending on the server configuration) by anybody,
including users who do not have a TeamDrive Client installed. A TeamDrive Professional Client license is required
to publish files.
Finally, versions 3.2.0 or later of the TeamDrive client support a so-called “Snapshot” feature, which cuts down
the time it takes to enter a Space considerably. The information required to implement this functionality is stored
in the snapshot subdirectory of a Space.
4.3. Directory Structure of Hosted Data 13TeamDrive Host Server Virtual Appliance Installation and Configuration, Release 3.7.10.0 4.4 Spaces, Owners, and Depots All Spaces created on a host are allocated to a specific Space Depot. A Space Depot has a storage quota and traffic limit. TeamDrive Client users require the access information of a Depot in order to create a Space. If enabled, the TeamDrive Registration Server creates the necessary Depot (called the default Depot) required by the TeamDrive Client during registration of a client. For this purpose the TeamDrive Registration Server must have API access to the Hosting Service. After the Depot has been created on the Hosting Service, the access information is returned to the TeamDrive Client via the Registration Server. The default Depot is linked to the registration of the TeamDrive Client, and cannot be used by any other user. The Space Owner and Space information is recorded when a Space is created using the TeamDrive Client. In addition to the default Depot, additional Depots can also be created manually via the Registration Server’s and the Host Server’s Administration Console. See chapter Manually creating a Depot in the Host Server Administra- tion Guide for details. 4.5 Background Tasks Performed by td-hostserver The td-hostserver process is a service running on a Host Server instance that executes background tasks scheduled by the Hosting Service. It uses the Yvva daemon yvvad to run the tasks at regular intervals. How to start start the td-hostserver process is described in the section: Starting td-hostserver (page 21). A complete description of the tasks performed by td-hostserver is provided in the chapter on Hosting Service Management: hosting service management/auto tasks. 14 Chapter 4. Introduction to the TeamDrive Hosting Service
CHAPTER

                                                                                                          FIVE

         VIRTUAL APPLIANCE INSTALLATION AND CONFIGURATION

5.1 Download and Verify the Virtual Appliance Image

A .zip Archive containing the virtual appliance’s disk image and VM configuration can be obtained from the
following URL:
      http://s3download.teamdrive.net/HostServer/TD-Host-Server-CentOS7-64bit-3.7.10.0.zip
Download the .zip archive and the corresponding SHA1 checksum file:
      http://s3download.teamdrive.net/HostServer/TD-Host-Server-CentOS7-64bit-3.7.10.0.zip.sha1
You should verify the SHA1 checksum to ensure that the zip archive is intact.
You can use the sha1sum command line utility on Linux to verify the integrity of the downloaded file.
For guidance on how to verify this checksum on other platforms, see the following articles:
    • Apple Mac OS X: How to verify a SHA-1 digest on Mac OS X
    • Microsoft Windows: Availability and description of the File Checksum Integrity Verifier utility
For additional safety, we recommend to verify the cryptographic signature of the zip archive as well.
You need to have a working GnuPG installation in order to verify this signature. The installation and configuration
of GnuPG is out of the scope of this document — see the documentation at https://gnupg.org/ for details.
The public TeamDrive Build GPG key can be downloaded from here:
      http://repo.teamdrive.net/RPM-GPG-KEY-TeamDrive
Import the key into your keyring and double check it matches the fingerprint provided below:

$ gpg --fingerprint support@teamdrive.net
pub   2048R/9A34C453 2014-07-01
      Key fingerprint = 8F9A 1F36 931D BEFA 693B 9881 ED06 27A9 9A34 C453
uid                  TeamDrive Systems (RPM Build Key)
sub   2048R/6048C568 2014-07-01

Each official release is signed with this TeamDrive GPG key. The signature can be obtained from the following
URL:
      http://s3download.teamdrive.net/HostServer/TD-Host-Server-CentOS7-64bit-3.7.10.0.zip.asc
To verify the signature on a Linux operating system, the .zip and corresponding .asc file should be located in the
same directory. Now run the following command:
$ gpg --verify TD-Host-Server-CentOS7-64bit-3.7.10.0.zip.asc
gpg: Signature made Mo 18 Mai 2015 10:34:09 CEST using RSA key ID 9A34C453
gpg: Good signature from ``TeamDrive Systems (RPM Build Key) ''
gpg: WARNING: This key is not certified with a trusted signature!
gpg:          There is no indication that the signature belongs to the owner.
Primary key fingerprint: 8F9A 1F36 931D BEFA 693B 9881 ED06 27A9 9A34 C453

                                                                                                                15
TeamDrive Host Server Virtual Appliance Installation and Configuration, Release 3.7.10.0 The procedure on other platforms may vary, please consult the GnuPG documentation for details on how to accomplish this task. 5.2 Import the Virtual Appliance After you have confirmed the integrity and authenticity, unzip the zip archive. The archive contains four files, a virtual disk image (.vmdk), two virtual machine description files (.ovf) and a manifest file (.mf), containing the file names and SHA1 checksums. Import the virtual machine image according to the documentation of your virtualization technology and adjust the VM parameters (e.g. number of virtual CPUs, RAM) based on your requirements, if necessary. Note: An import to VMWare ESXi might fail with the error: Unsupported hardware family 'virtualbox-2.2'. In this case use the .ovf file starting with vmx_*.ovf Start up the virtual machine and observe the virtual machine’s console output. 5.3 First Boot and Initial Configuration Log in as the root user with the standard password teamdrive. To change the default password, type in: [root@localhost ~]# passwd and define your own strong password. To change the network device and DNS, type in: [root@localhost ~]# nmtui A detailed description for the network setup can be found here http://www.krizna.com/centos/ setup-network-centos-7/ Note: A cloned CentOS image in a VMWare environment might exhibit problems updating the network interface. If you are observing issues when configuring the network interface, please follow these instructions: https://wiki. centos.org/TipsAndTricks/VMWare_Server 5.4 Updating the Installed Software Packages As a first step, we strongly advise to perform an update of the installed software packages. New security issues or software bugs might have been discovered and fixed since the time the Virtual Appliance has been built. This can be done using the yum package management tool. As a requirement, the Virtual Appliance needs to be connected to the network and needs to be able to establish outgoing HTTP connections to the remote RPM package repositories. To initiate the update process, enter the following command: [root@hostserver ~]# yum update -y yum will first gather the list of installed packages and will then determine, if updates are available. If any up- dates need to be installed, the affected RPM packages will now be downloaded from the remote repositories and installed. 16 Chapter 5. Virtual Appliance Installation and Configuration
TeamDrive Host Server Virtual Appliance Installation and Configuration, Release 3.7.10.0

If the yum update installed any updated packages, consider performing a reboot before you proceed, to ensure that
the updates are activated.

Note: Performing a regular update of all installed packages is an essential part of keeping your system secure.
You should schedule a regular maintenance window to apply updates using yum update (and perform a reboot,
to ensure that the system still boots up fine after these updates). Failing to keep up to date with security fixes may
result in your system being vulnerable to certain remote exploits or attacks, which can compromise your system’s
security and integrity.

5.5 Changing default passwords

The TeamDrive Host Server Virtual Appliance uses the following default passwords for user accounts of the
different software components. The following list shows the accounts in question and their passwords.

Note: We strongly suggest changing the passwords of the OS and MySQL root user accounts before connecting
this system to a public network.

                       Table 5.1: Default accounts and passwords
 Account type                  Username       Password (default)        New Password
 MySQL Database Server         root           teamdrive
 MySQL Database Server         teamdrive      teamdrive
 Admin Console                 HostAdmin      (defined during setup)

5.5.1 Changing the MySQL Database Passwords

To change the passwords for the MySQL root and teamdrive user, please use the following commands. First
change the password for the root user:

[root@hostserver ~] mysqladmin -u root -pteamdrive password
New password:
Confirm new password:

Next, log into the MySQL database as the root user (using the new password) and change the password for the
user teamdrive:

[root@hostserver ~]# mysql -u root -p
Enter password:

[...]

mysql> SET PASSWORD FOR 'teamdrive'@'localhost' = PASSWORD('');
Query OK, 0 rows affected (0.00 sec)

mysql> quit
Bye

Note: Take note of the new MySQL password for the teamdrive user, as you will need to update that password
in a configuration file as outlined the following chapter.

5.5. Changing default passwords                                                                                    17
TeamDrive Host Server Virtual Appliance Installation and Configuration, Release 3.7.10.0
5.6 Updating the MySQL Database Connection Information
The default Host Server Appliance installation assumes a MySQL database instance running on localhost that
can be accessed using the user teamdrive and password teamdrive. If you changed the password of the
teamdrive the following change need to be performed.
The Host Server Apache modules mod_pspace and mod_yvva as well as the yvvad daemon that performs
the td-hostserver background tasks need to be able to communicate with the MySQL management database
of the Host Server. To change the MySQL login credentials, edit the file /etc/td-hostserver.my.cnf.
The password for the teamdrive MySQL user in the [p1db] AND [tshs] option group must match the one
you defined earlier:
[p1db]
database=pspace
user=teamdrive
password=
host=localhost
socket=/var/lib/mysql/mysql.sock
5.7 Firewall Configuration
The iptables-based OS firewall on the TeamDrive Host Server Virtual Appliance has been configured to only
allow access to the following services:
• SSH (TCP Port 22)
• Secure WWW (HTTPS, TCP Port 443)
• WWW (HTTP, TCP Port 80)
If necessary, you can change the firewall configuration using the following utility:
[root@hostserver ~]# firewall-cmd
An instructions how to configure the firewall can be found here https://www.digitalocean.com/community/
tutorials/how-to-set-up-a-firewall-using-firewalld-on-centos-7
5.8 SELinux Configuration
Please note that the TeamDrive Host Server currently can not be run when SELinux is enabled. Therefore SELinux
has been disabled by setting SELINUX=disabled in file /etc/selinux/config. It is important to leave
it disabled, otherwise the correct functionality of the Host Server can not be ensured.
18 Chapter 5. Virtual Appliance Installation and ConfigurationCHAPTER
SIX
PRE-INSTALLATION TASKS
6.1 Mount the Space Storage Volume
The toplevel directory /spacedata contains the mount points for all space volumes. By default, the mount
point vol01 has already been created by the td-hostserver RPM package. Note that it must be owned by
the user that the Apache HTTP Server runs under (usually apache).
You need to create a dedicated file system that provides the requirements outlined in chapter Storage Requirements
(page 6).
Mount the file system and create the respective mount entry in /etc/fstab to enable automatic mounting of
the file system at bootup. Please consult your Operating System documentation for details on how to perform this
step.
Warning: The space volume’s file system must be mounted to /spacedata/vol01, not /spacedata,
to make it possible to mount additional volumes underneath the /spacedata directory, if required.
6.1.1 Verifying File Locking
The Space Storage Volume must provide reliable file locking. This is not always the case with certain network
mounted (NFS) volumes, which should be verified before usage.
TDLogTest is a tool which simulates the concurrent access and locking patterns generated by multiple TeamDrive
Clients. This tool can be used to test whether file locking support is compatible with the TeamDrive Hosting
Service.
Note: The test cannot confirm with 100% certainty, whether an NFS volume is compatible with TeamDrive.
However, failure of the test indicates that a volume is unfit to servie as /spacedata on a Host Server.
The following is a step-by-step guide to running TDLogTest:
1. Download the package from:
http://s3download.teamdrive.net/HostServer/TDLogTest-1485.tar.gz
and copy it to the Host Server machine.
2. Create a test directory on the Space Volume, for example:
mkdir /spacedata/vol01/TDLogTest
3. Enter this directory and extract the content of the tar archive, for example:
tar zxvf ~/TDLogTest-1485.tar.gz
19TeamDrive Host Server Virtual Appliance Installation and Configuration, Release 3.7.10.0
4. Edit TDLogTest.cfg, set the path in TDLOGS to the directory to be used for testing.
5. Initialize the test directory by running:
./initTDLogTest
6. Start the test by running:
./startTDLogTest
The script spawns a (definable) number of reader and writer background processes which log their progress to
STDOUT. Errors will be logged to TDLogTest.err by default. To stop the test, call ./stopTDLogTest.
Keep the test running for a while. Try using different values for readers and writers as well, by stopping the test
and passing different options to startTDLogTest. Also try creating multiple test directories and spawning
more readers/writers using a different location.
If there are multiple Host Server instances connected to the same NFS volume then the test must be performed
from multiple instances simultaneously, after the initial test with one instance succeeded.
6.2 Replacing the self-signed SSL certificates with proper certifi-
cates
The default Apache HTTP Server installation ships with self-signed SSL certificates for testing purposes. We
strongly recommend to purchase and install proper SSL certificates and keys before moving the server into pro-
duction.
You will need a properly signed SSL certificate (+ key) and an intermediate certificate (certificate chain) from a
trusted authority.
Edit /etc/httpd/conf.d/ssl.conf and enter the absolute location of your files into the appropriate settings:
SSLCertificateFile /path/to/your_domain.crt
SSLCertificateKeyFile /path/to/your_domain.key
Depending on your certificate provider and your security needs, you probably want to set:
SSLCertificateChainFile /path/to/server-chain.crt
or:
SSLCACertificateFile /path/to/gd_bundle.crt
After saving the changes, restart your httpd and watch out for errors:
[root@localhost ~]# service httpd restart
Now you can logout and proceed with the configuration via browser to register the Web Portal as described in
“Associating the Web Portal with a Provider” section in the web portal documentation. For production use please
read the following two chapters about the necessary storage.
6.3 Starting the Host Server Instance
After all configuration steps have been performed, we can start the TeamDrive Services to conclude the initial
installation/configuration.
20 Chapter 6. Pre-Installation TasksTeamDrive Host Server Virtual Appliance Installation and Configuration, Release 3.7.10.0 6.3.1 Starting td-hostserver To activate the yvvad-based td-hostserver background task you have to start the service using the provided init script. The configuration file /etc/td-hosting.conf defines how this process is run. You usually don’t have to modify these settings. To start the td-hostserver program, use the service command as user root: [root@hostserver ~]# service td-hostserver start Starting TeamDrive Hosting Services: [ OK ] Use the status option to the service command to verify that the service has started: [root@hostserver ~]# service td-hostserver status yvvad (pid 2506) is running... If td-hostserver does not start (process yvvad is not running), check the log file /var/log/td-hostserver.log for errors. See chapter Troubleshooting (page 31) for details. 6.3.2 Starting the Apache HTTP Server Now the Apache HTTP Server can be started, which provides the TeamDrive Host Server functionality (via mod_pspace) as well as access to the TeamDrive Hosting Service Administration Console and API (via mod_yvva). You can start the service manually using the following command: [root@hostserver ~]# service httpd start Warning: At this point, the Host Server’s web server is answering incoming requests from any web client that can connect to its address. For security purposes, you should not make it accessible from the public Internet until you have concluded the initial configuration, e.g. by blocking external accesses using a firewall. Check the log file /var/log/httpd/error_log, /var/log/td-hostserver.log, and /var/log/mod_pspace.log for startup messages and possible errors: [notice] mod_yvva 1.4.1 (Jan 10 2017 11:57:45) loaded [notice] Logging (=error) to: /var/log/td-hostserver.log [notice] Apache/2.2.31 (Unix) mod_ssl/2.2.31 OpenSSL/1.0.1k-fips configured -- resuming normal operations [notice] mod_pspace 1.7.10 Loaded; Build Nov 17 2016 16:55:00; Crash-Reporting-Disabled Please consult chapter Troubleshooting (page 31) if there is an error when starting the service. Note: You may observe Admin API Errors like the following one: Admin API, Error loading parameters: Host Server setup has not been completed These errors can be ignored at this stage. They are caused by the fact that the Host Server has not been configured and registered with a Registration Server yet. This step will be described in the following chapter. 6.3. Starting the Host Server Instance 21
TeamDrive Host Server Virtual Appliance Installation and Configuration, Release 3.7.10.0

22                                                           Chapter 6. Pre-Installation Tasks
CHAPTER

                                                                                                      SEVEN

                                           INITIAL HOST SERVER CONFIGURATION

7.1 Registering and Activating the Host Server

From a desktop system that can connect to the Host Server via HTTPS, start a web browser like Mozilla Firefox,
Google Chrome (or any other modern web browser) and start the configuration process by opening the following
URL in your browser:
      https://hostserver.yourdomain.com/admin/
This should open the Host Server Setup page. If you get an error message like “500 Internal Server Error”, check
the log files for any errors. See chapter Web Installation: “500 Internal Server Error” (page 33) for details.

Note: If you haven’t replaced the server’s self-signed default SSL certificate yet, your web browser most likely
will complain about an untrusted/insecure connection. Either replace the SSL certificate with an appropriate one
before you proceed, or ignore this message.

Alternatively, you can access the Setup Page via an unencrypted HTTP connection. In this case, you will be
prompted to proceed using an insecure connection.
When everything is configured correctly, you will see the TeamDrive Host Server Setup page that will guide you
through the initial configuration:
Fill out the fields according to your environment and requirements:
Admin Username The name of the user account with full administrative privileges.
Admin Password The adminstrator password that you need to provide to login to the Host Server Administration
    Console.
Admin Email The email address of the Administrator. This field is optional. This email address is used for
    2-factor authentication (if enabled).
Host Server Domain Name The domain name of this Host Server. This is the domain name that TeamDrive
     clients will use to create and access Spaces. The setup tool will try to determine and fill in this name
     automatically, please ensure that it is a fully-qualified and resolvable domain name (the setup will try to
     connect the server using the domain name; if your network configuration doesn’t allow, that an outgoing
     request will go back to the server, try to add the domain name to the /etc/hosts file).

Note: Dont use an IP address instead of a domain name, because using an IP address will cause the following
problems: Register a SSL certificate for an IP address can be a problem and the TeamDrive client applications on
the Apple platform (MAC and IOS) require a valid and official SSL certificate for the HTTPS communication.
Apple only allows HTTPS connections. The second problem is, that the IP of the server cant be changed anymore.
There is no possibility in the TeamDrive clients to change the space URL later on. If the server will be not longer
reachable by the initial name any more, all Spaces are lost and cant be synchronized any more.

Provider Code The Host Server will be assigned to a Provider on the specified Registration Server. The Provider
     Code (aka Distributor Code) is a 4 character code, consisting of letters A-Z and 0-9. If you don’t have

                                                                                                                23
TeamDrive Host Server Virtual Appliance Installation and Configuration, Release 3.7.10.0
Fig. 7.1: Host Server Setup Page
a Provider Code yet, please contact TeamDrive Systems for obtaining you individual Provider Code.
This code can not be changed later on.
Host Server API IP Whitelist Enter a comma separated list of IP addresses of systems that are permitted to
access the Host Server API. This list must include the IP address of the Registration Server’s Admin
Console. Please contact TeamDrive Systems for the correct value if you don’t manage your own
Registration Server.
Reg. Server Domain Name Enter the fully qualified domain name of the Registration Server. Setup will ping
this domain to ensure that the Registration Server is running and reachable. Please contact TeamDrive
Systems for the correct value if you don’t manage your own Registration Server.
Registration Server Name All Host Servers must be registered with a Registration Server. Enter the name of
your Registration Server here. Please contact TeamDrive Systems for the correct value if you don’t
manage your own Registration Server.
Reg. Server API Salt The API Salt is a code that allows the Host Server to validate calls to the Host Server’s
API. This value must match the value of the APIChecksumSalt setting on the Registration Server to
avoid “man in the middle”-attacks. Please consult the Registration Server Documentation on how to obtain
it or contact TeamDrive Systems for the correct value if you don’t manage your own registration server.
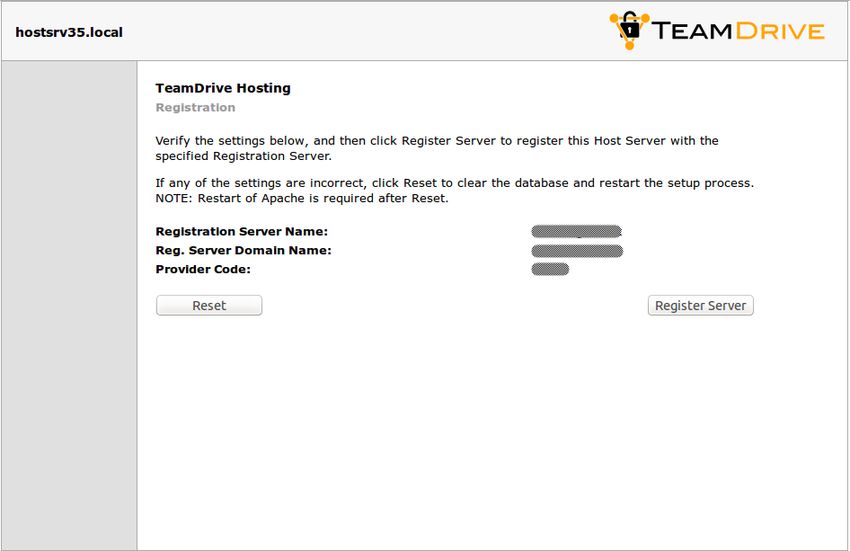
After you have entered all the required details, click Setup to initiate the Host Server configuration and registration
process with the Registration Server. After performing some initial checks, the setup process will summarize the
information that it will use to perform the registration with the selected Registration Server.
Click Register Server to proceed with the registration, Reset to abort and return to the setup page.
Warning: If you need to restart the Registration/Activation process because of incorrectly entered values, it’s
absolutely necessary to restart the Apache HTTP Server to roll back some internal changes:
[root@hostserver ~]# service httpd restart
24 Chapter 7. Initial Host Server ConfigurationTeamDrive Host Server Virtual Appliance Installation and Configuration, Release 3.7.10.0
Fig. 7.2: Host Server Registration Confirmation
Communication within the TeamDrive network is encrypted with a public-private encryption key pair. During
registration, this key pair is generated by the Host Server and the public key is sent to the Registration Server.
This will result in the creation of a new user account on the Registration Server, named tdhosting., e.g. tdhosting.hostserver.yourdomain.com, and a device and license associated
with that user.
Befor the Host Server registration can be concluded, you are required to enter an Activation Code. For security
reasons, you will not receive this code automatically. If you don’t run your own Registration Server, you need to
request this code from your Registration Server operator (usually TeamDrive Systems).
The activation code can be obtained from the Registration Server’s Administration Console in Server Manage-
ment -> Manage Servers page.
Take note of this activation code, enter it into the Host Server’s activation page and click Activate server.
7.2 Setup and Administration
Upon successful activation, you will be presented with the Host Server’s Administration Console Login Screen.
Enter the username and password you defined during the initial setup to log in.
Upon successful login, you will see the Host Server’s Administration Console Home Screen.
At this point, you have concluded the Host Server’s basic configuration and registration. See the TeamDrive Host
Server Administration Guide for more details on how to use the Administration Console and how to accomplish
other configuration tasks.
7.2. Setup and Administration 25TeamDrive Host Server Virtual Appliance Installation and Configuration, Release 3.7.10.0
Fig. 7.3: Host Server Activation Window
Fig. 7.4: Host Server Admin Console: Login Screen
26 Chapter 7. Initial Host Server ConfigurationTeamDrive Host Server Virtual Appliance Installation and Configuration, Release 3.7.10.0
Fig. 7.5: Host Server Admin Console: Home Screen
7.2. Setup and Administration 27TeamDrive Host Server Virtual Appliance Installation and Configuration, Release 3.7.10.0
7.3 Associating the Host Server with a Provider
As a final step, you need to associate your host server with your provider account on the Registration Server. This
can be performed via the Registration Server’s Admin Console, which you can usually access via the following
URL:
https://regserver.yourdomain.com/adminconsole/
Please see the Registration Server Manual for details.
Log in with your provider login and click the tab Edit Distributor Settings (Registration Server version 3.0.017
and older), Edit Provider Settings (Registration Server version 3.0.018) or Server Management -> Provider
Settings (Registration Server 3.5).
In the section Provider Settings, click the Button labelled HOSTSERVER.
Change the configuration setting HAS_DEFAULT_DEPOT from False to True and click “Save”.
The HOST_SERVER_NAME setting and related options should now appear in the list of HOSTSERVER settings.
Select your host server from the selection list and click “Save” to apply this change.
If required, adjust the other settings from the HOSTSERVER category to match your requirements, e.g.
HOST_SERVER_URL, HOST_DEPOT_SIZE and HOST_TRAFFIC_SIZE.
7.4 Testing Client Access
The Host Server has now been set up. To test its functionality, start a TeamDrive Client and create or log into a
user account belonging to the Provider Code this Host Server has been associated with.
When creating a new space, the Host Server should now be available in the “Server” selection list of the Client’s
“Create a Space” dialogue.
After the space has been created, take note of the Server URL and Space ID in the Client’s Space Information
panel. The URL should point to the host name of your Host Server.
On the Host Server, a directory with that Space ID as the directory name should have been created in
/spacedata/vol01/. If you add files to this Space via the TeamDrive Client, the encrypted versions should
appear in the respective Space’s data directory shortly afterwards.
Also try publishing a file (requires a Professional Client License), the file should be uploaded to the Host Server
in unencrypted form and placed into a subdirectory below the public directory of that space. Try downloading
the file using the URL provided. Again, the URL should point to your new Host Server.
28 Chapter 7. Initial Host Server ConfigurationCHAPTER
EIGHT
POST-INSTALLATION TASKS
8.1 Startup Sequence / Dependencies
To ensure a proper service start and to minimize error messages on the TeamDrive Client side, the following
startup sequence of the TeamDrive Enterprise Server components and services should be observed.
1. Start the TeamDrive Host Server services in the following order:
(a) Mount the Space Volumes (e.g. NFSv4, local/virtual disks)
(b) Start the Host Server MySQL database service
(c) Start the td-hostserver background service
(d) Start the Apache HTTP Server
2. Start the TeamDrive Host Server services as outlined in the TeamDrive Host Server Installation Guide.
8.2 Starting the Apache HTTP Server at Boot Time
To ensure that Apache HTTP Server starts up automatically at system bootup time, use the following command to
enable it:
[root@hostserver ~]# chkconfig httpd on
Note: It’s important, that the MySQL service starts before the Apache will start. On CentOS 7 edit the file:
/lib/systemd/system/httpd.service
and add at the end of the line starting with After= the entry mysqld.service. This will ensure, that the
Apache will start after the MySQL service.
8.3 Starting TeamDrive Service at Boot Time
To start the TeamDrive Host Server background service td-hostserver at boot time, use the following com-
mand to enable it:
[root@hostserver ~]# chkconfig td-hostserver on
29TeamDrive Host Server Virtual Appliance Installation and Configuration, Release 3.7.10.0 8.4 Next steps This concludes the basic installation and configuration of the TeamDrive Host Server. Please consult the Team- Drive Host Server Administration Guide for additional information on advanced administrative tasks and config- uration steps. 30 Chapter 8. Post-Installation Tasks
CHAPTER

                                                                                                      NINE

                                                                           TROUBLESHOOTING

9.1 List of relevant configuration files

/etc/httpd/conf.d/td-hostserver.httpd.conf: The configuration file that loads and enables the
    TeamDrive Host Server-specific modules for the the Apache HTTP Server:
         • mod_pspace.so: this Apache module provides the actual Host Server functionality by accepting
           incoming data from the TeamDrive clients as well as delivering data to other clients upon request.
         • mod_yvva.so: this Apache module is responsible for providing the web-based Host Server Admin-
           istration Console as well as the Host Server API interface.
/etc/logrotate.d/td-hostserver: This file configures how the log files belonging to the TeamDrive
    Host Service are being rotated. See the logrotate(8) manual page for details.
/etc/td-hosting.conf: This file defines how the td-hostserver background service is started using
    the yvvad daemon.
/etc/td-hostserver.my.cnf: This configuration file defines the MySQL credentials used to access the
    pspace MySQL database. It is read by the Apache modules mod_yvva and mod_pspace as well as the
    yvvad daemon that runs the td-hostserver background tasks and the yvva command line client.
/etc/yvva.conf: This configuration file contains configuration settings specific to the Yvva Runtime En-
    vironment that are shared by all Yvva components, namely the mod_yyva Apache module, the yvvad
    daemon and the yvva command line shell.
/etc/tshs.conf: This configuration file defines a number of maintenance tasks performed by the tshs
    background service.

9.2 List of relevant log files

In order to debug and analyse problems with the Host Server configuration, there are several log files that you
should consult:
/var/log/td-hostserver.log: The log file for the Yvva Application Server module which pro-
    vides the web-based Host Server Administration Console and API. Consult this log file when
    you have issues with associating the Host Server with the Registration Server, errors when issu-
    ing API requests or problems with the Administration Console. You can increase the amount
    of logging by changing the Yvva setting log-level from error to trace or debug in
    /etc/httpd/conf.d/td-hostserver.httpd.conf:

        SetHandler yvva-handler
        YvvaSet root-path=/opt/teamdrive/hostserver
        YvvaSet mysql-cnf-file=/etc/td-hostserver.my.cnf
        YvvaSet log-file=/var/log/td-hostserver.log
        YvvaSet log-level=error

                                                                                                            31
TeamDrive Host Server Virtual Appliance Installation and Configuration, Release 3.7.10.0
After changing these values, you need to restart the Apache HTTP Server service using service httpd
restart.
This log file is also used by the td-hostserver background task. Check this one to verify that back-
ground tasks are being processed without errors. The log file location can be configured by changing the file
name passed to the log-file option in the configuration file /etc/td-hosting.conf. The log level
can be increased by changing the default value error for the log-level option to trace or debug.
Changing these values requires a restart of the td-hostserver background process using service
td-hostserver restart.
/var/log/mod_pspace.log: This log file contains error messages related to the mod_pspace Apache
module, particularly when using an compatible object store or TSHS. It needs to be writable by the user
that the Apache HTTP Server runs under (apache by default). The log file location is configured by the
server setting ModuleLogFile and the amount of logging can be changed by adjusting the server setting
ModuleLogLevel via the Host Server Administration Console. The value defines the maximum level of
logging of messages logged: 1 = Error, 2 = Warning, 3 = Notice, 4 = Trace, 5 = Debug. Changing these
values requires restarting the Apache HTTP Server.
/var/log/httpd/: The Apache HTTP Server’s log files (e.g. error_log) might also contain additional
relevant error messages (e.g. from mod_pspace) that should be checked. The amount of logging is
affected by the ModuleLogLevel setting described above.
/var/log/tshs.log: This log file contains errors and other messages generated by the tshs background
service. The log file location and amount of output are defined in file /etc/tshs.conf, via the op-
tions log-file and log-level. Possible values in the order of verbosity are protocol, error,
warning, trace, debug. The default is warning.
/var/log/s3d.log: This log file is written by the TeamDrive S3 daemon s3d and provides log messages
and errors specific to the s3d background service. The log file location is defined in the init script
/etc/init.d/s3d.
9.3 Enable Logging with Syslog
As outlined in List of relevant log files (page 31), the TeamDrive Host Server logs critical errors and other notable
events in various log files by default.
Starting with Host Server version 3.5 and Yvva 1.2, it is now possible to redirect the log output of some server
components to a local syslog instance as well.
Note: Please note that other components of the TeamDrive Host Server, e.g. mod_pspace, s3d or tshs
currently do not provide syslog support. This limitation may be lifted in future versions of the TeamDrive Host
Server software.
Syslog support is an essential feature for auditing, security and/or compliance reasons, as it allows you to funnel
all log messages into a centralized syslog server.
This makes it easier to monitor the logs for critical events or errors and prevents tampering with the log files in
case of a security breach. It also helps to maintain control over the disk space utilization on the server, as growing
log files can’t accidentally fill up the file system.
To enable syslog support, the log file name in the log-file setting has to be replaced with the keyword syslog.
Optionally, a custom process identifier can be supplied, by appending it to the syslog keyword, using a colon
as the separator, e.g. log-file=syslog:my_process_identifier. If not used, the default process
identifier will be used, which is the name of the program executable.
To enable syslog support for the Yvva-based td-hostserver backround service, edit the log-file setting
in file /etc/td-hosting.conf as follows:
log-file=syslog:td-hostserver
32 Chapter 9. TroubleshootingTeamDrive Host Server Virtual Appliance Installation and Configuration, Release 3.7.10.0
You need to restart the td-hostserver background service via service td-hostserver restart in
order to activate this change. If the log-level is set to debug you will now see log messages appearing in
/var/log/messages:
Jun 23 11:57:33 localhost td-hostserver: notice: yvvad startup
Jun 23 11:57:33 localhost td-hostserver: notice: Using config file:
/etc/td-hosting.conf
Jun 23 11:57:33 localhost td-hostserver: notice: No listen port
Jun 23 11:57:33 localhost td-hostserver: notice: yvvad running in repeat 60
(seconds) mode
To enable syslog support for the Host Server API and Administration Console, edit the YvvaSet log-file
setting in file /etc/httpd/conf.d/td-hostserver.httpd.conf:
YvvaSet log-file=syslog
You need to restart the Apache HTTP Server via service httpd restart in order to activate this change.
If the log-level is set to debug you will now see log messages appearing in /var/log/messages:
Jun 23 12:06:04 localhost mod_yvva: notice: mod_yvva 1.2.1 (May 21 2015
11:00:12) startup OK
9.4 Tracing Client Accesses to a Single Space
For debugging issues with a specific Space, it might be useful to enable more verbose tracing of activity between
the Host Server and the TeamDrive Clients accessing this Space.
For this purpose, access to that Space can be traced by providing the Space’s ID to the option
watched_space_id in /etc/httpd/conf.d/td-hostserver.httpd.conf as follows:
SetHandler pspace-handler
MySQLCnf /etc/td-hostserver.my.cnf
watched_space_id
# Necessary to ignore the extra Range-header
# (see Range-header note in the documentation)
RequestHeader unset Range
Restart the Apache HTTP Server with service httpd restart. Any activity on the selected Space will
now be logged into the log file /var/log/mod_pspace.log.
Note: Remove this option and restart the Apache HTTP Server once you’ve finished analyzing the problem, to
avoid uncontrolled growth of the log file.
9.5 Common errors
9.5.1 Web Installation: “500 Internal Server Error”
This error can be triggered by several error conditions. Check the log file /var/log/td-hostserver.log
for details.
9.4. Tracing Client Accesses to a Single Space 33You can also read