WOSPi - a Weather Observation System for the Raspberry Pi
←
→
Page content transcription
If your browser does not render page correctly, please read the page content below
WOSPi
– a Weather Observation System for the Raspberry Pi –
                             © Torkel M. Jodalen
                             annoyingdesigns.com

                               September 8, 2015

                                      Abstract
     This document describes a weather observation system for the Raspberry Pi,
 utilizing the Davis Vantage Pro2 Plus/Vantage Pro2/Vantage Vue weather station as
 observation platform. The weather station is connected directly to the Raspberry Pi
 without using a Davis Instruments data logger. All necessary details, part numbers
 and relevant source code samples are provided. The WOSPi software is implemented
 using the Python programming language.
     Weather data output is provided in various formats (Weather Underground,
 weathercloud.net, WindGURU, WindFinder, APRS, XML, plain text file, data
 plots) and can be customised according to user requirements.
     By running on a low-power Raspberry Pi instead of a power-hungry traditional
 computer, the WOSPi software even contributes to reducing global carbon dioxide
 emissions.
     Weather data from a Vantage Pro2 Plus and a Raspberry Pi running the WOSPi
 software can be accessed at http://meteo.annoyingdesigns.com.

                                         1
http://meteo.annoyingdesigns.com 2
Contents
                                                                                                                      Page

1   Project background                                                                                                    6
    1.1 Disclaimer . . . . . . . . . . . . . . . . . . . . . . . . . . . . . . . . . . . .                                6
    1.2 Main goal . . . . . . . . . . . . . . . . . . . . . . . . . . . . . . . . . . . .                                 6

2   The    first few steps                                                                                                7
    2.1     A word of warning — console firmware        version 3.xx .    .   .   .   .   .   .   .   .   .   .   .   .   7
    2.2     Weather station and ISS installation .      . . . . . . . .   .   .   .   .   .   .   .   .   .   .   .   .   7
    2.3     A brief quick-start guide . . . . . . . .   . . . . . . . .   .   .   .   .   .   .   .   .   .   .   .   .   8
    2.4     Shopping for parts . . . . . . . . . . .    . . . . . . . .   .   .   .   .   .   .   .   .   .   .   .   .   9

3   Putting things together                                                          13
    3.1 Connecting the VP2P console to a PC — without a data logger . . . . . . 13
    3.2 Extending the console’s rear expansion connector . . . . . . . . . . . . . . 14

4   Configuring the Raspberry Pi                                                                                          18
    4.1 The raspi-config tool . . . . . . . . . . . . . . . . . . . . . . . . .                       .   .   .   .   .   18
    4.2 Updating and installing software packages . . . . . . . . . . . . .                           .   .   .   .   .   19
    4.3 Manually specifying keyboard layout and locale info . . . . . . .                             .   .   .   .   .   20
    4.4 Assigning a static IP address to the Raspberry Pi — ethernet . .                              .   .   .   .   .   20
    4.5 Assigning a static IP address to the Raspberry Pi — WLAN . .                                  .   .   .   .   .   21
    4.6 Setting a proper host name . . . . . . . . . . . . . . . . . . . . .                          .   .   .   .   .   23
    4.7 Adding/modifying user accounts . . . . . . . . . . . . . . . . . .                            .   .   .   .   .   23
         4.7.1 Adding the wospi and wx user accounts . . . . . . . . . .                              .   .   .   .   .   23
         4.7.2 Deleting the pi user account . . . . . . . . . . . . . . . . .                         .   .   .   .   .   24
    4.8 Setting up a Python-based FTP server . . . . . . . . . . . . . . .                            .   .   .   .   .   24
    4.9 Editing the system login message . . . . . . . . . . . . . . . . . .                          .   .   .   .   .   25
    4.10 Auto-mounting USB-attached storage devices . . . . . . . . . . .                             .   .   .   .   .   25
    4.11 Setting file system properties . . . . . . . . . . . . . . . . . . . .                       .   .   .   .   .   26
    4.12 Disabling kernel serial line output and serial line login . . . . . .                        .   .   .   .   .   27
    4.13 The wxview.sh shell script . . . . . . . . . . . . . . . . . . . . . .                       .   .   .   .   .   28
    4.14 Adding auto-login and changing the default shell for the wx user                             .   .   .   .   .   29
    4.15 Setting up RSA keypairs for ”passwordless” SCP . . . . . . . . .                             .   .   .   .   .   29
    4.16 Enabling auto-run of the wospi.pyc program . . . . . . . . . . . .                           .   .   .   .   .   30
    4.17 Verifying screen output . . . . . . . . . . . . . . . . . . . . . . .                        .   .   .   .   .   30
    4.18 Logging screen output to a file . . . . . . . . . . . . . . . . . . .                        .   .   .   .   .   30

5   Wiring the Raspberry Pi to the console                                              31
    5.1 General information . . . . . . . . . . . . . . . . . . . . . . . . . . . . . . 31
    5.2 Now you’re warned (again) . . . . . . . . . . . . . . . . . . . . . . . . . . 31

http://meteo.annoyingdesigns.com                                                                                           3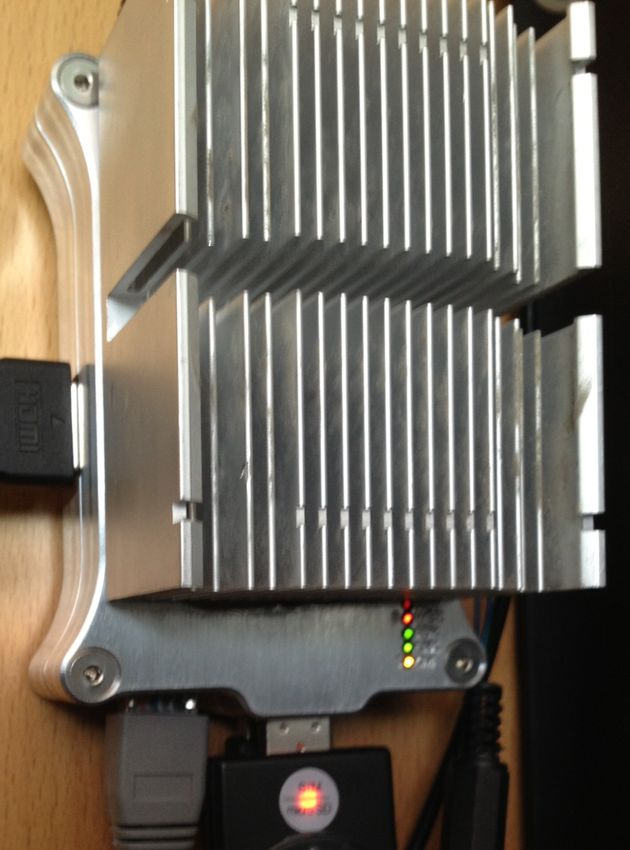
6   Sample Python code                                                                                                    34
    6.1 Using the serial module . . . . . . . . . . . . . . . . . . .                 .   .   .   .   .   .   .   .   .   34
    6.2 Using the struct module . . . . . . . . . . . . . . . . . . .                 .   .   .   .   .   .   .   .   .   34
    6.3 WOSPi’s wxDict and wxMinMax dictionaries . . . . . . .                        .   .   .   .   .   .   .   .   .   35
    6.4 The getRawData function . . . . . . . . . . . . . . . . . .                   .   .   .   .   .   .   .   .   .   35
    6.5 MSB or LSB first? . . . . . . . . . . . . . . . . . . . . . .                 .   .   .   .   .   .   .   .   .   36
    6.6 The CCITT-16 CRC algorithm — Python implementation                            .   .   .   .   .   .   .   .   .   36

7   Example output                                                                                                        37
    7.1 Weather Underground . . . . . . . . . . . . . . . . . . . . . . . . . . . . .                                     37
    7.2 weathercloud.net . . . . . . . . . . . . . . . . . . . . . . . . . . . . . . . .                                  39
    7.3 WindGURU . . . . . . . . . . . . . . . . . . . . . . . . . . . . . . . . . . .                                    40
    7.4 WindFinder . . . . . . . . . . . . . . . . . . . . . . . . . . . . . . . . . . .                                  41
    7.5 Plain-text weather report of current observations . . . . . . . . . . . . . .                                     41
    7.6 Plain-text min/max report . . . . . . . . . . . . . . . . . . . . . . . . . .                                     41
    7.7 Current observations as XML data . . . . . . . . . . . . . . . . . . . . . .                                      41
    7.8 24-hour data plot — wind speed and wind direction . . . . . . . . . . . .                                         46
    7.9 24-hour data plot — temperature, solar/UV radiation, barometric pressure                                          47
    7.10 Last month’s rainfall histogram . . . . . . . . . . . . . . . . . . . . . . . .                                  48
    7.11 Rainfall per month histogram . . . . . . . . . . . . . . . . . . . . . . . . .                                   49
    7.12 Rainy days per month histogram . . . . . . . . . . . . . . . . . . . . . . .                                     50
    7.13 Min/max temperatures from the last 12 months . . . . . . . . . . . . . . .                                       51
    7.14 Daily max solar and max UV radiation from the last 12 months . . . . . .                                         52
    7.15 Daily max solar radiation and temperature from the last 12 months . . .                                          53
    7.16 One week of barometric pressure data . . . . . . . . . . . . . . . . . . . .                                     54
    7.17 Weather observations CSV file format . . . . . . . . . . . . . . . . . . . .                                     55
    7.18 Rainfall data CSV file format . . . . . . . . . . . . . . . . . . . . . . . . .                                  56
    7.19 APRS weather report . . . . . . . . . . . . . . . . . . . . . . . . . . . . .                                    57
    7.20 Terminal output . . . . . . . . . . . . . . . . . . . . . . . . . . . . . . . .                                  57

8   The    WOSPi software                                                                                                 58
    8.1    Free of charge for non-commercial use . . . . .      . .   .   .   .   .   .   .   .   .   .   .   .   .   .   58
    8.2    Credit where credit is due . . . . . . . . . . . .   . .   .   .   .   .   .   .   .   .   .   .   .   .   .   58
    8.3    Commercial use . . . . . . . . . . . . . . . . . .   . .   .   .   .   .   .   .   .   .   .   .   .   .   .   58
    8.4    Installing the WOSPi software . . . . . . . . .      . .   .   .   .   .   .   .   .   .   .   .   .   .   .   58
    8.5    Configuring the WOSPi software — config.py             .   .   .   .   .   .   .   .   .   .   .   .   .   .   58
           8.5.1 The COMMISSIONDATE setting . . .               . .   .   .   .   .   .   .   .   .   .   .   .   .   .   58

9   Additional notes                                                                                                      59
    9.1 Sunrise/sunset times on data plots . . . . . . . . . . .              . . . . . .             .   .   .   .   .   59
    9.2 Updating the VP2P/VP2/Vue console time . . . . . .                    . . . . . .             .   .   .   .   .   59
    9.3 The condensation flag . . . . . . . . . . . . . . . . . .             . . . . . .             .   .   .   .   .   59
    9.4 The freeze flag . . . . . . . . . . . . . . . . . . . . . .           . . . . . .             .   .   .   .   .   59
    9.5 Correcting the UV radiation and solar radiation sensor                readings .              .   .   .   .   .   60

http://meteo.annoyingdesigns.com                                                                                           4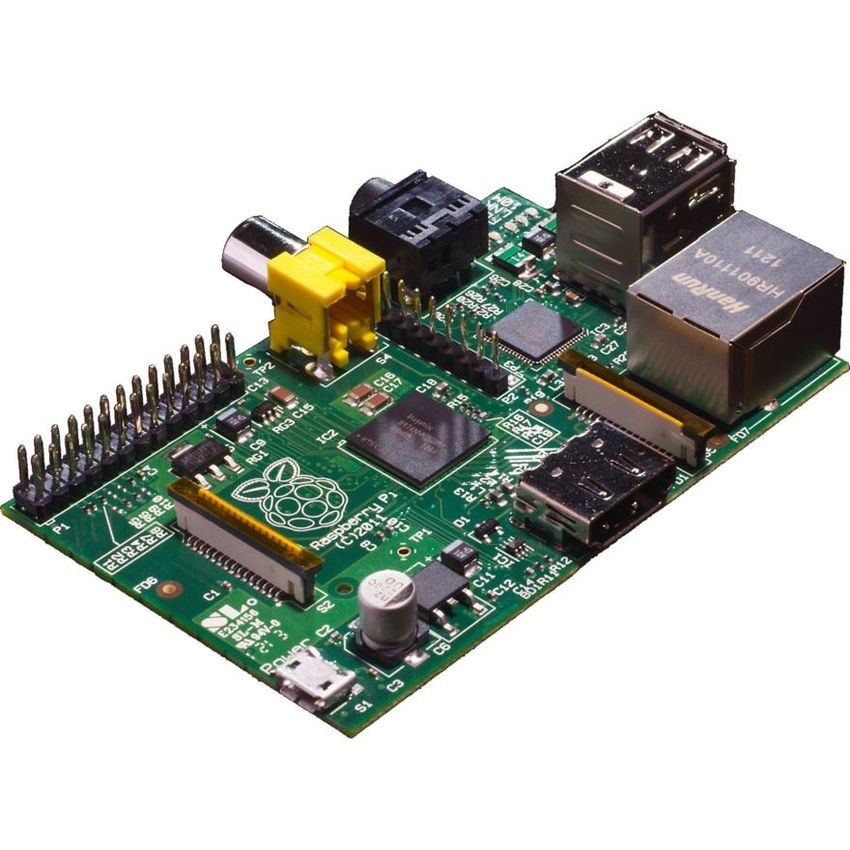
9.6    Console RXCHECK values . . . . . . . . . . . . . . . . .           .   .   .   .   .   .   .   .   .   60
    9.7    Importing the wospi.pyc library . . . . . . . . . . . . . . .      .   .   .   .   .   .   .   .   .   61
    9.8    Regularly running commands at specified times . . . . . .          .   .   .   .   .   .   .   .   .   61
    9.9    Choosing a web hotel . . . . . . . . . . . . . . . . . . . . .     .   .   .   .   .   .   .   .   .   61
    9.10   Raspberry Pi HDMI output . . . . . . . . . . . . . . . . .         .   .   .   .   .   .   .   .   .   62
    9.11   Password-protected websites — the .htaccess file . . . . .         .   .   .   .   .   .   .   .   .   62
    9.12   Backing up weather observations by email — wxBackup.sh             .   .   .   .   .   .   .   .   .   62
    9.13   The Raspberry Pi and SD or SDHC cards . . . . . . . . .            .   .   .   .   .   .   .   .   .   63
    9.14   SD card backup . . . . . . . . . . . . . . . . . . . . . . . .     .   .   .   .   .   .   .   .   .   63
           9.14.1 Using the Partclone tool . . . . . . . . . . . . . . .      .   .   .   .   .   .   .   .   .   63
           9.14.2 Using dd . . . . . . . . . . . . . . . . . . . . . . .      .   .   .   .   .   .   .   .   .   64
           9.14.3 Using the Win32 Disk Imager . . . . . . . . . . .           .   .   .   .   .   .   .   .   .   64
           9.14.4 Resizing the SD card image . . . . . . . . . . . . .        .   .   .   .   .   .   .   .   .   64
    9.15   Backing up your files via FTP . . . . . . . . . . . . . . . .      .   .   .   .   .   .   .   .   .   66
    9.16   Sentinel values, out-of-range values . . . . . . . . . . . . .     .   .   .   .   .   .   .   .   .   66
    9.17   Error messages (IOError, permission denied ) . . . . . . .         .   .   .   .   .   .   .   .   .   66
    9.18   The getBeaufort function . . . . . . . . . . . . . . . . . .       .   .   .   .   .   .   .   .   .   66
    9.19   Undocumented console commands . . . . . . . . . . . . .            .   .   .   .   .   .   .   .   .   68
    9.20   Improving the cooling of the Pi Holder case . . . . . . . .        .   .   .   .   .   .   .   .   .   69
    9.21   VP2P and ISS batteries . . . . . . . . . . . . . . . . . . .       .   .   .   .   .   .   .   .   .   70
    9.22   gnuplot script files . . . . . . . . . . . . . . . . . . . . . .   .   .   .   .   .   .   .   .   .   70

10 Resources and references                                                               71
   10.1 Thanks to ... . . . . . . . . . . . . . . . . . . . . . . . . . . . . . . . . . . 71
   10.2 Other references . . . . . . . . . . . . . . . . . . . . . . . . . . . . . . . . 71

11 Contact information                                                                72
   11.1 Comments, suggestions, feature requests, etc. . . . . . . . . . . . . . . . . 72

                                   Don’t print it unless you have to!

http://meteo.annoyingdesigns.com                                                                                   5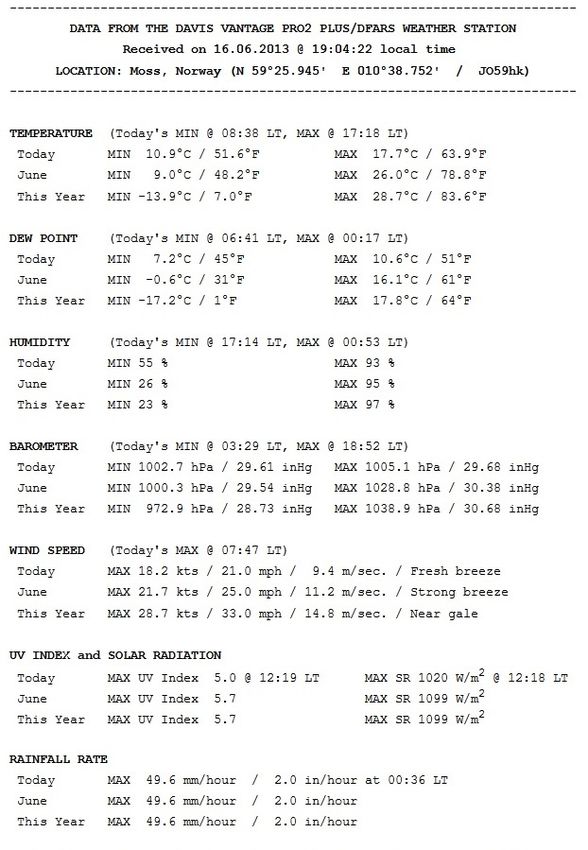
1 Project background
The Davis Vantage Pro2 Plus (VP2P) weather station is capable of interfacing to external
devices through its rear extension connector. Davis Instruments Corp. provides various
WeatherLink software products along with their data loggers1 , which are capable of
uploadig weather data to a proprietary, subscription-based web server operated by Davis
Instruments Corp. The WeatherLink IP data logger lacks flexibility and doesn’t really
leave the user with any real control of the device. The WeatherLink software itself is
not pretty and it requires a power-consuming personal computer running 24/7 to upload
weather data to the web. With the advent of small, embedded Linux-based systems,
time has certainly come for better solutions than the dated WeatherLink software.
    As the serial protocol employed by the VP2P weather station is thoroughly docu-
mented by Davis Instruments Corp.2 and the connector pinout has been documented
by unofficial sources, creating the missing link between the weather station and the in-
ternet is a rather easy task to accomplish — without using a ridiciously expensive data
logger unit. The Raspberry Pi has proven itself as an excellent hardware platform for
the weather observation system.

1.1 Disclaimer
The author assumes no responsibility for your use of information contained in this doc-
ument. Experiment at your own risk. The author does not represent Davis Instruments
Corp. or the Raspberry Pi foundation. Likewise, the author does not have any com-
mercial interests in these organisations. All trademarks remain the property of their
respective holders, and are used only to identify the products mentioned. Their use in
no way indicates any affiliation between the author and the holders of the said trade-
marks.

1.2 Main goal
It is my hope that the WOSPi software will be useful and inspire others to experiment
with their VP2P and the Raspberry Pi. You can use the WOSPi software as a standalone
weather observation system or import the desired functions from the wospi module for
use with your own software projects. This PDF file along with the relevant Python
documentation strings provide all the information you need to get going and is also the
author’s own aide-mémoire. Have fun!

   1
     The WOSPi software may be used with a data logger unit, but it will probably be disastrous to
connect the RS-232 data logger directly to the GPIO (P1) header of the Raspberry Pi.
   2
     http://www.davisnet.com/support/weather/downloads/software_dllsdk.asp

http://meteo.annoyingdesigns.com                                                                 6
2 The first few steps
2.1 A word of warning — console firmware version 3.xx
The Davis Instruments line of weather stations, including the Vantage Pro2 (Plus) series,
comes with different firmware versions. It has come to public attention that Davis
Instruments Corp. upgraded their consoles at some time in late 2012. New consoles
are shipping with firmware versions 3.00, 3.12, 3.15 or later. These versions have a
severe drawback compared to earlier versions: they introduce no new functionality, they
address no reliability issues in the v. 1.90 firmware — but they prevent the end-user
from accessing the serial line at the rear extension connector of the console without
purchasing an expensive, original Davis Instruments data logger.
    It is a sad situation — Davis Instruments Corp. painting themselves into a corner
at the same time as the world is on a move towards open source and open data. Please
let Davis Instruments Corp. know what you think of their move to force users into
purchasing expensive data loggers in order to retrieve their very own weather data from
their very own consoles. Davis Instruments Corp. maintains a Facebook page and
they can also be reached by email to support@davisnet.com and telephone (800) 678–
3669. Firmware version 3.xx is nothing but a move to force end-users into purchasing
proprietary hardware solutions. There are no other reasons why Davis Instruments Corp.
would introduce the ”logger requirement” for users to access data from the weather
station consoles.
    Hopefully, Davis Instruments Corp. will listen to customer feedback and take note
of the problems they introduced in FW version 3.xx (including versions 3.00, 3.12 and
3.15). Until that happens, users have to deal with the situation themselves — one
solution can be found here: http://meteo.annoyingdesigns.com/DavisSPI.pdf (yes,
a ”free my console” modchip is available for US$ 25 or you can program one yourself).
    The WOSPi software has been successfully tested with FW version 3.12 on a model
#6312 console, mfg. code A111201xxxx and a chip-modified console running FW v.
3.00, mfg. code AA13020xxxx.

2.2 Weather station and ISS installation
Install the weather station according to the instructions provided. Please pay close
attention to setting the station time, UTC offset, automatic DST adjustment, altitude,
latitude and longitude correctly. The barometer reading should be verified against a
nearby airport with an up-to-date METAR. Rain season should be set to start on the
1st of January. Perform the Clear All command on the console after installing the
integrated sensor suite to clear collected weather data which may contain erroneous
readings after the installation. Refer to the console documentation for a description of
the proper procedure.

http://meteo.annoyingdesigns.com                                                        7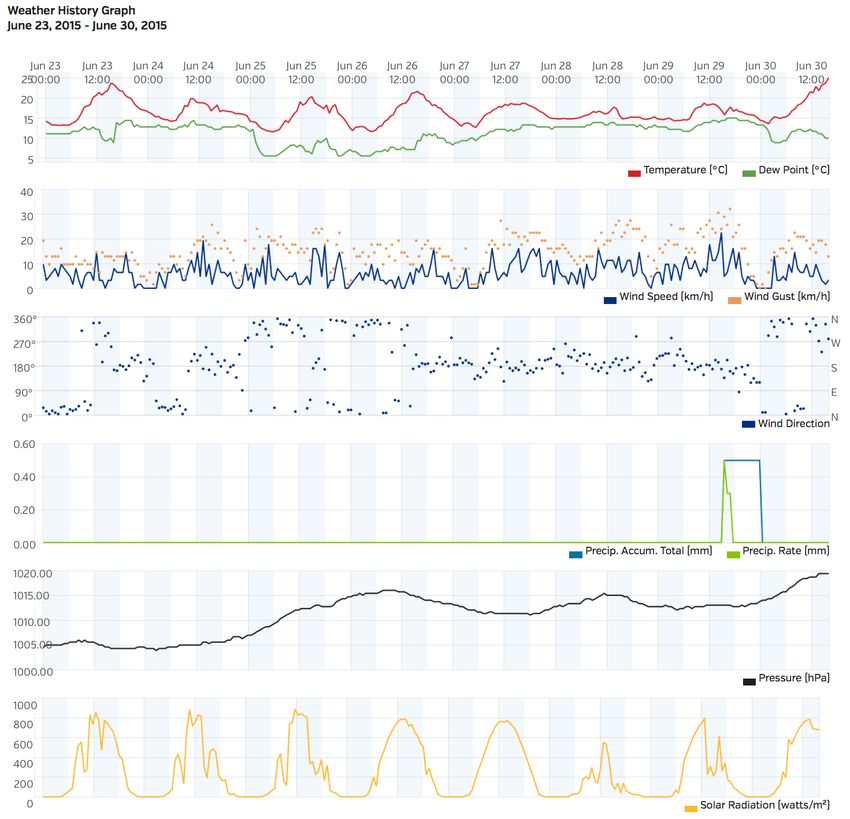
2.3 A brief quick-start guide
Please note that the WOSPi system is not ready to run out of the box. A little effort
is required to get the system up running — hopefully with the added benefit of learning
the basics of the Raspberry Pi.
    The suggested procedure for putting WOSPi to work is as follows:

    • Gather the required parts, refer to section 2.4 for suggestions.

    • Configure the Raspberry Pi as described in section 4.

    • Carefully wire the VP2P/VP2/Vue console to the Raspberry Pi as detailed in
      section 5.

    • Download and install WOSPi according to instructions provided in sections 8.4
      and 8.5.

    • If required, ask for help. Section 11 lists the URL of the WOSPi support forum
      hosted by Google Groups.

    This document contains numerous references to the VP2P console. WOSPi has been
successfully installed and used with VP2 and Vue consoles as well. The console rear-
panel connections remain identical but data recording capabilities differ between the
various console models and firmware versions.
    The WOSPi software was originally developed for the VP2P, FW versions 1.90,
3.00, 3.12 and 3.15. Using WOSPi with firmware versions prior to v. 1.90 may require
additional customisation.
    Users upgrading from an older version of the WOSPi software should refer to the
revision history (changelog.txt). Upgrades may require changes to the config.py
configuration file as well as other configuration files.

http://meteo.annoyingdesigns.com                                                      8
2.4 Shopping for parts
Company names, prices and part numbers referred to here are valid as of November,
2013.

Davis Vantage Pro2 (Plus) weather station The ”Plus” model includes solar and
    UV sensors, but if these are of little or no interest you can just as well start out
    with a less expensive model. The solar and UV sensors can be added later, if so
    desired. In the US, AmbientWeather (http://www.ambientweather.com) seems
    like a good place to start shopping for a weather station. With console FW version
    3.xx, be prepared to obtain a modchip in order to unlock the console serial line.

ATtiny85 modchip (OPTIONAL) A modchip is required to unlock the console se-
    rial line for new VP2/VP2P/Vue consoles shipped with firmware versions ≥ 3.00.
    Available from http://www.annoyingdesigns.com. Cost: US$ 25. Figure 1
    refers.

             Figure 1: The modchip which shouldn’t really have been necessary.

FT232RL breakout, 3.3V version (OPTIONAL) While not a required part, the
    FT232RL breakout from SparkFun Electronics (http://www.sparkfun.com) im-
    plements the USB 2.0 protocol and contains a USB to UART IC. This little break-
    out board lets you hook up the VP2P console to a PC via a USB port. Also a
    very useful part if you intend to update the console firmware. Do not use the 5V
    version. Part #BOB-00718. Cost: US$ 15. Figure 2 refers.

                   Figure 2: The SparkFun FT232RL breakout, 3.3V version.

PowerBASIC Console Compiler (OPTIONAL) While not a required software prod-
    uct, this tool (http://www.powerbasic.com) lets you experiment with console
    communication from your Windows XP/7/8 PC, and you can even write useful
    software. All without the trouble of writing/setting up a GUI. Cost: US$ 89–169.

http://meteo.annoyingdesigns.com                                                       9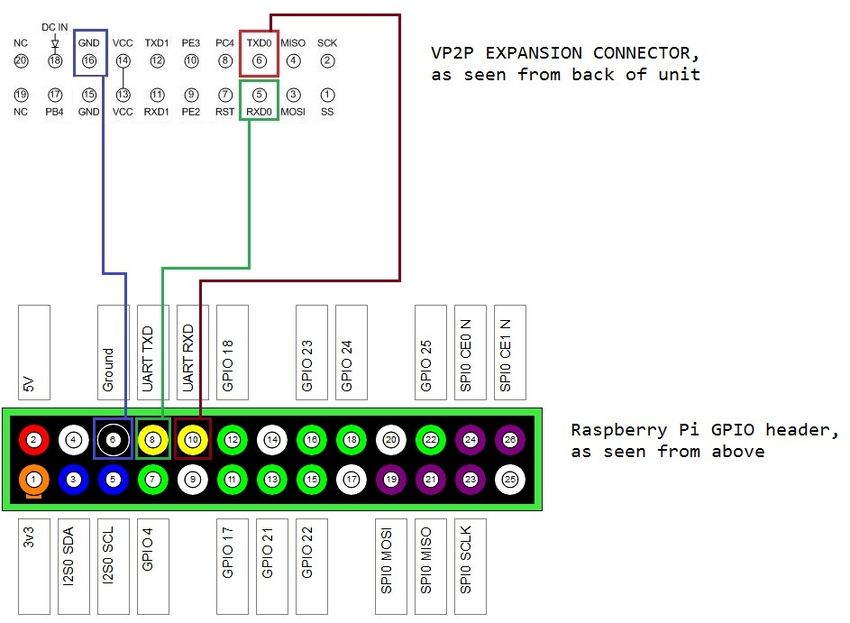
SD card The Raspberry Pi requires a SD card to store the operating system and other
    software. A 4 GB, class 4 SD card is sufficient, and you can easily prepare an ex-
    isting card using the procedure described on the Raspberry Pi website3 . Download
    and install the Wheezy/Raspbian image (build 2014-12-24 was used when prepar-
    ing this document). A fully prepared card is also available from Farnell/Newark
    and numerous other vendors. Newark part #96T7436. Farnell part #2113756.
    Cost: US$ 12.96.

Raspberry Pi It does not matter whether you use the A/B/A+/B+/2B model of
    the Raspberry Pi — just make sure it has a network connector. The Raspberry
    Pi is available from Farnell/Newark and numerous other vendors (http://www.
    farnell.com and http://www.newark.com). Cost: US$ 35. Figure 3 refers.

                                   Figure 3: Raspberry Pi, model B.

Male/female jumper wires These jumper wires are useful when connecting the VP2P
    console to the FT232RL breakout. You may as well throw in a pack of female/fe-
    male jumper wires which will come in handy when hooking up the VP2P console
    directly to the Raspberry Pi. SparkFun Electronis. Part #PRT-09140. Cost: US$
    3.95. Figure 4 refers.

3.5mm (or 6.35mm) stereo phono jacks Using these stereo phono jacks, you’ll get
    a handy connection between the VP2P console and the Raspberry Pi for the serial-
    line signals (TX, RX and GND). The jacks are available from any electronics store,
    as is the extension wire that goes ”in between”. Do not use mono plugs. Cost:
    dirt cheap. Figure 5 refers.

USB power supply A 5V micro-USB power supply capable of delivering at least 700
   mA is required to run the Raspberry Pi. Cost: not very expensive.
   3
       http://www.raspberrypi.org/quick-start-guide

http://meteo.annoyingdesigns.com                                                    10
Figure 4: Male/female jumper wires.
Figure 5: The 3.5mm stereo phono jacks — only the male version shown here.
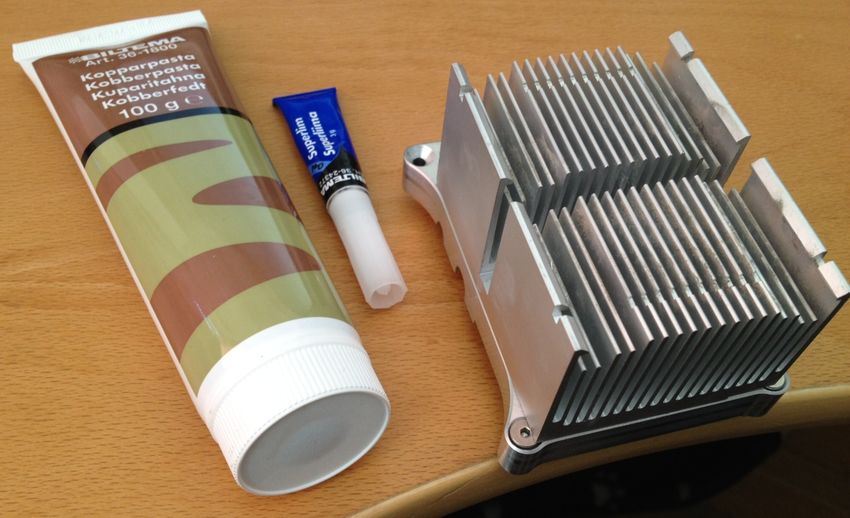
Pi Holder (OPTIONAL) Sooner or later, you’ll want a proper case for the Raspberry
Pi. While the Raspberry Pi does not generate a lot of heat, it does get warm.
Go for a proper aluminum case which allows the Raspberry Pi to run cool by
acting as an effective thermal heat sink. In a typcal office environment (room
temperature of 20◦ C), the aluminum case temperature will typically remain at
26–32◦ C. The Pi Holder is expensive but well worth it. Also refer to section 9.20.
(http://www.piholder.com). Cost: US$ 74.95.
Extension connector, 2mm/20-pos. After a minor modification, this part is ex-
tremely useful to ”elevate” the expansion connector at the rear of the console.
Use a sharp wire cutter to cut it just below the thin plastic spacer. It will then fit
perfectly between the console’s expansion connector and the receptable (see below).
Digi-Key Corp. (http://www.digi-key.com). Part #ESQT-110-02-G-D-760-ND.
Cost: US$ 6.28. Figure 6 refers.
USB memory stick/SD card/SD card reader The USB storage device will be used
to store weather observations — somewhat equivalent to the ”data logger” func-
tionality. The SD card containing the operating system and the WOSPi software
should not be used for this purpose.
http://meteo.annoyingdesigns.com 11Figure 6: Extension connector, 20mm/20-pos.
Connector, receptable, 2mm/20-pos. Farnell/Newark. Part #FCI-89947-720LF,
Farnell order code 2112423, Newark part #63K1291. Cost: US$ 2.03. Figure
7 refers.
Figure 7: Connector, receptable, 20mm/20-pos.
Ribbon cable, 20 cond. multi, 5’ Digi-Key Corp. Part #AE20B-5-ND. Cost: US$
8.65. Figure 8 refers.
Figure 8: Ribbon cable.
WiFi USB dongle (OPTIONAL) Pick a variant which is known to work with the
Raspberry Pi. Adafruit.com and SparkFun.com are both known to sell add-ons
which work well with the Raspberry Pi. Please note that a WiFi USB dongle
may significantly increase the power requirements of the Raspberry Pi. Cost: US$
10-15. Figure 9 refers.
Figure 9: WiFi USB dongle.
http://meteo.annoyingdesigns.com 123 Putting things together
3.1 Connecting the VP2P console to a PC — without a data logger
If you have no intention to experiment using a traditional personal computer, simply skip
this section and move on to section 4. Section 3.2 may still contain relevant information,
though.
Connecting the VP2P console to a PC is by no means required, but it will allow for
experimenting with console communications using familiar terminal emulation software
such as Realterm4 . This setup may also be used to update the console firmware. Also,
it will serve as an important first step in programatically decoding the contents of the
LOOP and LOOP2 data packages returned by the console. A few PowerBASIC source
code examples are included here, but this could just as well be implemented using any
other language supporting serial communications and decoding of binary data.
Using the SparkFun FT232RL breakout (3.3V version — do not use the 5V version),
the weather station can easily be interfaced to a PC running the Windows XP/Vista/7/8
operating system. Drivers are also available for MacOS X and Linux.
Figure 10: Wiring diagram between the VP2P console and the SparkFun FT232RL
breakout. The same wiring may also be utilized to update the console firmware. Based
on schematics by DeKay.
Wiring between the VP2P console and the SparkFun USB-to-serial converter requires
three wires:
• TXD0 from the VP2P console goes to RX on the FT232RL
• RXD0 from the VP2P console goes to TX on the FT232RL
• GND from the VP2P console goes to GND on the FT232RL
Using a terminal emulation program such as Realterm, you can now start commu-
nicating with the VP2P console. Please refer to the Serial Communication Reference
Manual, available from the Davis Instruments Corp. website for details.
4
http://realterm.sourceforge.net
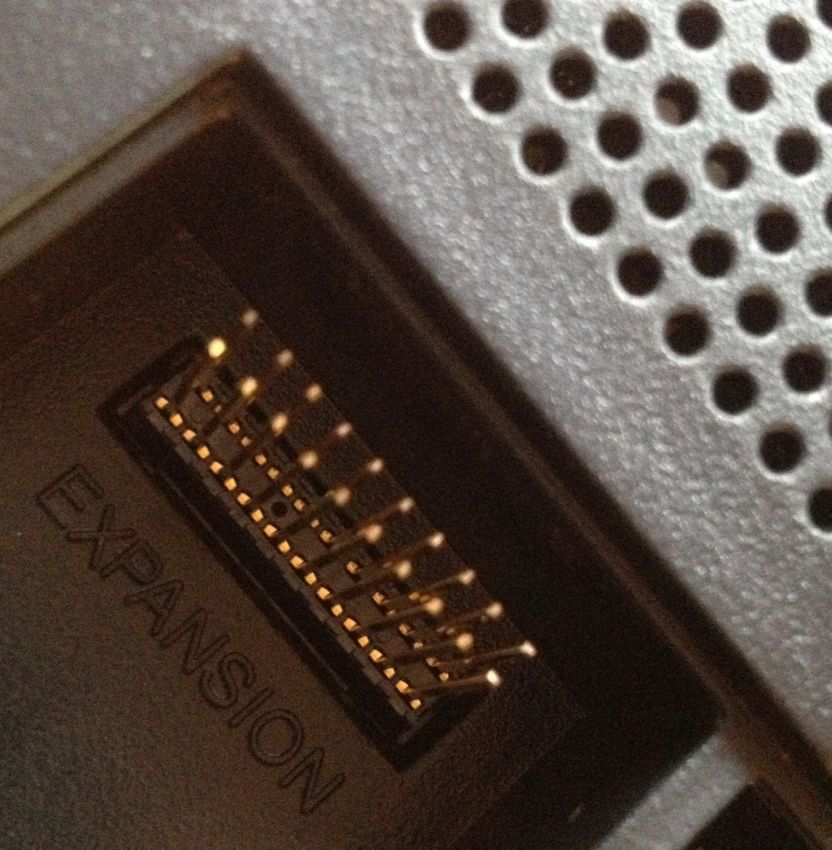
http://meteo.annoyingdesigns.com 133.2 Extending the console’s rear expansion connector
Accessing the rear expansion port requires a steady hand. For not-so-steady hands,
adding an extension connector as shown below will make the exercise a bit easier.
Figure 11: Preparing the extension connector.
Figure 12: ”Elevating” the rear expansion port makes it easier to work with. Don’t let
the pins get in close contact with each other.
http://meteo.annoyingdesigns.com 14The following communication parameters apply:
• 19,200 bps
• 8 data bits
• No parity
• 1 stop bit
• No flow control (XON/XOFF)
PC-side programming can be employed to gain a better knowledge and understanding
of the communication protocol. The PowerBASIC Console Compiler (PB/CC) contains
all required functions to facilitate further testing and/or write a complete weather data
retrieval/presentation system for the Win32 platform. Feel free to skip this section, as
it is by no means required for the Raspberry Pi implementation.
Allow the console some time to wake up and respond to commands. Experimenting
will reveal the required delays in program execution after issuing a command to the
console. Note that some commands require slightly longer time to execute on the console.
Listing 1: Complete PowerBASIC source code listing: sending the TEST command to
the console and reading the answer.
$COMPORT = " COM3 " ' refer to the Windows device manager for COM port number
% DELAY = 100 ' comm unicatio ns delay - 100 ms may not be the optimum value
% WKUPDELAY = 1200 ' wakeup delay - according to Davis documentation
DIM F AS LONG ' file number for COM port access
DIM Q AS LONG ' number of bytes waiting in RX queue
DIM S AS STRING ' text from RX queue
F = FREEFILE
COMM SET #F , BAUD = 19200
COMM SET #F , BYTE = 8
COMM SET #F , PARITY = 0
COMM SET #F , STOP = 1
COMM SET #F , XINPFLOW = 0
COMM SET #F , XOUTFLOW = 0
COMM OPEN $COMPORT AS # F CHR = ANSI
COMM RESET #F , FLOW
COMM SEND #F , CHR$ (10) + CHR$ (10) ' wake up the console with 2 x LF
SLEEP (% DELAY )
' check for console response to wakeup call
' if no response , SLEEP (% WKUPDELAY ) then perform up to two more
' wakeup calls - ref . Davis documentation
COMM SEND #F , " TEST " + CHR$ (10) ' send the TEST command + LF
SLEEP (% DELAY )
Q = COMM (# F , RXQUE )
COMM RECV #F , Q , S
PRINT S
CLOSE # F
CON . WAITKEY$
http://meteo.annoyingdesigns.com 15The LOOP and/or LPS commands are essential when it comes to retrieving weather
station data. Both the LOOP and the LOOP2 packages each consist of 100 bytes, made
up of binary-encoded data provided by the console.
PowerBASIC functions CVWRD (double-byte/word values) and CVBYT (byte values)
are essential for decoding the contents of the LOOP and LOOP2 packages.
Listing 2: Incomplete PowerBASIC source code example reading the barometric trend
field from the LOOP package using the CVBYT function.
S$ = COMM_SEND (# F , " LOOP 1 " + CHR$ (10) )
IF LEN ( S$ ) 100 THEN
PRINT " ERROR : ONLY " + STR$ ( LEN ( S$ ) ) + " BYTES RECEIVED FROM THE CONSOLE . "
BEEP
ELSE
PRINT " RECEIVED 100 BYTES FROM THE CONSOLE . CRC NOT VERIFIED . "
LOCAL Q AS LONG
LOCAL BAROTREND AS BYTE
Q = INSTR ( S$ , " LOO " )
BAROTREND = CVBYT ( S$ , Q +3) ' barometric trend byte is at offset 3
PRINT " BAROMETER TREND : " ;
SELECT CASE BAROTREND
CASE -60: PRINT " falling rapidly "
CASE -20: PRINT " falling slowly "
CASE 0: PRINT " steady "
CASE 20: PRINT " rising slowly "
CASE 60: PRINT " rising rapidly "
CASE 196: PRINT " falling rapidly "
CASE 236: PRINT " falling slowly "
CASE ELSE : PRINT " Rev . A or 3 hr BARO DATA not available . "
END SELECT
END IF
Listing 3: Incomplete PowerBASIC source code example reading the barometric pressure
(inHg units) field from the LOOP package using the CVWRD function. A conversion to
hPa/mb is also shown.
' Assuming that S$ still contains the LOOP package from the previous
' code listing and that Q contains the INSTR result from the same listing .
LOCAL BARO AS DOUBLE
BARO = CVWRD ( S$ , Q +7) / 1000 ' barometric pressure word is at offset 7
PRINT " BAROMETER : " + STR$ ( BARO ) + " inHg "
PRINT " BAROMETER : " + FORMAT$ (33.8639 * BARO , 5) + " hPa ( mb ) "
http://meteo.annoyingdesigns.com 16You may want to carry out a few experiments using the below commands which
should yield easy-to-understand results. Note that the HILOWS, LOOP and LOOP2
packets are binary-encoded — as such, on-screen output will look like a string of random
characters/garbage prefixed by the ”LOO” characters. All commands should be issued
in UPPERCASE LETTERS only. You may want to turn on local echo in the terminal
emulation program. The console first needs a few LF characters to wake up, and all
commands must be terminated with a single LF or CR — not both.
• LAMPS 1 — LCD background illumination ON.
• LAMPS 0 — LCD background illumination OFF.
• LOOP 1 — retrieve one LOOP packet.
• LPS 1 1 — retrieve one LOOP packet, requires console FW version ≥ 1.90.
• LPS 2 1 — retrieve one LOOP2 packet, requires console FW version ≥ 1.90.
• VER — retrieve console firmware date.
• NVER — retrieve console firmware version.
• BARDATA — retrieve barometric calibration data.
• STRMON and STRMOFF — refer to documentation and various web resources.
The Serial Communication Reference Manual as provided by Davis Instruments
Corp. provides further details on the protocol employed by the console. Sooner or
later you will encounter unreasonable readings, communication delays and CRC errors.
Make sure that your code is able to handle these exceptions in a reasonable way. It
is highly recommended to implement the CCITT-16 CRC routine to verify that data
returned by the console is indeed correctly transmitted/received.
When sending data to the console (such as when setting the console date/time based
on the correct time obtained from an NTP server), a valid CRC checksum is required
by the console. Section 6.6 describes a Python-based implementation of the CCITT-16
CRC algorithm.
http://meteo.annoyingdesigns.com 174 Configuring the Raspberry Pi
Copying the Wheezy/Raspbian image onto a SD card is covered in the Quick start guide
on the Raspberry Pi website (keyword for Win32 users: Win32DiskImager 5 ). A working
SD card with the Wheezy/Raspbian Linux distribution is assumed from here on.
The default password for the pi user is raspberry. The default password for the root
user is not known. Section 4.7 describes how to set/change the root password.
Proceed by plugging the Raspberry Pi into your router, allowing it to acquire an
IP address via DHCP — or configure the WLAN adapter as detailed in section 4.5. A
static IP address may be configured later.
4.1 The raspi-config tool
When first logging in to the Raspberry Pi, you’ll be greeted by the raspi-config tool.
You can move around using the arrow keys and the TAB key. Activate your choice by
hitting the ENTER key. The raspi-config tool can be started at any time by issuing the
sudo raspi-config command (leave out the sudo part if you are logged in as root).
The following options should be configured:
• Internationalisation options
– Keyboard layout — set according to your desired keyboard layout.
– Locale information — preferably an option containing ”UTF-8”.
– Your timezone.
• Advanced options
– Enable the SSH server6 .
• Do not start the desktop (GUI) on boot.
• Update the package list.
• Do not expand the file system to fill the entire SD card.
For practical reasons, do not expand the file system to fill the entire SD card. Refer
to section 9.14.4 for further details.
5
http://sourceforge.net/projects/win32diskimager/
6
You may want to download the free PuTTY SSH client to remotely log in to the Raspberry Pi:
http://www.chiark.greenend.org.uk/~sgtatham/putty/download.html contains what you need
http://meteo.annoyingdesigns.com 184.2 Updating and installing software packages
First update the locally stored APT7 package index by running sudo apt-get update
(if not already performed by the raspi-config tool) and also upgrading the software
packages by running sudo apt-get upgrade. It’s also a good idea to run sudo apt-get
dist-upgrade. Then install the following packages by running sudo apt-get install
followed by the package name (some of these packages may already have been installed):
• mingetty
• screen
• htop
• python-dateutil
• emacs8
• ftp
• gnuplot
• minicom9
• nmap — not required, but useful to have around.
• zip — not required, but useful to have around.
• ssmtp — not required, but useful for sending email (section 9.12 refers).
• mutt — not required, but useful for sending email and may be used for backup
purposes as detailed in section 9.12.
7
Advanced Packaging Tool — simplifies the process of managing software on Unix-like computer
systems by automating the retrieval, configuration and installation of software packages, either from
binary files or by compiling source code.
8
Some users will probably prefer other editors. Pick your choice. Emacs is referred to throughout this
document, but please use whatever suits your preferences. Windows Notepad is not an option, though.
9
Inside minicom, your best friend will be the Ctrl-A keyboard command.
http://meteo.annoyingdesigns.com 194.3 Manually specifying keyboard layout and locale info
All options can be configured using the raspi-config tool and there is really no reason why
you should change these settings manually. Still, by running the below commands —
prefix each command with sudo if you are not logged in as the root user — the essential
settings can also be adjusted manually. You may need the console-data package — in
that case, follow the general install procedure detailed in section 4.2.
a) emacs /etc/default/keyboard — set keyboard layout according to your prefer-
ences.
b) setupcon — select Norwegian/UTF-8, US/UTF-8 or any other setting — with a
strong preference for the UTF-8 variants.
c) dpkg-reconfigure tzdata
d) dpkg-reconfigure locales
At this point it is suitable to restart the Raspberry Pi, using the shutdown -r now
command.
4.4 Assigning a static IP address to the Raspberry Pi — ethernet
NOTE: this step can now be performed using the raspi-config tool.
While this step is not required, it makes life a bit easier when you want to log in to
your Raspberry Pi via a network connection. Again, prefix each command with sudo if
you are not logged in as the root user.
a) Start by running cp /etc/network/interfaces /etc/network/interfaces.old
— to make a backup copy of the cp /etc/network/interfaces file.
b) Then run cp /etc/resolv.conf /etc/resolv.old — to make a backup copy of
the /etc/resolv.conf file.
c) emacs /etc/network/interfaces — edit as below:
auto lo
iface lo inet loopback
iface eth0 inet static
address 10.0.0.100
netmask 255.255.255.0
network 10.0.0.0
broadcast 10.0.0.255
gateway 10.0.0.1
iface default inet dhcp
http://meteo.annoyingdesigns.com 20...assuming the that you want to assign the fixed IP address 10.0.0.100 to your
Raspberry Pi and that the router/gateway can be found at IP address 10.0.0.1.
Other settings may apply in your network.
d) emacs /etc/resolv.conf — edit as below:
domain MyDomain
search MyDomain
nameserver 10.0.0.1
Provided that your router/gateway at IP address 10.0.0.1 also works as a name
server. This may or may not apply in your network. Replace MyDomain with
your local domain name/search list for hostname lookups.
Restart the Raspberry Pi to apply the new network settings. If you are unfamiliar
with network settings in general, it may be better to leave the Raspberry Pi to obtain
a DHCP address. Experimenting will reveal what works in your network. If you apply
settings which render the Raspberry Pi without a network connection, you can always
log in directly from a locally attached console10 and change these settings back to their
original values.
4.5 Assigning a static IP address to the Raspberry Pi — WLAN
NOTE: an easier configuration option is now provided by the WiFi Config tool
found in the GUI (type startx to launch the GUI).
For WLAN setup, follow the step-by-step instructions as provided in section 4.4, but
edit the /etc/network/interfaces as follows:
auto lo
iface lo inet loopback
iface eth0 inet dhcp
auto wlan0
iface wlan0 inet manual
wpa-roam /etc/wpa_supplicant/wpa_supplicant.conf
iface default inet static
address 10.0.0.100
netmask 255.255.255.0
network 10.0.0.0
broadcast 10.0.0.255
gateway 10.0.0.1
10
Here referring to a keyboard and a monitor.
http://meteo.annoyingdesigns.com 21The /etc/network/wpa supplicant/wpa supplicant.conf file should be updated
with your network-specific settings (replace your SSID and your PSK as appropriate).
This example will work with with old-style WPA-secured WLAN networks:
ctrl_interface=DIR=/var/run/wpa_supplicant GROUP=netdev
update_config=1
network={
ssid="your_SSID"
psk="your_PSK"
proto=RSN
key_mgmt=WPA-PSK
pairwise=CCMP TKIP
group=CCMP TKIP
}
This example will work with WPA2/Personal-secured WLAN networks (AES):
network={
ssid="your_SSID"
psk="your_PSK"
proto=RSN
key_mgmt=WPA-PSK
pairwise=CCMP
auth_alg=OPEN
}
There are numerous online guides detailing various WLAN setup options for the
Raspberry Pi. The above listings have proved to work, even though they may produce
three ioctl error messages when bringing up the interface. As it seems, these error
messages can be safely ignored.
http://meteo.annoyingdesigns.com 224.6 Setting a proper host name
Typically, you’ll want to set a nice host name (such as ”wx”) for the Raspberry Pi.
Again, prefix these commands with sudo if you are not logged in as the root user.
a) emacs /etc/hostname — this file should only contain the actual host name.
b) emacs /etc/hosts — add 127.0.0.1 MyNewHostName where MyNewHostname is
the host name you specified in the /etc/hostname file above. Other ”shorthand”
host names may also be specified here.
c) shutdown -r now — to restart the system.
4.7 Adding/modifying user accounts
You can change the root password by logging in as the pi user and then running the sudo
passwd root command. Your WOSPi system, when fully configured, will typically have
three active user accounts:
root for system setup and system maintenance requiring superuser privileges.
wospi the user account associated with the WOSPi software. The wospi account re-
quires access to the system’s ttyAMA0 device (UART/serial port).
wx the user account which will automatically be logged in on tty6 for output of updated
weather data to a locally attached display (if present).
The passwd command can be used to change password(s). Passwords for the root
and wospi user accounts should be changed at regular intervals.
4.7.1 Adding the wospi and wx user accounts
The wospi user account will be the account running the WOSPi software. Log in as
root, then run the following commands:
a) adduser wospi — adding new user wospi.
b) adduser wx — adding new user wx 11 .
c) usermod -a -G dialout wospi — adding the wospi user to the dialout group.
d) visudo — add the wospi user to the /etc/sudoers file, allowing the wospi user
to run sudo. Simply change the old entry for the pi user, replacing pi with wospi
before saving the file.
NOTE: for group affiliation changes to take effect, the wospi user will have to log
out and then log in again. Use the groups command to check which group(s) a user
belongs to.
11
Not really required, but if omitted — also skip the instructions provided in sections 4.13 and 4.14.
http://meteo.annoyingdesigns.com 234.7.2 Deleting the pi user account
The pi user account serves no purpose in the WOSPi system and should be deleted.
Log in as root, then run the following command:
a) deluser pi --remove-home
4.8 Setting up a Python-based FTP server
A Python-based FTP server is not required, but it will allow for easy and convenient file
transfers between the Raspberry Pi and your desktop/laptop PC — highly recommended
for backup purposes. The FTP server will only be running when explicitly invoked by
the user.
The latest version of pyftpdlib can be found at https://github.com/giampaolo/
pyftpdlib/archive/master.zip. As of December 2014, the current version number is
1.4.0. Here assuming Python version 2.7.x installed on the Raspberry Pi (default on the
SD card image available from the Raspberry Pi website). Issue the following commands:
a) cd ~
b) wget https://github.com/giampaolo/pyftpdlib/archive/master.zip
c) gunzip master.zip
d) sudo mv pyftpdlib-master/pyftpdlib /usr/lib/python2.7/pyftpdlib
e) rm -Rf pyftpdlib-master
f) rm master.zip
g) Finally log in as the wospi user and create a Python program in the wospi home
folder containing the FTP server program. A typical implementation is shown
below (save the file as ftpServer.py).
Listing 4: A Python-based FTP server using the pyftpdlib module.
from pyftpdlib . authorizers import DummyAuthorizer
from pyftpdlib . handlers import FTPHandler
from pyftpdlib . servers import FTPServer
authorizer = DummyAuthorizer ()
authorizer . add_user ( " Name " , " Password " , " Path " , perm = " elradfmw " )
handler = FTPHandler
handler . authorizer = authorizer
server = FTPServer (( " " , 21) , handler )
server . serve_forever ()
Replace Name, Password and Path with suitable values as appropriate (wospi, topSe-
cret and /home/wospi could be typical values). Please DO NOT use topSecret as pass-
word — it is shown here as an example only. Also, for security reasons, the password
should not be the same as the login password for the wospi user account.
Whenever FTP access to the system is required, simply start the FTP server by
running sudo python ftpServer.py. Hit Ctrl-C to quit the FTP server program when
it is no longer needed.
http://meteo.annoyingdesigns.com 244.9 Editing the system login message
The system login message is defined in the /etc/motd file. Running emacs /etc/motd
as root allows you to edit the file. A sample file is shown below.
- WOSPi -
- a Weather Observation System for the Raspberry Pi -
- by Torkel M. Jodalen -- tmj@bitwrap.no -
- -
- http://meteo.annoyingdesigns.com -
- -
- Running on hostname 'wx' with static IP 10.0.0.100. -
4.10 Auto-mounting USB-attached storage devices
In order to reduce the number of write operations to the SD card containing the operating
system and the WOSPi software, a USB memory stick or other kind of external storage
device should be utilized for periodically storing weather data. A USB-connected hard
drive could also be used, but would significantly increase the power consumption of the
Raspberry Pi unless powered from an external power source. The standard WOSPi
system will store all weather parameters every ten minutes. Editing the fstab file
requires root privileges.
a) mkdir /media/sd — this will be the access path of the device.
b) cd /etc
c) cp fstab fstab.backup — creates a backup copy of the fstab file.
d) ls -l /dev/disk/by-uuid — take note of the UUID belonging to the new device.
e) emacs /etc/fstab — add the following line:
UUID=xxx /media/sd vfat defaults,auto,noatime,uid=1000 0 0
...where xxx will represent the actual UUID from (d) above. The uid (user ID)
parameter should match the numeric user ID for the wospi user (shown as 1000,
as an example), as listed in the /etc/passwd file (to list the contents of the file,
run the cat /etc/passwd command).
f) mount -a — attempt auto-mount of the newly defined device entry.
g) ls -l /media/sd — should list any existing files and folders on the ”new” device.
http://meteo.annoyingdesigns.com 254.11 Setting file system properties
The SD card containing the operating system and the WOSPi software should be op-
timized for running 24/7 by reducing the number of write operations to the card. The
following procedure is suggested:
a) sudo dphys-swapfile swapoff — to disable the swap file.
b) Mount the SD card read-only (sudo mount -r device directory) on a differ-
ent Raspberry Pi (or on any modern Linux system). Then disable ext4 jour-
naling by running sudo tune2fs -O ^has journal /dev/sdb2 — assuming that
the SD card is mounted read-only on /dev/sdb2. Then unmount (sudo umount
/dev/sdb2) the SD card and re-insert it into the Raspberry Pi.
c) Back on the Raspberry Pi, modify the fstab file with the noatime parameter for
the ext4 file system — preventing updates to the ”access time” whenever files are
accessed: sudo emacs /etc/fstab. Also, make sure that /var/tmp, /tmp and
/var/log are modified as follows:
tmpfs /var/tmp tmpfs nodev,nosuid,noatime,size=50M 0 0
tmpfs /tmp tmpfs defaults,noatime,nosuid 0 0
tmpfs /var/log tmpfs defaults,noatime,nosuid 0 0
proc /proc proc defaults 0 0
/dev/mmcblk0p1 /boot vfat defaults 0 0
/dev/mmcblk0p2 / ext4 noatime,discard,errors=remount-ro 0 0
UUID=xxx /media/sd vfat defaults,auto,noatime,uid=1000 0 0
The UUID=xxx refers to the UUID of the USB device as described in section
4.10. Replace xxx with an appropriate UUID reference. The uid parameter should
match the user ID of the wospi user — refer to section 4.10 for details.
d) sudo /etc/init.d/rsyslog stop — stop the rsyslog service.
e) sudo rm -Rf /tmp/* — remove everything from the /tmp folder.
f) sudo rm -Rf /var/log/* — remove everything from the /var/log folder.
g) sudo rm /var/tmp/* — remove everything from the /var/tmp folder.
h) sudo mount -a — auto-mount attached devices.
i) sudo /etc/init.d/rsyslog start — restart the rsyslog service.
http://meteo.annoyingdesigns.com 264.12 Disabling kernel serial line output and serial line login
NOTE: this step can now be performed using the raspi-config tool.
By default, the system will output kernel status messages to the serial line (at
ttyAMA0 ). Also, a getty login prompt is normally available on the serial line. As
the serial line will be used for communications with the VP2P console, no other in-
put/output should take place here. Edit the /boot/cmdline.txt and /etc/inittab
files as follows:
a) sudo emacs /boot/cmdline.txt — the file should look like this:
dwc_otg.lpm_enable=0 console=tty1 root=/dev/mmcblk0p2
rootfstype=ext4 elevator=deadline rootwait
NOTE: for layout reasons, a line break was inserted above. The actual cmdline.txt
file should be without this line break.
b) sudo emacs /etc/inittab — change:
T0:23:respawn:/sbin/getty -L ttyAMA0 115200 vt100
...into...
#T0:23:respawn:/sbin/getty -L ttyAMA0 115200 vt100
(Yes, the only change is a comment mark (#) added in front of the original line).
c) To save some time, also refer to section 4.14 now. If you proceed with section 4.14,
do not restart the Raspberry Pi until section 4.13 is also completed.
Restart the Raspberry Pi for the new settings to take effect.
http://meteo.annoyingdesigns.com 274.13 The wxview.sh shell script
The wxview.sh shell script will be the default shell for the wx user, providing weather
data output on tty6, accessible by pressing Alt-F6 on a locally attached keyboard. This
file is not included in the wospi distribution archive.
a) Log in as the wx user and store the this script as /home/wx/wxview.sh by running
emacs /home/wx/wxview.sh :
# display weather data output on tty6 (ref. inittab)
# user 'wx' will have the default shell set to this script
# sed removes HTML formatting and special &xxx; characters
#!/bin/bash
clear
echo 'Weather data will appear here shortly. Please be patient.'
while :
do
if [ -f /var/tmp/wxdata.txt ]
then
tail -f -n 50 /var/tmp/wxdata.txt |
sed -e 's/&/and/g;s/]*>//g;s/&[^;]*;/ /g'
fi
sleep 1
done
NOTE: for layout reasons, a line break was inserted above, causing ”sed -e
(...)” to appear on a line by itself. The actual wxview.sh file should be without
this line break. The apostrophe character above (') is ASCII character no. 39. Be
careful to type in the script exactly as shown above.
b) The wxview.sh shell script should be made executable by running the chmod 700
wxview.sh command.
Entering the contents of the wxview.sh file by hand is not recommended. Con-
sider ”copy and paste” instead. Most errors are likely to result in the init: id (x)
respawning too fast error message, effectively denying login for the wx user.
http://meteo.annoyingdesigns.com 284.14 Adding auto-login and changing the default shell for the wx user
The wx user account will provide continous weather data output on tty6. Edit /etc/init-
tab and also change the default shell for the wx user:
a) sudo emacs /etc/inittab — change:
6:23:respawn:/sbin/getty 38400 tty6
...into...
T:23:respawn:/sbin/mingetty --autologin=wx tty6
b) sudo chsh -s /home/wx/wxview.sh wx — change the defaut shell for the wx
user.
c) sudo shutdown -r now for a system restart.
4.15 Setting up RSA keypairs for ”passwordless” SCP
The SCP command will normally ask for a password for the remote system. Your system
can be set up to allow for ”passwordless” SCP file transfers. Replace myUserName,
myServer and myHomePath with appropriate values for your system/web hotel.
a) Log in as the wospi user.
b) ssh-keygen — Save the keys in the default location. Do not use a passphrase.
c) cd ~/.ssh
d) scp id rsa.pub myUserName@myServer:myHomePath/.ssh/authorized keys212 .
You should be asked for your password to the remote system.
e) ssh-agent sh -c "ssh-add < /dev/null && bash"
f) echo test > t.txt — for testing.
g) scp t.txt myUserName@myServer:/myHomePath — for testing. You should not
be asked for a password. The file should be copied to the specified server/path.
h) rm t.txt — clean up.
i) Hit Ctrl-D.
NOTE: step (d) above will overwrite any existing authorized keys2 file on the
remote system. Appending the file may be a better idea, especially if other units or
users also require ”passwordless” SCP/SSH access to the same user account at the
remote system. The command-line concatenation symbol (>>) is a handy tool.
12
Some systems (incl. MacOS X) use authorized keys instead of authorized keys2.
http://meteo.annoyingdesigns.com 294.16 Enabling auto-run of the wospi.pyc program
In order for the WOSPi software to restart after a power failure or an intentional system
reboot, the /etc/rc.local file should be altered slightly:
a) At this stage the wospi user has to be a member of the dialout group, as described
in section 4.7.1.
b) sudo emacs /etc/rc.local — add the following line before the line containing
exit 0 :
su - wospi -c
'screen -m -d -S wxscreen /usr/bin/python /home/wospi/wospi.pyc'
NOTE: for layout reasons, a line break was inserted above. The actual rc.local file
should be without this line break. The apostrophe character above (') is ASCII character
no. 39.
4.17 Verifying screen output
As output from the WOSPi software is ”encapsulated” by the screen utility, it cannot
be examined without re-attaching to the screen session. Log in as the wospi user, then
issue the following command(s):
a) screen -R wxscreen — to bring up the last output from the wospi.pyc program.
Depending on conditions, it may take up to 30 seconds until any output appears.
Don’t worry if you notice an error message or two — they occur periodically.
b) To exit screen and leave the wospi.pyc program running, hit Ctrl-A, d to detach
from the present screen session. The wospi.pyc program will keep running in the
background.
c) To exit the wospi.pyc program, hit Ctrl-A, k instead.
The screen utility supports a number of useful command-line options and arguments.
To list active screen sessions, simply issue the screen -ls command.
4.18 Logging screen output to a file
A log file containing output captured by the screen utility can be created by editing the
.screenrc file located in the home folder of the wospi user. If the file does not already
exist, simply create it using a text editor. This can be a useful tool for debugging your
WOSPi installation — but will normally not be required. To conserve memory usage,
consider deleting the accumulated log file from time to time.
logfile /var/log/screen-%S-%n.log
deflog on
http://meteo.annoyingdesigns.com 305 Wiring the Raspberry Pi to the console
Byrne’s Law: In any electrical circuit, appliances and wiring will burn
out to protect the fuses. – Robert Byrne
5.1 General information
Wiring between the VP2P console and the Raspberry Pi requires three wires (the TXD13 ,
RXD14 and GND15 signals). Anything transmitted from the VP2P console should be
received by the Raspberry Pi. Likewise, anything transmitted from the Raspberry Pi
should be received by the VP2P console — explaining the ”crossing” of the TXD and
RXD lines. Both units share the same signal ground reference (GND).
5.2 Now you’re warned (again)
You are proceeding entirely at your own risk. Rest assured, though — no VP2P console,
no BeagleBone and no Raspberry Pi was hurt during the development of the WOSPi
software.
• Be extremely careful not to short any wires/connections.
• Always connect/disconnect the wires without an external DC power supply
connected and without batteries inserted in the VP2P console unit.
• Power down the Raspberry Pi and disconnect its power supply before making
the connections to the VP2P console.
• Double-check all connections before powering up the devices again.
When attaching the 2mm/20-pos. extension connector to the ribbon cable, make
sure to use a vise in order to apply an even pressure to the connector. Using a tool
which does not apply an even pressure is guaranteed to break the connector.
Using standard 3.5mm (or equally standard 6.35mm) stereo phono connectors as
”interface connectors” between the VP2P console and the Raspberry Pi adds a bit of
flexibility — you can easily mount the VP2P console and the Raspberry Pi at slightly
different locations. Temporarily disconnecting the units is performed in a matter of
seconds. The stereo phono connector has three connection points, perfectly suited for
the TXD, RXD and GND signals. A cable length of up to 3m has been tested without
signs of any problems.
13
Transmit Data
14
Receive Data
15
Ground
http://meteo.annoyingdesigns.com 31Figure 13: Wiring diagram between the VP2P console and the Raspberry Pi GPIO (P1) header. Based on schematics by DeKay. The GPIO headers differ somewhat between the A/B (26 pin) and the A+/B+/2B (40 pin) versions of the Raspberry Pi. Figure 14: The Raspberry Pi with the female 3.5mm stereo phono connector attached. http://meteo.annoyingdesigns.com 32
Figure 15: The VP2P console with the female 3.5mm stereo phono connector attached,
connected to the Raspberry Pi via an off-the-shelves 3.5mm stereo phono jack cable.

http://meteo.annoyingdesigns.com                                                 33
6 Sample Python code
Sample Python v. 2.7.x code is provided here, to facilitate your experiments with the
Raspberry Pi, Python and the VP2P/VP2/Vue console. WOSPi ’s data extraction is
based on the techniques shown here.

6.1 Using the serial module
First disable all other use of the /dev/ttyAMA0 device, as described in section 4.12.

Listing 5: Python source code example, showing basic use of the serial module. Please
refer to the module documentation for full details, including how to read data from the
serial line.
 import serial

 WXPORT          =   '/ dev / ttyAMA0 '
 WXBAUDRATE      =   19200
 WXBYTESIZE      =   serial . EIGHTBITS
 WXPARITY        =   serial . PARITY_NONE
 WXSTOPBITS      =   serial . STOPBITS_ONE
 WXXONOFF        =   False
 WXTIMEOUT       =   3

 w = serial . Serial ( WXPORT , WXBAUDRATE , WXBYTESIZE , WXPARITY , WXSTOPBITS , WXTIMEOUT , WXXONOFF )

 # perform the console wakeup calls here , ref . Davis documentation

 w . write ( ' TEST \ n ')

6.2 Using the struct module
The struct module contains the unpack from function which can be used to decode
the binary-encoded data contained in the LOOP and LOOP2 data packages. The pack
function can be used to encode data going to the VP2P console.
    Please refer to the Serial Communication Reference Manual, available from the Davis
Instruments Corp. website for details on the data formats used by the VP2P console.

      Listing 6: Python source code example, showing basic use of the struct module.
 import struct

 #   Read LOOP and / or LOOP2 packet from the VP2P console , store
 #   the returned result in string s - and go ahead decoding the
 #   binary - encoded values using the struct . unpack_from function
 #   as shown below .

 wxDict [ ' BAROTREND '] = struct . unpack_from ( 'B ' , s , 1) [0]
 wxDict [ ' BAROMETER_INHG '] = round ( struct . unpack_from ( 'H ' , s , 5) [0] / 1000.0 , 2)

http://meteo.annoyingdesigns.com                                                                           34
6.3 WOSPi’s wxDict and wxMinMax dictionaries
The wxDict dictionary will contain the essential values returned by the VP2P console
using the LOOP and LOOP216 packet formats, provided the data packet CRC checksum
is valid. Some additional key-value-pairs are also included. The wxDict dictionary is
updated twice a minute.
The wxMinMax dictionary will contain the essential min/max values returned by the
VP2P console using the HILOWS packets. It is updated at the interval specified in the
WOSPi configuration file.
Listing 7: Python source code example, showing basic use of the wxDict dictionary.
import wospi
wospi . insertTestData () # OR perform actual console readout
print wospi . wxDict # prints the entire dictionary
print wospi . wxDict [ ' BAROMETER_HPA ']
print wospi . wxMinMax # prints the entire dictionary
6.4 The getRawData function
The getRawData function allows users to extract values from received LOOP 1, LOOP 2
and HILOWS data packets. The function will return the requested value from the last
data packet received with a valid checksum. LOOP packets are retrieved twice a minute
and HILOWS packets are retrieved at 10-minute intervals17 . The Serial Communication
Reference Manual contains descriptions of the data packet format, including offset and
data size for each variable.
Listing 8: Python source code example, showing use of the getRawData function.
import wospi
wospi . wx = wospi . openWxComm ()
wospi . readWxData () # read LOOP / LOOP2 packet ( s ) , as determined by the LPS setting in config . py
wospi . hiLows () # read HILOWS packet
# Note : the wxDict and wxMinMax dictionaries are now populated .
# " print wxDict " and / or " print wxMinMax " will display the corresponding dictionary contents .
print wospi . getRawData (1 , 9 , 'H ') # LOOP packet , offset 9 , WORD value = inside temperature
print wospi . getRawData (2 , 43 , 'B ') # LOOP2 packet , offset 43 , BYTE value = UV index
print wospi . getRawData (1 , 18 , 'B ') # LOOP packet , offset 18 , BYTE value = Extra temperature sensor
# Note : extra temperature is offset by 90 degrees F - ref . Davis documentation
print wospi . getRawData (1 , 62 , 'B ') # LOOP packet , offset 62 , BYTE value = Soil moisture #1 in centibars
The getRawData function is intended for users who need to extract the less common
values from the data packets. Most users will probably be happy to retrieve the values
from the provided dictionaries instead.
16
LOOP2 packets are retrieved only if supported and LPS=True is set in the configuration file.
17
Unless the interval has been changed in the configuration file.
http://meteo.annoyingdesigns.com 35You can also read