Tempo User Guide - Tempo User Guide - April 2019 - Telestream
←
→
Page content transcription
If your browser does not render page correctly, please read the page content below
Tempo User Guide

             Tempo User Guide

April 2019                       274329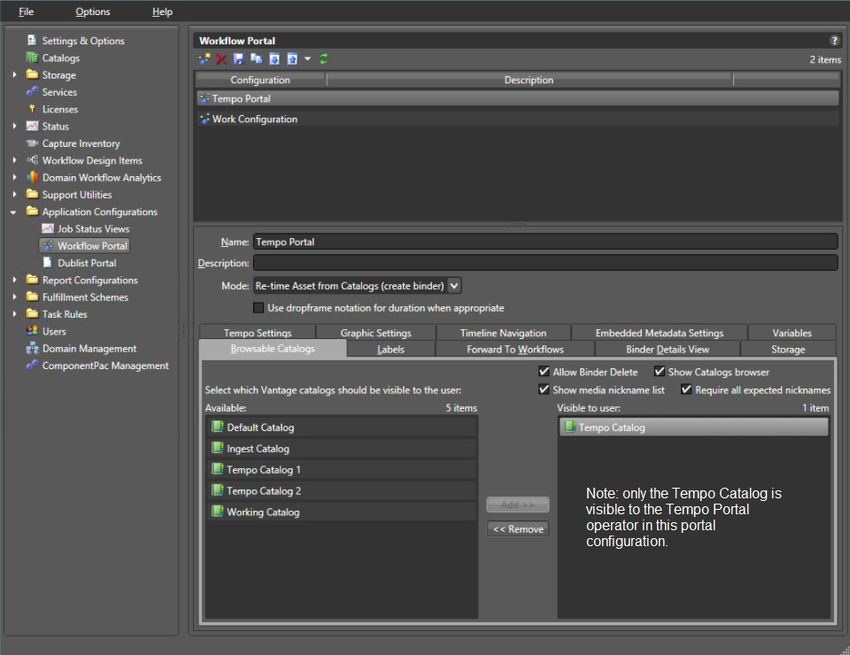
2
    Copyrights and Trademark Notices

    Copyrights and Trademark Notices
                       Copyright © 2019 Telestream, LLC. All rights reserved worldwide. No part of this
                       publication may be reproduced, transmitted, transcribed, altered, or translated into any
                       languages without the written permission of Telestream. Information and
                       specifications in this document are subject to change without notice and do not
                       represent a commitment on the part of Telestream.
                       Telestream. Telestream, CaptionMaker, Episode, Flip4Mac, FlipFactory, Flip Player,
                       Gameshow, GraphicsFactory, Lightspeed, MetaFlip, Post Producer, ScreenFlow, Split-
                       and-Stitch, Switch, Tempo, TrafficManager, Vantage, VOD Producer and Wirecast, are
                       registered trademarks and Cricket, e-Captioning, iQ, iVMS, iVMS ASM, Inspector,
                       MacCaption, Pipeline, Vantage Cloud Port, Vidchecker, and Surveyor are trademarks of
                       Telestream, LLC. All other trademarks are the property of their respective owners.
                       Adobe. Adobe® HTTP Dynamic Streaming Copyright © 2014 Adobe Systems. All rights reserved.
                       Apple. QuickTime, MacOS X, and Safari are trademarks of Apple, Inc. Bonjour, the Bonjour
                       logo, and the Bonjour symbol are trademarks of Apple, Inc.
                       Avid. Portions of this product Copyright 2012 Avid Technology, Inc.
                       BlackArrow. BlackArrow is a trademark of BlackArrow, Inc.
                       Canoe. Canoe is a registered trademark of Canoe Ventures, LLC.
                       Dolby. Dolby and the double-D symbol are registered trademarks of Dolby Laboratories.
                       Fraunhofer IIS and Thomson Multimedia. MPEG Layer-3 audio coding technology
                       licensed from Fraunhofer IIS and Thomson Multimedia.
                       Google. VP6 and VP8 Copyright Google Inc. 2014 All rights Reserved.
                       MainConcept. MainConcept is a registered trademark of MainConcept LLC and
                       MainConcept AG. Copyright 2004 MainConcept Multimedia Technologies.
                       Manzanita. Manzanita is a registered trademark of Manzanita Systems, Inc.
                       MCW. HEVC Decoding software licensed from MCW.
                       MediaInfo. Copyright © 2002-2013 MediaArea.net SARL. All rights reserved.
                       THIS SOFTWARE IS PROVIDED BY THE COPYRIGHT HOLDERS AND CONTRIBUTORS “AS
                       IS” AND ANY EXPRESS OR IMPLIED WARRANTIES, INCLUDING, BUT NOT LIMITED TO, THE
                       IMPLIED WARRANTIES OF MERCHANTABILITY AND FITNESS FOR A PARTICULAR
                       PURPOSE ARE DISCLAIMED. IN NO EVENT SHALL THE COPYRIGHT HOLDER OR
                       CONTRIBUTORS BE LIABLE FOR ANY DIRECT, INDIRECT, INCIDENTAL, SPECIAL,
                       EXEMPLARY, OR CONSEQUENTIAL DAMAGES (INCLUDING, BUT NOT LIMITED TO,
                       PROCUREMENT OF SUBSTITUTE GOODS OR SERVICES; LOSS OF USE, DATA, OR PROFITS;
                       OR BUSINESS INTERRUPTION) HOWEVER CAUSED AND ON ANY THEORY OF LIABILITY,
                       WHETHER IN CONTRACT, STRICT LIABILITY, OR TORT (INCLUDING NEGLIGENCE OR
                       OTHERWISE) ARISING IN ANY WAY OUT OF THE USE OF THIS SOFTWARE, EVEN IF
                       ADVISED OF THE POSSIBILITY OF SUCH DAMAGE.
                       Microsoft. Microsoft, Windows NT|2000|XP|XP Professional|Server 2003|Server 2008
                       |Server 2012, Windows 7, Windows 8, Media Player, Media Encoder, .Net, Internet
                       Explorer, SQL Server 2005|2008|Server 2012, and Windows Media Technologies are
                       trademarks of Microsoft Corporation.

                                                                                                      Tempo Guide
3
                                                                              Copyrights and Trademark Notices

              SharpSSH2. SharpSSH2 Copyright (c) 2008, Ryan Faircloth. All rights reserved.
              Redistribution and use in source and binary forms, with or without modification, are
              permitted provided that the following conditions are met:
              Redistributions of source code must retain the above copyright notice, this list of
              conditions and the following disclaimer.
              Redistributions in binary form must reproduce the above copyright notice, this list of
              conditions and the following disclaimer in the documentation and/or other materials
              provided with the distribution.
              Neither the name of Diversified Sales and Service, Inc. nor the names of its contributors
              may be used to endorse or promote products derived from this software without
              specific prior written permission.
              THIS SOFTWARE IS PROVIDED BY THE COPYRIGHT HOLDERS AND CONTRIBUTORS “AS
              IS” AND ANY EXPRESS OR IMPLIED WARRANTIES, INCLUDING, BUT NOT LIMITED TO, THE
              IMPLIED WARRANTIES OF MERCHANTABILITY AND FITNESS FOR A PARTICULAR
              PURPOSE ARE DISCLAIMED. IN NO EVENT SHALL THE COPYRIGHT OWNER OR
              CONTRIBUTORS BE LIABLE FOR ANY DIRECT, INDIRECT, INCIDENTAL, SPECIAL,
              EXEMPLARY, OR CONSEQUENTIAL DAMAGES (INCLUDING, BUT NOT LIMITED TO,
              PROCUREMENT OF SUBSTITUTE GOODS OR SERVICES; LOSS OF USE, DATA, OR PROFITS;
              OR BUSINESS INTERRUPTION) HOWEVER CAUSED AND ON ANY THEORY OF LIABILITY,
              WHETHER IN CONTRACT, STRICT LIABILITY, OR TORT (INCLUDING NEGLIGENCE OR
              OTHERWISE) ARISING IN ANY WAY OUT OF THE USE OF THIS SOFTWARE, EVEN IF
              ADVISED OF THE POSSIBILITY OF SUCH DAMAGE.
              Telerik. RadControls for ASP.NET AJAX copyright Telerik All rights reserved.
              VoiceAge. This product is manufactured by Telestream under license from VoiceAge
              Corporation.
              x264 LLC. The product is manufactured by Telestream under license from x264 LLC.
              Xceed. The Software is Copyright ©1994-2012 Xceed Software Inc., all rights reserved.
              ZLIB. Copyright (C) 1995-2013 Jean-loup Gailly and Mark Adler.
              Other brands, product names, and company names are trademarks of their respective
              holders, and are used for identification purpose only.

Tempo Guide
4
    Copyrights and Trademark Notices

    MPEG Disclaimers
    MPEGLA MPEG2 Patent
                       ANY USE OF THIS PRODUCT IN ANY MANNER OTHER THAN PERSONAL USE THAT
                       COMPLIES WITH THE MPEG-2 STANDARD FOR ENCODING VIDEO INFORMATION FOR
                       PACKAGED MEDIA IS EXPRESSLY PROHIBITED WITHOUT A LICENSE UNDER APPLICABLE
                       PATENTS IN THE MPEG-2 PATENT PORTFOLIO, WHICH LICENSE IS AVAILABLE FROM
                       MPEG LA, LLC, 4600 S. Ulster Street, Suite 400, Denver, Colorado 80237 U.S.A.

    MPEGLA MPEG4 VISUAL
                       THIS PRODUCT IS LICENSED UNDER THE MPEG-4 VISUAL PATENT PORTFOLIO LICENSE
                       FOR THE PERSONAL AND NON-COMMERCIAL USE OF A CONSUMER FOR (i) ENCODING
                       VIDEO IN COMPLIANCE WITH THE MPEG-4 VISUAL STANDARD (“MPEG-4 VIDEO”) AND/
                       OR (ii) DECODING MPEG-4 VIDEO THAT WAS ENCODED BY A CONSUMER ENGAGED IN A
                       PERSONAL AND NON-COMMERCIAL ACTIVITY AND/OR WAS OBTAINED FROM A VIDEO
                       PROVIDER LICENSE IS GRANTED OR SHALL BE IMPLIED FOR ANY OTHER USE.
                       ADDITIONAL INFORMATION INCLUDING THAT RELATING TO PROMOTIONAL, INTERNAL
                       AND COMMERCIAL USES AND LICENSING MAY BE OBTAINED FROM MPEG LA, LLC. SEE
                       HTTP://WWW.MPEGLA.COM.

    MPEGLA AVC
                       THIS PRODUCT IS LICENSED UNDER THE AVC PATENT PORTFOLIO LICENSE FOR THE
                       PERSONAL USE OF A CONSUMER OR OTHER USES IN WHICH IT DOES NOT RECEIVE
                       REMUNERATION TO (i) ENCODE VIDEO IN COMPLIANCE WITH THE AVC STANDARD
                       (“AVC VIDEO”) AND/OR (ii) DECODE AVC VIDEO THAT WAS ENCODED BY A CONSUMER
                       ENGAGED IN A PERSONAL ACTIVITY AND/OR WAS OBTAINED FROM A VIDEO PROVIDER
                       LICENSED TO PROVIDE AVC VIDEO. NO LICENSE IS GRANTED OR SHALL BE IMPLIED FOR
                       ANY OTHER USE. ADDITIONAL INFORMATION MAY BE OBTAINED FROM MPEG LA, L.L.C.
                       SEE HTTP://WWW.MPEGLA.COM.

    MPEG4 SYSTEMS
                       THIS PRODUCT IS LICENSED UNDER THE MPEG-4 SYSTEMS PATENT PORTFOLIO LICENSE
                       FOR ENCODING IN COMPLIANCE WITH THE MPEG-4 SYSTEMS STANDARD, EXCEPT THAT
                       AN ADDITIONAL LICENSE AND PAYMENT OF ROYALTIES ARE NECESSARY FOR
                       ENCODING IN CONNECTION WITH (i) DATA STORED OR REPLICATED IN PHYSICAL MEDIA
                       WHICH IS PAID FOR ON A TITLE BY TITLE BASIS AND/OR (ii) DATA WHICH IS PAID FOR ON
                       A TITLE BY TITLE BASIS AND IS TRANSMITTED TO AN END USER FOR PERMANENT
                       STORAGE AND/OR USE. SUCH ADDITIONAL LICENSE MAY BE OBTAINED FROM MPEG LA,
                       LLC. SEE HTTP://WWW.MPEGLA.COM FOR ADDITIONAL DETAILS.

                                                                                               Tempo Guide
5
                                                                               Copyrights and Trademark Notices

Limited Warranty and Disclaimers
              Telestream, LLC (the Company) warrants to the original registered end user that the
              product will perform as stated below for a period of one (1) year from the date of
              shipment from factory:
              Hardware and Media—The Product hardware components, if any, including equipment
              supplied but not manufactured by the Company but NOT including any third party
              equipment that has been substituted by the Distributor for such equipment (the
              “Hardware”), will be free from defects in materials and workmanship under normal
              operating conditions and use.

Warranty Remedies
              Your sole remedies under this limited warranty are as follows:
              Hardware and Media—The Company will either repair or replace (at its option) any
              defective Hardware component or part, or Software Media, with new or like new
              Hardware components or Software Media. Components may not be necessarily the
              same, but will be of equivalent operation and quality.

Software Updates
              Except as may be provided in a separate agreement between Telestream and You, if
              any, Telestream is under no obligation to maintain or support the Software and
              Telestream has no obligation to furnish you with any further assistance, technical
              support, documentation, software, update, upgrades, or information of any nature or
              kind.

Restrictions and Conditions of Limited Warranty
              This Limited Warranty will be void and of no force and effect if (i) Product Hardware or
              Software Media, or any part thereof, is damaged due to abuse, misuse, alteration,
              neglect, or shipping, or as a result of service or modification by a party other than the
              Company, or (ii) Software is modified without the written consent of the Company.

Limitations of Warranties
              THE EXPRESS WARRANTIES SET FORTH IN THIS AGREEMENT ARE IN LIEU OF ALL OTHER
              WARRANTIES, EXPRESS OR IMPLIED, INCLUDING, WITHOUT LIMITATION, ANY
              WARRANTIES OF MERCHANTABILITY OR FITNESS FOR A PARTICULAR PURPOSE. No oral
              or written information or advice given by the Company, its distributors, dealers or
              agents, shall increase the scope of this Limited Warranty or create any new warranties.
              Geographical Limitation of Warranty—This limited warranty is valid only within the
              country in which the Product is purchased/licensed.

Tempo Guide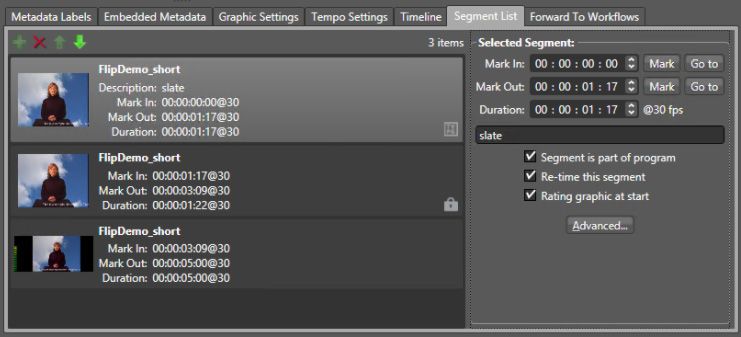
6
    Copyrights and Trademark Notices

                       Limitations on Remedies—YOUR EXCLUSIVE REMEDIES, AND THE ENTIRE LIABILITY OF
                       Telestream, LLC WITH RESPECT TO THE PRODUCT, SHALL BE AS STATED IN THIS LIMITED
                       WARRANTY. Your sole and exclusive remedy for any and all breaches of any Limited
                       Warranty by the Company shall be the recovery of reasonable damages which, in the
                       aggregate, shall not exceed the total amount of the combined license fee and purchase
                       price paid by you for the Product.

    Damages
                       Telestream, LLC SHALL NOT BE LIABLE TO YOU FOR ANY DAMAGES, INCLUDING ANY
                       LOST PROFITS, LOST SAVINGS, OR OTHER INCIDENTAL OR CONSEQUENTIAL DAMAGES
                       ARISING OUT OF YOUR USE OR INABILITY TO USE THE PRODUCT, OR THE BREACH OF
                       ANY EXPRESS OR IMPLIED WARRANTY, EVEN IF THE COMPANY HAS BEEN ADVISED OF
                       THE POSSIBILITY OF THOSE DAMAGES, OR ANY REMEDY PROVIDED FAILS OF ITS
                       ESSENTIAL PURPOSE.
                       Further information regarding this limited warranty may be obtained by writing:
                       Telestream
                       848 Gold Flat Road
                       Nevada City, CA 95959 USA
                       You can call Telestream, LLC. via telephone at (530) 470-1300.
                       Part number: 274329
                       Date: April 2019
                       Version: Vantage 8.0

                                                                                                   Tempo Guide
7

Contents

    Tempo User Guide                 1
    Copyrights and Trademark Notices 2

    Introduction to Tempo             9
    What Is Tempo? 10
    How Does Tempo Work?       11

    Configuring Tempo Resources                 15
    Installing Tempo 16
    Licensing Tempo 17
    Configuring Tempo in Vantage 18
             Adding Users 19
             Setting Passwords 20
             Removing Users 20
             Importing and Exporting Users 20
        Creating Catalogs 22
        Creating Tempo Portal Configurations 22
             Creating Two Pass Portal Configurations   36
        Deploy Portals on Client Machines 37

    Setting Up and Using Tempo                39
    Overview of Tempo Portal 40
    Tempo Quick Start 42
    Using Tempo Portal 50
        Using the Catalogs Panel 51
            Catalogs 51
        Using the Preview Player 52
        Viewing Metadata Labels 54
        Viewing and Updating Embedded Metadata         54
        Specifying Branding Graphics Files 56
        Applying Branding Graphics 56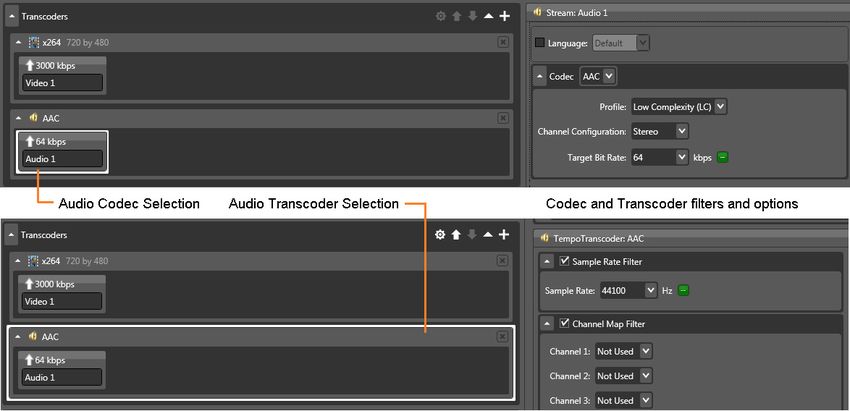
8   Contents

                  Specifying Tempo Settings 57
                  Setting Timeline Settings 59
                  Configuring the Segment List 60
                      Segment List Overview 60
                      Managing and Merging Segments 62
                      Applying Advanced Tempo Settings 63
                  Adjusting Total Re-timing 64
                  Forwarding to Workflows 65
                  Using the Two Pass Feature 66
               Tempo Portal Menus 68
                  Tempo Context Menu 70

               Tempo Workflows          71
               Ingest Workflow 72
                   Watch Action 73
                   Analyze Action 73
                   Two Flip Actions 74
                       Proxy Flip Action 74
                       Thumbnail Flip Action 74
                   Populate Action 74
                   Register Action 74
               Tempo Re-Timing Workflow 75
                   Receive Action 75
                   Populate Action 75
                   Tempo Action 75
                       Using Video Processors 77
                       Configuring Tempo Settings 78
                   Copy Action 83
               Tempo Two Pass Re-timing Workflows 84
                   Configuring a Catalog for Two Pass 85
                   Configuring Workflows for Two Pass 86
                       Tempo Ingest Workflow 87
                       Tempo Single Pass Workflow 88
                       Tempo Pass 1 Workflow 89
                       Tempo Pass 2 Workflow 90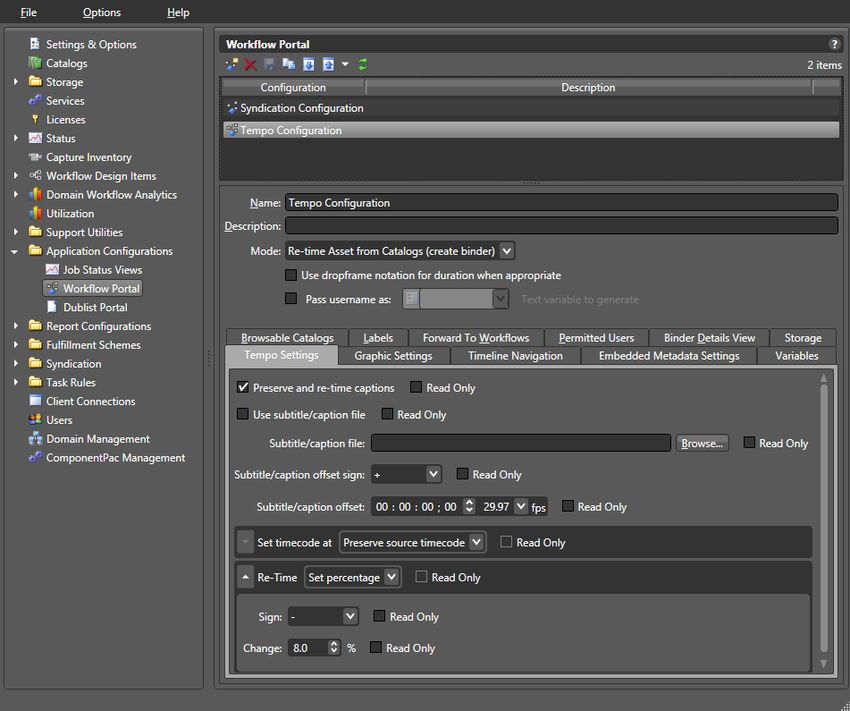
9
Introduction to Tempo
This guide provides an overview of Tempo. Use this guide to learn how to install and
configure Tempo and create Tempo ingest and publication workflows. You’ll also learn
how to use Tempo Portal to select and segment an asset and configure it for re-timing,
then submit it to a Tempo publication workflow for processing.
The guide includes these chapters:
Introduction to Tempo
Setting Up and Using Tempo
Configuring Tempo Resources
Tempo Workflows
What’s In This Chapter?
This Introduction chapter includes these topics:
What Is Tempo?
How Does Tempo Work?
Note: This guide is written for video professionals who are familiar with Vantage. To
use Tempo effectively, you should know how to create workflows and submit jobs in
Vantage, and you should be familiar with the basic operation of Workflow Portal. If you
aren’t familiar with Vantage, we suggest that you read the Vantage User Guide and
Vantage Domain Management Guide. If you aren’t familiar with Workflow Portal,
please read the Using Workflow Portal chapter in the Vantage User Guide.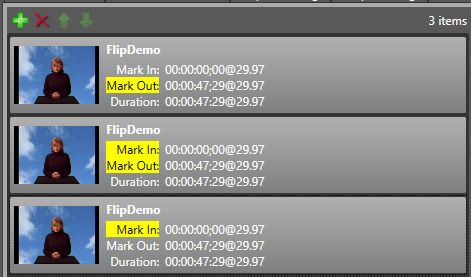
10   Introduction to Tempo
     What Is Tempo?

     What Is Tempo?
                      Vantage™ Tempo™ is a software solution designed specifically for re-timing video
                      assets—intelligently decreasing or increasing their running time.
                      Using sophisticated time compression algorithms, Tempo can re-time an entire asset or
                      specific segments you identify—to deliver superior quality and faster turn-around
                      times. Instead of throwing away frames as other technologies do, Tempo intelligently
                      interpolates the time change over the content duration, resulting in pristine output
                      with no noticeable visible or audible artifacts.
                      Tempo is implemented using the Telestream Media Framework in Vantage. Tempo
                      connects seamlessly to other Vantage or third-party systems to create a powerful
                      automated re-timing application—all under unified system control. Tempo can shorten
                      or lengthen an asset’s running time up to ten percent, without noticeable loss of video
                      or audio quality.
Introduction to Tempo 11
How Does Tempo Work?
How Does Tempo Work?
The following topics describe briefly how Tempo works. This information gives you the
background you need to understand Tempo workflows and to use the Tempo Portal.
Tempo Workflows
Tempo is an operator-intervention application. The simplest Tempo applications use
two media re-timing workflows: an ingest workflow, and a publication workflow.
The ingest workflow ingests source media, processes it to extract metadata as needed
for any Tempo processing requirements, produces a proxy file and a metadata label,
and registers all of these resources as a single binder in a Vantage catalog. The ingest
workflow can optionally analyze the source for black and slate/spot/color bars
segments, as well as scene changes, reducing operator effort by automatically creating
those segments.
For each source being re-timed, an operator uses Tempo Portal (described below) to
scrub the proxy and create or adjust segments, review and edit metadata, configure
how Tempo should process the asset, and forward it to a publishing workflow.
The publishing workflow ingests Tempo processing requirements specified by the
operator for this asset along with metadata, transcoding the source media into a
production-ready asset for VOD or broadcast.
Alternatively, the Tempo Two Pass feature allows you to process media in multiple
passes through two workflow stages to achieve very high quality re-timing results. The
first stage workflow identifies segments that may not respond well to re-timing. You
can then modify your processing choices for those segments and put the media
through the second stage publishing workflow. This produces the best possible quality
in the final output.
Tempo Portal
In Tempo Portal, an operator selects a binder of media to process, from a catalog of
assets that have been processed through the ingest workflow. The operator scrubs the
proxy and creates segments (optionally starting with automatically generated
segments) for re-timing; setting segment details and other re-timing options; reviews
and updates metadata and graphic settings.
As the operator works, behind the scenes a Composition file is created and updated to
capture each segment and its processing instructions. Then, the operator forwards the
asset and processing requirements (via the composition file) to a publishing workflow
for re-timing during production transcoding.12 Introduction to Tempo
How Does Tempo Work?
Video Processing Details
The Composition file auto-generated by Tempo Portal (or programmed externally)
describes the segmentation of the source program and specifies the re-timing
parameters to apply to each segment, along with all other required specifications.
When submitted to a Tempo workflow, the source asset file (also identified in the
Composition) is processed according to these specifications.
Video re-timing is performed by the Tempo action. In Workflow Designer, the Tempo
action is part of the Edit group; Tempo and all other Edit group actions are executed by
the Vantage Edit service. The Edit service is an optional, licensed feature of Vantage.
The Tempo action’s processing of a given source asset is guided by the Composition
that was submitted, along with the Tempo action settings. It transcodes the source
media from one format to another, re-timing the asset simultaneously, and supplies the
streams to the Output component.
During audio transcoding, various processing may be applied. Audio may be re-
sampled, or channels may be remapped. For video, filters can also be applied as it is
being transcoded. The Tempo action includes several common video and audio codecs
selected using the Transcoder menu.
The Output component you select in the Tempo action specifies the types of media
files that can be generated
Tempo begins the re-timing process by analyzing each frame or interpolated frame and
predicting which can be adjusted for time compensation. Then it applies the re-timing
over the duration of the content, or to the segments you identify for re-timing. Since
the entire file (or segment) is analyzed to determine the best candidate frames for
adjustment, the desired time compression is applied longitudinally rather than at
random intervals.
The source media file can include one video track and up to 32 audio tracks.
Timecode propagation is supported in TIFO and QuickTime containers, but not in
Program Stream or MP4 containers. If you plan to use the general purpose Flip action in
your workflow, the TIFO format is recommended.
Tempo also supports closed captioning, content advisory, Active Format Description,
and copy generation management (CGMS-A).
The re-timed output video file may be ready for distribution as is, or you can process it
with a Flip, Multiscreen, or IPTV VOD action for further transcoding and packaging into
another format prior to distribution. Supported audio and video input and output
formats are listed on the Tempo data sheet, available on the Telestream web site.
Note: Tempo can’t change the fundamental metrics of the video such as frame size or
frame rate. To do that, create an additional workflow (or transcoding action in the
same workflow) to convert the re-timed media to your final specifications.Introduction to Tempo 13
How Does Tempo Work?
How Segmentation Works
Tempo changes are applied to either the entire duration of an asset or to individual
segments within the asset, which you can specify. The asset is re-timed according to
your instructions to create the output file. By default the asset consists of a single
segment spanning the entire duration of the source. Optionally, black and slate/spot/
color bars segments may be generated automatically, via the segment analysis report.
Operators scrub the proxy, adding new segments and validating auto-generated ones.
Segmentation identifies sections of the file that are eligible or ineligible for changing
the tempo. A section may be considered ineligible if any of these criteria apply:
• A tempo change is not required (for example, bars, slate, etc.)
• A tempo change is not permissible (for example, barter spots).
• A tempo change would introduce unacceptable artifacts.
Segmentation allows the target file to contain a subset of the source file. This capability
allows a segment to be excluded (for example, to remove an existing commercial) or
inserted (such as to replace a texted shot with a textless version).
Segmentation also identifies which sections of the file contribute to the source
program duration. Tempo changes are then applied to each eligible segment in order
to achieve the target program duration. Re-timing target percentages can be specified
separately for specific segments and for the total file. This allows you to limit re-timing
on sensitive segments or apply greater re-timing to non-crucial segments.
The target program duration may be specified as either an absolute value (such as
00:30:00;00) or a value relative to the source duration (such as +/- 00:01:00).14 Introduction to Tempo
How Does Tempo Work?
Audio Processing
Tempo performs compression operations on audio with equivalent timing for the
video. Pitch correction, which is enabled by default, is applied using a special
synchronous technique that preserves the original sound pitch. You can turn off pitch
correction for an entire job or segment by segment.
Captions Processing
Caption data (608 and 708) is redistributed to maintain the original presentation times
without exceeding bandwidth limitations. Tempo also supports captioning in SCC and
STL files.
Video Format Support
Tempo supports many input and output formats and wrappers. For a list, consult the
Vantage Transcode encode and decode format sheets on the Telestream.net web site.15
Configuring Tempo
Resources
This chapter explains how to configure a Vantage domain to implement a Tempo-
based re-timing application. You will need to complete these configuration tasks
before Tempo is ready to use.
This chapter includes these topics:
Installing Tempo
Licensing Tempo
Configuring Tempo in Vantage
Adding Vantage Users
Creating Vantage Stores
Setting the Edit Service’s Session Limit
Creating Catalogs
Creating Tempo Portal Configurations
Deploy Portals on Client Machines
Note: This chapter guides you through creating and configuring the required
Vantage resources yourself. Alternatively, you can download an example set of Tempo
resources from the Telestream web site. All example workflows are on the Vantage
Download page under the Workflow Examples tab. Import them into your Vantage
domain using the Domain Management Console and customize them to meet your
requirements.16 Configuring Tempo Resources
Installing Tempo
Installing Tempo
Tempo is an option for Telestream Vantage that can run on Lightspeed servers or other
servers on which Vantage is installed. For best performance Telestream recommends
running Tempo on a Lightspeed K80 server.
To install Tempo on your own Vantage server, follow the steps below.
1. Choose a server that meets the minimum Vantage server specifications listed on
telestream.net.
2. Install Vantage according to the first four chapters of the Vantage Domain
Management/Installation Guide.
3. Install the latest Tempo ComponentPac from Telestream:
a. Download the latest Tempo package from Telestream at the following page:
http://www.telestream.net/telestream-support/tempo/support.htm.
b. Unzip and copy the ComponentPac file from the package to any local folder for
single-node domains or a shared folder (using a UNC path or SAN drive letter) for
Vantage arrays.
Vantage services must be given user permissions to access shared folders either
by adding a credential in the Management Console Authorization tab Settings &
Options and restarting the service, or by using services.msc to log onto the Van-
tage service as a specified user and restart the service.
c. In the Vantage Management Console left column, click ComponentPac
Management. Installed ComponentPacs display in the Installed ComponentPacs
list on the right.
d. Use the Browse button to set the ComponentPac Storage Location field to the
local or shared folder where you copied the Tempo ComponentPac previously.Configuring Tempo Resources 17
Licensing Tempo
e. Click the Install new packages button. The Install ComponentPacs window opens.
f. Enable the check box for the Tempo ComponentPac, and click Install.
When installation finishes, the Tempo package appears in the Installed Compo-
nentPacs list (as shown in the earlier screen shot).
g. Restart the Tempo service in Management Console Services.
Licensing Tempo
If you are adding the Tempo option to an existing Vantage system, obtain the Tempo
license from Telestream Sales at enterprisesales@telestream.net or phone 530-470-
1300, and install the license as explained below.
To install a Tempo license, follow these steps summarized from the Vantage Domain
Management Guide:
1. Place a copy of the license file in a location accessible to the Tempo Server.
2. Start the Vantage Management Console by double-clicking its desktop icon.
3. In the Vantage Management Console left panel, select Licenses.
4. In the right panel, click the Add License button to display the Add/Update License
dialog.
5. Navigate to the license location, select the license, and click Open.
If this computer has an Internet connection, Vantage prompts you to accept the
license agreement. If an error message appears, see Troubleshooting License Installa-
tion Problems in the Vantage Domain Management Guide to activate the license
without an Internet connection.
6. Click I Accept... if you agree to the license terms, and click OK.
7. Read the Licensing Changed dialog and click OK. This completes license
installation.
8. Next, in the Vantage Management Console, click Services in the left column.
9. Select all services that are in Maintenance mode for which you have a license (Ctrl-
or Shift-click to select multiples).
10. Select the Exit button (in the tool bar) to exit Maintenance mode for the selected
services. All licensed services should now be in the green (Online) state, and the
Vantage Tempo feature should be enabled.18 Configuring Tempo Resources
Configuring Tempo in Vantage
Configuring Tempo in Vantage
Configuring a Tempo system is essentially a subset of the tasks required to set up a
Vantage domain generally, including creating stores, catalogs, Tempo Portal
configurations, workflows, and deploying the Vantage Workflow Portal program on
client computers.
If you are familiar with these tasks, you may be able to skip the detailed steps presented
below and simply skim each topic for any special details before performing the task. If
you are not familiar with these tasks, detailed steps are provided to guide you.
The following topics describe the required configuration tasks:
Ensuring Maximum Server Performance
Adding Vantage Users
Enable Open Workflows
Creating Vantage Stores
Setting the Edit Service’s Session Limit
Creating Catalogs
Creating Tempo Portal Configurations
Deploy Portals on Client Machines
Ensuring Maximum Server Performance
To ensure maximum server performance, set the Control Panel Power Options to High
Performance with Sleep disabled:
1. Navigate to Start > Control Panel > Power Options.
2. Select the High Performance plan.
3. Set Sleep mode to Never (never sleep).
4. Select Change advanced power settings, and set all critical functions so that they are
always ON (this usually means setting them to Never turn OFF).
Also disable any real-time processes that may interfere with performance, such as virus
scanning of media files as they are being captured, automatic real-time software
updates, and real-time file indexing.Configuring Tempo Resources 19
Configuring Tempo in Vantage
Adding Vantage Users
Note: Adding users is optional, depending on whether your Vantage domain has
User Administration enabled. You can you use Tempo without enabling User
Administration—skip this topic if that is the case.
Before anyone can use a Vantage Tempo system with User Administration enabled, you
must add them as users in the Vantage Management Console. You can create users
directly in Vantage or you can also select Use Windows Active Directory for Users to allow
logging in using Windows accounts.
For details on creating users in Vantage, see the Vantage Domain Management Guide.
Figure 1. Users Detail Panel
Adding Users
The procedure to add users differs slightly depending on whether you use Windows
Active Directory or not.
Adding Users Without Windows Active Directory
To add a new user without using Windows Active Directory, follow these steps:
1. Click the New User button or right-click and select New User.
2. Enter the username and password (and confirm the password) in the dialog box.
3. Check the Administrator check box if you want the new user to be an administrator.
4. Click OK to add the user, and then click Save to save your changes.20 Configuring Tempo Resources
Configuring Tempo in Vantage
Adding Users With Windows Active Directory
The Vantage Active Directory feature allows you to create users and groups in Windows
Active Directory and add them as users with or without administrator privileges:
1. Click the New User button or right-click in the empty user list and select New User.
2. Enter part or all of the user name in the blank field and click Find Now to search for
and list users whose names match the text you entered.
The drop-down menu lets you select a filter for your search, and the Users and
Groups check boxes allow searching for users, groups, or both (default).
3. Select a user in the displayed list.
4. Check the Administrator check box if you want the new user to be an administrator.
5. Click Add to add the user, and then click Save to save your changes.
Setting Passwords
To set the password of a user, click the Set Password button (or right-click the user in
the list and click Set Password). When the dialog box displays, enter the password (and
confirm the password) of the user. Click OK to close the dialog box, then click the Save
button to save your changes.
Removing Users
Remove users by selecting the user in the Users list and clicking the Delete button at
the top of the User Management panel (or right-click the user and select Delete).
Importing and Exporting Users
User lists can be imported and exported. To import a list of users, click the Import
button , navigate to the XML file containing a list of users, and click the Open button.
To export a list of users, click the Export button (or right-click the list and select
Export), enter an XML filename for the list of users, and click the Save button.Configuring Tempo Resources 21
Configuring Tempo in Vantage
Enable Open Workflows
You may enable Open Workflows in Vantage when using the Tempo Two Pass feature to
help your workflows operate more quickly, but it is not required. In the Vantage
Management Console, access Settings & Options, General tab, and check the Enable
Open Workflows option. Also, enable Open Workflows at the top of the Workflow
Designer and in each action.
Creating Vantage Stores
Before you can begin configuring Tempo, you must have a fully-operational Vantage
domain with Vantage Stores (folders) for holding interim results of Vantage and Tempo
workflow processing. The stores are where Tempo will place temporary output media
and other files that it produces before you use other workflows to move them to their
final destination, such as a media or broadcast server.
If you have not already done so in the Vantage Domain Console, create Vantage stores
as needed (skip this topic if your stores are already configured). For additional details
about stores, See Managing Vantage Stores in the Vantage Domain Management Guide.
Setting the Edit Service’s Session Limit
The session limit for each Vantage service determines the maximum number of
concurrent sessions (actions that can execute) for a given service. This value is displayed
in the Vantage Management Console > Services > Session Limit column. The default Edit/
Tempo limit is 4 and the recommended limit is 2. To change the session limit:
1. Open the Vantage Management Console and display the Services panel.
2. Right-click the Edit service, and select Enter Maintenance Mode.
3. Select the Setup tab at the bottom of the window.
4. Click the Service Limits Configuration Item, and set the Session Limit to 2.
5. Click Apply.
6. Right-click the Edit service again, and select Exit Maintenance Mode.
Note: Changing the Edit service session limit affects all Edit actions, including, for
example, the number of Conform jobs you can run. Specify Run On rules to dedicate a
given Edit service to Tempo actions and avoid unnecessarily affecting other actions.22 Configuring Tempo Resources
Configuring Tempo in Vantage
Creating Catalogs
The starting point for organizing assets for re-timing is the catalog. Operators access
media in the Tempo Portal by browsing catalogs and then selecting a binder (media
files with metadata and variables) that has been ingested and pre-preprocessed and
registered in the catalog to re-time.
You need to create at least one catalog to hold binders generated from each asset
processed in a Tempo ingest workflow. For the Tempo Two Pass feature, it is convenient
to create a single Tempo catalog with two catalog folders: Pass 1 and Pass 2.
The Pass 1 catalog folder should be the target of the ingest workflow. The Pass 2 catalog
folder should be the target of the first pass Tempo workflow.
If you have not already done so, use the Vantage Domain Console to create Vantage
catalogs as needed (skip this topic if your stores are already configured). For additional
details about catalogs, See Managing Vantage Catalogs in the Vantage Domain
Management Guide.
Creating Tempo Portal Configurations
Before you can use Tempo, you will need to create a Workflow Portal configuration for
Tempo Portal and configure it to meet your application’s requirements.
Note: When an operators loads the Tempo Portal configuration into Workflow Portal
to use it for processing assets with Tempo, Workflow Portal is commonly referred to
simply as Tempo Portal, rather than the formal Workflow Portal Tempo Configuration.
Workflow Portal configurations are created, configured, and managed in the
Management Console. As you make configuration selections, you are customizing the
features, functionality, and user interface of Workflow Portal’s panels and labels.
All of the configuration options are grouped in tabs to make the task easier. Some tabs
as specific to Tempo Portal; others are general, and are present in many (or all)
Workflow Portal configuration types.
Note: After you’ve created a configuration, select it to modify its configuration. Or,
when you want to modify an existing configuration, select it and make the changes.
Always click the Save button to update the configuration.Configuring Tempo Resources 23
Configuring Tempo in Vantage
These Tempo Portal configuration topics are covered:
Creating a Workflow Portal Tempo Configuration
Configuring Tempo Settings
Specifying Access to Catalogs
Configuring the Binder Details View
Adding and Configuring Metadata Labels
Adding Rating Systems Variables
Configuring Graphic Settings
Configuring Embedded Metadata Settings
Specifying Workflow Submission
Configuring Storage Utilization
Setting Permitted Users
Managing Configurations
Creating Two Pass Portal Configurations24 Configuring Tempo Resources
Configuring Tempo in Vantage
Creating a Workflow Portal Tempo Configuration
To create a Workflow Portal configuration for Tempo Portal, follow these steps:
1. Start the Vantage Management Console and connect to your Vantage domain.
2. Select Application Configurations > Workflow Portal to display this panel:
3. Click the Create configuration button .
4. Update the following general settings per your requirements:
a. Name: Enter the name of the new configuration as appropriate.
b. Description: (Optional) enter a description of the new configuration as
appropriate.
c. Mode: Select Re-time Asset from Catalog (create binder) from the Mode drop-
down menu to create a Tempo Portal configuration.
d. Use Dropframe Notation: When checked, displays duration timecodes in
dropframe notation when in and out points are specified in dropframe notation.
e. Pass username as: When checked, allows you to set the username of the portal
operator as a variable that you can use in workflows. This can be helpful, for
example, to address a message to an operator based on the results of a workflow.
5. Click the Save button to save your new Tempo Portal configuration.Configuring Tempo Resources 25
Configuring Tempo in Vantage
Configuring Tempo Settings
The Tempo Settings tab allows you to specify standard settings to use for increasing or
decreasing media duration and handling subtitles and captions:
1. Select the Tempo Settings tab, as shown above.
2. Select the captions re-timing features to enable and controls to display in Tempo
Portal’s Tempo Settings tab.
Read Only: Each of these controls has a Read Only control, which you can check to
disallow changing the setting directly in Workflow Portal. When unchecked, the
setting is displayed in a read only view. Uncheck to allow Workflow Portal operators
to change the setting.
– Preserve and re-time captions: Selects whether to include and re-time
captions together with the re-timed media. Applies to embedded captions and
caption files.
– Use subtitle/caption file: Allows the operator to enter a path or browse and
select an SCC (.scc) or STL (.stl) caption/subtitle file for inclusion with the media
output. Telestream’s CaptionMaker software lets you create captions and save
them in SCC or STL files if you need an application to do that.
– Subtitle/caption file: When Use subtitle/caption file is enabled, the operator
must enter a path or browse and select an SCC or an STL caption/subtitle file
(with file extensions .scc or .stl) for inclusion with the media output.
– Subtitle/caption offset sign: Allows the operator to set the start time of
captions forward (+) for a later start or backward (-) for an earlier start relative to
the specified starting timecode in the SCC/STL or STL file. Use the Subtitle/caption
offset described below to set the amount of offset.
– Subtitle/caption offset: Sets the amount of start time adjustment to apply to
captions or subtitles relative to the start time specified in the caption or subtitle
file. Use the +/- sign described above to set caption start time earlier or later.
– Set timecode at: Determines where to start or end timecode in the re-timed
output. You can preserve existing source timecode, start timecode at the first26 Configuring Tempo Resources
Configuring Tempo in Vantage
frame or end it on the last frame of the program, or start it on the first frame or
end it on the last frame of the output file.
– Re-time: Determines what type of re-timing operation to perform:
– Set Total Duration: Re-time the asset to adjust the time to a total set amount,
specified in the Amount field.
– Set Percent: Re-time the asset to adjust the time up or down to a specified
percentage of the total, specified in Sign and Change fields.
– Increase Duration by: Re-time the asset to increase the time by a set amount,
specified in the Amount field.
– Decrease Duration by: Re-time the asset to reduce the time by a set amount,
specified in the Amount field.
When Set Total Duration | Increase Duration | Decrease Duration are selected, spec-
ify the amount of time to use. When Set Percent is selected, specify negative (-) or
positive (+) to decrease or increase the amount of time and supply the percent.
3. Click the Save button to save your changes.
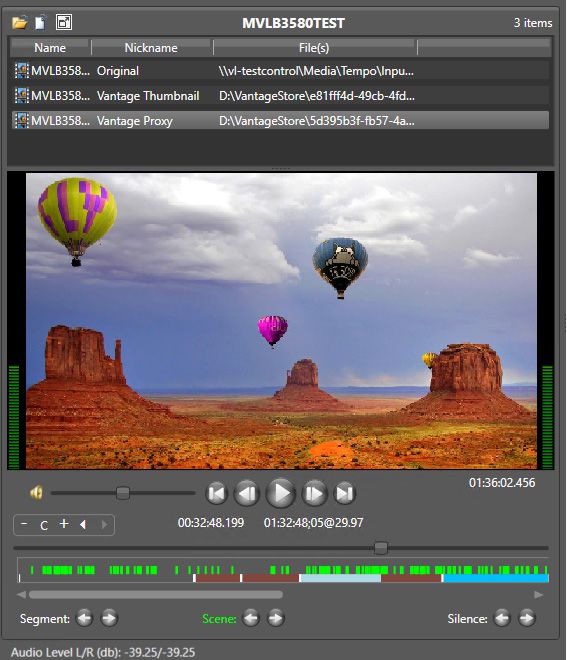
Specifying Access to Catalogs
Tempo allows you to specify which catalogs (and their binders) are accessible to Tempo
Portal operators:
1. Select the Browsable Catalogs tab (shown in the previous figure).
2. To make a catalog visible, select the catalog in the Available list in the left panel, and
click Add. This moves the catalog to the Visible to user list on the right.
3. To remove a catalog from the Visible to user list, select the catalog and click Remove.
4. Click the Save button to save your changes.
Only catalogs (and their binders) in the Visible to user list on the right can be seen by
Tempo Portal users.Configuring Tempo Resources 27
Configuring Tempo in Vantage
Selecting the Show Media Nicknames List Option
The media list displays the media files for a binder that you select. For example, the
media list includes the original media submitted to a workflow and the output media
from that workflow. Typically, it will also display the proxy file. When the media list is
visible, operators can play the media or view the contents of the folder that contains
the media.
To display the media list, check the Show media nickname list check box in the
Browsable Catalogs panel.
Click the Save button to save your changes.
Selecting the Require All Expected Nicknames Option
For Tempo configurations, you typically check Require All Expected Nicknames. The
publishing workflow’s required nicknames identify each resource associated with an
asset that is required for processing. These resources must be present in the binder.
Otherwise, the Receive action will fail, and so will the workflow.
Click the Save button to save your changes.
Enabling and Disabling Binder Deletions
By checking the Allow Binder Delete check box, you are allowing operators to remove
binders from the catalog after they’ve been process and submitted, leaving only
binders that have not yet been processed. This effectively makes the catalog a
manually-managed drop-box that operators can control at their discretion.
If you prefer to save binders and do not want operators to delete them, uncheck the
Allow Binder Delete check box.
Note: Binder deletion is also controlled by expiration times defined in the workflow
Register action or catalog configuration.
Click the Save button to save your changes.
For more information about how binders are handled, see Understanding Binders in the
Vantage Domain Management Guide.28 Configuring Tempo Resources
Configuring Tempo in Vantage
Configuring the Binder Details View
Vantage allows you to control the columns and metadata label parameters displayed in
the binder list by making selections in the Binder Details View panel, as shown here:
1. Select the Binder Details View tab in the Tempo Portal Configuration.
2. Select each check box to display the item, or clear the check box to hide it:
– Binder name: Displays the name assigned to the binder when it was created.
– Created: Displays the date and time the binder was created.
– Expiration: Displays the date and time the binder expires.
– Play button: Displays a button that the operator can use to play or pause the
selected job.
Note: Vantage allows you to hide all columns in the binder list, producing an empty
list. Configure at least one column to display so that binders show up in the list.
Note: The play button operates only when the workflow has generated and registered
a proxy file (see the Using Workflow Portal topic in the Vantage User Guide), which is a
requirement for Tempo configurations.
3. Click the Column button .
4. For each metadata label parameter you want to display in a column:
a. Select a metadata label in the Labels panel.
b. Select the check box for the metadata label parameter in the Parameters panel.
c. When you are done making changes, click OK.
5. For each metadata label parameter you want to remove from the binder view:
a. Select the parameter you want to delete in the parameter list.
b. Click the Delete button and confirm the deletion.
6. To change the displayed order of parameters:
a. Select a parameter in the list (Ctrl-click or Shift-click for multiple selections)
b. Use the green up and down arrow buttons to move the variables.
7. Click the Save button to save your changes.Configuring Tempo Resources 29
Configuring Tempo in Vantage
Adding and Configuring Metadata Labels
Vantage allows operators to view and modify values in metadata labels when they
submit jobs to a workflow. They are used by the workflow to control job processing.
Note: Before a metadata label can be made available to users, it must be defined
using the Vantage Management Console. See Creating Metadata Labels and also
Understanding Metadata Labels in the Vantage Domain Management Guide.
Only those labels are visible that are created in the ingest workflow and configured to
be visible in the portal configuration. Typically, at a minimum you’ll select the Identify
label which holds values about the source asset specified in the ingest workflow:
1. Select the Labels tab (see above) in the Tempo Portal Configuration.
2. To enable visibility of metadata labels, select the Show Metadata Labels check box.
3. To allow operators to add and delete metadata labels, select the Allow Add/Delete
check box. Typically, this is unchecked in Tempo applications.
4. To make metadata labels available to operators, select labels in the Available panel.
(Ctrl-click or Shift-click to select multiples) and click Add.
5. To change label order, select labels in the Visible to user list (Ctrl-click or Shift-click to
select multiples) and use the green up and down arrows to move the labels.
6. Click each label and use the center buttons to set optional parameters, trim group
in, out, and duration time codes, and hot keys for transferring trim group time
codes to labels.
7. Click the Save button to save your changes.30 Configuring Tempo Resources
Configuring Tempo in Vantage
Adding Rating Systems Variables
You can set up specific variables as needed if you are using the Content Advisory
feature, for example.
Note: For an introduction to Vantage variables, see Understanding Variables in the
Vantage Domain Management Guide.
To enable operator to use these variables, follow these steps:
1. Select the Variables tab (shown here) in the Tempo Portal Configuration.
Note: Before a variable can be made available to an operator, it must be defined as
described in Creating Variables in the Vantage Domain Management Guide.
2. To make a variable available, select its check box.
3. Select the variable to use from the drop-down menu.
4. Click the Save button to save your changes.Configuring Tempo Resources 31
Configuring Tempo in Vantage
Configuring Graphic Settings
The Graphic Settings tab allows you to select and set the display parameters for a
station branding logo (bug) and for a content rating image. The Content Branding logo
can be composited from up to five graphic layers and added to a segment in the Tempo
Portal by checking the Branding during segment check box for that segment. The rating
image is displayed by checking the Rating graphic at start check box for that segment.
Content Branding Logo or Rating Image Configuration
To configure the Content Branding logo or Rating image, follow these steps:
1. Click the Content Branding or Rating drop-down menu to access the settings.
2. Click Browse to specify the path to the branding logo, or click Placement & duration
and select Custom to change settings for the Rating image. (Note that not all
settings listed below for the logo are available for the Rating and vice versa.)
3. Modify the graphic layering, positioning, and appearance settings:
Logos and images can be added as layered overlay images. The origin or default
starting point for the logo or image is in the top left corner.
– Layer name, Overlay: Enter a name for the layer, and browse for the graphic.
Select Read Only to prevent operators from changing the settings.
– X, Y: Enter x and y coordinates for the graphic location. Select units in percentage
or pixels from the drop-down menu.
– Width, Height: Enter graphic dimensions. Select units in percentage or pixels.
– Opacity: Enter the percentage of logo opacity.
– Duration: Enter the length of time that the graphic will appear in the segment in
minutes, seconds, or frames. Check Entire segment if you want the logo on
throughout the segment.
– Frequency: Enter how often the logo will appear in minutes, seconds, or frames.
– Fade duration: Enter graphic fade in and fade out duration in seconds or frames.32 Configuring Tempo Resources
Configuring Tempo in Vantage
Configuring Embedded Metadata Settings
The Embedded Metadata Settings tab allows you to configure default content ratings
that you want to show up in the Embedded Metadata panel:
• Select the default Rating system (MPA, US TV, Canadian English, Canadian French)
• Select the default Rating.
• Check the content descriptions you want checked by default.
Select Read Only to prevent Tempo Portal operators from changing settings.
Setting Timeline Settings
The Timeline Navigation tab includes settings for the Silence buttons on the Preview
panel timeline.
Silence level threshold - Sets the level for detecting silence (. Default is -40db.
Silence duration minimum - Sets the minimum number of frames defining a period of
silence. Default is 1 frame.
Artifact Quality Threshold - Sets the default Artifact quality threshold that appears in the
Tempo Portal Timeline tab.Configuring Tempo Resources 33
Configuring Tempo in Vantage
Specifying Workflow Submission
Tempo Portal operators complete the re-timing process by forwarding the re-timing
composition file to a publishing (Tempo re-timing) workflow where the re-timing
process occurs.
Operators can forward the composition to any visible target workflow by selecting the
workflow on the Forward to Workflows Portal tab and clicking Submit. If a target
workflow is required, it is automatically selected on the Forward to Workflows tab and
the binder is forwarded to the required workflow when the operator clicks Submit.
For Tempo Two Pass, binders in a Pass 1 catalog folder should be forwarded to a first
pass Tempo workflow. Binders in a Pass 2 catalog folder should be forwarded to either a
second pass Tempo workflow or a direct convert workflow.
For workflows to be visible to the operator, they must be added to the Visible to user
column in the Forward to Workflows tab.
1. Select the Forward to Workflows tab (shown here).
2. To enable operator viewing of target workflows, select the Show Forward to
Workflows check box.
Note: If all target workflows are required (indicated by the Req'd field), then you can
uncheck the Show Forward to Workflows check-box to reduce the number of clicks for
the operator.
3. To make target workflows available to operators, select one or more workflow
names in the Available panel and click Add.
Note: To accept forwarded binders, the target workflow must start with a Receive
action. The Available panel only displays workflows with a Receive action.
4. To specify whether a target workflow is required for forwarding or optional, check
the Req’d check box next to the workflow in the Visible to user panel.
5. Click the Save button to save your changes.34 Configuring Tempo Resources
Configuring Tempo in Vantage
Configuring Storage Utilization
The composition files created by the Tempo Portal can be stored in any Vantage store
or folder. The Storage tab lets you select the storage location.
Note: The Microsoft User Account Control (UAC) feature may deny access to Vantage
stores or folders that are placed in protected locations. If Vantage users report that
access to a Vantage store or folder is denied, do one of the following:
1. Place the store or folder in a directory that is not protected by UAC.
2. Use the procedure below to specify a different store or folder.
1. Select the Storage tab.
2. Choose an option:
a. To store files in any available Vantage store, select Available Vantage Store.
b. To store the files in a specific Vantage store or folder, select Vantage Store/Folder,
and choose a Vantage store or folder from the drop down list.
3. Click the Save button to save your changes.Configuring Tempo Resources 35
Configuring Tempo in Vantage
Setting Permitted Users
The Permitted Users panel defaults to the Everyone check box so that all Vantage users
have access to the Tempo Portal configuration.
Note: The Permitted Users tab only displays when User Administration is enabled in
your Vantage Domain.
To grant access to selected users only, uncheck Everyone. Then click names in the left
column and use the Add button to move the names you want to have access into the
Permitted users column on the right. To remove users from access, click their names in
the right column, and click Remove.36 Configuring Tempo Resources
Configuring Tempo in Vantage
Managing Configurations
Once your Portal configuration is complete, you can manage it in these ways by
selecting the configuration and using the following toolbar buttons:
• Click the Refresh button to refresh the configuration list.
• Click the Delete button to delete the configuration.
• Click the Duplicate button to create a copy of a configuration.
• Click the Export button to export a single configuration as an XML file, or select
Export all from the Export button drop down menu to export all configurations.
• Click the Import button to import a previously exported configuration XML file.
• Click the Save button to save configuration changes.
You can also right-click on a configuration or in the blank area below the configurations
to open a context menu providing access to the same tools described above.Configuring Tempo Resources 37
Configuring Tempo in Vantage
Creating Two Pass Portal Configurations
Using a single portal configuration works best for Tempo Two Pass. This allows both
Pass 1 and Pass 2 catalog folders to be seen and used in the same configuration. A
suggested configuration is described below. (For details about the associated
workflows, see the Tempo Workflows chapter in this guide.)
The Tempo portal configuration provides a portal operator access the Tempo catalog,
which allows the operator to selectively submit to any of the following workflows:
• Tempo Ingest
• Tempo Pass 1
• Tempo Pass 2
• Tempo Direct Convert
The setup of the Tempo configuration is displayed below. (Note: only the relevant
sections of the configuration are presented here (in particular the catalog access and
the available workflows.)38 Configuring Tempo Resources
Configuring Tempo in Vantage
Deploy Portals on Client Machines
As a Vantage domain administrator, you can make it easier for operators to start using
the Tempo Portal by doing the following:
1. Install the Vantage client programs on operator workstations.
a. Log on to the target workstation with a local administrator account, and make
sure that virus-checking software and Windows Firewall is off.
b. Copy the Vantage 8.0 Client Application.msi installer or the Vantage_8.0_Setup.exe
installer to the workstation, or make the installer available on a network share.
c. Run the Vantage 6.3 Client Application.msi installer or the Vantage_8.0_Setup.exe
installer, and select the Vantage Workflow Portal and any other desired clients for
installation.
2. Launch and configure the Vantage Workflow Portal for the first time:
a. Select the Vantage domain (File > Change Vantage Domain).
b. Choose the Tempo Portal when you are offered a choice of configurations, or if
there is only one configuration available, it is opened automatically.
(You can also manually select and load a Tempo Portal configuration after the
Portal starts by selecting File > Change/Reload Application Configuration.)
c. Select the Tempo catalog, which will display the binders available for selection
and processing by the operator.
Tempo is now ready for use. The next steps are to import or create Tempo workflows as
explained in the Tempo Workflows chapter and to begin using the Tempo Portal as
explained in the Setting Up and Using Tempo chapter.39
Setting Up and Using
Tempo
Tempo includes a Tempo Portal which you use to select a clip (asset) and create
segments, scrub a proxy of the source media which you want to re-time, mark
segments to include or exclude from re-timing, and specify how much time expansion
or compression to apply.
Clips can be automatically segmented by use of slate/bars/black detection with the
Analyze action in ingest workflow. Tempo Portal can be used to adjust the auto-
segmentation from Analyze, or the Portal can simply be used to manually apply
segmentation.
When segmentation and other work (metadata, branding graphics, etc.) are complete,
Tempo Portal (behind the scenes) generates a composition file to describe re-timing
requirements for the asset. The operator forwards the asset to a Tempo publishing
workflow to process the source media—the Tempo action in the workflow re-times the
video during transcoding.
Before you can begin setting up a Tempo solution for your environment, you need to
Configure the Tempo Vantage domain to meet your requirements. Use the Tempo Quick
Start to set up Tempo in your environment and learn how to re-time media through the
two workflows, utilizing Tempo Portal. For full details on every set up task, refer to
Configuring Tempo Resources.
These topics explain how to use Tempo:
Overview of Tempo Portal
Tempo Quick Start
Using Tempo Portal
Tempo Portal MenusYou can also read