Hot Potatoes version 6 - Half-Baked Software Inc., 1998-2009
←
→
Page content transcription
If your browser does not render page correctly, please read the page content below
Hot Potatoes version 6

      © Half-Baked Software Inc., 1998-2009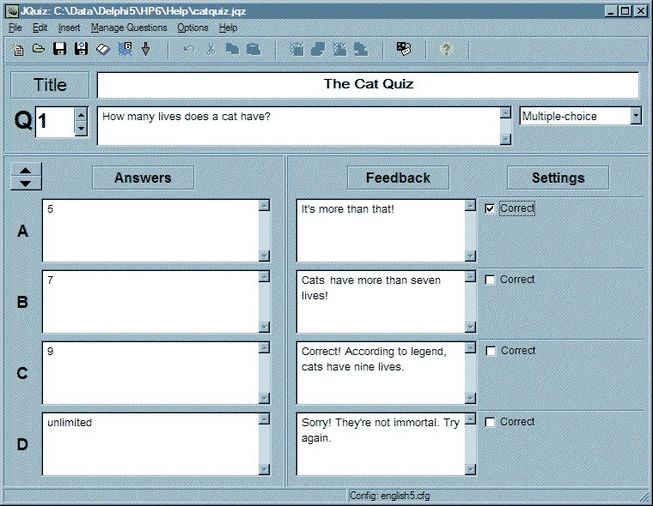
© Half-Baked Software, Inc., 1998-2004

                 p1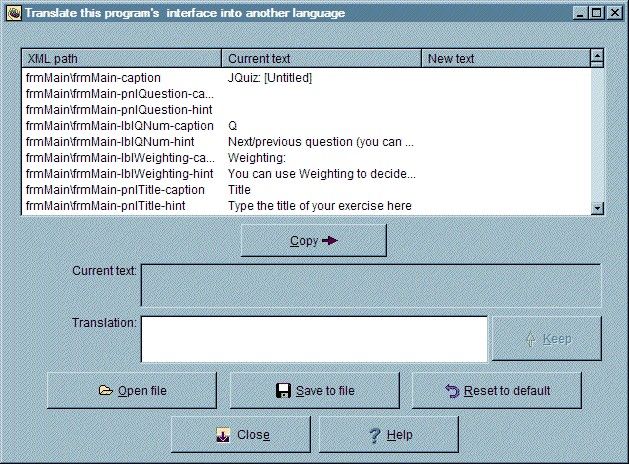
© Half-Baked Software, Inc., 1998-2004

Table of Contents

Contents                                                            4
 General introduction and help                                      4
   What do these programs do?                                        4
   Conditions for using Hot Potatoes                                 4
   Notes for upgraders                                               4
   What's new in this version?                                       5
   Getting started                                                   6
   What do I need to use Hot Potatoes?                               6
   How do the programs work?                                         7
   Entering and saving data                                          7
   Configuring the output                                            8
   Adding a reading text                                            10
   Adding a timer                                                   11
   Adding graphics                                                  11
   Adding links                                                     12
   Adding sound and video                                           13
   Inserting an object                                              13
   Using Unicode                                                    14
   Creating Web pages                                               15
   Creating a zip package                                           16
   How to link a series of exercises                                16
   Giving students an onscreen keyboard                             17
   Using Hot Potatoes in other languages                            17
   What is the Masher?                                              17
   The hotpotatoes.net hosting service                              18
    The Toolbar and Menus                                           19
     The Toolbar                                                    19
     The File menu                                                  20
     The Edit menu                                                  20
     The Insert menu                                                21
     The Manage Questions menu                                      21
     The Manage Grid menu                                           21
     The Options menu                                               22
     The Help menu                                                  22
  Help on specific programs                                         22
    JQuiz                                                           22
     The main JQuiz screen                                          22
     JQuiz question types                                           23
     JQuiz configuration details                                    24
     Beginner and Advanced modes                                    24
    JCloze                                                          25
     The main JCloze screen                                         25
     Adding alternate correct answers & clues                       25
     JCloze configuration details                                   26
    JCross                                                          26
     The main JCross screen                                         27
     Entering clues                                                 27
     JCross configuration details                                   28

                                            p2
© Half-Baked Software, Inc., 1998-2004

   Printing in JCross                                              28
   Case sensitivity in JCross                                      28
  JMix                                                             29
   The main JMix screen                                            29
   Breaking up the sentence into segments                          29
   Brackets and quotation marks in JMix                            30
   JMix configuration details                                      30
  JMatch                                                           30
   The main JMatch screen                                          30
   JMatch output                                                   31
   JMatch configuration details                                    31
Registering the programs                                           32
 How to register                                                   32
Frequently-asked questions                                         32
 Can I make separate config files?                                 32
 Will Hot Potatoes read my old files?                              32
 Can I insert graphics into my Web pages?                          32
 Can I insert sound and video?                                     33
 Must I always run the front end program?                          33
 Why do Win and Mac versions differ?                               33
 How does the scoring work in JQuiz?                               33
 How does the scoring work in JCloze?                              34
 How does the rest of the scoring work?                            34
 Can I get students' results by e-mail?                            34
Support and credits                                                35
 Technical support                                                 35
 Internet help                                                     35
 About the authors                                                 35
 Acknowledgements                                                  35
 The future of Hot Potatoes                                        38
For power-users                                                    38
 Custom configuration (user strings)                               38
 W3C standards support                                             38
 Dublin Core Metadata                                              39
 SCORM 1.2 support                                                 39
 Making separate JavaScript files                                  40
 Keystroke shortcuts for HTML tags                                 40
 Editing the source files                                          41
 How the programs use source files                                 41
 Translating the interface                                         42
Installing and uninstalling                                        43
 Installing and uninstalling Hot Potatoes                          43
 What is installed with the programs?                              44

                                           p3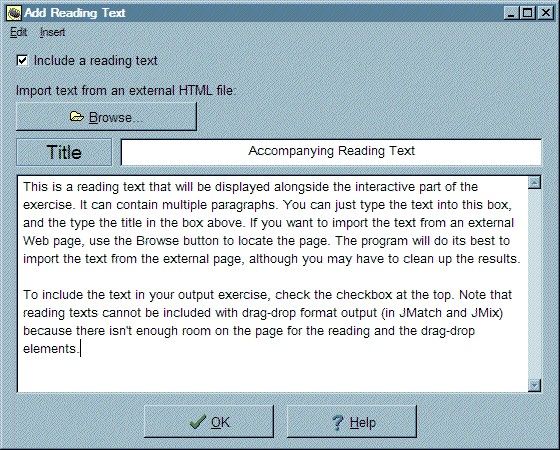
© Half-Baked Software, Inc., 1998-2004
Contents
General introduction and help
What do these programs do?
The purpose of the Hot Potatoes is to enable you to create interactive Web-based teaching exercises
which can be delivered to any Internet-connected computer equipped with a browser. The exercises use
HTML and JavaScript to implement their interactivity, but you do NOT need to know anything about these
languages in order to use the programs. All you need to do is enter the data for your exercises (questions,
answers, responses etc.), and press a button. The program will create the Web pages for you, and you can
then upload them to your server.
There are five basic programs in the Hot Potatoes suite:
The JQuiz program creates question-based quizzes. Questions can be of four different types, including
multiple-choice and short-answer. Specific feedback can be provided both for right answers and
predicted wrong answers or distractors. In short-answer questions, the student's guess is intelligently
parsed and helpful feedback to show what part of a guess is right and what part is wrong. The student
can ask for a hint in the form of a "free letter" from the answer.
The JCloze program creates gap-fill exercises. Unlimited correct answers can be specified for each
gap, and the student can ask for a hint and see a letter of the correct answer. A specific clue can also
be included for each gap. Automatic scoring is also included. The program allows gapping of selected
words, or the automatic gapping of every nth word in a text.
The JCross program creates crossword puzzles which can be completed online. You can use a grid of
virtually any size. As in JQuiz and JCloze, a hint button allows the student to request a free letter if help
is needed.
The JMix program creates jumbled-sentence exercises. You can specify as many different correct
answers as you want, based on the words and punctuation in the base sentence, and a hint button
prompts the student with the next correct word or segment of the sentence if needed.
The JMatch program creates matching or ordering exercises. A list of fixed items appears on the left
(these can be pictures or text), wth jumbled items on the right. This can be used for matching
vocabulary to pictures or translations, or for ordering sentences to form a sequence or a conversation.
In addition, there is a sixth program called the Masher. This is designed to create complete units of
material in one simple operation. If you are creating sequences of exercises and other pages that should
form a unit, you may find the Masher useful. The Masher can also be used to upload Web pages not
created with Hot Potatoes to the www.hotpotatoes.net server.
-o-
Conditions for using Hot Potatoes
Hot Potatoes version 6.3 is the first freeware release. This release is open for anyone to use for any
purpose, but we do not provide technical support for it.
-o-
Notes for upgraders
Upgrading from version 4.x or 5.x:
If you are upgrading from version 4.x or 5.x, you have two options:
1. Just install the new version over the top of your old version, replacing it.
2. Install version 6 to a different location. This means that your old version will be unchanged, and will still
function properly; you can therefore use both versions until you're happy with the transition. You can
continue to use a previous version to create old output formats for old browsers, if you need to do that.
p4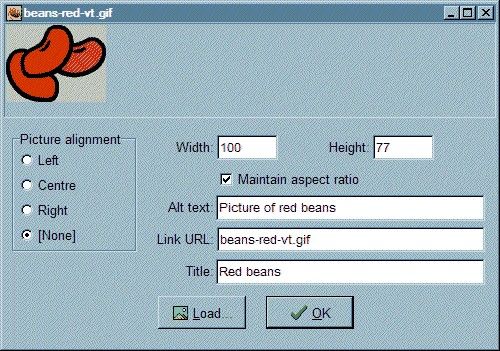
© Half-Baked Software, Inc., 1998-2004

If you have been using a personalized configuration file in version 4 or 5, you will need to load that file into
version 6 as well. Note that some new configuration items have been added, so you may need to update
your old configuration file. You should be able to share the same configuration files between both versions
without problems.

Upgrading from version 3

Hot Potatoes versions 4 and above are a substantial upgrade from version 3. All the file structures, source
files and configuration files have changed completely.

Therefore, if you are upgrading, you should install version 6 of Hot Potatoes over the top of version 3,
overwriting it. We do not recommend keeping both versions on your machine, unless you understand quite
thoroughly how the programs work (especially with regard to source files).

Converting Configuration Files

If you have configuration files that you need to convert from version 3 to version 4+, here is the best way to
do it:

1.   Start a Potato, and go to the Configuration screen.
2.   Click on the Load button, and load your old configuration file.
3.   Click on Save As, and save the file with a new name (this is important!).

With the next Potato, follow the same steps -- load the OLD file, and save it with the new name. Do each
Potato in turn, gradually transferring all the old configuration information from the old file to the new one.
You will notice that there are some new configuration settings in versions 4 and 5 that were not there in
version 3; you can set these as you go along, if you wish.

                                                        -o-

What's new in this version?
Version 6.3 has no new features, except that it is free. You will be prompted to register when you start the
application. This process simply asks for your name, and stores it in the system registry; your name will be
inserted into exercises you create with Hot Potatoes, identifying you as the author of the exercises. It will
not be sent to us or to anyone else.

Version 6.2.4.0 adds two new menu items: The Options menu now has two menu items to choose the
source file location, and reset it to the default. See Editing the source files for more information on this.

Version 6.2.3.1 adds a new Show tooltips command on the Options menu.

In Version 6.2.2.0, JQuiz has some refinements in the information shown to students doing the exercises.
After each question, the student can now see how many questions they have completed so far, and when
all the questions are completed, they're told that they've finished. This helps avoid the problem where
students skip questions and then forget that they haven't answered all of them.

Version 6.2.1.0 of Hot Potatoes has better handling for its own XML data files, if they've been edited by an
external program. In some XML editors, empty tags may be replaced with self-closing empty element tags.
This behaviour is actually not what the W3C recommends, but it's often done. Such tags would cause Hot
Potatoes to fail to open the changed files, but that is now fixed.

Version 6.2.0.9 of Hot Potatoes introduces only one new feature: case sensitivity in JCross. You can now
create crosswords which use lower-case letters, and have answers accepted or rejected based on case.

Version 6.2 of Hot Potatoes introduces support for SCORM 1.2. You can now output your exercises in the
form of SCORM packages which can be imported into learning management systems that support SCORM.

Version 6.1 of Hot Potatoes introduces one new feature, Create zip package, which enables you to create
a portable zip archive of your exercise, along with any related media files.

From version 6.0.4.18, this Help file is in the form of an HTMLHelp (.chm) file. That means that a recent
version of Internet Explorer must be installed in Windows before the file will work. It is assumed that
anyone working regularly on Web-based materials will be updating Windows regularly, as a

                                                        p5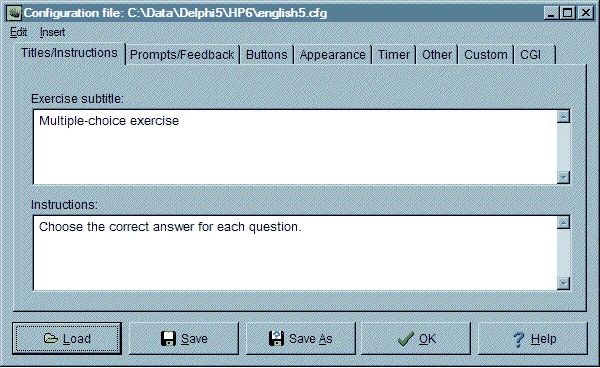
© Half-Baked Software, Inc., 1998-2004
common-sense measure for their own protection, so this will not be an issue for users of Hot Potatoes.
Version 6.0 is a major rewrite of Hot Potatoes. These are the most important new features:
All the applications now support Unicode data and configuration on Windows 2000 and XP. This
means you can create exercises in Chinese, Japanese, Arabic etc.
The V6 output format has been extensively rewritten to make it 100% XHTML 1.1-compliant.
All exercises can now have time-limits placed on them (instead of on the reading text).
JQuiz now handles four question types, including multiple-choice and short-answer, and you can mix
question types in one exercise. (The old JBC no longer exists, because JQuiz does all question-based
formats.)
JQuiz questions can be weighted, and answers can be designated as (for example) "30% correct", to
enable more sophisticated scoring.
Exercise output has been designed so that it's easier to edit in common Web editor programs such as
DreamWeaver. For instance, the text of a gapfill exercise is now part of the XHTML body, and can be
edited WYSIWYG-style.
Source files have been modularized to make them easier to understand, edit and maintain.
A new Insert Object wizard allows you to create nested XHTML object tags to embed common media
players into exercises.
All old output formats have been removed, to simplify the applications and keep bloat to a minimum.
However, if you still want to use v5 output, you can continue to run version 5 alongside version 6.
The suite has a new-look interface, with new icons which we hope are clearer and more colourful than
the old ones., and many changes have been made to increase support for accessibility.
-o-
Getting started
If you have worked with previous versions of Hot Potatoes, the interfaces of these programs will be
familiar to you, and you will probably want to jump right in and start work. However, if the programs are new
to you, we recommend that you work through the tutorial before you start. You can run the tutorial by
clicking on Tutorial in the main Hot Potatoes screen, or by double-clicking the Tutorial icon in the Hot
Potatoes folder.
Also, once you start using the applications, remember that they all have context-sensitive help. Simply
press F1 at any time, and you should see a Help screen appropriate to the task you're working on.
-o-
What do I need to use Hot Potatoes?
To use the Windows version of the programs, you will need:
Windows 98, ME, NT4, 2000, XP, Vista or Windows 7. (Windows 95 is not supported.) To use Unicode
text, 2000 or above is required.
A modern Web browser (Firefox, Safari, Opera, Internet Explorer 6+, Netscape 7+, Mozilla 1.4+, etc.)
Access to a Web server (if you wish to deliver your exercises on the Internet) or an Internet connection
to upload your exercises to the www.hotpotatoes.net server.
If you know HTML and JavaScript, you will be able to exercise more control over the final format and style
of your exercise pages, but this is not a requirement for creating useful interactive pages with Hot Potatoes
.
To use the exercises, your students will also need an appropriate browser. They do NOT need Hot
p6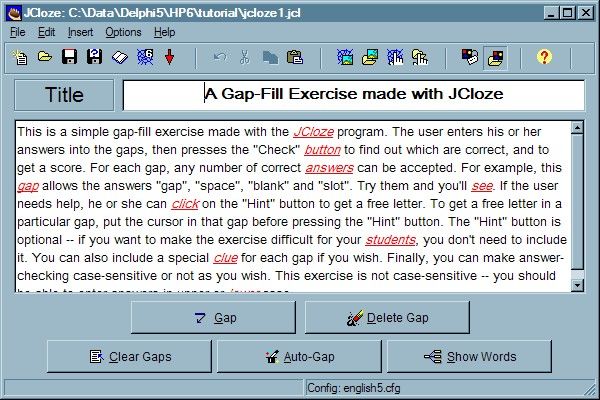
© Half-Baked Software, Inc., 1998-2004

Potatoes itself. Students using Macs can also access the exercises using Opera, Firefox or Safari.

                                                     -o-

How do the programs work?
There are three stages in creating exercises with these programs:

1. Enter your data

You type in the questions, answers, feedback etc. which forms the basis of the exercise. See Entering and
saving data for more information on this.

2. Adjust the configuration

The "configuration" is a set of information used to compile the Web pages. It includes instructions for the
student, captions for navigation buttons, and other information which is not likely to change much between
exercises. See Configuring the output for more details.

3. Create your Web pages

This is simply a matter of pressing the "Export to Web" button on the toolbar, choosing a file name, and
letting the program do the rest. See Creating Web pages for further information.

                                                     -o-

Entering and saving data
The data for your exercise is entered in the main screen of the program. As an example, here is the main
screen of JQuiz:

                                                     p7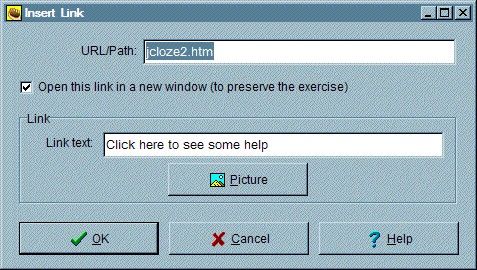
© Half-Baked Software, Inc., 1998-2004
You can see that there is space to enter the title of the exercise, the current question, and boxes for four
answers to the question. Clicking on the "Up" arrow next to the question number allows you to enter a new
question. If you want to add more than four answers, you can use the lower pair of up/down buttons to
scroll through correct answers. When all the data is complete, you should save your data file. Each
program saves files with its own extension:
JQuiz: .jqz
JCloze: .jcl
JCross: .jcw
JMix: .jmx
JMatch: .jmt
If you want to make changes to your exercise later, you can reload the data file, make the changes, and
create new Web pages. Please note that you CANNOT RELOAD THE WEB PAGES INTO THE
PROGRAMS, so it is important to save your data files.
-o-
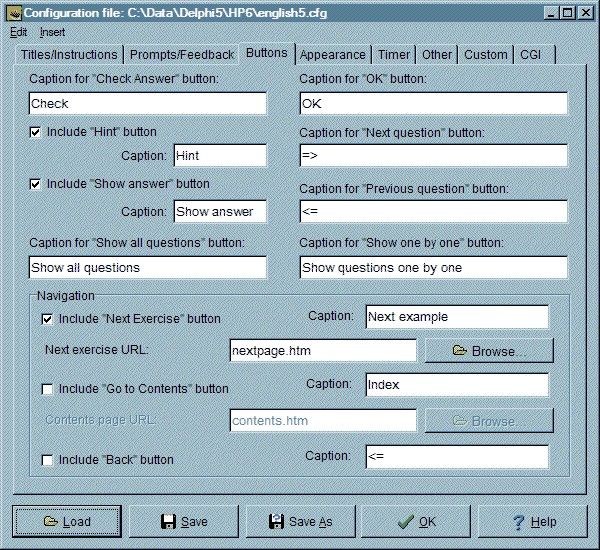
Configuring the output
The exercises created by Hot Potatoes programs use a variety of buttons and prompts to interface with
the user (the student). While the data for exercises (questions, answers etc.) will change from exercise to
exercise, such things as button captions, prompts, and explanations will not change so often. These are
therefore stored in the form of a configuration file. By default, the programs share the same configuration
file, so that common items such as the captions of "Check" or "Hint" buttons need to be changed only once.
Using the configuration screen, you can set up the programs to produce output in any of the languages
supported by Unicode.
Each program provides an interface to the configuration file, accessible through the Configuration button
p8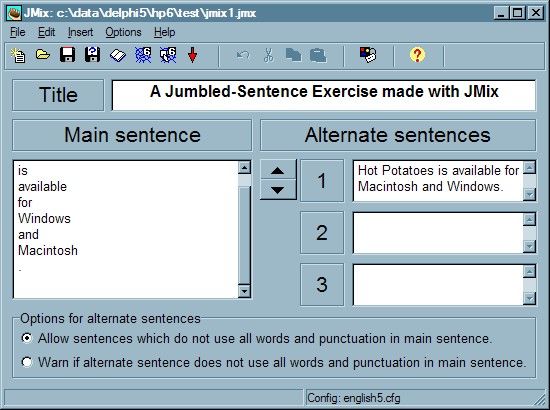
© Half-Baked Software, Inc., 1998-2004

on the toolbar, or the Configure output command on the Options Menu. These will bring up a screen like
the one below, giving access to all the configuration data relevant to the application you are using. You can
click on the graphic to get more information about items and functions.

Here is another page in the configuration dialog. As above, you can click on the graphic to get more
information about the items:

                                                      p9
© Half-Baked Software, Inc., 1998-2004
-o-
Adding a reading text
All of the Hot Potatoes programs give you the option to include a reading text in a separate frame next to
your quiz. (The only exceptions to this are the drag-and-drop output from JMix and JMatch -- doing
drag-and-drop inside only half of the page is not practical.) The reading text may be typed directly into the
program, or it can be an imported from an external Web page. Clicking on Add Reading Text from the file
menu, or clicking on the button on the toolbar, will bring up this screen. Click on the graphic to learn more
about the functions.
p10© Half-Baked Software, Inc., 1998-2004
-o-
Adding a timer
You can add a timer to your exercise by specifying this in the Timer tab of the Configuration screen.
Check the checkbox to include the timer, and set the time limit in minutes and seconds. When the timer
runs out, the student's work so far will be scored, and the score displayed; after that, no further work on the
exercise will be possible.
Please note that the student can always reload the page and start again, but they'll have to do all the work
a second time to complete the exercise.
-o-
Adding graphics
It is possible to type HTML tags directly into most of the Hot Potatoes text boxes, in order to insert images
or links into the Web pages. However, if you want to insert a graphic, you can use one of the built-in
functions to help you. With your cursor in a Hot Potatoes text box, click on the Insert menu and choose
Picture / Picture from Local File. A dialog box will appear, allowing you to select an image from your hard
drive. Then you will see the screen below. From this screen, you can configure the information which will
create the IMG SRC tag and insert it in the text box. Note that Hot Potatoes is NOT a WYSIWYG Web
page editor; the tools on the Insert menu are only intended to help you create HTML code for the page, and
you will not see the image until you actually compile the page. Also, note that the program automatically
creates a relative file path between your data file (your .jqz, .jcl or other Hot Potatoes file) and the image
file on your hard drive. If you do not intend to put your HTML pages in the same place as your data file
relative to your image files, then you will need to configure the relative path manually to ensure that the
image appears on your page. This will be much easier if you understand basic HTML.
Here is the Insert picture screen. Click on the graphic to get more information about how it works.
p11© Half-Baked Software, Inc., 1998-2004
-o-
Adding links
You may wish to insert a link to another Web page in one of the fields in your exercise. To make a simple
link to a Web page, click on the Insert menu and choose Link / Link to Web URL, and you will see the
screen below. You can also insert a link to a page on your hard drive by choosing Link / Link to Local File;
if you do this, you will see a dialog box from which you can choose the file to link to, and a relative path
between your data file and that file will be created automatically. Note that if the file structure you plan to
use on the Web server is not the same as that on your hard drive, or if you store your Hot Potatoes data
files separately from your HTML pages, you will have to edit the relative path manually to make the link
work. This means understanding some basic HTML.
Here is the Insert link screen. Click on the graphic to get more information about it.
You can use these link functions to add sound and video to your pages -- see Adding sound and video for
more information on this.
p12© Half-Baked Software, Inc., 1998-2004
-o-
Adding sound and video
It's increasingly common to add sound and video to Web pages, and this is especially appropriate in the
case of educational materials. There are two basic ways to add sound and video to your pages: Inserting
an object, and adding a link. Adding a link is the simplest approach, and this page explains it.
Adding sound or video to your pages is basically no different from adding a link to a file; sound files and
video files are no different from other files. Here are some basic guidelines, and a couple of example
scenarios.
First, create your media files...
Hot Potatoes does not contain any tools for creating or editing sound or video files. For this, you will need
to find other software programs. Most modern sound cards can be used for recording or capturing sound
on disk, but you may need to get some special software with which to edit it. Video is a little more
complicated, since you may need a video card which has video capture capabilities, and not all video cards
can do this.
Linking to a simple sound file
Let's imagine that you have a sound file called listen.mp3. (MP3 files are a common sound file format
used on the Internet.) The file is sitting in the same folder as your JQuiz exercise. You would like your
students to be able to listen to this file before they answer Question 1 of your quiz. Here's what you do:
1. Make sure you have saved your JQuiz exercise.
2. Click in the Question field of Question 1 in JQuiz.
3. Click on Insert / Link / Link to Local File.
4. If a message appears, read it and make sure you understand it, then press OK to bring up the Open
File dialog box.
5. Find your sound file and select it, then press Open. You will now see the Insert Link dialog box.
6. In the Link Text box, type an appropriate piece of text, such as "Click here to listen to the text".
7. Press OK.
Now, when you compile your Web page, you should see a link in Question 1. Clicking on the link will play
the sound file. Note that how the file is played (what application is used to play it) really depends on the
user's browser. Sometimes Quick Time will pop up, sometimes the Windows Media Player, and sometimes
another application; it all depends on what is installed on the user's machine, and you have no control over
that. However, something should always appear which can play the file, as long as the user's computer is
able to handle sound.
Linking to a video file
Linking to a video file is really no different from linking to a sound file. Just follow the steps above, but
select a video file instead of a sound file. However, you should note that, in order to view the video, your
user's computer must be able to handle the specific video format you have chosen. It's a good idea to do
extensive testing on various types of machine to make sure that your video is in a format which the user
can play. If you're using a format such as RealVideo, you might want to include a link on the page so that
users can download and install the RealVideo plug-in if necessary.
Embedding media players on the page
It's also possible to embed a media player on a Web page. See Inserting an object for more information on
this.
-o-
Inserting an object
The XHTML 1.1 specification includes a sophisticated system for embedding "objects" into the middle of a
p13© Half-Baked Software, Inc., 1998-2004
Web page. This is most useful for including embedded "players" for media files. You can use this system to
include (for example) a Flash movie or a RealMedia player on your Web page, by using the Insert / Media
Object menu command. Just as when you insert a picture, all you need to do is to place your cursor in the
position where you want to insert the object, and click on the menu item. You'll see a screen that looks like
this:
At the top is a Browse button that enables you to find the media file you want to insert (in this case, an mp3
file). Once you have selected the file, a "Play" button will appear, so you can check that you have the right
file by listening to or watching it. Below that, you'll see Width and Height settings; these will determine the
size of the player in the page. If you're only inserting an audio file, these can be quite small, but if you're
inserting video, don't forget to make the object large enough to include both the video display and the
control panel for playing it.
Below this, you'll see a series of buttons for different players. The idea here is that in the XHTML
specification, you're allowed to give a series of player objects, in order of preference. For example, if you
want to use Windows Media Player, you would add that first; for users who don't have WMP, you might
want to specify the RealPlayer as an alternative, so you would add that second. If a Web browser supports
the standard properly, it will look for the first available player in the list, and show that. However, Internet
Explorer does not yet support this properly, so it will show all the players listed.
Finally, at the bottom, you get the chance to include a link to the media file, just in case no players are
available. We recommend that you always do this, because you can never be sure what players may be
installed on your students' computers.
When you press OK, the required code will be generated by the program and added to the Hot Potatoes
text box. (The source for this code is the source file hp6objecttags.ht_, so you can modify it if you know
HTML well.)
-o-
Using Unicode
Unicode is a standard system for encoding characters from almost all human languages in such a way that
languages can be mixed easily in the same document, and displayed reliably without the need for special
fonts. Windows 2000 and XP support Unicode natively, and Hot Potatoes version 6 makes use of this to
enable you to create exercises in virtually any language (or a mixture of languages).
p14© Half-Baked Software, Inc., 1998-2004
This is how Unicode support works in Hot Potatoes version 6:
First, you need to make sure that you have configured Windows to support the language(s) you want to
use. There are three components to this:
1. Language support
2. Fonts
3. Keyboards/Input method editors
The first is the "text services" Windows needs in order to process input in the language; the second is a
Unicode font or fonts which contain characters in the Unicode range for that language; and the third is a
way of typing or entering text in the language. Depending on the language you're trying to use, you may or
may not need to install special fonts, and you may find that there is a range of input method editors or
keyboards available to you for any given language.
For example, if you want to use Japanese in any of your Windows programs, you need to go to the Control
Panel, open Regional and Language Options, click on Languages and Details, and add the appropriate
Japanese language and input method editor settings. You may also need to install fonts for Asian
languages if they're not already installed.
None of this has anything to do with Hot Potatoes; if you're having trouble with this, then you need to
consult your Windows documentation or get help from another user who is familiar with using this language
in Windows. Once Windows is set up for input in a particular language, you should be able to switch to that
language in the language bar or the Control Panel, and then type directly into Hot Potatoes in that
language. You may need to change the font used in Hot Potatoes (Options / Font...) in order to make the
characters show up correctly. Once you are able to type your language into the Hot Potatoes text boxes,
everything else should work automatically; when you export your exercise, the Unicode text should show
up as expected in your Web browser.
Note that if you are using a right-to-left language in your exercise, you should check the option in the Other
tab of the Configuration screen to ensure that the exercise is processed for right-to-left functionality. This
will adjust relative font sizes and alignment so that your right-to-left text looks good on the Web page.
-o-
Creating Web pages
When your data is ready, and you have checked the Configuration information, you are ready to create a
Web page. Creating Web pages is the simplest part of using Hot Potatoes. Use the Create Web Page
commands, accessible through the File menu or the toolbar:
All of the Potatoes use the same command to create a single HTML file. You can post this file on your
server, and the exercise will appear when you load it. If you are using JMix or JMatch, there are other
options, however. JMatch has two other output types: one is a flashcard output, which you can use to let
your students practice or memorize something before quizzing them on it, and the other is a drag-and-drop
form of the exercise. JMix also has a drag-and-drop format.
Choosing an output format
You should choose an output format based on the needs of your users, the type of material, and the kind of
screen resolution you can expect your users to have. For example, if you are using JMatch, and you know
some of your users have only 15" screens with a resolution of 800 by 600, don't create drag-drop exercises
with more than five or six items, because they won't fit on the screen; either use the "standard"
non-drag-drop output, or make your exercises smaller by reducing the number of items in each exercise.
Creating and viewing your pages
When you have selected the type of output you want, and specified a file name, the Web page will be
created. The program will then ask you if you wish to see the exercise in a browser. If you say yes, then
your default browser program will be launched, and the exercise will be loaded into it. You can check that
the results match your expectations. This dialog box also gives you the option to Upload your exercise to
the hotpotatoes.net server.
Choosing good filenames
p15© Half-Baked Software, Inc., 1998-2004
If you enter a file name containing a space, the program will warn you that this is not a good idea; the
reason for this is that on many Web servers, spaces will be replaced with "%20", and therefore the URL of
your document may not be what you expect it to be. It's best to avoid spaces in the file and folder names of
Web pages.
Old output formats
If you are upgrading from Hot Potatoes version 5, you will find that the old output formats are no longer
available in version 6 of Hot Potatoes. We have removed them to improve the standards-compliance of the
new version, and to keep the interface as simple as possible. If you want to create exercises in one of the
older formats, just open the data file in an old version of Hot Potatoes and export it from there.
-o-
Creating a zip package
If you have inserted images or other media files into your exercise, it can be a little confusing trying to
manage the project because the media files may be in different folders from your original data file or Web
page. To make it easier to move exercises around, complete with all their media, you can create single
package in zip format using Create zip package in the File menu.
When you click on Create zip package, you'll be asked to choose a location for your zip file. Then the
program will create a zip file containing the following files:
1. An HTML file of your exercise, with all links to media files converted to simple file names.
2. A copy of each media file linked from your exercise.
3. A JavaScript code file (if Create separate JavaScript file is checked in the Configuration screen).
You can take this zip file and move it anywhere, and as long as you extract all of its files into the same
folder, the exercise should work.
-o-
How to link a series of exercises
A common way to use Hot Potatoes is to create a series of linked exercises, so that the student does one
after another in sequence. You can easily do this by creating an Index page, and having students jump to
each exercise, do it, then jump back to the index and choose another one. However, Hot Potatoes allows
you to link exercises in a simpler way, using the Next Exercise, Contents and Back buttons.
In any of the Potatoes, if you go to the Configuration screen and click on the Buttons tab, you will see
settings for these three buttons. You can decide whether or not to include the buttons, and you can set the
caption that will appear on the buttons. If you want the buttons to work, though, you will have to tell the
program where the next exercise and the contents page actually are, so the button can jump to them. To
do that, just enter the URL or path to the next exercise in the correct box, then do the same with the
contents page. Note that these can be complete URLs, beginning with http://..., or they can be relative
URLs. In the simplest case, if the current exercise and the next exercise will be in the same folder, then all
you need to enter is the filename of the next exercise.
Here's an example:
You're making a page called exercise1.htm, and you want to link it to exercise2.htm. Both of these files
will be in the same folder.
1. Open the first page in your Potato.
2. Go to the configuration screen (Buttons tab).
3. Make sure Include "Next Exercise" button is checked.
4. Enter "exercise2.htm" in the Next Exercise URL text box.
5. Press OK, and then compile your Web page.
p16© Half-Baked Software, Inc., 1998-2004
You should see a Next Exercise button on the page. When you click on it, the browser will go to
exercise2.htm (providing that exercise2.htm exists).
The Contents button works the same way as the Next Exercise button, but the Back button is different --
all that does is to take you back to whatever page you were on before (like pushing the back button on your
browser toolbar).
If this all seems rather complicated to you, have a look at the Masher, which is designed to do this kind of
linking automatically.
-o-
Giving students an onscreen keyboard
If you are making language exercises, you may find that your students may not be able to type the required
characters directly from their keyboard; perhaps they cannot install the required language files and
keyboard on their computer, or perhaps they have not yet reached a high enough level in the language that
you could expect them to be able to type; maybe there isn't even a standard keyboard available for the
characters they need to type.
For cases like this, in JQuiz and JCloze you can provide an "onscreen keyboard" consisting of a set of
buttons on the exercise Web page. You'll find this option on the Other tab of the Configuration screen. If
you simply check the option "Include a keypad to help the student type non-roman characters", when
the exercise is created, the program will provide a button for every character included in the answers. If you
want to add more buttons to the keyboard, you can type the relevant characters into the box below. When
you create the exercise, you'll see a set of buttons below the answer boxes. Clicking in an answer box and
then pressing one of the buttons will "type" that character into the page.
Under normal circumstances, the items in the keypad are automatically sorted into alphabetical order.
However, sometimes that doesn't quite work as you expected (it can depend on the dominant locale in your
Windows installation), and sometimes it's not what you want. Therefore you can override this setting by
adding a slash character (/) as the first character in the text box in the configuration screen. If you do this,
then all the characters in the box will appear in the keypad in the order in which they appear in the box.
-o-
Using Hot Potatoes in other languages
Hot Potatoes version 6 provides two levels of language support:
1. Support for exercise creation in any language
If you are using Windows 2000 or XP, you can type exercise and configuration text in any language
supported by the Unicode standard. See Using Unicode for more information on this.
2. Support for viewing/translating the interface of the programs
When you first started up Hot Potatoes, you were probably asked which language you wanted to use in the
interface, and presented with a range of options. The range of languages in which the interface of the
programs can be displayed is limited to languages based on the 256 characters in the ANSI character set.
This includes all the accented characters such as é, è, ö etc. used in many European languages.
computers.
If your language falls into this group, but there is no translation for it available yet, you might want to
contribute one. See Translating the interface for more information on this. All the interface translations
distributed with the program have been contributed by members of our user community.
In version 7 of Hot Potatoes, we hope to have Unicode support throughout the applications, so that the
interface can be translated into Japanese, Chinese, Russian etc.
-o-
Introduction to the Masher
p17© Half-Baked Software, Inc., 1998-2004
The Masher is a tool designed to help you manage larger sites containing many Hot Potatoes exercises.
What the Masher does is to compile a whole unit of Hot Potatoes exercises in one go; as it compiles the
exercises, it automatically sets the URLs of the Next Exercise navigation buttons, so that the student can
easily work through the exercises sequentially. Also, you can set the colours and choose which navigation
buttons to display.
The Masher has its own Help file -- to view the Help, start the Masher program by double-clicking on its
icon in the Hot Potatoes folder, then press F1. It also has its own tutorial, accessible from the Tutorial link
on the Help menu.
-o-
The hotpotatoes.net hosting service
Many Hot Potatoes users have asked for a system by which they can track students' access to exercises
and retrieve their scores. This can only really be done using a server application, so in collaboration with
Creative Technology (Microdesign) Ltd in the UK, we have created hotpotatoes.net. If you get an account
on the hotpotatoes,net server, you will be able to upload your exercises directly from each Potato to the
server, and your students can log on to do the exercises. Their scores will be saved automatically, and you
can track their access times and performance through the hotpotatoes.net database. The service is located
here:
http://www.hotpotatoes.net
Please note that the hotpotatoes.net service is not free; you can create a demo account to test out the
features, but if you want your pages to remain on the server for more than a couple of days, you will have
to purchase an account. The hotpotatoes.net service is NOT FREE.
To upload an exercise to hotpotatoes.net, this is what you need to do:
1. Export the exercise (File / Create Web Page).
2. After export, you will see a dialog box which gives you the option of uploading to the server (shown
below) Choose the second option.
3. The program will then check for media files (called "assets") and other links in your exercise, so that it
can upload any files that are necessary. It will also check on the server to see if any of these files are
already there; if they are, you will be given the choice to upload them again, or not. Please note: there
is a size limit on individual nedua files on www.hotpotatoes.net. If one of your files is too large, the
program will warn you that it cannot be uploaded. See the documentation on the hotpotatoes.net
Website for details of size restrictions.
4. The program will ask you which class you want to upload the exercise for. On hotpotatoes.net,
students are organized into classes, and each upload is assigned to a class. If you haven't specified
any classes, you will see a default "Class 1".
5. The program will upload your page, tell you the URL, and offer to let you view it.
p18© Half-Baked Software, Inc., 1998-2004
You can also upload files which are not exercises to hotpotatoes.net. To do this, use the Masher. The
Masher has a special Hotpotatoes.net menu which allows you to upload single Web pages (or other types
of file, such as PDF or Word documents) to the hotpotnet server.
Support for hotpotatoes.net is provided by Creative Technology -- see the hotpotatoes.net Website for help
and information.
-o-
The Toolbar and Menus
The Toolbar
The toolbar is completely configurable in Hot Potatoes -- see Toolbar Options for more information on how
to do this. The toolbar can show a button for each menu command, and also some commands and
functions that are not available on the menus. Each toolbar button has a picture identical to that on the
corresponding menu item, if there is one. The buttons are arranged in sets, separated by vertical lines, and
each set corresponds to one of the main menus. Once you have used a Potato for a while, and you know
which menu items you use a lot, you can set up your toolbar to include buttons for those items (using
Options / Toolbar Options).
This is the complete range of toolbar buttons. You can jump to the relevant menu page to find out about
individual items.
File menu buttons:
Edit menu buttons:
Insert menu buttons:
Manage Question/Item menu buttons:
p19© Half-Baked Software, Inc., 1998-2004
Manage Grid menu buttons (JCross only):
Options menu buttons:
Help menu buttons:
-o-
The File menu
The File menu is basically the same in all the programs, although there are minor differences. Click
anywhere on the graphic to get specific information on each item. Note that JMatch has an extra File Menu
item called Flashcards; this enables you to create a Web page that functions like flashcards, for
learning/memorizing items prior to quizzing. JMatch and JMix also have drag-and-drop export items.
-o-
The Edit menu
The Edit menu is basically similar in all programs. Click on the graphic to get more details about the items.
p20© Half-Baked Software, Inc., 1998-2004
-o-
The Insert menu
The Insert menu is the same in all programs. Click on the graphics to get more information on the menu
items.
-o-
The Manage Questions menu
The Manage Questions menu is available in JQuiz, and a similar Manage Items menu is included in
JMatch (these are the only programs which include multiple items on one page). These functions allow you
to change the order of questions or items, by dragging and dropping, moving, inserting or deleting
questions. Click on the graphic to get more information.
-o-
The Manage Grid menu
p21© Half-Baked Software, Inc., 1998-2004
The Manage Grid menu is only available in JCross. It contains functions for changing aspects of the
crossword grid. Click on the graphic for more information.
-o-
The Options menu
The Options menu is the same in all the programs (with the exception of JQuiz, which has an extra Mode
setting). Click on the items to get more information.
-o-
The Help menu
The Help menu is the same in all the programs. Click on the graphic to get more information about the
items.
-o-
Help on specific programs
JQuiz
The main JQuiz screen
JQuiz is used to create question-based quizzes. A JQuiz exercise can contain an unlimited number of
questions, from four different question types, and each question can contain an unlimited number of correct
p22© Half-Baked Software, Inc., 1998-2004
or incorrect answers, each with feedback. Here is the main screen of the program. Click on the graphic to
get information about each feature.
-o-
JQuiz question types
JQuiz can create four different types of question: multiple-choice, short-answer, hybrid (a short-answer
question that turns into a multiple-choice question after several attempts), and multi-select (in which the
student has to choose several of a set of options, then check the choices). This is a detailed explanation of
each question type:
In multiple-choice questions, the student chooses an answer by clicking on a button. If the answer is
correct, the button caption will change to a smiley face :-), and if it's wrong, it will change to an X (you can
configure these bits of text in the configuration screen). In either case, the student will see feedback
specific to that answer, explaining why it's right or wrong (assuming you write the feedback when you make
the exercise!). If the answer is wrong, the student can continue choosing answers until a correct answer is
selected. The score for each question is based on the number of tries taken to get a correct answer. Once
a correct answer is chosen, the scoring is "frozen", but the student can still click on buttons to see the
feedback for other answers without penalty.
In short-answer questions, the students has to type the answer into a text box on the page, and press a
Check button to see if it is correct. The page will try to match the student's answer to a list of correct or
incorrect answers you have defined. If a match is found, the feedback for that answer will be shown. If not,
then the page will try to find the nearest match among the specified correct answers, and signal to the
student which parts of their answer are right and which parts are wrong. The score for each question is
p23© Half-Baked Software, Inc., 1998-2004
based on the number of attempts the student makes before getting a correct answer. You can also include
a Hint button, which will give the student one letter of the answer; using the Hint button incurs a penalty on
the score.
A hybrid question is a combination of a multiple-choice question and a short-answer question. In this type
of question, the student is first presented with a text box and asked to type the answer. However, if the
student fails to get the answer right after a specified number of tries (which you can configure in the
configuration screen), the question changes to a multiple-choice question to make it easier. When you are
creating a hybrid question, you'll see an extra checkbox on the right: Include in MC answers. Check this
checkbox for any answer you want to appear as part of the multiple-choice answers in the second phase of
the question. For example, your short-answer question may include four predicted correct answers which
would be acceptable, but you probably only want to include one of them as a multiple-choice option.
Finally, a multi-select question asks the student to select several of a specific set of items. The idea here
is that the student must select all the correct items, and not select all the wrong items. This type of question
might take the format "Which of the following are nouns?", followed by a list of words. The student must
check all the nouns, but not check any answers which are not nouns, then press a Check button. If the
answer is not completely correct, the student will see a readout of the number of correct choices, and one
piece of feedback; this would be the feedback from the first item in the list which was either selected when
it shouldn't be selected, or not selected when it should be selected.
-o-
JQuiz configuration details
The configuration for JQuiz includes a lot of prompts, because each type of question requires different
onscreen controls, responses and explanations. On the Other page of the Configuration dialog there are
options for shuffling the order of questions when the page loads, and shuffling the order of answers within
each question. You can also choose to have only a limited number of questions (selected randomly) load
each time the page loads. If you combine these options (shuffling of questions and answers, and random
selection of questions) you can create a quiz that will be different each time a student accesses it, making it
more useful for repeated practice.
Also, note that you can choose whether to make answer-checking case sensitive or not. In normal
circumstances, if you are making short-answer quizzes, it would probably make sense to have
case-sensitivity switched off, so that it doesn't matter whether the student enters an answer in upper case
or lower case. However, if your quiz asks for answers in sentences (as for example in the case of a
grammar exercise), then using the correct case where necessary might be part of the exercise. In this
case, case-sensitivity should be turned on.
Finally, both JQuiz and JCloze include the option to add an onscreen keyboard for students to type
non-roman characters into answer boxes.
For more information on the configuration screen and configuration files, see Configuring the output.
-o-
Beginner and Advanced modes
JQuiz is quite a complicated application compared with previous versions, and the full interface can be a
little intimidating for new users because of the range of features available. Therefore, on the Options menu,
there is a Mode setting so you can choose between Beginner or Advanced interface features. These are
the features which are hidden in Beginner mode:
Question Weighting
With this option, you can change the relative importance of different questions in the overall score. For
instance, you could set one question to be worth only 10, while another is worth 100 (the range is 0-100); in
this case, the score for the second question would be worth ten times as much as a component of the
overall quiz score than the score for the first question.
Another use for question weighting might be to give students one or two "trial questions" at the beginning of
a quiz, in case they're new to online exercises. If you set the question weighting to zero, then the student
can do the question without penalty; there will be no effect on their score.
p24© Half-Baked Software, Inc., 1998-2004
Percentage Correctness for Answers
Using this option, you can give answers a percentage value for correctness. Each question should of
course have at least one answer which is 100% correct -- the preferred correct answer -- but other answers
may be partially correct, and you might want your students to get some credit in the scoring for choosing or
typing a partly-correct answer.
Accept As Correct setting
This option allows you to designate that an answer should be "accepted as correct" if the student chooses
it, even if its percentage correctness is not 100%. This has the effect of "finishing" the question on the Web
page, so that no further tries will be accepted. If you want your exercise to behave like a traditional test,
where only one attempt is allowed, then you could set all your answers to "accept as correct".
-o-
JCloze
The main JCloze screen
JCloze creates gap-fill or cloze exercises. This is the main screen of JCloze. Click on the graphic to learn
more about its functions.
-o-
Adding alternate correct answers
When you gap a word in JCloze, you will see a screen like the one below. Click on it to learn more.
p25© Half-Baked Software, Inc., 1998-2004
-o-
JCloze configuration details
There are four unusual settings in the configuration of JCloze. Three are on the Other page of the
Configuration dialog box. The first is Use dropdown list instead of textbox in output. If you choose this
option, the following things will happen:
1. Instead of text boxes, each gap will show as a drop-down list, consisting of a list of all the gapped
words in the exercise.
2. The hint button will not be shown (because there's no need for hints if the words are all shown in the
list).
3. The keypad will not be shown (because there's no need to type answers).
The other settings on the Other page are these:
Make answer-checking case sensitive allows you to switch on or off case-sensitivity on the Web page
(as you can do in JQuiz). Include word list with text allows you to include a list of the gapped words from
the text, mixed up, in a box at the top of the page, to make the exercise a little easier.
The fourth setting is Include clue button for each gap, which is on the Buttons page. If you have
specified clues for your gaps, check this option to make sure that a button will appear next to each gap
which has a clue associated with it, so the student can see the clue. See Adding alternate correct answers
and clues for more information on this.
Both JQuiz and JCloze include the option to add an onscreen keyboard for students to type non-roman
characters into answer boxes.
For more information on the configuration screen and configuration files, see Configuring the output.
-o-
JCross
p26© Half-Baked Software, Inc., 1998-2004
The main JCross screen
This is the main screen of JCross. Click on the graphic for more information on each item.
-o-
Entering clues
When you have created your grid, you can click on the Add Clues button to enter clues for all your words.
At this point, the program will work out the numbers of the words, and show you the screen below. Note
that even after this, you can make any changes you wish to the grid; the program will remember the clues
you already entered and match them up with the correct words again, even if you move the words around
on the grid.
This is the Add Clues screen. Click on the graphic to get more information.
p27© Half-Baked Software, Inc., 1998-2004
-o-
JCross configuration details
Most of the configuration options for JCross are the same as those in the other programs. Exceptions are
crossword labels such as Clues Across and Clues Down.
For more information on the configuration screen and configuration files, see Configuring the output.
-o-
Printing in JCross
If you use the File / Export for printing option in JCross, the output is a Web page, and in order to print
this properly, you will need to set the print options in your browser correctly. For example, in Internet
Explorer, you will need to check the option "Print background colour and images". The same applies if your
students are trying to print a JCross crossword from their Web browser.
-o-
Case sensitivity in JCross
In a traditional crossword, all letters in the grid are in upper-case (capitals), and answers are not
case-sensitive. However, there are some circumstances in which you might want to allow lower-case
letters in the grid, and you might want to mark an answer wrong based on case. For instance, if you're
creating a crossword for phonetic transcriptions, A is not the same as a.
Beginning with version 6.2.0.6, JCross allows you to create case-sensitive crosswords. There are two
distinct controls involved:
First, you need to be able to enter lower-case letters into the grid. Normally, JCross upper-cases letters
you type into the grid automatically. On the Manage Grid menu, you'll find a menu item Force upper case.
p28© Half-Baked Software, Inc., 1998-2004
This is a checkable item. In other words, it can be on or off; when it's on, its icon appears pressed down,
and when it's off, it looks normal. The default is on, meaning that when you type into the grid, your letters
will be upper-cased automatically. If you turn it off, you will be able to type lower case letters into the grid.
The second thing to configure is the case-sensitivity of answer-checking. To do this, go to the
Configuration screen, click on the Other tab, and find the Make answer checking case-sensitive
checkbox. If this is checked, then if your answer contains lower-case letters, and the student types
upper-case letters, the answer will be marked wrong.
-o-
JMix
The main JMix screen
This is the main screen of JMix. Click on the graphic to get more information on how the program works.
-o-
Breaking up the sentence into segments
To create your JMix exercise, break up the sentence yourself into separate segments, making them as big
or as small as you like. To do this, just put each segment on a separate line. For example, to break up the
sentence "Yes, we have no bananas." into segments, you would type this into the main sentence box:
Yes
,
we
have
no
bananas
p29© Half-Baked Software, Inc., 1998-2004
.
Note that the comma and period are also on separate lines, so that they become separate segments. You
can of course have longer segments consisting of multi-word phrases such as "University of Victoria". Also,
you can break up one word into individual letters, to create a mixed-up word puzzle.
-o-
Brackets and quotation marks
In many languages (including English), the single quotation mark ( ' ) is used both as an apostrophe and as
a quotation marker:
He said, 'I need help.' (quotation marker)
I'm listening. (apostrophe)
In a JMix jumbled sentence exercise, it is difficult for the program to tell which of these is intended. The
single quotation is therefore always treated as an apostrophe; if you want to use quotation marks, please
use the double quotation ( " ) in JMix. It's probably best to avoid quotation marks altogether if you can.
Also, the angle bracket characters ( < and > ) are sometimes problematic on Web pages since they are the
delimiters for HTML tags, so these should be avoided unless you are using HTML tags on purpose -- for
example, by creating a drag-and-drop output page which uses pictures instead of words.
-o-
JMix configuration details
JMix has more buttons than the other programs, because the standard output exercises allow the student
to Undo previous actions, and both forms of output include Hint and Restart buttons. As in all the
programs, however, all these buttons except for the Check button are optional.
The Prompts/Feedback page of the Configuration screen has a checkbox item, Always capitalize first
letter. When this option is checked, the first letter of the student's answer will be capitalized (as it should
be in a normal sentence) while the exercise is being completed. If you are compiling for drag-and-drop
output, note that this option can cause slightly annoying behaviour under Internet Explorer; it can cause the
text on multiple segments to become selected. You might therefore want to turn the option off if many of
your users will be using IE. Also, if you are creating mixed-up-word puzzles (by breaking up one word into
separate letters), then you will probably want to turn this off.
For more information on the configuration screen and configuration files, see Configuring the output.
-o-
JMatch
The main JMatch screen
This is the main screen of JMatch. Click on the graphic to get more information about how the program
works.
p30You can also read