LESSON PLAN - SOUTHWEST PUEBLO POTTERY
←
→
Page content transcription
If your browser does not render page correctly, please read the page content below
LESSON PLAN – SOUTHWEST PUEBLO POTTERY

TITLE: Southwest Pueblo Pottery                                       TIME: 90 minutes

LEARNER POPULATION: grade level 5

CURRICULAR CONTEXT: part of Social Studies, U.S. History, unit: Southwest Pueblo
Indians

OBJECTIVES:
          By the end of this activity:
          1) Students will be able to compare different styles of pottery from the
             Southwest.
          2) Students will be able to identify world-famous potter Maria Martinez and her
             style of pottery.

CONCEPTS/INFORMATION:
          • The Pardee Home Museum’s collection of Southwest Pottery.
          • Different styles, colors, shapes, usages.
          • Maria Martinez, world-famous potter from San Ildefonso, New Mexico.

INSTRUCTIONAL SEQUENCE:
          1) Develop students’ interest by asking whether they have ever made something
             out of clay, whether they know what a potter does and how he/she works.
          2) Introduce the Pardee Home Museum, and show photos of different Southwest
             pottery at the Pardee Home Museum.
          3) Distribute handouts and let students work in groups to analyze the different
             styles of pottery. Let them guess about usage, age and how the pots might
             have been collected and brought into the museum.
          4) After about 20-30 minutes, let students report back from their groups and
             share their answers.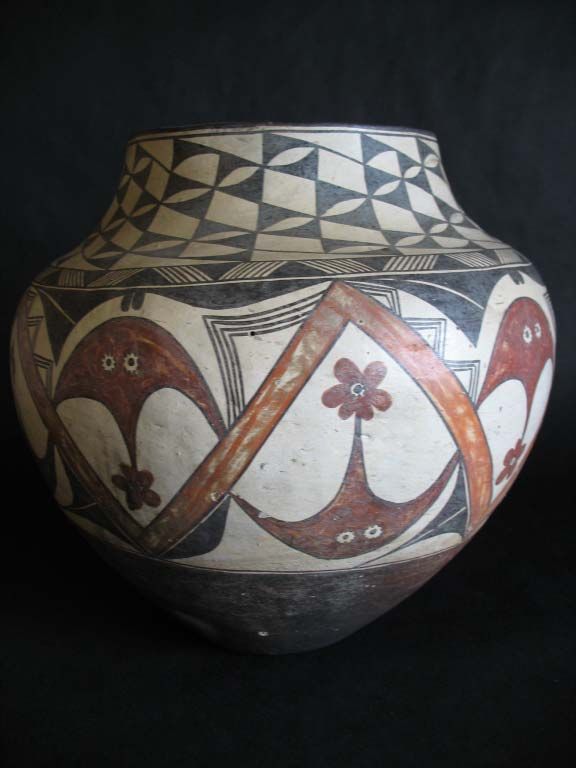
5) Introduce Maria Martinez; show a map of New Mexico to students.
       6) Ask students whether they have thought of pottery as an art, and explain why
          Maria Martinez is seen as an artist.

INSTRUCTIONAL MATERIALS: Background information Southwest Pottery;
background information on Maria Martinez; Handout; photos from Pardee Home
Museum pottery; Information about photos; pencils; map New Mexico; photos of Maria
Martinez and her husband Julian.

EXTENSION/CLOSURE:
   1) Ask students what kind of kitchenware they use. Is it pottery, plastic or metal, or
       do they use disposable materials? Talk about the environmental impact of using
       pottery vs. using disposable containers.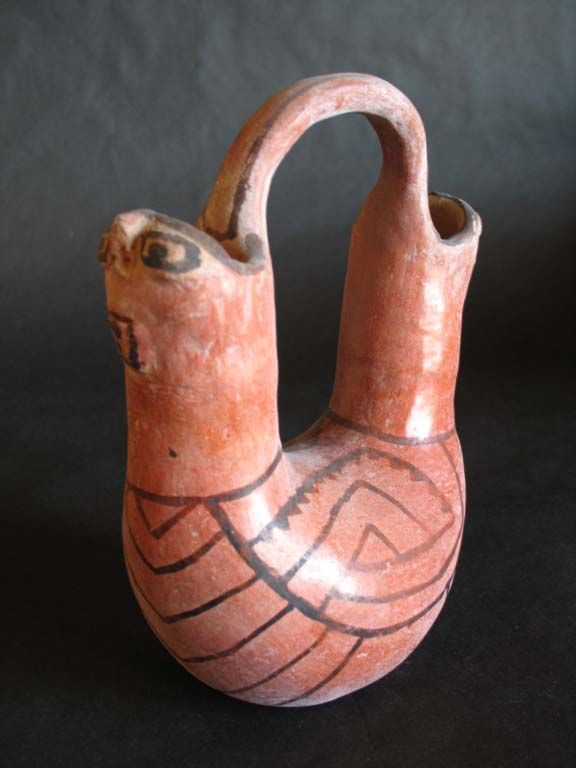
Background Information – Southwest Pottery

        As far as geography is concerned, the Southwest has been an isolated area: in the

south, it borders on the Sonoran Desert; in the north, the land rises to mountains and

canyons; in the west, you’ll find the canyons of the Colorado River; and in the east there

are remote, isolated trading passes leading to the Southern Plains. This is why indigenous

people in the Southwest were mostly isolated from other Native American groups. This

isolation meant stability and cultural continuity. However, they were not totally isolated

but also traded with other people.

        The first people living in that region were the Hohokam, Anasazi and Mogollon,

who were prehistoric peoples that settled in the area, and their cultures were heavily

influenced by Mexican cultures. The earliest settlers were hunter and gatherers, moving

from one area to another to harvest seasonal foods. By 300 BCE, they cultivated early

varieties of corn, but that was only a small part of their diet. Over the next several

hundred years, they became more dependent on domesticated foods, such as beans,

squash, and other native plants, and started leading a settled, agricultural life. They built

and lived in mud-brick houses which the word “Pueblo” refers to. When the Spanish

arrived in the area in the 1500s, they named these settlements “pueblos”, meaning “town”

or “village;” today the term also refers to a village of Pueblo Indians, to the people or

their culture.

        Today, you can find many ancient ruins of houses and villages in the Southwest.

What were the reasons why people left? Archaeologists, scientists who study the past,

have several theories: 1) there was a drought in the 13th century that might have wiped

out the villages; 2) villages might have been subject to raiding by other Indians, starting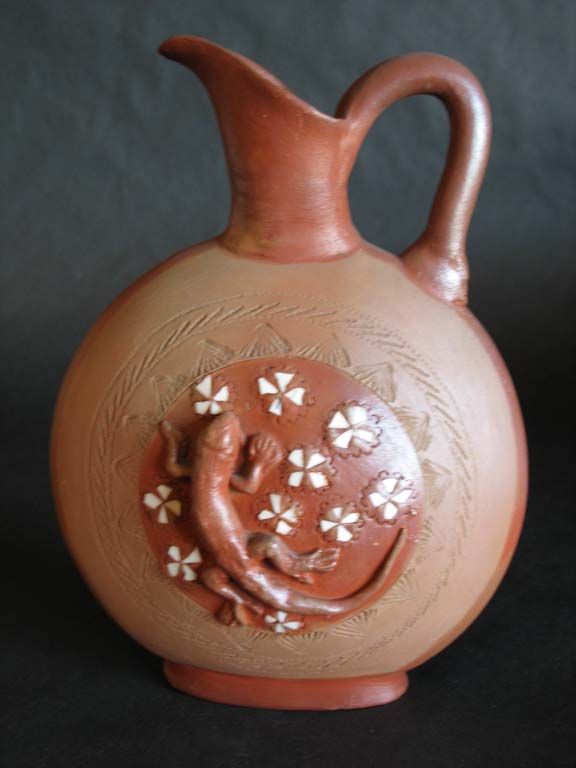
in the 16th century; 3) European influence beginning in the 17th century, brought such

drastic changes and diseases to the region and killed many of its people, so that places

were abandoned.

       The art of pottery arrived from Meso-America at around 500 AD; it was further

developed by the ancestors of the Pueblo people. Each Pueblo community possessed and

still possesses its own unique pottery tradition, based on local sources of clay and

pigment, and on production techniques. In Pueblo Pottery, we see hundreds, even

thousands of traditions which are all expressions of different Pueblo groups and

individual potters. However, today only a few pueblos still make pottery for their own

general use. Mostly pottery is made for the tourist trade: tourists visiting Pueblo

communities, or artists selling their ceramics to shops or collectors. Different pottery

styles have different names. The naming of pottery usually comes from a place name – a

town, river or archaeological site – followed by the description of the color or surface

treatment of the pottery, for example “Mesa Verde Black-on-White”. A common,

recurring theme in pottery is water and fertility: water is symbolized by repetitive

patterns, either spiral (symbolizing water beneath the ground) or diagonal, stepped lines

(water falling from clouds in the sky). Animals, such as a fish or a snake, clouds and

lightning, were also associated with water and with the rainy season, and this was

integrated onto ceramics by wildlife, birds, butterflies and insects.

       The Pueblo Indians and their ancestors have been around for thousands of years,

which can be seen in archaeological finds from the region. As was mentioned before, the

earliest pottery was made at around 500 AD by the ancestors of today’s Pueblo Indians.

In the north, potters established a tradition of black-on-gray or black-on-white, and in the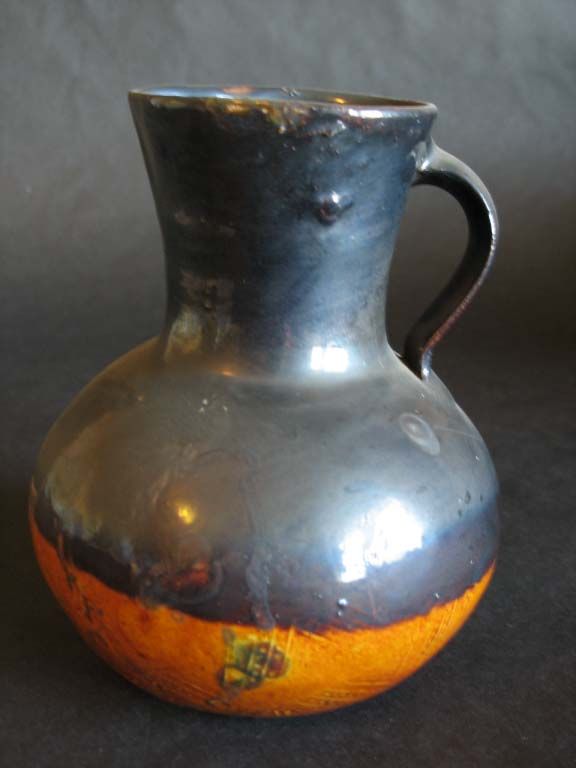
south, pottery was mostly of a brown or buff color. Around 1000 AD, people in the

Southwest developed a new technique. The entire vessel would be covered with a “slip”,

a thin layer of watery clay that would fire to a red or black or white color. Before the

firing, they painted on black decorations. At about 1200 AD, we see an equal popularity

of colored wares and black-on-white wares, but already a century later, colored wares

dominate.

       In the 16th century, several groups of Spanish explorers came through the area,

and the first permanent European colony, Mission San Gabriel, was established in 1598,

settled by Juan de Onate. This is close to where San Juan Pueblo is today. In the year

1680, a revolt against the Spanish takes place and this drove the Spanish away for 12

years. However, thereafter the Southwest was re-conquered, and the Pueblo Indians were

forced to shed their religions and cultures and convert to Christianity.

       During what is called the Classic Period (1700 – 1760) in Southwest Pottery, jars

and bowls are considered very beautiful with many fine features, such as flaring rims,

angular bends in the surface, concave bases, and lips at the rim top. Design was also

precise. A very common symbol was the sacred feather and the use of red color. At the

end of the 18th century, however, pottery was less precise and instead became more

utilitarian. Design patterns grew more abstract and geometrical.

       After the independence of Mexico from Spain, trade routes were established with

the United States. This way, new products, like metal dishes and pans, came into the

region. This resulted in a decrease in the demand for pottery. Nevertheless, there was a

new freedom in design in the pottery. Potters incorporated birds, animal and floral

patterns. Between 1880 and 1900, the region saw much change with the introduction of a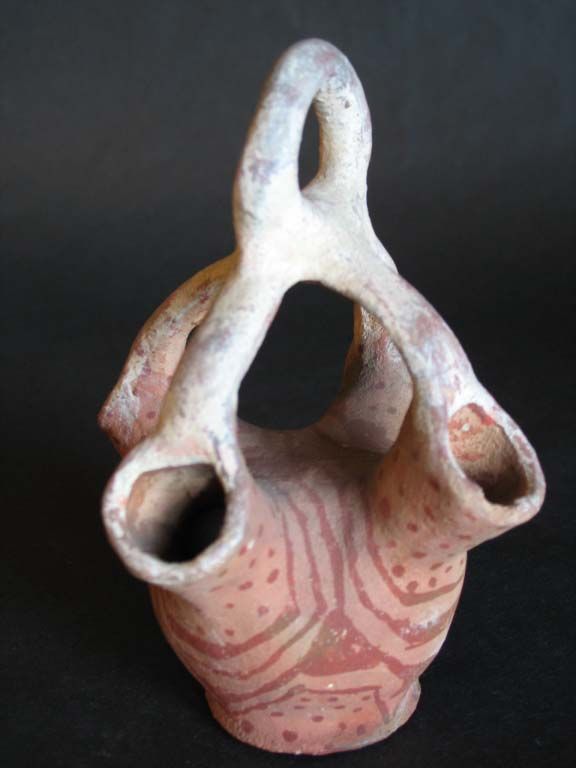
new railroad. Until the arrival of the railroad, Pueblo potters supplied European settlers

with important household utensils; afterwards, their pottery was replaced by

commercially made tin ware and porcelain. Furthermore, the railroad brought tourists,

collectors and anthropologists into the region, which resulted in the development of new

styles emphasizing beauty over strength. At the beginning of the 20th century, in what is

called the “Commercial Period,” most of the pottery was made of poor quality, a

consequence of mass tourism. Collectors bought even less Southwest pottery, which

again resulted in a decline in pottery making; some pueblos even completely stopped

making pottery. During the 1920s, there was a renewed interest by anthropologists and

artists in crafts of the Pueblo Indians, and the annual Indian Market in Santa Fe was

established where Pueblo Indians would sell their wares. Potters developed many new

styles that were beautiful and attractive, and also they started making miniature pots and

jars which would fit into tourists’ suitcases. Since the mid 1960s, people have started

paying more attention to Indian affairs, and there has been an increase in demand for fine

Indian arts and crafts, so that they are popular to collect today.
Background Information on Maria Martinez

        Maria Martinez, the world famous potter, came from San Ildefonso Pueblo, which

is a quiet community located 20 miles northwest of Santa Fe, New Mexico. For centuries,

their traditional pottery style was a polychrome ware with black decorations in paint

made from vegetal materials, and red decorations derived from a clay “slip” which is a

fine layer of clay that is applied to pottery before the firing.

        Around 1880, the village Maria Martinez lived in experienced a revival of pottery

making, and many residents began learning the craft from older women who still knew

the techniques. However, they also developed new styles to attract tourists and collectors.

        Maria Martinez is one of the most famous potters of the American Southwest. She

was born in the late 1880s (probably in 1887) as a member of the Tewa-speaking Pueblo

of San Ildefonso in northern New Mexico. As a young girl, she learned to make typical

Pueblo-style pottery by watching her elders and then doing it herself. Later on in life, she

mostly worked together with her husband Julian, who painted designs on her pots,

ranging from simple geometric patterns to complex ones, incorporating motifs from the

Pueblo world.

        The couple is very famous for what is known as “San Ildefonso Black-on-Black,”

which was created by them before 1920. They took the old idea of plain black pottery and

introduced two changes:

        1) They painted parts of the polished pots with a color made from minerals before

        they baked or “fired” them. This resulted in those parts having a matte finish,

        whereas others come out glossy black. The glossy black was achieved by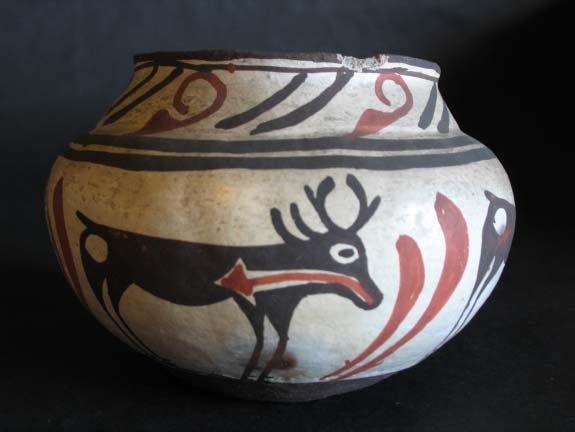
“burnishing,” which meant rubbing the leather-hard clay with a smooth stone

       before firing.

       2) They paid more attention to the firing of their pottery, employing a technique

       called “reduction firing,” which had a much deeper, more uniform black color as

       its outcome. During the process of reduction firing, oxygen is excluded from the

       central part of the fire where the pottery is located, which results in a closed and

       smoldering fire. Red slip or paint turns dark gray or black; white slip or clay turns

       into cool shades of light gray.

       Furthermore, what was new was the discovery that a personal identification with

their pots increased their market value. Therefore, they fashioned themselves as artists as

the Western world understands the term and started signing their pieces. This led to the

widespread recognition that each piece of Pueblo pottery was a unique work by an

individual creator, and pottery making was accepted as an art. However, first Maria

Martinez was encouraged to sign with “Marie,” which would be more familiar with non-

Pueblo people; later she switched to “Maria” or “Poh’ve’ha,” her Tewa name, meaning

Water Lily.

       Maria also worked together with many museums, for example the Museum of

New Mexico. Her expertise helped researchers, for example Edgar Lee Hewett, the

director of the museum, in their studies of the prehistoric Southwest. They encouraged

her to do her pottery and provided opportunities for her to earn a living from her art. She

was also asked to replicate some of the pottery that had been found in archaeological

excavations near San Ildefonso. In 1904, Maria and her husband demonstrated at the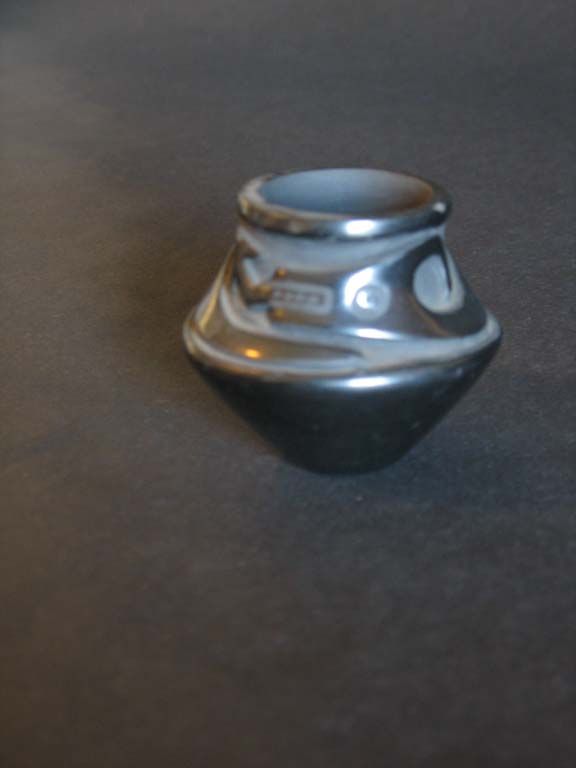
Louisiana Purchase International Exposition in St. Louis; they also participated in fairs in

San Diego, Chicago, San Francisco, and New York. Maria Martinez died in 1980.

                    Photo of Maria Martinez and her husband Julian Martinez

                  Source: Penney, D. W. 1998. Native Arts of North America. Paris: Terrail.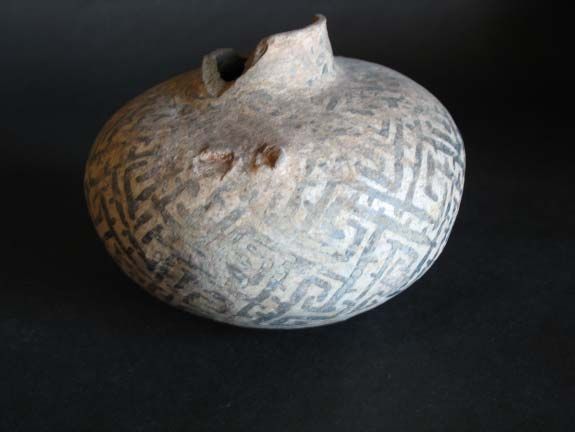
Map of Pueblos in New Mexico
Source: Harlow, F.H. 1977. Modern Pueblo Pottery. 1880-1960. Flagstaff: Northland Press.
Handout – Pueblo Pottery
Group work
Let’s look at some examples of Pueblo Pottery from the Southwest of the United States.
Compare the different kinds of pottery! Talk about:
Shape:
Design:
Color:
Usage:
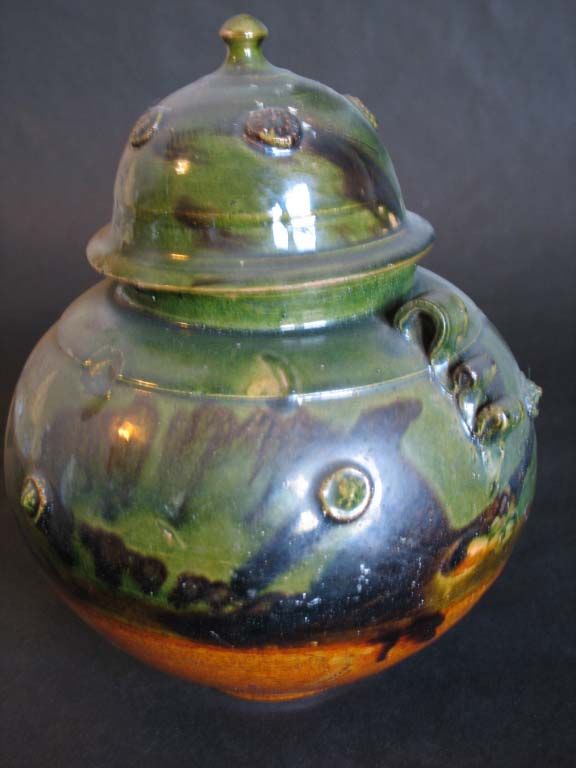
Age:Jar with lid from Mexico
Pitcher from Mexico
Water Bottle from Arizona
Water Jar from Mohave
Jar from San Ildefonso, New Mexico
Pitcher from Mexico
Zuni Bowl
Acoma or Zuni bowl
Aztec Jar from Mexico
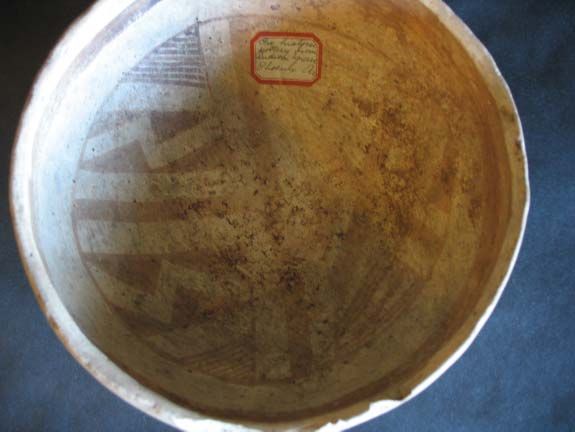
Hopi Bowl from Arizona
Acoma Pot
Museum Catalogue Information on Objects

Jar from Mexico
A round, two-handled, hand-thrown jar with a lid. Terracotta clay with a green glaze
through which a dark brown color is added. The color stops half-way down body. 7
Medallions and 2 handles have been attached to sides. The bottom is uneven and causes
jar to sit unevenly. 17.1 cm diameter, 16cm tall. From Mexico.

Pitcher from Mexico
A hand-thrown, Terracotta colored clay pitcher with one handle and a spout. A very dark,
almost black color extends from an inch inside neck to half-way down outer surface.
Small designs have been pressed into surface of bottom half. Entire outer surface is shiny.
14 cm diameter, 17.2 cm tall. From Mexico.

Water Bottle from Arizona
Oval-shaped body with 2 spouts and a connecting handle. Eyes, nose and mouth are
formed at end of each spout. Terracotta-colored slip, polished. Line designs on body and
across handle, and features done in black paint. Square eye-liner and tongue. Faces and
handles rough feeling. Paper sticker on bottom “Papago – Arizona”. 20.2 cm tall, 15.5 cm
wide, 8.8 cm deep. From Maricopa, Arizona.

Water Jar from Mohave
A round jar with 4 spouts. 4 pieces of clay connect spouts to a ring at top. Surfaces are
rough. Body of jar is light terracotta color and line and dot design is painted on in darker
terracotta color. Handle is off-white color. Splatters of white on sides and spouts. 16 cm
tall, 35.6 cm circumference. From Mohave.

Jar from San Ildefonso, New Mexico
Round mouthed, largest part of body and base. Tapers out from base. A snake-like form
circles the shoulder/neck of jar. The background is inset and is a dull black. All other
outer surfaces are smooth, shiny black. Facial features are dull black. “Juanita” written on
bottom in pencil. 6.8 cm diameter, 6 cm tall. From San Ildefonso, New Mexico.

Pitcher from Mexico
A flattened round body with handle and spout on top edge. Designs on both sides pressed
or cut in circular designs. A lizard made of the same terracotta colored clay had been
attached near center of each side. Small shards of predominantly white glass pressed into
central area in groups of four. Centers, edges, handle and spout appear to be coated in
darker red. 24.5 cm tall, 18.5 cm wide, 10.4 cm deep. From Mexico.

Zuni Bowl
Round bowl, short neck. Off-white background. Design painted in red and black. Around
bowl four black deer with red arrows from mouth to heart and a white spot on rump.
Bottom area solid black or dark brown. Chip broken out of rim and out of bottom edge.
Written in pencil on bottom “Zuni, NE Arizona”. Written in pencil on side of bowl “$
1.00”. 15.5 cm diameter, 11.5 cm tall.

Acoma or Zuni Bowl
Round bowl shape with a flat top with mouth in center. Off-white background with
geometric designs painted on in red and black. Bottom and 0.5 cm up painted solid red.
Round black spots follow some of the lines and forms. 11.4 cm diameter, 6 cm tall.
Acoma or Zuni Pueblo.

Aztec Jar from Mexico
Round body, rounded bottom, short neck, round opening. Grey-tan clay. Hand-built.
Appears to have had 2 handles as pieces of them are still visible. Red and white sticker on
bottom “Aztec from Gra…..., Mexico”. Outer surface white with black line design from
top of neck to ¾ down bowl. Surface has dents and scratches. Large portion of neck
broken off. Crack around one side of base of neck. Design worn off or smeared. Perhaps
dating around 1100-1200 AD. 16 cm diameter, 12.5 cm tall.
Hopi Bowl from Arizona
Round clay bowl, uneven rim, round bottom. Beige colored clay with light and dark
colored designs. Outside: one dark brown design. Inside: light brown band, not meeting,
near lip. Design covers inside of bottom. Spots of grey and brown inside and outside. Red
and white sticker inside “Pre-historic pottery from Indian grave, Phoenix, Arizona”.
Perhaps dating after 1100-1200 AD. 21.8 cm diameter, 9.3 cm tall. From Hopi, Arizona.

Acoma Pot
Large round, blue, white, red, and orange stoneware pot. Slip decoration painted on.
Bottom 2/3 is bowl shaped, then it curves in to open top 18.5 cm diameter. Curved area
decoration is white chain of ovals inside navy checkerboard of parallelograms. At
beginning of curve is a band of alternating diamonds and white lines. Bowl part has
orange zigzag, wide lines with flowers and circular shapes, and dark zigzag lines. 107cm
circumference, 31.3 cm tall. Acoma.
LESSON PLAN – STORYTELLING

TITLE: Storytelling                                                 TIME: 90 minutes

LEARNER POPULATION: grade level 5

CURRICULAR CONTEXT: part of Social Studies, U.S. History; unit: Southwest Pueblo
     Indians

OBJECTIVES:
     By the end of this activity:
     1) Students will be able to narrate a story originating from the Southwest.
     2) Students will be able to sing a song from the Southwest.
     3) Students will be able to illustrate the story.
     4) Students will be able to compare and contrast the story with stories from their
     own cultures.

CONCEPTS/INFORMATION:
     • Narrating a Southwest Pueblo story.
     • Singing a Southwest Pueblo song.
     • Drawing pictures about the story.

INSTRUCTIONAL SEQUENCE:
      1) Read the story of “The Giant and the Elf” from Picuris Pueblo to the students.
      2) Teach “The Elf’s Song” to the students.
      3) Let students decide whether they want to draw (parts of) the story, or act it out.
      Students can take time to draw and paint, and others can form groups and work on
      a theater performance.
      4) Let students show their work in class.
INSTRUCTIONAL MATERIALS: Background Information on story “The Giant and the
Elf”; Handout “The Elf’s Song”; paper, pencils, crayons, watercolors.
EXTENSION/CLOSURE:
1) Give students the opportunity to reflect on their own cultures by comparing and
contrasting the story and the song with one from their own culture. This makes it
possible for students to contribute something from their background to the
classroom discussion.Background Information: Story of “The Giant and the Elf”
During the winter time, many Pueblo people believe that the world takes a rest
and sleeps for some time. During this time, children love to sit inside the house and listen
to their parents or grandparents tell stories. Many of the stories include songs that are
repeated throughout the story. The person narrating the story plays the main character and
sings their song.
The following is a story that is told among the Picuris:
The Giant and the Elf
Long, long ago, there used to be a giant who came to people’s houses and stole
the children. He put them in his pack basket and carried them off to his home. Now, in
those days, the elf was living on Jicarita Mountain, and one day the giant came up the
mountain looking for children and saw the elf. “Come, get into my basket,” he said.
“Why?” said the elf. “I said get into my basket! If you don’t do it I’ll catch you and put
you there.” Then he picked up the elf, put him into the basket, and started off for home.
Inside the basket the elf began to sing. As he sang, the basket went up and down, up and
down, and this is the song he sang.
Sing “The Elf’s Song” with repeat and first verse only.
The giant couldn’t hear the singing inside the basket, but he could feel the basket
bouncing up and down. It made the basket seem very heavy, and by the time he got home
he was dripping with sweat and all tired out. Right away he lay down and took a nap.
While he was sleeping, the elf climbed out of the basket and discovered a big pile
of bones. As it happened, he had his medicine bag with him. So he took out a littlemedicine, chewed it, and spit it on the bones. Then he said to the bones, “Little children,
get up!” And immediately all the children the giant had eaten came back to life and stood
up. Right away he sent two of the children to find him some pitch. They returned very
soon with what he wanted. Then all the children who had been brought back to life
rubbed the magic pitch on the elf’s body so that the giant would not be able to kill him.
When this had been done, the elf turned the children back into bones.
Now the giant woke up and stirred the fire with his poker stick. “Oh, there you
are, my little one,” he said to the elf. Then he said to himself, ”Tonight I’ll have a nice
dinner. This little boy looks fat.” Then he put the elf in the fire to roast. As the elf went
into the fire, he chewed a little of the medicine from his medicine bag and spit it on the
flames. Then he began to sing. “Why, this little boy sings very well,” said the giant, and
he lay back and listened to the song.
Sing “The Elf’s Song” with repeat and second verse only.
By the time the elf had finished singing, the giant was sound asleep. Then the elf,
with sparks flying, came out of the fire. He picked up the poker stick and hit the giant on
the head and killed him. Once again, he spit medicine on the bones, and all the children
began to rise up. He said to the children, “I’ve killed the old giant who’s been eating you
up. Now you can go home to your parents, who are thinking about you. I too have a home
far away and a grandmother there who is thinking about me. I must go. You go too.”
They all started out. And from that time on there were no more giants.
Source: Bierhorst, J. 1979. A Cry from the Earth. Music of the North American Indians. New York: Four
Winds Press. Pp. 40-43.Source: Bierhorst, J. (1979). A Cry from the Earth: Music of the North American Indians. Santa Fe: Ancient City Press.
LESSON PLAN – TAKING A CLOSER LOOK

TITLE: Taking a Closer Look                                           TIME: 90 minutes

LEARNER POPULATION: grade level 5

CURRICULAR CONTEXT: part of Social Studies, U.S. History; unit: Southwest Pueblo
     Indians

OBJECTIVES:
     By the end of this activity:
     1) Students will be able to describe, analyze and interpret a work of art or an
     artifact.
     2) Students will be able to identify certain art concepts, like color, shape, design,
     pattern and texture.
     3) Students will be able to compare and contrast the art/artifact with objects from
     their own culture.
     4) Students will have learned how to work together as a group, and exchange,
     explain and appreciate each others’ ideas.

CONCEPTS/INFORMATION:
     • Describing and analyzing art by using concepts like, color, shape, design, pattern
     and texture.
     • Interpreting art by taking guesses about its cultural context and about the artist
     who made it.
     • Comparing and contrasting art/artifact with one’s own cultural objects.

INSTRUCTIONAL SEQUENCE:
       1) Teacher brings in a work of art or a visually interesting and stimulating object.
2) Inform students that they will describe, analyze and interpret a work of art.
Explain the exercise to them, which will take place in several steps, outlined on
the handout.
3) Using the guidelines on the handout, show the art/artifact to the students.
Afterwards, let them describe what they saw; then just follow along with the
handout.
4) Read out each question aloud for the students, and have them write down their
answers. Or assign a certain time frame (10-15 minutes) for each sequence and
have students work silently.
5) Group work: Let students exchange and discuss their ideas within their groups,
and have the groups report back their ideas to the whole class. Within groups,
assign different roles (praiser, checker, recorder, task monitor, gate keeper).
INSTRUCTIONAL MATERIALS: Handout; interesting and stimulating art or artifact;
pencils; handout group roles
EXTENSION/CLOSURE:
1) Give students the opportunity to reflect on their own cultures by comparing and
contrasting the assigned subject with art or artifacts from their own culture. This
makes it possible for students to contribute something from their background to the
classroom discussion.TAKING A CLOSER LOOK I. DESCRIBE WITHOUT LOOKING BACK, list what you saw: Look again. Correct your list. What else do you see now that you missed the first time? Sketch a miniature drawing of this art object: What materials did the artist use? What tools did he/she use? How many different colors can you see? How would you describe the object’s texture? How many different textures can you find? How would you describe its overall shape? How many different shapes exist within the overall shape?
II. ANALYZE:
This work of art is mostly (circle one):

       Three-dimensional (it has a height, width and depth)                 Flat

On your sketch, mark where the focus of attention is in this art object. How has the artist
drawn your eye to this spot?

Why is this spot important?

Which of the design elements are most important in this work of art – color, shape, or
texture? Why?

How is the surface of this object decorated?

What tools and materials were used to create the decoration?

Where, if at all, does the artist use pattern on the object?

Draw the repeating part of the pattern in the space below:
III. INTERPRET: What images, if any, does this object represent? What is the purpose of this work of art? Imagine, later research, the place this object was made or used. What people are around? What are they doing? Imagine, later research, what the person who made this object was like: Imagine, later research, who the owner of the object might have been: Where artist and owner one and the same? If not, how do you think the owner acquired the object? (How did the object get into the museum?) If you were a reporter interviewing the artist, what questions would you ask?
How do you think the artist felt about this object?

Why do you think the artist created this work?

How are the artist’s personal beliefs or values revealed?

What object in your culture serves a similar purpose? Why?

What object in your culture has a similar appearance? How?

How easy is this work of art to understand? What else would you like to know?

Is this a work of art you would like to own? Why or why not?
LESSON PLAN – MAKE YOUR OWN POTTERY

TITLE: Make your own Pottery                                             TIME: 90 minutes

LEARNER POPULATION: grade level 5

CURRICULAR CONTEXT: part of Social Studies, U.S. History, unit: Southwest Pueblo
Indians

OBJECTIVES:
          By the end of this activity:
          1) Students will be able to work with clay.
          2) Students will be able to make a pot out of clay.

CONCEPTS/INFORMATION:
          • How to make pottery.
          • How to work with clay.
          • Learning the different steps of making a pot.

INSTRUCTIONAL SEQUENCE:
          1) Review with students what they have learned about Southwest Pottery.
          2) Explain to students how one works with clay, and go through the different
             steps of making pottery.
          3) Introduce the idea to students that they will work with clay today. Set up rules
             beforehand: clear up work space, clean-up, etc.
          4) Distribute aprons, clay, water and utensils
          5) Help students in working with clay and reiterate the different steps of making
             a pot.
          6) At the end of the lesson, pots are left in a safe space to dry.
          7) Teacher takes pots to be burned.
INSTRUCTIONAL MATERIALS: Handout Pottery; clay; aprons; utensils; water containers; water. EXTENSION/CLOSURE: 1) Students can learn about the chemical characteristics of clay.
Background Information – Pottery

How to make pottery:

       First, you need to collect clay and remove coarse stones and gravel. Then, potters

add “temper,” material such as fine sand, rocks or potsherds, which gives body to the

paste. This will prevent stickiness and cracking during drying and firing. Various

Southwest Pueblos use different types of temper which makes archaeological

identification possible. Afterwards, the clay is mixed with water, and it is ready to be

modeled. Potters did not really use the potter’s wheel but rolled ropes or coils of clay to

build up vessel walls which are then smoothed out. The pot is left to dry to a leathery

hardness; afterwards, the potter scrapes the walls or slaps the pot with a wooden paddle

while a rock or another smooth object is held inside as an anvil.

       The next major step is the application of a slip. A slip is a thin layer of diluted

clay before the firing and hides the roughness of the surface and can be polished to make

the surface less porous. Furthermore, it absorbs and binds color pigments to the basic

clay. Then, the potter does some polishing with a smooth stone that is rubbed over the

damp slip. Alternatively, a piece of leather or smooth bone can be used. It is important to

paint the designs on before the baking or firing. Pueblo Indians used vegetal or mineral

pigments. Vegetal pigments are made by boiling leaves and stems, which results in a

thick brownish juice. The mixture can be dissolved with water when needed. Vegetal

paint soaks into the polished slip and becomes black when fired. Iron minerals applied to

the surface result in black and dark-brown colors, or in red, orange and tan colors
depending on the presence or absence of oxygen during firing. The mineral paint adheres
to the surface.
The firing of Pueblo pottery is usually done outdoors on the ground which is
warmed by a preliminary fire. The potter builds a supporting structure of stones or sheets
of metal or wire, and the pots are placed upside down. Fuel, such as dried dung, bark and
wood, is piled up around the vessel. Very important for a successful firing is the
maintenance of consistent heat. There are two basic types of firing, “reduction firing” and
“oxidation firing.” During the reduction firing process, air flow and oxygen are excluded
from the central part of the fire where the pottery is located. This creates a closed and
smoldering fire. The red iron slip or paint turns dark gray or black, and white slip or clay
turns into cool shades of light gray. Oxidation firing allows a draft of oxygen-rich air to
bathe the vessel. Red slip and paint become a warm brick-red color, and a white slip
results in shades of cream, tan, orange and yellow.
Different types of pottery:
1) Cooking vessels are usually not decorated or even smoothed on outside. Only the
inside has a smooth surface to facilitate cleaning.
2) Household bowls are simple, rounded, and have a wide mouth, e.g., a dough bowl to
bake bread.
3) Household jars have tall proportions with a narrow neck. One variation with a handle
on one side is a pitcher, e.g., a water jar.4) Ceremonial vessels are very different in design. In ancient times, pottery was often
buried with the dead, which was later forbidden by Europeans. Usually they were
decorated by men, since these ceremonies were limited to them.
5) Commercial pots were made for sale and barter by Pueblo Indians for at least 14
centuries.
Important Terminology
glaze: pottery is covered by a glass-like film; will remain firm when wet
hatching: painted decoration consisting of straight or occasionally wavy, closely spaced
lines; diagonally or at right angles, as fillers between framing lines
incising: decorative technique; use of pointed instrument to draw simple designs on
exterior surface
polychrome: with two or more painted or slipped colors on the same vessel
slip: application of very fine-grained clay to surface of a vessel to create color or cover
imperfections, provide a uniform-texture surface for polishing, and provide contrast for
painted decoration
temper: coarse to fine crushed sand, crushed sandstone, igneous or metamorphic rock, or
crushed potsherds are added to clay to counteract shrinkage during drying and firing
Technique of making pottery:
1) collect and clean the clay
2) add “temper”: gives body to the paste; then mix with water
3) ready to be modeled: rolled coils are put on top of each other to build up walls of
vessel; smoothing the coils
4) left to dry to leathery hardness; afterwards scraping of walls
5) application of “slip”
6) “burnishing”: polishing with smooth stone or with piece of hide or fabric
7) painting on of designs (use of vegetal or mineral pigments)
8) firing on a structure of stones or wire; use of bark, dried dung or wood as fuelResources for Teachers
Bierhorst, J.
1979 A Cry from the Earth: Music of the North American Indians. Santa Fe:
Ancient City Press.
Harlow, F. H.
1977 Modern Pueblo Pottery 1880-1960. Flagstaff: Northland Press.
Hegmon, M.
1995 The Social Dynamics of Pottery Style in the Early Puebloan Southwest.
Cortez, Colorado: Crow Canyon Archaeological Center.
Mera, H. P.
1938 Pueblo Designs. 176 Illustrations of the “Rain Bird”. New York: Dover
Publications.
Peckham, S.
1990 From This Earth. The Ancient Art of Pueblo Pottery. Santa Fe: Museum of
New Mexico Press.
Penney, D. W.
1998 Native Arts of North America. Paris: Terrail.
Copyright: Johanna Fassbender 2006You can also read