Lunar perception Project. Moon's view from different latitudes on earth.
←
→
Page content transcription
If your browser does not render page correctly, please read the page content below
Lunar perception Project.
Moon’s view from different latitudes on earth.
Autor: Edmundo Garron
email: edmundo.garron@gmail.com
Date: February to May, 2010.

Abstract
Based on pictures of the moon taken from several observers located at different latitudes, a
composition of the crescent moon was made. It shows that the moon looks exactly the same to all
observers, as long as the moon is transiting the meridian of any given location. However, northern
latitudes and southern latitudes observers will see the moon “flipped” horizontally to each other.
On the other hand, the angle of the moon’s terminator to any observer will be affected by the
latitude of where the observer is located. Moon rise and moon set are the moments where this
angle difference is stronger.

Introduction
Is the moon’s view the same for all human beings that inhabith on earth? Being our planet almost
an sphere, wil it be posible that the moon’s view being affected by the observer’s latitude?

Those two questions were the ones that trigger this project.

Objective
The objective of this project was to evaluate the output from a 3D model developed to show
moon’s phases formation1. In the 3D model the angle formed by the lunar terminator and the
observer’s horizon differs for several latitude observations.

Materials and methods
In order to collect data (moon’s pictures) for this project several volunteers were recruited from all
over the world, from different earth latitudes2. The volunteers received precise instructions on
how to take the picture, so the way the picture was taken should not vary from observer to
observer3. It was instructed that the picture should be taken with any regular, digital camera. Due
the massive use of this digital cameras, otherwise the project will risk not to have enough
volunteers. It was also stablished the date for the pictures. Coud be either March 22nd, 23rd or 24th.
Being the perfect date 22nd, day of the crescent moon. A picture of the day before or after will be
good enough. The three day window opportunity was set with possible cloudy skies in mind, at the
observer’s location.

1
  Appendix: 3D simmulation model for moon phases.
2
  Appendix: List and location of volunteer observers.
3
  Appendix: How to take the picture.
Once data
      d      (picturess) collected, the next step is to create the
                                                                t image com    mposition witth the gatherred
data. Moon’s
      M          pictures will be so orted based on the latitude’s observeer. The next step
                                                                                          s      will be the
                                                                                                         t
analysiis of the pictuures. Basicallyy, two resultss are spected:: a) that the moon’s
                                                                               m      terminator angle will
                                                                                                         w
be varyying consistently from 90ºº North to the ecuator, an     nd backwardss from ecuato or to 90º South.
Or b) the moon’s te  erminator willl be the samee to each obseerver.

Results
Accord
     ding to the previously desccribed proced
                                            dure, a compo           w obtained4.
                                                        osite image was

Regretttably, high latitude north hern hemisphere observeers, 45º and
                                                                    d up, had clo   oudy skies th hat
prevennt them to takke the picturee. However, the
                                              t project co
                                                         ould continuee despite thiss important laack
of dataa.

4
    Appen
        ndix: Resulting composite image, bigger.
The image size of the moon varies considerably from observer to obsever, this is due the kind of
imaging camera used to take the picture. As explained in Materials and methods, the observers
were instructed to take the pictures with regular digital cameras.
Discussion
From the several pictures taken, it is clear that there is neither significant nor consistent variation
of the moon’s terminator angle to earth, for all observers’ location. Although there are some
variation in the terminator’s angle, but they origin is the way the picture was taken and not due
the latitude of the observer location.
The conclusion for this facts is that two or more given observers will see the moon in exactly the
same way (and the same moon’s terminator inclination) from each other as long as they see the
moon when it is transiting or on the observer’s meridian5. However, should be taken in account
that the northern hemisphere observers and southern hemisphere observers will have an
interesting discrepancy. The will see the moon flipped horizontally to each other. This is due their
latitude observing location. The northern observer watch the moon facing south, and viceversa,
the southern observer watch the moon facing north. This is why, both views are compared, they
looks flipped horizontally to each other.
This is the composite image, where it show the moon as they see it from their location.
5
Appendix: Meridian’s definition.Now th hat is clear th
hat all the ob
bservers see the
t moon thee same way (as ( was explained before),, Is
that trrue always? The answer is not. The moon’s term minator anglee it is differeent at differeent
latitudes, as long the moon it’ss not over th he observers’ meridian. The path in th he sky that the
t
moon transits while over the horizon its given by thee observer’s latitude. The highest the t
observver’s latitude, the greater the curve of the moon’s path
p across the sky. Also, the greater the
t
moon’s terminator angle. This is better explained in the fo
ollowing illusttrations:Moon observed at high latitude
es
As seen in the illustration, the moon
m raises ovver the horizo
on with a veryy low angle’s terminator (α).
Slowly,, as moon mo oves up in thee sky, the terrminator’s angle moves too 90º. This is when
w the mo
oon
its over the observeer’s meridian..Moon observed at mid latitudess
In this case, when the
t moon risees over the horizon
h it’s terminator make an angle (α) greater thhan
as the previous caase. Still, α will be steaadly increasinng until it reeach 90º, at the observeer´s
meridian. The moon a not as currved as it occurs at high latitudes.
n’s path in the sky it’s an arc,Moon observed at low altitudess, o close to over
o the Equaator.
Observving the moo on close, or over
o the equ uator, the mooon will rise up
u over the horizon
h with its
terminator’s angle very
v close to,, or at, 90º. When
W the mo
oon reaches the
t observer’’s meridian, will
w
be 90º, as the stated cases beforre.
Concclusions
As seen in the threee cases, the moon’s
m terminator angle forms 90º at reaching
r the meridian at the
t
observvers’ location. That is whaat this projecct has demon nstrated. Thiss position is the
t same to all
latitudes. However,, the moon teerminator’s angle
a nt latitudes att the moon rise
will varyy for differen
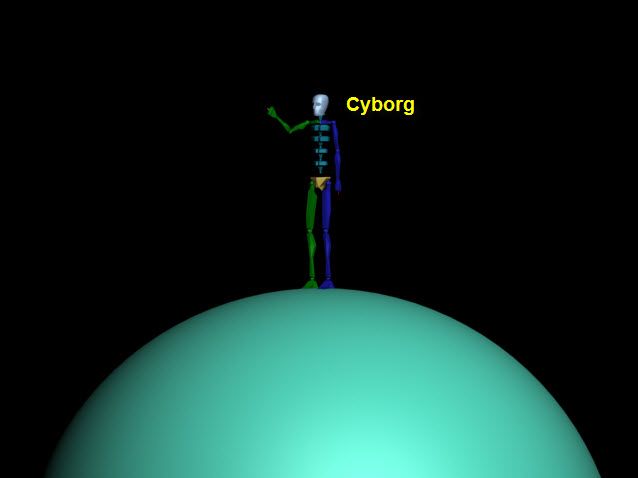
and mo oon set.Appendix 1: Simmulation model for lunar phases (spanish) “Trataré de explicar este fenómeno utilizando imágenes de tres dimensiones. Representando de esta manera al sol (fuente de luz), y la tierra y la luna como esferas. Esto se llama hacer un modelo. Es decir, es una representación simplificada de algún fenómeno complejo. Que se simplifica para poder tener una mejor comprensión del mismo. También pondré un observador sobre la tierra. Este observador es un cyborg (Cyborg: ser compuesto por una parte cibernética y una parte orgánica. Es decir, un ser parte maquina y parte humano) y quiere entender como ocurren las fases de la luna. Este cyborg es un muñequito extraordinariamente grande para la “tierra”, y está hecho así con fines didácticos. Recuerden que el modelo o imágenes que estoy usando en este blog no están ni a escala, ni se considera los movimientos de rotación de la tierra ni de la luna. Solo la luna tendrá un movimiento de traslación. Esta es la disposición de las esferas en el modelo de nuestro sistema modelado: Y este es un detalle del cyborg:
Nuevamente por fines didácticos, nuestro cyborg está parado sobre la esfera “Tierra”. Durante la
mayor parte de este texto estará en el punto superior de la esfera (tierra), es decir sobre el Polo
Norte. Se debe tener en cuenta esta ubicación para entender la orientación de las fases. Ya al final
del documento, moveré a cyborg hacia unas latitudes un poco más bajas, para ver las fases lunares
desde esta perspectiva.

Nuestro cyborg tiene el brazo derecho levantado apuntando en dirección al sol. Convengamos
que siempre este brazo apuntará al sol, de modo que podamos saber de dónde proviene la luz (lo
que ayuda a entender las fases lunares). Otra convención es que la cara siempre estará apuntando
a la luna, esto por la misma razón anterior. A no ser que se indique otra cosa, siempre se enfocará
al cyborg desde el sol. Y por lo general la imagen que tendremos de este cyborg siempre será visa
desde la espalda del muñeco.”

El documento completo se encuentra en:

http://astroimagenes.blogspot.com/2010/02/como‐ocurren‐las‐fases‐de‐la‐luna.html
Appendix 2: Volunteers, and their latitude location.

     Voluntario                      Pais         ciudad/lugar              Latitud
   1 Fredrik Broms                   Noruega      Kvaløysletta               68 N
   2 Leilany garron                  Canada       Halifax                    44 N
   3 Umbriel                         España       Gijón                      43 N
   4 José Angel Sanchez Garcia       España       Cabreros del rio           42 N
   5 jipifeliz                       España       Xátiva                     38 N
   6 Lira y Villanus                 España       Orihuela                   38 N
   7 Amir Taheri                     Iran         Teheran                    35 N
   8 Pablo Reynoso                   Mexico       Guadalajara                20 N
   9 Hardpaella                      Colombia     Medellin                    6N
  10 Juan Carlos Fajardo Cuellar     Colombia     Guadalupe                   2N
  11 Ernesto ribera                  Ecuador      Quito                       0
  14 Trunks Brief                    Chile        Temuco                     38 S
  16 Victor Gabriel Vibé             Argentina    Ushuaia                    54 S

Special thanks to Jaime Escobar Morales, for his cheer up voice for this Project.

(http://astronomos.net23.net/)
Appendix 3: How to take the picture The perfect date is March 23rd, but 22nd and 24th are ok. The moon's shot must be taken at "high noon", at the highest point on the sky. Local time is irrelevant. Remember that you do not need to use a telescope or other device. A regular digital camera will do the job perfectly. The procedure to take the picture is as follows: 1.- Locate the geographic north. And stand facing north. 2.- Once you are facing north, take the camera and aim the horizon. Your arm, straight, must be parallel to the floor. Do not shoot yet. The camera should show the horizon in it. 3.- With the camera aligned to the north, and keeping the horizon in the cameras' screen, move up the camera. This will make the camera describe an arc. Move up the camera until the moon show up in the camera screen. 4.-With the moon on the screen, now you can shoot. Remember that is not important a great image resolution, or a great detail of the moons' surface. We are interested in the angle that solar light hits the moon, and the way we see them on earth. Again, quick instructions: Check the dates, shoot the moon when it is at "high noon", make the shoot with the camera aligned to the north, and perpendicular to the horizon. The full text is at: http://astroimagenes.blogspot.com/2010/03/earths‐lunar‐perception‐small‐astronomy.html
Anexo 4: Resulting composite image, bigger.
Anexo 5: Meridian’s definition
According to wikipedia.org:

Meridian (geography)
From Wikipedia, the free encyclopedia

A meridian (or line of longitude) is an imaginary arc on the Earth's surface from
the North Pole to the South Pole that connects all locations running along it with a
given longitude. The position of a point on the meridian is given by the latitude. Each
meridian is perpendicular to all circles of latitude at the intersection points. Each is also the
same size, being half of a great circle on the Earth's surface and therefore measuring
20,003.93 km.

Since the meridian that passes through Greenwich, England, establishes the meaning of
zero degrees of longitude, or the Prime Meridian, any other meridian is identified by the
angle, referenced to the center of the earth as vertex, between where it and the prime
meridian cross the equator. As there are 360 degrees in a circle, the meridian on the
opposite side of the earth from Greenwich (which forms the other half of a circle with the
one through Greenwich) is 180° longitude, and the others lie between 0° and 180° of West
longitude in the Western Hemisphere (west of Greenwich) and between 0° and 180° of
East longitude in the Eastern Hemisphere (east of Greenwich). Most maps show the lines
of longitude.

The term "meridian" comes from the Latin meridies, meaning "midday"; the sun crosses a
given meridian midway between the times of sunrise and sunset on that meridian. The
same Latin stem gives rise to the terms a.m. (ante meridiem) and p.m. (post
meridiem) used to disambiguate hours of the day when using the 12-hour clock.
Fuente:

http://en.wikipedia.org/wiki/Meridian_(geography)
You can also read