MCDONALD'S HEMS II WAYPORT INTERFACE MANUAL
←
→
Page content transcription
If your browser does not render page correctly, please read the page content below
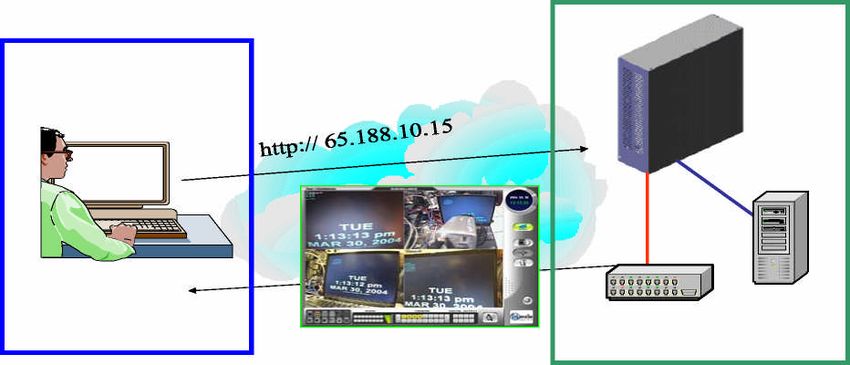
McDonald’s HEMS II

Wayport Interface Manual
INTRODUCTION
The purpose of this document is to provide general guidelines, for Owner/Operators that have installed
the McDonald’s AT&T Wayport Connectivity Solution in their restaurants. Wayport will enable them to
connect the Honeywell Energy Management System to the Internet.

FUNCTION OF OWNER/OPERATOR PORT
The Owner/Operator port (red) was provided in response to those Owner/Operators who needed the ability
to connect devices in the restaurant, other than McDonald’s applications, to the Wayport solution, and
leverage the access to the Internet; the Wayport Owner/Operator port is used to provide this service.

It contains a single IP address on each side of the Wayport solution for your direct use. This means that you
can attach only one computer, router or network appliance device directly to the Wayport solution.

It is important to note that this IP address appears different, depending on whether you are on the inside
or outside of the restaurant (see below). On the inside, an internal IP address, and associated
information, is used to actually configure the device, and will be used once. This is a private address,
and it is masked by the Wayport hardware in order to be protected from attack or compromise. The
external IP address is a translated “virtual” IP address, which is used to reach your hardware from the
outside (Internet).

CONNECTION
The Wayport solution contains multiple hardware devices housed in a single cabinet. It will typically only be
installed in one of a few locations within the restaurant, with the most probable location being in the
manager’s office area.

1.    Locate the Wayport connectivity enclosure.
2.   There are four ports on the bottom of the enclosure, which are labeled according to the below
     diagram. Only the first port (red jack) is usable by the Owner/Operator for connection of your
     equipment. The remaining ports are either actively used for cashless, or designated for McDonald’s
     specific applications. Your Energy Management System or computer will not work properly if you connect
     to the wrong port.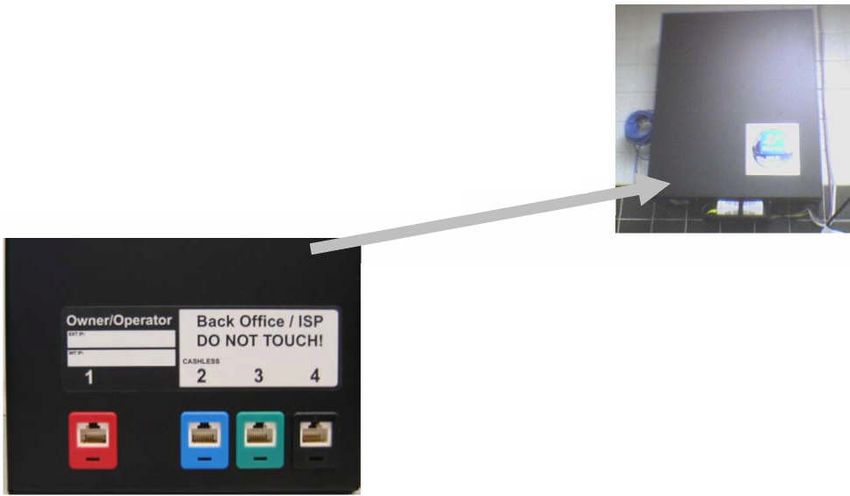
Typical Wayport Connections
Typical Wayport Unit
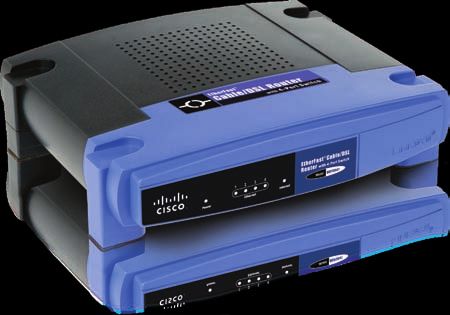
Linksys BEFSR41 Cable/DSL Router with/4-port switch or equal.
Furnished by owner/operator or others. This item is not
furnished by Honeywell and does not come with the Wayport
Unit. The installer must purchase locally. Configure router
from Basic Setup as incoming “Obtain an IP Automatically”.
Change “Local IP Address” to the following: 192.168.100.1 and
leave Subnet Mask at the following: 255.255.255.0. Or change
to 255.255.255.252. Configure router to port forward ports 80,
1911 and 3011. Refer to attached router manual for
adjustments and settings.
Configure WEBs unit
Change Port #1 as follows:
IP Address = 192.168.100.10
Subnet Mask = 255.255.255.0
Or 255.255.255.252
Gateway = 192.168.100.1
Port #2 configured to communicate with Touch Screen PC on
HEMS II panel face. Do not change settings.
WEBs Unit inside HEMS II Panel
SETUP AND OPERATION
It is not possible for Honeywell to predict or directly support all of the potential types of computers, DVR’s,
CCTV or other hardware devices which may be attached to the Wayport Owner/Operator port. Please refer
to the specific manufacturer’s operations and user guides, for the computer or appliance that you would like to
connect to the Wayport hardware, for specific information on configuration and setup when linking to Internet
facing services.

As described briefly above in the functional area, there is an internal addressing mechanism and an
external addressing mechanism, when using the Owner/Operator port. When you want to remotely
connect to the HEMS II system; you will use the external IP address in order to connect to the system
from your home or office.

             NOTE: The internal and external IP addressing
             information that you need should be labeled on
             the Wayport solution in the restaurant.

             The external IP address (here labeled as
             65.188.10.15) is used outside the store, by
             the Owner/Operator, to reach the device in
             the restaurant.

             The internal IP address is used by the device
             inside the store to configure to the local
             network. This information is masked from the
             outside, for security reasons. In all cases,
             the device should be configured for an IP
             address of 192.168.1.2.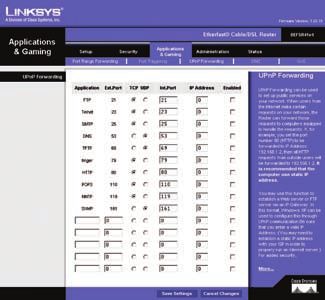
REMOTELY CONNECTING TO YOUR HEMS II System
If you want to remotely connect to your HEMS II System in the restaurant, you will need to use the external IP
address for accessing it. In the example above, you would type 65.188.10.15 into the web browser on your
computer in your office or home. Your PC will connect across the Internet to the HEMS II System in the
restaurant using only this address. This is an example only. Use the individual IP address assigned to your
store.

    Owner/Operator Office                 Internet                 Restaurant

     SUPPORT
     Honeywell cannot directly support any of the attached devices an Owner/Operator may choose to
     connect to this red port. Honeywell’s support services are specifically limited to providing assistance
     to the owner/operator in ensuring that the HEMS II panel is enabled and functioning properly, as well
     as ensuring the correct information was used to configure the device. Neither McDonald’s, Honeywell
     nor Wayport can provide support for your device itself. You must rely on your manufacturer’s service
     plan, an internal Operator IT staff, or a contracted service you obtain to provide the necessary support for
     your needs.
USER GUIDE

EtherFast® Cable/DSL Router
          with 4-Port Switch
                       Model: BEFSR41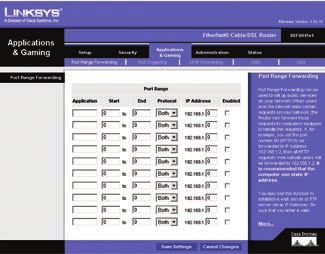
Table of Contents

                                    Chapter 1: Product Overview                                                                                                                                           2
                                         Front Panel .  .  .  .  .  .  .  .  .  .  .  .  .  .  .  .  .  .  .  .  .  .  .  .  .  .  .  .  .  .  .  .  .  .  .  .  .  .  .  .  .  .  .  .  .  .  .  .  .  . 2
                                         Back Panel .  .  .  .  .  .  .  .  .  .  .  .  .  .  .  .  .  .  .  .  .  .  .  .  .  .  .  .  .  .  .  .  .  .  .  .  .  .  .  .  .  .  .  .  .  .  .  .  .  .  . 2

                                    Chapter 2: Advanced Configuration                                                                                                                                     3
                                         Setup > Basic Setup .  .  .  .  .  .  .  .  .  .  .  .  .  .  .  .  .  .  .  .  .  .  .  .  .  .  .  .  .  .  .  .  .  .  .  .  .  .  .  .  .  .  .  .  . 3
                                         Setup > DDNS .  .  .  .  .  .  .  .  .  .  .  .  .  .  .  .  .  .  .  .  .  .  .  .  .  .  .  .  .  .  .  .  .  .  .  .  .  .  .  .  .  .  .  .  .  .  .  . 7
                                         Setup > MAC Address Clone .  .  .  .  .  .  .  .  .  .  .  .  .  .  .  .  .  .  .  .  .  .  .  .  .  .  .  .  .  .  .  .  .  .  .  .  .  .  . 7
                                         Setup > Advanced Routing .  .  .  .  .  .  .  .  .  .  .  .  .  .  .  .  .  .  .  .  .  .  .  .  .  .  .  .  .  .  .  .  .  .  .  .  .  .  .  . 8
                                         Security > Filter  .  .  .  .  .  .  .  .  .  .  .  .  .  .  .  .  .  .  .  .  .  .  .  .  .  .  .  .  .  .  .  .  .  .  .  .  .  .  .  .  .  .  .  .  .  .  . 9
                                         Security > VPN Passthrough  .  .  .  .  .  .  .  .  .  .  .  .  .  .  .  .  .  .  .  .  .  .  .  .  .  .  .  .  .  .  .  .  .  .  .  .  .  . 10
                                         Applications and Gaming > Port Range Forwarding  .  .  .  .  .  .  .  .  .  .  .  .  .  .  .  .  .  .  .  .  .  .  . 10
                                         Applications & Gaming > Port Triggering  .  .  .  .  .  .  .  .  .  .  .  .  .  .  .  .  .  .  .  .  .  .  .  .  .  .  .  .  .  . 10
                                         Applications and Gaming > UPnP Forwarding .  .  .  .  .  .  .  .  .  .  .  .  .  .  .  .  .  .  .  .  .  .  .  .  .  .  . 11
                                         Applications and Gaming > DMZ  .  .  .  .  .  .  .  .  .  .  .  .  .  .  .  .  .  .  .  .  .  .  .  .  .  .  .  .  .  .  .  .  .  .  . 12
                                         Applications and Gaming > QoS .  .  .  .  .  .  .  .  .  .  .  .  .  .  .  .  .  .  .  .  .  .  .  .  .  .  .  .  .  .  .  .  .  .  .  . 12
                                         Administration > Management .  .  .  .  .  .  .  .  .  .  .  .  .  .  .  .  .  .  .  .  .  .  .  .  .  .  .  .  .  .  .  .  .  .  .  . 13
                                         Administration > Log .  .  .  .  .  .  .  .  .  .  .  .  .  .  .  .  .  .  .  .  .  .  .  .  .  .  .  .  .  .  .  .  .  .  .  .  .  .  .  .  .  .  . 14
                                         Administration > Factory Defaults  .  .  .  .  .  .  .  .  .  .  .  .  .  .  .  .  .  .  .  .  .  .  .  .  .  .  .  .  .  .  .  .  .  . 15
                                         Administration > Firmware Upgrade .  .  .  .  .  .  .  .  .  .  .  .  .  .  .  .  .  .  .  .  .  .  .  .  .  .  .  .  .  .  .  .  . 15
                                         Status > Router .  .  .  .  .  .  .  .  .  .  .  .  .  .  .  .  .  .  .  .  .  .  .  .  .  .  .  .  .  .  .  .  .  .  .  .  .  .  .  .  .  .  .  .  .  .  . 16
                                         Status > Local Network .  .  .  .  .  .  .  .  .  .  .  .  .  .  .  .  .  .  .  .  .  .  .  .  .  .  .  .  .  .  .  .  .  .  .  .  .  .  .  .  .  . 16

                                    Appendix A: Troubleshooting                                                                                                                                        17
                                    Appendix B: Specifications                                                                                                                                         18
                                    Appendix C: Warranty Information                                                                                                                                   19
                                         Limited Warranty  .  .  .  .  .  .  .  .  .  .  .  .  .  .  .  .  .  .  .  .  .  .  .  .  .  .  .  .  .  .  .  .  .  .  .  .  .  .  .  .  .  .  .  .  . 19

                                    Appendix D: Regulatory Information                                                                                                                                 21
                                         FCC Statement .  .  .  .  .  .  .  .  .  .  .  .  .  .  .  .  .  .  .  .  .  .  .  .  .  .  .  .  .  .  .  .  .  .  .  .  .  .  .  .  .  .  .  .  .  .  . 21
                                         Safety Notices .  .  .  .  .  .  .  .  .  .  .  .  .  .  .  .  .  .  .  .  .  .  .  .  .  .  .  .  .  .  .  .  .  .  .  .  .  .  .  .  .  .  .  .  .  .  . 21
                                         Industry Canada Statement .  .  .  .  .  .  .  .  .  .  .  .  .  .  .  .  .  .  .  .  .  .  .  .  .  .  .  .  .  .  .  .  .  .  .  .  .  .  . 21
                                         User Information for Consumer Products Covered by EU Directive 2002/96/EC on Waste
                                         Electric and Electronic Equipment (WEEE)  .  .  .  .  .  .  .  .  .  .  .  .  .  .  .  .  .  .  .  .  .  .  .  .  .  .  .  .  . 22

                                    Appendix E: Software License Agreement                                                                                                                             26
                                         Software in Linksys Products .  .  .  .  .  .  .  .  .  .  .  .  .  .  .  .  .  .  .  .  .  .  .  .  .  .  .  .  .  .  .  .  .  .  .  .  .  . 26
                                         Software Licenses .  .  .  .  .  .  .  .  .  .  .  .  .  .  .  .  .  .  .  .  .  .  .  .  .  .  .  .  .  .  .  .  .  .  .  .  .  .  .  .  .  .  .  .  . 26

EtherFast Cable/DSL Router with 4-Port Switch                                                                                                                                                               i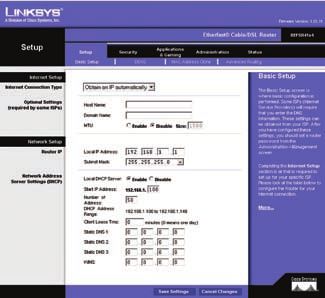
About This Guide

About This Guide
Icon Descriptions
While reading through the User Guide you may see
various icons that call attention to specific items. Below is
a description of these icons:

           NOTE: This check mark indicates that there is
           a note of interest and is something that you
           should pay special attention to while using the
           product.

           WARNING: This exclamation point indicates
           that there is a caution or warning and it is
           something that could damage your property or
           product.

           WEB: This globe icon indicates a noteworthy
           website address or e-mail address.

Online Resources
Website addresses in this document are listed without
http:// in front of the address because most current web
browsers do not require it. If you use an older web browser,
you may have to add http:// in front of the web address.

 Resource                  Website

 Linksys                   www.linksys.com

 Linksys International     www.linksys.com/international

 Glossary                  www.linksys.com/glossary

 Network Security          www.linksys.com/security

Copyright and Trademarks
                 Linksys, EtherFast, Cisco, and the Cisco Logo
                 are registered trademarks or trademarks
                 of Cisco Systems, Inc. and/or its affiliates
                 in the U.S. and certain other countries.
                 Copyright © 2008 Cisco Systems, Inc. All
                 rights reserved. Other brands and product
                 names are trademarks or registered
                 trademarks of their respective holders.

EtherFast Cable/DSL Router with 4-Port Switch                                   1
Chapter 1                                                                                   Product Overview

Chapter 1:                                                      Back Panel
Product Overview
Thank you for choosing the Linksys by Cisco EtherFast
Cable/DSL Router with 4-Port Switch. The Router lets
you access the Internet through its four switched ports.
You can also use the Router to share resources such as
computers, printers and files. A variety of security features
help to protect your data and your privacy while online.             Reset There are two ways to reset the Router to
Security features include a Stateful Packet Inspection (SPI)         its factory default settings. Use a straightened
firewall and NAT technology. Configuring the Router is               paper clip or similar object to press and hold the
easy using the provided browser-based utility.                       Reset button for approximately five seconds.
                                                                     You can also restore the defaults from the
                                                                     Administration > Factory Defaults screen of the
Front Panel                                                          Router’s web-based utility.
                                                                     Internet The Internet port is where you will
                                                                     connect your cable or DSL Internet connection.
                                                                     1, 2, 3, 4 These Ethernet ports (1, 2, 3, 4)
                                                                     connect the Router to computers on your wired
                                                                     network and other Ethernet network devices.
                                                                     Power The Power port is where you will
         Power (Green) The Power LED lights up and                   connect the power adapter.
         will stay on while the Router is powered on.
         It flashes when the Router goes through its
         self-diagnostic mode during every boot-up or
         upgrades its firmware.
         1, 2, 3, 4 (Green) These numbered LEDs,
         corresponding with the numbered ports on the
         Router’s back panel, serve two purposes. If the
         LED is continuously lit, the Router is successfully
         connected to a device through that port. A
         flashing LED indicates network activity over
         that port.
         Internet (Green) The Internet LED lights up
         when there is a connection made through the
         Internet port. A flashing LED indicates network
         activity over the Internet port.

EtherFast Cable/DSL Router with 4-Port Switch                                                                             2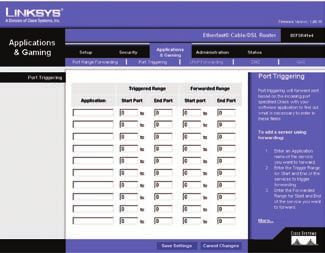
Chapter 2                                                                               Advanced Configuration

Chapter 2:
Advanced Configuration
After setting up the Router with the Setup Wizard (located
on the CD-ROM), the Router will be ready for use. However,
if you’d like to change its advanced settings, use the
Router’s web-based utility. This chapter describes each
web page of the utility and each page’s key functions. You
can access the utility via a web browser on a computer
connected to the Router.
The web-based utility has these main tabs: Setup, Security,
Applications & Gaming, Administration, and Status.
Additional tabs will be available after you click one of the
main tabs.

          NOTE: When first installing the Router, you
          should use the Setup Wizard on the Setup                                     Setup > Basic Setup
          CD-ROM. If you want to configure advanced
          settings, use this chapter to learn about the         Internet Setup
          web-based utility.
                                                                The Internet Setup section configures the Router to your
                                                                Internet connection. Most of this information can be
How to Access the Web-Based Utility                             obtained through your Internet Service Provider (ISP).

To access the web-based utility, launch the web browser on      Internet Connection Type
your computer, and enter the Router’s default IP address,       Select the type of Internet connection your ISP provides
192.168.1.1, in the Address field. Then, press Enter.           from the drop-down menu. These are the available types:
A login screen will appear. Leave the User Name field           •• Obtain an IP Automatically
blank. The first time you open the web-based utility, use
the default password admin. (You can set a new password         •• Static IP
from the Administration > Management screen.) Click OK          •• PPPoE
to continue.
                                                                •• RAS
                                                                •• PPTP
                                                                •• Heart Beat Signal
                                                                •• L2TP

                                                                Obtain an IP Automatically
                                                                By default, the Router’s Internet Connection Type is set to
                          Login Screen                          Obtain an IP automatically, which should be kept only if
                                                                your ISP supports DHCP or you are connecting through a
Setup > Basic Setup                                             dynamic IP address. (This option usually applies to cable
                                                                connections.)
The first screen that appears is the Basic Setup screen. This
allows you to change the Router’s general settings.

                                                                       Internet Connection Type > Obtain an IP Automatically

EtherFast Cable/DSL Router with 4-Port Switch                                                                                  3
Chapter 2 Advanced Configuration
Static IP Keep Alive: Redial Period If you select this option,
the Router will periodically check your Internet
If you are required to use a permanent IP address to connection. If you are disconnected, then the Router
connect to the Internet, select Static IP. will automatically re-establish your connection. To use
this option, select Keep Alive. In the Redial Period field,
you specify how often you want the Router to check
the Internet connection. The default Redial Period is
30 seconds.
RAS
Remote Access Service (RAS) is a service that applies to
connections in Singapore only. For users in Singapore,
Internet Connection Type > Static IP check with Singtel for information on RAS.
IP Address Enter the Router’s IP address, as seen from the
Internet. This is provided by your ISP.
Subnet Mask Enter the Router’s subnet mask, as seen by
users on the Internet (including your ISP). This is provided
by your ISP.
Default Gateway Your ISP will provide you with the IP Internet Connection Type > RAS
address of the ISP server.
User Name and Password Enter the User Name and
Static DNS 1-3 Your ISP will provide you with at least one
Password provided by Singtel.
DNS (Domain Name System) server IP address.
RAS Plan Select the type of plan you have.
PPPoE
Connect on Demand: Max Idle Time You can configure
Some DSL-based ISPs use PPPoE (Point-to-Point Protocol the Router to cut the Internet connection after it has been
over Ethernet) to establish Internet connections. If you are inactive for a specified period of time (Max Idle Time). If
connected to the Internet through a DSL line, check with your Internet connection has been terminated due to
your ISP to see if they use PPPoE. If they do, you will have inactivity, Connect on Demand enables the Router to
to enable PPPoE. automatically re-establish your connection as soon as you
attempt to access the Internet again. To use this option,
select Connect on Demand. In the Max Idle Time field,
enter the number of minutes you want to have elapsed
before your Internet connection terminates. The default
Max Idle Time is 5 minutes.
Keep Alive: Redial Period If you select this option, the
Router will periodically check your Internet connection. If
Internet Connection Type > PPPoE you are disconnected, then the Router will automatically
re-establish your connection. To use this option, select
User Name and Password Enter the User Name and
Keep Alive. In the Redial Period field, you specify how often
Password provided by your ISP.
you want the Router to check the Internet connection. The
Service Name If provided by your ISP, enter the Service default value is 30 seconds.
Name.
Connect on Demand: Max Idle Time You can configure
the Router to cut the Internet connection after it has been
inactive for a specified period of time (Max Idle Time). If
your Internet connection has been terminated due to
inactivity, Connect on Demand enables the Router to
automatically re-establish your connection as soon as you
attempt to access the Internet again. To use this option,
select Connect on Demand. In the Max Idle Time field,
enter the number of minutes you want to have elapsed
before your Internet connection terminates. The default
Max Idle Time is 5 minutes.
EtherFast Cable/DSL Router with 4-Port Switch 4Chapter 2 Advanced Configuration
PPTP
Point-to-Point Tunneling Protocol (PPTP) is a service that
applies to connections in Europe only.
Internet Connection Type > Heart Beat Signal
User Name and Password Enter the User Name and
Password provided by your ISP.
Heart Beat Server Enter the IP address of your ISP’s Heart
Beat server. This is provided by your ISP.
Internet Connection Type > PPTP Connect on Demand: Max Idle Time You can configure
the Router to cut the Internet connection after it has been
IP Address Enter the Router’s IP address, as seen from the
inactive for a specified period of time (Max Idle Time). If
Internet. This is provided by your ISP.
your Internet connection has been terminated due to
Subnet Mask Enter the Router’s subnet mask, as seen by inactivity, Connect on Demand enables the Router to
users on the Internet (including your ISP). This is provided automatically re-establish your connection as soon as you
by your ISP. attempt to access the Internet again. To use this option,
Default Gateway Your ISP will provide you with the IP select Connect on Demand. In the Max Idle Time field,
address of the ISP server. enter the number of minutes you want to have elapsed
before your Internet connection terminates. The default
User Name and Password Enter the User Name and Max Idle Time is 5 minutes.
Password provided by your ISP.
Keep Alive: Redial Period If you select this option, the
Connect on Demand: Max Idle Time You can configure Router will periodically check your Internet connection. If
the Router to cut the Internet connection after it has been you are disconnected, then the Router will automatically
inactive for a specified period of time (Max Idle Time). If re-establish your connection. To use this option, select
your Internet connection has been terminated due to Keep Alive. In the Redial Period field, you specify how often
inactivity, Connect on Demand enables the Router to you want the Router to check the Internet connection. The
automatically re-establish your connection as soon as you default value is 30 seconds.
attempt to access the Internet again. To use this option,
select Connect on Demand. In the Max Idle Time field, L2TP
enter the number of minutes you want to have elapsed
L2TP is a service that applies to connections in Israel only.
before your Internet connection terminates. The default
Max Idle Time is 5 minutes.
Keep Alive: Redial Period If you select this option, the
Router will periodically check your Internet connection. If
you are disconnected, then the Router will automatically
re-establish your connection. To use this option, select
Keep Alive. In the Redial Period field, you specify how often
you want the Router to check the Internet connection. The Internet Connection Type > L2TP
default value is 30 seconds.
Server IP Address Enter the IP address of the L2TP server.
Heart Beat Signal This is provided by your ISP.
Heart Beat Signal is a service used in Australia only. If you User Name and Password Enter the User Name and
are using a Heart Beat Signal connection, check with your Password provided by your ISP.
ISP for the necessary setup information.
Connect on Demand: Max Idle Time You can configure
the Router to cut the Internet connection after it has been
inactive for a specified period of time (Max Idle Time). If
your Internet connection has been terminated due to
inactivity, Connect on Demand enables the Router to
automatically re-establish your connection as soon as you
attempt to access the Internet again. To use this option,
select Connect on Demand. In the Max Idle Time field,
EtherFast Cable/DSL Router with 4-Port Switch 5Chapter 2 Advanced Configuration
enter the number of minutes you want to have elapsed Network Address Server Settings (DHCP)
before your Internet connection terminates. The default
Max Idle Time is 5 minutes. The settings allow you to configure the Router’s Dynamic
Host Configuration Protocol (DHCP) server function. The
Keep Alive: Redial Period If you select this option, Router can be used as a DHCP server for your network. A
the Router will periodically check your Internet DHCP server automatically assigns an IP address to each
connection. If you are disconnected, then the Router computer on your network. If you choose to enable the
will automatically re-establish your connection. To use Router’s DHCP server option, make sure there is no other
this option, select Keep Alive. In the Redial Period field, DHCP server on your network.
you specify how often you want the Router to check
the Internet connection. The default Redial Period is
30 seconds.
Optional Settings
Some of these settings may be required by your ISP. Verify
with your ISP before making any changes.
Network Address Server Settings (DHCP)
Optional Settings
Local DHCP Server DHCP is enabled by factory default.
Host Name and Domain Name These fields allow you to If you already have a DHCP server on your network, or you
supply a host and domain name for the Router. Some ISPs, don’t want a DHCP server, then select Disable (no other
usually cable ISPs, require these names as identification. DHCP features will be available).
You may have to check with your ISP to see if your
Start IP Address Enter a value for the DHCP server to
broadband Internet service has been configured with a
start with when issuing IP addresses. Because the Router’s
host and domain name. In most cases, leaving these fields
default IP address is 192.168.1.1, the Start IP Address must
blank will work.
be 192.168.1.2 or greater, but smaller than 192.168.1.253.
MTU MTU is the Maximum Transmission Unit. It specifies The default is 192.168.1.100.
the largest packet size permitted for Internet transmission.
Number of Address Enter the maximum number of
Select Enable if you want to manually enter the largest
computers that you want the DHCP server to assign IP
packet size that is transmitted. To have the Router select
addresses to. This number cannot be greater than 253.
the best MTU for your Internet connection, keep the
The default is 50.
default setting, Disable.
DHCP Address Range Displayed here is the range of
Size When Manual is selected in the MTU field, this option
available IP addresses.
is enabled. Leave this value in the 1200 to 1500 range. The
default size depends on the Internet Connection Type: Client Lease Time The Client Lease Time is the amount
of time a network user will be allowed connection to the
•• DHCP, Static IP, or Telstra: 1500 Router with their current dynamic IP address. Enter the
•• PPPoE: 1492 amount of time, in minutes, that the user will be “leased”
this dynamic IP address. After the time is up, the user will
•• PPTP or L2TP: 1460 be automatically assigned a new dynamic IP address. The
default is 0 minutes, which means one day.
Network Setup
Static DNS 1-3 The Domain Name System (DNS) is how
The Network Setup section changes the settings on the the Internet translates domain or website names into
network connected to the Router’s Ethernet ports. Internet addresses or URLs. Your ISP will provide you with at
least one DNS Server IP address. If you wish to use another,
Router IP
enter that IP address in one of these fields. You can enter up
This presents both the Router’s IP Address and Subnet to three DNS Server IP addresses here. The Router will use
Mask as seen by your network. these for quicker access to functioning DNS servers.
WINS The Windows Internet Naming Service (WINS)
manages each PC’s interaction with the Internet. If you
use a WINS server, enter that server’s IP address here.
Router IP Otherwise, leave this blank.
EtherFast Cable/DSL Router with 4-Port Switch 6Chapter 2 Advanced Configuration
Click Save Settings to apply your changes, or click Cancel TZO.com
Changes to cancel your changes.
Setup > DDNS
The Router offers a Dynamic Domain Name System (DDNS)
feature. DDNS lets you assign a fixed host and domain
name to a dynamic Internet IP address. It is useful when
you are hosting your own website, FTP server, or other
server behind the Router.
Before you can use this feature, you need to sign
up for DDNS service with a DDNS service provider,
www.dyndns.org or www.TZO.com. If you do not want to
use this feature, keep the default setting, Disabled.
DDNS Setup > DDNS > TZO
DDNS Service E-mail Address, TZO Password Key, and Domain
Name Enter the settings of the account you set up with
If your DDNS service is provided by DynDNS.org, then TZO.
select DynDNS.org from the drop-down menu. If your
Internet IP Address The Router’s Internet IP address is
DDNS service is provided by TZO, then select TZO. The
displayed here. Because it is dynamic, it will change.
features available on the DDNS screen will vary, depending
on which DDNS service provider you use. Status The status of the DDNS service connection is
displayed here.
DynDNS.org
Click Save Settings to apply your changes, or click Cancel
Changes to cancel your changes.
Setup > MAC Address Clone
A MAC address is a 12-digit code assigned to a unique
piece of hardware for identification. Some ISPs will require
you to register a MAC address in order to access the
Internet. If you do not wish to re-register the MAC address
with your ISP, you may assign the MAC address you have
currently registered with your ISP to the Router with the
MAC Address Clone feature.
Setup > DDNS > DynDNS.org
User Name Enter the User Name for your DDNS account.
Password Enter the Password for your DDNS account.
Host Name The is the DDNS URL assigned by the DDNS
service.
Internet IP Address The Router’s Internet IP address is
displayed here. Because it is dynamic, it will change.
Status The status of the DDNS service connection is
displayed here.
Click Save Settings to apply your changes, or click Cancel Setup > MAC Address Clone
Changes to cancel your changes.
EtherFast Cable/DSL Router with 4-Port Switch 7Chapter 2 Advanced Configuration
MAC Clone the NAT setting is disabled, this feature is available. Select
Enable to use the Dynamic Routing feature.
MAC Clone Service To have the MAC address cloned,
Transmit RIP Version To use dynamic routing for
select Enable.
transmission of network data, select the protocol you
MAC Address Enter the MAC address registered with want: RIP1, RIP1-Compatible, or RIP2.
your ISP here.
Receive RIP Version To use dynamic routing for reception
Clone Click this button to clone the MAC address of the of network data, select the protocol you want, RIP1 or
computer you are using. RIP2.
Click Save Settings to apply your changes, or click Cancel
Static Routing
Changes to cancel your changes.
A static route is a pre-determined pathway that network
Setup > Advanced Routing information must travel to reach a specific host or network.
Enter the information described below to set up a new
This screen is used to set up the Router’s advanced static route.
functions. Dynamic Routing automatically adjusts how
packets travel on your network. Static Routing sets up a Select Entry To set up a static route between the Router
fixed route to another network destination. and another network, select a number from the drop-
down list. Click Delete Entry to delete a static route.
Destination IP Address Enter the IP address of the
remote network or host to which you want to assign a
static route.
Subnet Mask Enter the subnet mask. This determines
which portion of a Destination IP Address is the network
portion, and which portion is the host portion.
Gateway Enter the IP address of the gateway device that
allows for contact between the Router and the remote
network or host.
Hop Count Enter the maximum number of steps between
network nodes that data packets will travel. A node is any
device on the network, such as a computer, print server,
or router.
Interface Select the appropriate interface. This tells you
whether the Destination IP Address is on the LAN (Local
Setup > Advanced Routing
Area Network) or the Internet.
Advanced Routing Click Show Routing Table to view the static routes you
have already set up.
NAT
Enable/Disable If this Router is hosting your network’s
connection to the Internet, keep the default, Enable. If
another router exists on your network, select Disable.
When the NAT setting is disabled, the Dynamic Routing
feature can be enabled.
Dynamic Routing (RIP) Advanced Routing > Routing Table
Enable/Disable This feature enables the Router to
automatically adjust to physical changes in the network’s Routing Table
layout and exchange routing tables with the other router(s). For each route, the Destination LAN IP address, Subnet
The Router determines the network packets’ route based Mask, Gateway, Hop Count, and Interface are displayed.
on the fewest number of hops between the source and Click Refresh to update the information.
the destination. When the NAT setting is enabled, the
Dynamic Routing feature is automatically disabled. When Click Save Settings to apply your changes, or click Cancel
Changes to cancel your changes.
EtherFast Cable/DSL Router with 4-Port Switch 8Chapter 2 Advanced Configuration
Security > Filter Filter MAC Address
The Filter screen is used to set up filters to block specific This feature blocks computers with specific MAC addresses
internal users from accessing the Internet and enhance from going out to the Internet.
your network’s security. Edit MAC Filter Setting To set the MAC filter, click Edit
MAC Filter Setting.
Filter > MAC Access Control Table
Use the MAC Access Control Table to select the MAC
addresses you want to filter.
Security > Filter •• Filtered MAC Address Select the range of MAC
address entries.
Filter IP Address Range •• mac 1-10 Enter the MAC address.
You can create up to five different IP Address Range filters. Click Apply before closing the window. To cancel
Users who have filtered IP addresses will not be able to changes, click Undo.
access the Internet at all. If you only want to filter one IP
address instead of a range of IP addresses, enter the same Block WAN Requests
value into both fields. For instance, if you wish to filter the Use these features to enhance your network’s security and
PC with the IP address of 192.168.1.5, enter 5 into both filter multicasting.
fields on one line: 192.168.1.5 ~ 192.168.1.5.
Block Anonymous Internet Requests This feature
Start Enter the starting IP address of the range you wish makes it more difficult for outside users to work their
to filter. way into your network. This feature is enabled by default.
End Enter the ending IP address of the range you wish Select Disabled to allow anonymous Internet requests.
to filter. Filter Multicast Multicasting allows for multiple
transmissions to specific recipients at the same time. If
Filter Port Range multicasting is permitted, then the Router will allow IP
You can create up to five different Port Range filters. Users multicast packets to be forwarded to the appropriate
connected to the Router will no longer be able to access computers. Select Enabled to filter multicasting. This
any port number listed here. feature is disabled by default.
Protocol Select the protocol you want to filter, TCP, UDP, Filter Internet NAT Redirection This feature uses port
or Both. forwarding to block access to local servers from local
networked computers. Select Enabled to filter Internet
Start Enter the starting port number of the range you NAT redirection. This feature is disabled by default.
wish to filter.
Filter IDENT (Port 113) This feature keeps port 113 from
End Enter the ending port number of the range you wish being scanned by devices outside of your local network.
to filter. This feature is enabled by default. Select Disabled to allow
port 113 to be scanned.
EtherFast Cable/DSL Router with 4-Port Switch 9Chapter 2 Advanced Configuration
Click Save Settings to apply your changes, or click Cancel appropriate servers (computers). Before using forwarding,
Changes to cancel your changes. you should assign static IP addresses to the designated
servers.
Security > VPN Passthrough If you need to forward all ports to one computer, click the
The VPN Passthrough screen allows you to enable VPN DMZ tab.
tunnels using IPSec, PPPoE, or PPTP protocols to pass
through the Router’s firewall.
Applications and Gaming > Port Range Forwarding
Security > VPN Passthrough
VPN Passthrough Port Range Forwarding
To forward a port, enter the information on each line for
IPSec Passthrough Internet Protocol Security (IPSec) is
the criteria required.
a suite of protocols used to implement secure exchange
of packets at the IP layer. To allow IPSec tunnels to pass Application In this field, enter the name you wish to give
through the Router, keep the default, Enabled. the application. Each name can be up to 12 characters.
PPPoE Passthrough Point-to-Point over Ethernet Start and End Enter the number or range of port(s)
(PPPoE) Passthrough allows your computer(s) to use the used by the server or Internet applications. Check
PPPoE client software provided by your ISP. Some ISPs with the Internet application documentation for more
may request that you use this feature on the Router. To information.
allow PPPoE Passthrough, keep the default, Enabled.
Protocol Select the protocol used for this application,
PPTP Passthrough Point-to-Point Tunneling Protocol either TCP or UDP, or Both.
(PPTP) allows the Point-to-Point Protocol (PPP) to be
IP Address For each application, enter the IP address of
tunneled through an IP network. To allow PPTP tunnels to
the PC running the specific application.
pass through the Router, keep the default, Enabled.
Enabled Select Enabled to enable port forwarding for
Click Save Settings to apply your changes, or click Cancel
the applications you have defined.
Changes to cancel your changes.
Click Save Settings to apply your changes, or click Cancel
Applications and Gaming > Port Range Changes to cancel your changes.
Forwarding Applications & Gaming > Port Triggering
The Port Range Forwarding screen allows you to set up The Port Triggering screen allows the Router to watch
public services on your network, such as web servers, outgoing data for specific port numbers. The IP address of
ftp servers, e-mail servers, or other specialized Internet the computer that sends the matching data is remembered
applications. (Specialized Internet applications are any by the Router, so that when the requested data returns
applications that use Internet access to perform functions through the Router, the data is pulled back to the proper
such as videoconferencing or online gaming. Some Internet computer by way of IP address and port mapping rules.
applications may not require any forwarding.)
When users send these types of requests to your network via
the Internet, the Router will forward those requests to the
EtherFast Cable/DSL Router with 4-Port Switch 10Chapter 2 Advanced Configuration
Applications and Gaming > Port Triggering
Port Triggering Applications and Gaming > UPnP Forwarding
Application Enter the application name of the trigger.
Triggered Range
UPnP Forwarding
Application Ten applications are preset. For custom
Start Port and End Port For each application, enter
applications, enter the name of your application in one of
the starting and ending port numbers of the triggered
the available fields.
port number range. Check with the Internet application
documentation for the port number(s) needed. The preset applications are among the most widely used
Internet applications. They include the following:
Forwarded Range
FTP (File Transfer Protocol) - A protocol used to transfer
Start Port and End Port For each application, enter files over a TCP/IP network (Internet, UNIX, etc.). For
the starting and ending port numbers of the forwarded example, after developing the HTML pages for a website
port number range. Check with the Internet application on a local machine, they are typically uploaded to the web
documentation for the port number(s) needed. server using FTP.
Click Save Settings to apply your changes, or click Cancel Telnet - A terminal emulation protocol commonly used on
Changes to cancel your changes. Internet and TCP/IP-based networks. It allows a user at a
terminal or computer to log onto a remote device and run
Applications and Gaming > UPnP a program.
Forwarding SMTP (Simple Mail Transfer Protocol) - The standard e-
mail protocol on the Internet. It is a TCP/IP protocol that
The UPnP Forwarding screen displays preset application defines the message format and the message transfer
settings as well as options to customize port services for agent (MTA), which stores and forwards the mail.
other applications.
DNS (Domain Name System) - The way that Internet
domain names are located and translated into IP addresses.
A domain name is a meaningful and easy-to-remember
“handle” for an Internet address.
TFTP (Trivial File Transfer Protocol) - A version of the TCP/IP
FTP protocol that has no directory or password capability.
Finger - A UNIX command widely used on the Internet
to find out information about a particular user, such as a
telephone number, whether the user is currently logged
on, and the last time the user was logged on. The person
being “fingered” must have placed his or her profile on
the system in order for the information to be available.
EtherFast Cable/DSL Router with 4-Port Switch 11Chapter 2 Advanced Configuration Fingering requires entering the full user@domain address. HTTP (HyperText Transport Protocol) - The communications protocol used to connect to servers on the World Wide Web. Its primary function is to establish a connection with a web server and transmit HTML pages to the client web browser. POP3 (Post Office Protocol 3) - A standard mail server commonly used on the Internet. It provides a message store that holds incoming e-mail until users log on and download it. POP3 is a simple system with little selectivity. All pending messages and attachments are downloaded at the same time. POP3 uses the SMTP messaging protocol. Applications and Gaming > DMZ NNTP (Network News Transfer Protocol) - The protocol used to connect to Usenet groups on the Internet. Usenet DMZ newsreaders support the NNTP protocol. Any PC whose port is being forwarded must have its DHCP SNMP (Simple Network Management Protocol) - A widely client function disabled and should have a new static IP used network monitoring and control protocol. Data is address assigned to it because its IP address may change passed from SNMP agents, which are hardware and/or when using the DHCP function. software processes reporting activity in each network DMZ To disable DMZ hosting, keep the default, Disable. device (hub, router, bridge, etc.), to the workstation To expose one PC, select Enable. Then configure the console used to oversee the network. The agents return following setting: information contained in a MIB (Management Information Base), which is a data structure that defines what is DMZ Host IP Address Enter the IP address of the obtainable from the device and what can be controlled computer you want to expose. (turned off, on, etc.). Click Save Settings to apply your changes, or click Cancel Ext. Port. Enter the number of the external port used by Changes to cancel your changes. the server in the Ext. Port column. Check with the Internet application documentation for more information. Applications and Gaming > QoS TCP or UDP Select the protocol UDP or TCP for each Quality of Service (QoS) ensures better service to application. You cannot select both protocols. high-priority types of network traffic, which may Int. Port Enter the number of the internal port used involve demanding, real-time applications, such as by the server in the Int. Port column. Check with the videoconferencing. Internet application software documentation for more information. IP Address Enter the IP address of the server that you want the Internet users to be able to access. Enabled Select Enabled to enable the service you have defined. Click Save Settings to apply your changes, or click Cancel Changes to cancel your changes. Applications and Gaming > DMZ The DMZ feature allows one network computer to be exposed to the Internet for use of a special-purpose service such as Internet gaming or videoconferencing. DMZ hosting forwards all the ports at the same time to one PC. The Port Range Forwarding feature is more secure because it only opens the ports you want to have opened, while DMZ hosting opens all the ports of one computer, exposing the computer to the Internet. EtherFast Cable/DSL Router with 4-Port Switch 12
Chapter 2                                                                              Advanced Configuration

                                                                Incoming Rate Limit This feature limits the incoming
                                                                bandwidth. To use this feature, select 8M, 4M, 2M, 1M,
                                                                512K, 256K, or 128K (M stands for Mbps, while K stands
                                                                for kbps). If you do not want to use this feature, keep the
                                                                default, Disable.

                                                                Application Priority
                                                                Application Priority QoS manages information as it is
                                                                transmitted and received. Depending on the settings of
                                                                the QoS screen, this feature will assign information a high
                                                                or low priority for the five preset applications and three
                                                                additional applications that you specify.
                                                                The preset applications are among the most widely used
                                                                Internet applications. They include the following:
                                                                FTP (File Transfer Protocol) - A protocol used to transfer
                                                                files over a TCP/IP network (Internet, UNIX, etc.). For
                                                                example, after developing the HTML pages for a website
                                                                on a local machine, they are typically uploaded to the web
                                                                server using FTP.

                  Applications and Gaming > QoS
                                                                HTTP (HyperText Transport Protocol) - The communications
                                                                protocol used to connect to servers on the World Wide
                                                                Web. Its primary function is to establish a connection with
QoS                                                             a web server and transmit HTML pages to the client web
Enable/Disable To limit outgoing bandwidth for the QoS          browser.
policies in use, select Enable. Otherwise, keep the default,    Telnet - A terminal emulation protocol commonly used on
Disable.                                                        Internet and TCP/IP-based networks. It allows a user at a
Upstream Bandwidth Select the bandwidth to be used              terminal or computer to log onto a remote device and run
from the drop-down menu. This setting allows you to limit       a program.
the outgoing bandwidth for the QoS policies in use, so you      SMTP (Simple Mail Transfer Protocol) - The standard e-
can control how much bandwidth a particular application         mail protocol on the Internet. It is a TCP/IP protocol that
is allowed to use.                                              defines the message format and the message transfer
There are three types of QoS available: Device Priority,        agent (MTA), which stores and forwards the mail.
Ethernet Port Priority, and Application Priority.               POP3 (Post Office Protocol 3) - A standard mail server
                                                                commonly used on the Internet. It provides a message
Device Priority                                                 store that holds incoming e-mail until users log on and
Device Name Enter the name of your network device.              download it. POP3 is a simple system with little selectivity.
                                                                All pending messages and attachments are downloaded at
Priority Select the appropriate priority level.                 the same time. POP3 uses the SMTP messaging protocol.
MAC Address Enter the MAC address of the device.                Application Name Enter the name of an application you
                                                                specify.
Ethernet Port Priority
                                                                Priority For each application, select High or Low.
Ethernet Port Priority QoS allows you to prioritize
performance for four of the Router’s ports, LAN Ports           Specific Port# Enter the port number of each application
1-4. It does not require support from your ISP because          you specify.
the prioritized ports are LAN ports going out to your           Click Save Settings to apply your changes, or click Cancel
network.                                                        Changes to cancel your changes.
Priority For each of these ports, select High or Low.
Flow Control If you want the Router to control the              Administration > Management
transmission of data between network devices, keep the          The Management screen allows the network’s administrator
default, Enable. To disable this feature, select Disable. The   to manage specific Router functions for access and
Router’s other four ports will be automatically assigned        security.
low priority.

EtherFast Cable/DSL Router with 4-Port Switch                                                                             13
Chapter 2 Advanced Configuration
UPnP If you want to use UPnP, keep the default setting,
Enabled. Otherwise, select Disabled.
Allow Users to Make Configuration Changes Keep the
default, Enabled, if you want to be able to make manual
changes to the Router while using the UPnP feature.
Otherwise, select Disabled.
Allow Users to Disable Internet Access Keep the default,
Enabled, if you want to be able to prohibit any and all
Internet connections. Otherwise, select Disabled.
Click Save Settings to apply your changes, or click Cancel
Changes to cancel your changes.
Administration > Log
Administration > Management The Router can keep logs of all traffic for your Internet
connection.
Router Access
Local Router Access
To ensure the Router’s security, you will be asked for your
password when you access the Router’s web-based utility.
The default is admin.
Router Password Enter a new password for the Router.
Re-enter to confirm Enter the password again to
confirm.
Remote Router Access
Remote Upgrade If you want to be able to upgrade the
Router remotely, from outside the local network, select
Enabled. (You must have the Remote Administration Administration > Log
feature enabled as well.) Otherwise, keep the default,
Disabled. Log
Remote Administration To permit remote access of the
Log To disable the Log function, keep the default setting,
Router, from outside the local network, select Enabled.
No. To monitor traffic between the network and the
Otherwise, keep the default, Disabled.
Internet, select Yes. With logging enabled, you can choose
Administration Port Enter the port number that will be to view temporary logs or keep a permanent record using
open to outside access. the Logviewer software.
Logviewer IP Address For a permanent record of these
NOTE: When you are in a remote location logs, the Logviewer software must be used. Download
and wish to manage the Router, enter this software from the Linksys website, www.linksys.com.
http://:port, The Logviewer software saves all incoming and outgoing
depending on whether you use HTTP or HTTPS. activity in a permanent file on your computer’s hard drive.
Enter the Router’s specific Internet IP address Enter the fixed IP address of the computer running the
in place of , and enter Logviewer software. The Router will now send updated
the Administration Port number in place of the logs to that computer.
word port.
Incoming Log Click this button to view a temporary log
of the Source IP addresses and Destination Port Numbers
UPnP for all the incoming Internet traffic. Click Refresh to
Universal Plug and Play (UPnP) allows Windows Me and XP update the log.
to automatically configure the Router for various Internet Outgoing Log Click this button to view a temporary
applications, such as gaming and videoconferencing. log of all the URLs and IP addresses of Internet sites that
users on your network have accessed. The LAN IP address,
EtherFast Cable/DSL Router with 4-Port Switch 14Chapter 2 Advanced Configuration
Destination URL/IP, and Service/Port Number for each site NOTE: Do not restore the factory defaults unless
are listed. Click Refresh to update the log. you are having difficulties with the Router and
View Log Click this button to view a log of all activities have exhausted all other troubleshooting
and to access a drop-down menu of various logs to view. measures. Once the Router is reset, you will have
to re-enter all of your configuration settings.
On the All screen, select the log you wish to view: All,
System Log, or Access Log.
Factory Defaults
Restore Factory Defaults To reset the Router’s settings
to the default values, select Yes and click Save Settings.
Then follow the on-screen instructions. Any settings you
have saved will be lost when the default settings are
restored.
Administration > Firmware Upgrade
The Firmware Upgrade screen allows you to upgrade the
Router’s firmware. Do not upgrade the firmware unless
you are experiencing problems with the Router or the new
Log > View Log firmware has a feature you want to use.
•• All You see a log of all activities, a combination of the
System and Access Logs.
•• System Log This log displays a list of cold and warm
starts, web login successes and failures, and packet
filtering policies.
•• Access Log This log shows all data traffic.
Click Clear to clear a log. Click Refresh to update a
log.
Click Save Settings to apply your changes, or click Cancel
Changes to cancel your changes.
Administration > Factory Defaults
Administration > Firmware Upgrade
The Administration > Factory Defaults screen allows you
to restore the Router’s configuration to its factory default
settings. NOTE: The Router may lose the settings you
have customized. Before you upgrade its
firmware, write down all of your custom settings.
After you upgrade its firmware, you will have to
re‑enter all of your configuration settings.
Upgrade Firmware
Before upgrading the firmware, download the Router’s
firmware upgrade file from the Linksys website,
www.linksys.com. Then extract the file.
Please select a file to upgrade Click Browse and select
the extracted firmware upgrade file.
Upgrade After you have selected the appropriate file,
Administration > Factory Defaults click this button, and follow the on-screen instructions.
EtherFast Cable/DSL Router with 4-Port Switch 15Chapter 2 Advanced Configuration
Status > Router Local Network
The Router screen displays information about the Router Local MAC Address The MAC address of the Router’s
and its current settings. local, wired interface is displayed here.
IP Address This shows the Router’s IP address, as it
appears on your local network.
Subnet Mask This shows the subnet mask of the Router.
DHCP Server The status of the Router’s DHCP server
function is displayed here.
DHCP Clients Table Click this button to view a list of PCs
that are using the Router as a DHCP server.
Status > Router
DHCP Clients Table
Information
DHCP Client Table
Firmware Version This is the version number of the
Router’s current firmware. The DHCP Client Table lists computers and other
devices that have been assigned IP addresses by the
MAC Address This is the Router’s MAC address, as seen
Router. The DHCP Server IP Address is the IP address
by your ISP.
of the Router. The table lists the Client Hostname, IP
Address, MAC Address, and Interface for each DHCP
Status client. To remove a DHCP client, select the client
This section shows the current network information and click Delete. To retrieve the most up-to-date
stored in the Router. The information varies depending on information, click Refresh.
the Internet connection type selected on the Basic Setup Click Refresh to update the on-screen information.
screen.
Click Refresh to update the on-screen information.
Status > Local Network
The Local Network screen displays information about the
local, wired network.
Status > Local Network
EtherFast Cable/DSL Router with 4-Port Switch 16Appendix A Troubleshooting
Appendix A: When you double-click the web browser, you are
prompted for a username and password. If you want to
Troubleshooting get rid of the prompt, follow these instructions.
Launch the web browser and perform the following steps
(these steps are specific to Internet Explorer but are similar
Your computer cannot connect to the Internet.
for other browsers):
Follow these instructions until your computer can connect 1. Select Tools > Internet Options.
to the Internet:
2. Click the Connections tab.
•• Make sure that the Router is powered on. The Power
LED should be green and not flashing. 3. Select Never dial a connection.
•• If the Power LED is flashing, then power off all of 4. Click OK.
your network devices, including the modem, Router,
The Router does not have a coaxial port for the cable
and computers. Then power on each device in the
connection.
following order:
1. Cable or DSL modem The Router does not replace your modem. You still need
your cable modem in order to use the Router. Connect your
2. Router cable connection to the cable modem, insert the setup
3. Computer CD into your computer, and then follow the on‑screen
instructions.
•• Check the cable connections. The computer should
be connected to one of the ports numbered 1-4 on You need to modify the settings on the Router.
the Router, and the modem must be connected to the
Internet port on the Router. Open the web browser (for example, Internet Explorer or
Firefox), and enter the Router’s IP address in the address
The modem does not have an Ethernet port. field (the default IP address is 192.168.1.1). When
prompted, leave the User name field blank and enter the
The modem is a dial-up modem for traditional dial-up
password to the Router (the default is admin). Click the
service. To use the Router, you need a cable/DSL modem
appropriate tab to change the settings.
and high-speed Internet connection.
You cannot use the DSL service to connect manually to
the Internet. WEB: If your questions are not addressed here,
After you have installed the Router, it will automatically refer to the Linksys website, www.linksys.com.
connect to your Internet Service Provider (ISP), so you no
longer need to connect manually.
The DSL telephone line does not fit into the Router’s
Internet port.
The Router does not replace your modem. You still need
your DSL modem in order to use the Router. Connect
the telephone line to the DSL modem, insert the setup
CD into your computer, and then follow the on‑screen
instructions.
EtherFast Cable/DSL Router with 4-Port Switch 17Appendix B Specifications
Appendix B:
Specifications
Model BEFSR41
Standards IEEE 802.3 (10BaseT),
IEEE 802.3u (100BaseTX)
Ports One 10/100 RJ-45 Port for
Broadband Modem
Four 10/100 RJ-45 Switched Ports
Button Reset
Cabling Type Ethernet Category 5
LEDs Power, Ethernet, Internet
OS Support Windows 98SE/Me/2000/XP/Vista
Network Protocols TCP/IP
Environmental
Dimensions 7.31" x 6.16" x 1.88"
(186 x 154 x 48 mm)
Unit Weight 11.40 oz. (320 g)
Power External, 12V DC, 1A
Certifications FCC, CE
Operating Temp. 0 to 40ºC (32 to 104ºF)
Storage Temp. -20 to 70ºC (-4 to 158ºF)
Operating Humidity 10% to 85%, Noncondensing
Storage Humidity 5% to 90%, Noncondensing
Specifications are subject to change without notice.
EtherFast Cable/DSL Router with 4-Port Switch 18Appendix C Warranty Information
Appendix C: service offerings. This limited warranty shall not apply to
such third party software or service offerings. This limited
Warranty Information warranty does not guarantee any continued availability
of a third party’s service for which this product’s use or
operation may require.
Limited Warranty TO THE EXTENT NOT PROHIBITED BY LAW, ALL IMPLIED
WARRANTIES AND CONDITIONS OF MERCHANTABILITY,
Linksys warrants this Linksys hardware product against
SATISFACTORY QUALITY OR FITNESS FOR A PARTICULAR
defects in materials and workmanship under normal
PURPOSE ARE LIMITED TO THE DURATION OF THE
use for the Warranty Period, which begins on the date of
WARRANTY PERIOD. ALL OTHER EXPRESS OR IMPLIED
purchase by the original end-user purchaser and lasts for
CONDITIONS, REPRESENTATIONS AND WARRANTIES,
the period specified below:
INCLUDING, BUT NOT LIMITED TO, ANY IMPLIED
•• One (1) year for new product WARRANTY OF NON-INFRINGEMENT, ARE DISCLAIMED.
Some jurisdictions do not allow limitations on how long
•• Ninety (90) days for refurbished product an implied warranty lasts, so the above limitation may not
This limited warranty is non-transferable and extends only apply to you. This limited warranty gives you specific legal
to the original end-user purchaser. Your exclusive remedy rights, and you may also have other rights which vary by
and Linksys’ entire liability under this limited warranty jurisdiction.
will be for Linksys, at its option, to (a) repair the product
TO THE EXTENT NOT PROHIBITED BY LAW, IN NO EVENT
with new or refurbished parts, (b) replace the product
WILL LINKSYS BE LIABLE FOR ANY LOST DATA, REVENUE
with a reasonably available equivalent new or refurbished
OR PROFIT, OR FOR SPECIAL, INDIRECT, CONSEQUENTIAL,
Linksys product, or (c) refund the purchase price of the
INCIDENTAL OR PUNITIVE DAMAGES, REGARDLESS OF THE
product less any rebates. Any repaired or replacement
THEORY OF LIABILITY (INCLUDING NEGLIGENCE), ARISING
products will be warranted for the remainder of the
OUT OF OR RELATED TO THE USE OF OR INABILITY TO
original Warranty Period or thirty (30) days, whichever is
USE THE PRODUCT (INCLUDING ANY SOFTWARE), EVEN
longer. All products and parts that are replaced become
IF LINKSYS HAS BEEN ADVISED OF THE POSSIBILITY OF
the property of Linksys.
SUCH DAMAGES. IN NO EVENT WILL LINKSYS’ LIABILITY
EXCEED THE AMOUNT PAID BY YOU FOR THE PRODUCT.
Exclusions and Limitations The foregoing limitations will apply even if any warranty
This limited warranty does not apply if: (a) the product or remedy provided under this limited warranty fails of
assembly seal has been removed or damaged, (b) the its essential purpose. Some jurisdictions do not allow
product has been altered or modified, except by Linksys, (c) the exclusion or limitation of incidental or consequential
the product damage was caused by use with non‑Linksys damages, so the above limitation or exclusion may not
products, (d) the product has not been installed, operated, apply to you.
repaired, or maintained in accordance with instructions
supplied by Linksys, (e) the product has been subjected to Obtaining Warranty Service
abnormal physical or electrical stress, misuse, negligence,
If you have a question about your product or experience a
or accident, (f ) the serial number on the Product has been
problem with it, please go to www.linksys.com/support
altered, defaced, or removed, or (g) the product is supplied
where you will find a variety of online support tools and
or licensed for beta, evaluation, testing or demonstration
information to assist you with your product. If the product
purposes for which Linksys does not charge a purchase
proves defective during the Warranty Period, contact
price or license fee.
Linksys Technical Support for instructions on how to
ALL SOFTWARE PROVIDED BY LINKSYS WITH THE obtain warranty service. The telephone number for Linksys
PRODUCT, WHETHER FACTORY LOADED ON THE Technical Support in your area can be found in the product
PRODUCT OR CONTAINED ON MEDIA ACCOMPANYING User Guide and at www.linksys.com. Have your product
THE PRODUCT, IS PROVIDED “AS IS” WITHOUT WARRANTY serial number and proof of purchase on hand when calling.
OF ANY KIND. Without limiting the foregoing, Linksys does A DATED PROOF OF ORIGINAL PURCHASE IS REQUIRED
not warrant that the operation of the product or software TO PROCESS WARRANTY CLAIMS. If you are requested to
will be uninterrupted or error free. Also, due to the return your product, you will be given a Return Materials
continual development of new techniques for intruding Authorization (RMA) number. You are responsible for
upon and attacking networks, Linksys does not warrant properly packaging and shipping your product to Linksys
that the product, software or any equipment, system or at your cost and risk. You must include the RMA number
network on which the product or software is used will be and a copy of your dated proof of original purchase when
free of vulnerability to intrusion or attack. The product returning your product. Products received without a RMA
may include or be bundled with third party software or number and dated proof of original purchase will be
EtherFast Cable/DSL Router with 4-Port Switch 19You can also read