NETEDIT INSTALLATION GUIDE 2.1 - ARUBA NETWORKS
←
→
Page content transcription
If your browser does not render page correctly, please read the page content below
NetEdit Installation Guide
                            2.1

Part Number: 5200-8090
Published: April 2021
Edition: 1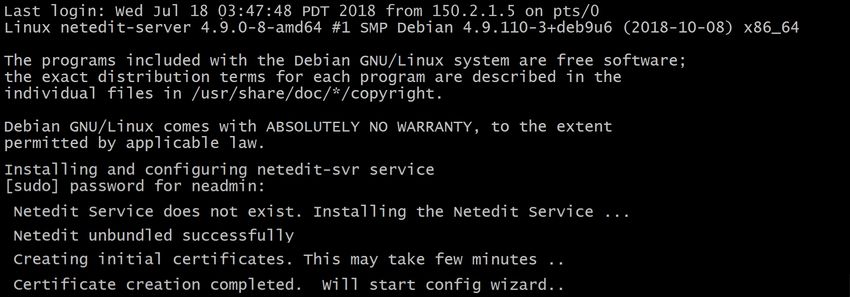
Copyright Information
© Copyright [[[Undefined variable Variables.Current Year]]] Hewlett Packard Enterprise Development LP.
Open Source Code
This product includes code licensed under the GNU General Public License, the GNU Lesser General Public
License, and/or certain other open source licenses. A complete machine-readable copy of the source code
corresponding to such code is available upon request. This offer is valid to anyone in receipt of this
information and shall expire three years following the date of the final distribution of this product version
by Hewlett Packard Enterprise Company. To obtain such source code, send a check or money order in the
amount of US $10.00 to:
Hewlett Packard Enterprise Company
6280 America Center Drive
San Jose, CA 95002
USA

Notices
The information contained herein is subject to change without notice. The only warranties for Hewlett
Packard Enterprise products and services are set forth in the express warranty statements accompanying
such products and services. Nothing herein should be construed as constituting an additional warranty.
Hewlett Packard Enterprise shall not be liable for technical or editorial errors or omissions contained herein.
Confidential computer software. Valid license from Hewlett Packard Enterprise required for possession, use,
or copying. Consistent with FAR 12.211 and 12.212, Commercial Computer Software, Computer Software
Documentation, and Technical Data for Commercial Items are licensed to the U.S. Government under
vendor's standard commercial license.
Links to third-party websites take you outside the Hewlett Packard Enterprise website. Hewlett Packard
Enterprise has no control over and is not responsible for information outside the Hewlett Packard
Enterprise website.

Acknowledgments
Java® and Oracle® are registered trademarks of Oracle and/or its affiliates.

                                                                                                                  |2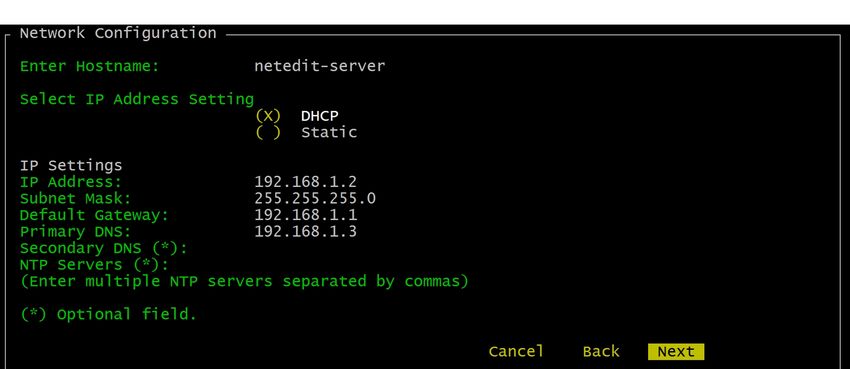
Contents

                                                       Contents

            Contents                                          3
            Overview and requirements                         4
                    NetEdit server requirements               4
                    NetEdit client-side requirements          4

            Deploying NetEdit using vSphere                   6
            Deploying NetEdit using Hyper-V                   9
            Configuring the NetEdit server                   10
            Using NetEdit for the first time                 13
            Upgrading to NetEdit 2.1                         18
                    Legacy upgrade instructions              18
                    Current upgrade instructions             19

            NetEdit VM maintenance                           23
            Replacing the web-server certificate             24
            Support and other resources                      26
                    Accessing Aruba Support                  26
                    Accessing updates                        26
                          Aruba Support Portal               27
                          My Networking                      27
                    Warranty Information                     27
                    Regulatory Information                   27
                    Documentation Feedback                   27

NetEdit Installation Guide | 2.1                                  3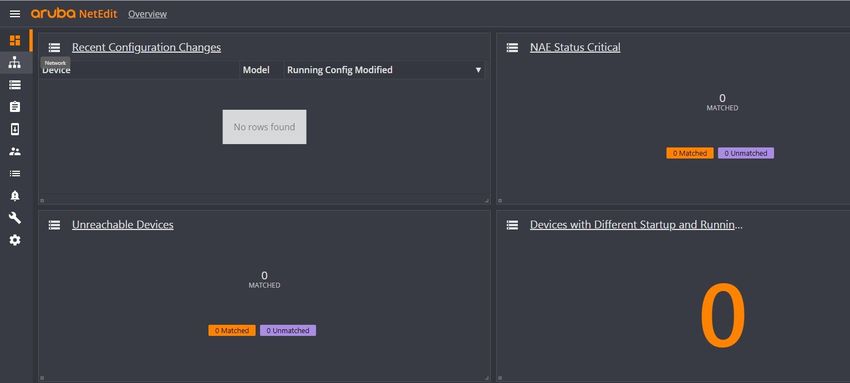
Chapter 1
                                                                      Overview and requirements

        Overview and requirements
        The NetEdit product is a browser-based client/server application. The "NetEdit server" is provided as an Open
        Virtual Appliance (OVA). The NetEdit application uses a web browser-based user interface.

        The following sections describe how to:

        n   Deploy the NetEdit server OVA through the VMware vSphere Web Client interface.
        n   Perform the initial NetEdit server configuration using the console configuration tool.
        n   Access the NetEdit application user interface through a browser and set the initial application credentials.

        For security purposes, some network administration tools have not been included in the OVA. These tools
        include nslookup, netstat, tcpdump, ifconfig, arp, and route. These tools can still be installed on the running
        VM at the admin's discretion.

        NetEdit server requirements
        Ability to deploy the NetEdit OVA to a vSphere Server environment (version 6.0 or higher) with:

        n   6 CPUs
        n   32 GB RAM
        n   115 GB disk space (initial size 1.7 GB when thin provisioned)
        n   A network with connectivity to the target switches to be managed

        NetEdit client-side requirements
        The browser must have access to the same network the NetEdit virtual machine is connected to. The
        following browsers are supported:

NetEdit Installation Guide | 2.1                                                                                           4
Browser   Minimum version

Chrome    75

Firefox   69

                            Overview and requirements | 5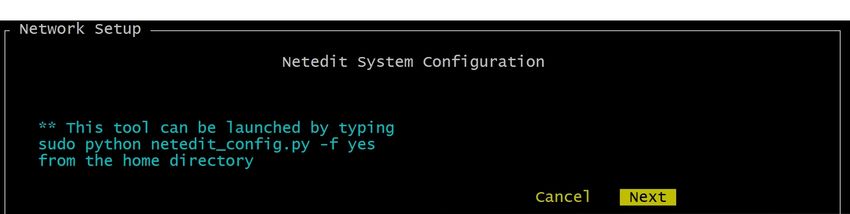
Chapter 2
                                                            Deploying NetEdit using vSphere

        Deploying NetEdit using vSphere
        The NetEdit OVA deployment is supported with ESXi versions 6.0 or newer. The following steps show how to
        deploy the NetEdit OVA using the VMware vSphere web-client. The procedure to deploy using the VMware
        vSphere Client (HTML5) or ESXi UI is similar.

        Procedure
            1. Use a web browser to log into the web UI of the vSphere server to which you want to deploy NetEdit.
               The URL is https:///ui. If you are using ESXi 6.0, the URL is https:///vsphere-client.
            2. Navigate to Hosts and Clusters.

            3. Right-click on where you want to deploy the OVA and select Deploy OVF Template.

            4. Click Browse and select the local copy of the NetEdit OVA file.

NetEdit Installation Guide | 2.1                                                                                     6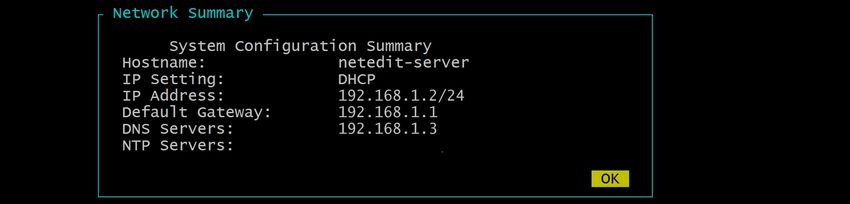
5. Enter a name for the virtual machine (VM) that will be deployed.

     6. Select a host, cluster, or resource pool as a destination.

7.        Select which virtual disk format to use for the VM.
      n      Thick Provision Lazy Zeroed: Space required for the virtual disk is allocated (about 100 GB) at time
             of creation, but is zeroed out only when the new data is written to the disk.
      n      Thick Provision Eager Zeroed: Space required for the virtual disk is allocated (about 100 GB) at
             time of creation, and is zeroed out at time of creation.
      n      Thin Provision: Virtual disk consumes only the space it needs initially (about 1.7 GB), and grows
             with time according to demand.

                                                                                      Deploying NetEdit using vSphere | 7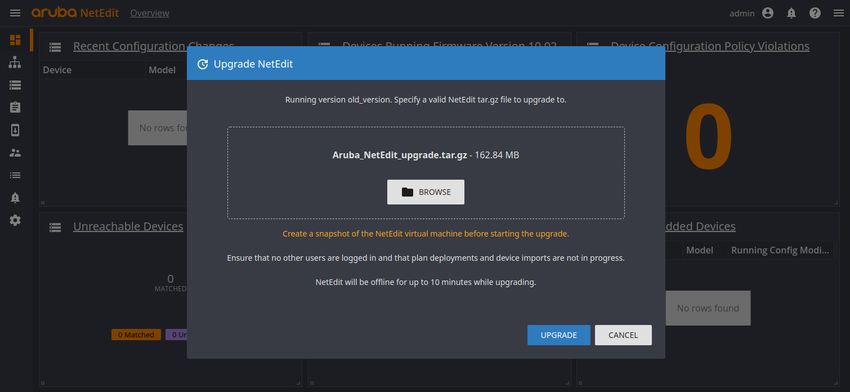
8. Select the network the deployed VM will use.

            9. Review the OVF template deployment settings, click the check box for Power on after deployment,
               and then click Finish to start deployment.

NetEdit Installation Guide | 2.1                                                                                 8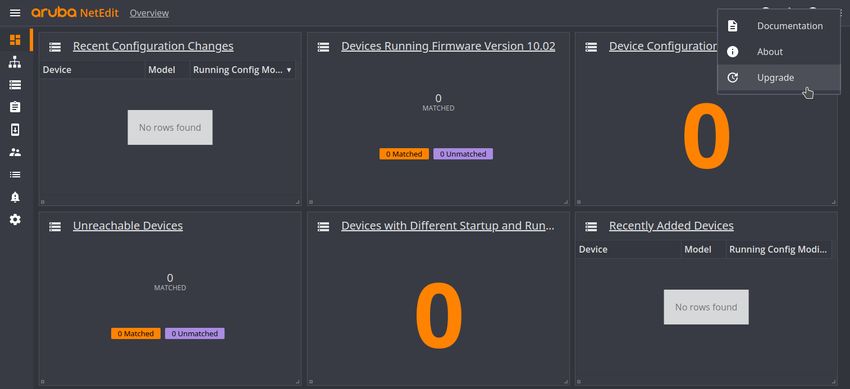
Chapter 3
                                                              Deploying NetEdit using Hyper-V

        Deploying NetEdit using Hyper-V
        The NetEdit OVA deployment is supported with Hyper-V versions of Widows 2019 Server or newer.

        Procedure
            1. Unzip the NetEdit files to a folder on the local C: drive. Aruba recommends
               C:\ProgramData\Microsoft\Windows\Hyper-V\Virtual Machines\NetEdit.
            2. Open Hyper-V Manager and navigate to Action > New > Virtual Machine....
            3. On the Specify Name and Location tab, name the VM, select Store the virtual machine in a
               different location, and enter the path to the folder where the NetEdit files reside.
            4. Click Next.
            5. On the Specify Generation tab, select Generation 1 and click Next.
            6. On the Assign Memory tab, enter 32768 in the Startup memory field and click Next.

                           32GB of memory is the recommended setting for a production environment.

            7. On the Configure Networking tab, select the appropriate network where the VM will be connected
               and click Next.
            8. On the Connect Virtual Hard Disk tab, select Use an existing virtual hard disk, enter the path
               to the NetEdit files, and click Next.
            9. On the Summary tab, verify the information and click Finish.
          10. In Hyper-V Manager, right-click the VM created and select Settings.
          11. In the Processor section, increase the number of processors to 6 and click OK.
          12. Right-click the VM and select Start.
          13. Right-click the VM and select Connect.

NetEdit Installation Guide | 2.1                                                                                9
Chapter 4
Configuring the NetEdit server
Configuring the NetEdit server
When logging into the NetEdit VM console for the first time, the neadmin user is prompted to set a
password. After the password is set, the console-based configuration automatically starts.
Procedure
1. After the virtual machine (VM) is deployed, use the vSphere interface to select the running NetEdit
VM, open a console, and log in as neadmin.
2. The neadmin user will be prompted to reset the password on the first login. Follow the prompts to set
the new password.
The new password must be at least eight characters long.
3. After successfully resetting the password, the user will be prompted again for the new password, then
the console-based configuration will automatically start.
4. The first configuration page states that this tool can be rerun at any time.
When changes are necessary, rerun this script to ensure that changes are applied to the NetEdit
services.
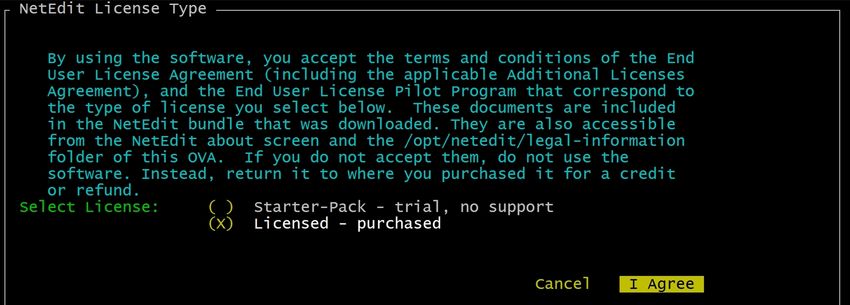
NetEdit Installation Guide | 2.1 105. Select the license that applies and then click I Agree.
6. Use the Network Configuration screen to specify a hostname and IP settings and then click Next.
n If DHCP is available, the currently assigned DHCP address is shown by default.
n A static IP is strongly suggested.
n If the hostname is changed after the initial hostname is set, a new signed web certificate
must be installed.
7. If the settings are correct, click OK to finish or click Cancel to make changes.
The IP address shown is the address used to access the NetEdit application in a web browser.
Make note of this IP address.
8. The settings that have been applied are shown. Click OK to exit to the console command line. The
NetEdit server setup is complete.
Configuring the NetEdit server | 11After the setup is complete, you should update your OS with the latest patches and security
updates. Refer to NetEdit VM maintenance.
NetEdit Installation Guide | 2.1 12Chapter 5
Using NetEdit for the first time
Using NetEdit for the first time
After completing the console-based NetEdit server configuration, the NetEdit application services will be
running. The neadmin user can verify that the NetEdit services are running by executing:
systemctl status netedit-svr
The NetEdit admin can now log into the NetEdit application through a browser using the IP address from the
configuration screen.
The IP address can be retrieved from the virtual machine's console by executing the command hostname -I.
Procedure
1. From a web browser, navigate to the NetEdit application using https://. Since the
NetEdit application is by default set up with a self-signed web certificate, the browser will be rerouted
to a privacy error page. To continue to the login page, click Proceed to .
Refer to Replacing the web-server certificate?> to set up your own secure certificate.
2. On the Login page, enter the default credentials:
n User: admin
n Password: Leave the field blank.
NetEdit Installation Guide | 2.1 133. At the first login, a prompt to change the password displays.
n The NetEdit application web UI credentials are separate from the NetEdit server OVA
credentials.
n The new password must be at least eight characters long.
a. Leave the Old Password field blank.
b. Enter a new password.
c. Enter the new password again to confirm.
d. Click OK.
Using NetEdit for the first time | 14The Overview page displays. NetEdit is ready to use.
4. Navigate to the Network page by clicking the Network icon.
5. Discover devices on the network by selecting Discover Devices from the Action menu in the top-
right corner of the Network page.
NetEdit Installation Guide | 2.1 156. Specify the subnets NetEdit should use to discover devices. Where connectivity between subnets
exists, the discovery process can find all the connected subnets from a single starting point called a
seed device. If there are subnets NetEdit should discover that are not connected, provide a seed
device to use as a starting point in each separate group of connected subnets.
a. Use the top portion of the Discover Devices dialog to enter subnets in CIDR format. Each
subnet must be associated with credentials that specify the REST and/or SNMP credentials that
NetEdit should use to read data from the devices in that subnet.
b. Use the bottom portion of the Discover Devices dialog to enter seed device IP addresses. One
seed is needed from each group of connected subnets. If all subnets are connected, then a single
seed will suffice as long as the appropriate credentials were specified for each subnet so that
NetEdit can traverse all the connecting devices. Multiple seeds may be specified too, but are not
required.
When discovery is initiated using a router attached to multiple subnets as a seed device,
each IP address of the router that is a subnet that NetEdit should discover may appear as a
separate device in NetEdit. Specifying multiple IP addresses from such a router as seeds will
definitely cause such "duplicate" devices to appear in NetEdit. If this happens, manually
identify and delete the extraneous "duplicate" devices from NetEdit using the Devices page.
Using NetEdit for the first time | 16The LLDP management address needs to be configured on the device before attempting
discovery from NetEdit in order to use a device's OOBM IP address to discover a device that
has any of the following properties:
n loopback IP addressed configured
n route-only-port IP address on the connected interface
n SVI IP address on the connected interface
This can be accomplished by running the lldp management-ipv4-address
command from the device.
You should now be able to see the devices on your network and configure them using NetEdit. For more
information on using NetEdit, see the online help build into the application.
NetEdit Installation Guide | 2.1 17Chapter 6
Upgrading to NetEdit 2.1
Upgrading to NetEdit 2.1
Select the appropriate section for the proper upgrade steps:
n Upgrading from NetEdit 1.0: Legacy upgrade instructions
n Upgrading from versions after 1.0: Current upgrade instructions
Legacy upgrade instructions
Prerequisites
Applies to NetEdit 1.0 only.
The NetEdit virtual machine (VM) upgrade must be executed using the neadmin user.
Before starting an upgrade, take a VM snapshot of the NetEdit VM to serve as a backup. Note that the
upgrade process does not provide a backup or restore option. Therefore, failing to take a VM snapshot could
result in loss of data if the upgrade were to fail.
Before starting the upgrade, ensure that the NetEdit VM has enough space for the upgrade. The NetEdit
upgrade bundle consumes about 0.3 GB of space, and the extracted contents of the NetEdit upgrade
bundle consume about 0.8 GB of space.
Procedure
1. Download the upgrade bundle file from the Aruba Support Portal
(https://asp.arubanetworks.com/downloads).
Select filters:
n Product Family: "Aruba Switches"
n Product Series: "Aruba NetEdit Software"
Use the information found at
https://h20392.www2.hpe.com/portal/swdepot/displayProductInfo.do?productNumber=HPLinuxC
odeSigning to verify that the upgrade bundle is from HPE.
2. Copy the upgrade bundle file to the NetEdit VM /tmp directory.
The extracted file should not be copied anywhere under the /opt/netedit directory, since doing so
could corrupt the application.
For example, if the IP address of the VM to be upgraded is 192.168.1.2, use the following command
to copy the file to the /tmp directory on the VM:
NetEdit Installation Guide | 2.1 18scp Aruba_NetEdit_1.1.0_upgrade.tar.gz neadmin@192.168.1.2:/tmp
3. Using ssh, connect to the NetEdit VM as the 'neadmin' user. For example, if the IP address of the VM
to be upgraded is 192.168.1.2, then the following command will connect to the VM and open a shell
in the neadmin's home directory:
ssh neadmin@192.168.1.2
4. Extract the upgrade bundle.
tar -xzf /tmp/Aruba_NetEdit_1.1.0_upgrade.tar.gz --directory /tmp
This extracts the contents to the /tmp/netedit_bundle directory.
5. Extract the NetEdit tar inside of /tmp/netedit_bundle.
tar -xzf /tmp/netedit_bundle/Aruba_NetEdit-1.1.0_upgrade.tar.gz --directory
/tmp/netedit_bundle
This extracts the contents to the /tmp/netedit_bundle/netedit directory.
6. Upgrade the NetEdit appication with sudo privileges.
Before starting the NetEdit application upgrade:
n Create a VM snapshot for a backup
n Ensure no plan deployments are in progress
n Ensure no device imports are in progress
sudo /tmp/netedit_bundle/netedit/bin/upgrade.sh
Once the upgrade.sh script finishes running, the NetEdit application has been upgraded and is ready for
use. Confirm that you can successfully log in to the application and the correct version is displayed in the UI,
by selecting the About option under the Help menu. At this point, /tmp/netedit_bundle and its contents
have been removed from the VM.
The upgrade.sh script makes a backup copy of the pre-existing application.properties file to
/opt/netedit/config/application.properties.bak. If changes have been made to the pre-existing
application.properties file before upgrading, manual transfer of the modified properties may be
required.
If the upgrade is not successful, review /opt/netedit/logs/upgrade.log to see if there are any errors that
need to be addressed. If you are still unable to successfully upgrade, please contact support.
Current upgrade instructions
Upgrading NetEdit is performed using the NetEdit UI.
Prerequisites
Upgrading to NetEdit 2.1 | 19Before starting an upgrade:
n Take a VM snapshot of the NetEdit VM to serve as a backup. Note that the upgrade process does not
provide a backup or restore option. Therefore, failing to take a VM snapshot could result in loss of data if
the upgrade were to fail.
n Ensure the NetEdit VM has enough space for the upgrade. The NetEdit upgrade may consume
approximately 1 GB of space.
n No other users are logged into NetEdit.
n No plan deployments are in progress.
n No device imports are in progress.
Procedure
1. Download the upgrade bundle file from the Aruba Support Portal
(https://asp.arubanetworks.com/downloads).
Select filters:
n Product Family: "Aruba Switches"
n Product Series: "Aruba NetEdit Software"
Use the information found at
https://h20392.www2.hpe.com/portal/swdepot/displayProductInfo.do?productNumber=HPLinuxC
odeSigning to verify that the upgrade bundle is from HPE.
2. Click on the ? icon in the top-right corner of the UI and select Upgrade:
NetEdit Installation Guide | 2.1 203. Click BROWSE or drag-and-drop the Aruba_NetEdit-2.0.0_upgrade.tar.gz file into the browser
4. Click UPGRADE.
Once the upgrade is complete, the web browser will be redirected to the NetEdit login screen.
5. Once you see the NetEdit login screen, press the F5 key to refresh the browser. This will refresh the
browser cache with the latest UI components.
Once the upgrade has been initiated, the NetEdit application will verify that the upgrade can be
performed before proceeding with the upgrade. The application will be offline for several minutes
while the upgrade is in progress.
The upgrade of the NetEdit application will make a backup copy of the current
/opt/netedit/config/application.properties file to
/opt/netedit/config/application.properties.bak. If changes have been made to the current
application.properties file before upgrading, then manual transfer of the modified properties may
be required.
The plans page and the devices page may take a few minutes to re-populate after an upgrade.
At this point, the upgraded NetEdit application is ready for use.
All devices imported from NetEdit 1.x will appear as individual /32 subnets (using CIDR notation),
each with their own individual credentials. They can be left that way or consolidated using broader
subnet specifications and common credentials after the upgrade. However, no changes should be
required in order for NetEdit to report status for the imported devices and build a topology for them
on the Network page.
Upgrading to NetEdit 2.1 | 21After the upgrade is complete, you should update your OS with the latest patches and security
updates. Refer to NetEdit VM maintenance.
NetEdit Installation Guide | 2.1 22Chapter 7
NetEdit VM maintenance
NetEdit VM maintenance
Aruba does not provide OS security updates to the NetEdit VM. To continue to benefit from important
security updates offered by Debian, please run the following items periodically:
sudo apt update
sudo apt upgrade
NetEdit Installation Guide | 2.1 23Chapter 8
Replacing the web-server certificate
Replacing the web-server certificate
Procedure
1. Use SSH or a vSphere console to log in to the NetEdit OVA as the neadmin user.
2. Stop the netedit-svr service.
sudo systemctl stop netedit-svr
3. Back up the default keystore (/opt/netedit/config/appKeystore.p12) to a safe location.
4. Determine the keystore password using this command:
sudo grep server.ssl.key-store-password \
/opt/netedit/config/application.properties
5. Generate a Certificate Signing Request (CSR) for signing.
sudo /opt/netedit/jre/bin/keytool \
-keystore /opt/netedit/config/appKeystore.p12 \
-certreq -alias tomcat -keyalg rsa \
-dname 'CN=myserver, OU=myDept, O=myOrg, L=myLoc, ST=myST, C=myC' \
-file /opt/netedit/config/neteditapp.csr \
The alias tomcat must be used in order for the NetEdit web server to operate correctly.
The -dname option is used as the subject in the CSR. Enter your organization’s information in the
above command.
First and last name (Common Name (CN)): Enter the domain of your website (for example,
www.myneteditserver.net) in this field.
Organizational Unit (OU): This field is for the name of the department or organization unit
making the request.
Organization (O): If your company or department has the special characters &, @, or any other
symbol using the shift key in its name, you must spell out the symbol or omit it to enroll. For
example: "XY & Z Corporation" would be "XYZ Corporation".
Locality or City (L): The Locality field is the city or town name (for example: Roseville).
State or Province (S): Spell out the state completely; do not abbreviate the state or province
name (for example: California).
Country Name (C): Use the two-letter code without punctuation for country (for example: US).
NetEdit Installation Guide | 2.1 246. Send the neteditapp.csr to a Certified Authority (CA) to be signed. The CA will authenticate you and
return a signed certificate and its CA certificate chain.
It is assumed the signed certificate from the CA is named signed.cer and the CA's certificate is
cacert.pem. If cacert.pem is from your own internal CA, then you need to import cacert.pem
into your browser as an authority. If the signed certificate contains all the certificates to form a
trusted chain and the trusted chain ends with a self-signed root CA certificate then step 7 can be
omitted
7. Import the signed root certificate into the NetEdit app keystore.
sudo /opt/netedit/jre/bin/keytool -importcert \
-keystore /opt/netedit/config/appKeystore.p12 \
-alias CARoot -file /opt/netedit/config/cacert.pem
8. Replace the existing self-signed certificate in the tomcat entry with the signed certificate from your CA
(signed.cer).
sudo /opt/netedit/jre/bin/keytool -importcert \
-keystore /opt/netedit/config/appKeystore.p12 \
-file /opt/netedit/config/signed.cer -alias tomcat
The alias tomcat must be used in order for the NetEdit web server to operate correctly.
9. Start the netedit-svr service.
sudo systemctl start netedit-svr
10. Navigate to the NetEdit web interface, and verify the updated certificate is being used.
Changing the "Hostname" through the console-based NetEdit System Configuration script
netedit_config.py will cause a self-signed certificate to be created overwriting any existing
certificate.
For additional info on the keytool command and options see
https://docs.oracle.com/en/java/javase/11/tools/keytool.html.
Replacing the web-server certificate | 25Chapter 9
Support and other resources
Support and other resources
Access Aruba support and updates, and view warranty and regulatory information
Accessing Aruba Support
Aruba Support Services https://www.arubanetworks.com/support-services/
Aruba Support Portal https://asp.arubanetworks.com/
North America telephone 1-800-943-4526 (US & Canada Toll-Free Number)
+1-408-754-1200 (Primary - Toll Number)
+1-650-385-6582 (Backup - Toll Number - Use only when all other
numbers are not working)
International telephone https://www.arubanetworks.com/support-services/contact-
support/
Be sure to collect the following information before contacting Support:
n Technical support registration number (if applicable)
n Product name, model or version, and serial number
n Operating system name and version
n Firmware version
n Error messages
n Product-specific reports and logs
n Add-on products or components
n Third-party products or components
Other useful sites
Other websites that can be used to find information:
Airheads social forums and Knowledge https://community.arubanetworks.com/
Base
Software licensing https://lms.arubanetworks.com/
End-of-Life information https://www.arubanetworks.com/support-services/end-of-life/
Aruba software and documentation https://asp.arubanetworks.com/downloads
Accessing updates
You can access updates from the Aruba Support Portal or the HPE My Networking Website.
NetEdit Installation Guide | 2.1 26Aruba Support Portal
https://asp.arubanetworks.com/downloads
If you are unable to find your product in the Aruba Support Portal, you may need to search My Networking,
where older networking products can be found:
My Networking
https://www.hpe.com/networking/support
To view and update your entitlements, and to link your contracts and warranties with your profile, go to the
Hewlett Packard Enterprise Support Center More Information on Access to Support Materials page:
https://support.hpe.com/portal/site/hpsc/aae/home/
Access to some updates might require product entitlement when accessed through the Hewlett Packard
Enterprise Support Center. You must have an HP Passport set up with relevant entitlements.
Some software products provide a mechanism for accessing software updates through the product
interface. Review your product documentation to identify the recommended software update method.
To subscribe to eNewsletters and alerts:
https://asp.arubanetworks.com/notifications/subscriptions (requires an active Aruba Support Portal (ASP)
account to manage subscriptions). Security notices are viewable without an ASP account.
Warranty Information
To view warranty information for your product, go to https://www.arubanetworks.com/support-
services/product-warranties/.
Regulatory Information
To view the regulatory information for your product, view the Safety and Compliance Information for Server,
Storage, Power, Networking, and Rack Products, available at https://www.hpe.com/support/Safety-
Compliance-EnterpriseProducts
Additional regulatory information
Aruba is committed to providing our customers with information about the chemical substances in our
products as needed to comply with legal requirements, environmental data (company programs, product
recycling, energy efficiency), and safety information and compliance data, (RoHS and WEEE). For more
information, see https://www.arubanetworks.com/company/about-us/environmental-citizenship/.
Documentation Feedback
Aruba is committed to providing documentation that meets your needs. To help us improve the
documentation, send any errors, suggestions, or comments to Documentation Feedback (docsfeedback-
switching@hpe.com). When submitting your feedback, include the document title, part number, edition,
and publication date located on the front cover of the document. For online help content, include the
product name, product version, help edition, and publication date located on the legal notices page.
Support and other resources | 27You can also read