OPENPROJECT INSTALL ON CENTOS 7 RUNNING IN VMWARE PLAYER - 2014 Aug
←
→
Page content transcription
If your browser does not render page correctly, please read the page content below
OPENPROJECT INSTALL ON
       CENTOS 7 RUNNING IN
           VMWARE PLAYER
                                                                          2014 Aug

                                                                               Abstract
An and to end step by step installation instruction set for OpenProject running on Centos 7
                                                                     under VMWare player

                                                                      Brendan Dunn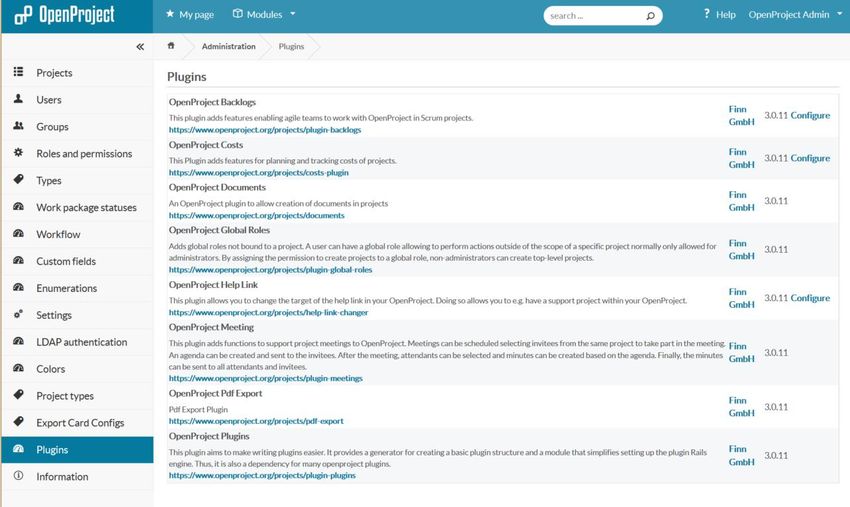
Installing OpenProject on Centos 7 with Apache and Postgesql

Contents
Installing Open Project on Centos with Apache and Postgesql .............................................................. 1
Download Centos .................................................................................................................................... 2
   Update your system .......................................................................................................................... 12
   Install git and curl and other tools .................................................................................................... 13
   Install apache .................................................................................................................................... 14
   Disabling SELINUX ............................................................................................................................. 15
   Install dev tools ................................................................................................................................. 16
   Install the DB ..................................................................................................................................... 17
   Add the openproject admin user ...................................................................................................... 18
   Create Production DB ....................................................................................................................... 19
   Add Ruby through RVM .................................................................................................................... 19
   Use RVM to install Ruby .................................................................................................................... 20
   Install bundler. .................................................................................................................................. 21
   Clone the OpenProject repository .................................................................................................... 21
   Run bundler to install all gems ......................................................................................................... 21
   Configure OpenProject ..................................................................................................................... 22
   Install Plugins .................................................................................................................................... 24
   Set up Apache for OpenProject ........................................................................................................ 27
   Reset the production.rd file .............................................................................................................. 27
   Install Passenger ............................................................................................................................... 27
   Compile Passenger for Apache ......................................................................................................... 28
   Update httpd Config to make OpenProject your home page ........................................................... 28
   Create virtual host file....................................................................................................................... 29
   Test the System and Run the App ..................................................................................................... 30
Security ................................................................................................................................................. 30

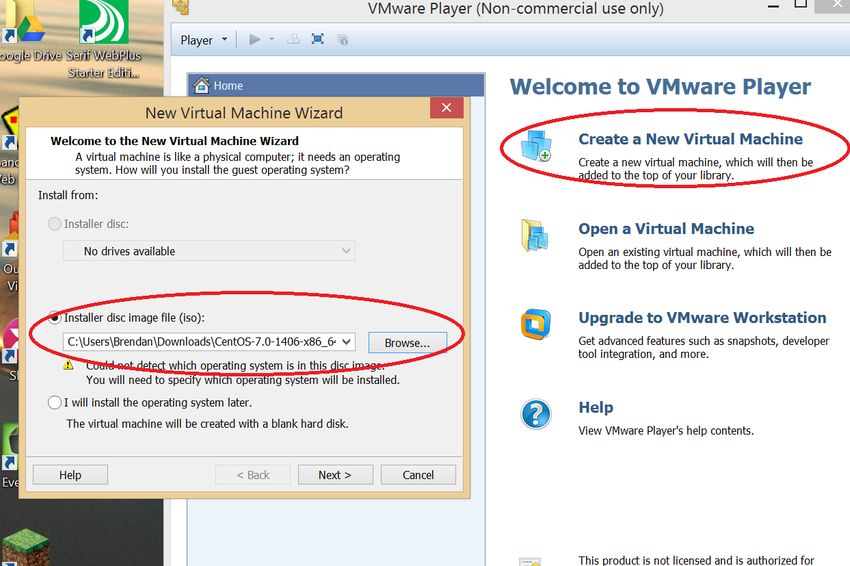
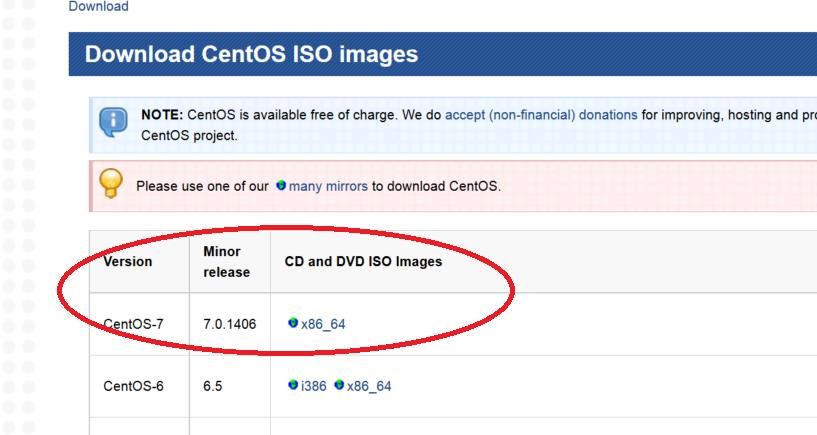
Download Centos
From the site

http://wiki.centos.org/Download

I have downloaded Centos 7.0 64 bit dvd iso and run it up in VMWare player.
Start the Virtual machine and install Centos
You use the up arrow and select just the install centos 7 option, the default option has issues.

We will accept most of the defaults to keep it simple
If you get a bug, it seems to be cause by running the Check media option instead of running just the
“Install Centos 7” option

We will configure the following
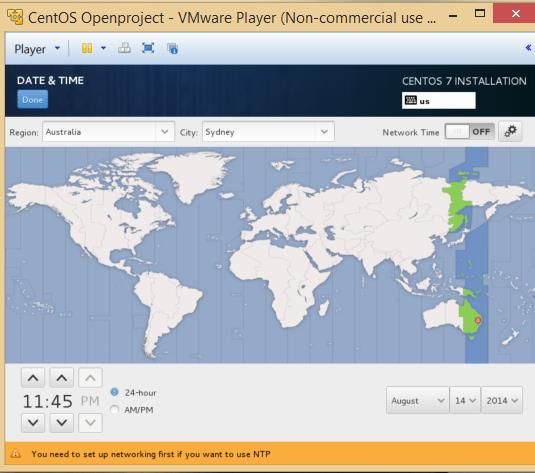
Click date and time and select your time zone then click done at the top

The software I choose was an Infrastructure server.

I turned on the network and my dhcp server gave my new vm an ip address. You should note down the ip address if you want to connect to your new server later using putty rather than use the vmware player interface (which is not as easy to cut and paste into, hence you get a lot more typos ) No change to the installation destination You can install Centos now. You will also have to setup your username and give the root user a password
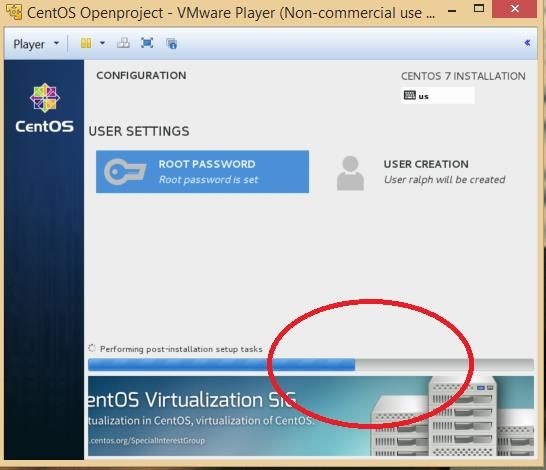
Create a user by completing the template
Create a root password

Now wait for your installation to complete

And reboot the server
Once the reboot is complete, log in as the new user you just created. You might like to use the putty
app here if you are using a Microsoft Operating system instead of the vmware player interface as
you can cut and paste into the putty terminal.

http://www.chiark.greenend.org.uk/~sgtatham/putty/

Su to root

su -

Type in your new root password

(The following steps are taken mainly from the site below )

https://www.openproject.org/projects/openproject/wiki/Installation_on_Centos_65_x64_with_Apa
che_and_PostgreSQL_93

There are changes to the firewall setup and Apache, but the rest is a standard OP install (mainly)

Update your system
Update your system, so you know you have the latest available packages for your system.
yum update

accept the defaults

Install git and curl and other tools

We will install the software we need as best we can now. I am not sure if we need all the items
below, most likely we do not need the mysql items, but I will install anyway, just in case there are
some unknown dependencies. Some of the packages will have already been installed during the
server setup.

yum install git curl curl-devel wget vim mlocate nano

yum install libyaml libxml2 libxml2-devel libxslt-devel libxml2-devel ruby-mysql mysql-devel
ImageMagick-c++ ImageMagick-devel graphviz graphviz-ruby graphviz-devel memcached sqlite-
devel

Install apache

we will also install apache2 here as well.

yum -y install zlib zlib-devel httpd httpd-devel apr-devel apr-util-devel man libffi-devel readline-
devel pidentd

Need to open up the ports for apache and for our test web server
firewall-cmd --permanent --zone=public --add-service=http
firewall-cmd --permanent --zone=public --add-service=https
firewall-cmd --permanent --zone=public --add-port=3000/tcp firewall-cmd --reload enable the htpd service to start at boot systemctl enable httpd.service start the service systemctl start httpd.service Disabling SELINUX We do this as SELinux stops apache from working It is a complex system and requires a lot of admin knowledge to configure. But it is part of an enterprise OS, which is what centos is. If you do not need an enterprise OS, try Ubuntu, it is easier for noobs to manage The following command is temporary. When you reboot, SELinux will start in “enforcement” mode again setenforce 0 To make this a permanent change, edit the SELinux config file nano /etc/sysconfig/selinux and change SELinux to permissive SELINUX=permissive
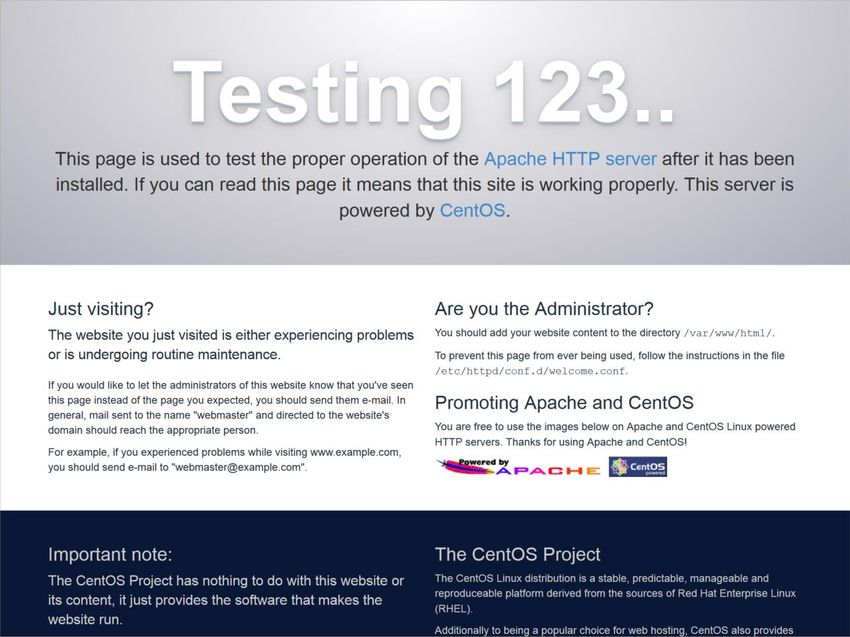
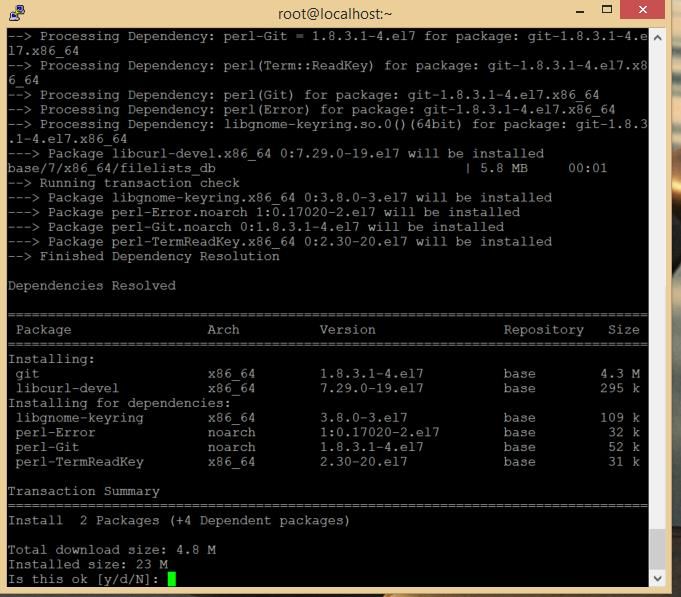
Check that you can see the default Apache page on your server then stop the service for the now.

e.g browse to http://xx.xx.xx.xx/

where xx.xx.xx.xx is the ip address of your server. You should see the default apache test page. If
you don’t , recheck your firewall settings.

Success look like

Lets stop apache as we want to test further on using the ruby web server

systemctl stop httpd.service

Install dev tools

yum –y install patch
yum -y groupinstall "Development tools"

without the development tools and patch, you will not be able to compile ruby.
We need to manually install the epel apps for centos 7

wget http://dl.fedoraproject.org/pub/epel/beta/7/x86_64/epel-release-7-0.2.noarch.rpm
Type
ls -la

and you will see the rpm file
Lets install it

rpm -ivh epel-release-7-0.2.noarch.rpm

Install the DB
I am using postgresql

The postgres wiki

https://wiki.postgresql.org/wiki/YUM_Installation

recommends the following steps

Locate and edit your distributions .repo file, located: On CentOS: /etc/yum.repos.d/CentOS-
Base.repo, [base] and [updates] sections

nano /etc/yum.repos.d/CentOS-Base.repo

Insert the line in the [base] and [updates] sections

exclude=postgresql*

My file now looks like

[base]

name=CentOS-$releasever - Base

mirrorlist=http://mirrorlist.centos.org/?release=$releasever&arch=$basearch&repo=os

#baseurl=http://mirror.centos.org/centos/$releasever/os/$basearch/

gpgcheck=1

gpgkey=file:///etc/pki/rpm-gpg/RPM-GPG-KEY-CentOS-7

exclude=postgresql*

#released updates

[updates]

name=CentOS-$releasever - Updates

mirrorlist=http://mirrorlist.centos.org/?release=$releasever&arch=$basearch&repo=updates

#baseurl=http://mirror.centos.org/centos/$releasever/updates/$basearch/
gpgcheck=1

gpgkey=file:///etc/pki/rpm-gpg/RPM-GPG-KEY-CentOS-7

exclude=postgresql*

>>>>>>>>>>>>>>>>>>>>>>>>>>>>>>>

then run

yum localinstall http://yum.postgresql.org/9.3/redhat/rhel-6-x86_64/pgdg-centos93-9.3-
1.noarch.rpm

Install the server and dev

yum install postgresql93-server postgresql93-devel

Initialise it
/usr/pgsql-9.3/bin/postgresql93-setup initdb
This creates the DB config files

Edit the postgres hba config file and change the authentication method from ident to md5 for both
ip4 and ip6. (otherwise the rails db create will not work)

nano /var/lib/pgsql/9.3/data/pg_hba.conf

start it up and add it to the start up

service postgresql-9.3 start                                                                        Commented [BD1]:

chkconfig postgresql-9.3 on

Add the openproject admin user
sudo groupadd openproject

sudo useradd --create-home --gid openproject openproject

sudo passwd openproject #
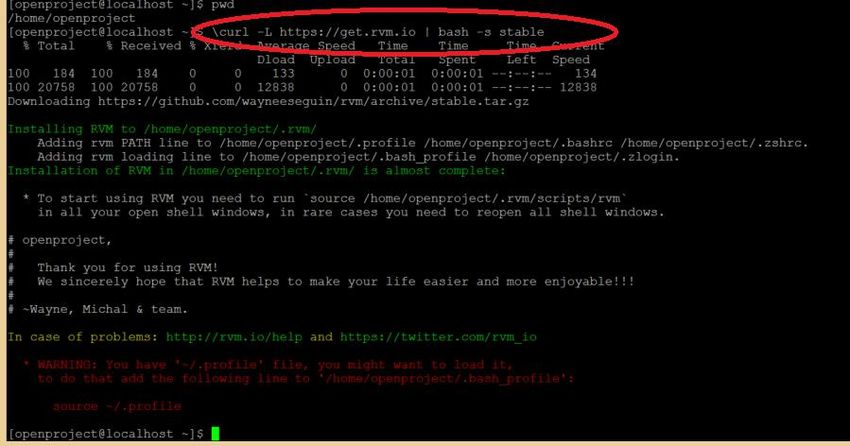
passwd: all authentication tokens updated successfully.

Create Production DB
Configure your DBMS - I am using postgesql,

We are only creating a prod environment

sudo -u postgres psql postgres

Change the password in the following line before running it

postgres=# CREATE ROLE openproject LOGIN ENCRYPTED PASSWORD 'mypassword' NOINHERIT
VALID UNTIL 'infinity';

postgres=# CREATE DATABASE openproject WITH ENCODING='UTF8' OWNER=openproject;

postgres=# \q

(you may want to change the default root passwords here as well or sometime soon)

Add Ruby through RVM

As the openproject user

su - openproject

\curl -L https://get.rvm.io | bash -s stable
source $HOME/.rvm/scripts/rvm

Add following lines into profile file of the desired user: (this maybe a bit of overkill as rvm added
lines as well.)

nano /home/openproject/.bash_profile

source "/home/openproject/.profile"

source "/home/openproject/.rvm/scripts/rvm"

These two lines need to run everytime you su to the user openproject.

(fyi the source command is like a run command)

Use RVM to install Ruby
rvm autolibs disable

rvm install 2.1.0

this will take a while as it will compile ruby 2.1.0.
Install bundler.
gem install bundler

Clone the OpenProject repository
- takes a while to do the downloads

git clone https://github.com/opf/openproject.git

git created a sub directory call openproject and downloaded the files to that directory

cd openproject

git checkout stable

Run bundler to install all gems
- takes a while to do the downloads

bundle install

The install will fail at the postgresql install step.

I ran the following step separately to install postgresql then reran bundle install

gem install pg -- --with-pg-config=/usr/pgsql-9.3/bin/pg_config
bundle install

And now it continues on – (a todo is to find out which config file has the wrong path /bin/pg_config
does not exist)

Finished

Configure OpenProject

In your openproject account

Copy config/database.yml.example to config/database.yml.

And

Edit database.yml and fill in your database username and password.

cd /home/openproject/openproject/config

cp database.yml.example database.yml

nano database.yml

my updates look like this

>>>>>>>>>>>>>>>>>>>

production:
adapter: postgresql

 database: openproject

 host: localhost

 username: openproject

 password: mypassword

 encoding: utf8

>>>>>>>>>>>>>

I commented out the dev and test options

Configure email notifications (using gmail account) by creating configuration.yml in
openproject/config directory

cp configuration.yml.example configuration.yml

nano configuration.yml

I uncommented and edited the production config

>>>>>>>>>>>>>>>>>>>>>>>>>>>>>>>>>>>>>>>>>>>>

#

production:

    email_delivery_method: "smtp"

    smtp_enable_starttls_auto: true

    smtp_address: "smtp.gmail.com"

    smtp_port: 587

    smtp_domain: "smtp.gmail.com" # 'your.domain.com' for GoogleApps

    smtp_authentication: :plain

    smtp_user_name: "your_email@gmail.com"

    smtp_password: "your_password"

#

You will have to put your own gmail account and password in if you choose this option

>>>>>>>>>>>>>>>>>>>>>>>>>>>>>>>>>>>>>>>>>>>>>>>
Finish installation of OpenProject in production RAILS_ENV=production bundle exec rake generate_secret_token RAILS_ENV=production bundle exec rake db:create:all RAILS_ENV=production bundle exec rake db:migrate RAILS_ENV=production bundle exec rake db:seed RAILS_ENV=production rake assets:precompile When you test you will use the rails web server, so you will need this next update. reverse it when you run under apache nano /home/openproject/openproject/config/environments/production.rb change false to true config.serve_static_assets = true Now, as root, stop apache and SElinux (It should already be stopped…but just in case ) service httpd stop setenforce 0 You now have a working Openproject server and you can test it using the command RAILS_ENV=production bundle exec rails server Open your browser to the host ip address on port 3000 e.g. http://xxx.xxx.xxx.xxx:3000 This is a good test to see if you have done everything correctly. Success looks like ( to this point takes about 60 minutes) Install Plugins Main reference is here
https://www.openproject.org/projects/openproject/wiki/OpenProject_Plug-Ins

You will want to install some useful plugins

Login to the openproject account if you are not in it already (you should be)

su - openproject

change directory and create the plugins file

cd /home/openproject/openproject

nano Gemfile.plugins

add the following lines to the Gemfile.plugins (note: the file is empty before I added these lines)

gem 'openproject-plugins', :git => 'https://github.com/opf/openproject-plugins.git', :branch =>
'stable'

gem 'openproject-meeting', :git => 'https://github.com/finnlabs/openproject-meeting.git', :branch
=> 'stable'

gem 'openproject-global_roles', :git => 'https://github.com/finnlabs/openproject-global_roles.git',
:branch => 'stable'

gem 'openproject-help_link', :git => 'https://github.com/finnlabs/openproject-help_link.git', :branch
=> 'stable'

gem 'openproject-costs', :git => 'https://github.com/finnlabs/openproject-costs.git', :branch =>
'stable'

gem 'openproject-pdf_export', :git => 'https://github.com/finnlabs/openproject-pdf_export.git',
:branch => 'stable'

gem 'openproject-documents', :git => 'https://github.com/opf/openproject-documents.git', :branch
=> 'stable'

gem 'reporting_engine', :git => 'https://github.com/finnlabs/reporting_engine.git', :branch =>
'stable'

gem "openproject-backlogs", :git => "https://github.com/finnlabs/openproject-backlogs.git", :branch
=> 'stable'
Afterwards, run:

RAILS_ENV=production bundle install

You should see the new plugins installed.

Some plugins contains migrations. To migrate the database, run:

RAILS_ENV=production bundle exec rake db:migrate

RAILS_ENV=production rake assets:precompile

We can test to see if the plugins are there

RAILS_ENV=production bundle exec rails server

(RAILS_ENV=production bundle exec rails server –d )

Use the –d to start the server as a daemon

Now open up a browser and go to your home page on port 3000

You should see the openproject home page

You can log in as admin and the passwd is admin

Open the admin module and you will see the plugins option

You will want to run the site using apache and not the more primitive ruby web server. A good
reason to continue to run under ruby is that you get a lot of logging on the screen so you can see
what the server is doing. So if you are experimenting, use the ruby/rails web server.

Success looks like
Set up Apache for OpenProject
We already installed the server at the beginning of this procedure

Reset the production.rd file
reset the production.rd file (you should be the openproject user still)

nano /home/openproject/openproject/config/environments/production.rb

change true back to false

config.serve_static_assets = false

cd /home/openproject/openproject

Install Passenger
gem install passenger
Compile Passenger for Apache
This will take a while.

Install ruby as one of the languages

passenger-install-apache2-module

ignore the warnings about lack of memory. (I am using the Tiny AWS server)

I installed it for Ruby and python languages.

If the install fails due to lack of memory, just stop a few more processes that you do not need at the
moment.

Update httpd Config to make OpenProject your home page

The following will configure apache to make OpenProject your home page. The advantages of this is
that you have a dedicated project management server that you own and run and your team only has
to remember (or save) the server link. The disadvantages are that you have set it all up from scratch
on your own server.

If your company already has a server running apache, go to the section where Apache is configured
to run OpenProject as a sub site.

using your root login

nano /etc/httpd/conf.modules.d/passenger.conf

add the lines (note: this file is a new file, it should be empty)
LoadModule passenger_module /home/openproject/.rvm/gems/ruby-2.1.0/gems/passenger-
4.0.48/buildout/apache2/mod_passenger.so

   PassengerRoot /home/openproject/.rvm/gems/ruby-2.1.0/gems/passenger-4.0.48

   PassengerDefaultRuby /home/openproject/.rvm/gems/ruby-2.1.0/wrappers/ruby

Note. The version number of passenger changes. passenger-4.0.48 may not be the version you
install. Please check and update this. It has changed 3 times since I first wrote the original draft of
the document.

Create virtual host file
using your root login

nano /etc/httpd/conf.d/openproject.conf
add the lines (note: this file is a new file, it should be empty)

  ServerName www.myopenprojectsite.com
  # !!! Be sure to point DocumentRoot to 'public'!
  DocumentRoot /home/openproject/openproject/public

    # This relaxes Apache security settings.
    AllowOverride all
     Require all granted
     RailsEnv production

   # MultiViews must be turned off.

     Options -MultiViews

Note that the Server name is a dummy site. You can update this when you set it up in your hosts file
or even better, in a DNS.

Reset https access to the passenger module
chmod o+x /home/openproject
Test the System and Run the App Start apache and test systemctl start httpd.service Restart your server just to make sure everything starts up as expect shutdown –r now the –r is the “reboot” command see if the web page is available after reboot check your site on port 80 all should be ok if you see the openproject home page (This installation takes 90 minutes if you are an average amateur linux admin like myself ) This will also make sure the changes are permanent, i.e. apache starts up, postgresql starts up, SELinux stays in passive mode, the firewall settings are ok if not login and Check that httpd ( apache2) is running (ps –ef | grep http) Security We have made some changes that are expedient so you can get the server running. If you intend to put OpenProject into production, you will need to become or consult a good linux admin and apache admin We disable SElinux, you will to turn that on and install the mgt packages yum -y install policycoreutils-python You will need to consult a page such as https://access.redhat.com/documentation/en- US/Red_Hat_Enterprise_Linux/6/html/Managing_Confined_Services/chap- Managing_Confined_Services-The_Apache_HTTP_Server.html and http://drupalwatchdog.com/volume-2/issue-2/using-apache-and-selinux-together
>>>>>>>>>>>>>>>>>>>>>>>>>>>>>>>>>>>>>>>>> The End >>>>>>>>>>>>>>>>>>>>>>>>>>>>>
You can also read