Owner's Manual - Life Floor
←
→
Page content transcription
If your browser does not render page correctly, please read the page content below
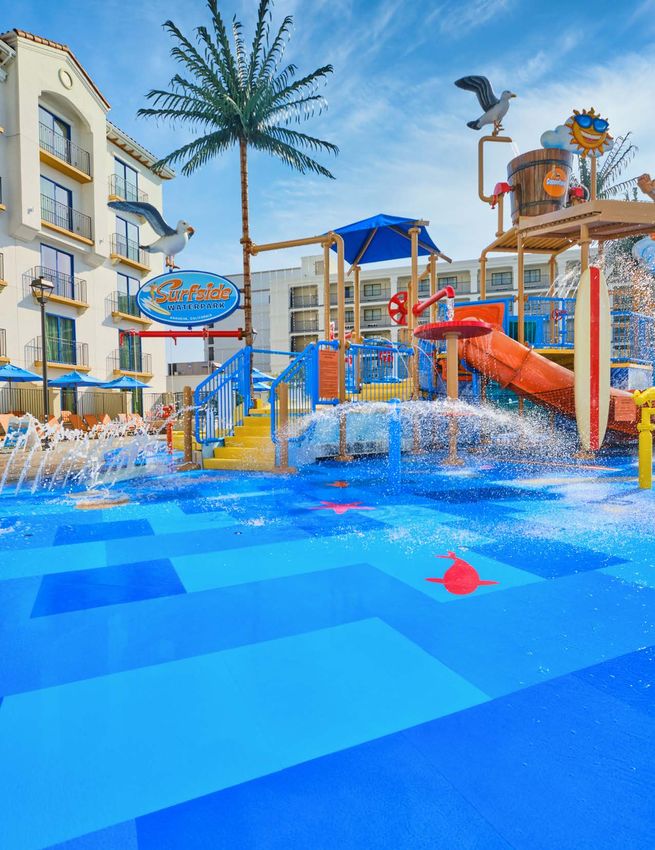
Owner’s Manual
THANK YOU FOR PURCHASING LIFE FLOOR
 Please refer to this manual for Life Floor’s recommended cleaning process, tile maintenance/replacement,
 and FAQ. If you have further questions or concerns about caring for your installation, please contact our team
 at solutions@lifefloor.com.

 TABLE OF CONTENTS
 Protecting Life Floor												                                                                     3

 Cleaning Life Floor												4

 Sample Cleaning Schedule											5

 Storing Life Floor												6

 Replacing Life Floor												7

 Water Quality Guidelines											8-9

 Warranty Process												10

 Material Safety Data Sheet											                                                                 11-13

 Contact Information												                                                                       14

 Terms and Conditions												                                                                      15-16

Please visit lifefloor.com/general-faqs for frequently asked questions.                                           2
PROTECTING LIFE FLOOR
 Life Floor offers many advantages and safety benefits unavailable with other aquatic safety surfacing solutions
 and is subsequently cared for differently. The purpose of this Owner’s Manual is to provide information about
 Life Floor maintenance, care, and limitations. Failure to follow these guidelines may result in damaged Life Floor
 tiles and a voiding of your Life Floor warranty. We recommend clients ensure they always have an attic stock of
 replacement tiles on hand and check prior to season opening so they have enough time to order more if necessary.

 Routine Maintenance
 Areas exposed to only barefoot traffic can be cleaned on an as-needed basis with Life Floor Easy Maintenance
 Cleaners. For areas exposed to shoe traffic, Life Floor should be cleaned at least once a week. A standard cleaning
 schedule can be found on page 5 of this manual. When cleaning Life Floor, use a cloth, sponge, a light or medium
 scrubbing machine with vacuum recovery, or non-metallic brushes. Mops can be used, but are least effective.
 Stiff brushes or brushes that contain abrasives may damage Life Floor. Do not use metal brushes or grit-coated,
 aggressive brushes of any kind on the tile surface.

 Cleaning Solutions
 We recommend Life Floor Easy Maintenance Cleaners sold by our Installation Partner, Inside Edge
 (www.safetysurfaces.com/shop). Effective alternatives include bacteria killing agents such as hydrogen peroxide,
 bleach, ammonia or citrus cleaners. Do not use any type of sealer or wax product, as these will coat the tile surface
 with a slippery residue.

 Preventative Maintenance
 Life Floor tiles are durable and designed to withstand high volumes of barefoot traffic. However, Life Floor tiles
 may be scratched or cut by sharp, heavy, or abrasive objects. Should a tile become damaged, replacement is
 generally easy, but force will be required to remove an adhered tile. We recommend the use of plastic or natural
 bristle scrub brushes to clean the tile surfaces. We also recommend the use of plastic or wood furniture instead of
 heavy, metal furniture. Deck furniture should have wide and flat feet, or broad furniture coasters secured to the
 bottom of deck furniture feet. If mechanical lifts or heavy objects are to be transported or placed on top of Life
 Floor, it may be necessary to protect the tiles with plywood or Masonite. Do not allow burning or extremely hot
 objects such as fireworks to come into contact with Life Floor.

 Non-Warranty Conditions
 3/8” Life Floor tiles in normal traffic and UV conditions are warrantied for five years. For further details, see
 terms and conditions of sale. The following is a non-exhaustive list of conditions for which Life Floor tiles are not
 warrantied: high heel damage, caustic pool conditions, contact with sharp objects such as knives, scissors,
 metal edges, contact with hot objects such as, sparks, cigarettes, hot liquids, contact with heavy machinery, and/or
 prolonged contact with hazardous chemicals (e.g. solvents or acids).

Please visit lifefloor.com/general-faqs for frequently asked questions.                                                  3
CLEANING LIFE FLOOR
 RECOMMENDED CLEANERS
 We recommend a full line of cleaning supplies that are designed specifically for Life Floor tiles sold separately
 through our Installation Partner, Inside Edge (safetysurfaces.com/shop). Life Floor Cleaners include: Peroxide
 Cleaner, Degreaser Cleaner, and Mineral Deposit Remover.

 Peroxide Cleaner
 Removes dirt, grime, and all types of organic matter.

 Degreaser Cleaner
 Removes oil and grease stains from food, feet, and sunscreen.

 Mineral Deposit Remover
 Removes calcium, rust stains, lime, magnesium, and aluminum oxide.

 Each application will require the use of different cleaners. Bathrooms, showers, and locker rooms need to be
 cleaned more frequently with Peroxide Cleaner. Mineral Deposit Remover should be used on any application
 where deposits are visible. Areas exposed to heavy traffic, food, and sunscreen should be cleaned regularly with
 Degreaser Cleaner.

 CLEANING PROCESS
 Step 1: Apply
 Apply the cleaner with a mop, pump-up sprayer, or spray-foamer (Mineral Deposit Remover should not be sprayed).
 If you are using an auto scrubber, make the first pass with the vacuum turned off. After applying the cleaner, let
 the cleaner sit for minimum 2 minutes on the surface. Do not allow the cleaner to dry; mist with water if cleaner
 does start to dry.

 Step 2: Agitate
 After the cleaner has had time to break down and loosen any dirt and oils, scrub the floor. We do not recommend
 power-washing since it can damage Life Floor if done incorrectly. We do recommend polyurethane medium-
 softness bristles to get into the relief of the tiles and pick up dirt. We do not suggest mops since they are not very
 effective. Do not use metal-bristled scrubbers since they will damage the floor. Additionally, Life Floor may be
 damaged if brushes are too stiff or if the floor is dry.

 Step 3: Recover
 Begin recovery immediately after agitating the cleaners. A wet vacuum is the most effective recovery method, as
 vacuuming will also pull dirt and water from between the tiles. If you do not have access to a wet vacuum, use a
 hose to rinse the area and a foam blade squeegee to push dirty water into a nearby drain.

Please visit lifefloor.com/general-faqs for frequently asked questions.                                                   4
SAMPLE CLEANING SCHEDULE
 Week 1: Degreaser Cleaner + Peroxide Cleaner

 Week 2: Degreaser Cleaner + Peroxide Cleaner

 Week 3: Peroxide Cleaner

 Week 4: Degreaser Cleaner + Peroxide Cleaner

 Week 5: Degreaser Cleaner + Peroxide Cleaner

 Week 6: Peroxide Cleaner

 Week 7: Degreaser Cleaner + Peroxide Cleaner

 Week 8: Degreaser Cleaner + Peroxide Cleaner

 Week 9: Mineral Deposit Remover*

 (Repeat)

 *Use Mineral Deposit Remover wherever mineral deposits can be seen on the tile.

 Life Floor’s Mineral Deposit Remover (MDR) is specially formulated to remove the unsightly white residue that can
 form around puddles and on joints on a pool deck. Unlike the other Life Floor cleaners, which are typically applied
 over a wide area or entire pool deck at the same time on a consistent schedule, the MDR is a spot cleaner that we
 recommend using when it is needed.

 When using the MDR, prepare a solution of equal parts cleaner and water in a squeeze bottle. Do not use any type
 of mister, pump sprayer, or any other tool that will aerosolize the cleaning solution. Apply the cleaning solution on
 the affected area and begin agitating immediately with a deck brush to help separate the deposits from the tiles.
 Do not allow the cleaner to dry on the floor. Rinse the area thoroughly and begin recovery.

 A wet vacuum is the most effective recovery method, as vacuuming will also pull dirt and water from between
 the tiles. If you do not have access to a wet vacuum, use a hose to rinse the area and a foam blade squeegee to
 push dirty water into a nearby drain. We do not recommend the use of a mop for recovery, as this is the least
 effective method.

 We recommend you follow up any MDR treatment immediately with a normal degreaser cleaning to remove any
 lingering films or residue.

Please visit lifefloor.com/general-faqs for frequently asked questions.                                                  5
STORING LIFE FLOOR
 Due to Life Floor’s unique formula, we have instructions for how to properly store our product so that it does not
 get damaged or lose its form. Please follow these tips to ensure your replacement tiles and/or extra tiles in storage
 are cared for as well as your beautiful Life Floor installation on your application.

 Keep Life Floor Tiles Flat so Pressure is Not Placed on Any of the Edges of Tiles
 For long term storage (longer than 2 weeks) this is critical if you have a shape of tile that is not a square (e.g.
 triangle, diamond, hexagon, inlay, etc.) since corners can deform and squish when bearing weight. Similarly, flat
 edges of the tile can roll over time when bearing weight and can deform the tile.

 Store Life Floor Tiles in a Dry, Protected Space with a Tarp Over Them or in Their Boxes
 Life Floor performs best when clean and an accumulation of dust and debris can make replacement cumbersome
 since the smooth application side of the tile must be clean before application of adhesive. Additionally, this
 debris can damage Life Floor if sticks or rocks get between tiles and slide around, they may tear the tile or imprint.
 Most imprints will bounce back to their original form, but it may not always occur. If left in elements outdoors,
 tiles can become damaged by hail, foreign objects, or human error. While Life Floor tiles are impervious, the
 boxes are not. Failure to keep them covered and out of wet/too sunny environments may cause the cardboard to
 rot/disintegrate which would then need to be cleaned off the tiles, which can add to the cost of labor as well as
 the time involved in replacing tiles or installing for the first time.

 Store Life Floor Tiles in a Secure Area to Prevent Theft and Damage
 Do not store anything on top of Life Floor which might dent or pierce the tiles. Do not store around corrosive or
 dangerous chemicals that might leak and potentially damage the tiles. Keep sharp and heavy objects away from
 the tiles. Ideally, Life Floor should be kept in a temperature-controlled environment, so they do not shrink from
 cold or expand in the heat before they are installed.

Please visit lifefloor.com/general-faqs for frequently asked questions.                                                   6
REPLACING LIFE FLOOR
 Due to Life Floor’s modular tile design, replacing Life Floor tiles is made easy by only needing to replace the
 damaged tiles instead of the entire installation. If you wish to replace tiles yourself, please follow the procedure
 below. If you would prefer to have a professional replacement, please contact us at solutions@lifefloor.com.

 TOOLS
 Razor scraper or putty knife

 Measuring tape

 Utility knife

 Waterproof contact cement* adhesive - 1 Gallon of adhesive can install approximately 65 sq ft
 (1 Litre of adhesive = 1.6 sq m)

 Paintbrush or paint roller

 Floor roller

 REPLACEMENT PROCESS
 Step 1: Remove the damaged tile(s) by cutting an X into the middle of the damged tile and prying up from the
 middle with a razor scraper or putty knife. Pull the tile away from the floor substrate until completely free. Be
 careful not to damage other tiles.

 Step 2: Scrape and remove any leftover adhesive from the substrate surface with a putty knife/4” razor scraper.

 Step 3: After removing leftover adhesive, measure and (with a utility knife) cut a new Life Floor tile to the size of
 the replacement area. Do not cut Life Floor tiles on top of other Life Floor tiles.

 Step 4: Adhere tile to the substrate using waterproof contact cement. With a general paintbrush, evenly apply
 adhesive to the back of the replacement tile and to the substrate. Let both surfaces cure for approximately 10-15
 minutes until the adhesive is tacky or slightly dry to the touch (see adhesive label for curing times). Begin laying
 down the replacement tile by aligning the new tile edge with the surrounding tile edges. Ensure each corner and
 edge are secure by applying pressure with your thumb and index finger. To ensure adhesive is secured to the
  substrate, use a floor roller to apply pressure to the entire tile area.

 *We recommend using Weldwood DAP Original which can be sourced from most hardware stores in the U.S. It
 maintains a robust bond while being workable which makes it a good option for a less experienced installer. Be
 sure to use the ORIGINAL formula. Other varieties will not work in an aquatic environment.

 Other Commercial Grade Contact Cements (can be sourced at most flooring supply centers):

 W.F. Taylor 1-N (C- California compliant)

 Powerhold 500

 Parabond M-250

 Capitol CC028

 (SDS for these adhesives can be found at lifefloor.com/tech-documents)

Please visit lifefloor.com/general-faqs for frequently asked questions.                                                  7
WATER QUALITY GUIDELINES
 Life Floor tiles are designed for aquatic environments. This includes resistance to pool water and the chemicals
 used to balance and sanitize it. To ensure tiles last in all aquatic environments through the life of the installation,
 it is crucial to understand the impact of pool water chemistry on the tile’s appearance.

 There have been instances in applications with Life Floor installed underwater or constantly flooded with water,
 where the color has appeared to fade. This can be exacerbated when the tiles are allowed to dry. This condition is
 caused by extreme conditions due to the pool water chemistry.

 Proper water chemistry utilizes oxidation in controlled amounts to sanitize the pool water and to balance the
 water so that it is not in a corrosive or scaling state. When the water chemistry is off, it can lead to excessive
 oxidation, corrosiveness, or both.

 Common Causes of High Oxidation/Corrosiveness of Pool Water
 • Free Chlorine too high potentially causes high oxidation

 • Combined Chlorine too high potentially causes a corrosive state

 • Low pH causes high levels of hypochlorous acid (HOCL) which potentially causes high oxidation

 • Total Alkalinity too low potentially causes a corrosive state

 • Calcium Hardness too low potentially causes a corrosive state

 • LSI too low indicates a potentially corrosive state

 To reduce the risk of Life Floor tiles fading, Life Floor recommends the water chemistry be managed within
 the recommended limits, and as close to the ideal as possible, set by ANSI/APSP/ICC-11 2019 and your local
 health codes.

 The table on the following page presents target ranges for important water chemistry parameters. These
 guidelines were last revised in November 2018 and are generally accepted by professionals in the pool and spa
 (hot tub) market.

Please visit lifefloor.com/general-faqs for frequently asked questions.                                                    8
WATER QUALITY GUIDELINES
 POOL AND HOT TUB ALLIANCE (PHTA) GUIDELINES FOR
 CHEMICAL OPERATIONAL PARAMETERS
 The following table does not include complete PHTA guideline information and should only be used to minimize
 Life Floor tile fading. It is not intended for pool water management. Pool operators must comply with applicable
 health codes.

                          Minimum Maximum                      Ideal      Notes
  Free Chlorine,          1.0            4.0                   1.0-4.0    Pools
  ppm                     2.0            4.0                   2.0-4.0    Pools using Cyanuric Acid in excess of
                                                                          50 ppm
                          2.0            5.0                   2.0-5.0    Spas
                          3.0            5.0                   3.0-5.0    Spas using Cyanuric Acid in excess of
                                                                          50 ppm

  Combined                               0.4                   0          Pools and Spas
  Chlorine, ppm
  Total Bromine,          2.0            See Product Label     2.0-4.0    Pools
  ppm                     4.0            See Product Label     4.0-6.0    Spas
  PHMB, ppm               30             50                               Pools and Spas
  Ozone, ppm                             0.1                              Pools and Spas
  pH                      7.2            7.8                   7.4-7.6    Pools and Spas
  Total Alkallinity,      60             180                   80-100     Pools   and      Spas  using    calcium
  ppm as CaCO3                                                            hypochlorite, lithium hypochlorite, and
                                                                          sodium hypochlorite
                          60             180                   100-120    Pools    and    Spas   using  sodium
                                                                          dichlor, trichlor, chlorine gas, and
                                                                          bromine compounds
  Total Disolved                         1500 ppm above                   Pools and Spas
  Solids, ppm                            the concentration
                                         at start up
  Calcium                 150            1000                  200-400    Pools
  Hardness                100            800                   150-250    Spas
  Cyanuric Acid,                         100                   30-50      Pools and Spas
  ppm (When
  Used)
  Langalier               -0.3           0.5                              Pools and Spas
  Saturation Index

Please visit lifefloor.com/general-faqs for frequently asked questions.                                             9
WARRANTY PROCESS
If you need to submit a claim that falls under our warranty coverage, please follow the process
below and we will help you repair your installation.
Step 1: Contact Us
Contact information is listed on page 12 of this manual for both sales representatives and our
main office.
Step 2: Inform a Representative of Your Claim
From here, we will evaluate your claim. We may ask for pictures or a site visit to determine the full extent of
the damage.
Step 3: Updates to Your Claim
We will process your claim and update you throughout the process. Due to Life Floor’s 8 week lead time, there
may be some waiting time involved before we can get you replacement tiles if it is not a tile in a popular color. If
you have a rush order, we may be able to accomodate this special request, but please be aware we may suggest a
complimentary color or alternative based on the stock we have available.
Step 4: Installation
Once you receive your replacement tiles, there are a few options for installation. Please discuss these options with
your representative to determine the best option with you since they vary based on size and complexity.
Step 5: Follow-Up
We will follow-up with you to determine how the replacement is performing with periodic follow-ups after that. If
you have any issues before you hear from us, please contact us immediately so we can assist you.
Thank you for your business and collaboration with Life Floor.
We hope that we can continue to serve you and make your facilities safer.
Please visit lifefloor.com/general-faqs for frequently asked questions. 10SAFETY DATA SHEET
Section 1, Identification
Product Name
Life Floor tile – All thicknesses, colors and shapes
Manufacturer
Life Floor
Address
2010 E Hennepin Ave
Building 8, Suite 206
Minneapolis, MN 55413
+01 612.567.2813
Emergency Contact
Engineering Department
+01 612.567.2813
Recommended Use
Aquatic Safety Surfacing
Section 2, Hazard Identification
In the event of fire, decomposition products may include acrolein, other aldehydes, carbon monoxide and carbon
dioxide. May generate static electricity.
Section 3, Composition / Ingredient Information
Exempt: This product is considered an article according to 29 CFR, hazardous communication – 1910.1200(b)(6)
(v).
While this material is not classified as hazardous under OSHA regulations, this SDS contains valuable information
critical to the safe handling and proper use of the product. This SDS should be retained and available for
employees and other users of the product.
Section 4, First Aid Measures
Inhalation: No hazard in normal use
Skin Contact: No hazard in normal use
Eye Contact: Wash with water
Ingestion: Wash with water and seek medical advice
Section 5, Fire Fighting Measures
Water spray recommended. Other extinguishing agents may be used. Decomposition products may include
acrolein, other aldehydes, carbon monoxide and carbon dioxide. This product supports combustion and may
continue to burn after removal from source.
Please visit lifefloor.com/general-faqs for frequently asked questions. 11SAFETY DATA SHEET
Section 6, Accidental Release Measures
Not Applicable
Section 7, Handling and Storage
Handling
Provision should be made for sufficient ventilation and local exhaust where dust and/or fumes may be pro-
duced. Measures must be taken to avoid static buildup and discharge where dust is produced. Equipment
used should be bonded electrically to earth and equipped with static control measures.
Storage
Store in a dry, well ventilated location, away from direct sunlight, at temperatures below 120°F. Keep away
from strong oxidizing agents. Store in a dry, well ventilated location at the same temperature as the area
where it is to be installed for at least 24 hours prior to beginning the installation.
Section 8, Exposure Controls/Personal Protection
No special precautions are necessary in normal use.
Section 9, Physical and Chemical Properties
Physical state: Solid
Appearance: Foam
Color: Varies according to product
Odor: Faint to mild hydrocarbon and/or ammonia
Flammability: Nonflammable
Explosive Properties: No Data
Melting Point: 85°C
Boiling Point: No Data
Decomposition Temperature: No Data
Vapor Pressure: No Data
Density 9/cm3: 0.16-0.19
Solubility in Water: Insoluble
pH: Not Applicable
Please visit lifefloor.com/general-faqs for frequently asked questions. 12SAFETY DATA SHEET
Section 10, Stability and Reactivity
Stability: Stable under normal conditions
Materials to avoid: Strong oxidizers, acid, and alkali
Conditions to avoid: Open flame, other sources of ignition, and
high temperatures
Section 11, Toxicological Information
No toxic effects are known under normal use.
Section 12, Ecological Information
No ecological effects are known under normal use.
Section 13, Disposal Considerations
Dispose of according to local regulations.
Section 14, Transportation Information
Proper shipping name: Soft Tile
Material is classified as non-hazardous
Section 15, Regulatory Information
None
Section 16, Other Information
More information about Life Floor products can be found on our website, lifefloor.com
Email: solutions@lifefloor.com
Phone: +01 612.567.2813
Revision date: 6/26/2020
Please visit lifefloor.com/general-faqs for frequently asked questions. 13CONTACT INFORMATION
MAIN OFFICE
Address: 2010 E Hennepin Ave, Building 8, Suite 206, Minneapolis, MN 55413
Email: solutions@lifefloor.com
Phone: +01 612.567.2813
Website: lifefloor.com
SALES REPRESENTATIVE CONTACTS
East Coast United States
MaryAnn Eifert
Email: maryann.eifert@lifefloor.com
Phone: +01 386.898.2632
Central United States
Holden Bigler-Johnson
Email: holden.bigler@lifefloor.com
Phone: +01 612.987.7539
International
Kyle Seeman
Email: kyle.seeman@lifefloor.com
Phone: +01 763.200.6552
Strategic + Cruise Line
Lindsay Fetzer
Email: lindsay.fetzer@lifefloor.com
Phone: +01 612.946.2134
For all other regions not listed above, please contact our main office.
Has Life Floor improved your facility? We’d love to hear from you and feature your facility!
LinkedIn: linkedin.com/company/life-floor
Facebook: facebook.com/LifeFloor
Instagram: instagram.com/life.floor
Twitter: twitter.com/life_floor
Pinterest: pinterest.com/life_floor
Please visit lifefloor.com/general-faqs for frequently asked questions. 14You can also read