PMOD MacOSX Installation - INSTALLATION MANUAL Version 4.2 FOR RESEARCH USE ONLY (RUO)
←
→
Page content transcription
If your browser does not render page correctly, please read the page content below

PMOD MacOSX                                           ®

             Installation

              INSTALLATION MANUAL
                    Version 4.2

                      PMOD is a software
                FOR RESEARCH USE ONLY (RUO)
   and must not be used for diagnosis or treatment of patients.

(C) 1996-2021 PMOD Technologies LLC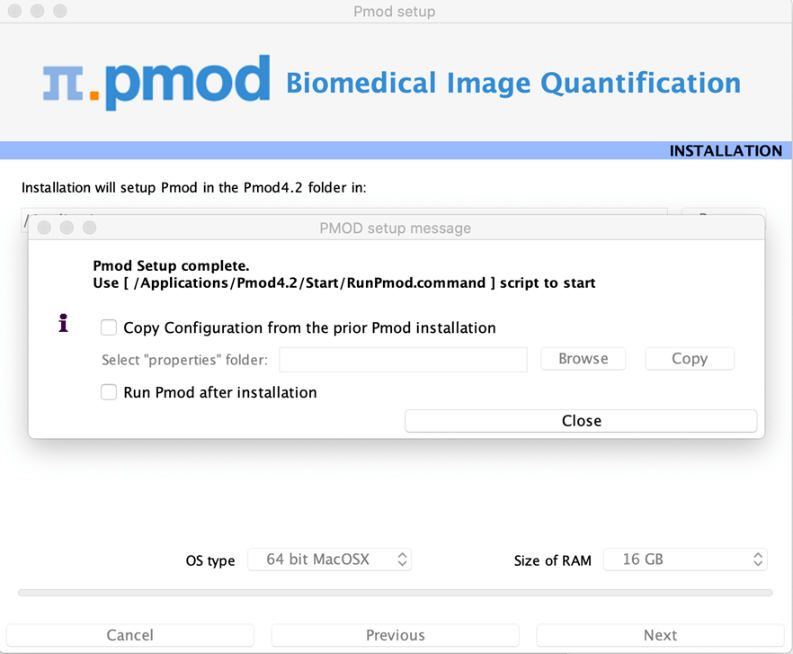
This page is intentionally left blank.

Table of Contents                                                                                                                        3

 1.       PMOD Installation on Mac OS X                                                                                             4
    1.1         Installation Overview ............................................................................................. 4
    1.2         PMOD Software Extraction ..................................................................................... 5
    1.3         PMOD Stand-alone License Installation .................................................................. 9
    1.4         PMOD Cloud License Activation ............................................................................ 11
    1.5     PMOD Network License Installation ...................................................................... 12
      1.5.1     PMOD License Server Installation ......................................................................... 13
      1.5.2     PMOD Network Clients Installation and Configuration ........................................ 15
      1.5.3     Combination of License and Database Server ...................................................... 18
    1.6     Version Upgrade in a Complex PMOD Environment .............................................. 18
    1.7         Troubleshooting ................................................................................................... 19

 Index                                                                                                                              0

 PMOD MacOSX Installation                                   (C) 1996-2021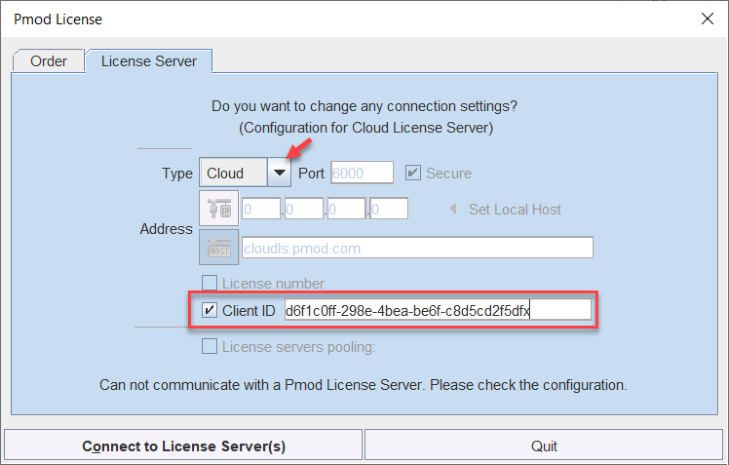
PMOD Installation on Mac OS X                                                                                           4

  1          PMOD Installation on Mac OS X
             The installation for all types of PMOD systems starts with downloading the software from the
             Download Page on our website. Note that additional archives are available on the Download Page,
             containing the Brain Parcellation Knowledge base for the Neuro tool, Example data database,
             and Documentation (also available online). To include these archives during installation they
             should also be downloaded, then moved to the folder pmod-42-setup-macosx/pmod/ after
             unzipping the installation package.
             For PMOD network clients, only software installation is required. For PMOD standalone systems
             and PMOD license server systems, the USB protection key drivers must also be installed after
             PMOD software installation and the license file copied to the system/lcs folder.

             Installation Account
             It is strongly recommended to install PMOD when logged into the account of the user who will later
             use PMOD. Note that during WIBU driver installation, administrator privileges will be required.
             If multiple users need to run PMOD locally, a root installation might still be considered. In this case,
             the permissions of the PMOD directory and all data directories will have to be opened, and the
             execution permission granted for the scripts which start PMOD and its servers. Additional
             permission problems might occur which are sometimes tricky to solve.

  1.1        Installation Overview

             PMOD supports three licensing types: stand-alone licenses, cloud licenses and network licenses.

             Licensing, Stand-alone License
             The PMOD software stand-alone licensing mechanism consists of two components:
             1. a USB protection key (WIBU-Box/RU, WIBU-SYSTEMS AG, http://www.wibu.com), and
             2. a license file pstarter.lcs (in sub-directory system/lcs of the PMOD installation).
             During PMOD startup the license information encoded in the USB key is read and compared to
             that in the license file. Only if the two informations match, startup proceeds. Next is a check
             whether the PMOD version purchased allows running the currently installed version. If all checks
             are successful, the PMOD ToolBox appears showing the purchased modules, and processing can
             start. Note that the USB key must remain connected while running PMOD.

             Licensing, Network License
             The PMOD network licensing scheme consists of a PMOD license server which manages a pool of
             purchased licenses, and an arbitrary number of PMOD clients which can check out unused
             licenses from the server. As soon as the PMOD program on a client is closed, the license is
             returned to the managed server pool. If the PMOD client crashes for some reason, the license is
             re-collected to the pool after about 15 minutes. On the other hand, if the license server is stopped,
             the clients show a warning message to the user and allow to continue work for a few minutes.
             Then, the clients will be stopped, unless the server has been started again.
             On the license server PMOD is installed in the same way as for a stand-alone license with the USB
             key, but the license file turns it into a license server.
             On the clients PMOD is also installed in the standard way, except that
             ·    installation of the drivers for the USB protection key is not required;
             ·    no license file is required.
             Note the following:
             ·    The license server PMOD installation is only intended for server purposes and not for data
                  processing.
             ·    The license server must be running and the USB key must be connected at all times.

  PMOD MacOSX Installation                             (C) 1996-2021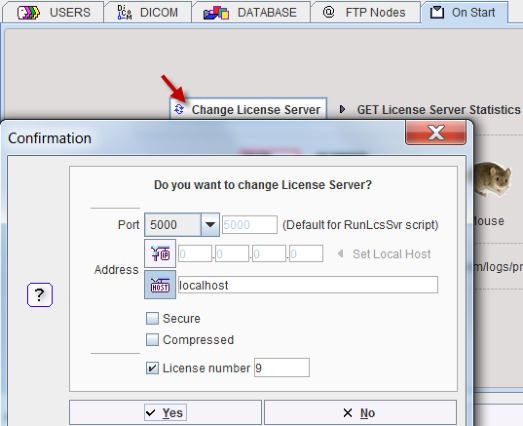
PMOD Installation on Mac OS X                                                                                      5

             ·    The license server and the clients must run the same PMOD version.
             ·    It is not required that the license server and the clients have the same operating system.

             Licensing, Cloud License
             The PMOD cloud licensing mechanism is similar to network licensing. It relies on a Cloud License
             Server operated by PMOD Technologies. During startup of a local PMOD installation, the license
             server is contacted over the Internet and a Client ID provided. The license server returns
             information about the purchased configuration. If the currently installed version matches the
             license, the PMOD ToolBox appears showing the purchased modules and processing can start.
             Note that the Internet connection to the license server must be maintained while running PMOD.

             Java Runtime Environment (JRE)
             The entire PMOD software is programmed in Java and therefore requires an appropriate Java
             Runtime Environment (JRE) to be executed. PMOD needs Java 11 to be installed on the system.
             Java 11 can be downloaded and installed from here. During PMOD installation, an appropriately
             configured JRE is extracted into the java sub-directory of the PMOD installation. This dedicated
             JRE will then be used to run PMOD. In this controlled environment, PMOD will remain unaffected
             by changes due to automatic OS upgrades.

             Installation Steps
             The installation of the PMOD software consists of the following steps which should be performed in
             the proposed sequence. They are explained in detail in the following installation sections.
             1. Extraction of the PMOD program files, the JRE, and optionally the example data to the
                Pmod4.2 directory in a user-defined directory.
                This installation step is required for: Stand-alone Installation, License Server, Network
                Clients, Cloud Clients.
             2. Installation of the USB protection key drivers for the WIBU-Box/RU plugged into the USB port.
                Please do not connect the PMOD USB protection key before this installation has been
                completed.
                This installation step is required for: Stand-alone Installation, License Server.
             3. Installation of the PMOD license file pstarter.lcs. The license file can be downloaded from the
                Support area of the PMOD website (please refer to the delivery note of your PMOD package
                for login information).
                This installation step is required for: Stand-alone Installation, License Server.

  1.2        PMOD Software Extraction

             The following procedure must be performed for standalone PMOD installations, for PMOD servers,
             and also for all PMOD network clients.
             We recommend leaving the installation package in your Downloads folder. Please begin by
             unzipping the PMOD installation package (do not unzip any sub-directories). Installation is started
             by executing the RunSetup.command in the Setup directory of the unzipped installation package.
             Note that the most recent MacOS Catalina and Big Sur block execution by double-click.
             RunSetup.command should be executed from the command line in the Terminal application. For
             older MacOS double-clicking may be sufficient.

             Open the application Terminal (e.g. using Spotlight). We recommend navigating to the Setup folder
             of the installation package. Typically this will require the command:
             cd Downloads/pmod-42-setup-macosx/Setup/
             Next, use the command:
             sh RunSetup.command
             to launch the installer.
             The following installation screen appears.

  PMOD MacOSX Installation                            (C) 1996-2021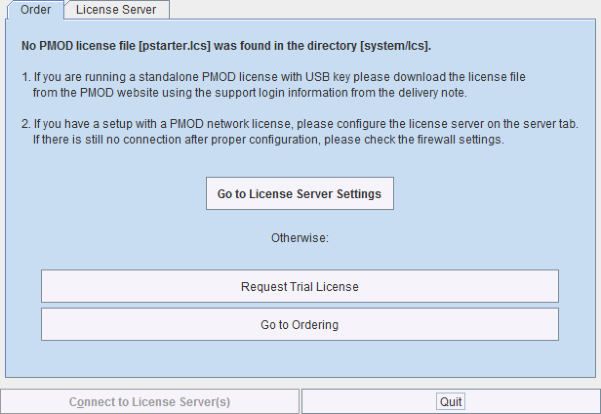
PMOD Installation on Mac OS X                                                                                 6

             Please use Next to proceed and accept the license agreement in the dialog window that appears:

  PMOD MacOSX Installation                         (C) 1996-2021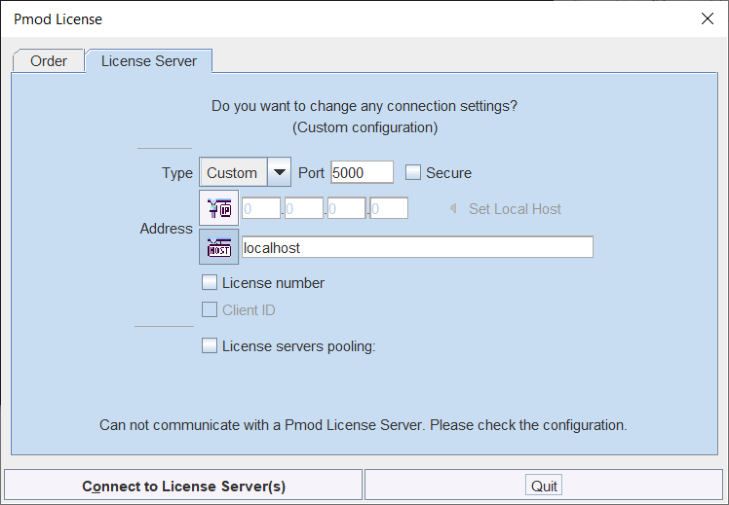
PMOD Installation on Mac OS X                                         7

             After selecting Next the installation continues.

  PMOD MacOSX Installation                            (C) 1996-2021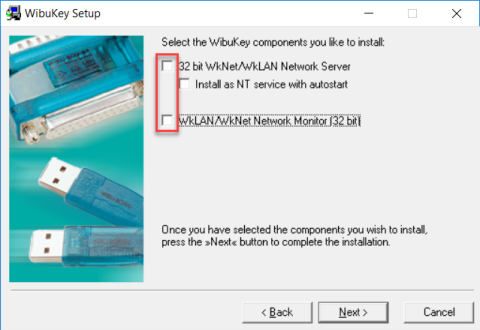
PMOD Installation on Mac OS X                                                                                          8

             Please perform the following configurations:

             Installation Path
             Use the Browse button to select the parent directory for the installation (if a location other than the
             recommended Applications is required). There, the installer will create a new directory Pmod4.2
             for the program files and the data. Please make sure that 4.3GB of free space is available for the
             full package.

             Packages
             Depending on the packages downloaded (and moved to the pmod-42-setup-macosx/pmod/
             directory before execution of RunSetup.command), up to five packages are available for
             installation, the Pmod Software, the Protection Key Driver Software, The PNEURO
             Parcellation resources, the Documentation, and the Database with Examples. The Database
             with Examples requires about 970MB and will show up as database called Pmod. This database
             will allow you to get acquainted with the program using examples for the different types of data
             analysis. We recommend creating a new database separate to the PMOD installation folder for
             your own study data processing. The PNEURO Parcellation resources should only be enabled if
             the PNEURO tool is licensed.

             Properties of Operating System and RAM
             The operating system of your target computer needs to be 64-Bit. Size of RAM can be set to any
             size, up to 32 GB. However, if the specified size exceeds the physical RAM, the system will start
             swapping after RAM space is exhausted and will become very slow. Therefore we strongly
             recommend setting Size of RAM < physical RAM (e.g. 14 GB for 16 GB system). To assign more
             than 32 GB when it is available on your system, the start script RunPmod.command should be
             edited after installation.

  PMOD MacOSX Installation                            (C) 1996-2021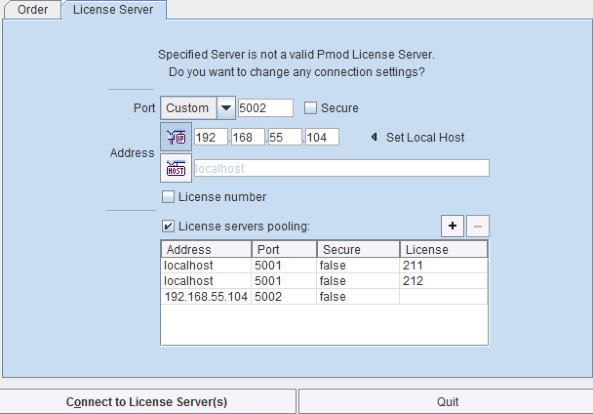
PMOD Installation on Mac OS X                                                                                        9

             Installation of the PMOD Environment
             The Pmod4.2 directory is created wherein all PMOD-related files are extracted. If the installing user
             has no write permission in the parent directory, a dialog window appears to report an installation
             problem. In this case please try the installation again using a different installation directory.
             At the end of the installation a dialog window is shown. It indicates the command script that must
             be used to start Pmod4.2. If this is the first PMOD installation, Close the window.
             If this is not your first PMOD installation we recommend importing your previous working
             environment. To do this, check Copy Configuration ... and select the properties folder of your old
             PMOD installation using the Browse button as illustrated below. Then click Copy to import the
             settings, after which you can Close the window.

  1.3        PMOD Stand-alone License Installation

             Install USB Key Drivers
             All the files required for the driver installation were extracted during the installation of the PMOD
             software and stored in the PMOD directory tree. Browse to the directory
             /Applications/Pmod4.2/install/hksetup/MacOSX
             First double-click WkRuntimeUser_6.51.500.dmg, then WkInstall.pkg, and perform a standard
             installation

  PMOD MacOSX Installation                           (C) 1996-2021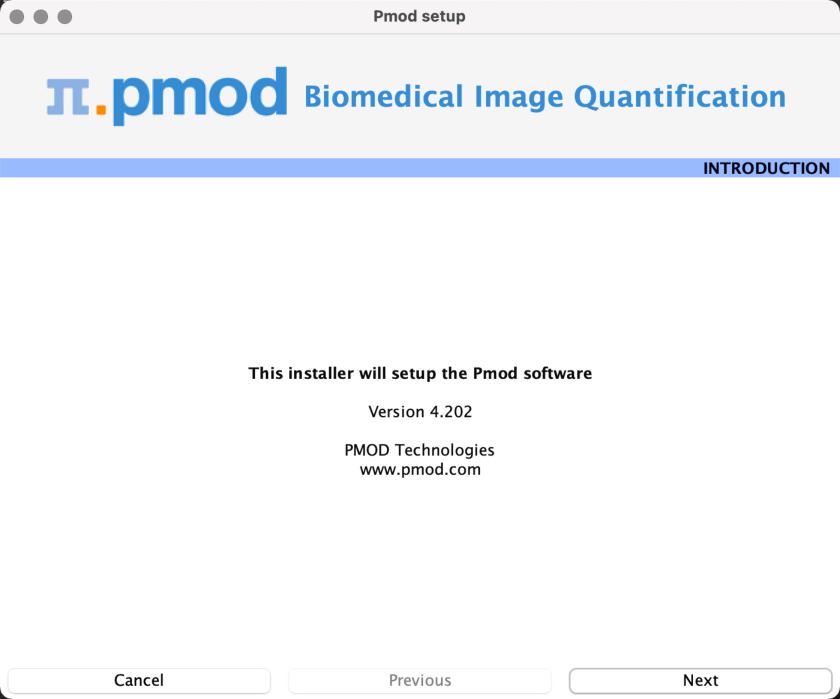
PMOD Installation on Mac OS X                                                                                          10

             Note that the network components don't need do be installed and can be unchecked as illustrated
             below,

             Note: If you experience problems during driver installation, you are recommended downloading the
             most recent drivers for the WIBU-KEY (WibuKey Runtime) and try the installation again. Also, in
             some cases, a reboot may be required after driver installation.

             License File
             The delivery note you have received with the PMOD installation package contains your account
             information for your PMOD Customer Account at www.pmod.com. There you will find a license
             report, and a button to download the license file for your purchased configuration. Please download
             pstarter.lcs and copy it to the directory /Applications/Pmod4.2/system/lcs.

             Important Note: Please do not change pstarter.lcs in any way - a modified license file will not be
             accepted. Do not open pstarter.lcs in any program, do not rename it, and if you transfer it per FTP,
             use binary transfer.

             Start PMOD
             PMOD can now be started by double-clicking the RunPmod.command script
             in /Applications/Pmod4.2/Start/. Depending on the selected configuration it contains the following
             commands:
             cd '/Applications/Pmod4.2'
             ./java/jre/bin/java -Xmx16000M -jar pmod.jar
             Alternatively, the script can be dragged once from the finder to the Mac OS X taskbar to create a
             shortcut. From then on, PMOD can be started using this shortcut.

             Notes:
             The script is tailored to the installation directory. Therefore, if the Pmod4.2 directory is moved to a
             different location, the path needs to be adjusted.
             The -Xmx16000M option specifies the maximum heap memory (8000 MB) that PMOD can

  PMOD MacOSX Installation                            (C) 1996-2021
PMOD Installation on Mac OS X 11
allocate. To process large data sets this number should be increased. Caution: The P3D tool may
crash when the reserved space approaches the physical RAM size.
Change Permission Settings of Directories for writing
If other users than the one used to install PMOD should be able to use the software from their own
accounts it is necessary to open some key PMOD directories for writing.
The following commands should be executed in the Terminal:
chmod -R ugo+w /Applications/Pmod4.2/properties
chmod -R ugo+w /Applications/Pmod4.2/data
There may be other directories you have to open for writing later on, if several users are working
with the same PMOD installation.
1.4 PMOD Cloud License Activation
If a Cloud License has been purchased, no driver installation is necessary after PMOD software
extraction. Instead, registration of the Client ID with the PMOD Cloud License Server is required.
The Client ID is listed in the PMOD delivery note and also when singing into the PMOD account.
Activation of Client ID
Please start PMOD with the command script RunPmod.command in Pmod4.2/Start. The
following dialog window appears:
Activate Go to License Server Settings, to arrive on the License Server panel.
PMOD MacOSX Installation (C) 1996-2021PMOD Installation on Mac OS X 12
Switch Type to Cloud, and enter the Client ID code, which you have copied from the delivery note
or the PMOD account. Then activate Connect to License Server(s). If everything runs normally,
the dialog window disappears and the PMOD ToolBox opens up instead. Because the
configuration is saved in the file lcserver.ini in the system/lcs directory, the dialog window doesn't
appear any more when PMOD is started.
Troubleshooting
If a dialog window similar to the one illustrated below appears, registration of the Client ID was not
successful.
If the entered code was correct, the most likely issue is failed Internet connectivity with the Cloud
License Server. Please make sure that connection to port 6000 of cloudls.pmod.com is allowed.
If you are working behind an institution firewall, please contact your IT department and ask them to
grant you this connectivity.
If there is a need to get access to the License Server configuration panel to enter a modified
code, please remove the file lcserver.ini in the system/lcs directory.
Note that if PMOD is started more times than allowed for in the license configuration, the first
instances will be forced to quit.
1.5 PMOD Network License Installation
PMOD MacOSX Installation (C) 1996-2021PMOD Installation on Mac OS X 13
1.5.1 PMOD License Server Installation
PMOD Software Installation
The computer for the PMOD license server doesn't require a high performance (e.g. 2GB RAM,
20GB free space on HDD, 64-bit OS), but needs to have access to the WIBU key USB dongle and
run continually. Therefore, a robust vintage machine is sufficient as a PMOD license server.
Preferably, it is dedicated to serving the PMOD license, because the license server is a standard
process rather than a Windows service.
When using a Virtual Machine for PMOD license serving, the USB device from the host server
needs to be mapped to the selected Virtual Machine. If there are no USB ports in a host server or
the mapping is not possible, a Network USB Device Server can be used. USB hubs from Digi
Network, Silex, and Belkin have been tested by Wibu-Systems. In such a setup, the WIBU key can
be served over the network and mapped to the Virtual Machine. The standard WIBU drivers can
be installed and used at the Virtual Machine.
To install the PMOD license server first perform the steps described in the Stand-alone PMOD
Installation 9 including copying of the license file and plugging the USB key in.
Starting the License Server
The PMOD license server can then be started by executing the RunLcsSvr.command script
in /Applications/Pmod4.2/Start containing the following lines (64-Bit version)
cd '/Applications/Pmod4.2'
./java/jre/bin/java -Xmx2G -jar pmtsvr.jar 5000 -ls
The meaning of the command arguments is:
-Xmx2G: Size allocated to the license server
5000:IP port over which the license server communicates
-ls: license server only, no data sharing
-d:This option can be added for more verbose output
Note: The script has been tailored to the installation directory. Therefore, if the Pmod4.2 directory
is moved to a different location, the path needs to be adjusted.
Log Output
The command window will show startup information and log the checking out/in events as
illustrated below. In this example, two clients are started, and then the one of them is stopped
again.
MD03845:/Applications/Pmod4.2/Start/RunLcsSvr.command
***
Started on license [9]
***
License Server [Version 3.901 A (c) 1996 - 2016 by PMOD Technologies]
Verbose: false, Secure: false, Compressed: false
***
Port: 5000
Started on: PMOD-CB2/192.168.55.103
License Server: [ ON ] STANDALONE (Use to stop), Number of
Server Licenses: 3
Memory Assigned: 1820 MB
--> License Server started [Fri Jul 25 16:43:40 CEST 2014] : on port
5000
1) 127.0.0.1-192.168.55.103
Number of free licenses: 2
1) 127.0.0.1-192.168.55.103
2) 192.168.55.104-192.168.55.104
Number of free licenses: 1
PMOD MacOSX Installation (C) 1996-2021PMOD Installation on Mac OS X 14
===> REMOVE: 192.168.55.104-192.168.55.104, 1406299586017
1) 127.0.0.1-192.168.55.103
Number of free licenses: 2
===> REMOVE: 192.168.55.104-192.168.55.104, 1406299586017
1) 127.0.0.1-192.168.55.103
2) 192.168.55.104-192.168.55.104
Number of free licenses: 1
1) 127.0.0.1-192.168.55.103
2) 192.168.55.104-192.168.55.104
3) 127.0.0.1-192.168.55.103
Number of free licenses: 0
At this time clients can't connect any longer, but will see the window illustrated below.
Another client needs to stop
===> REMOVE: 192.168.55.104-192.168.55.104, 1406299700154
1) 127.0.0.1-192.168.55.103
2) 127.0.0.1-192.168.55.103
Number of free licenses: 1
before connection is possible again and Connect to License Server will work.
Multiple Licenses Management
Multiple licenses can be served by a single PMOD installation. In order to use this feature please
rename the different license files (pstarter.lcs) by appending the license numbers in square
brackets (pstarter[1324].lcs, pstarter[427].lcs, ...) and copy them into the Pmod3.7/system/lcs
folder. There are two scenarios, a single license server managing multiple licenses simultaneously,
or a separate license server for each license.
If the license server script RunLcsSvr.bat is started without modification, it will manage all licenses
found in the directory. A specific license can then be defined in the RunPmod.bat script of the client
by the command line option "-lsn[.@",
e.g.:
.\java\jre\bin\java -Xmx16G -jar pmod.jar -lsn[5000.1324@192.168.55.103]
- to acquire license 1324
.\java\jre\bin\java -Xmx16G -jar pmod.jar -lsn[5000.427@192.168.55.103] -
to acquire license 427
In order to operate a dedicated server for each license please create a separate server script for
each license with the "-lic[]" option included, e.g.
PMOD MacOSX Installation (C) 1996-2021PMOD Installation on Mac OS X 15
java -Xmx2G -jar pmtsvr.jar 5000 -ls -lic[1324]
java -Xmx2G -jar pmtsvr.jar 5001 -ls -lic[427]
A specific license can then be defined in the RunPmod.bat script of the client by the command line
option "-lsn[@" e.g.
.\java\jre\bin\java -Xmx16G -jar pmod.jar -lsn[5000@192.168.55.103] - to
acquire license 1324
.\java\jre\bin\java -Xmx16G -jar pmod.jar -lsn[5001@192.168.55.103] - to
acquire license 427
The advantage of separate servers is that the processes can be independently started, stopped
and monitored.
Emergency Restart
In the case of connection or license management problems the following procedure is
recommended for restoring clean license handling:
1. Stop the license server.
2. Delete the contents of the Pmod4.2/system/lcs/lct/ directory.
3. Start the license server again.
If this procedure is completed within 5 minutes, no shutdown of running PMOD clients is required.
1.5.2 PMOD Network Clients Installation and Configuration
PMOD Software Installation
For a PMOD client only the software extraction of the Stand-Alone PMOD installation is required.
The license file should not be copied.
Configuration of the License Server
The PMOD client can then be started by the command script RunPmod.command in the
Pmod4.2/Start directory. As no license file is found, the following dialog window is shown.
Please select the Go to License Server Settings button to open the License server panel
illustrated below.
PMOD MacOSX Installation (C) 1996-2021PMOD Installation on Mac OS X 16
Please configure the same Port that you have configured for the license server (or transaction
server), and specify the server Address either by entering its IP address, or by entering its host
name. If the process employed for license serving uses compression or encryption, please check
the appropriate boxes. If the license server manages several licenses at the same time, enable the
License number box and enter the number of the license to which you want to connect. Then
activate Yes.
If the connection succeeds, the dialog window disappears and PMOD starts up. Otherwise the
dialog
is shown. In this case, please check the configuration of the license server and try again.
If a customer has multiple license servers, the proper license server can also be specified in
RunPmod.command as a client command line option by:
-lsn[.@]
Alternatively muliple license servers can be added in the License servers pooling configuration
by entering their definition in the upper area and then using the + button. Each time the client is
started it will connect to the first license server in the list which responds.
PMOD MacOSX Installation (C) 1996-2021PMOD Installation on Mac OS X 17
License Server Change and Statistics
The license server setting is available on the On Start panel of the Configuration tool. The
Change License Server button opens a dialog window for changing the license server address. If
a license server handles multiple network licenses, the License number field can be used to
address a specific license.
The GET License Server Statistics button allows finding out whether there are free licenses left.
Starting and Stopping a PMOD Client
After the license server has been properly configured, PMOD can be started in exactly the same
way as with a stand-alone installation. However, for stopping PMOD the main Quit button of the
ToolBox should always be used. This will initiate a proper shutdown procedure which returns the
license to the license server. Otherwise, when simply killing the client, it will take about 15 minutes
until the license server diagnoses loss of connection and reclaims the lost license.
PMOD MacOSX Installation (C) 1996-2021PMOD Installation on Mac OS X 18
Connection Problems
If at client startup no more licenses are available from the license server because all are in use, the
License Server connection dialog window is shown again to give the user a chance for connecting
to a different license server. In case the connection is repeated with the same server following
message is shown.
If a connection problem with the license server occurs while working, the License Server
connection dialog window is shown. If it is not possible to re-establish the connection (for instance
by restarting the license server) the following warning is displayed
and after five more minutes the PMOD client is finally stopped.
1.5.3 Combination of License and Database Server
Please note that the license server process is based on the transaction server mechanism used for
publishing a database. Therefore, if the user is already running a transaction server process on the
server system (RunDbSvr.command, see Setting up a Transaction Server), it is not necessary to
start a dedicated process (RunLcsSvr.command) just for the license management. The clients can
use the same port for requesting a license as for requesting data from the transaction server.
In this context the transaction server option
-noLS: database server only
is relevant. This option should be used when running multiple transaction servers. In this case, only
one of the transaction servers should started without -noLS, namely the one used for license
serving.
1.6 Version Upgrade in a Complex PMOD Environment
Upgrading a standalone installation of PMOD is straightforward. When using absolute paths for the
databases the new PMOD version should be immediately functional after copying the properties
folder as the last installation step.
In a more complex environment with clients and servers the following rules should be observed:
1. Absolute paths outside the PMOD installation directory should be used for the databases. If
this is not the case they should be moved and the paths adjusted in the configuration.
2. The databases should be backed up before the migration.
3. Server and clients should preferably run the same PMOD version. (To some extent, newer
server versions can support older client versions, but not reverse.)
4. The PMOD version on the server should be updated first, followed by the clients.
Server Update
Please perform the following tasks sequentially:
1. Stop all PMOD servers in the order DICOM servers (DS), transaction servers (TS), license
servers (LS).
PMOD MacOSX Installation (C) 1996-2021PMOD Installation on Mac OS X 19
2. Install the new PMOD version and import the properties from the old installation.
3. In Config/DATABASE switch each database to Use Direct Connection, verify it with Echo
DB, and run Update & Optimize. Then switch back to Use Transaction Server and generate
new starting scripts for the transaction and license servers.
4. In Config/DICOM/DICOM SERVER generate new scripts for the DICOM Servers.
5. Save the configuration and exit PMOD.
6. Start the DICOM, transaction and license servers using the new scripts.
7. Start PMOD and verify with the Configuration utility, that the TS and DS are working properly.
To this end use Echo TS and C-Echo.
8. In case of a network license: Exit PMOD and restart the license server (otherwise a license is
blocked).
Client Update
1. Install the new PMOD version and import the properties from the old installation. For ATL
installations the old properties are not required, as the configuration is centrally stored.
2. Start PMOD, provide the license server details when using a network license, and verify the
connections with the transaction and DICOM servers.
1.7 Troubleshooting
Error reporting
Internal errors typically leave messages of the form
java.lang.NullPointerException
at
pmclass.applications.pmgateway.PMgatewayDefaults.getConvertionSettings(P
MgatewayDefaults.java:143)
at
pmclass.applications.pmgateway.PMgatewayFrame.convert(PMgatewayFrame.jav
a:854)
at
pmclass.applications.pmgateway.PMgatewayFrame.run(PMgatewayFrame.java:91
1)
at java.lang.Thread.run(Thread.java:484)
in the command window or the log file.
To allow PMOD Technologies tracking the problem please report the error using the in-built
reporting mechanism as described in the problem reporting section. If this is not possible due to a
firewall problem please open the Support Request section on the www.pmod.com website and fill
the error message together with a description into the problem report form.
License Errors
Some of the most likely license errors are:
§ The following error message might appear when restarting PMOD after a crash or after killing
the program rather than quitting regularly
PMOD MacOSX Installation (C) 1996-2021PMOD Installation on Mac OS X 20
§ If the license file has not been copied to the right directory, you will see a message
Please copy pstarter.lcs to /Applications/Pmod4.2/system/lcs
§ If the license file has been modified somehow, you will see a message
License Error. Invalid license file (2)
Please try to extract pstarter.lcs again from your e-mail without any modifications.
§ If the USB key cannot be read because it is not connected or because the driver installation is
not up to date, you will see an error message Hardware license key not accessible with
additional details.
Please make sure that the USB key is connected and the installation was done as described.
The installation may have to be repeated after an operating system upgrade.
3D Rendering Problems
The 3D rendering solution of PMOD may fail on some older MacOSX systems. Please try solving
the problem as follows:
1. Java is already installed on Machine:
§ copy content of “Pmod4.2/Pmod/java/ext/j3d” to “/Library/Java/Extensions”
§ check whether 3D works in PMOD
§ if not, install Java 1.8 using the latest installer form the Oracle download page and copy
content of “Pmod4.2/java/ext/j3d” to “/Library/Java/Extensions”
§ check whether 3D works in PMOD
§ if not, there is no simple solution at this time.
2. Java is not yet installed on Machine
§ install Java 1.8 using the latest installer form the Oracle download page and copy content of
“Pmod4.2/java/ext/j3d” to “/Library/Java/Extensions”
§ check whether 3D works in PMOD
§ if not, there is no simple solution at this time, please contact support@pmod.com.
R Plotting Problems
If plots are not shown or very slowly, an update of X11 is required. Please install XQuartz from
http://xquartz.macosforge.org/.
PMOD MacOSX Installation (C) 1996-2021You can also read