Product Manual Oryx Delivery Robot
←
→
Page content transcription
If your browser does not render page correctly, please read the page content below
Better Robot, Better Life

Oryx Delivery Robot

Product Manual
       V 1.1.0

      BOOCAX

     400 -161- 8661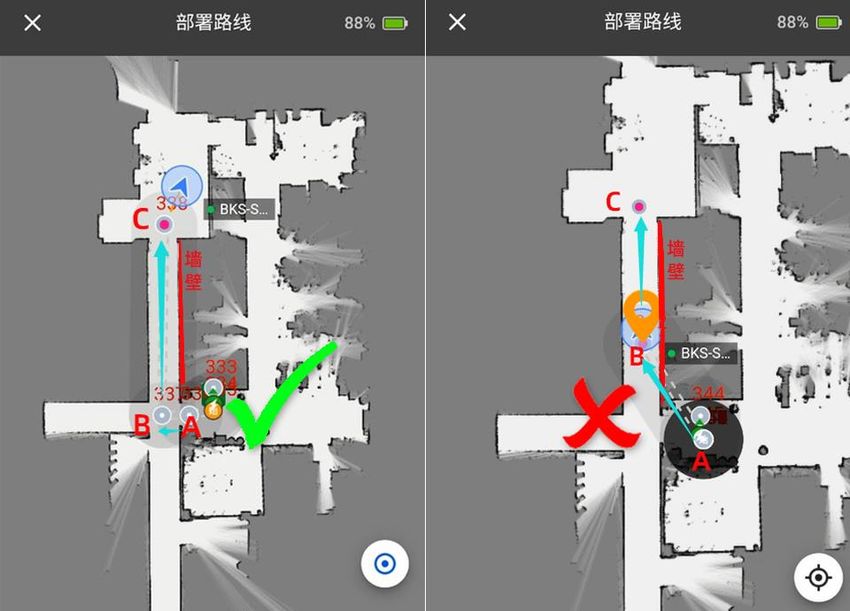
Oryx Robot_Product Manual

                                       Safety and Precautions

          The use of this robot should follow the specifications of this product, and use out of range is
    strictly forbidden! BooCax will not assume any responsibilities for the losses caused by improper
    operation.

           Symbols:
           ○! This symbol indicates danger, warning and attention.
           ○\ This sign indicates prohibited behavior.

                                        ⚠ PROHIBITIONS
    ○\ THE ROBOT IS NOT EQUIPPED WITH EXPLOSION-PROOF STRUCTURE AND SHALL NOT BE USED IN
       FLAMMABLE ENVIRONMENT;
    ○\ DO NOT STAND IN FRONT OF A RUNNING ROBOT ;
    ○\ DO NOT TOUCH THE DRIVING DEVICE UNDER OPERATION, WHICH MAY CAUSE INJURY AFTER BEING
       ENTANGLED;
    ○\ WHEN THE BATTERY IS CHARGED, DO NOT TOUCH THE COMPONENTS IN THE CONTROL BOARD
       (EXCEPT THE CIRCUIT PROTECTOR) AND THE WIRE TERMINALS, OTHERWISE, SHORT CIRCUIT,
       LEAKAGE AND ELECTRIC SHOCK MAY OCCUR, CAUSING MACHINE DAMAGE, INJURY AND FIRE;
    ○\ DO NOT STAND IN THE FORWARD DIRECTION OF THE ROBOT FOR OPERATION, IN CASE THAT
       SUDDEN START CAUSES AN ACCIDENT.

                                         ⚠ ATTENTIONS
    ○! BEFORE STARTING THE ROBOT, PLEASE CHECK WHETHER THE SAFETY COMPONENTS (SENSOR,
       EMERGENCY STOP SWITCH, ETC.) ARE IN NORMAL CONDITIONS;
    ○! THE DRIVING WHEEL MAY SLIP ON WATERLOGGED OR GREASY FLOOR. PLEASE CLEAN THE FLOOR
       PROMPTLY;
    ○! SMALL OBJECTS SUCH AS SCREW OR SOLID WASTE ON THE PATH MAY BE ENGAGED IN THE
         UNIVERSAL WHEEL AND DRIVING WHEEL, MAKING THE ROBOT DEVIATE FROM THE ROUTE.
    ○! ROUGH PAVEMENT SUCH AS CONCRETE AND ASPHALT WILL ACCELERATE WEARING OF WHEELS,
       SO PLEASE KEEP THE PAVEMENT SMOOTH AS MUCH AS POSSIBLE;
    ○! WHEN REMOVING ANY COMPONENT, PLEASE REMOVE THE CONNECTING LINE WITH THE MAIN
       BODY FIRST, AND THEN OPERATE AFTER POWER OFF;
    ○! PLEASE FIRMLY INSTALL THE TERMINAL COVER OF THE BATTERY, OR IT MAY CAUSE SHORT
       CIRCUIT, MACHINE DAMAGE AND FIRE IF THE COVER CURLS UP OR FALLS OFF;
    ○! WHEN CHARGING, PLEASE READ THE INSTRUCTIONS OF THE CHARGING PILE BEFORE OPERATION;
    ○! THE ROBOT BODY MUST BE MAINTAINED BY A TRAINED PROFESSIONAL.

BooCax                                            1 / 23                                      boocax.com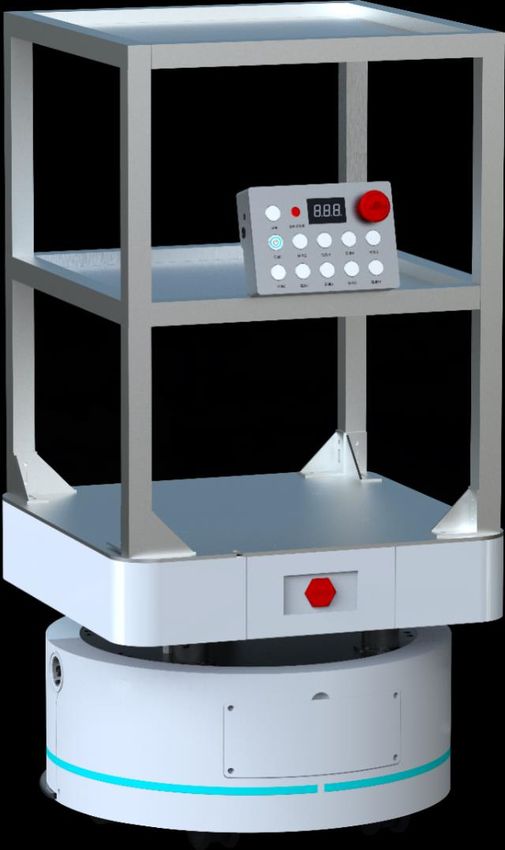
Oryx Robot_Product Manual

Contents
1.     PRODUCT PROFILE ........................................................................................................................................... 3
2.     SPECIFICATIONS ................................................................................................................................................ 4
3.     EXTERNAL DIMENSIONS ................................................................................................................................ 5
4.     FUNCTIONAL COMPONENTS ........................................................................................................................ 6
5.     PRODUCT STRUCTURES ................................................................................................................................. 7
6.     OPERATING INSTRUCTIONS FOR CONTROL PANEL ........................................................................... 8
     6.1       FUNCTION DESCRIPTION OF CONTROL PANEL ............................................................................................................ 8
     6.2       OPERATING INSTRUCTIONS FOR CONTROL PANEL ..................................................................................................... 9
7.     PREPARATION BEFORE USE ....................................................................................................................... 11
     7.1       INSTALL THE CHARGING PILE ..................................................................................................................................... 11
     7.2       QR CODE DEPLOYMENT .............................................................................................................................................. 12
     7.3       CLEAN UP BARRIERS .................................................................................................................................................... 13
     7.4       DOWNLOAD APP ........................................................................................................................................................... 14
     7.5       TURN ON AND CONNECT THE ROBOT ........................................................................................................................ 14
     7.6       BUILD SCENE MAP ........................................................................................................................................................ 16
     7.7       SET PATH POINTS AND TASK POINTS .......................................................................................................................... 17
8.     START TO WORK ............................................................................................................................................. 21

BooCax                                                                                 2 / 23                                                                           boocax.com
Oryx Robot_Product Manual

1. Product Profile

                                           BooCax "Oryx” delivery robot is used indoors, such as

                                      factories, laboratory buildings, hospitals, e-commerce

                                      warehouses, etc., to realize two-point delivery and cargo

                                      handling.

                                           The robot is light and small, and easy to use. It can issue

                                      instructions through its own control panel, which allows the

                                      robot to move and handle according to the actual needs,

                                      greatly optimizing the field operation process, reducing

                                      operating costs and improving the intelligent management of

                                      enterprises.

PRODUCT FEATURES
         Easy to use—use robot like elevator

 Mobile App operation; route deployment by pushing the robot, offline operation without reliance on 4G
 network;
 The target task is issued by clicking the button on control panel. The user can learn to operate instantly
 without training.

         Excellent distribution ability—optimized process and efficient delivery

 The delivery workflow is greatly optimized, and the high-performance chassis is equipped with a smart
 navigation engine to efficiently realize the high-frequency delivery between two points.

         Accurate positioning and safe use—multiple operation tips

 Centimeter-level precision ensures accurate positioning; driving light in combination with voice prompt
 guarantees safe operation.

         One-button return to charge—automatic charging

 With one click, the robot will return to autocharge, eliminating the trouble of wire charging. It is easy to
 manage, convenient, and can improve work efficiency.

BooCax                                            3 / 23                                        boocax.com
Oryx Robot_Product Manual

2. Specifications
 Type          Oryx Delivery Robot

 Model Name    LY-55

 Function      Indoor delivery and handling

               Body weight                 47.4 kg
                                           530mm (diameter) * 397mm (chassis height) (shelf
               External dimensions
                                           height is adjustable)
               Rated load                  50 kg
               Positioning/navigation
 Basic                                     Laser SLAM
               mode
 parameters
               Communication mode          WiFi

               Man-machine interaction     Physical button control panel, mobile App

               Drive mode                  Two-wheel differential drive

               Rotating diameter           610 mm

               Running speed               0.8 m/s

               Positioning accuracy        ±20 mm

               Navigation accuracy         Startup ±25 mm; smooth running ±10 mm
 Operating
               Gradeability                ≤8°
 parameters
               Obstacle crossing ability   Vertical obstacle crossing height: 10mm

               Width of driving channel    ≥750 mm

               Noise                       ≤53dB@0.8m/s

               Rated voltage/capacity      24V / 28Ah

               Battery life                Full load 10 ~ 12

 Battery       Charging time               3 h (0-80%)

               Charging mode               Autocharge

               Charging current            8A fast charge +1A slow charge

               Obstacle avoidance          Laser+collision sensor
 Safety
               Emergency stop button       Control panel
 performance
               Driving safety              Voice prompt,driving indicator

 Working       Indoor                      Concrete pavement, wood floor
 environment   Working temperature         -5°C ~ +50°C

BooCax                                      4 / 23                                       boocax.com
Oryx Robot_Product Manual

3. External dimensions

                                                  397 mm

                            530 mm

                         Oryx Robot Basic

BooCax                             5 / 23                  boocax.com
Oryx Robot_Product Manual

     4. Functional components

       Expandab
       le loading
       platform

                                                                                     Laser radar

                                                                                     Vision sensor

        Charging connector

                                                                                     Driving wheel

                             Description of front functional components

                                                                                     Control
                                                                                     panel

Expandable
loading platform

   Power switch

      Nameplate
                                                                                     Running light
 Collision sensor

                                                                                     Universal wheel

                             Description of back functional components

     BooCax                                    6 / 23                                    boocax.com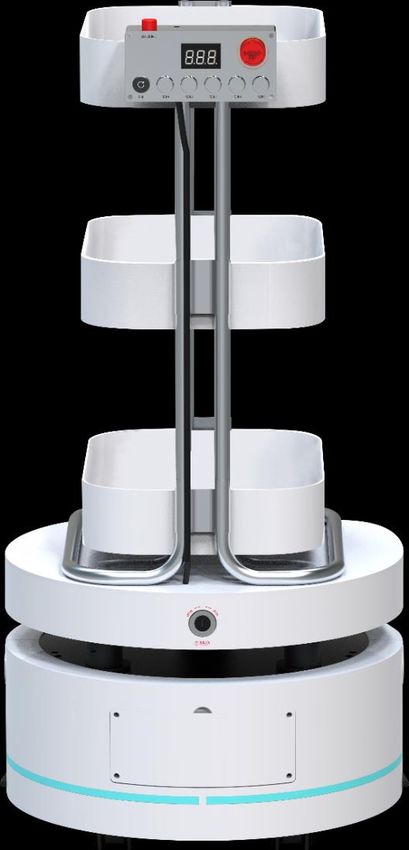
Oryx Robot_Product Manual

5. Product structures

         Structure 1: Oryx suitable for handling            Structure 2: Oryx suitable for delivery in
                                                                        commercial buildings

BooCax                                             7 / 23                                    boocax.com
Oryx Robot_Product Manual

6. Operating instructions for control panel

6.1      Function description of control panel

                                           Battery display

 Low battery alarm lamp

      Return-to-charge                                                                 Emergency stop button
                button

                                                                                                Task buttons

 Description of corresponding functions of buttons:
                                                 •     1-10 task buttons correspond to 10 target
                                                       location points;
 Task buttons                                    •     At present, only 10 target points can be set;
                                                 •     Only one target point can be clicked once,
                                                       triggering one navigation task.
                                                 •     By clicking the “Charge" button, the robot will
                                                       automatically return to the charging pile for
 Return-to-charge
                                                       charging;
 button
                                                 •     The robot will keep charging at the pile until a new
                                                       task instruction is received.
                                                 •     By pressing the "Emergency Stop" button, the
                                                       robot will immediately stop the executing
                                                       task;
 Emergency stop                                  •     By releasing the "Emergency Stop” button,
 button                                                the robot will be in a stop status, at the same
                                                       time, the executing task will be cancelled, and
                                                       the target point button corresponding to the
                                                       task will keep flashing.
                                                 •     When the battery is less than 15%, the alarm
                                                       lamp will flash continuously to give a
 Low      battery
                                                       charging warning;
 alarm lamp
                                                 •     When the battery is more than 15%, the alarm
                                                       lamp will stop flashing.

BooCax                                        8 / 23                                            boocax.com
Oryx Robot_Product Manual
6.2 Operating instructions for control panel
① Assign tasks
Press the "Task 1" button,
the light is on, and the
robot will go to the target
position 1.
② Emergency stop
Press the "Emergency Stop"
button
Press the "Task 1" button, the
light keeps on, and the robot
will stop.
③ Cancel the task
Release the "Emergency Stop"
button (rotate right)
The "Task 1" button light flashes,
the robot stops, and the ongoing
task is cancelled.
BooCax 9 / 23 boocax.comOryx Robot_Product Manual
④ Continue the task ⑤ Modifying task
Release the "Emergency Stop" button Click "Task 10", and the "Task 1”
(rotate right) button light turns off.
Press the "Task 1" button, the light keeps The "Task 10" button light keeps on,
on, and the robot will go to the target and the robot will go to the target
position 1. position 10.
Other wrong operations
When "emergency stop button" is not released, there is no reaction by clicking any
button
BooCax 10 / 23 boocax.comOryx Robot_Product Manual
7. Preparation before use
7.1 Install the charging pile
The charging pile of the robot should be placed in a safe and tidy place. It should be on the horizontal
ground with its back against the flat wall, as shown in the following figure:
① Place the back of the charging pile against the wall, and then turn the foot pads at the bottom
to adjust the charging pile;
② Plug the 3-pin female socket end of the three-plug power cord into the 3-pin male end of the
adapter, and connect the other end (i.e., power plug) to a 110V/220V AC socket to complete
the power-on preparation.
BooCax 11 / 23 boocax.comOryx Robot_Product Manual
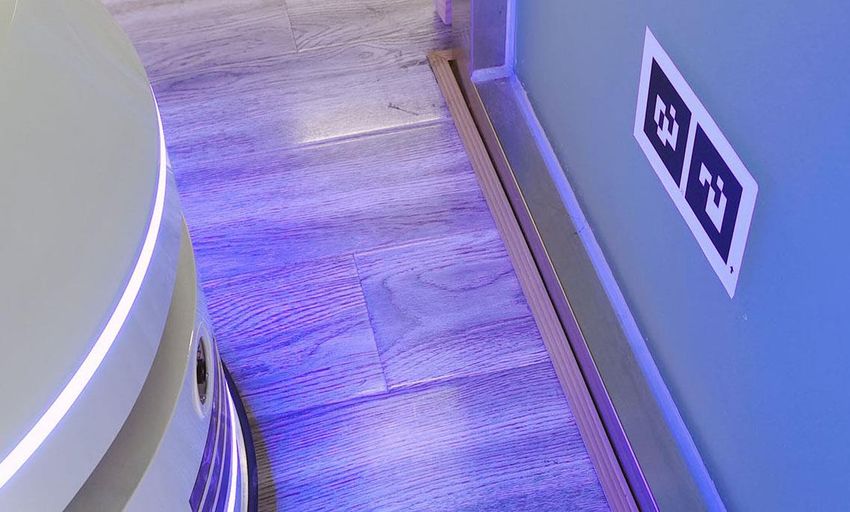
7.2 QR code deployment
In order to enhance the positioning accuracy of the robot, QR codes are provided so that the long-
term running is more stable.
Usage scenario of QR codes:
①Right above the charging pile;
② The QR codes are generally used to
assist positioning where the robot
positioning is prone to deviation, for
example, in a long corridor, a QR code can
be pasted at a distance of 15 m.
1) QR code pasting
• Avoid deploying at a place with strong light, so as not to affect the camera to capture the QR
code image;
• The QR code should be pasted at the same level as the camera;
• Paste the QR code as the arrow points;
• A QR code damaged shall be replaced in time.
2) The example is shown below:
Parallel to
Same level
the ground
3) Precautions
• No same QR codes can appear in the same environment;
• When mapping, the robot stops at the QR code board for 1-2 seconds to ensure that the QR
code is saved(Voice prompt will be given for successful identification);
• The QR code of the charging pile should be identified by the camera in front of the robot, and
the QR code of a corridor is identified by the cameras on two sides;
• When incrementally mapping, it is necessary to ensure that the robot's positioning is accurate
before identifying and saving the QR code.
BooCax 12 / 23 boocax.comOryx Robot_Product Manual
7.3 Clean up barriers
1) Before using the robot, remove the barriers in the aisle to avoid affecting the working and
charging;
Narrowest walking width: 750 mm
2) Make sure that there is no vertical step over 10mm, and no objects (books, boards, stones, etc.)
over 10mm in height on the working path;
The obstacle crossing height of the robot is 10 mm
3) Make sure that there is no steep slope on site:
Maximum gradeability: 8°
BooCax 13 / 23 boocax.comOryx Robot_Product Manual
7.4 Download App
Android 8.0 and above mobile phone scan the QR code below to download the App and install it:
Scan by WeChat or mobile browser to download App
7.5 Turn on and connect the robot
1) When starting up for the first time, turn the power key switch to "on" position to connect the
power;
2) Turn on the phone wifi, search the wifi network beginning with "LY-****", and enter the
assigned initial password “robot123” to connect the robot;
3) Open the App, you will find the robot beginning with "LY-****" (as shown in the following
BooCax 14 / 23 boocax.comOryx Robot_Product Manual
figure), click login;
4) Go to the homepage of App, and the interface shown below indicates that the online
connection is normal, then you can proceed to the next step, i.e., mapping.
Screenshots of App homepage, deployment and setting interface and description of function
buttons:
App homepage: App deployment: App setting:
• Robot name and battery • Build a map • Volume
• Robot status • Deploy route • Switch loop mode
• View route, manual • Switch map • Firmware upgrade
control • Product instruction
• Virtual buttons • Simulated demonstration
• Bus Mode(Extensions) • App version information
• Run log
•
BooCax 15 / 23 boocax.comOryx Robot_Product Manual
7.6 Build scene map
1) PREPARATION
Push the robot at 0.5-1m away from the charging pile.
Robot battery>50%
2) BEGIN TO BUILD MAP
Click Deployment-Build Map on App, and you will see the "Build Map" interface (shown in the
middle figure below). Click "Start to map" to build a 2D map of the working scene (push the robot by
hand to build the map).
White radius—the range scanned by the laser;
Black thick line—the scanned obstacles (special objects such as transparent glass may not be
identified);
Gray area—Area that has not been scanned.
The robot can accurately execute the assigned tasks in the new scene only after the mapping is
completed.
⚠ Attentions:
① When mapping by hand, push the robot forward slowly in the scene from the charging pile as
the starting point, and finally return to the charging pile to form a large circle;
② When mapping, don't be too close to the wall and keep a distance of at least 0.5 m;
③ The operator must stand behind the robot to avoid leaving noise on the map;
④ When turning, walk slowly so that the robot can collect as much characteristic point data as
possible;
BooCax 16 / 23 boocax.comOryx Robot_Product Manual
⑤ As laser radar does not recognize accurately in abnormal environment (glass, mirror, pure
black object, grid, etc.), it is suggested to carry out appropriate treatment, such as pasting
frosted sticker, gray adhesive tape, reflector, etc.;
⑥ If the working scene is too large, you can use "incremental mapping" for local repair and
area expansion;
⑦ When passing the QR code, stay in front for more than 1 second, and there will be a voice
prompt when it is successfully scanned.
7.7 Set path points and task points
The walking path consists of charging points, path points and task points, in which N path points
(setting points while walking) and 10 task points are allowed.
The task points
correspond to the 10
task buttons on the
panel.
When deploying, you can: push the robot by hand to set points while walking; or drag the map to on
the App interface.
The detailed steps are shown in the following figure ("Rapid Deployment" is the initial path
setting, "Free Edit" is to edit the existing path):
➢ Rapid deployment
① Set the charging position:
Click "Rapid Deployment" to enter the route setting mode; push the robot to the charging pile
for docking as guided, and click Next to complete the setting when the green symbol shows.
BooCax 17 / 23 boocax.comOryx Robot_Product Manual
② Set path points and task points:
• Path points and task points are also set on the above interface, which can be realized by
pushing robot by hand/dragging map;
• Path points have to be set where the robot has to pass through, such as turning and gate
(as shown in Figure 3 below: gray points are path points);
• The target location points are the task points, which correspond to the 10 task buttons on
the panel (as shown in Figure 2 below: the purple symbol is the task point, and the task
point can be set with a parking direction of 180 degrees).
BooCax 18 / 23 boocax.comOryx Robot_Product Manual
➢ Free editing—adjust path
• If the route by rapid deployment is not applicable, click "Free Edit" to adjust the route.
The robot supports adding/deleting/moving points, changing running route, changing
disinfection points, etc.
BooCax 19 / 23 boocax.comOryx Robot_Product Manual
⚠Attention: Don’t pass through walls.
When mapping, the turning should be deployed with path points which cannot pass through the wall,
as shown in the figure below:
As shown in the figure above, when the robot has to move from A to C, but is obstructed by a wall
or an unmovable obstacle inbetween, the correct path deployment should be A-B-C. B must be set as it is
the key node of the turning.
The figure on the right shows the wrong deployment, in which the path will go through the wall
directly, causing the robot unable to walk.
BooCax 20 / 23 boocax.comOryx Robot_Product Manual
8. Start to work
① After the route has been deployed, push the robot to the charging pile or in front of the QR code;
② Ensure that the robot is on the route and ready to accept the task instruction;
③ Press the "Return-to-charge" button or the "Task Point" button on the control panel to
automatically navigate to complete the assigned task.
BooCax 21 / 23 boocax.comOryx Robot_Product Manual
www.boocax.com
Business cooperation / after-sales: 0086-400-161-8661
Beijing Headquarter: Shenzhen Branch: Shandong Branch:
Room 606, Jianjin Center, 3F, Building 10, COFCO No.269 Hengfeng Road,
Yongtaiyuan A No.1, Qinghe, Fu’an Robotics Industrial Zoucheng Central
Haidian District, Beijing Park, Fuyong Street, Baoan Electromechanical Industrial
District, Shenzhen Park, Ji’ning, Shandong
BooCax 22 / 23 boocax.comYou can also read


