Self Service Student Guide - (as of 02/15/2021) Alamance Community College Student Success Division
←
→
Page content transcription
If your browser does not render page correctly, please read the page content below
Self Service
Student Guide
 (as of 02/15/2021)

                      Alamance Community College
                       Student Success Division
                      PO Box 8000
                      1247 Jimmie Kerr Rd
                      Graham, NC 27253
                      (336) 506 – 4270
                      www.alamancecc.edu

     Page 1 of 54
Alamance Community College
                             Self Service Student Guide
                                 Table of Contents
                                                                            Pages
Getting Started with Self Service …………………………………………………………..........          4-6
      What is Self Service and how to access it.
Self Service Landing Page ………………………………………………………………………………                      7
Finance …………………………………………………………………………………………………………                              8-9
      How to view your account information (charges, payments, etc) and statements
       How to make a tuition payment …………………………………………………………… 10-11
Tax Information ……………………………………………………………………………………………                         12 - 13
       How to designate format for receipt of tax information
Financial Aid …………………………………………………………………………………………………                         14 - 26
      Information on navigating financial aid section
Academics …………………………………………………………………………………………………….                             27

Course Catalog ………………………………………………………………………………………………                         28 - 29
      How to view and search for courses.
Creating an Academic Course Plan …………………………………………………………………                    30
Registering for Classes …………………………………………………………………………………... 31 - 34
      How to register for classes
Program Evaluation ……………………………………………………………………………………….                         35
      How to evaluate progress in your program

Official Transcript Requests ……………………………………………………………………………                    36
       How to request an official transcript.
Grades ……………………………………………………………………………………………………………                              37
      How to view grades.
Unofficial Transcript ………………………………………………………………………………………                     38 - 39
      How to view an unofficial transcript.
Finding my Advisor ………………………………………………………………………………………..                        40
      How to find and contact your advisor.
Current Schedule …………………………………………………………………………………………..                         41

                                     Page 2 of 54
How to view & print current schedule.
Required Documents Status ………………………………………………………………………….                   42
      How to find out status of required documents.
Student Forms ………………………………………………………………………………………………                      43 - 44
      How to access student forms

Graduation Overview ……………………………………………………………………………………                    45 - 46
     How to submit a graduation application.

User Profile …………………………………………………………………………………………………..                    47 - 53
      How to view and update demographic information in our database.
Log Out …………………………………………………………………………………………………………                          54

                                     Page 3 of 54
Getting Started with Self Service

What is Self-Service?

Self-Service is our new student portal that allows students to plan out the courses in their
academic programs, register for classes, request transcripts, check grades and many more
functions.

How do I log in to Self-Service?

Logging in is easy. You will use your common username and password (school e-mail, Moodle,
Web Advisor) to log in.

What is my username?
First initial of your first name+ middle initial+ full last name+ the last 3 digits of your student ID.
Name: Smokey The Bear
ID: 1000123
Example: stbear123

Note: If you can’t remember your password, you can follow the steps below to reset it.
What if I forget my password?
If you forget your password, go to this link to reset it: https://guardian.alamancecc.edu/
IMPORTANT: Changing your Self-Service password automatically changes your Moodle,
WebAdvisor, and School Email (if applicable) passwords, too.

                                               Page 4 of 54
There are two ways to access Self Service from our homepage (www.alamancecc.edu)

Scroll to the bottom and click on “Self Service” or at top click on “Quick Links” and then select “Self Service
                                                    Login.”

                                                                                        Click on
                                                                                      Self Service

Note that there is a Self Service Student Guide available on the landing page.

Click on “Self-Service Login” to login.

                                                 Page 5 of 54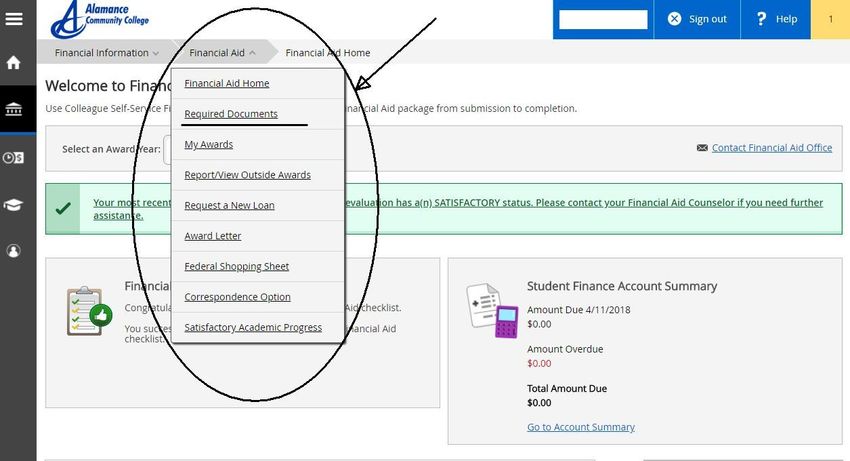
Click on
Self Service Login
     to Login

                                       Click Here to download latest Self
                                             Service Student Guide

    Sign-in with your
     User Name and
        Password

                        Page 6 of 54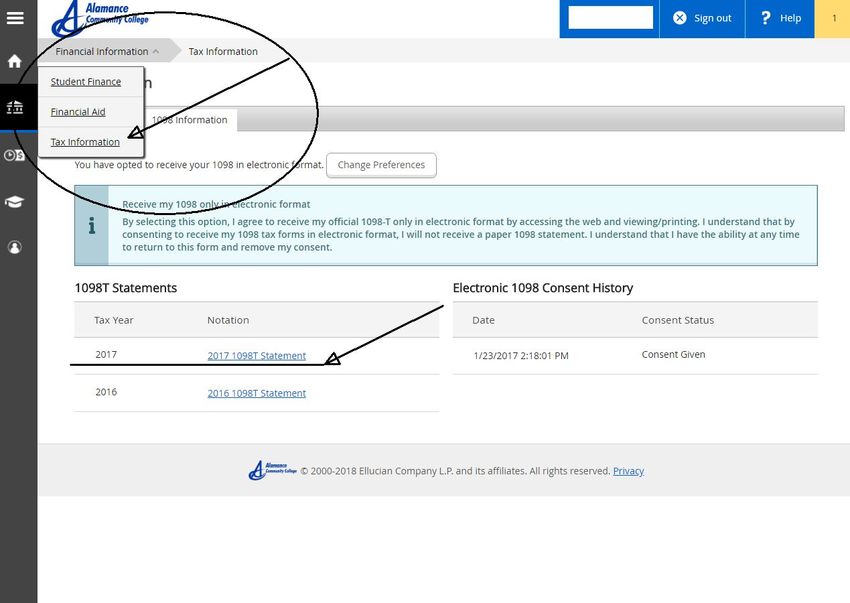
Self Service Landing Page
When you first log in to Self Service, the following landing screen will appear:

                                                 Page 7 of 54
Student Finance

    Click on Student Finance and the following screen will appear

Click on any semester and the account activity for that semester will appear

                          Example shown below:

                               Page 8 of 54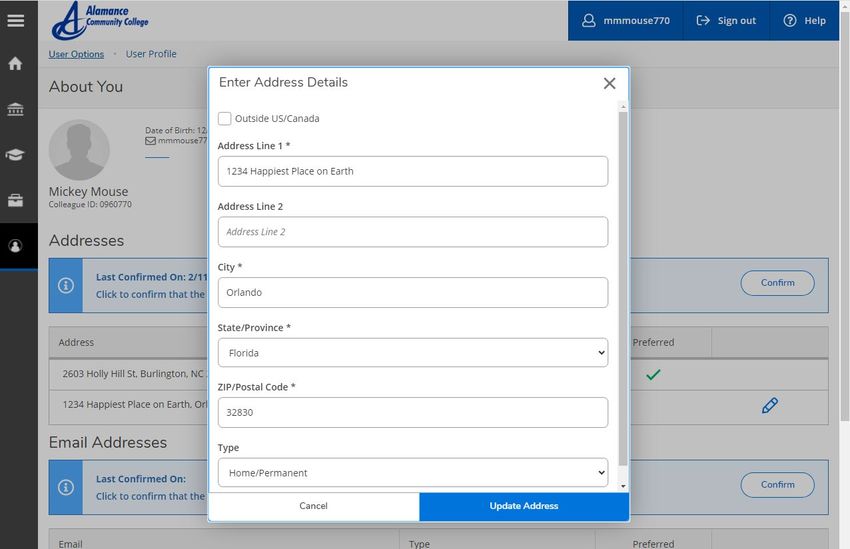
This shows Charges,
                                     Payments, & Balance

                                         Click here to expand
                                         and get more
                                         account details

                          Click to view statement

Below is an example of what a statement for a semester looks like
      Note that student information has been blacked out

                          Page 9 of 54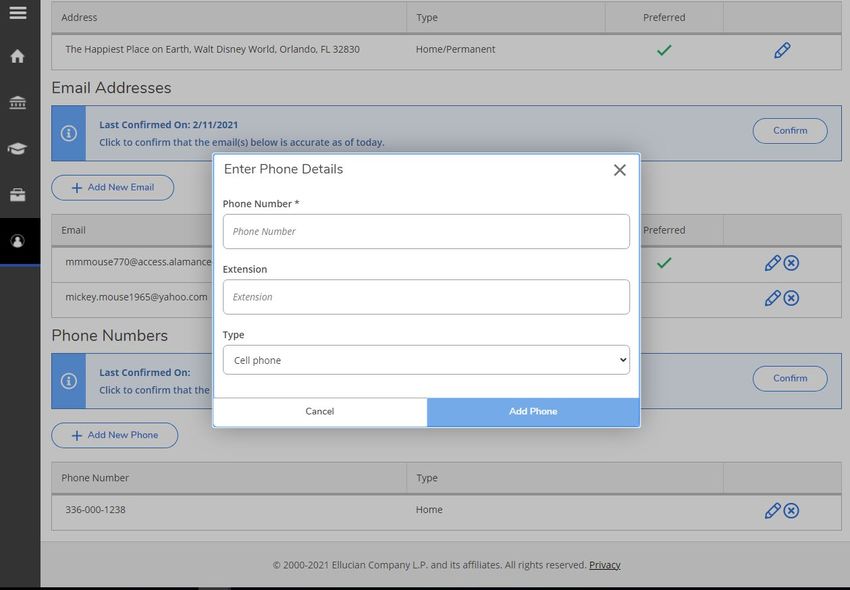
How to Make a Payment

Click “Student Finance” and then “Make a Payment”

          and the following screen appears:

                    Page 10 of 54
Click “Proceed to Processor”, then
• Verify personal information
• Amount of tuition due
• You will have the option to Pay in Full or Monthly Installments
• Enter Bank Information (credit/debit card or ACH Bank account)
• Go through the remaining steps to complete the payment plan
****PLEASE NOTE THAT YOUR PAYMENT WILL NOT REFLECT IN SELF SERVICE FOR 5-7 BUSINESS DAYS, IT
WILL STILL SHOW THE ENTIRE TUITION BALANCE IN SELF SERVICE. AS LONG AS YOU GET A
CONFIRMATION NUMBER YOU ARE GOOD AND YOUR CLASSES ARE HELD.
Page 11 of 54TAX Information
Click Tax Information
and the following screen will appear
Click to change format
for receipt of tax form
Click to view 1098T for as shown below
appropriate tax year
Page 12 of 54Choose a format (Electronic or Paper) Then click Save Page 13 of 54
FINANCIAL AID
Once logged in you will see the Financial Aid tab on the right.

                         Page 14 of 54
Once you enter the Self-Service Financial Aid page you will see a checklist at the bottom with the
status of you FAFSA Application for the selected award year.
You can change your award year at the top of the screen to the school year you want to check on.
Page 15 of 54To navigate the Financial Aid Self-Service, you can use the drop down arrow at the top next to
Financial Aid link.
Click on the Required Documents link to see what items are needed to move forward.
When you click on Required Documents Self-Service will generate a complete/incomplete list.
Page 16 of 54To access the needed electronic documents, click on link Financial Aid E-Forms located on the main
Financial Aid Self Service page on the right side under Resources/Form links.
It will open ACC Softdocs page.
To log in use the same username and password for Self-Service EXCEPT add acc\ before the user name.
For example: acc\mmouse123
Page 17 of 54Once logged in you will need to click on the Forms Link. Only the forms you need will allow you to
complete them. Make sure you choose the correct year for the form. Once a document is completed
and successfully submitted it will take up 24 hours to update on your self-service account.
If you have a number showing on the Inbox, then you have been sent a particular form that you
should also complete.
Once all required documents have been completed and turned in you will see this screen with
green check marks next to each document name.
Page 18 of 54Page 19 of 54
Once all documents have been received your FAFSA application will enter the review stage and you
                can see this update on the main Financial Aid Self-Service page

                                             Page 20 of 54
You can check your eligibility status on the Satisfactory Academic Progress page.
Please see ACC Title IV Satisfactory Academic Progress Standards for details.
Page 21 of 54Once you have been reviewed and awarded you can view the details of your awards on the My Awards
page.
Page 22 of 54At the beginning of the tax year when you need tax information for your status as a student
you can access you 1098-T in the Tax Information page.
Page 23 of 54To see your Billing Statement/Account Summary and make a payment online go to Student Finance.
Page 24 of 54Account Summary to see your most recent bill.
Page 25 of 54Account Activity breaks down your charges and payments to ACC and shows your refund amount
after your tuition has been paid.
Not everyone will receive a refund.
Page 26 of 54Academics
Note that a help menu is available.
The help menu is keyed to the page that is displayed
and will give help information for page displayed
Click on “Academics” (academic cap icon) and all of the following submenus will appear
Page 27 of 54Course Catalog
Course Catalog only shows courses for the “active term” i.e. future terms that have been created. Also the
Course Catalog can be searched from the Self Service landing page (no login required) or from inside your
Self Service Account. Same procedures apply. Below is how to search from inside Self Service:
To check on courses offered Click on “Course Catalog” and the following will appear
Search for a
specific course
Note that you can search for a
particular subject area here
or click on the subject if you know it
Click on Advanced Search for more searching options and the following screen appears.
Page 28 of 54Note that you can search by
term, course, day of week,
location etc.
Shown below is an example advanced search result for the following criteria: Term - 2018 Spring Semester,
Course - Auto (Automotive), & Time of Day – Evening.
Information on courses that meet selected criteria
Includes section number & name, description, prerequisites and locations
Page 29 of 54Creating an Academic Course Plan
Select Student Planning
Select Go to Plan & Schedule
Add classes to your plan in one of three ways:
Course Search Tool The Course Catalog My Progress
Look for the “Search for Hover over Hover over Student Planning
courses tool on the right- Student and select My Progress at the
hand side of the page. Planning and top of the screen
select Course My Progress is a degree audit
Catalog at the tool that displays the courses
top of the you still need to complete for
Type in either the course screen your program
prefix (e.g. ENG for English) Either scroll To add classes to your plan,
or the course prefix and down the page click on the option you want to
course number (e.g. ENG- to find the add (e.g. ENG 231)
111). You must include the course prefix (e.g. ENG for English)
hyphen. or type in the course prefix in the
Click, “Add Course to Plan” search for a course subject box
Select the course you are looking
Select the semester in which
for (e.g. ENG 111)
you plan to take the class.
Click “Add Course to Plan”
Click “Add Course to Plan”
Select the semester in which you
plan to take the class Select the semester in which
you plan to take the class
You can view your planned courses and future semesters by selecting “Plan and Schedule” and
then clicking the Timeline Tab
Page 30 of 54Registering for Classes
Registering for Classes from the Course Catalog
1. Search for your course through the
Course Catalog Tab or through the
Search for courses tool.
2. Type in the course prefix (e.g. BIO for
Biology) in the Course Catalog, or
type in prefix-course number (e.g.
BIO-111) in the course search box.
Then select the term from the menu on the left:
3. Select the course you are looking for (e.g. BIO 111: General Biology I)
and view the available sections.
Available Class and Lab meeting times Class Location(s) Instructor
Seats
4. If the class works well with your schedule, select “Add Section to Schedule”.
****
5. Select Plan and Schedule under the Student Planning tab to view the course in
your course plan.
6. Use the forward arrow to
advance to the current semester.
7. To register for your selected classes,
select the “Register Now” option
Page 31 of 54Search for the classes by subject.
If you are looking for multiple classes you can select
additional subjects or un-check your course subject
box to display all available courses.
You can filter your options by location including
online courses.
You will need to select the appropriate semester.
You can filter by specific days of the week…
…or look for classes held during specific times.
You can filter for both continuing education (non-
credit) and curriculum (credit) options.
You can look for specific levels of classes. For
example, selecting “Comp. Articulation Agree.”
displays only courses that meet the Comprehensive
Articulation Agreement (CAA) designation as
transferrable to a four-year university within the UNC
system.
You can also filter for specific course type, for
example, by selecting AGE Natural Science, you
narrow your search to only classes that meet the
Natural Science requirements for an Associate in
General Education degree.*
*Consult with your advisor to ensure that you are taking classes that
meet your specific program requirements.
Page 32 of 54Registering for Planned Classes
1. Select Plan and Schedule
under Student Planning.
2. Select the “Schedule” tab and use the forward arrow to progress to the appropriate semester.
Selecting “View other sections” will display course options.
Hovering your mouse over each section in the menu will display the course and lab meeting times on
your weekly schedule.
3. To add the class
to your planned
schedule, simply Your selected course will appear on your
left-click on the schedule as a bright yellow “planned” course
section within and the other options will disappear.
the menu.
4. To register for your selected classes,
select the “Register Now” option.
Page 33 of 54Filtering courses from your course plan
Select Plan and Schedule under
Student Planning.
Selecting the Filter Sections option will allow you to filter your course
options by several different criteria.
Filter only open Search by location Find classes held on Find classes held at Find classes taught
courses. (campus and online specific days of the specific times. by a particular
options) week. instructor.
How do I know that my registration was successful?
There are several ways that you can confirm that your registration was processed.
You will receive a notification in the upper right-hand corner of the page notifying you either that you are
successfully registered, or that your registration was not processed. If you were not registered, the
notification alert will indicate the reason(s) why.
Currently registered courses will appear in green on your schedule.
You will also have the option to Drop the classes.
Please Note: You must pay for classes by the tuition deadline to avoid being dropped for non-payment. For
more information about the tuition and fees payment schedule, go to: https://www.alamancecc.edu/
Page 34 of 54Program Evaluation
My Progress - This page shows the requirement courses that you need to complete your academic program.
It also shows those classes that you have taken and those that you will need for your degree etc…
Click “Student Planning” and then click “Go To My Progress”
My progress page will show your progress in your program along with status of all requirements for your
program. Sample screenshot below:
If you have questions on your progress check with your advisor
Page 35 of 54Official Transcript Request
Click on the “National Student Clearinghouse” link. This will take you directly to the transcript ordering
page. The following will appear:
Click here to begin your order
And complete the request
Transcript can be sent either electronically to an email address or mailed. Note that there is a small
processing fee charged by National Student Clearinghouse for this service. You are not charged until the
transcript is sent. You also receive confirmation emails at every step of the process (ie request received,
consent received, transcript sent, transcript retrieved, etc).
Page 36 of 54Grades
Click on “Grades (either link)
and you can view your grades, by term, for every class taken at ACC
Course Section & Title & Final Grade & Midterm Grade & Credits
are listed for each course by term
Click on arrow to expand or collapse term grades
Page 37 of 54Unofficial Transcript
Your unofficial transcript will show all courses taken at our college, grades for each, along with term and
cumulative GPAs, and any degrees awarded by our college. In addition, any credits transferred in from
other institutions (with institution’s name) will also show on the transcript
1st - Click on Arrow to expand Student Planning
2nd - Click on Unofficial Transcript
This is reminder that you are
viewing an unofficial transcript
Click on Curriculum Transcript and then open as a PDF.
Page 38 of 54An Example is shown below
Heading information on student has been excluded
Course & Title of Course & Final Grade & Hours Attempted and Completed & Dates & Academic Standing
are listed by term
Page 39 of 54How to Find Your Advisor
1st - Click on Arrow to expand Student Planning
2nd - Click on Plan & Schedule
3rd - Click on Advising Tab
Advisor name is listed along with a section
to compose a message
and a history of emails sent and received
Page 40 of 54Current Schedule
1st - Click on Arrow to Expand Academics
2nd - Click on Arrow to Expand Student Planning
3rd - Click on Plan & Schedule
The following screen appears showing student schedule
Click Here to print
Below is an example of a printed student schedule
Status & Course Title & Date/Time & Location & Instructor for each class is shown
Page 41 of 54Required Documents Status
This will show the status of all documents that are required
(ie Transcripts, FA documents, etc)
1st - Click on Arrow to Expand Financial Information
2nd - Click on Arrow to Expand Financial Aid
3rd- Click on Required Documents
Example shown below:
Documents Completed
(Shown as Received with date and title of document)
Status & Documents still required
(Shown as Incomplete)
Page 42 of 54Student forms
Access to ACC forms
Click on “Student Planning” and then on “Student Forms”
A page with links to Alamance Community College student forms will appear.
Note that selected form will need to be printed out, completed, and then submitted.
Page 43 of 54Links to Student Forms (PDF format)
Description of each form below
- Change of Student Information Form is used to change your information in our database (name, mailing
address, email address, etc). Address/Email/Telephone changes can now be made by the student
themselves in the User Profile section of Self Service (pages 47 – 53 of this guide explains how). Note that
SSN change or Name change requires additional documentation.
- Drop/Add Form – Form used to drop or add a course after the end of the semester drop/add period.
Note that form will need to be submitted to your instructor/department head.
- FERPA Release Form – Form authorizing the college to release your non-directory information to specified
individual(s) upon their request.
- Placement Test Retest – Form to authorize placement test retest. Note that request must be approved
by ACC Faculty/Staff member.
- Placement Test Score Request – Form authorizing ACC to release your placement test scores.
- Tuition Refund Request – Form for a tuition refund. Note that form is submitted to the Academic Dean
for approval/disapproval.
- Degree Certification Reprint Request – Request for an additional copy of ACC degree/certificate. Note
that there is a fee involved that must be paid before release of degree/certificate.
- Application for Graduation – Paper copy of application for graduation.
Page 44 of 54Graduation Overview
Click on “Graduation Overview” to begin process to electronically submit a graduation application.
Note that you must submit a graduation application if you wish to graduate and have your degree listed on
your transcript – it is not an automatic process
Click on “Apply” button next to the program of study that you wish to submit a graduation application for
and the following screen will appear.
Page 45 of 54Name and address
will auto-populate from our database
If you want your name listed differently on your
diploma update it here
If you want it shipped to a different address
click here and complete new address
Click on arrow button and select the
term you are applying for
Click on submit button
Once you click on “Submit” button you will receive an email confirming that we have received your
graduation application along with other planning information that you will need for graduation.
Note that if Graduation Application is not submitted by the deadline date then a paper copy must be
submitted to Academic Dean.
Page 46 of 54User Profile
View and update your demographic information in college database
Click here to expand and then here to access your profile
Page 47 of 54The following screen will appear
Your name, ID#, DOB, & Primary Email
will be shown here
Your current address
and type of address
will be shown here
Your primary email will
be shown here
All phone numbers & types
will be shown here
Page 48 of 54How to Update User Profile (address, email, & telephone)
1st - Click Here
(User Options)
2nd Then Click Here
(User Profile)
Update Address
3rd - Click Here
(Edit Icon)
Page 49 of 543rd - Click Here and Update
as Needed - Address, City,
Zip, etc.
4th – Once Done
Click Here to
Update Database
5th – Verify Information is
Correct and new address is
now shown
6th – Click Here to Confirm
Confirmation Message Then
Appears
Page 50 of 54Update Email Address(s)
Note that your preferred email address will always be your ACC email address
1st - Click Here
(Edit Icon)
2nd – Insert
(New Email Address)
3rd –Select Type
4th- Click (Add Email)
Page 51 of 545th – Verify Update and
Click Here to Confirm
Update/Add Telephone Number(s)
1st - Click Here
(Add New phone)
Page 52 of 542nd – Add
Information Here
3rd – Click Here
(Add Phone)
4th Verify Here That Correct Information
was Added and Click Confirm
Page 53 of 54LOG OUT
Click on “Sign out” to
log out of program
Page 54 of 54You can also read