Tapa-Inspired Pattern Painting - San Diego Museum of Art
←
→
Page content transcription
If your browser does not render page correctly, please read the page content below
Tapa-Inspired Pattern Painting
An art project to teach students about pattern and the South Pacific art of tapa, using paper
bags, oil pastels, and watercolor. . .
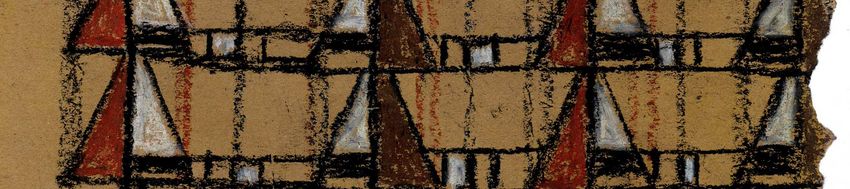
example work created by a Museum Educator example work created by a Museum educator
Subjects: Visual Arts and Oceanic Art and Culture
Grades: Upper Elementary (adaptable to middle and high school grades)
Medium: brown paper bag, watercolor paint, and oil pastel
Author: Amy Briere, Museum Educator, The San Diego Museum of Art
Project Time: two 30 minute or one 60 minute lesson from start to completion.
General Description
On view at The San Diego Museum of Art, Oceanic Art: A Celebration of Form features
works from Oceania, an area of approximately 25,000 islands in the southern part of the Pacific
Ocean. Artists from the South Pacific use nature as both a material and spiritual source, and the
art that they create from it contains aesthetic, spiritual, and social significance for them.
Sculpture, masks, decorative and utilitarian arts, and body art were and still are created and used
in the South Pacific in rituals to contact spirits, inaugurate leaders, and move individuals from
childhood to adulthood or from the living world to the world of the dead.
Tapa, or bark cloth, a textile made from the soft inner bark of the Mulberry tree, is one of
the most widely recognized art forms in the South Pacific, and is used for clothing, other
everyday items, mask making, and in ceremony. Tapa artists, traditionally women, mix plant
dyes and other natural materials (traditional colors include yellow, white, rust, black, and various
shades of ochre obtained from local clays, native plant dyes, and charcoal) to stain, paint, stamp,
and stencil stylized designs using geometric shapes onto the paper-like cloth.
In this lesson, designed as a jumping off point for discussing the Oceanic Art: A
Celebration of Form exhibition with students of any grade level, the techniques of pattern design
and watercolor dyeing combine to emulate the look of traditional tapa cloth as well as to mimic
the process followed by South Pacific artists when creating this symbolic, nature-inspired art.
1
Objectives
Students will . . .
   • explore and learn about the traditional Oceanic art form of tapa.
   • create their own unique pattern designs, using geometric shapes, inspired by tapa works
       found in the Museum-generated exhibition, Oceanic Art: A Celebration of Form.
   • define the terms symmetry, texture, geometric shape, and pattern and be able to recognize
       their significance when designing tapa cloth.
   • understand the value and tradition of tapa cloth making in South Pacific culture.
   • be able to recognize how art can serve a function in the everyday life of a culture.
   • be able to discuss artwork within a specific cultural and historical context.
   • reflect on the art they have created and answer questions about it.
   • present their works in a collaborative presentation (optional).

Adaptation Suggestions (for younger students grades K-2 and grades 6 – 12):
This lesson can be adjusted for younger elementary grades by decreasing the size of the tapa
work–so as to take less time–and/or decreasing the complexity of the pattern and final design.
This lesson can be adjusted to fit the needs of middle school and high school students by
including a more in depth introduction to the art and culture of the South Pacific, through a more
extensive exploration of pattern, and/or through the use of alternative materials to apply the
designs (such as block prints, student-designed stamps, or student-created stencils/patterns).

Please see the Resources section of this lesson for a list of library materials and website
information relating to South Pacific art and culture.

For more information on alternative material techniques visit the following websites:

       For directions on how to create stencils, visit:
       http://www.childrensmediaproject.org/article.asp?showid=52

       For directions on how to create stamps, visit:
       http://www.theartfulcrafter.com/stamps.html

       For directions on how to create block prints, visit:
       http://www.worldprintmakers.com/english/opm.htm

Special Needs Adaptations
This lesson can be easily adapted to suit the needs of most learners with disabilities. For
students with visual impairments, tactile activities are essential to learning and present
throughout this lesson. For students with tactile sensitivity, limit their exposure to more irritating
items. Consider allowing them to use markers in place of oil pastels. For students with limited
motor skills, try using larger paper and materials. Also consider group work, where students
share the responsibility of choosing shapes, tracing, and drawing.

                                                                                                    2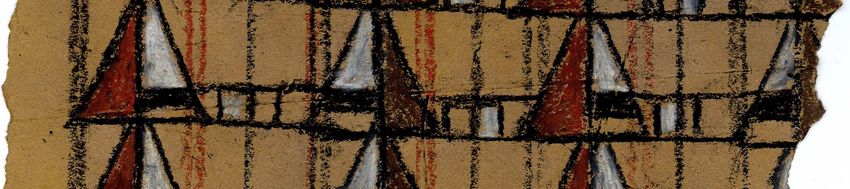
Pre-Lesson Information

Art Terms
Functional Art – art with a utilitarian purpose (everyday use)

Geometric Shapes – shapes or forms that are regular and precise (e.g. squares, triangles, and
rectangles)

Pattern – a design made by repeating a motif at regular intervals

Resist – process in which a wax material (such as white crayon or candle wax) is drawn onto the
paper and covered with paint. The areas which contain the wax will resist the watercolor paint
and remain the color of the original paper material.

Symmetry – the placement of the same elements on either side of a dividing line in such a way
that they form a mirror image of each other

Tapa (referred to as kapa in Hawaii, ngatu in Tonga, and siapo in Samoa) – a textile made in the
South Pacific islands from the pulp of the Mulberry tree and decorated by hand with nature-
inspired patterns using natural materials

Texture – the quality of a surface, usually characterized by its roughness or smoothness.
Texture can refer to both the visual and tactile quality of a surface.

Watercolor Wash – A watercolor wash is a basic technique to establish tone and atmosphere in
a painting. In a wash, the artist covers the paper with a thin or watery coating of paints. Washes
are useful for filling in the background before you start painting your subject or for sealing wax
materials (such as crayon) when creating a work of art.

Materials Needed
   o brown bag paper material (one half for each student)
   o scissors (one pair for each student)
   o watercolor paints (standard set of 8 colors – one for every two students)
   o medium-sized watercolor brush (one for every student)
   o oil pastels (in traditional tapa colors of brown, black, white, red, yellow, and ochres)
   o black, permanent marker (optional – one for every two students)
   o pencils (one for every student)
   o paper towels (one roll)
   o water containers (one for every two students)
   o pre-made cardboard geometric shapes for tracing (several sets to be shared)
   o photo-copied visuals of traditional tapa designs for students to view while working

                                                                                                 3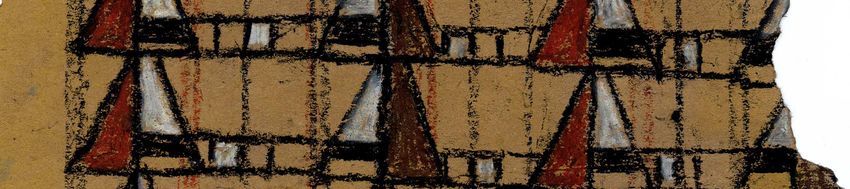
Tips for Working with Watercolor Paints
  •   Using brown bag paper – Watercolor paper is specially designed to absorb watercolor paints
      evenly and without buckling, however, the weight of the brown bag paper also supports this
      medium well.
  •   Mix the colors –Dip your brush in water first, and then into the paint, and create a puddle of
      color in the top of the palette or on a white plastic plate. Add at least one other color to it, to
      create you own color. (Example, a puddle of green, then add yellow to it.)
  •   Demonstrate how to keep dip the brush in the container of water, and gently wipe off the
      excess water on the edge of the container, rather than tapping the brush to remove excess water
      (and consequently splashing paint where you don’t want it.)
  •   Add water to add lightness – unlike other paint mediums, such as acrylics, watercolors are not
      lightened or darkened by adding white or black paint. Instead, watercolor artists add water to
      make a color lighter.
  •   “Create free space” by leaving the original color of the paper. Watercolor artists don’t use
      white paint; they leave the original color of the paper untouched.
  •   Keep a tissue or paper towel handy to wipe off excess paint or water from your brush. Clean
      tissue or paper towel can be used to lift excess water or paint from the painting surface.
  •   It’s watercolor! Use plenty of water with the color and let the colors mix and mingle on the
      paper. Enjoy the unpredictability of the watercolor.

Preparation
  1. Create an example of the project before the lesson. Even if you choose not to share the
      work with students, a lot can be understood about the lesson by creating an example.
  2. If teaching this lesson to more than one group of students, think about displaying unique
      student examples from the first group for students from later groups.
  3. Display photographs of the South Pacific, island-related storybooks, visuals of tapa cloth,
      and/or natural forms for students to look at and be inspired by.
  4. Cover all tables/desks with newspaper – this will ease the clean up process.
  5. Gather all materials from the materials list, including your own assortment of visuals.
  6. Using matte board or cereal box cardboard, create an assortment of geometric shapes for
      students to trace in order to create their tapa cloth designs (horizontal bars, triangles, and
      rectangles are typical shapes found in traditional tapa designs).
  7. Distribute materials onto the tables or desks.

                                                                                                            4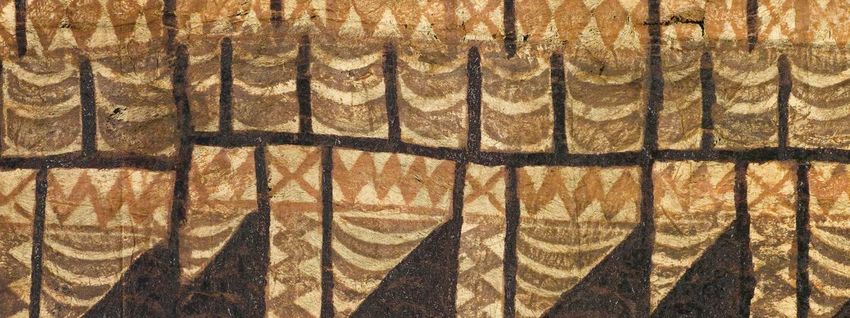
Procedure
Motivation
If possible, show students real tapa cloth or photographs/visuals of tapa cloth created in the
South Pacific islands. Discuss tapa and its traditional purpose as an art form used for clothing,
other everyday items, mask making, and in ceremony.
If possible, plan a trip to The San Diego Museum of Art to view Oceanic Art: A Celebration of
Form. In looking at the works of tapa on display in the exhibition, describe for students how, the
bark cloth is created (bark from a Mulberry tree is pounded into very thin sheets and dried in the
sun. Artists mix plant dyes and other natural materials to paint stylized designs, primarily
geometric shapes, on the cloth).
Please see the Resources section of this lesson for a list of tapa cloth works on view in the
Museum galleries.
While viewing tapa designs, point out the artists’ use of symmetry and repeated motifs to create
patterns with shapes based on natural objects (e.g. fish and plants). Discuss the influence that the
artists’ environment may have had on their choice of materials and colors.

Tapa cloth (siapo vala), Polynesia; Samoa, early 20th century,   Tapa cloth (kapa moe), Polynesia; Hawai’i, ca. 1850-60,
112 x 74 inches, Sana Art Foundation Collection                  72 x 42 inches, Sana Art Foundation Collection

When looking at tapa cloth or other textile art consider asking students the following
questions:

     •     In what way do the shapes, colors, and patterns in this work remind you of nature?
     •     How did the artist use materials from their environment to make this work of art?
     •     Why do you think the people of the South Pacific chose to wear and use their art?

                                                                                                                           5
Art Making Step-by-Step
Note: It’s essential to first demonstrate to students the steps they will be taking to create their
works of art. If you have the time, create a step-by-step display. Most importantly, be sure to
explain each step as you model it for the class.

Step 1:
   • Tear (if you’d prefer the edges to be a bit ruffled) or cut a large section of a brown paper
        bag (approximately 10 x 12” size).

   •     Crumple the paper tightly, unfold, and flatten it. Repeat this step several times so that the
         paper is very pliable, much like fabric.

Step 2
   • Using the pre-cut geometric shape patterns and tapa visuals as inspiration, have students
       trace shapes onto their paper in a pattern design. It is recommended that students first do
       this step with pencil, followed by oil pastel (traditional colors tapa cloth design colors
       such as yellow, white, red, and ochre), after their pattern design is finalized.

Step 3

   •     Apply watercolor paint to the entire area of the designed paper to create a “dyed” look.
         Encourage students to consider colors that might be found in nature, and the effects that
         their environment would have on the colors available to them if they were, in fact, using
         natural dyes.

         Note: As you are demonstrating this step, encourage students to combine colors on their
         palettes to create new colors and to use an ample amount of water, not the watercolor
         straight from the tray.

Step 4
   • Once students have completed painting with watercolors, set the works in a safe space to
       dry.

Step 5
   • When the tapa cloth is dry, reapply oil pastel or outline in black permanent marker
       (optional) the design for added definition.

Step 6
   • Have students place their names either at the bottom corner of their tapa cloth, like
       professional artists, or on the back side of their piece.

                                                                                                      6
Observe Artists in Action
As students are working, walk around and observe the art that they are making. Ask students to describe
their choices to you. In doing this, you will help your students to evaluate their work and their aesthetic
decisions while making their art. This exercise directly connects with the component: Aesthetic Valuing,
as described in the California Visual and Performing Arts Frameworks. Begin by asking questions such
as:
    • What shapes do you think you’ll use for your design and what makes them geometric shapes?
    •   What natural objects do your shapes represent? How does your overall design show symmetry?
    •   How does the way in which you used color and shapes in your design show pattern?

Final Discussion
(Many of these ideas on discussing work with children are taken directly from the text, Children and Painting
by Cathy Weisman Topal)
Looking at one’s work and the work of classmates is an important part of the experience of art
making, and the artistic process is nurtured by respectful and encouraging conversation between
participants. If time permits, display the finished works and talk about them. Choose works that
display the lesson objectives. This will help remind the other students of the project goals while
they are working.

Discussion Guidelines
    I. Limit the time. No more than ten minutes for young children – twenty to thirty minutes
       for older children. Because it may be difficult to talk about everyone’s work in such a
       short period of time, choose only a few works to discuss this time. However, try to
       remember to include everyone’s art in an evaluation at one time or another.

   II. Model talking about art for your students. For example, you might say:
                Does anyone see a work with an exciting use of pattern?

  III. Ask questions that call for specific responses. For example, you might say:
               Where, in nature, might we find shapes like those found in Javier’s work?

  IV. Focus on one or two new skills or concepts. For example, you might say:
               Who can point out a work of art where the artist used more than one geometric shape?

   V. Stress the positive – focus on student successes. To help ensure your student’s success
      with this and future projects, while students are still working on making their patterns, be
      sure to travel around the room and redirect any students who may be forgetting to include
      necessary elements from the objectives list or who may be traveling too far outside the
      goals of the assignment. Be sure to redirect in a gentle way, or individually, so that the
      student is not embarrassed in front of their peers.

                                                                                                           7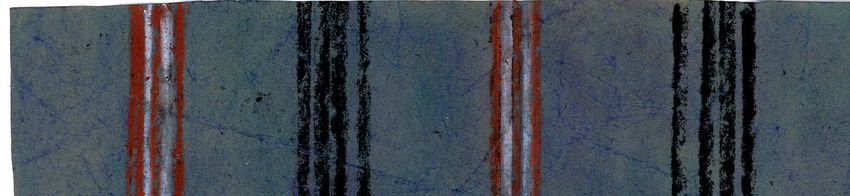
Displaying Finished Artwork
Have students help with the arrangement of the tapa cloth works for installation. Explore ways of
hanging the works together (perhaps attached together like a quilt) or individually with an artist’s
statement. These decisions can be made before starting the project, to ensure that students feel
that they have ownership in this final step of the artistic process.

Extension Activities
   •   Create designs using alternative means (Other methods of application might include
       block printing, stamps, stenciling, or overlapping sections of tapa to each other.)

   •   Explore the uses for tapa. When the tapa bags have dried, have students cut up their
       designs into shapes representative of the ways in which tapa is used in everyday life in
       South Pacific cultures (e.g clothing, bedding, mask making). Students can create a
       drawing set in the South Pacific and glue their shapes on top of it to create an island-
       inspired collage.

   •   Take an imaginary journey to the South Pacific. Introduce this area of the world to
       students through visuals, stories (see Resources section for suggested literature), tastes
       (e.g. coconut), smells (tropical flowers), and sounds (students can simulate the sound of
       the ocean) and then have students write and illustrate a story about all that they will hear,
       see, taste, smell, and feel on their visit to the South Pacific.

   •   Create an artist’s statement. An artist’s statement is the what, how, and why of a work
       of art from the artist’s own perspective. Writing an artist’s statement gives students
       another way to reflect on their work and artistic process. An artist’s statement should be
       personal and speak to the ideas behind the work and the relationship between the artist
       and their work. When done well, the artist’s statement and the art support each other.

   •   Discuss traditional artwork from other cultures. How do other cultures incorporate
       their art into everyday life?

   •   Explore the work of modern Western artists influenced by Oceanic art and culture.
       (e.g. Paul Gauguin, Pablo Picasso, Henri Matisse, André Derain, Maurice Vlaminck, and others).

                           Tahitian Women on the Beach, Paul Gauguin 1891

                                                                                                    8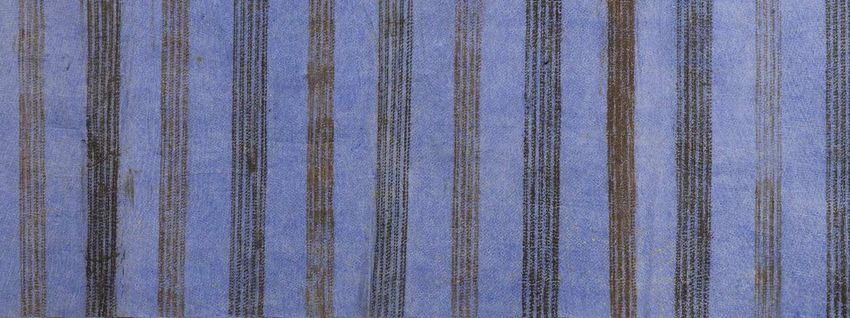
Resources
Museum Recommended Literature for Oceanic Art: A Celebration of Form

Explora Australia Y Oceania (2007) by Bobbie Kalman and Rebecca Sjonger

The Island-below-the-Star (1998) by James Rumford

Nuanua: Pacific Writing in English since 1980 (1995) edited by Albert Wendt

Oceanic Art (2005) by Nicholas Thomas

Tales from the South Pacific (1997) by Anne Gittins

Examples of Tapa Cloth Currently on View at the Museum

Tapa cloth (kapa moe), Polynesia; Hawai’i, ca. 1850-60, 112 x 74 inches, Sana Art Foundation
Collection

Tapa cloth (salatasi), Polynesia; Futuna island, 19th century, 2 x 14 feet, Edward and Mina Smith
Collection

Tapa cloth (siapo vala), Polynesia; Samoa, early 20th century, 72 x 42 inches, Sana Art Foundation
Collection

Resources Available at the San Diego County Library
Visit the library website and view the Oceanic Art: A Celebration of Form bibliography:
http://www.sandiego.gov/public-library/services/researchguides.shtml

Website Resources
More on Oceanic Art Collections in the U.S.

de Young Museum, San Francisco, CA
http://www.famsf.org/deyoung/collections/collection.asp?collectionkey=39

Peabody Essex Museum, Salem, MA
http://www.pem.org/collections/oceanic.php

More on Tapa Cloth

http://www.art-pacific.com/artifacts/nuguinea/barktapa.htm

http://lcweb2.loc.gov/diglib/legacies/HI/200002884.html

                                                                                                     9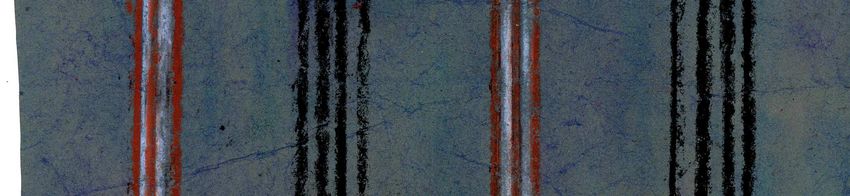
California Visual Arts Standards Addressed in this Lesson
Grade Three
1.1 Perceive and describe rhythm and movement in works of art and in the environment.
1.5 Identify and describe elements of art in works of art, emphasizing line, color, shape/form,
texture, space, and value.
2.2 Mix and apply tempera (watercolor) paints to create tints, shades, and neutral colors.
2.3 Paint or draw a landscape, seascape, or cityscape that shows the illusion of space.
3.4 Identify and describe objects of art from different parts of the world observed in visits to a
museum or gallery
4.3 Select an artist's work and, using appropriate vocabulary of art, explain its successful
compositional and communicative qualities.

Grade Four
2.7 Use contrast (light and dark) expressively in an original work of art.
3.1 Describe how art plays a role in reflecting life (e.g., in photography, quilts, architecture).
4.1 Describe how using the language of the visual arts helps to clarify personal responses to
works of art.
4.2 Identify and describe how a person's own cultural context influences individual responses to
works of art.
4.3 Discuss how the subject and selection of media relate to the meaning or purpose of a work of
art.
4.4 Identify and describe how various cultures define and value art differently.
4.5 Describe how the individual experiences of an artist may influence the development of
specific works of art.

Grade Five
1.1 Identify and describe the principles of design in visual compositions, emphasizing unity and
harmony.
3.2 Identify and describe various fine, traditional, and folk arts from historical periods
worldwide.
4.2 Compare the different purposes of a specific culture for creating art.
4.3 Develop and use specific criteria as individuals and in groups to assess works of art.
4.4 Assess their own works of art, using specific criteria, and describe what changes they would
make for improvement.

                                                                                                     10
Tapa Cloth Shapes
Cut out and trace the shapes on this page
(or design your own) onto matte board or
cereal box cardboard to make patterns which
students can trace to create their geometric
designs.
11You can also read