Towards Oculus Rift based Augmented and Virtual Reality - TALLINN UNIVERSITY OF TECHNOLOGY Faculty of Information Technology Department of ...
←
→
Page content transcription
If your browser does not render page correctly, please read the page content below

TALLINN UNIVERSITY OF TECHNOLOGY
          Faculty of Information Technology

           Department of Computer Control

                  Andrei Mihnevitš

Towards Oculus Rift based Augmented and Virtual
                     Reality
                  Bachelor’s Thesis

                               Supervisor(s): Eduard Petlenkov,

                                              Aleksei Tepljakov

                    Tallinn 2015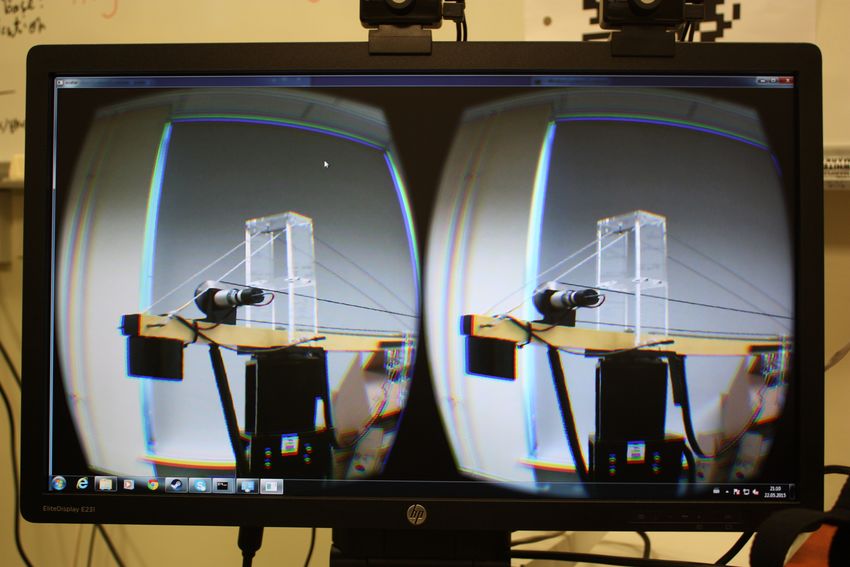
Declaration: I hereby declare that this Bachelor’s thesis, my original investigation and achieve-
ment, submitted for the Bachelor’s degree at Tallinn University of Technology, has not been
submitted for any degree or examination.

Deklareerin, et käesolev bakalaureusetöö, mis on minu iseseisva töö tulemus, on esitatud Tallin-
na Tehnikaülikooli bakalaureusekraadi taotlemiseks ja selle alusel ei ole varem taotletud aka-
deemilist kraadi.

Andrei Mihnevitš

 Date:              ...........................................

 Signature: . . . . . . . . . . . . . . . . . . . . . . . . . . . . . . . . . . . . . . . . . . .
Contents

Abstract                                                                                           3

Kokkuvõte                                                                                          4

1   Introduction                                                                                   7

    1.1    State of the Art . . . . . . . . . . . . . . . . . . . . . . . . . . . . . . . . . .    7

    1.2    Objectives and Contributions . . . . . . . . . . . . . . . . . . . . . . . . . . .      8

    1.3    Thesis Outline . . . . . . . . . . . . . . . . . . . . . . . . . . . . . . . . . . .    8

2   Overview of the Oculus Rift Development Kit                                                   10

3   Selection of API for Rendering Computer Graphics                                              12

4   Software Environment for Application Development                                              14

    4.1    Alternative Implementations . . . . . . . . . . . . . . . . . . . . . . . . . . .      14

    4.2    Overview of the Qt Toolkit . . . . . . . . . . . . . . . . . . . . . . . . . . . .     15

    4.3    The Reasons to Choose Qt . . . . . . . . . . . . . . . . . . . . . . . . . . . .       15

    4.4    C++ as Programming Language for Software Environment . . . . . . . . . . .             16

5   Building the Code Base                                                                        17

    5.1    Overview of the Architecture . . . . . . . . . . . . . . . . . . . . . . . . . . .     17

    5.2    OpenGlApp Class . . . . . . . . . . . . . . . . . . . . . . . . . . . . . . . .        18

           5.2.1   Deriving from QWindow and QOpenGLFunctions Classes . . . . .                   18

                                                  1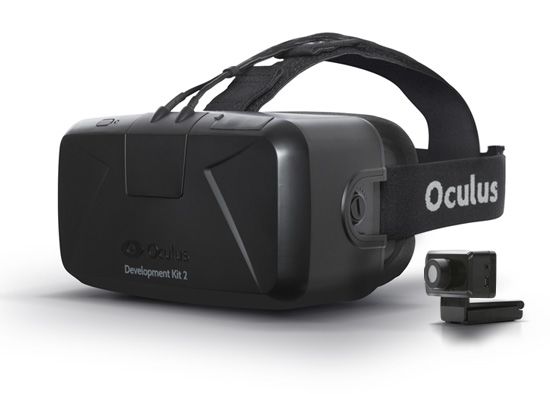
5.2.2   OpenGL Rendering Loop . . . . . . . . . . . . . . . . . . . . . . . .        19

    5.3   RiftApp Class . . . . . . . . . . . . . . . . . . . . . . . . . . . . . . . . . .    22

          5.3.1   A Subclass of OpenGlApp . . . . . . . . . . . . . . . . . . . . . . .        22

          5.3.2   Initializing Oculus Library and the HMD . . . . . . . . . . . . . . . .      23

          5.3.3   OVR Rendering Loop . . . . . . . . . . . . . . . . . . . . . . . . . .       27

    5.4   CustomApp class . . . . . . . . . . . . . . . . . . . . . . . . . . . . . . . . .    31

6   Developing a Custom Application using the Code Base                                        32

    6.1   Stereo Video Stream . . . . . . . . . . . . . . . . . . . . . . . . . . . . . . .    32

    6.2   The interconnection of the HMDs . . . . . . . . . . . . . . . . . . . . . . . .      33

    6.3   Implementation details . . . . . . . . . . . . . . . . . . . . . . . . . . . . . .   34

    6.4   The Working Application Results . . . . . . . . . . . . . . . . . . . . . . . . .    40

Conclusions                                                                                    42

Bibliography                                                                                   43

                                                2
Abstract
Towards Oculus Rift based Augmented and Virtual Reality
The goal of this thesis was to create a software code base for developing Oculus Rift based vir-
tual and augmented reality applications using Qt toolkit and Oculus SDK. In order to make the
code base beneficial to a larger amount of developers, only cross-platform tools were used in
this work. During the development process, several important topics were investigated, includ-
ing rendering computer graphics with OpenGL and understanding the inner workings of Oculus
SDK. A software solution was developed for building custom applications focused on virtual
and augmented realities. Resulting working applications showed, that the goal of the thesis was
successfully achieved.
3Kokkuvõte
Oculus Riftil põhinev täiendatud ja virtuaalne reaalsus
Käesolev bakalaureuse töö käsitleb tarkvarateegi loomist Oculus Rift-il põhinevate virtuaalse ja
täiendatud reaalsuse rakenduste arendamiseks Qt paketi ning Oculus SDK baasil. Välja paku-
tud lahendus on universaalne, kuna põhineb ainult platvormiülestel lahendustel. Töö uurib ka
arvutigraafika genereerimise võimalusi OpenGL teegi abil. Välja töötatud tarkvaraline lahendus
loob aluse virtuaalse ja täiendatud reaalsuse rakenduste arendamiseks.
4List of Figures
2.1 Oculus Rift DK2 . . . . . . . . . . . . . . . . . . . . . . . . . . . . . . . . . 11
5.1 Architecture Class Diagram . . . . . . . . . . . . . . . . . . . . . . . . . . . . 17
5.2 Rendering steps in the Rift . . . . . . . . . . . . . . . . . . . . . . . . . . . . 26
5.3 Rift eye textures and viewports . . . . . . . . . . . . . . . . . . . . . . . . . . 27
6.1 Webcams mounted on the HMD . . . . . . . . . . . . . . . . . . . . . . . . . 33
6.2 HMDs interconnection concept . . . . . . . . . . . . . . . . . . . . . . . . . . 34
6.3 UML class diagram for master’s reality application . . . . . . . . . . . . . . . 35
6.4 The Master’s Reality application multithreading scheme . . . . . . . . . . . . 39
6.5 A pair of stereo images . . . . . . . . . . . . . . . . . . . . . . . . . . . . . . 41
5Nomenclature
API Application Programming Interface
DK2 Development Kit 2
FBO FrameBuffer Object
FOV Field Of View
GUI Graphical User Interface
HMD Head-Mounted Display
IT Information Technology
OVR Oculus Virtual Reality
SDK Software Development Kit
UDP User Datagram Protocol
UI User Interface
UML Unified Modeling Language
VR Virtual Reality
XML EXtensible Markup Language
6Chapter 1
Introduction
1.1 State of the Art
With the advent of the first Oculus Rift Development Kit—the DK1—in 2012, the interest in
virtual reality has experienced an enormous boost. The Oculus Rift has influenced the creation
of a great amount of virtual reality content. Although much of the effort has been devoted to
bringing virtual reality into the gaming industry, there are also other interesting applications of
the experience provided by the Oculus Rift [1], [2], [3], [4]. It can be seen, that while game
developers primarily focus on virtual reality—an artificial world with computer-generated envi-
ronment, developers and researchers from other fields of IT tend towards augmented reality—an
enhanced version of reality created by overlaying computer-generated objects on an image of
real world viewed through a video capturing device, e.g. a webcam.
The speech of Michael Abrash [5]—Chief Scientist at Oculus—can be considered a very great
source of inspiration to embark on VR research. During his speech he gave a vision of the future
of VR:
Imagine anyone on the face of the Earth being able to be anywhere with anyone
doing anything whenever they want.
Following the idea of this quote, one can imagine futuristic scenarios where a person wearing
a VR headset controls a robot—the avatar—on Mars fully immersing into the robot’s Martian
reality. Something more realistic regarding the near future would be to use such an avatar to
explore places on Earth unavailable to a human.
71.2 Objectives and Contributions
This work focuses on the starting point of creating virtual and augmented reality applications—
the development of software code base. This code base has to be easily extensible in order to
build customized applications on top of it. The solution in this work uses inheritance in object-
oriented design of the code base. By deriving from the classes provided by the code base, a
custom application gets all the required features to interact with the Rift and implement its own
specific logic.
One of the challenges faced during the work was to use only the tools provided by the most
recent Qt5 toolkit in conjunction with Oculus SDK, because the code samples available on the
internet either used totally different tools, or used older versions of Qt. From this point of view,
the use of modern Qt5 introduced novelty to this work.
In order to prove the results of this work, a custom software application is built using the created
code base. This application has to show, that:
• The ’Qt5 only’ approach actually works;
• The performance of the application is satisfactory.
1.3 Thesis Outline
Chapter 2 gives an overview of the Oculus Rift. Due to the fact, that this work uses DK2, the
focus in the chapter is laid on this particular development kit.
Chapter 3 deals with the selection of computer graphics API. OpenGL and Direct3D are first
introduced to the reader and then compared from the perspective of current work. Finally, one
of the APIs is chosen to be used in the work.
Chapter 4 starts with an overview of applicable software frameworks, which suit the current
task. After that, the attention gets focused on Qt framework and the advantages of using it in
the current work.
Chapter 5 focuses on the code base implementation details. The explanation starts with an
overview of the code base architecture followed by highlighting the most important parts of the
code.
8In Chapter 6 the reader learns, how a custom application can be developed using the code base.
An application called Master’s Reality was chosen as an example of such software solution
development.
9Chapter 2
Overview of the Oculus Rift Development
Kit
The development kits released by Oculus [6] are aimed at game developers and enthusiasts in
order to allow them to integrate new amazing experiences into their games and applications.
This approach ensures, that by the time the consumer version is released, there will already be
a large community of software developers involved with the Rift.
The latest development kit for the Oculus Rift—the DK2—was released in 2014. This devel-
opment kit represents a headset, which allows the wearer of this device to immerse into virtual
reality. Figure 2.1 presents the DK2 headset in a way it is advertised by Oculus. In order to
get the feeling of what the Rift can deliver to the user, it is worth quoting Palmer Luckey—the
founder of Oculus—as he said:
The magic, that sets the Rift apart, is immersive stereoscopic 3-D rendering, a
massive field of view and ultra low latency head-tracking.
To follow his words one needs to be aware, that while other consumer head-mounted displays,
e.g. [7], have a diagonal FOV of about 40 degrees, the Oculus Rift makes an impressive step by
providing a 100 degrees in its DK2. As a consequence, a person wearing the Rift is not simply
looking at the screen, but gets the impression of actually being inside of the world. Also, the
latency is so far regarded to be the biggest problem of virtual reality. The higher the latency,
the less realistic the virtual scene will appear. Moreover, latency issues can cause disorientation
of the user in a purely virtual environment, resulting in motion sickness [8]. The developers at
10Oculus find this problem so important, that they built a special latency testing system into the
DK2.
An increasing popularity of the Rift is also caused by the fact, that it has out-of-the-box inte-
grations for a number of modern game engines, such as Unreal Engine 4 [9] and Unity 4 [10],
which gives game developers a great advantage.
Finally, the Oculus Rift comes with the publicly available Oculus SDK, which includes all the
necessary—the source code, documentation and samples—to create Oculus Rift based software
applications.
Figure 2.1: Oculus Rift DK2
11Chapter 3
Selection of API for Rendering Computer
Graphics
Basically there are two options to consider—Direct3D and OpenGL. These low-level 3-D APIs
are not only one of the most popular, but also the ones supported by the Rift.
OpenGL is considered to be the most widely used graphics standard. Due to the support of a
wide range of hardware and software platforms and also due to the quality of its official docu-
mentation, OpenGL has been adopted by numerous companies—entertainment, medical imag-
ing, broadcasting and many more. Therefore, there are thousands of applications developed
using this API.
Direct3D is a graphics component included in DirectX and provides low-level graphics API.
This API was designed and developed by Microsoft specifically for the use on Windows plat-
form.
Comparing both APIs from the perspective of this work, there are three aspects, which are worth
considering at first sight:
• Ease of use;
• Portability;
• Performance.
In terms of usability both APIs experienced significant changes over the years of their exis-
tence. Mostly it concerns Direct3D, because the first versions of this API elicited widespread
12criticism [11]. Nowadays, both APIs provide a clean and documented functionality to be used
by developers. More than that, a number of wrappers has been created for both APIs, making
the development even more comfortable.
An increasing support of Linux and OSX operating systems makes a cross-platform graphics
API quite desirable nowadays. Being an open source cross-platform API, OpenGL presents a
very attractive choice. Locking oneself into a single OS with proprietary standards—as is the
case with Direct3D—is shortsighted and can lead to stagnation.
While Direct3D 12 introduces a new feature like low-level programming [12], which should
allow developers to gain more control of the rendering process, OpenGL has also seen im-
provements lately. As was stated at Game Developer Conference 2014 [13] OpenGL has very
good potentials in terms of performance increase by reducing the driver overhead.
Having considered all these aspects, the choice falls on OpenGL, because of its open standard
and platform independence. Getting ahead of the discussion, it can be stated, that all the compo-
nents used in this work are cross-platform. Therefore, it is a natural decision to prefer OpenGL
to Direct3D.
13Chapter 4
Software Environment for Application
Development
4.1 Alternative Implementations
There is clearly a number of possibilities to deal with computer graphics rendering—starting
from graphics libraries like GLFW [14], SDL [15] or FreeGLUT [16], and ending with 3-D
engines like Unreal Engine [9] and Unity [10].
Graphics libraries like GLFW or SDL are both cross-platform and open source, which is def-
initely an advantage. The problem though is that it does not suffice to use just these libraries
alone. In order to develop a complete graphical application one needs a number of additional
libraries, each serving its small role. Thus, the list of application dependencies grows large.
3-D engines like Unreal Engine are aimed at game development. Basically it means, that they
serve as a great layer of abstraction of what really goes on inside graphics rendering process.
Considering also the fact, that both the above mentioned engines provide a plugin for Oculus
Rift, a developer gets everything ’straight from the box’. Although it sounds like a preferred way
to do it, this work is focused on a more detailed exploration of computer graphics. Therefore,
3-D engines are not well suited for the task at the moment. This does not mean though, that this
opportunity is totally out of the picture. In time, if there will be a need for it, then this choice
may well be reconsidered. There are nice candidates available like, for example, the Minko
Engine [17].
144.2 Overview of the Qt Toolkit
According to the official website [18], Qt is a cross-platform application and UI framework.
It allows developing application software for a variety of software and hardware platforms.
The fact, that this framework combines cross-platform solutions together with the speed of
native applications makes it widely used among developers who are interested in gaining these
benefits.
To put it briefly, Qt is a toolkit. Apparently, this definition gives a much better description—Qt
is actually a set of tools. These tools comprise components for GUI, network, XML, OpenGL,
multimedia and much much more. It can be said, that Qt is a library of libraries.
4.3 The Reasons to Choose Qt
Abundance of features provided by Qt was the main reason why this toolkit was chosen for the
current work. Keeping in mind the specific character of the work at hand, three core features
have to be supported:
• Window representation in the underlying windowing system;
• Object-oriented wrappers for native OpenGL functionality;
• Platform independent access to raw OpenGL API.
Qt provides all of them, which makes it very easy to keep the list of dependencies tiny—instead
of using a number of different libraries, it is possible to use just one framework and be fine.
Additionally, Qt in conjunction with OpenGL has gained recognition among academic re-
searches focused on both real-time [19] and professional graphics applications [20].
As a final note about Qt, it should be mentioned, that it has its drawbacks. Such a vast variety
of features provided by Qt can be both its power and its weakness—at some points, more spe-
cialized tools can simply do the job better. Moreover, the introduction of new OpenGL support
in Qt5 has caused rather controversial opinions among OpenGL developers [21]. On the con-
trary though, it should be kept in mind, that Qt is constantly being developed. Therefore, it is
assumable, that its features will only improve with time.
154.4 C++ as Programming Language for Software Environ-
ment
C++ has been around for more than 30 years. As a successor of C language, C++ was designed
with performance, efficiency and flexibility notions in mind. All these features are essential
for system programming. Although there was a period of stagnation, when after the release of
C++98 standard the language did not evolve for more than 10 years1 , the recent standards, such
as C++11 and C++14, show, that the language is on the rise right now.
Additionally, it should be mentioned, that both Qt and Oculus SDK were initially designed
and developed using C++ language. Even if Qt already has well-established bindings for other
languages, such as [22] and [23], there is no such equally mature content available for Oculus
SDK. Therefore, C++ seems like a reasonable choice indeed.
1
C++03 standard released in 2003 was more like an edition of C++98 aimed at fixing its defects.
16Chapter 5
Building the Code Base
5.1 Overview of the Architecture
It is natural to assert, that an Oculus Rift based software application is a graphics application.
Having chosen OpenGL as an API for graphics rendering, it is logical to develop that assertion
further—Oculus Rift based software application is an OpenGL application. This ’is-a’ rela-
tionship plays a fundamental role in building a hierarchy of software classes which form the
architecture.
Figure 5.1 depicts an UML class diagram which gives a basic overview of the architecture. As
can be seen from this diagram, there is a number of layers, each of them is represented by its
own class from the hierarchy and each of them deals with its own set of activities.
OpenGlApp
CustomApp
RiftApp
Figure 5.1: Architecture Class Diagram
175.2 OpenGlApp Class
This class manages OpenGL interaction by defining the basics for windowing and graphics
rendering using OpenGL API.
5.2.1 Deriving from QWindow and QOpenGLFunctions Classes
A windowing system support is provided by publicly deriving from QWindow class. Addition-
ally, due to the fact, that QWindow class derives from QObject class, this inheritance activates
a very effective Qt communication mechanism—signals and slots.
It is a common knowledge, that both protected and private types of inheritance mean is-impleme-
nted-in-terms-of relationship between base and derived classes. Therefore, OpenGlApp class
as well as its subclasses gain platform independent access to OpenGL API functions, when
using protected inheritance from QOpenGLFunctions class.
class OpenGlApp : public QWindow, protected QOpenGLFunctions
{
Q_OBJECT
...
};
Initialization is an essential point in the lifetime of this class, because it creates an OpenGL
context—a vital part of any OpenGL graphics application. In order to initialize OpenGL func-
tion resolution for the current context initializeOpenGLFunctions()method inherited
from QOpenGLFunctions class is called. This initialization is performed once right before
the first frame is rendered to the screen. This is important, because until the window receives
its first expose event its actual size might be unknown, and, moreover, what is rendered might
not even end up on the screen. In order to get access to this moment of the first exposure,
virtual method exposeEvent() inherited from QWindow class is overridden. Also, such
delayed initialization forces to store the object of class QOpenGLContext as a pointer inside
OpenGlApp class.
class OpenGlApp : public QWindow, protected QOpenGLFunctions
{
18Q_OBJECT
...
protected:
virtual void initializeApp();
...
virtual void exposeEvent(QExposeEvent * e) override final;
...
private:
...
std::unique_ptr m_context;
};
void OpenGlApp::exposeEvent(QExposeEvent * ev)
{
Q_UNUSED(ev);
if (isExposed())
{
if (!isAppInitialized())
{
initializeApp();
...
}
...
}
}
5.2.2 OpenGL Rendering Loop
There are three basic steps inside OpenGL rendering loop:
1. Start frame;
2. Render frame;
3. Finish frame.
Each of them does its own set of specific actions.
19class OpenGlApp : public QWindow, protected QOpenGLFunctions
{
Q_OBJECT
...
protected:
virtual void startFrame();
virtual void renderFrame() = 0;
virtual void finishFrame();
};
Method renderFrame() is made pure virtual, so that the subclasses are fully responsible for
implementing the actual frame rendering. Also, the two other methods are virtual to allow the
subclasses to reimplement their standard behavior.
void OpenGlApp::startFrame()
{
// It is important to make the context current
// before beginning to render a new frame.
//
m_context->makeCurrent(this);
}
void OpenGlApp::finishFrame()
{
// Swap the back and front buffers of the surface.
// Method swapBuffers() is called to finish the current frame.
//
m_context->swapBuffers(this);
}
The interesting part of this loop is how it actually gets looped. Usually, such rendering is
implemented inside a simple while() or do..while() loop, for instance:
do
{
...
// 1. Start frame
20// 2. Render frame
// 3. Finish frame
...
}
while (glfwWindowShouldClose(window) == 0);
In this case though the implementation relies on Qt event mechanism, which allows handling
all window events in a single uniform way, including the rendering loop. To make it happen
there are two methods inside OpenGlApp class responsible for this maintenance:
class OpenGlApp : public QWindow, protected QOpenGLFunctions
{
Q_OBJECT
...
private:
void renderLater();
void renderNow();
...
private:
bool m_isUpdatePending;
bool m_isAnimating;
...
};
The method renderLater() simply schedules the rendering for a later time by putting an
update request in the event loop.
void OpenGlApp::renderLater()
{
if (!m_isUpdatePending)
{
m_isUpdatePending = true;
QCoreApplication::postEvent(this,
new QEvent(QEvent::UpdateRequest));
}
}
21The second method—renderNow()—invokes the sequence of the above-mentioned render-
ing steps:
void OpenGlApp::renderNow()
{
if (!isExposed())
{
return;
}
startFrame();
renderFrame();
finishFrame();
if (m_isAnimating)
{
renderLater();
}
}
Being polymorphic the object of this class will call proper overridden methods from the sub-
classes.
5.3 RiftApp Class
The aim of this class is to interact with Oculus SDK in order to perform a number of differ-
ent tasks including the initialization and shutdown of Oculus runtime environment, as well as
rendering to the Rift.
5.3.1 A Subclass of OpenGlApp
By subclassing OpenGlApp class this class declares, that it is an OpenGL application and,
thus, it inherits the basic rendering features defined by its base class. Given the flexibility
provided by virtual methods this class is able to apply fine tuning to both the initialization and
the rendering process.
22class RiftApp : public OpenGlApp
{
Q_OBJECT
public:
RiftApp();
~RiftApp();
...
protected:
virtual void initializeApp() override;
virtual void startFrame() override;
virtual void renderFrame() override final;
virtual void finishFrame() override;
virtual void renderScene(ovrEyeType renderedEye,
QMatrix4x4 const & view,
QMatrix4x4 const & projection,
float timeDelta) = 0;
...
private:
...
startOvr();
...
private:
...
std::unique_ptr m_fbo;
...
};
5.3.2 Initializing Oculus Library and the HMD
The initialization is split into two parts—one of them takes place in the class constructor and
the other one in the overridden method initializeApp().
The first part is performed by method startOvr() called from the constructor:
23void RiftApp::startOvr()
{
if (!ovr_Initialize())
{
throw ...
}
...
int const defaultDevice = 0;
ovrHmd hmdDescriptor = ovrHmd_Create(defaultDevice);
if (hmdDescriptor == nullptr)
{
...
hmdDescriptor = ovrHmd_CreateDebug(ovrHmd_DK2);
...
}
unsigned int const trackingCaps = ovrTrackingCap_Orientation |
ovrTrackingCap_Position |
ovrTrackingCap_MagYawCorrection;
ovrHmd_ConfigureTracking(hmdDescriptor, trackingCaps, 0);
...
}
As can be seen, the first thing during the initialization of OVR is to call ovr_Initialize()
function—it must be called before using any other OVR API function. Once the OVR is initial-
ized, the HMD can be opened. If the device is turned off, then a debug version may be created,
which is quite convenient, if one simply needs to debug some issues in the application code.
The last thing during construction of the class is to configure Oculus tracking. The tracking
capability bits used here are quite basic—the rotation of HMD in 3-D space and the positional
tracking provided by the positional tracking camera supplied with DK2.
The second part of the initialization goes inside initializeApp() method. The method is
quite big so it will be wiser to split it and proceed with the explanation bit by bit.
void RiftApp::initializeApp()
{
// First of all, let the superclass perform its initialization.
24//
OpenGlApp::initializeApp();
...
}
The nice thing about virtual methods is that overridden versions are free to call the base ones
if there is a need for it. In this case RiftApp class highly depends on OpenGL initialization,
thus, it is critical to call the base class version right from the start.
void RiftApp::initializeApp()
{
...
// Initialize offscreen rendering texture size.
//
...
ovr::Sizei const fullTextureSize(
leftEyeTextureSize.w + rightEyeTextureSize.w,
ovr::Alg::Max(leftEyeTextureSize.h, rightEyeTextureSize.h));
// Create a frame buffer object using the offscreen
// rendering texture size.
// The frame object also contains a depth buffer.
//
m_fbo = std::make_unique(
fullTextureSize.w,
fullTextureSize.h,
QOpenGLFramebufferObject::Depth);
...
}
In order to supply rendered graphics to the Rift a method called off-screen rendering [24, "Off-
Screen Rendering", p. 364] is used. The idea behind this method is that the graphics is rendered
to non-default locations, that is, not to the screen, but to some intermediate objects. Capturing
rendered images in such a way gives an opportunity to perform image post-processing, which is
exactly the case with the Rift, as it applies distortion filters to the images before doing the final
25rendering to the screen. OpenGL provides a mechanism called frame buffer objects [24, "Off-
Screen Rendering", p.364] to support off-screen rendering, including rendering to a texture.
The latter case is the one used in the Rift. The steps, forming this process, are shown in Figure
5.2.
Render to Texture Apply Post-Processing Render to Screen
Figure 5.2: Rendering steps in the Rift
Another thing worth noting from the code listing above is how the full texture size is calculated.
It will become clear in a moment, why this size is constructed from both left and right eye
texture sizes.
void RiftApp::initializeApp()
{
...
// Initialize eye viewports.
// The viewports split the full texture size into two parts:
// one for the left eye and the other one for the right eye.
//
EyeViewPorts eyeViewPorts;
eyeViewPorts[ovrEye_Left] = ovr::Recti(
ovr::Vector2i(0),
leftEyeTextureSize);
eyeViewPorts[ovrEye_Right] = ovr::Recti(
ovr::Vector2i((fullTextureSize.w + 1) / 2, 0),
rightEyeTextureSize);
...
}
Now it is clear, that one big texture is shared by both eyes, and the viewports define which part
of this texture belongs to which eye. Figure 5.3 serves as an illustration of this concept.
One final note about the initialization—OVR needs to be configured in terms of graphics render-
26full texture width
right eye viewport
full texture
height
le eye viewport
le eye texture right eye texture
width width
Figure 5.3: Rift eye textures and viewports
ing API. This means, that a developer has to specify, what kind of API—OpenGL or Direct3D—
is going to be used. This aspect of the initialization can be seen from the following code listing.
void RiftApp::initializeApp()
{
...
// Configure OVR to use OpenGL for rendering.
//
ovrGLConfig config;
auto & header = config.OGL.Header;
header.API = ovrRenderAPI_OpenGL;
...
}
5.3.3 OVR Rendering Loop
The rendering steps are basically the same as for OpenGL with the main difference, that in this
case both OVR API and off-screen rendering come into play.
void RiftApp::startFrame()
27{
OpenGlApp::startFrame();
auto const frameTiming = ovrHmd_BeginFrame(m_hmdDescriptor, 0);
...
// All the rendering will go into the frame buffer object.
//
m_fbo->bind();
}
By binding the frame buffer object at the end of RiftApp::startFrame() method, OpenGL
pipeline is told to render everything into that bound object—namely, into its texture.
void RiftApp::finishFrame()
{
m_fbo->release();
// Submit the eye images for SDK distortion processing.
//
ovrHmd_EndFrame(m_hmdDescriptor,
m_eyePoses.data(),
&m_eyeTextures[0].Texture);
}
One aspect of RiftApp::finishFrame() method should be stressed—there is no call to
the base version of this method. This is intentionally, since OVR API ovrHmd_EndFrame()
performs the buffers’ swapping. Therefore, there is no need to swap the buffers once again by
calling OpenGlApp::finishFrame() method.
The code of the rendering method RiftApp::renderFrame() is quite complicated, so it
is better to just give the basic idea about what is going on.
First, the buffers are cleared. This is a common operation before starting to render a frame.
void RiftApp::renderFrame()
{
// The buffers should always be cleared before rendering.
28//
glClear(GL_COLOR_BUFFER_BIT |
GL_DEPTH_BUFFER_BIT |
GL_STENCIL_BUFFER_BIT);
...
}
Then the eye poses are queried from the Rift. This information contains both the orientation
and the position of the HMD.
void RiftApp::renderFrame()
{
...
ovrHmd_GetEyePoses(m_hmdDescriptor, 0,
getEyeViewOffsets().data(),
m_eyePoses.data(), nullptr);
...
}
Once the eye poses are retrieved, the rendering of each eye takes place. The code makes exten-
sive use of C++11 features, so in this case a lambda expression is created to set a sequence of
steps to render each eye.
void RiftApp::renderFrame()
{
...
// Create a lambda to render an eye.
//
auto renderEyeTexture = [&](ovrEyeType eye)
{
...
};
// Run the lambda for each eye.
//
rift_utils::foreach_eye(renderEyeTexture);
29}
Having a closer look at the steps performed inside the lambda, a few basic things should be
highlighted.
auto renderEyeTexture = [&](ovrEyeType eye)
{
// Get the eye, that is currently
// recommended for rendering by the SDK.
//
ovrEyeType currentEye = m_hmdDescriptor->EyeRenderOrder[eye];
...
};
The Oculus SDK documentation advises to perform the rendering in a specific eye order, defined
by Oculus Library. It is claimed, that this can improve the quality of pose prediction.
auto renderEyeTexture = [&](ovrEyeType eye)
{
...
glViewport(eyeViewPorts[currentEye].x,
eyeViewPorts[currentEye].y,
eyeViewPorts[currentEye].w,
eyeViewPorts[currentEye].h);
...
};
When the current rendered eye is determined, it is important to set the corresponding viewport,
which is done by calling OpenGL API glViewport().
At this point, all that is left before actually drawing the scene is the creation of rendering ma-
trices, that is, the view and projection matrices. The matrices are built using the pose and other
information provided by Oculus Library. Once the matrices are created, the scene drawing
method—renderScene()—can be called.
auto renderEyeTexture = [&](ovrEyeType eye)
30{
...
renderScene(currentEye, view, projection, m_frameTimeDelta);
};
5.4 CustomApp class
Here CustomApp class is an abstraction of a possible custom application. Considering that
the code base is basically ready, such customized applications can now be developed using the
interfaces provided by OpenGlApp and RiftApp classes.
31Chapter 6
Developing a Custom Application using
the Code Base
There is a number of various application examples developed using this code base. Some of
them are quite simple, like a rotating cube with a texture on it. In this Chapter a custom appli-
cation will be described called—Master’s Reality. The idea is to interconnect two HMDs and
to pass a stereo video stream from one HMD (Master) to the other one (Slave). The slave will,
thus, immerse into the master’s reality.
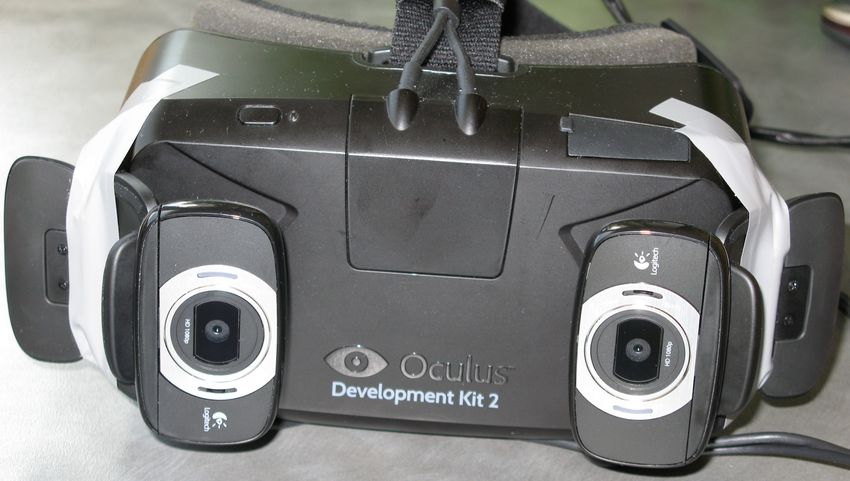
6.1 Stereo Video Stream
The stream’s input will come from two webcams1 mounted on the master’s HMD. The place-
ment of these webcams is meant to represent the master’s eyes. Figure 6.1 illustrates an example
of this concept. Although there are two specific ways to mount cameras in a stereo rig—parallel
and toed-in [25]—this work is more like a proof of concept. Therefore, it does not use any of
them explicitly. Rather than that, the cameras are mounted loosely, so that a developer can man-
ually adjust them to achieve stereo convergence, while wearing the headset. Another important
aspect worth noting about the cameras is that they are mounted in portrait mode. Due to the fact,
that none of consumer webcams nowadays support this feature, the images from the webcams
are rotated ’on-the-fly’ in the software. The reason for all this, is that the eye images in the Rift
are presented in portrait mode, as can be seen from Figure 5.3. Consequently, in order to avoid
1
The webcams used in this work are Logitech HD C615.
32skewing the images received from the webcams, the above-mentioned adjustments have to be
carried out.
Figure 6.1: Webcams mounted on the HMD
6.2 The interconnection of the HMDs
This work uses a local area network to pass the images captured from the Master webcams to
the Slave HMD. The network protocol being used is UDP.
Since there is a need to somehow differentiate between right and left eye images, a method has
to be found to solve this problem.
One way to deal with this issue is to encapsulate an image in a structure, which has a header.
The header could then hold information about the size of the encapsulated image, its type and,
perhaps, other things as well.
Another opportunity to handle this problem would be to use the fact, that a network application
can listen to multiple ports. Thus, different network ports could deliver images for different
eyes.
The second solution was found to be more elegant, and, as a consequence, it is used in the work.
The concept is depicted in Figure 6.2.
33le eye webcam
The client port 7710
port 7701
right eye webcam
transport-layer mul plexing
transport-layer demul plexing
right eye texture
port 7701
port 7710
The server le eye texture
Figure 6.2: HMDs interconnection concept
6.3 Implementation details
The hierarchy of the classes, which compose one of the static aspects of the application’s struc-
ture is depicted in Figure 6.3. One of the reasons for such abundance of classes is to avoid code
duplication, so that each class in the hierarchy implements its own set of features, and other
classes can inherit these features.
In order to draw an image received from a webcam onto some rendering surface (in this case
it is the surface of the frame buffer object’s texture), one needs some graphics geometry, e.g.
a simple plane. Since modern OpenGL is used in this work, a shader program [24, "Shaders
and Programs", p.187] is also required to perform the drawing itself. All these requirements are
fulfilled by VideoStreamApp class.
class VideoStreamApp : public RiftApp
{
...
protected:
34OpenGlApp
RiftApp VideoStreamApp
VideoStreamStereoApp VideoStreamRemoteApp
VideoStreamClientApp VideoStreamServerApp
Figure 6.3: UML class diagram for master’s reality application
virtual void initializeApp() override;
virtual void renderScene(ovrEyeType renderedEye,
QMatrix4x4 const & view,
QMatrix4x4 const & projection,
float timeDelta) override final;
virtual void bindEyeTexture(ovrEyeType renderedEye) = 0;
virtual void releaseEyeTexture(ovrEyeType renderedEye) = 0;
...
private:
void initShaderProgram();
private:
QOpenGLVertexArrayObject m_vao;
QOpenGLBuffer m_verticesPositionBuffer;
QOpenGLShaderProgram m_shaderProgram;
GLuint m_vertexPositionAttribute;
};
The code uses vertex array objects [24, "Our First OpenGL Program", p.13] and vertex buffer
objects [24, "Buffers", p.92] provided by OpenGL. These are the mechanisms, that allow to
setup the vertex information once and then use it each time it is needed. Keeping in mind, that
this application needs a plane as a graphics geometry, the vertices need to be combined in this
particular form. A common way to draw figures in OpenGL is to split the figure into a number
35of triangles. Two adjacent triangles are needed to represent a plane:
namespace
{
// A simple square, which consists of two triangles.
//
QVector const verticesPositionBufferData = {
{ -1.0f, -1.0f, 0.0f },
{ 1.0f, -1.0f, 0.0f },
{ -1.0f, 1.0f, 0.0f },
{ -1.0f, 1.0f, 0.0f },
{ 1.0f, -1.0f, 0.0f },
{ 1.0f, 1.0f, 0.0f },
};
}
The shader programs are written in OpenGL Shading Language [24, "Shaders and Programs",
p.187] and are quite simple here, implementing only the mandatory shading stages—the vertex
and the fragment shading.
// A vertex shader
//
#version 330 core
layout(location = 0) in vec3 vertexPosition;
out vec2 UV;
void main()
{
gl_Position = vec4(vertexPosition, 1);
UV = (vertexPosition.xy + vec2(1, 1)) / 2.0;
}
// A fragment shader
//
#version 330 core
in vec2 UV;
out vec3 color;
uniform sampler2D textureSampler;
void main()
36{
color = texture2D(textureSampler, UV).rgb;
}
The handling of stereo-pair images is backed by VideoStreamStereoApp class. The re-
ceived images are converted into OpenGL textures, which are then used while rendering to the
FBO.
class VideoStreamStereoApp : public VideoStreamApp
{
...
protected slots:
void setLeftEyeImage(ImagePtr image);
void setRightEyeImage(ImagePtr image);
private:
void setEyeImage(ovrEyeType eye, ImagePtr image);
private:
std::array m_eyeTextures;
};
At this point it is important to highlight the fact, that the application is multithreaded. There is
a range of tasks, that are executed in their own dedicated threads:
• Image reading;
• Image processing;
• Image writing.
Qt provides its own way to handle threading and especially the communication between threads.
In the time of Qt3 and Qt4 a prevalent approach was to subclass QThread class in order to put a
worker object into a dedicated thread. This is not anymore the case with Qt5. More than that, it
is considered a flawed approach, which violates the design of QThread class [26]. Rather than
subclassing, a more preferred (and also more proper) way is shown in the following program
listing:
class ImageProcessor : public QObject
37{
Q_OBJECT
public slots:
virtual void processImage(ImagePtr image) = 0;
signals:
void imageProcessed(ImagePtr image);
};
...
void ImageHandler::setupWorkingProcess(
std::unique_ptr imageProcessor,
std::unique_ptr imageReader) const
{
//
// Setup the image processor in its dedicated thread.
//
auto imageProcessorThread = std::make_unique();
imageProcessor->moveToThread(imageProcessorThread.get());
// Interconnect the processor’s thread destruction chain.
//
QObject::connect(imageProcessor.get(), &ImageProcessor::destroyed,
imageProcessorThread.get(), &QThread::quit);
QObject::connect(imageProcessorThread.get(), &QThread::finished,
imageProcessorThread.get(), &QThread::deleteLater);
// Interconnect the working chain.
//
QObject::connect(imageProcessor.get(), &ImageProcessor::imageProcessed,
this, &ImageHandler::imageReady);
// Interconnect the processor’s destruction chain.
//
QObject::connect(this, &ImageHandler::destroyed,
imageProcessor.get(), &ImageProcessor::deleteLater);
...
// Start working.
//
imageProcessorThread->start();
...
38}
As can be seen, Qt heavily relies on a mechanism called ’signals and slots’. In case of multi-
threading this mechanism makes interthread communication transparent to the developer. The
idea is that when a signal is emitted to a slot situated in a different thread, Qt automatically uses
a queued connection for the communication2 . Actually, this means putting an event request into
the receiver’s event loop. Once the event is picked from the loop and processed, the slot will
be executed. This transparency implies, that a developer need not worry about using additional
synchronization techniques, such as mutexes, because it is already implemented in the event
loop. Thus, program code can be written as if no multithreading exists in the application at all.
All, that is required, is to properly design the code to use the signals and slots mechanism.
Figure 6.4 shows the multithreading scheme used in this application.
main thread loop
image processor thread loop emit imageProcessed() signal
image reader thread loop emit imageRead() signal image writer thread loop
Figure 6.4: The Master’s Reality application multithreading scheme
Class VideoStreamRemoteApp defines the port numbers used for the client-server com-
munication.
class VideoStreamRemoteApp : public VideoStreamStereoApp
{
...
protected:
quint16 getLeftEyePort() const;
quint16 getRightEyePort() const;
private:
static quint16 const m_leftEyePort = 7710;
static quint16 const m_rightEyePort = 7701;
2
This is the case when passing a default connection type to QObject::connect(). The default connection
type is Qt::AutoConnection.
39};
Having inherited all the required features, both classes—VideoStreamClientApp and
VideoStreamServerApp—simply need to override virtual initializeApp() method
to setup image handlers for both eyes. This exemplifies a true power of inheritance in object-
oriented design—on the one hand, the implementation of features is split between different
classes in the hierarchy, while, on the other hand, a subclass then accumulates all these imple-
mented features.
6.4 The Working Application Results
One of the main things worth noting here is the true impression of seeing a 3-D scene inside the
Rift. Although it is not that easy to show this effect on photos, Figures 6.5a and 6.5b try to give
a basic overview of the idea.
Before speaking about the achieved performance, it ought to be mentioned, that the Rift operates
at a refresh rate of 75Hz, which basically means, that a new frame can be supplied for rendering
every:
75 s
75Hz = ⇒T = ≈ 0.0133s = 13.3ms
s 75
In other words, it takes 13.3ms to draw a single frame.
During the performance tests3 the application was running for 2 minutes, and the average time
to draw a frame was around 17ms. Keeping in mind, that a webcam is a potentially high latency
device, these results may be considered more than satisfactory in this case.
Concerning the network communication, it can be stated, that the initial implementation is done,
and, as in any software development, a specific amount of time has to be spent on debugging
the feature.
3
Although the webcams used in this work are plug-and-play USB devices, it is still highly recommended to
install the drivers provided by Logitech.
40(a) No stereo convergence
(b) Stereo convergence achieved
Figure 6.5: A pair of stereo images
41Conclusions
This work has shown, that Qt is applicable to create a software environment, which allows
developing Oculus Rift based virtual and augmented reality applications. The code base built
in Chapter 5 represents an extensible hierarchy of classes, which can be subclassed to gain all
the required features for interacting with the Rift. The application Master’s Reality developed
in Chapter 6 proves, that the code base provides a well-designed interface to build customized
application for the Oculus Rift. Therefore, it can be stated, that the objectives of this work have
been fulfilled.
The results of this work have also shown, that further investigation lies ahead, which regards
topics like:
• Presenting a stereo image in the Rift without the need to manually adjust the cameras all
the time;
• Issues related to passing a stereo video stream over a network efficiently.
This work only lifted the curtain into the world of virtual and augmented realities, so there are
definitely future perspectives related to this study, including telerobotics, image processing and
other research fields like capturing and reconstructing the real world into its virtual equivalent.
42Bibliography
[1] S. Khattak, B. Cowan, I. Chepurna, and A. Hogue, “A real-time reconstructed 3d environ-
ment augmented with virtual objects rendered with correct occlusion,” in Games Media
Entertainment, Toronto, ON, October 2014, pp. 1–8.
[2] J. Blaha and M. Gupta, “Diplopia: A virtual reality game designed to help amblyopics,”
in Virtual Reality, Minneapolis, MN, March–April 2014, pp. 163–164.
[3] S. Webel, M. Olbrich, T. Franke, and J. Keil, “Immersive experience of current and ancient
reconstructed cultural attractions,” in Digital Heritage International Congress, Marseille,
France, October–November 2013, pp. 395–398.
[4] Surreal Vision. (2015) Retrieved 05.06.2015. [Online]. Available: http://surreal.vision/
[5] M. Abrash. (2014, September) Michael Abrash Keynote on Oculus Connect. Retrieved
27.05.2015. [Online]. Available: https://www.youtube.com/watch?v=KS4yEyt5Qes
[6] Official website of OculusVR. (2015) Retrieved 27.05.2015. [Online]. Available:
https://www.oculus.com/
[7] Sony HMZ-T3W Specifications. (2015) Retrieved 27.05.2015. [Online]. Available: http:
//www.sony.co.uk/electronics/head-mounted-display-products/hmz-t3w/specifications
[8] H. Ujike, T. Yokoi, and S. Saida, “Effects of virtual body motion on visually-induced
motion sickness,” in Engineering in Medicine and Biology Society, San Francisco, CA,
September 2004, pp. 2399–2402.
[9] Official website of Unreal Engine. (2015) Retrieved 26.05.2015. [Online]. Available:
https://www.unrealengine.com/
43[10] Official website of Unity3D. (2015) Retrieved 26.05.2015. [Online]. Available:
https://unity3d.com/
[11] J. Carmack. (1996, December) John Carmack’s complaint about Direct3D. Retrieved
26.05.2015. [Online]. Available: http://www.bluesnews.com/archives/carmack122396.
html
[12] Intel Developer Zone. (2014, July) Direct3D 12 Overview Part 1: ’Closer To The Metal’.
Retrieved 26.05.2015. [Online]. Available: https://software.intel.com/en-us/blogs/2014/
07/17/direct3d-overview-part-1-closer-to-the-metal
[13] NVIDIA Blogs. (2014, March) NVIDIA, AMD, Intel Explain How OpenGL
Can Unlock 15x Performance Gains. Retrieved 26.05.2015. [Online]. Available:
http://blogs.nvidia.com/blog/2014/03/20/opengl-gdc2014/
[14] Official website of OpenGL FrameWork. (2015) Retrieved 26.05.2015. [Online].
Available: http://www.glfw.org/
[15] Official website of Simple DirectMedia Layer. (2015) Retrieved 26.05.2015. [Online].
Available: http://www.libsdl.org/
[16] Official website of Free OpenGL Utility Toolkit. (2015) Retrieved 26.05.2015. [Online].
Available: http://freeglut.sourceforge.net/
[17] Official website of Minko Engine. (2015) Retrieved 26.05.2015. [Online]. Available:
https://minko.io/engine/
[18] Official website of Qt framework. (2015) Retrieved 26.05.2015. [Online]. Available:
http://www.qt.io/qt-framework/
[19] D. Wang and Z. Wang, “Research of Real-Time Trajectory Simulation Module Based on
Qt and OpenGL,” in Computational and Information Sciences, Shiyang, China, June 2013,
pp. 179–182.
[20] J. Gois and H. Batagelo, “Interactive Graphics Applications with OpenGL Shading Lan-
guage and Qt,” in Graphics, Patterns and Images, Ouro Preto, Brazil, August 2012, pp.
1–20.
44[21] KDAB - the Qt Experts. (2013) Retrieved 26.05.2015. [Online]. Available: http:
//www.kdab.com/opengl-in-qt-5-1-part-1/#comment-713
[22] Official website of Qt Jambi. (2015) Qt Jambi—Qt for Java. Retrieved 29.05.2015.
[Online]. Available: http://qtjambi.org/
[23] Official wiki page of PyQt. (2015) Retrieved 29.05.2015. [Online]. Available:
https://wiki.python.org/moin/PyQt
[24] G. Sellers, R. S. Wright, and N. Haemel, OpenGL SuperBible: Comprehensive Tutorial
and Reference (6th Edition). Addison-Wesley, 2013.
[25] A. Takagi, S. Yamazaki, Y. Saito, and N. Taniguchi, “Development of a stereo video see-
through HMD for AR systems,” in Augmented Reality, Munich, Germany, October 2000,
pp. 68–77.
[26] B. T. Hughes. (2010) Qt blog—you’re doing it wrong... Retrieved 26.05.2015. [Online].
Available: https://blog.qt.io/blog/2010/06/17/youre-doing-it-wrong/
45You can also read