Trip Planning - Shadow Light Productions
←
→
Page content transcription
If your browser does not render page correctly, please read the page content below
Trip Planning

An excerpt from the E-book:
Avalanche! the Guides’ Guide to Safer Travel in the Mountains

This is an interactive pdf with hyper-links to online resources for winter trip plans
www.shadowlightproductions.ca

© Shadow Light Productions ltd, 2018
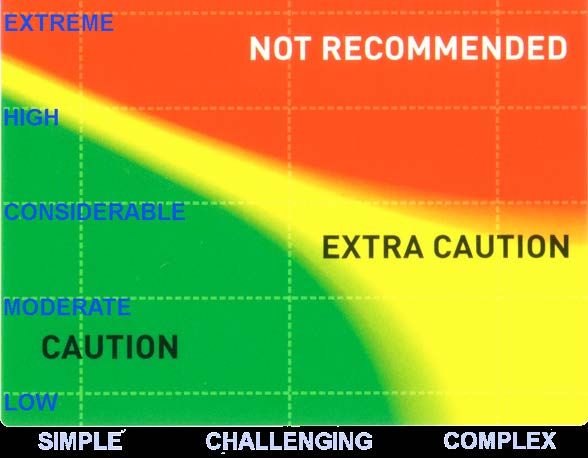
Trip Planning                                                                       Introduction
1. Check the avalanche hazard (avalanche.ca) and weather forecast (Environment
Canada) for the region(s) you may be travelling in.

2. Based on the avalanche hazard and weather forecast, who is in your group, their
skills, interests and physical abilities, consider possible routes or trips.

3. Use the ATES (avalanche terrain exposure scale) to determine appropriate trips based
on the avalanche hazard.

National Parks

Kananaskis Country

4. Once a primary and possibly alternate trip has been chosen, put together a trip plan.

5. Leave word with a responsible person who will miss you if you are late (think Mom).
Put together a basic outline of the trip, number of participants, expected time of return,
and description of the vehicle at the trailhead.

6. Go through the personal and group checklist

7. Reassess avalanche hazard (check the Avalanche Bulletin and weather) just before
leaving. Gather field observations enroute to the trailhead.

8. On completion of the trip, discuss the day with all participants. Did everyone feel the
trip was conducted safely? What was done well? What needs improvement?

9. Post any useful information regarding avalanche hazard and snow conditions on the
Mountain Information Network.
Trip Planning                     Equipment Checklist: Personal
Safety Eqipment                           Clothing

• Avalanche transceiver                   • Windproof/waterproof jacket
• Probe                                   • Insulated pull over or jacket
• Shovel                                  • Base layer insulated shirt
• Helmet                                  • Long underwear
• Airbag                                  • Insulated pants
                                          • Windproof/water proof pants (can be put on without taking boots off)
Touring Equipment                         • Insulated socks
                                          • 2 pairs of insulated gloves or mittens
• Skis                                    • Large down or another warm lightweight jacket
• Skins                                   • Insulated hat or toque
• Ski crampons (spring/icy conditions)
• Ski Boots                               Misc
• Snowshoes                               • Pack
• Snowboard                               • Insulated water bottle or thermos
• Skins                                   • Sunglasses
• Boots                                   • Sunscreen
• Poles                                   • Toilet paper
• Repair parts                            • Personal medications
• Gaiters (optional)                      • Repair tools
                                          • Headlamp
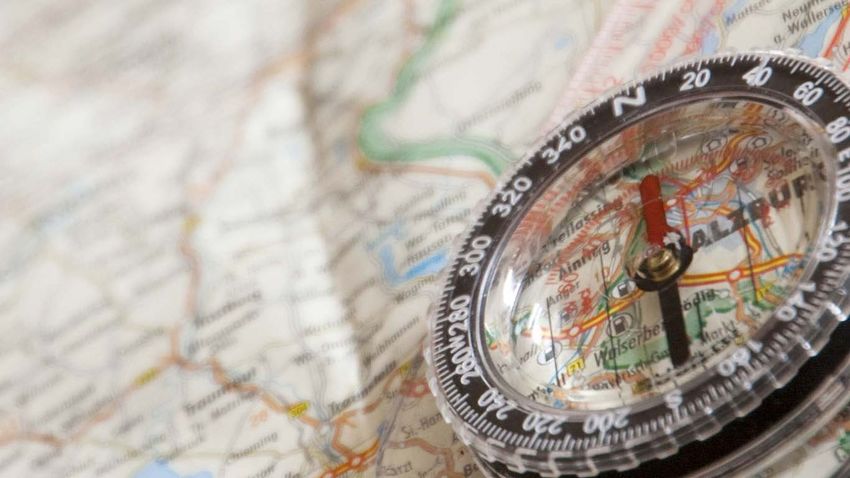
Trip Planning                                    Equipment Checklist: Group
Safety Equipment
• First aid kit
• Repair kit
• Basic shelter (tarp or bivy sack)
• Foam pad (ground insulator)
• Compact wood/snow saw
• Lighter or matches and fire starter
• Extra food

Navigation Tools
• Map
• Compass
• Altimeter
• GPS

Emergency Communication
• Cell phone
• Satellite phone
• Emergency locator beacon (spot)
• VHF radio with appropriate frequencies

Snow Study Kit
• Avaluator
• Slope meter
• 3 metre cord for cutting ECT and rutschblock columns
• Thermometer
• Crystal screen (optional)
• Loop, magnifying glass (optional)
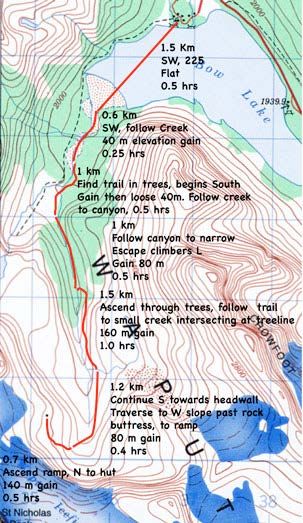
Trip Planning                                                                       Route Plan
When planning a longer or more serious backcountry trip, it is very useful to build a
proper route plan. This allows you to estimate travel times, consider alternate routes,      The estimated time to the Bow hut is about 3 1/2 to 4 hours, plus breaks. Rests, lunch
set decision points and identify turnaround points and times. Below are some starting        and regrouping could easily add up to an additional hour. When leading a group, I
points for calculating travel time. As skill and experience improve, you can modify          usually plan 5 hours to the Bow hut.
these numbers to better match actual speeds.
                                                                                             Distance and elevation information of popular trips can be found in guide books and
• Travelling on a defined tack in moderate mountain terrain on skis: 3-4 kilometres/hr       online. Less popular and more remote tours can be calculated using a topographical
                                                                                             map and/or Google Earth Pro. Google Earth Pro is now free and can be used to
• Breaking trail in challenging conditions: 2-3 kilometres/hr                                produce a route plan on satelite images, profiling the elevation changes of the trip.
                                                                                             Google Earth also allows you to overlay your GPS trip data after the tour to record and
• Poor weather/whiteout conditions: 2 kilometres/hr                                          save trips.

In addition to calculating the horizontal speed of travel, it is necessary to add time for
the elevation gain over the trip.

Elevation gains: For every 300m (1000 ft) elevation gained, add 1 hour. For example,
the ski tour from Bow Lake to the Bow hut is 8 km long, with an elevation gain of 390
metres.
Trip Planning Route Plan Calculating the travel time is the first step in building a more detailed route plan for complex tours. Most trips will require calculating multiple segments or legs of the journey. Straight shots and distinctive features help define each segment to calculate. The route plan should serve three purposes: 1. It is a set of directions to reach your destination. 2. As your skill improves, you will adjust travel times to better reflect your strength and speed. If you are travelling much slower than expected, a route plan highlights how far behind schedule and what remains to be completed. This is a solid tool to recognize the need to turn around or change objectives as needed. 3. Building a route plan requires you to think through the trip. Maps, photos, guide books and Google Earth allow you to previsualize the journey and have a mental map built into your mind. This can be a very powerful tool when exploring new areas, and compliments navigational tools and maps very well. This will also help identify areas of concern, options or special interests along the way. You can write the route plan down in a field book, on a copy of the map needed, or my favourite, a combination of both. Trip planning and navigation is a skill worthy of a separate book. Remember tht a route plan is much more than loading data into a GPS.
Trip Planning                                                                    Additional Resources
There are a number of other sites that can provide detailed information when planning
a trip. They include:

Parks Canada Mountain Safety
This site offers information for winter travel in the mountain national parks. For more
day to day information go to the Parks Canada Mountain Safety Facebook page.

Kananaskis Mountain Safety
The staff at Kananaskis Mountain Safety also have a Facebook page that they use to
provide the public with additional information beyond the public bulletin. Their winter
video updates have been well received by the public.

Avalanche Quebec
Avalanches do not exist solely in western Canada. If you are planning a trip in Quebec,
this is your go-to site for current avalanche information.

Avalanche.Org
This is the national avalanche information site for the United States, and includes
regional Avalanche Bulletins. The site also contains educational resources and tracks
notable avalanche accidents.
Trip Planning                                                                        Glacier National Park
Of all the places to go skiing, Glacier Park/Rogers Pass is perhaps the most famous. The
park’s reputation is well deserved. The challenge is that it is also home to the largest
mobile avalanche control program in the world. The deadliest avalanche in Canadian
history and probably the most famous avalanche in recent memory both occurred in
Glacier National Park.

If you love backcountry skiing, Glacier is a rite of passage,big lines and some of the
best snow in the country, but it is not a place for your first trip. There are several good
guide books for the area. Parks Canada has also produced a downloadable photo atlas
of popular tours. The atlas is contained in “Additional Resources”.

The park has a winter permit system for backcountry users. This is necessary for the
avalanche control program to keep the highway open without blasting slopes that may
have skiers on them. The winter permit system involves completing an online quiz and
then taking the results to the Discovery Centre to receive your winter permit. The park
staff have made a sincere effort to keep as much of the park open to skiers as possible.
The url for the online quizz changes annually, but the above site should point you in
the right direction.

There is also a downloadable terrain atlas for Glacier National Park. Use this
terrain atlas link to access the resource.
You can also read