UPS_SHIPMENT_LABEL VERSION - BOOSTMYSHOP - BOOSTMYSHOP DOCUMENTATION
←
→
Page content transcription
If your browser does not render page correctly, please read the page content below
ups_shipment_label
      version

     BoostMyShop

     avril 11, 2019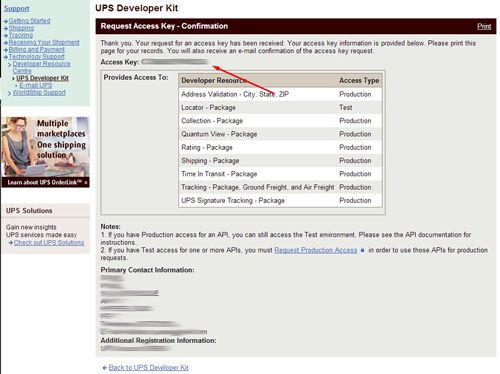
Contents
ups_shipment_label                                                             1
   1. Overview                                                                 1
       Overview                                                                1
            Features                                                           1
   2. Installation - Configuration                                             1
       2.1. Prerequisites                                                      1
       Prerequisites                                                           1
            UPS account creation                                               1
            UPS Shipper account creation                                       2
            UPS Access Key                                                     2
       2.2. Installation                                                       4
       Installation                                                            4
            Downloading module                                                 4
            Preparing magento for installation                                 4
            Uploading module                                                   4
       2.3. Configuration                                                      5
       Configuration                                                           5
            General                                                            5
            UPS Account                                                        5
            Shipper                                                            5
            Ship from                                                          5
            Packages settings                                                  5
            Developer                                                          6
   3. Usage                                                                    6
       3.1. Generating your packages                                           6
       3.2. Printing documents                                                 7
   4. Troubleshooting                                                          7
       My shipment is created without any tracking number                      7
       I can’t print UPS label for my shipment                                 7
       I use Embedded ERP for Magento but I can no longer generate shipments   7
       4.1 Errors Messages from UPS API                                        8
       4.2 Standard UPS code                                                   9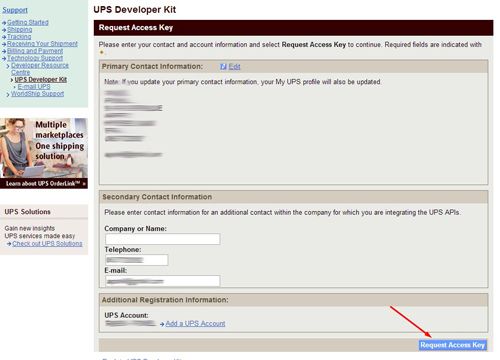
ups_shipment_label
ups_shipment_label
1. Overview
Overview
UPS Shipment is a module made to simplify use of UPS shipping services within a Magento environment
Features
• Enables generation of UPS tracking numbers and shipping labels inside Magento
• Easy to install and configure
• Lightweight memory footprint and disk space usage
• Fully transparent behavior
2. Installation - Configuration
2.1. Prerequisites
Prerequisites
Notice : Before going further into installation check that you meet the following requirements :
• Magento CE version 1.4.1.1 > 1.8.1
• UPS account and UPS shipper account (will be described further)
UPS account creation
To be able to function, UPS Shipment requires to have an active account registered at www.ups.com and select the
country and languages you wish to use
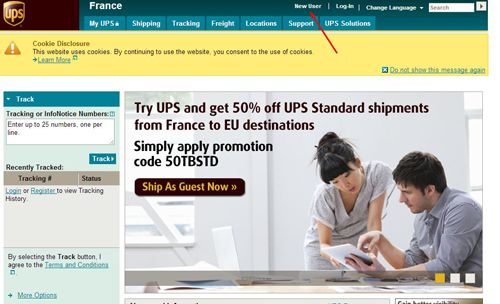
Go to www.ups.com and click on New user on top of the screen
Fill in required fields and complete your account creation
1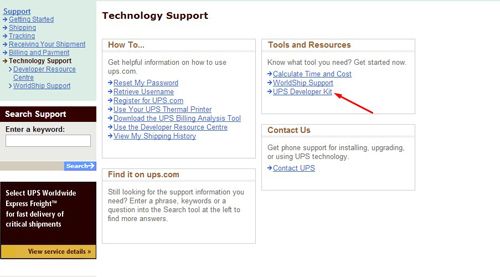
ups_shipment_label
UPS Shipper account creation
Once your UPS account is created, you need to have a UPS shipper account in order to be able to generate tracking
numbers and labels.
To open a new UPS shipper account, follow the steps below
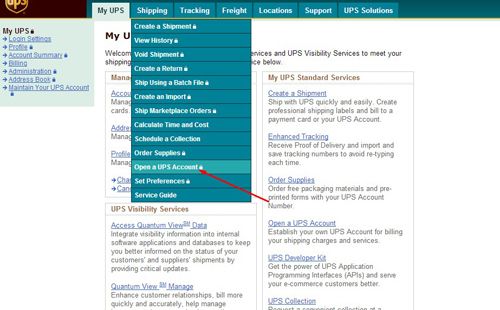
1. Log in to your UPS account, and in the main menu click on “Shipping > Open a UPS account
After few registration steps, your account will be created and you will be provided with a UPS Account Number (6
characters code)
UPS Access Key
Now, to be able to communicate with UPS API, your UPS account needs to have an Access Key
1. To generate one, once logged in your UPS account, go to “Support > Technology Support”
2. On the next page, In the “Tools and resources” part, click on UPS Developer Kit
2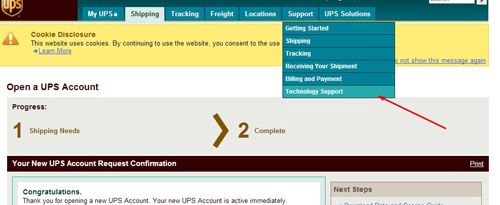
ups_shipment_label
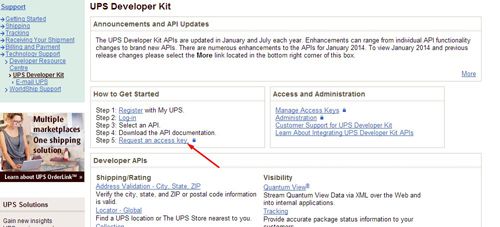
3. On the UPS Developer kit page, in the “How to get Started” part click on “Request an access key”
4. Fill in the form and click on “Request access key” on the bottom of the page
3ups_shipment_label
Your access key is now created. Check in the table that your access key as Production access type for “Shipping-
Package” developer resource. If yes, you can now use it in UPS Shipment module for Magento. Copy it somewhere
as reminder.
Note
If you lose your Access Key, you can generates another one following previous steps
2.2. Installation
Installation
Installing UPS Shipment for Magento is very easy. Simply follow the steps bellow.
Downloading module
1. Download the archive containing the module from your boostmyshop.com account
2. Once downloaded, open the archive with appropriate software (winrar, 7-Zip, etc…) and extract its content to a
convenient place on your computer.
Preparing magento for installation
1) Check that magento cache is active System > Cache management 2) Disable Magento compilation System >
Tools > Compilation 3) Disable any full page cache currently activated on your server.
Uploading module
1. Upload the content of the extracted folder to the root of your Magento installation
2. Go to your Magento back office and refresh cache
3. Log-out of Magento back office and log-in again to refresh permissions
4ups_shipment_label
Your module is now installed !
2.3. Configuration
Configuration
As UPS is very picky on informations sent to its API, a good configuration of Magento and your UPS Shipment for
Magento module is very important to avoid troubles
We will not treat of Magento UPS shipping method configuration here. For more information, check on Magento
online knowledge database
You will be able to find UPS Shipment configuration in : System > Configuration > Sales > UPS Shipment
General
In this tab, you will be able to find generic options that impacts on module behavior.
• Enabled : Set this to yes to enable communication between your magento installation and UPS shipping
services
• Duties and taxes billing method : Use this option to define the way that duties and taxes will be billed.
• Enable address checking : Use this to make UPS check addresses that will be used for your shipments.
Notice : Take care that if an address is not validated by UPS, no shipping label or tracking number will be
created.
• Shipment PDF overloading : Use this to rewrite default magento shipment PDF with UPS Shipment for
Magento’s one
• Force UPS usage on selected shipping methods : Use this box to select shipping methods which will be
used with UPS. When the order shipping method is NOT ups, then our extension can not know the exact
method you want to use. So it will apply this default method if you dont select another one from the shipment
form.
• UPS default method to force shipments with : The default UPS shipping method that will be used to force
other shipping methods.
• Origin of shipments : The origin of the shipments that you will send. This is used to define available shipping
methods when forcing UPS method within shipment’s creation.
UPS Account
In this tab, you will have to enter informations concerning your UPS account and access key.
Notice : Take note that each of those fields are required in order for the module to work properly
Shipper
This section will allow you to enter informations about shipper.
Notice : Informations filled here must correspond with the ones that you used to create your UPS account.
Ship from
In this tab, you will be able to enter information about the location from where your shipments will be sent.
Notice : Informations here are required. The country you choose must correspond with the one you used to create
your UPS account.
Packages settings
Use this tab settings to specify your packages default characteristics.
• Default container : Default kind of container used for your packages
53. Usage
• Weight unit : Specify your packages weight unit.
• Length unit : Specify your packages lenght unit.
• Default package description : Set the default description of generated packages.
• Default height : Set the default height of generated packages.
• Default width : Set the default width of generated packages.
• Default length : Set the default length of generated packages.
• Add shipment reference : Add shipment reference number to generated packages. To disable if you get
“Shipment/ReferenceNumber is not allowed for this shipment” error message
• Limit zipcode to 5 digits : Limit packages postcode maximum lenght to 5 digits
• Replace phone number : Replace by a default one all incorrect customers phone numbers.
• Default phone number : Default phone number to apply for previous option.
Developer
Options in this tab are used by developers, or in case of troubles with UPS Shipments for Magento extension.
• Test environment : This options allows you to specify if you want to use or not UPS CIE (testing) webservice.
If this is set to “Yes”, no shipment will be created at UPS, but you will be provided with tracking numbers and
labels to test installation of the module.
• Purge label olders than X days : This values is used to define the frequency to which UPS lables will be
wiped from hard drive.
• Activate extension logging : Log all UPS API requests and responses
• Display XML : Display XML files instead of sending them to UPS
3. Usage
3.1. Generating your packages
Once your order is created (by a client on front or by an admin), select it in back office by going in
Seealso
Sales > Orders > Your order
Follow the steps you are used to when validating and invoicing an order
Then, click on the “Ship” button on top right corner of the screen
You are now in the shipment’s creation screen.
Informations about UPS shipment must be filled in the “UPS Shipment” box.
In this box, fill in all the informations needed and then, click on “Add all products” to add the products to the
shipment’s package.
64. Troubleshooting
If you have chosen to force the current shipping method with an UPS one, you will be asked to select it here or use
the default one.
Note
Notice : Check that the UPS methods that you want to use is available between shipment’s origin country and
destination
Once your shipment is created, it should be provided with a UPS tracking number and label.
3.2. Printing documents
Once your shipment is created you are now able to print specific documents to UPS. Go to
Seealso
Sales > Shipments > Your shipment
In the “Shipping and tracking information” box, you should see the tracking number of your shipment
To print UPS documents, you can use the buttons on top right corner of the screen. Use “Print” to print shipment’s
packing slip, or “Print UPS label” to print only the shipping label
4. Troubleshooting
My shipment is created without any tracking number
This issue can be caused by many situations
• Check that UPS Shipment for Magento and UPS shipping method configurations are OK
• Check that UPS shipping method currently selected for your order is available for use between shipper’s
country and receiver country. Correspondances for UPS shipping methods can be found on this page
I can’t print UPS label for my shipment
Check that there is not another extension that already overloads packing slips PDF printings.
Note
Magento Extension Conflict could help resolve conflicts.
I use Embedded ERP for Magento but I can no longer generate shipments
As UPS Shipments for Magento is not yet compatible with ERP, we recommend you to disable shipments generation
within it by setting the following option to “No”
System > Configuration > ERP - Order preparation > Create shipment and invoices Options tab > Create
shipments
SOAP-ERROR: Encoding: object has no ‘Code’ property”
This error happens when the shipment request doesnt include a service code : services codes are “standard”,
“ground”, “next day air…” : this may differ depending of your country and UPS settings.
Most of the time, that error happens when parameter
System > Configuration > UPS Shipment > General > UPS default method to force shipments with
74. Troubleshooting
is not set.
4.1 Errors Messages from UPS API
Invalid Access License number: Need to make sure the order is not shipping UPS Freight and this is determined
by the Ship To Country.
Failure:Missing or invalid Shipper country code: The Order Header ship from or the Facility address does not
contain a Country Code.
Failure:Missing or invalid shipper StateProvinceCode: The Order Header ship from or the Facility address does
not contain a Ship From State Province.
Failure:Missing/Invalid Shipper PostalCode. Postal Code is required. Please use the Format ##### or
######### Where # represents a single number: The Order Header ship from or the Facility address does not
contain a Ship From Postal Code.
Failure:Missing or invalid Shipper AttentionName: The Order Header ship from or the Facility address does not
contain a Ship From Attention.
Missing or Invalid Payer Country Code: Freight Bill to Country is not valid or missing.
Failure:Invalid Package Reference Value: Make sure the reference numbers that print on the UPS label are the
correct length. If the container contains more than one item, it could be trying to print all items on the label, which it
can’t. Contact support. Or the LPN’s contain a invalid character like a semicolon.
Missing or Invalid Shipper Phone Number: VERBAL_CONFIRMATION_PHONE_NUMBER is null.
Cannot find printer for user support report ShippingDocuments: Make sure the user has a printer assignment
with a report name of ShippingDocuments.
InvoiceLineTotal MonetaryValue must be greater than 0: Must have a dollar value for Unit Price on the item.
Invalid or missing product origin country code for product number xx: Must populate Origin Country on item.
Missing or invalid ship to state province code: Must populate ship to Ship to State Province field on shipment.
Missing or invalid ship to company name.: Ship To Attention and Ship To Name cannot be longer than 30
characters.
Missing or invalid shipper phone number: Must populate ship from phone number on shipment.
Scanned package not belonging to same trip: Shipping service configuration does not match trip’s freight type.
Invalid combination of city, state, and/or zip: Verify the weight is being passed correctly.
Failure:Missing or invalid shipper number: The UPS account number could be expired or not valid. Or the
account number being passed to UPS in the shipping processes is incorrect. Deposco Support will be able to help
determine what account number is being sent to UPS.
Failure: The first email address used for quantum view notification-Ship Notification is missing or contains
invalid c…: The context object parameter table needs to contain the email in which Deposco support will need to
adjust. The email addresses need to be populated in order to send the email on the trading partner.
Missing or invalid ship from company name: The context object parameter table will define where the value is
being pulled from. Once found, then either update the context or update the data(e.g. Facility).
Invalid or missing sold to attention name. Valid value is 1 to 35 alphanumeric: The Ship To Attention Field is
not populated on the shipment, a special character is existing, or there are too many characters in the field.
Failure: a single billing option is required per shipment: The Freight Terms Type is not populated on the order.
A payer is required when specifying a shipment charge.: The Freight Terms Type is not populated on the order.
Failure: The maximum per package weight for the selected service from the selected country is 150.00
pounds.: UPS Ground has a weight limit of 150 lbs per package for any packages that are shipped within the US.
The XML document is well formed but the document is not valid: This is generally a UPS ground error. This
occurs when the Freight Terms Type does not match with the Ship Via. For UPS Ground, the freight terms type
should be either Prepaid or Collect. Or if its Third Party, make sure Bill To Postal Code, Freight Bill To Account, and
Freight Bill To County are populated.
84. Troubleshooting
Invalid product description for product number 1. Product description should be present at least once. Valid
range is 0 to 35 alphanumeric: Make sure the items product code/name is populated with data.
Invalid or missing product origin country code for product number 1: Make sure the items origin country is
populated.
Missing or invalid service code: Make sure the shipping service ship method code is correct or existing.
The requested service is invalid for the shipment origin: Make sure the order is being shipped from is valid to
ship to destination.
The requested service is unavailable between the selected locations: Make sure the order is being shipped from
is a valid address to ship to the destination address with the selected shipping method.
Missing/Invalid PostalCode of payment account: This occurs if a user is trying to ship UPS using a Freight Terms
Type of Collect. Double check the account number and associated postal code. If the problem persists, then contact
the owner of the UPS Account and find out the address they have on file with UPS. If the error still persists, then their
UPS account rep should be contacted to ensure that the account is enabled to allow for 3rd party and recipient
billing.
The format of the first Email Address entered for Quantum View Notification - Ship Notification is invalid:
This occurs because there is a invalid Contact email on trading partner.
Package/ReferenceNumber is not allowed for this shipment.: Package and shipment reference text is only
allowed for shipments within the USA and within Puerto Rico. If it happend please set the option System >
Configuration > Sales > UPS Shipment > package settings > Add shipment reference : NO
4.2 Standard UPS code
CODE DESCRIPTION
1DM Next Day Air Early AM
1DML Next Day Air Early AM Letter
1DA Next Day Air
1DAL Next Day Air Letter
1DAPI Next Day Air Intra (Puerto Rico)
1DP Next Day Air Saver
1DPL Next Day Air Saver Letter
2DM 2nd Day Air AM
2DML 2nd Day Air AM Letter
2DA 2nd Day Air
2DAL 2nd Day Air Letter
3DS 3 Day Select
GND Ground
GNDCOM Ground Commercial
GNDRES Ground Residential
STD Canada Standard
XPR Worldwide Express
WXS Worldwide Express Saver
XPRL Worldwide Express Letter
XDM Worldwide Express Plus
XDML Worldwide Express Plus Letter
XPD Worldwide Expedited
9You can also read