WF720
Wireless Home Phone
   User Manual
←
→
Page content transcription
If your browser does not render page correctly, please read the page content below
WF720 Wireless Home Phone User Manual
Content
Getting to Know Your Device......................................... 3
    Appearance......................................................................................3
    LED Indicator....................................................................................4

Device Installation........................................................... 5
    Before You Begin..............................................................................5
    Installing the SIM Card and the Battery............................................5
    Installing the Power Adapter.............................................................7
    Connecting the Device to a Phone...................................................7
    Turning on Your Device.....................................................................8
    Checking the Wireless Signal...........................................................8

Using Your Device........................................................... 9
    Making Calls.....................................................................................9
    Receiving Calls.................................................................................9
    Voice Mail.........................................................................................9
    Call Waiting.....................................................................................10
    Call Forwarding...............................................................................10
        Activating Call Forwarding........................................................10
        Deactivating Call Forwarding.................................................... 11
        Calling Line Identification Restriction........................................ 11
    3 - Way Calling................................................................................ 11
    Adjusting Volume............................................................................ 11

PIN Lock......................................................................... 12
Troubleshooting............................................................ 13
Specification.................................................................. 14
Safety Notes................................................................... 15
IC Notice......................................................................... 17
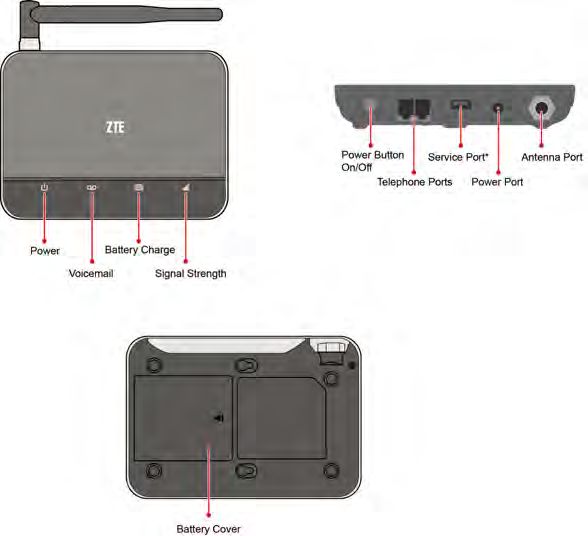
Getting to Know Your Device
Appearance

NOTE:
Service Port is designed for diagnostic purposes only, not for customer
use. Never place a USB-based device into the USB port of the device
under any circumstance. Doing so may damage the device and negate
its warranty.
LED Indicator
The table below describes possible states for each of the
       Icon               Indicator                    Status
                    Green Solid           Strong
  Signal Strength   Yellow Solid          Week
                    Red Solid             No service
                    Red Blinking          Checking SIM card
                    Green Solid           High (Charging)
                    Green Blinking        High (Using the battery)
                    Yellow Solid          Average (Charging)
  Battery Charge
                    Yellow Blinking       Average (Using the battery)
                    Red Solid             Low (Charging)
                    Red Blinking          Low (Using battery)
                    Off                   No battery connected
    Voice Mail      Green Blinking        New message waiting

                    Off                   No new message

      Power         Solid Green           AC power connected

                    Off                   AC power disconnected
Device Installation
Before You Begin
Your device works exclusively with the ROGERS cellular network and
DOES NOT use your home’s phone wall jacks.
Your device should be located:
Where you have a strong cellular signal from a cell tower, typically
near a window or outside wall.
Near an electrical wall outlet.
Installing the SIM Card and the Battery
1. Remove the cover from the battery compartment.
2. Insert the SIM card in the SIM card slot.
3. Insert the battery connection cable into the battery port.
4. Place the battery in the battery slot and replace the battery cover.
NOTES:
The system will stop charging the battery when the ambient tem-
perature is outside of the temperature range allowed for charging
(0 °C ~ 55 °C).
When the power adapter is connected, the battery will automatically
be charged.
When fully charged, the battery will automatically stop charging.
Remove the battery if the device will be unused for a long period.
The battery is intended for backup purposes only (in the event of a
power failure).
The device takes about 5 hours to charge fully. The charge time
may be impacted by environmental factors.
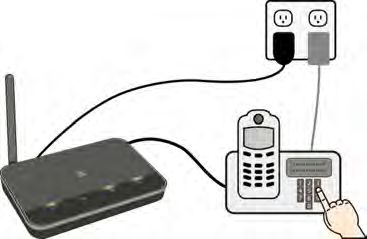
Installing the Power Adapter
1. Plug the power adapter into an electrical wall outlet.
2. Insert the small end of the power adapter into the Power port on the
back of your device.
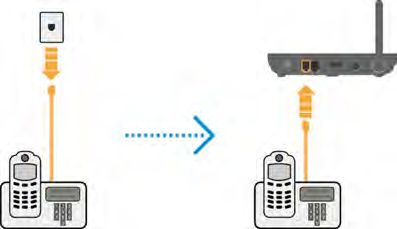
Connecting the Device to a Phone
1. Unplug your phone from the wall jack.
2. Plug your phone into the “Phone 1”port on the WF720, using your
existing phone cable or included phone cable.
IMPORTANT: DO NOT plug the WF720 into a wall jack.
NOTE:
The “Phone 2” port can be used to connect an additional phone.
This port uses the same telephone number as the “Phone 1” port.
Put the device at least 2.5 meters away from the connected phone,
TV sets, radio and other electronic devices to avoid electromagnetic
interference.
Turning on Your Device
Press and hold the power button about 8 seconds until the signal
strength light comes on.
Checking the Wireless Signal
1. Raise antenna to an upright position.
2. Confirm signal strength light is green for optimal performance.
NOTE: If there is a yellow light, please change the installation location.
Using Your Device
Making Calls
1. Before making a call, make sure that the wireless signal is strong.
2. Lift the handset of your home phone, enter the telephone number
   (0~9*#). The number will be dialed automatically.
3. When your call is finished, hang up your home phone or return the
   phone to its base to ensure that you can receive calls.

Receiving Calls
When the home phone rings, lift the handset or press Hands-Free to
answer the incoming call.

Voice Mail
The voice mail indicator (      ) will blink green when you have new
voice mail messages.
1. Lift the handset of your home phone and listen for the dial tone.
2. Press 1 to access your voice mail and enter your password.
3. Follow the system prompts to listen to and manage your voice
    mails.
Call Waiting
If you subscribe the call waiting service with your local telephone ser-
vice provider, you will hear a beep tone if someone calls while you are
already on a call. Press FLASH on the handset to put your current
call on hold and take the new call. You can press FLASH any time to
switch back and forth between calls.
Press the service code on the dial pad of your home phone to enable
or disable the call waiting function per instructions below.
To enable this feature:
1. Pick up the handset and listen for the dial tone.
2. Dial *43# to enable this function and you will hear a confirmation
    tone.
3. Hang up your home phone or return the phone to its base.
To disable this feature:
1. Pick up the handset and listen for the dial tone.
2. Dial #43# to disable this function and you will hear a confirmation
   tone.
3. Hang up your home phone or return the phone to its base.

Call Forwarding
If you subscribe to the Call Forwarding feature, you can forward the
calls to another phone number. Your home phone will not ring until you
deactivate the service.
Activating Call Forwarding
1. Pick up the handset and listen for the dial tone.
2. Dial *21*phone number# to enable this function and you will hear
   a confirmation tone.
Tip: The phone number is that you want the calls to be forwarded to (e.g.
*21*1234567890#).
3. Hang up your home phone or return the phone to its base.

                                   10
Deactivating Call Forwarding
1. Pick up the handset and listen for the dial tone.
2. Dial #21# to disable this function and you will hear a confirmation
tone.
3. Hang up your home phone or return the phone to its base.
Calling Line Identification Restriction
1. If you have to call line ID feature you can restrict the display of your
number by dialing #33#phone number
3 - Way Calling
If you subscribe to 3-Way Calling feature, follow these steps below.
1. When you hear a call waiting tone, press flash to answer and place
current call on hold.
2. Press flash to swap between the two calls
3. Press 3 and flash to conference both calls together.
Adjusting Volume
During a call, press ** or ## in 1 second to enter the volume adjusting
mode, and then press * to decrease volume or press # to increase vol-
ume. Press other keys or do nothing for 5 seconds will exit this mode.
Four volume levels are available (level 1 to level 4), and the default
level is 4.
NOTE:
The device and an external phone usually work together, this method
is only change the volume of the device (of course the volume of the
whole system will be changed at the same time), and you can also
change the volume of the external phone (if supported).
11PIN Lock
Refer to the following table to check your SIM card status, and perform
the corresponding action.
SIM Status Light Indicator Action
Signal indictor: No colour;
Enter PIN code and
PIN Locked Battery Indicator: Green
then the “ #” Key.
blinking
Enter PUK code, the
Signal indictor: No colour; “*” Key, New PIN, the
PUK locked Battery Indicator: Yellow “*” Key again, New
blinking PIN again, and then
the “#” Key.
Signal indictor: No colour;
SIM card perma- Contact your service
Battery Indicator: Red
nently locked provider.
blinking
NOTE:
When you enter wrong PIN code for 3 times, the SIM card will be PUK
locked; When you enter wrong PUK code for 10 times, the SIM card
will be permanently locked.
12Troubleshooting
Fault Solution
Check the antenna connection or con-
No dialing tone after
nection between the device and tele-
off-hook.
phone.
Phone is buzzing after The telephone may be not compatible
off-hook. with the device, change another one.
Phone alerts or gives other Make sure that SIM card is inserted
prompt sounds after properly, and valid (consult with the
off-hook. network carrier).
Make sure that the device is at least
2.5 meters away from other electronic
You hear noise after devices.
off-hook. If the device runs without antenna, and
the signal strength indicator is Yellow
or Red, install the antenna.
The system stops sending
Hook on, and then hook off again to
dialing tone 30 seconds after
make a call.
off-hook.
Incoming call display is Make sure the phone supports CLIP
abnormal. function.
No response when power on Power off the device, wait for seconds,
the device. and re-power on.
Refer to the User Manual firstly, and
then check whether the parts, such as
Other abnormal
power supply adapter and antenna,
phenomenon.
etc. are connected properly or not. If
there is no problem, restart the device.
13Specification
Dimension(W*D*H) 160 mm x 111 mm x 29.5 mm
Weight 600 g (including battery)
2.5 hours (GSM)
Talk Time*
1.5 hours (WCDMA)
Standby Time* 36 hours
Battery Capacity 1500 mAh
NOTE:
The value of the talk time or standby time varies with the actual envi-
ronment.
14Safety Notes
Keep the device and the external antenna at least 20 cm from
persons.
Disconnect external power supply and do not use the device during
a thunderstorm.
Some electronic devices are susceptible to electromagnetic inter-
ference sent by the device if inadequately shielded; Try to use the
device at least 2.5 meters away from TV sets, radio and other auto-
mated office equipment so as to avoid electromagnetic interference.
Turn off the device in the hospital.
Do not use the device on board and aircrafts.
Operating of the device may interfere with medical devices like
hearing aids and pacemakers. Consult a physician or the manufac-
turer of the medical device before using.
Be aware of the usage limitation when using the device at places
such as oil warehouses or chemical factories, where there are
explosive gases or explosive products being processed, because
even if your terminal is in idle state, it still transmits radio frequency
(RF) energy.
Do not touch the antenna while calling.
Keep the antenna free from obstructions and position the antenna
straight up. This will ensure best call quality.
Please put the device on the safe place. The device may cause in-
jury if used as a toy by children.
Do not put other things on the terminal to avoid overlaying radiator.
15 Please use original accessories or accessories that are approved
by vendor. Using any unapproved accessories may affect your de-
vice’s performance, damage your terminal or even cause danger
to your body and violate related national regulations about telecom
terminals.
As the device can produce electromagnetic field, do not place it
near magnetic items such as computer disks.
Do not expose the device to direct sunlight or store it in hot areas.
High temperatures can shorten the life of electronic devices.
Prevent liquid from leaking into the device.
Do not attempt to disassemble the device by yourself. Non-expert
handling of the device may cause body injury or device damage.
Keep length of line between the device and telephone at least 0.5
meters.
Do not unplug the connector of the data cable away from the
phone, and not install and remove SIM card when the power is on.
16IC Notice
This complies with Industry Canada license-exempt RSS standard(s).
Operation is subject to the following two conditions:
(1) this may not cause interference, and
(2) this must accept any interference, including interference that may
cause undesired operation of the .
Le présent appareil est conforme aux CNR d'Industrie Canada appli-
cables aux appareils radio exempts de licence. L'exploitation est auto-
risée aux deux conditions suivantes:
(1) l'appareil ne doit pas produire de brouillage, et
(2) l'utilisateur de l'appareil doit accepter tout brouillage radioélectrique
subi, même si le brouillage est susceptible d'en
This Class B digital apparatus complies with Canadian ICES-003.
Cet appareil numérique de la classe B est conforme à la norme
NMB-003 du Canada.
IC: 5200A-WF720
17You can also read