HPRL High Power Ring Light - Operating manual - ENDOTEST
←
→
Page content transcription
If your browser does not render page correctly, please read the page content below
Operating manual

High Power Ring Light
       HPRL

          9 | 28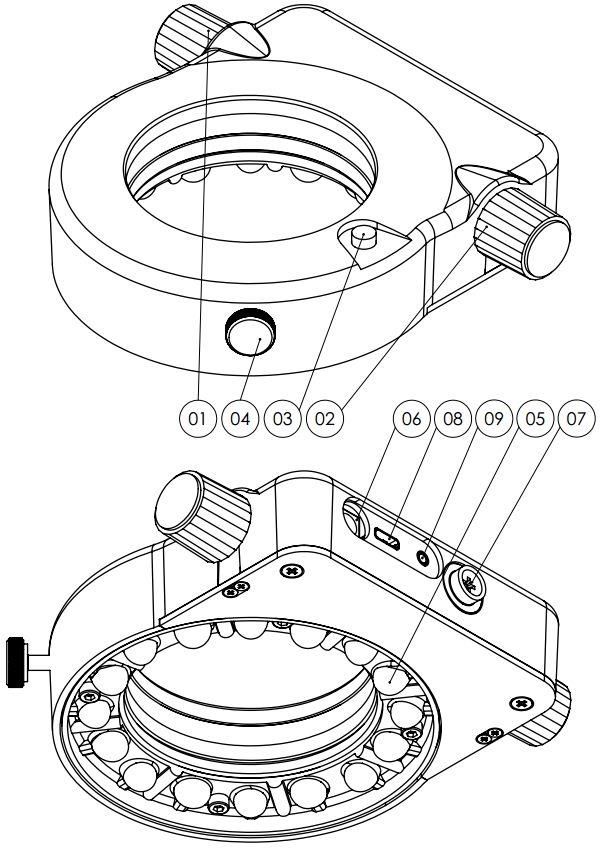
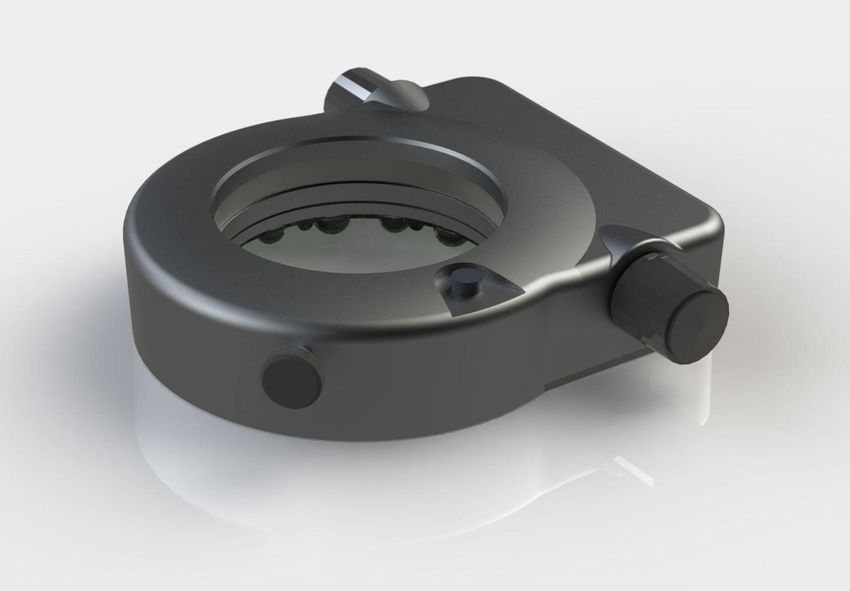
1 ........... Left rotary encoder (segment selection)
2 ........... Right rotary encoder (brightness control)
3 ........... On/off switch
4 ........... Clamping screw for fastening
5 ........... Ring lens
6 ........... DC socket for power supply
7 ........... ESD connector
8 ........... USB type C port (optional)
9 ........... Socket for foot switch (optional)

                                                 10 | 28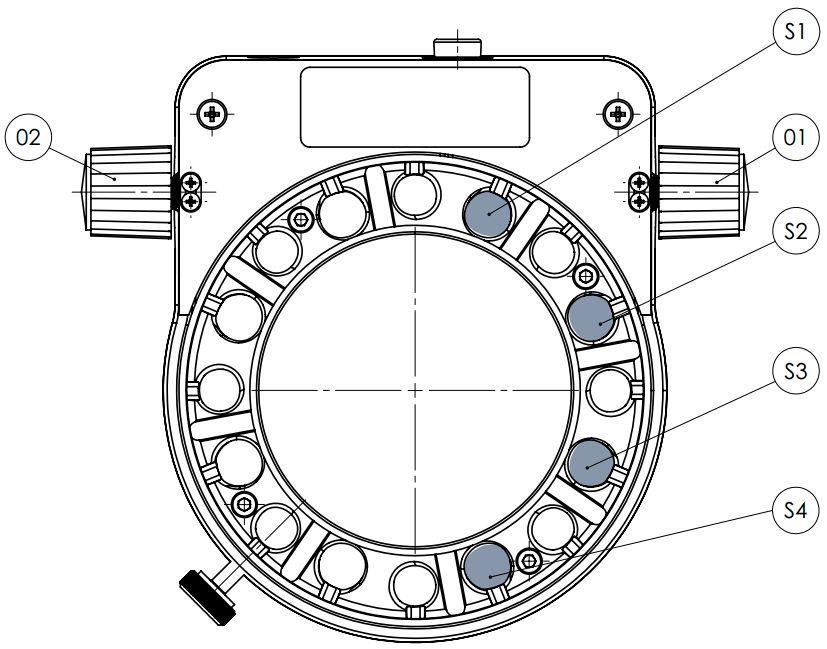
Designated use
This product has been developed and is intended for illumination purposes in the sector of stereo
microscopy for industry and laboratory use. The applicable standards and guidelines are listed in the
Chapter "Technical data".

This product is attached to the microscope lens and illuminates the underlying objects. A lens focuses
the light to the desired working distance.

We would like to say thank you for choosing to purchase this high-quality product and wish you lots of
success whilst using it.

Instructions for your safety
The following danger symbols are used in this operating manual:

        Warning of a danger area! Caution, please refer to documentation!

        Warning of dangerous electrical voltage!

        Warning of hot surfaces!

        ATTENTION: Dangerous optical radiation! Do not look into the light!

This chapter deals with safety instructions that must be complied with when using the device. In your
own interests, please comply with all safety instructions that are listed on the device and in this manual.

       The operating instructions must be read before using the device. It is recommended to store the
operating instructions close to the device to ensure that it can be read immediately by the user in case
of need. The user must inform a responsible person or the manufacturer immediately if there are any
changes in the operating behaviour or to any safety-relevant device components. The operator is
responsible for the correct use of the product and for the training of the user. The generally application
legal national safety and accident prevention regulations must be complied with in addition to the
supplementary user guidelines of the operator. The manufacturer is not liable for any damages due to
incorrect operation or non-compliance with the danger instructions!

       Never open the device or its components, unless specifically indicated in this manual as you
could otherwise risk physical injury or damage. If necessary, contact your retailer. Technical
modifications to the device are not permitted under any circumstances and repairs should only be carried
out by the manufacturer or authorised service points. Only original spare parts must be used. Only use
original spare parts approved by the manufacturer for this product. Operate this product only with the
supplied power supply adapter and place the adapter so that it can be quickly disconnected from the
mains.

Do not operate the device in the vicinity of water or in rooms with extreme humidity. Do not spill any
liquids onto the device and do not push any foreign bodies into the product, you could be electrocuted
or cause damage to the device. Do not position any flammable materials in the direct vicinity of the
device. The device must be kept away from all sources of heat and is not approved for use in explosion
hazard areas! The device may only be used in closed rooms.

                                                 11 | 28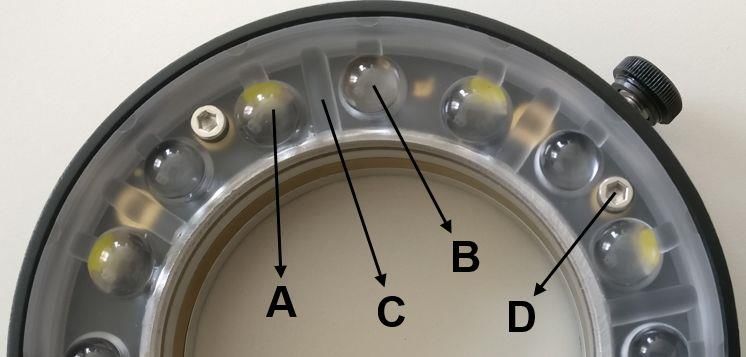
Never allow the device to operate unsupervised! The device may only be operated with the specified
supply voltage and the power supply adapter included in the scope of delivery. Only use as much
brightness as required for working. A higher brightness setting can irritate the eyes, stresses the object
and also reduces the service life of the device.

       Always keep the ventilation openings of the device free to avoid causing any overheating. Ensure
that the free air circulation is not hindered by anything and that there is a sufficiently large gap between
the ventilation openings and other objects. Keep the environment of the device clean (above all, dust
and lint-free), so that any device fans cannot suck in any dirt.

      ATTENTION: dangerous optical radiation, do not look into the light, can injure your eyes

The device emits light with a high intensity! Never look directly into the lamp or any light-emitting device
openings as you will risk injury to the eyes. The emitted light is absorbed by materials and converted
into heat. Never cover the light emission aperture of the device with the hand, any other parts of the
body or any materials. To illuminate objects correctly, always ensure there is a distance appropriate to
avoid thermal damage or fire.

Before cleaning, disconnect the product from the mains and allow it to cool for at least 15 minutes. Use
a dry cloth for cleaning or a cloth moistened with water or a 5% ethyl or isopropyl alcohol solution, but
do not use combustible or flammable liquids under any circumstances. Allow the device to dry thoroughly
before use. If any liquid penetrates the device accidentally, pull the plug immediately and bring the
device to a service point. If dust has collected on the ventilation openings, it must be removed carefully.
Excessively intensive cleaning or the use of solutions that are too concentrated can lead to scratches,
discoloration or other damage to the surfaces of the device.

                                                  12 | 28
Operation
Unpack this product and remove any protective film. Save the packaging.
Carefully read the complete operating instructions and observe the safety instructions under all
circumstances!
Attention: If the encoders do not behave as described here, then perhaps the left-handed mode
has been activated as described in the "Settings" chapter (S3), whereby the functions of the two
encoders are interchanged. If at any point you are not sure, you can perform a factory reset, which is
also described in the "Settings" chapter.
Use only the supplied power supply adapter and check if it is suitable for your voltage supply.
Assembly of the ring lens
Select the working distance suitable for your application by placing the lenses A or B above the LEDs.
Lense A is factory preset.
Lense A (left of divider C) for working distances between 45-130 mm.
Lense B (right of divider C) for working distances between 80-300 mm.
The areas overlap, whereby from an 80 mm working distance the B lense produces more brightness.
Observe all safety instructions before moving the ring lens. Disconnect the ring light from the
mains. Make sure the LEDs cannot illuminate.
Loosen the 4 D screws using the SW2.5 Allen key and lift the ring lens gently. Do not touch any LEDs
or other electronic components. Now place the desired lenses A or B over the LEDs and tighten the 4
D screws carefully again. Make sure that the screws are not tightened too tightly.
Simply rotating the ring lens without lifting it can destroy the LEDs.
ESD workplace
When working with ESD-sensitive components, an appropriate cable must be connected to the ESD
socket (7). This serves to compensate the workplace potential.
13 | 28On/off switch
Select the required country adapter and plug the supplied power supply adapter into the mains outlet.
Plug the supplied adapter to the socket (6) to switch on the power supply. The lamp can be switched on
and off by briefly pressing the button (3).
Brightness control
The brightness can be changed by turning the right encoder (2). By briefly pressing the same encoder,
a previously stored brightness value can be recalled. To set the memory value, first set the desired
brightness and the illumination pattern and then press the encoder (2) for approx. 2 seconds until the
LEDs flash briefly.
Segment selection
Press the left encoder (1) to select the following LED patterns:
Full circle | Semicircle | Quarter circle | Single LED | 2 Quarter circles opposite
Rotating the same encoder (1) rotates the selected LED light image in 1/8 th circular steps. It can be
rotated in both directions.
Autorotation
If a luminous image is selected, an approx. 2 second long press on the encoder (1) starts the
autorotation. The rotation speed can be changed in this mode by turning the encoder (1). The
autorotation is terminated by briefly pressing (1) once.
Mounting and using the polarising filter (optional)
To attach polarisation filters or diffusers, screw the corresponding accessories from below into the thread
of the ring light. Make sure that the accessories are not screwed too tightly. Check that the polarising
filter cannot come loose from the ring light from twisting the analyser.
USB (optional)
Optional USB type C is available for remote control and integration into systems. For the commands
please see the attached document.
Foot switch (optional)
A connection for a footswitch is available as an option. The lamp can be switched on and off with this.
14 | 28Settings
You can enter the setup menu by pressing both encoders (1 + 2) approx. 4 seconds long.
There are 4 setting points for which one LED (S1-S4) is available for each. By turning the encoder (1),
you can control the desired setting point. Pressing the same encoder (1) changes the value of this
setting. The set value is indicated by the flashing or lighting of the respective LED.
Setup LED constantly lit (default) LED flashes
S1 Safety mode: Light OFF after Connector strip mode: Light ON after
connecting to the power supply. After connecting to the power supply. Automatic
power on the last lighting scenario start with the saved lighting scenario
follows
S2 Logarithmic brightness control Linear brightness control from 1-100%
S3 Brightness encoder right and segment Brightness encoder left and segment
selection left selection right
S4 Brightness control by analogue current Brightness control over the duty factor of a
setting PWM signal
The default settings are defined in the first column ("LED constantly lit")
By prolonged pressing of both encoders (1 + 2) the settings are saved and the setup menu is exited.
Factory reset
To do so, pull the power supply (6) and then press and hold the on/off switch (3) while you plug the
power supply back in. Press and hold the on/off switch until the LEDs flash briefly several times.
15 | 28Technical data
HPRL
Dimensions (WxDxH) approx. 107x128x31mm without protruding parts
Weight approx. 300g (without power supply adapter and accessories)
Illumination source 8 high power LEDs
Colour temperature Approx. 5800 K
Centre brightness approx. 210kLux at 50mm working distance for lenses A
approx. 170kLux at 90mm working distance for lenses B
Lifespan L70 approx. 25,000 hrs.
Cooling passive (without fan)
Power supply 24VDC | 300 mA
Power consumption approx.8 Watt
Operating conditions 10-40°C, max 75% non-condensing humidity, max. 2000 m altitude
800-1060hPa
Storage in the packaging 10-40°C, max 75% relative humidity at 35° non-condensing
humidity
Transport in the packaging -40 to +70°C
Rear connections DC socket
ESD port
USB type C (optional)
2,5mm stereo jack for footswitch (optional)
Mounting Clamping to lens diameter 66 mm
Approval (CE) EMC Directive 2014/30/EC
LVD 2014/35/EC (Low Voltage Directive for power supply adapters)
RoHS 2011/65/EC (Restriction of Hazardous Substances Directive)
Risk group 0 according to EN62471 (exempt, no risk)
Disposal
Do not dispose of the product in household waste, take it to the appropriate collection and disposal
points. Comply with the national and local disposal guidelines and laws. Please help to keep our
environment clean.
The development of this product is subject to continuous development. Although we try to keep this
operating manual up to date, we reserve the right to change device data at any time without prior notice.
The operating manual is produced subject to errors and printing errors.
16 | 28You can also read