5-step guide to checking ventilation rates in classrooms - BUILDING FOR HEALTH - Schools For ...
←
→
Page content transcription
If your browser does not render page correctly, please read the page content below

BUILDING FOR HEALTH

 5-step guide to checking ventilation
 rates in classrooms
 Joseph Allen, Jack Spengler, Emily Jones, Jose Cedeno-Laurent August, 2020
 Harvard Healthy Buildings program | www.ForHealth.org
BUILDING FOR HEALTH

 5 Step Guide to Measuring Ventilation
 Rates in Classrooms
 1. Measure the Classroom Dimensions
 2. Perform Preliminary Audio and Visual Checks
 3. Measure or Estimate Outdoor Air Ventilation Rate (using one of four
 methods)
 4. Compare Results to Targets
 5. If Needed, Consider Supplemental Air cleaning Strategies to Meet Targets

 The examples at the end of this guide show how to follow these steps to
 meet ventilation targets in different scenarios.
 © 2020 | Harvard Healthy Buildings Program | 1

BUILDING FOR HEALTH

 Step 0

 What You’ll Need

 © 2020 | Harvard Healthy Buildings Program | 2
BUILDING FOR HEALTH Materials Needed Tape measure/ laser measure Paper or cardboard and tape to cover unit ventilator or diffusers Additional materials listed below depending on which option is selected to accomplish Step 3 For Step 3, Option A or B (Measuring outdoor air ventilation with a balometer) Balometer* with appropriately shaped hoods for your school’s systems (e.g. https://tsi.com/products/ventilation-test-instruments/alnor/alnor-capture-hoods/alnor- balometer-capture-hood-ebt731/?gclid=Cj0KCQjwhIP6BRCMARIsALu9LfkRMQl0LE9GDZvDC49MUbEbuomuj7Bl8MJR7XQKgB-PPO1IDsA5DnIaAt0yEALw_wcB) For Step 3, Option C or D (Estimating outdoor air ventilation from CO2 concentration) Carbon dioxide monitor*, ** (e.g. CO2meter.com, www.getawair.com, Onsetcomp.com, https://aranet.com) For Step 3, Option C (Estimating outdoor air ventilation from CO2 concentration) Cooler to transport dry ice Dry ice (~10 pounds will work for approx. five 1000 ft2 classrooms) At least two fans per room to enhance mixing Carbon dioxide (CO2) is often used as an indirect measure of ventilation. When a building is occupied, the CO2 concentrations indoors are elevated by CO2 exhaled by occupants. When occupants leave and no other CO2 sources are present (e.g. people, combustion sources, etc.), the rate of decay of the CO2 concentration can be used to estimate how fast air from outdoors (at approximately 400 ppm CO2) replaces the indoor volume of air. In the absence of occupants, dry ice (the solid form of carbon dioxide) can be used to cause the concentration of CO2 in indoor air to increase. Be careful when handling dry ice, since its low temperature (-109°F) can cause burns. Do not touch dry ice with bare hands. Do not let CO2 concentrations indoors exceed the occupational exposure limit of 5,000 parts per million (ppm). *Note: These recommendations are not endorsements of any particular brand or product. They are intended to assist users of this guide while choosing the equipment needed to perform the suggested measurements. There are several alternative suppliers of reliable equipment. **Note: Carbon dioxide sensors have become better and less expensive in the recent years. For the uses described here, it is useful to have a sensor that can give back the raw data to the users. It is also useful to have a sensor with a display that shows realtime CO2 levels and a sensor that reports measurements at least once a minute. 3
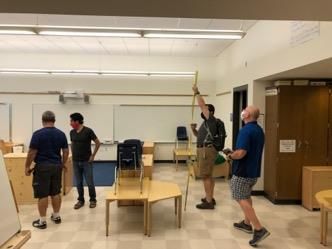
BUILDING FOR HEALTH

 Step 1

 Measure the
 Classroom Dimensions

 © 2020 | Harvard Healthy Buildings Program | 4

BUILDING FOR HEALTH

 Step 1. Measure the Classroom
 Goal: Obtain the volume of space.
 How to:
 Measure the room length and width, and ceiling height, to
 estimate volume in cubic feet, using the formula:
 length x width x height
 Notes:
 • For spaces with intricate geometries, use square footage of
 architectural plans and multiply by the floor-to-ceiling height.
 • If the room has a tapered ceiling, first estimate the area of the
 wall and multiply by the length of the room.
 • If the space has many built-ins (e.g. fireplace) try to account
 for the dead volume, as well as volume occupied by furniture.
 It could be that functional volume is ~80% of the total volume
 of the space.
 • Count number of windows, measure their dimension and their
 openable area.

 5
BUILDING FOR HEALTH

 Step 2

 Perform Preliminary Audio and
 Visual Checks

 © 2020 | Harvard Healthy Buildings Program | 6

BUILDING FOR HEALTH
 “Tissue Test”
 Step 2. Perform Audio and Visual Checks
 Goal: Make sure the system is on and understand the direction of
 airflow.
 How to:
 1. Audio test: Listen for sound coming out of the ventilator units and
 supply/exhaust fans.
 2. Visual test: Use a piece of light tissue, or a puff cloud tracer, to see if
 air is being supplied (puff cloud or tissue flows away from fan) or air
 is being exhausted (puff cloud or tissue gets sucked in the fan grille).

 Notes:
 • Some systems, such as AC units, can have both supply and exhaust fans; in this case, you want to identify
 which area of the unit diffuser performs each function.
 • One might check to see if air is entering or leaving the room by using a tissue to indicate direction of air
 flow under a door or with the door slightly ajar. This check indicates whether the room is typically
 ‘positively’ pressurized relative to the adjacent areas (i.e. tissue is sucked toward door) or ‘negatively
 pressurized’ relative to the adjacent areas (i.e. tissue is floats away from door).

 7
BUILDING FOR HEALTH

 Step 3

 Measure or Estimate Outdoor
 Air Ventilation Rate

 © 2020 | Harvard Healthy Buildings Program | 8
BUILDING FOR HEALTH

 Select the option for measuring or estimating classroom ventilation
 based on your scenario and type of system

 Classroom Scenario Type of Ventilation Materials Needed
 System

 Option A Occupied or unoccupied Unit ventilator balometer

 Option B Occupied or unoccupied Central air system balometer

 Option C Unoccupied Any CO2 monitor & dry ice

 Option D Occupied Any CO2 monitor

 © 2020 | Harvard Healthy Buildings Program | 9
BUILDING FOR HEALTH

 Step 3, Option A

 Measure Outdoor Air
 Ventilation Rate
Materials: Balometer
Classroom Scenario: Occupied or unoccupied
Ventilation Type: Unit ventilator

 © 2020 | Harvard Healthy Buildings Program | 10
BUILDING FOR HEALTH

 Step 3, Option A. Determine Outdoor Air Ventilation Rate
 (Unit Ventilators)
 Goal: Measure incoming outdoor air flow via
 mechanical ventilation through unit ventilators.
 How to:
 1. Choose a capture hood for the balometer with the
 closest form factor to cover the air diffusers (i.e. pick
 a hood that has a shape similar to the air diffuser’s
 shape). In case the capture hood does not cover
 the entire diffuser, use a piece of cardboard and
 tape to direct the flow exclusively through the
 capture hood.
 2. Start outside and use the balometer to measure the
 flow rate (in cubic feet per minute [CFM]) coming
 into the building through the grille where air is
 sucked in.
 3. Move inside the classroom and use the balometer to
 measure the flow rate (in CFM) at the air diffusers
 where air is supplied, or blown into, to the room.

 11
BUILDING FOR HEALTH

 Step 3, Option A. Determine Outdoor Air Ventilation Rate
 (Unit Ventilators)
 4. Calculate the percentage of outdoor air (OA) coming in as the ratio of the first measurement to the second. In
 cases where some of the air delivered to the classroom is recirculated, the % OA will be less than 100%; in cases when
 all of the air delivered to the classroom comes directly from outdoors, the % OA will be 100%.

 outdoor air flow coming in, measured outdoors
 % outdoor air = total air flow coming in, measured inside the room

 5. Calculate air exchange rates (ACH) from balometer measurements by dividing the outdoor air flow coming into
 the room (measured outdoors) by the room volume (length * width * ceiling height).

 ACH outdoor air flow coming in (ft3 per minute) * 60 (minutes per hour)
 = classroom volume (ft3)

 Notes:
 • Unit ventilators are one of the most common ventilation systems found in classrooms. These systems can provide a combination of outdoor air
 and recirculated air into the space.
 • In many cases, dampers are not fully open. It is important to verify their position by comparing the flow going into the unit (outdoor diffuser) to
 the air being supplied indoors (indoor diffuser), as described in Step 4 above.
 • To maximize ventilation, and when the weather permits, open the unit ventilator’s dampers fully to provide 100% outdoor air.
 • Do not place books or other materials over the air flow diffusers.
 • Ventilation systems are usually designed to promote air mixing in the central areas of a classroom, which may lead to lower ACH in corners or
 other peripheral areas.
 12
BUILDING FOR HEALTH

 Step 3, Option B

 Measure Outdoor Air
 Ventilation Rate
Materials: Balometer
Classroom Scenario: Occupied or unoccupied
Ventilation Type: Central air system

 © 2020 | Harvard Healthy Buildings Program | 13
BUILDING FOR HEALTH

 Step 3, Option B. Determine Outdoor Air Ventilation Rate
 (Central Systems)
 Goal: Measure incoming outdoor air flow via mechanical ventilation through a central system.
 How to:
 1. Identify the supply diffusers in the classroom (i.e. grilles where air enters the room) and use the
 balometer to measure flows, making sure that the capture hood covers the entire area of each diffuser
 and creates a good seal around the diffuser. In case the capture hood does not cover the entire
 diffuser, use a piece of cardboard and tape to direct the flow exclusively through the capture hood.
 2. Determine the damper position in the central air system by asking the school’s facilities team or HVAC
 maintenance team. The damper position will be between 0% and 100% open.
 3. Calculate air exchange rates (ACH) from balometer measurements. For central air systems, the
 outdoor air flow coming into the classroom is the sum of the supply cfm measurements (indoor diffusers)
 multiplied by the fraction of outdoor air allowed in by the damper (e.g. multiply by 0.2 if the damper
 position is 20%).

 Total measured air flow (ft3 per minute) * 60 (minutes per hour) * fraction outdoor air (based on damper position)
 ACH = classroom volume (ft3)

 14
BUILDING FOR HEALTH

 Step 3, Option C

 Estimate Outdoor Air
 Ventilation Rate
Materials: CO2 monitor & dry ice
Classroom Scenario: Unoccupied (CO2 decay method)
Ventilation Type: Any

 © 2020 | Harvard Healthy Buildings Program | 15
BUILDING FOR HEALTH

 Step 3, Option C. Determine Outdoor Air Ventilation Rate
 using the CO2 Decay Method
 Goal: Estimate incoming outdoor air flow in an unoccupied classroom
 using a CO2 sensor.
 How to:
 1. Follow manufacturer instructions to calibrate the CO2 sensor.
 2. Set up the CO2 sensor to log measurements at least one time per minute.
 This will help you select the beginning and end of a decay period more
 precisely.
 3. Measure the outdoor CO2 concentration with the CO2 sensor for at least
 five minutes. (Note: you should also measure outdoor CO2 again after
 you finish making indoor measurements.) While the background
 concentration outdoors is approximately 400 ppm, in denser urban
 areas CO2 can fluctuate throughout the course of the day due to
 emissions from combustion sources. Take note of the outdoor
 concentrations both before and after your indoor measurements, as you
 will need the average to estimate the ventilation rate.

 (continued on next page)
 16
BUILDING FOR HEALTH

 4. Place the CO2 sensor in the classroom away from the dry ice container
 location and approximately 3 feet above the floor.
 5. Use dry ice to cause the CO2 concentration to rise in the classroom to
 approximately 2000 ppm.
 a. Do not touch dry ice with bare hands. It is very cold and can cause burns.
 b. Do not allow CO2 concentrations to exceed the occupational exposure limit of
 5000 ppm.
 c. Reduce airflow from your mechanical systems to speed up the concentration
 buildup. Ideally, turn off the unit ventilators and exhaust fans (only during this step
 while the CO2 concentration builds up). If this is not possible, cover the air diffusers
 with a piece of paper and tape.
 d. Place an open container of dry ice in the classroom. For a regular classroom
 (500-1000 ft2), approximately 10 pounds of dry ice pellets should suffice to raise
 the CO2 concentration to 2000 ppm in less than 15 minutes for five tests. Place a
 fan blowing on the dry ice to assist with sublimation of CO2. Also, use fans to
 promote mixing of the dry ice CO2 in room air to ensure a uniform concentration
 throughout the room. This is important because you are generating CO2 from a
 single point in space, and because it is a heavier, colder gas than the room air.
 e. Check the concentration of CO2 on the CO2 sensor. When it reaches at least
 2000 ppm, remove the dry ice or close the dry ice container, return airflow to
 normal conditions (i.e. undo airflow reductions in 5c), and have all people
 present in the room leave the room.
 (continued on next page)
 17
BUILDING FOR HEALTH
6. Allow the CO2 concentration in the classroom to decay to a concentration ~ CO2 Buildup
 37% of its original peak concentration above background.
 a. The CO2 concentration will begin to decrease when the dry ice is removed from the
 room and when people leave the room.
 b. During this period, try to keep ventilation as constant as possible by leaving the
 mechanical systems setting unchanged, and minimize the number of times and
 people going in and out of the test room.
 c. The test may end when the CO2 level approaches 37% of its original peak
 concentration above background. For example, if the peak concentration is 2500
 ppm and the outdoor concentration is 400 ppm (excess CO2 = 2500-400 = 2100
 ppm), you should aim for 1177 ppm (i.e., [2100 ppm*0.37] + 400 ppm).

7. Repeat steps 5 and 6 to test the following scenarios, if applicable, to CO2 Decay
 understand ventilation in each circumstance:
 • Empty classroom with doors and windows closed and with ‘fresh’ outside air dampers
 open for the room unit ventilators (if present).
 • Empty classroom with some doors and/or windows open for supplemental natural
 ventilation. Can try multiple configurations of open doors and windows. Even with
 windows open, interior door(s) might need to be open to allow the extra air to flow
 through the classroom.
 • Test other classrooms to understand the influence of wind flow over and around the
 building and the effect of window opening.
 (continued on next page)
 18
BUILDING FOR HEALTH

8. Use data from the CO2 sensor to calculate air changes per hour
 (ACH) for each test:
 • Access the data collected by the CO2 sensor.
 • Identify the beginning of the decay curve by looking at the data and
 comparing it with the timing of your testing and mark down the
 concentration (Cstart) and the corresponding time (tstart)- shown with the
 green dot in the graph. Try avoiding periods when the CO2 concentrations
 oscillate around the same value, and choose a point that has a clear,
 consistent concentration decrease.
 • Identify the end of the decay curve by looking at the data and comparing
 it with the timing of your testing and mark down the concentration (Cend)
 and the corresponding time (tend) - shown with the red dot in the graph.
 • Take the average of outdoor concentrations measured with the sensor
 before and after the indoor tests (Cambient).
 • Estimate the decay duration in hours tend-tstart. For example, a 10-min decay
 equals 10/60=0.167hrs
 • Use the following equation to obtain the air changes per hour (note that all
 concentrations, C, will be in ppm and all times, t, will be in hours:

 −
 −1 ∗
 −
 =
 −
 19
BUILDING FOR HEALTH

 Example – test impact of mechanical ventilation

 • Identify the beginning of the decay, Cstart=
 2278 ppm and tstart= 09:58:26
 • Identify the end of the decay, Cstart= 1053
 ppm and tstart= 10:15:46.
 (Note that this endpoint was chosen because, in
 this test, windows were opened after 10:15:46 and
 we want to know the air changes per hour from
 only mechanical ventilation.)
 • Outdoor concentration Cambient = 400 ppm
 • Time difference tend-tstart is 17 minutes and 20
 seconds. In hours that would be 17/60 +
 20/3600 = 0.2889 hours.

 1053−400
 −1∗ 2278−400
 = = 4.6 changes per hour
 0.2289

 20
BUILDING FOR HEALTH

 Example – test additional impact of opening
 windows and doors

 • Identify the beginning of the decay,
 Cstart=1023 ppm and tstart=10:16:26.
 (Note that this beginning point was chosen
 because, in this test, windows and doors were
 closed before 10:16:26 and we want to know the
 air changes per hour from mechanical ventilation
 with windows and doors open.)
 • Identify the end of the decay, Cstart=448 ppm
 and tstart=10:29:46
 • Outdoor concentration Cambient=400 ppm
 • Time difference tend-tstart is 13 minutes and 20
 seconds. In hours that would be 13/60 +
 20/3600 = 0.2222 hours

 448−400
 −1∗ 1023−400
 = = 11.5 changes per hour
 0.2222

 21
BUILDING FOR HEALTH

 Step 3, Option D

 Estimate Outdoor Air
 Ventilation Rate
Materials: CO2 monitor
Classroom Scenario: Occupied (steady state CO2 method)
Ventilation Type: Any

 © 2020 | Harvard Healthy Buildings Program | 22
BUILDING FOR HEALTH

Step 3, Option D. Determine Outdoor Air Ventilation Rate using
the Steady State CO2 Method
 Goal: Estimate incoming outdoor air flow in an occupied classroom using a CO2 sensor.
 Once the space is occupied, CO2 sensors in the classroom can be used to approximately know how well-ventilated
 the space is. For example, a 500 ft2, 10-ft ceiling classroom with 15 teenager students, and a ventilation rate of 4
 ACH should have a steady state concentration around 800 ppm. That steady state concentration drops to ~700 ppm
 and ~650 ppm for 5 and 6 ACH, respectively.
 How to:
 1. Follow manufacturer instructions to calibrate the CO2 sensor.
 2. Set up the CO2 sensor to log measurements at least 1 time per minute.
 3. Measure the outdoor CO2 concentration with the CO2 sensor for at least five minutes. While the background concentration
 outdoors is approximately 400 ppm, in denser urban areas, CO2 can fluctuate throughout the course of the day due to
 emissions from combustion sources. Take note of the outdoor concentration as you will need this number to estimate the
 concentration at steady state.
 4. Estimate the CO2 generation rate by multiplying the number of occupants in the classroom by their rate of CO2 exhalation (in
 CFM). The per person CO2 generation rate is dependent on age, gender, weight, and metabolic activity. For students 6-11
 years old, consider an average generation rate of 0.0066 cfm per child, and for teenagers use 0.0087 cfm per teenager.
 Multiply the corresponding generation rate times the number of kids in the classroom. For teachers (standing and speaking,
 average age 30-40) use 0.013 cfm.
 • For a classroom with 14 teenage students and one teacher, the CO2 generation rate is 14*0.0087 cfm +1*0.013 cfm = 0.1348 cfm
 (continued on next page) 23
BUILDING FOR HEALTH

5. Estimate the target volumetric flow of outdoor air. Multiply the volume of the classroom (in cubic feet)
times the target air changes per hour and divide by 60 minutes per hour.
 • e.g., For a target of 4 ACH in a 5000 ft3 classroom, 5000*4/60 =333 cfm
6. Estimate the steady state CO2 concentration using the following formula

 2 + ∗ 2 ∗ 1 ∗ 10−6
 − =

 1 ∗ 10−6

 0.1348 +333 ∗400 ∗1∗10−6
 Continuing the example above, − = 333 = 804 ppm CO2
 1∗10−6

This method only considers the dilution effect due to outdoor air flow. If part of your air supply is filtered through a MERV 13 or
higher efficiency filter, or a portable air cleaner with a HEPA filter, you may use a lower target air exchange rate for this
calculation as long as the total air changes per hour of clean air still meets the recommended ACH target. For example, if your
mechanical ventilation can provide 3ACH, estimate the steady state concentration at 3 ACH considering that you could add 2
ACH with portable air cleaners to meet the 5 ACH target
Notes:
• Now that you’ve done this calculation, you can use your CO2 monitor while class is in session to evaluate whether ventilation is
 adequate. In the example presented here, if the CO2 sensor read around 800 ppm while the 14 students and 1 teacher were
 in class, we’d know we were meeting the stated target of 4 ACH of outdoor air ventilation. If we noticed the CO2 sensor
 consistently read 1400 ppm while the 14 students and 1 teacher were in class, we’d want to check the ventilation because
 the increased steady-state CO2 concentration indicates that the actual ACH is below the stated target of 4 ACH. In this way,
 CO2 sensors can be used to determine when ventilation may not be adequate. 24
BUILDING FOR HEALTH

 Step 4

 Compare Results to Target

 © 2020 | Harvard Healthy Buildings Program | 25
BUILDING FOR HEALTH

 TARGET IS AT LEAST 5 TOTAL AIR CHANGES PER HOUR
 Ideal (6 ACH)

 Excellent (5-6 ACH)

 Good (4-5 ACH)

 Bare minimum (3-4)

 Low (
BUILDING FOR HEALTH

 Step 5

If Needed, Consider Supplemental
 Air Cleaning Strategies

 © 2020 | Harvard Healthy Buildings Program | 27
BUILDING FOR HEALTH

 Strategies to use if the classroom does not
 meet the target ACH

 1. Increase outdoor air

 2. Use MERV13 filters (or greater) on recirculated air

 3. Add portable air cleaners with HEPA filters to the classroom

 28
BUILDING FOR HEALTH

1. Increase outdoor air
Natural Ventilation Mechanical Ventilation
• Open windows and/or doors to increase airflow • Set unit ventilator or central air system to
 maximum outdoor air ventilation rate that the
 system can handle based on outdoor
 temperature conditions

Note:

 Good
• Outdoor air gets into the classroom due to a pressure
 differential, caused by bulk motion (wind), a
 temperature gradient (buoyancy), or a mechanical
 system (negative pressure due to an exhaust fan)
• Cross-ventilation is a preferred strategy since it displaces
 air more effectively in a larger portion of the classroom.

 Better
 Having a functional exhaust fan or opening the door to
 a hallway can facilitate the flow coming through an
 open window.
• Performing tests with different window/ door opening
 configurations might suggest the optimal strategy for a
 classroom.
 Graphic reference unknown. Credits to the author
 29
BUILDING FOR HEALTH

2. Use MERV13 filters (or greater) on recirculated air

• In a mechanical system, a filter of MERV 13 (or greater) can help remove some
 particles from air that recirculates through the system and is redistributed into
 classrooms

• Check with a commissioning agent to determine whether your mechanical
 system can handle the pressure drop of installing a MERV 13 filter.

• The recirculated flow passing through a higher efficiency filter can be added to
 the air flow (CFM) in the ventilation calculations to reach the ACH target.

• We recommend assuming 80% capture efficiency for calculations that include a
 MERV 13 filter.

 30
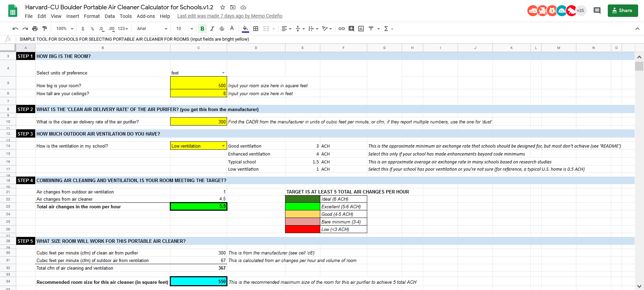
BUILDING FOR HEALTH

3. Add portable air cleaners with HEPA filters to the classroom

• If your mechanical systems cannot accommodate a higher efficiency filter, you
 can use portable air cleaners with HEPA filters.

• To choose a portable air cleaner with the right dimensions for your classroom size
 and clean air delivery rate to meet the ventilation target, use the Portable Air
 Cleaner Calculator for Classrooms developed by the Harvard Healthy Buildings
 team and Shelly Miller at CU Boulder (tinyurl.com/portableaircleanertool)

• The center of the classroom might be the ideal location. If this is not possible,
 choose a location in which the flow out of the portable air cleaner does not blow
 directly into the occupants.

 31
BUILDING FOR HEALTH

 Example 1

 Central Mechanical Ventilation
 with MERV 13 Filters

 © 2020 | Harvard Healthy Buildings Program | 32
BUILDING FOR HEALTH

Step 1. Room dimensions were measured to be:
 Square footage = 700 square feet // Ceiling height = 9.8 feet // Volume = 6,883 cubic feet
 (volume = square footage * ceiling height)

Step 2. Systems were confirmed to be on via eyes and ears.

Step 3. Option B was selected because the school had access to a balometer and had a central ventilation system. The
 balometer was used to measure the outdoor air ventilation rate from the supply diffusers where air enters the room.
 The central ventilation system uses 20% outdoor air.

 • Measured air flow rate inside the classroom (ie, outdoor air + recirculated air) ….. 760 cfm

 • Percent outdoor air ….. 20%

 • Outdoor air ventilation rate ….. 760 cfm * 20% = 152 cfm

 • Air changes per hour (152 cfm * 60 minutes/hour) / 6,883 cubic feet) ….. 1.3 ACH

Step 4. The ACH of 1.3 is less than the 5 ACH target.

 (continued on next page)
 33
BUILDING FOR HEALTH
Step 5. Determine which supplemental ventilation or filtration strategy can be pursued.
 1. Can outdoor air be increased?
 • through greater % of outdoor air? In this example, no.
 • through opening windows? In this example, no.
 2. Can MERV13 filters be installed on the recirculated air? In this example, YES.
 3. Are portable air cleaners with HEPA filters needed? First determine if MERV13 filters can be used to meet target ACH

Next step will be to determine the impact of MERV 13 filters

Measured air flow rate inside the classroom (ie, outdoor air + recirculated air) 760 cfm

 Percent outdoor air 20%

 Outdoor air ventilation rate 760 cfm * 20% = 152 cfm

 Recirculated air ventilation rate 760 cfm – 152 cfm = 608 cfm

 Clean recirculated air rate through MERV 13 608 cfm * 0.8 efficiency = 486 cfm

 Outdoor air + clean recirculated air through MERV 13 filter 152 cfm + 486 cfm = 638 cfm

 Air changes per hour (638 cfm * 60 minutes/hour) / 6,883 cubic feet) 5.6 ACH

This room now meets the 5 ACH target. No further action is needed. 34
BUILDING FOR HEALTH

 Example 2

 Unit Ventilators
 + Opening Windows

 © 2020 | Harvard Healthy Buildings Program | 35
BUILDING FOR HEALTH

Step 1. Room dimensions were measured to be:
 Square footage = 1,010 square feet // Ceiling height = 9.5 feet // Volume = 9,595 cubic feet
 (volume = square footage * ceiling height)

Step 2. Systems were confirmed to be on via eyes and ears.

Step 3. Option A was selected because school had access to a balometer and the classroom measured had a unit ventilator.
 The following balometer measurements were made:
 • Measured air flow rate outside the classroom (ie, outdoor air supply to the classroom) ….. 231 cfm
 • Measured air flow rate inside the classroom (ie, outdoor air + recirculated air) ….. 800 cfm
 • Percent outdoor air being delivered into the classroom ….. 29%

 • Air changes per hour (231 cfm * 60 minutes) / 9,595 cubic feet ….. 1.4 ACH

Step 4. The measured ACH of 1.4 is lower than the 5 ACH target. This classroom needs supplemental ventilation and/or filtration.

Step 5. Determine which supplemental ventilation or filtration strategy can be pursued.
 1. Can outdoor air be increased?
 • through the unit ventilator? In this example, no.
 • through opening windows? In this example, YES.
 2. Can MERV13 filters be installed on the recirculated air? In this example, no.
 3. Are portable air cleaners with HEPA filters needed? First determine if opening windows can meet target ACH

 (continued on next page)
 36
BUILDING FOR HEALTH

Next step is to return to Step 3 and evaluate ventilation rate with windows open using the CO2 decay method
(Option C)

 Identify the beginning of the decay:
 Cstart=1794ppm and tstart=9:16:26 Decay start

 Identify the end of the decay:
 Cstart=475ppm and tstart=9:42:46

 Outdoor concentration: Cambient=400 ppm

 Time difference: tend-tstart is 26 minutes and 20 seconds. In hours
 that would be 26/60 + 20/3600 = 0.4389 hours

 475 −400
 −1∗
 = 6.7 ACH
 1794 −400
 =
 0.4389 ℎ
 Decay end

 6.7 ACH is greater than the 5 ACH target. This classroom with
 windows open meets the target ventilation. Efforts should still be
 made to increase the % of outdoor air delivered by the unit
 ventilators, and install higher grade filters

 37
BUILDING FOR HEALTH

 Example 3

 Mechanical Ventilation
 + Portable Air Cleaner

 © 2020 | Harvard Healthy Buildings Program | 38
BUILDING FOR HEALTH

Step 1. Room dimensions were measured to be:
 Square footage = 1,010 square feet // Ceiling height = 9.5 feet // Volume = 9,595 cubic feet
 (volume = square footage * ceiling height)

Step 2. Systems were confirmed to be on via eyes and ears.

Step 3. Option A was selected because school had access to a balometer and the classroom measured had a unit ventilator.
 The following balometer measurements were made:
 • Measured air flow rate outside the classroom (ie, outdoor air supply to the classroom) ….. 400 cfm
 • Measured air flow rate inside the classroom (ie, outdoor air + recirculated air) ….. 800 cfm
 • Percent of outdoor air being delivered into the classroom ….. 50%

 • Air changes per hour (400 cfm * 60 minutes) / 9,595 cubic feet ….. 2.5 ACH

Step 4. The measured ACH of 2.5 is lower than the 5 ACH target.

Step 5. Determine which supplemental ventilation or filtration strategy can be pursued.
 1. Can outdoor air be increased?
 • through the unit ventilator? In this example, no.
 • through opening windows? In this example, no.
 2. Can MERV13 filters be installed on the recirculated air? In this example, no.
 3. Are portable air cleaners with HEPA filters needed? In this example, YES.

 (continued on next page)
 39
BUILDING FOR HEALTH

Next step will be to determine the right size of portable air cleaner

Select the appropriate sized portable air cleaner using this tool: https://tinyurl.com/portableaircleanertool

• Air changes needed to meet target ACH in this example = 5 - 2.5 = 2.5 additional ACH needed
• Determine the clean air delivery rate (CADR) needed from the portable air cleaner CADR value required (CADR ratings are
 listed on most portable air cleaners available for purchase.)
 • 2.5 ACH needed * 9,595 cubic feet/ 60 minutes= 400 cfm
• This classroom meets the 5 ACH target if portable air cleaner(s) with HEPA filtration and with a total CADR of 400 cfm are used.

 Tool for selecting an appropriate portable
 air cleaner can be found here:
 https://tinyurl.com/portableaircleanertool

 Also available at:
 https://schools.forhealth.org/

 40
BUILDING FOR HEALTH

 Additional Resources for School Reopening

 Schools for Health

 © 2020 | Harvard Healthy Buildings Program | 41
BUILDING FOR HEALTH

 Additional Resources

 Risk Reduction When to open
 strategies for based on
 reopening community
 schools spread

 20 questions
 every parent Tool for selecting
 should ask before portable air
 sending kids back cleaners for
 to school classrooms

 All resources available at: https://schools.forhealth.org/
 42
BUILDING FOR HEALTH

Limitations
• Values measured on one day will reflect only the conditions experienced that day, both within and outside the building. Infiltration and flow
 through windows is highly dependent on outdoor weather conditions, whether the classroom and hallway doors are open, and whether the
 exhaust system (gravity or mechanical) is working as intended.

• Opening windows and doors is not a permanent solution and should not replace efforts to ensure ventilation systems are working properly.

• Not all areas of the room can be considered well mixed. For example, a mechanical system may more thoroughly mix the central area of a
 classroom and less thoroughly mix corners or other peripheral areas.

• Our target air changes per hour (ACH) values (Step 4) are based on classroom default densities as expressed in ASHRAE Standard 62.1-2019 (25
 students/1000 sq ft for 5- to 8-year-olds). These densities should not be exceeded not only because of an effective reduction of the equivalent
 ventilation rate per person considered in our calculations, but also because of the risk of droplet transmission if not preserving the recommended
 physical distancing.

• Limitations of using CO2 to estimate ventilation (Step 3, Option C or D):

 • For the purpose of infectious disease control, filtering recirculated air with high efficiency filters (MERV 13 or higher) or portable air cleaners with HEPA filters provides additional
 clean air capable of diluting bioaerosols. Estimating air changes per hour with CO 2 is only capable of approximating the rate of outdoor air supply and DOES NOT account
 for any benefit due to filtering air. For more details on how to combine the flow from adequately filtered air, please use our portable air cleaner calculator
 (tinyurl.com/portableaircleanertool).

 • The results are sensitive to errors due to poorly calibrated CO2 sensors, proper selection of the start and end points of the decay, flows from other spaces within the building, as
 well as changes in ventilation rate during the measurement due to changes in pressure differentials within the building and in the building envelope.

 43
BUILDING FOR HEALTH

Disclaimer
• This document is provided for informational and educational purposes only. It is intended to offer guidance regarding questions about
 best practices regarding assessing ventilation in school classrooms in an effort to reduce the risk of disease transmission, specifically
 novel coronavirus SARS-CoV-2 and the disease it causes, COVID-19.

• Adherence to any information included in this document will not ensure successful treatment in every situation, and the user
 should acknowledge that there is no “zero risk” scenario, that each building and situation are unique and some of the guidance
 contained in the document will not apply to all buildings, or countries outside the United States.

• Furthermore, the document should not be deemed inclusive of all proper methods nor exclusive of other methods reasonably directed
 to obtaining the same results. The document is in no way intended to override or supersede guidance from government and health
 organizations, including, without limitation, the Centers for Disease Control and Prevention, the World Health Organization, the United
 States Government, and or any States.

• The information contained herein reflects the available information at the time the document was created. The user recognizes that
 details and information are changing daily, and new information and/or the results of future studies may require revisions to the
 document (and the general guidance contained therein) to reflect new data.

• We do not warrant the accuracy or completeness of the guidance in this document and assume no responsibility for any injury or
 damage to persons or property arising out of or related to any use of the report or for any errors or omissions.

 44
BUILDING FOR HEALTH

 5-step guide to checking ventilation
 rates in classrooms
 Joseph Allen, Jack Spengler, Emily Jones, Jose Cedeno-Laurent August, 2020
 Harvard Healthy Buildings program | www.ForHealth.org
You can also read