Advent calendar & ornaMent - project sheet - fabric by Alexia Marcelle abegg & Melody miller - Moda Fabrics
←
→
Page content transcription
If your browser does not render page correctly, please read the page content below
advent
                                       calendar
                                      & ornaMent
                                       project sheet

fabric by   Alexia Marcelle abegg & Melody miller
CALENDAR cutting instructions                                              Starting with the top row, lay pockets out and pin them to calendar
                                                                           front with numbers up. Use measurements on diagram for placement.
                                                                           The first row should be 21/4" from the top edge and left-most pocket
From assorted pocket fabrics, cut (24) pairs of retangles 31/2"            should be 23 8" in from left edge. Space between pockets of same
wide and 4" tall (48 total).                                               row is 11/4".

Place fusible web over number templates on pgs 4 & 7 with paper            Topstitch around three edges of each pocket 1 8" inside edge to
side up (be sure when you print, print scale is set at 100%). Trace        attach to calendar and close turning hole, leaving top edge open
numbers onto paper (they will be backwards). Cut each color section        and backstitching at beginning and end.
apart in one big chunk. Following manufacturer's instructions, fuse
each set of numbers onto wrong side of corresponding fabric. Let           Continue adding rows with each row 1" below bottom of previous
cool, then cut numbers out. Peel off paper backings.                       row and starting 23 8" from left edge.

From calendar fabric:
  Cut (1) 301/2" WOF strip. Subcut (2) 201/2" x 301/2" rectangles for
   calendar front and back.

 Cut (2) 3" WOF strips. Subcut (1) 201/2" x 3" rectangle for sleeve.

From interfacing:
  Cut (1) rectangle 20" x 30" and fuse to wrong side of calendar
   front following manufacturer's instructions.

CALENDAR sewing instructions
Place pocket pairs RST and stitch
around all four edges, leaving a
1" hole in bottom edge for turning.
Clip corners and turn right side out.
Press, folding seam allowance of
opening to inside.

Place numbers with glue side down on pockets, eyeball-centering
them. It's a good idea to lay out all your pockets and numbers at
once to determine print/color placement if you're not following the
print placement in our diagrams. (Tip: if you need a little help to find
the centers, fold and finger press pockets in half horizontally and
vertically and crease to find centers).

Following manufacturer's instructions, press to fuse numbers on each
pocket.

                                                                           On hanging sleeve, turn short ends 1/2" towards wrong side twice
                                                                           and press. Stitch to hem. Fold both long edges under 1/2" and press.

                                                                           Fold and finger press both sleeve and calendar back to find vertical
                                                                           centers. Pin sleeve to calendar back, 1" below top edge and with
                                                                           centers aligned. Topstitch along top and bottom folded edges
                                                                           to secure, backstitching at beginning and end (be sure to leave
                                                                           hemmed edges open).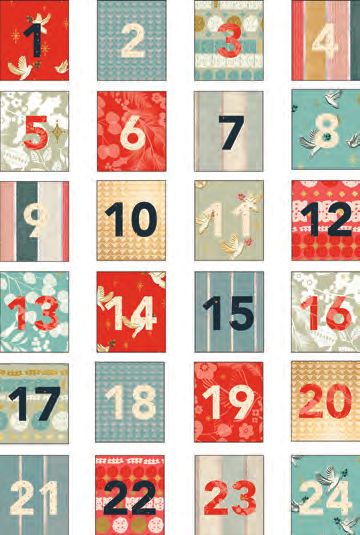
Place calendar front and back right sides together, being sure top                 CONSTRUCTION:
and bottoms are aligned. Stitch around all four edges, leaving a
hold in the bottom edge for turning.                                               Once you have decorated your base, cut a batting scrap and
                                                                                   backing fabric slightly larger and sandwich batting between fabric
Clip corners, turn right side out and press. Fold seam allowance of                with wrong sides of fabrics against batting. From decorated side,
opening to inside. Topstitch all the way around 1 8" inside edge to                stitch around ornament base edge to secure layers together. Feel
close opening and give a nice finish.                                              free to get creative! Do a straight stitch, a wide zig zag to enclose
                                                                                   the edge, or maybe try one of your machine's decorative stitches.
To hang, insert dowel or stick through sleeve. Tie ribbon or twine to
ends to make hanging loop.                                                         Trim all layers in line with decorated side of ornament. Try using
                                                                                   pinking shears or decorative scissors for some extra pizazz.

Ornament instructions
These ornaments are quick, fun and have a raw-edge finish for a
handmade look. The instructions are presented in a mix and match
way, a menu of sorts. Trace off the templates on pages 6-7 then pick
and choose which components you'd like to add to your ornament!
(Tip: these can easily be a hand sewing project to do with kids! You
could also swap hot glue or fusible web wherever the sewing is too
tedious.)

BASE
                                                                                    FINISHING
Choose either the Round or Diamond base and cut (1).
                                                                                    With embroidery floss, hand stitch
                                                                                    button to center of ornament,
                                                                                    tying knot on back to secure. This
                                                                                    is a great time to use up orphan
                                                                                    buttons, or make covered buttons
                                                                                    with fabric!v

                                                                                    Hand stitch a 3" loop of
                                                                                    embroidery floss at the top center
                                                                                    for hanging, tying in a knot to
                                                                                    secure.
RAW EDGE APPLIQUE ACCENT:

Choose the Diamond, Round or Square raw edge applique. Cut
just (1), or layer a Square or Diamond on top of a Round. Center                   OPTIONAL TASSEL
in your ornament base and topstitch just inside edges to attach.
                                                                                   To make a tassel, wrap embroidery floss around four fingers about
                                                                                   10 times. Cut 10" length of floss and thread through top loop. Tie in
                                                                                   a knot and remove from fingers. Wrap knot tails around tassel for
                                                                                   about 1/2" and tie again. Cut bottom loop to free tassel ends. Hand
                                                                                   stitch to bottom of ornament.

YO YO ACCENT:

Cut out a Round Base shape. Hand stitch loosely around the edge
and pull to tighten. Flatten and use tails to hand stitch yo yo to
center of base. The yo yo accent has a little more puff and can be
layered on top of the Round raw edge applique accent.

                                                                                                                                                       3
                      Copyright 2020 Ruby Star Society. Copying or otherwise redistributing is strictly prohibited. For personal use only.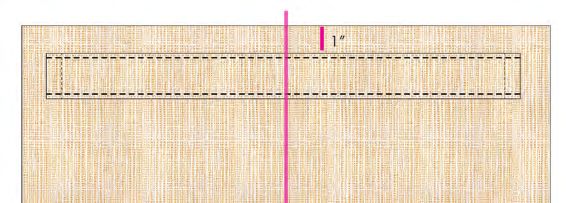
calendar number templates

    These number templates are for:
              RS4005-12M Add It Up - Copper

                              unbleached Add It Up

                                              1" square
                                               to check
                                              print scale

                                                            1” square for print scale
4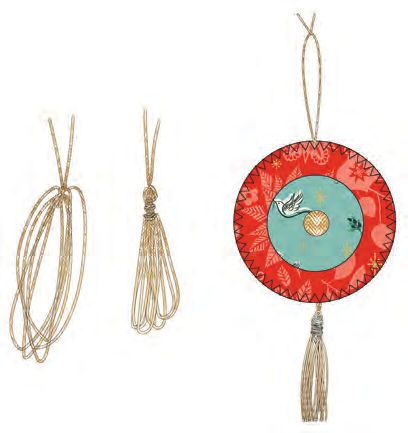
calendar number templates
   These number templates are for:
             RS5027-58M Speckled - Pine

              green speckled
           green speckled

   These number templates are for:
             RS5034-14M Winter Garden - Poinsettia
                    red floral
                 red floral

                                                                             5
                                                     1” square for print scale
ornament templates
Round Base Template
Diamond Base Template
Diamond
Applique Accent Square Applique Accent
Round Applique Accent
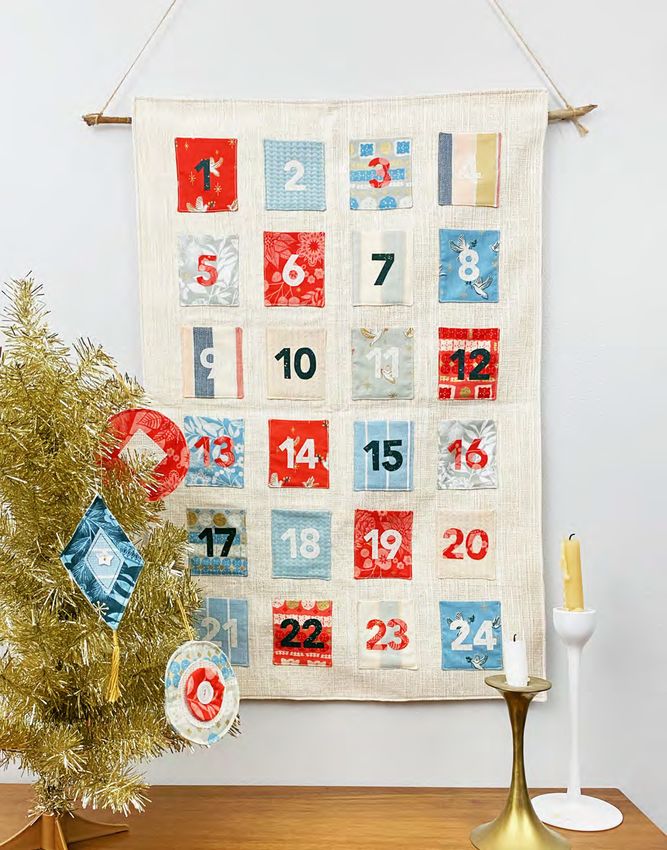
6advent
calendar
& ornaMentS
Get ready for the holidays with this cute advent calendar /
ornament set created by Alexia Marcelle Abegg. Mix and
match our Candlelight and Candlelight Wovens collections
for an understated, modern color palette. The ornaments
are a fun way to use up scraps and a great sewing activity
to do with kids!
fabric requirements
CALENDAR FABRIC
RS4008-15
Chore Coat - Gold (or other canvas/bottomweight fabric)
1 yard
NUMBER FABRICS
RS5034-14M RS5027-58M RS4005-12M
Winter Garden Speckled - Pine Add It Up - Copper
Poinsettia F8 F8
F8
CALENDAR POCKETS & ORNAMENTS
You will need (48) 31/2" x 4" squares for the pockets, and a selection of 5" (approximately) squares for
the ornaments. An assortment of 12-15 fat eighths (9" x 22") will provide plenty of fabric to work with.
All fabrics shown are from Candleight and Candlelight Wovens by Alexia Marcelle Abegg and Melody
Miller.
ADDITIONAL SUPPLIES
CALENDAR: 1 yd fusible interfacing (at least 20" wide); 1/4 yd paper-backed fusible webbing such as Heat
n Bond (at least 17" wide); wooden dowel or stick approximately 22" long; ribbon or twine for hanging
ORNAMENTS: batting scraps (approx 5" square per ornament); embroidery floss; assorted buttons.
Copyright 2020 Ruby Star Society. Copying or otherwise redistributing is strictly prohibited. For personal use only.
7You can also read