ARISE & Ski Adaptive Skiing and Snowboarding
←
→
Page content transcription
If your browser does not render page correctly, please read the page content below
ARISE & Ski
Adaptive Skiing and Snowboarding
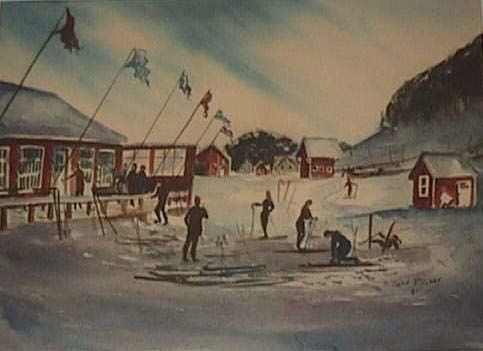
Toggenburg Mountain, Fabius, New York circa 1965
The Adaptive Manual
Christopher Weiss
Executive Coordinating & Training Committee
Christopher Weiss Technical Director, PSIA Level 3 Alpine, Level 2 Adaptive
Richelle Maki Coordinator & Trainer, PSIA Level I Adaptive & Alpine
Jason Cassulis, Trainer, PSIA Level 1 Adaptive
Tyson Gorman Trainer, PSIA Level 1 Adaptive
Jeff Roney, Trainer, PSIA Level 1 Adaptive
Jes Sudol, Teaching Consultant, Disability Specialist
Dick Scheutzow, Assistant Clinician
History
The ARISE & Ski program, founded by Melissa Hall and Christopher Weiss, began providing adaptive ski
lessons at Toggenburg Winter Sports Center in 1997. Both Melissa and Christopher started skiing as
children; Melissa spent much of her youth on McCauley Mountain racing while Christopher started skiing
and walking at about the same age and became a Toggenburg instructor in 1977 at the age of 15. In the 90s
Melissa worked for ARISE and soon rose to the position of Executive Director. Her knowledge and experience
in the field of disabilities and Christopher’s many years as a professional ski instructor inspired them to
create this unique program. With some assistance and training from the PSIA and various adaptive ski
schools Melissa and Christopher began recruiting and training volunteers. Finding participants was not
difficult. Over the last 8 years Richelle Maki has taken on the lion’s share of coordinating the program with
the support of Tom McKeown, the current executive director of ARISE. Melissa has moved on to focus on her
family.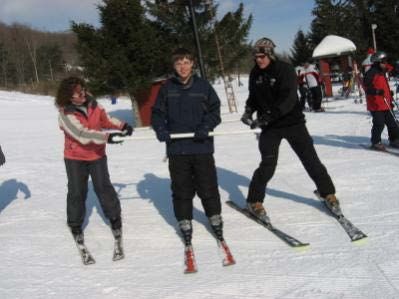
Since its inception ARISE & Ski has provided ski lessons to individuals with various disabilities including:
spinal cord injuries, traumatic brain injuries, cerebral palsy, Downs syndrome, autism, behavioral disorders,
vision impairments and many others. The program has grown over the years thanks to the support of the
Hickey Family (owners of Toggenburg); the staff at Toggenburg; the donations of various individuals,
corporations, and agencies; the incredible volunteers that work with us; and all the skiers at Toggenburg that
share the mountain with us.

Volunteer Adaptive Ski Instruction
Anyone and Everyone can provide assistance to this program…

ARISE & Ski seeks volunteers to assist in a variety of capacities for our six week program.
We operate morning and afternoon sessions on Saturdays and Sundays for six consecutive
winter weekends. Of course we are looking for skiers with a fair amount of experience but
we also welcome non-skiers to assist our participants in the lodge, in the rental shop and
even out on the learning center slopes. We can also help our volunteers wanting to learn to
ski or improve their skiing during our trainings and various gaps in our program. Volunteer
ski instructors are required to participate in several dry land and on-hill training sessions.
All will be exposed to the various teaching techniques and equipment that we use. The
training staff will work with volunteers to develop specific skills to become competent in at
least one of our instructional categories (mono/bi skiing; 3track or 4 track skiing; using the
sno slider; using the sno wing; using the ski frame; working with visually impaired
students; or working with individuals requiring no adaptive equipment).

The ARISE & Ski program focuses on learning. Our basic philosophy is that all people have
the capacity to learn. Participating in winter sports activities benefits everyone. Snow sports
provide physical, social and educational experiences that help children to grow, young
adults to socialize and older adults to stay healthy. Skiing and snowboarding are activities
that friends and family members can do together for a lifetime. In our adaptive lessons we
emphasize the importance of the relationship between student and instructor and make an
effort to set up partnerships between participants and volunteers that continue throughout
the season. Sometimes participant family members become ARISE & Ski volunteers.

The Adaptive Ski Lesson: Overview

One can find a great deal of information on the standard learning progression for skiing
and boarding at the Professional Ski Instructors of America website:
http://www.psia.org/01/home/home.asp

ARISE & Ski clinic leaders are all PSIA certified and follow the basic principles outlined in
the PSIA materials (Core Concepts). What follows is essentially an outline beginning with
our philosophy of the importance of the teacher – student relationship.
Ski Instructor as Person
The most effective instructors are people who are able to develop a positive, trusting,
friendly relationship with their student(s).
GET TO KNOW YOUR STUDENT
LET THE STUDENT KNOW YOU
YOU SET THE TONE
Ski Instructor as Critical Thinker
Who will you teach today?
Who came with them?
How might the student’s disability impact the lesson?
Is the student taking any medications?
If the student is taking medications are there any special instructions (sun
sensitivity,
Hydration…
Does the student have a catheter or insulin pump?
Are there any communication issues?
Instructor as a Guide
Introduce student to any equipment that will be used in the lesson.
Describe the function of each piece.
Check for understanding.
Teach student how to wear, buckle, attach, hold on to – all of the equipment they will
use (do not simply strap them in).
Describe how chairlift evacuation straps function
IMPORTANT: Make certain all equipment is in proper working condition and is
appropriate for your student.
Any new skier needs to become familiar with equipment, feel safe with instructor and be
made aware of dangers
Alpine Downhill Skiing Teaching Progressions (Generic Overview)
(Mohar & Schatz, 2003, “It’s All Downhill From Here” Presentation at Midwest Symposium)
Level 1
1. Introduction to skiing and equipment
2. Walking, Stepping and Sliding
3. Climbing up small grades
4. Straight run to a Natural Stop
Level 2
1. Gliding and Breaking Wedge
2. Wedge Stop
3. Falling down and getting up
4. Wedge Turns
5. Introduction to riding the liftsLevel 3
1. Linked Wedge Turns
2. Varying Wedge Turn Shape and Size
Level 4
1. Wedge Christy Turn
2. Increase Body Dynamics while Turning
3. Introduce Pole Touch
Level 5
1. Refine Wedge Christy Turn
2. Increase Speed, Grade of Terrain
3. Steering Whole Body Through Turns
4. Begin Parallel Turns
Level 6
1. Wide-track Parallel Turns
2. Linking Parallel Turns
3. Increase Terrain and Speed
4. Increase movement Dynamics
Our goals in teaching in an Adaptive context are “parallel” to these levels and progressions
however we will often need to make “adaptations” and “adjustments” with each individual
that we work with. What is listed above is the broad brush stroke of how to guide a student
in the development of their skills and competencies as a skier. Snowboarding progressions
as well as Adaptive Equipment progressions are similar in that the student is guided from
the “introduction” stage in a gentle and safe process through simple balancing exercises,
gliding and stopping movements toward more dynamic turning and body movements.
Practice is vital – it is not enough just to achieve a new skill, skills need to be practiced and
“tweaked” in different settings and at different speeds.
FIRST LESSON: focus should be on interacting with the gear and the basic skills of skiing
(without saying it or getting technical BALANCE - ROTARY MOVEMENTS, PRESSURE AND
EDGING). These movements and skills will be reinforced throughout their development as a
skier.
Review the skier’s code - the rules of the slopes
Always stay in control, and be able to stop or avoid other people or objects.
People ahead of you have the right of way. It is your responsibility to avoid them.
You must not stop where you obstruct a trail, or are not visible from above.
Whenever starting downhill or merging into a trail, look uphill and yield to others.
Always use devices to help prevent runaway equipment.
Observe all posted signs and warnings. Keep off closed trails and out of closed areas.
Prior to using any lift, you must have the knowledge and ability to load, ride and
unload safely.Make certain equipment is safe - if student brings their own equipment ask if it was
checked by a properly certified ski / board technician.
DO NOT ADJUST RELEASE MECHANISMS ON HILL GO TO SKI SHOP!
Instructor as Technician
Learn/Teach about the skis & bindings & equipment:
Step in and out of bindings (toe first then heel)
Look at the ski:
Where is the tip?
Where is the tail?
What are edges?
What is a tether?
Adapt as needed to:
Bi-Ski; Mono-Ski; Mogul Master; Outriggers; etc.
Practice with Hand held Outriggers.
Instructor as Teacher: How does learning happen?
Concept of “Learning Styles”
Teaching Methodology needs to attend to all styles for best results
Visual Learners
Show the student
Static & Dynamic demonstrations
Draw pictures on snow
Point out other skiers
Use markers – poles to turn around or a track to follow
Auditory Learners
Describe what you want the student to do.
Check for understanding by asking student to repeat instructions
Use simple language
Develop key words to be used such as: flex or bend, extend or make long, tall / short,
big / small, stand straight / lean, turn- twist, slide etc….
Experiential or Kinesthetic Learners
Learn by doing
Set reachable goals
Break it down
Repetition / Mileage
Reward Progress
Learn from Mistakes
Encourage DiscoveryInstructor as Strategist
Exercises & Activities
Shuffle skis back and forth - walk by shuffling - walk straight - walk in a circle.
[Pressure & Rotation]
Pick up ski tips one at a time and turn around - tails are center axis of circle, repeat
same by picking up tails and leaving tips at center axis of circle. [Pressure &
Rotation].
Remove one ski and scoot - straight line scooting then scoot in a circle with ski on
outside leg of circle. [ALL].
Practice side stepping up and down the hill with skis perpendicular to fall line (do
you know what the fall line is? Tell your student about the fall line). [Edging].
BODY POSITION – STANCE, (DYNAMIC & STATIC) SHOULD BE EXPLORED WITH
ATTENTION TO BALANCE AT ALL TIMES. “I fall down, but I get up again…”
You may want to discuss falling and getting up (it is suggested that you wait for the
student to fall before teaching this rather than asking the student to sit down and get
back up again).
Straight running - gliding - student sidesteps up a small bit (very little incline -
student will come to natural stop without additional movement) - pivoting around the
tips or tails, student begins gliding. Focus on stance (skis hip width, knees flexed,
back slightly curved, head up and eyes front). EDGING and BALANCE.
With Straight running do exercises such as: Stand tall then get small, shuffle feet as
you glide, lift one ski tip, lift one ski tail, lift up one ski, march, clap your hands,
touch your toes, yell out your instructor’s name, yell out your own name…
BALANCE.
As you practice straight running have student(s) climb facing different directions
each time
Set up targets so that they’re straight running: A) down fall line; B) angle off fall line
to right and left; C) nearly traversing the hill. BALANCE & EDGING.
On flat ground demonstrate the wedge and use descriptive terms. Put your skis like a
piece of pie, the letter “A” or “pointy hat.” Practice moving skis from straight run
position (parallel) to wedge position (converging) by sliding tails out at same time and
flexing knees and rocking forward slightly.
Wedge Turns (if deemed necessary and productive)
On flat practice sliding one heel out with both hands on the knee above that same
heel. Progression for a turn from gliding wedge is: slide heel out (rotary) then stand
on that leg (pressure) and flex knee (slight edging).
Gliding Wedge… Spreading peanut butter…
Body should go from a tall position to a shorter position, with knees flexed, as tails are
pushed out. You can also practice by moving one ski out at a time but remember if I push
my left tail/heel out I should move my head to the left as well (this is the difficult concept
but if mastered here it will save time and energy on the hill). Skier should not push tail away from upper body - upper body should move with
turning ski.
Now you are ready to move on to THE WEDGE TURN.
Early Sessions: Skier is balanced on skis, can climb, get up from a fall, and
understands the wedge position. Continue to practice the skills and exercises.
Play a game of tag with skis on flat ground. Play “follow the leader” on mostly flat
terrain with some straight run gliding. Play “Simon says.”
Begin to discuss using the “mighty mite” ski lift on the small hill. Watch other skiers
using the lift. Remember that when you use the lift you need not ride all the way to
the top.
DO NOT PRESS TAILS OUT SO FAR THAT KNEES GET STRAIGHT - THE WEDGE IS
ONLY A SLIGHT PARTING OF THE TAILS.
Learning to Turn…
First series of runs should be simple and just focus on pressing ski tails out.
Is the skier slowing?
Is the skier beginning a turn? Both are good - point out what is happening and
encourage student.
Your student may have begun turning without you even asking for it.
In practicing the gliding wedge have student(s) move tails in and out as they glide.
Use the position of the skis to assist with turning
Right ski in wedge is pointed left – that ski helps skier to go left.
Start with one turn one direction – then other – then linked turns
Mileage – mileage – mileage…
The Adaptive Ski Lesson: Developmental Disabilities
The ARISE & Ski program may be most visible by the number of bi-skis and other adaptive
equipment out on the hill however the majority of our participants are “stand up” skiers
with disabilities that might include: behavioral issues (ADD/ADHD); Down’s Syndrome;
Lowe Syndrome; Autism; Aspergers; MR; Cerebral Palsy and other disorders that may notrequire adaptive equipment. We pride ourselves in being accessible and providing lessons to
as many folks as we are able. Our students also range in age from as young as five years
old to adults in their fifties.
This section will not go into any detail regarding disability information but rather will
outline strategies and approaches to teaching, learning and working with skiers and snow
boarders with disabilities.
There are three basic rules that apply to all snow sports learning environments:
Fun.
Simple.
Safe.
There are times when a student presents challenging behaviors. These behaviors can be
related to the disability or simply to the age of the student. There are several strategies
which can help manage a variety of situations.
Maintain your cool and students more likely to be cool too.
Use games, sing songs, make rhymes, count, pretend to be a train, drive a car, fly a
plane
Engage students in various activities as anything (silly things) you might do on the
snow will help in the development of balance and coordination.
The Adaptive Lesson: Using equipment with stand-up skiers
The Adaptive Lesson: Using Adaptive Equipment to assist Snow Boarders and 2-
Track skiers
The Ski Frame (pictured on previous page)
The Ski Frame is a simple rectangle or square made of pvc pipe. See recipe at back of
this manual.
Use with skiers needing assistance with balance, speed control, body position &
rotational movements.
Two instructors can assist to right and left of student (as pictured).
One instructor can assist from behind or in front of skier (instructor skis backwards;
both ski outside of the Ski Frame).
One instructor can assist behind skier yet within Ski Frame.
Student can ski within frame or behind it depending on instructor(s) position(s).
The Snow-Wing
The Snow-Wing can be a useful piece of adaptive equipment for providing support
and directional control to adaptive skiers and snow boarders. The snow wing is a
frame which positions the skier or snowboarder within it so that the guides can hold
it to offer steering and support. Short tethers can also be attached to the snow wing
for more refined control by the guide.Four-Track Skiing Four-track skiing is stand up skiing using two skis with two hand-held outriggers for balance/support, giving the skier four points of contact with the snow. Outriggers are metal elbow crutches with skies on the ends, some having adjustable brakes to aid in speed control. People with cerebral palsy, multiple sclerosis, post-polio, spinal cord injury, stroke, muscular dystrophy, spina bifida, and those with strength and balance issues are candidates for 4-track skiing. The Sno-Slider The Sno-slider is used by 4-track skiers with balance issues. Skis are mounted to the metal frame making it something like a walker with skies. The skier uses his/her own boots and skis, and is aided by instructors on either side. The Sno-slider can be tethered by one instructor by we have had much more success using two instructors who position themselves up hill and to the right and left of the student forming a “tethering triangle.” This allows the instructors to assist with turns to both sides as well as assisting with speed control. The instructors on tether need to be aware of each other as well as the student and coordinate their speed and directional changes. Communication is critical and having two instructors with well-developed skiing skills is paramount. The Adaptive Ski Lesson: Visually Impaired Skiers & Boarders When working with students with limited or no vision it is important to spend time getting to know how your particular student typically navigates. Don’t assume that you know the best method for guiding or assisting the student rather discuss and determine a methodology that is comfortable for both student and instructor. Ski lodges, slopes and lift lines are often busy places. There can be a variety of challenges for a person with limited or no vision. Usually the student has developed a methodology of organizing themselves and their things (hat, gloves, money etc.) so that they can locate and use these items. As in any adaptive lesson the instructor should be aware of any medications and any potential side effects. Some individuals with vision impairments may be diabetics and it is important to know if the student’s blood sugar is well controlled and if they carry glucose with them. It is recommended that Instructor and Student wear brightly colored bibs indicating “Guide” and “Visually Impaired” or “Blind” skier. Communication between instructor and student is very important. Student and instructor should decide upon a strategy that works best for them. The “Clock” system is a good way to assist in directional positioning. 12 o’clock is always the position that the skier is facing. This tactic can work well in lift lines and moving through the lodge. The “Grid” system works well when you’re out on the slope. This method involves imagining horizontal and vertical lines running across the snow forming boxes or zones. The instructor might describe the trail as 10 zones wide (about 50 yards) and suggest that
they try to do all their skiing between zones 2 and 8 (fairly wide turns) or between 3 and 6
(fairly short turns). The Grid system can help to orient the student and assist in
determining turn size. These two systems, Clock and Grid, should not be used together.

Various Auditory cues can be used by the instructor to assist the student with direction.
The instructor can ski backwards tapping the ski poles together or clapping the hands so
that the student can follow and know that they are not alone on the slopes. Student and
instructor should develop some Verbal Commands as well such as an emergency word to
mean “stop” other than “stop” but also terms in addition to “left” and “right” such as edge,
pivot, drive, soft, firm. The instructor should also be able to describe the terrain in an effort
to prepare the skier for what they will feel under their skis (icy, washboard, bumps, flats,
granular, hard packed etc.)

Instruction on the hill can be handled in a variety of ways. The instructor can use a
bamboo pole and ski alongside the student or two poles and ski in front of, or behind, the
student. If the student is well balanced and can turn and stop safely the instructor can
simply follow and provide directions verbally using the grid system, verbal cues and
describing the terrain ahead.

The instructor and student should always make a plan and do their best to stick to the
plan.

The Adaptive Ski Lesson: Using the Bi Ski

The ARISE & Ski program has been working with bi skis since the late 1990s. The first bi
skis we used were designed by Mr. Milty and aptly called “the Milty Bi Ski”. Bi Ski
technology has improved over the years and we no longer use the Milty. We have several Bi
Ski models that are currently in use: The Mountain Man (Adult and Junior); the Bi Unique;
and the Mogul master.

Both the Mountain Man and the Bi Unique utilize specially designed short skis that have a
fairly wide tip and tail to add stability. The Mogul Master uses traditional skis (shaped skis
can also be used). These skis are generally used by skiers who typically use wheel chairs
and may or may not have full use of their arms.
What follows is a basic outline of teaching progressions and strategies when working with a
bi ski in a lesson. For the most part the information can be applied to any of the bi skis
used by ARISE & Ski. Of course there will be adjustments to the lesson based upon the
particular bi ski in use. The Mountain Man ski, for example, can be used with or without
hand held or fixed outriggers. The presence of fixed outriggers and how they are set up will
have an impact upon how the ski turns and moves across the snow. Our Bi Unique does
not use fixed outriggers and the person skiing with the Bi Unique needs to use hand held
outriggers (an instructor can use a two-point assist with the bi unique and the student can
go without hand held out riggers but this becomes more of a “ride” than a skiing
experience).
The Mogul master can be used in ways similar to the Bi Unique.
Bi Ski Progression
After assessment, selection of proper equipment, fit and introduction of equipment to skier
the fun begins (equipment intro includes: how the ski works; the strapping; the tether; the
fixed outriggers; hand held outriggers if appropriate; and balancing adjustments).
Like a stand up skier’s progression we stay on flat terrain for some time in an effort to
develop balance.
Instructor (with or without help of the student) can rock the bi ski from one side to
the other; if the skier can use hand held out riggers they can use them to stop the
lean.
It is important that if the skier is to be using the hand-held outriggers that they are
properly fitted and instructed about the two basic positions (crutch position and ski
position).
A discussion and demonstration of how the outriggers can be used as in speed
control (show student how the brake can be adjusted).
Instructor should provide a demonstration of how to use the outriggers when pushing
across the flats in the crutch position (if the student is able the goal should always be
to encourage independence).
When skiing with hand held outriggers from the seated position it should be noted
that the outriggers are always in view of the skier (forward).
It is important to understand that outrigger movements need to be coordinated with
edging and pressure movements to guide skier through a turn (outrigger as fulcrum
and the “opening the door” technique).
Bi Ski Sliding
Not all students will use hand held outriggers but the tilting exercise on flat ground is still
valuable in preparing the student for these kinds of movements during skiing.
Straight running is the next step. Instructor & assistant will push the bi ski w/skier
up the hill just a short distance. Pick a starting spot that will not intimidate the skier.
First few straight run glides should be done with the two point assist technique (this
means that the instructor places hands on the back of the seat and with a firm grip
assists in balancing and directing the bi ski).
As confidence builds instructor and student can repeat using tether.
Bi Ski – First turns
Describe how the skis under the bi ski function (edge and carve) in a turn.
The skier’s part is to assist by leaning.
Encourage student to tilt shoulders or move head in direction of desired turn
(pressure).
Begin with one simple turn from the straight run glide – few times with two-point
assist then on tether.
Riding the Chairlift
Before you take student to the chair lift describe the process. Describe how ski & seat
separate and adapt to the chair lift. Toggenburg Lifties (the staff assisting with the load) are
the best.
Loading
Make sure the lift operators / loaders know you’re in line.
All bi ski lessons will use only the Triple Chair.
It is suggested that tether lines be removed or stowed securely.
Ask for a “slow load”.
Good preparation usually prevents incidents.
Emphasize the importance of tucking in loose clothing and tether lines.
Determine how fixed or hand held outriggers will be adjusted for ride.
It is generally good to use a count down as most skiers using bi skis will be unable to
turn around to look.
Before you get on the lift describe procedure for getting off the lift.
Describe emergency / crisis situations – what to do.
If a load is not going well ask lifty to “stop”.
Don’t panic.
Be sure to use safety bar.
Keep a hand on bi ski at all times.
Off Loading
One tower before ramp raise safety bar.
Manipulate seat/ski (twist) and nudge forward so that it would be easily tipped.
Instructor and assistant anchor bi ski until over ramp. Student is asked to lean /
lunge forward when chair & ski are over ramp. Instructor must sit on edge of chair, then stand with skis on snow before assisting
skier off of chair.
Top of the Mountain (World)
Skiing
All of our bi-ski lessons generally are comprised of a “Lead Instructor” and one or more
assistants. The safety and management of the session is the responsibility of the Lead
Instructor (s/he is the captain). Assistant Instructors function in a variety of ways from
loading and off-loading to blocking and supporting the lesson as directed by the Lead.
Once you’re on top check equipment (attach tether lines)
Take a moment to enjoy the mountain
Check snow condition
Decide on trail
Rehearse communication strategies
Determine lead instructor and assistant
Mountain Safety
Lead instructor is in charge of the two-point assist and/or tethering student.
Bi Skiing
Instructional / Guiding Techniques
The Two Point Assist is a method whereby the instructor is positioned directly behind the bi
ski and uses his / her hands to provide support. Some skis have a bar which can be
grabbed other skis require the instructor to take hold directly of the back of the seat. At all
times the instructor should also be tethered to the bi ski.
The two point assist has benefits & drawbacks
Instructor and student are close allowing continuous interaction
Instructor has more direct control over bi ski
Instructor may limit student progress
Can be physically taxing for instructor
Demands the instructor have expert coordination and skiing skills
Instructor should use a wide stance
Instructor hips should be right up against bi ski seat
Instructor hands should grasp seat or bar with thumbs inside
Instructor needs to be able to stop bi ski with a very wide wedge and/or a quick hard
turn
Instructor must attend to fixed or hand held outriggers and keep skis clearTethering refers to a technique whereby the instructor skis uphill of the bi ski using lines
(tethers) to provide speed control and directional control. Instructor determines length of
tether based on skier skill, snow conditions, outrigger position and any other issues related
to safety and the functionality of the ski.
Tethering has advantages & disadvantages
Gives skier more freedom
Instructor skis in more comfortable position
Tether lines can tangle
Bi skier at higher risk of “falling” when on tether
Technique is critical
Tethering
Begin by using a two point assist technique with tethers wrapped around instructor’s
arms
While gliding in fall line slowly unwind tethers moving to a comfortable distance
Begin assisting with turn – call out direction first
Instructor & Bi Skier as One
First turn practiced on flats was a turn to a stop – you may want to do this once to
each side before taking on the whole hill
Instructor position should be in a wedge with skis matching the direction of the bi ski
Have Fun – Be Safe – Teach
Tethering instructor walks a fine line between controlling the bi ski and teaching
Encourage discovery
Explore student potential
Set reasonable goals
Never rush
Check for frost bite and fatigue
Stay in your comfort zone
Have FUN
Please read tethering article “It Takes Two” by Weiss in TPS, Winter 2005.
Lead tethering instructors must be able to ski all terrain at Toggenburg and should be able
to ski most black diamonds at big mountain areas (such as: Killington, Stowe, Sugarbush)
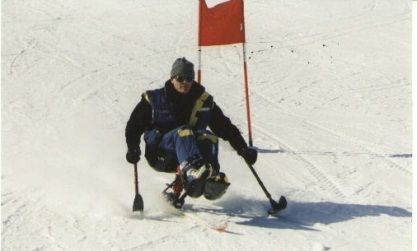
On hill training will be critical – please attendThe Adaptive Lesson: The Mono Ski ARISE & Ski has two mono skis and we are trained to teach individuals how to use this wonderful piece of equipment. The Mono Ski is generally used by individuals who play wheel chair sports (tennis, basketball, road racing). The ski requires good balancing skills and the ability to grip and manipulate hand held outriggers. While technique is more critical than strength a certain amount of physical prowess is needed for transferring, scooting across the flats, loading, and off-loading, from the chairlifts independently. As in any adaptive lesson once the assessment is completed and it is determined that the Mono Ski is the best adaptive equipment for the skier the instructor should spend some time describing how the ski and the out riggers function. It is important that the skier is properly fitted to the ski and it may be necessary to do a dowel test (this is a test to insure that the weight of the skier is properly centered). The instructor and student should collaborate on how best to transfer from wheelchair to mono ski and discussions of how one might do this independently should be part of this initial lesson. It may take some time before the student achieves any level of independence with the mono ski but that is generally the goal. The early lessons will require the instructor to assist with a two point hold. What follows is a general progression of skill development with the mono ski. Please understand that these steps, while presented in a linear and developmental way, may be shuffled and revisited over the course of the lessons. Mono Ski Progression Student assessment and introduction & fitting of mono ski Explore transfer techniques from wheel chair to mono ski Demonstrate and fit hand held outriggers Work on balance in static position – balancing with and without outriggers Pivot ski around center using outriggers Push forward and back with outriggers Tilt side to side with out riggers Straight run, down fall line, to gliding stop on flats (with two point assist) Practice slowing ski with hand held outriggers (with two point assist) Straight run on gentle angle from the fall line (with two point assist) Single turn to a stop (with two point assist) Linked turns (with two point assist)
Discuss falling and how to get up (get ski downhill of skier – use outriggers) Discuss lift loading and off-loading procedures (how mono ski adjusts for lift) Practice lift loading (what to do with hand held outriggers) Discuss off-loading procedures With a second instructor go to triple chair and review procedure and go for it Descend blue trails with two point assist (vary turn shape and speed) Descend blue trails with short tether (teach hockey stop) As the student becomes more confident and competent with balance, turning and stopping skills the instructor can reduce the level of support. This may mean moving from a two point assist to a short tether to no support at all. When the student becomes an independent skier then the instructor will continue to work to develop the skiing skills (hockey stops, side slipping skills, varying the turn radius, skiing in different conditions, skiing more challenging slopes, running gates etc.). We also want to work with our students to develop independence regarding lift usage and transferring from wheelchair to mono ski. Eventually the student may wish to consult with us in terms of purchasing his/her own mono ski. References & Suggested Reading Gallwey, Timothy and Kriegel, Robert (1977, 1997). Inner Skiing (revised edition). New York, NY: Random House. Mohar, Kathy and Schatz, Angie (2003). “It.s all downhill from here”. Presented at the Midwest Symposium 2003. O.Leary, Hal (1995). Bold Tracks (Third edition). Colorado, Winter Park: National Sports Center for the Disabled. PSIA, 1997. Adaptive Manual. Lakewood, Colorado. PSIA, 2001. Core Concepts. Lakewood, Colorado. PSIA 2003. Adaptive Snowsports Instruction. Lakewood, Colorado. Weiss, Christopher, J. (2005). The art of tethering: Lining up the right skills. The Professional Skier, Winter 2005. Weiss, Christopher, J. (2007). Three keys to better instruction: Knowledge, awareness and skills. The Professional Skier, Spring, 2007. Weiss, Christopher, J. (2008). An adaptive tool suitable for framing. The Professional Skier, Winter, 2008.
You can also read