Bank of America Works PCard Training Guide - Georgia Institute of Technology Copyright 2005 Last Update: December 2010
←
→
Page content transcription
If your browser does not render page correctly, please read the page content below

Bank of America Works
 PCard Training Guide

 Georgia Institute of Technology Copyright 2005
 Last Update: December 2010

                                                  1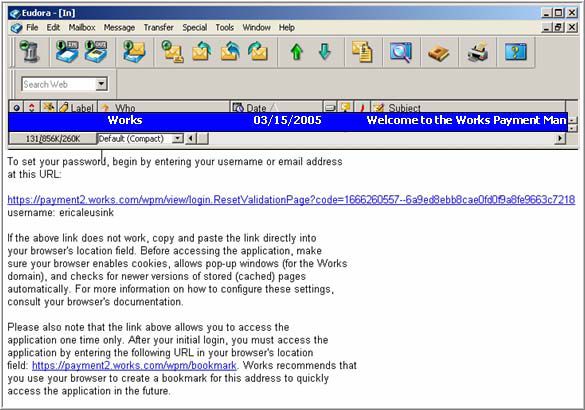
Table of Contents
•   PCard Cycle                                      3

•   Why Redistribute                                 4

•   First time Log In                                5

•   Accessing Works PCard Manager                    7

•   Setting Your E-mail Preferences                  12

•   Printing a Cardholder Statement                  13

•   Select a transaction to review                   17

•   Transaction Detail – General                     18

•   Transaction Detail –Allocation                   19

•   Transaction Detail - Purchase Detail             24

•   Transaction Detail – Vendor Detail and Address   24

•   Adding a Comment                                 25

•   “Signing Off” a Transaction                      26

•   Using the Filter Function                        30

•   Validation and Error Messages                    32

•   Viewing PCard Transaction History                34

•   Navigation Tips                                  36

                                                          2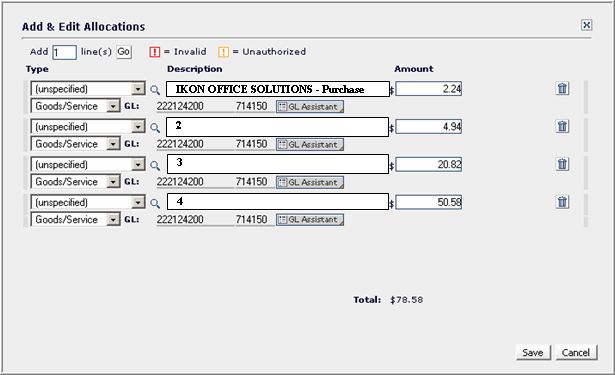
PCard Cycle
- from purchase to posting -

                               3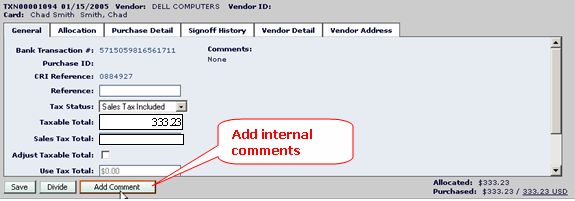
Why Redistribute

•   Your department authorizes a default Project ID for each card issued.
    The default Project ID is used to process all PCard transactions as they
    occur.

•   When the PCard is used to purchase an item that should be charged to
    a Project ID other than the default Project ID, the Works PCard
    Manager application is used to re-distribute the transaction charge to
    another Project ID.

•   Our PCard provider, Bank of America, transmits PCard transactions
    daily. These transactions are posted nightly and are available in the
    Works PCard Manager application for 7 calendar days. During that time
    the transaction can be reviewed and the Project ID/Account Code
    redistributed if necessary.

•   After 7 calendar days PCard transactions are removed from the Works
    PCard Manager application and posted to the General Ledger. PCard
    transaction history is available in the Works PCard Manager application
    via report or a view only function.

•   Actual General Ledger posting information is not available in the Works
    PCard Manager application. Consult with the Department PCard
    Coordinator if additional accounting information is needed.

               All PCard questions should be directed to
                      pcard.ask@business.gatech.edu

                                                                               4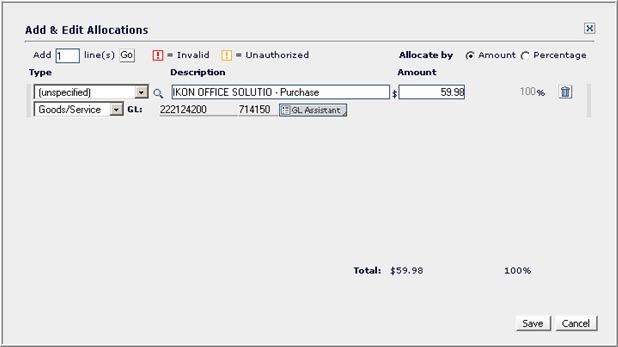
First Time Log In
•   The following steps must be completed before you use the Works
    PCard Manager Distribution System for the FIRST time.
•   You will receive an email from Works, the name of the company that
    provides the Works PCard Manager.
•   This email provides
•   1. Your user name and the URL for system access one time only
•   2. Instructions for immediately changing your password. Please adhere
    to the Institute’s established password management standards when
    creating your password.
•   3. The link for your first time only log in. ** Do not bookmark
    this url **

    Note: You must have the web “Pop-Up Blocker” feature turned off
    to use this application. Contact your computer support personnel
    should you need assistance.
                                                                            5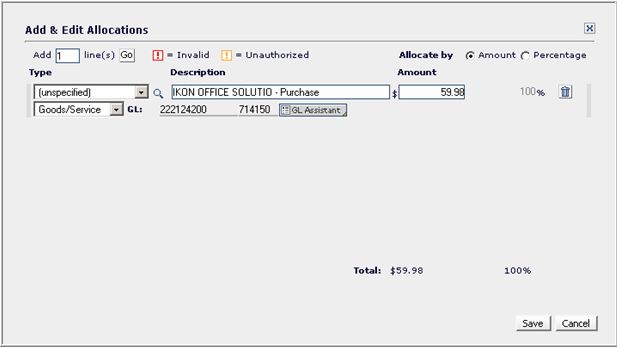
First Time Log In
Enter your username or email address

                                          Enter your
                                          desired
                                          password
                                          (twice)

                                         Enter your 3
                                         security validation
                                         questions and
                                         answers with
                                         confirmations

After you set your password, you should ONLY access
the Works PCard Manager application by logging in to
TechWorks.
                                                         6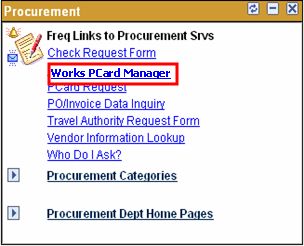
Accessing Works PCard
           Manager

    Go to
    techworks.gatech.edu
    Login using your
    GT Account and password

Navigate the TechWorks menu –

Business Services

  Procurement

     Frequent Links

         Works PCard Manager

Or, go to the Procurement pagelet and click   7
on “Works PCard Manager.”
Accessing Works PCard
Manager
Log in to Works PCard Manager with your
new password
The system displays a message indicating the application is currently loading
in a new window.
This message
window can
be closed at
any time.
Please note: For added security protection this application
closes after 15 minutes of inactivity.
The home page is displayed.
8Accessing Works PCard
Manager
• The action term “Sign Off” means PCard transactions can be
viewed in summary, reviewed in detail, redistributed to
another Project ID or Account Code, and approved or Signed
Off on which removes the transaction from the displayed list
and allows it to be posted during the normal 7 calendar day
posting cycle.
Number of transactions
Click to display
PCard transactions
Click to display
PCard
transactions
Cardholder information is
displayed
Click “Sign Off” to display the PCard transactions.
The total number of transactions is listed in the “Count” column.
Viewing information is displayed at the bottom of the page. You can choose to change the number of
items displayed at one time.
The following cardholder information is displayed:
Card Name Embossed (name on card)
Card Id Profile (Purchasing sets up the profile)
Credit Limit Activation (Not used by GT)
Available Credit Transaction Limit
9Accessing Works PCard
Manager
Use the scroll bars to move up and down as well as right to left to view the entire
transaction summary information.
Click on any column heading to RE-SORT
the list of transactions
10Accessing Works PCard
Manager
Highlight the column name and then click “Add” or “Remove” until you have all of the columns you
want displayed in the “Active Column.”
Use the “Move Up” and “Move Down” buttons to arrange the order in which you want the
columns displayed. Be sure to SAVE your changes.
The following list is recommended for optimal display of pertinent information:
Sign Off, Primary Card Holder, Card ID #, Date Posted, Date Purchased, Vendor, Purchase Amount, 11
Allocation, Comp/Val/Auth, DocumentSetting Your E-mail
Preferences
You will receive an automatic E-mail alert once a day when transactions
post for the previous day. The default is set to “Daily.” You have the option
to change the E-mail preference setting.
Go to “Tools” on the side menu.
Click Personal Settings> E-mail Preferences
Default is set to “Daily.”
(“Immediate” is turned off)
12Printing a Cardholder
Statement
• Go to the main menu and click “Reports”, Select Spend
Reports, (click on drop down and choose from “all available
templates”), then select CH Memo Statement
13Printing a Cardholder
Statement
The CH Memo Statement may appear as below and you will need to
click on the “show expert view”
Click on show expert view
The top half of the page will appear as below
Click on Excel to
generate a
downloadable
report
14Printing a Cardholder
Statement
• The second half of the page appears below
Click on Card and key in
last 4 digits of card in Card
ID
Click on date box, put
cursor in month, then
selected cycle and finish
Click on
submit report
Click on download
xls (excel file)
15Printing a Cardholder
Statement
Click on Open to display the excel file
The report is opened in a second window. All excel functionality is available to
format or perform calculations
16Select A Transaction To
Review
Click on any column in the row to view the transaction details/make
changes.
The transaction detail page is divided into 6 tabs:
General – Displays reference number provided by the cardholder at the
time of purchase. Total cost with a breakdown if taxes were added. **
Georgia Tech does not pay tax. If tax has been added please contact the
vendor and request a refund for the tax amount.
Allocation - Provides ability to change Project ID and Account Code.
Purchase Details - Shows line item details IF the vendor provides to the
PCard provider.
Sign Off History - Displays user name and date when a transaction is
“signed off” (considered complete and ready for posting)
Vendor Detail and Address - Vendor information provided by the PCard
provider.
17Transaction Detail -
General
Works PCard
Manager Trans.
ID. *Posts to GL
Number we give to Vendor.
Posts to GL.
Data entered in this field
This is the OVERWRITES the CRI
Vendor’s Reference and posts to GL.
Purchase Id
NOT ours. Request a refund from vendor if
Sales Tax is charged.
Do Not Use Divide or Dispute!
Bank Transaction#: Unique number assigned by the PCard provider to identify a transaction.
Purchase ID: Number used by Vendor to uniquely identify the purchase.
CRI Reference: Number cardholder may give to vendor at the time of purchase. The CRI
Reference will post to the General Ledger unless a different number is entered in the
Reference field.
Reference: Enterable field. Any data entered in this field will be posted to the General
Ledger. Note: If there is a CRI Reference, the data entered in this field will overwrite the CRI Reference
number and post to the General Ledger.
Note: The GL Reference field is limited to 10 characters.
Sales Tax: Georgia Tech is exempt from paying Sales tax. If the vendor has charged any
taxes immediately request a refund of the tax amount.
Do not use the DIVIDE or DISPUTE buttons.
Do you need to dispute a purchase? Complete the Dispute Form and fax it to the bank.
Follow up with the bank as needed to resolve the dispute.
Be sure to SAVE!
You must SAVE before leaving each tab,
otherwise your changes will be lost.
18Transaction Detail -
Allocation
Redistribute charges from ONE Project ID/Account to another
Click the checkbox to redistribute this transaction line.
Not used
Changing the Project ID/Account
Click the checkbox next to the allocation line
Click
A second window opens with the new row displayed
19Transaction Detail -
Allocation
Click on GL Assistant to enter the new Project ID
Enter partial value to search
Choose
Project
ID or
Account
Click on the
value.
New
combination
is displayed
Click Finish. Display selected
value on the allocation page
Total must equal 100%
Save your changes!
20Transaction Detail -
Allocation
Redistribute from one distribution to MULTIPLE distributions
Enter the number of additional lines you will need to redistribute the charge from a
single distribution to multiple distributions.
Click to delete if
Example: Redistribute charge to 3 Project IDs. line is not
Enter # of
needed
additional
lines you
need to
redistribute
charges
To
distribute Change Amounts
over three
Project Description is required
ID’s add 2
lines
Total must equal 100%
Description is required. Just enter the
line number as the description.
Description is for internal use only and does not
post to the General Ledger 21Transaction Detail -
Allocation
Click GL Assistant to enter the Project ID and Account Code for each distribution
line.
Enter the appropriate amount for this distribution line.
The distribution is calculated and displayed as you make your changes.
Verify the total has been redistributed correctly (must equal 100%)
before you save.
22Transaction Detail -
Allocation
Need to make a change to a redistributed line?
Allocated $ and
Purchase $ must
equal
Click the checkbox of the line you want to edit/remove.
If you want to change or edit the data click
If you want to delete the redistributed line
click
Note: Don’t forget if you add/edit/remove a distribution line that the
remaining lines for that transaction equals the original total!
On the View: Transactions Requiring Sign Off page, the project
ID/Account is displayed in the Allocation field for single distribution
transactions.
A blank Allocation field indicates the transaction has multiple distributions
23Transaction Detail -
Purchase Detail & Vendor
Detail and Address
Data is only available IF the vendor has supplied the information to
the PCard provider.
Vendor Detail and Vendor Address contain limited
information.
24Adding a Comment
Internal comments can be added to a transaction from the “General” transaction
detail page.
Be careful,
spellchecker
is not
available
Message is displayed on the “General” page.
25“Signing Off” a
Transaction
• The Signing Off action simply means the transaction is complete and ready
for posting to the General Ledger. (Posting occurs during the normal 7
calendar day posting cycle.)
• It is highly recommended that you “Sign Off” or authorize a transaction
instead of waiting for the transaction to roll off the list after 7 calendar days.
• Once a transaction is flagged as Signed Off it is automatically removed from
the list and you can no longer make any changes to that transaction.
• Some transactions require no further review or changes and can be “Signed
Off” on immediately. Other transactions will require further review and
redistribution. These transactions can also be flagged as “Signed Off” once
the final review/changes are made. Using the “Sign Off” feature effectively
eliminates having to constantly scroll through transactions that need no
further action. Only those transactions requiring your attention remain.
• There are three ways to flag a transaction as “Signed OFF”
• 1. Highlight a single transaction on the main task page and click the “Sign
Off” action button
• 2. Click on the “Table” button to retrieve a list of transactions allows you to
“Sign Off” on multiple transactions at one time.
• 3. Click the “Sign Off” action button after you save your changes in the
Transaction Detail pages.
26Highlight a transaction
and click “Sign Off”
button
This transaction will be removed from the list and posted to the General Ledger during
the normal 7 calendar day posting cycle.
Note: The “Attach” and “Bundle” action buttons are not used at this time.
27Click on the “Table” action
button to “Sign Off” on
multiple transactions
The Table action button returns a list of transactions
Click the box to
flag the Click “Sign Off”
transactions that (Be sure to take
need no further this action or
action. your “flag” will
not be saved
These transactions will be removed from your list and posted to the General
Ledger during the normal 7 calendar day posting cycle.
Click to flag all of the
transactions then click on a specific transaction
to “unflag” or remove from the Sign off
process. This may be a quicker way to Sign off
on many transactions at one time without
having to click on each transaction.
28Click “Sign Off” in
Transaction Detail
You can Sign Off on a transaction when you complete any necessary changes and it is
ready for posting.
This transaction will be removed from your list and posted to the General Ledger during
the normal 7 calendar day posting cycle.
Click “Split View” to return to the main task page view. Split View displays the
list of transactions in the top portion of the page and the transaction details in
the lower half.
29Using the Filter Function
Use the “Filter” function to display only those transactions meeting your search criteria.
Example: Using Date Range to select specific transactions.
30Using the Filter Function
Example: Using Cardholder name to select specific transactions.
Enter first, last, or a portion of the cardholder name.
Click on the radio button next to “Last Name” to select your
choices.
Click “Finish” to retrieve the transactions matching your selection
criteria and return to the main task page.
31Validation and Error
Messages
The Works PCard Manager application verifies Project ID and Account code as they are
entered to eliminate data entry errors.
Other validations occur when you “Sign Off” on the transaction.
Error: Missing a Description.
Action: Enter a Description (i.e. “2.”)
Error: Allocation amount is red.
Action: Correct distribution amounts.
Totals
must
equal
100%
When transactions are redistributed over multiple Project IDs/Account Codes the distribution calculation
is verified when the Sign Off function is activated.
Validation messages are displayed in the Message Bar at the bottom of the page when you click “Sign
Off.”
32Validation and Error
Messages
The following errors can occur.
Error: The amount allocated and the amount of the original purchase do not
equal.
Action: Correct the math. Use the Transaction ID to find the transaction and
correct.
Error: Project ID/Account Code is missing.
Action: Add the appropriate Project ID/Account code. Use transaction ID to find
the transaction and correct.
Error: Red X in the “Comp” field indicating Project ID/Account data is incomplete.
Action: Add the missing Project ID/Account.
Note: Comp = complete. Project ID and Account Code are entered and valid.
33Viewing PCard
Transaction History
From the main menu click:
Tools
Search
Transactions
Enter your selection criteria and click
Your search results are displayed.
34Viewing PCard
Transaction History
Note: CH = transaction has been signed off
This is the only way you can see a PCard transaction once
you have performed the “Sign Off” function.
*** ***
Transactions are posted to the General Ledger seven
calendar days from the date they are added to the Works
PCard Manager system.
35Navigation Tips
Navigating back to the main task page
Want to get back to the main page quickly?
Click the home page icon.
(You can always use the menu to navigate to
another page.)
Hiding the main menu gives you a wider display area.
Click the icon to hide and display the menu.
Click to return to the home page.
36You can also read