Beehive FenceTM Construction Manual - A step by step guide to building a protective beehive fenceTM to
←
→
Page content transcription
If your browser does not render page correctly, please read the page content below
Beehive Fence Construction Manual
                           TM

A step by step guide to building a protective beehive fence to  TM

    deter crop-raiding elephants from small scale farm land

              Written and Illustrated by Dr Lucy E. King
      Human-Elephant Co-Existence Program, Save the Elephants
                   www.elephantsandbees.com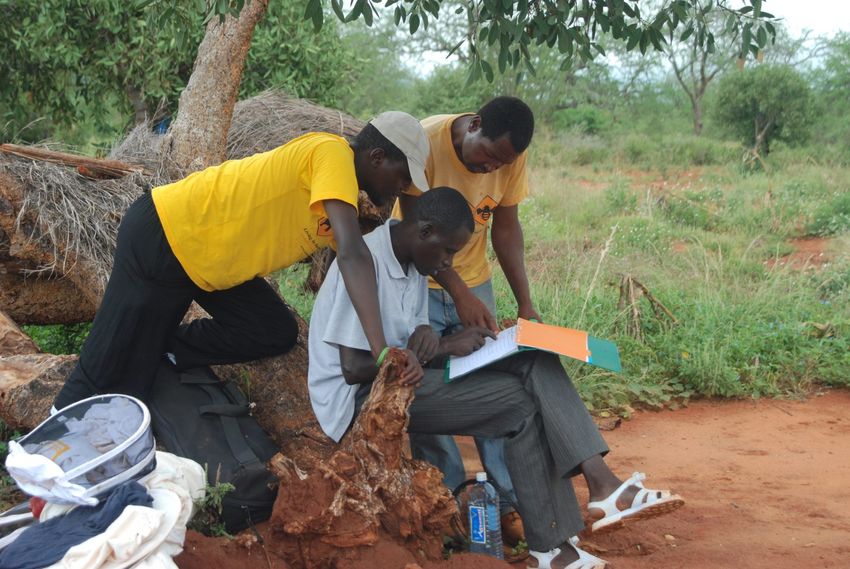
Front cover images: (1) Elephant family peacefully foraging in Samburu National Reserve, Kenya;
(2) Elephant-Friendly HoneyTM harvested from a Beehive FenceTM in Taita-Taveta, Tsavo, Kenya;
(3) Beehive FenceTM of Langstroth beehives protecting a maize field in Sagalla community, next
to Tsavo East National Park.
Photo credits: The Elephants and Bees Project
Editorial Contributions: E. Brennan, N. Raja, M. Baker, B. Stievater, C. de Wolff

  With special thanks to our corporate & charitable donors who support our projects

                                   Copyright © Dr Lucy E. King
                                       Fourth Edition 2019
                                        All rights reserved

                                          Published by
                                 The Elephants and Bees Project
                             Human-Elephant Co-Existence Program
                                       Save the Elephants
                                         P.O. Box 54667
                                      Nairobi 00200, Kenya
                           Project website: www.elephantsandbees.com
                                Email: lucy@savetheelephants.org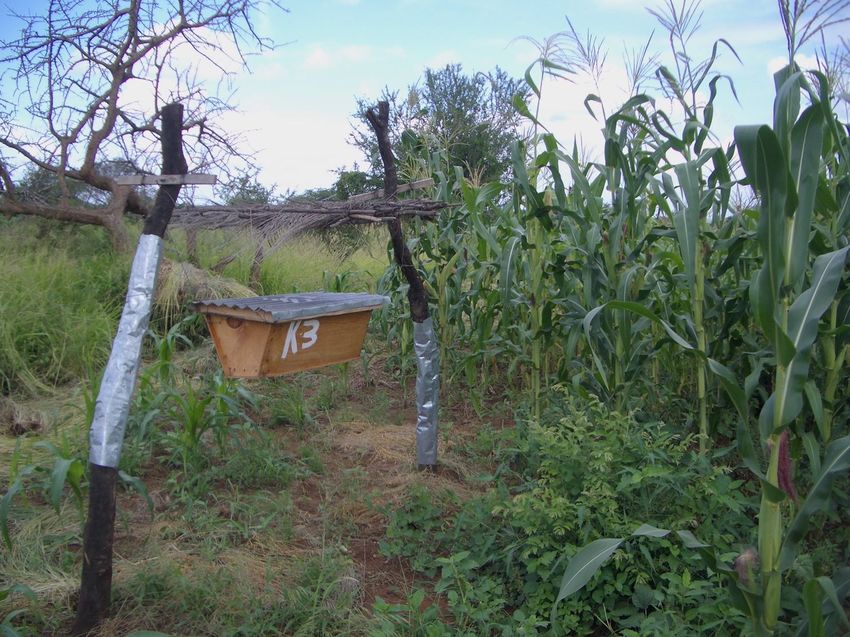
Contents                                                   Page 1
1. Introduction                                            2
       Save the Elephants organisation                     3
       Elephant behaviour and human-elephant conflict      4-5
2. Beehives                                                6
       Traditional, Kenyan top bar or Langstroth hives     7
       Beehive fences using traditional hives              8
       Beehive fences using KTBH beehive fences            9
       Beehive fences using Langstroth hives               10
       Using “dummy hives” with Langstroth beehive fence   11
       Step-by step construction of KTBH hives             12-15
3. Building a Beehive Fence                                16
       Constructing a beehive fence                        17-18
       Using Commiphora posts for a living fence           19
       Common issues and maintenance tips                  20
       Bees protecting trees from elephants                21
4. Beekeeping                                              22
       Introduction to beekeeping                          23
       Encouraging colonisation                            24
       Maintaining and managing occupied hives             25-26
       Honey harvesting and processing                     27-28
5. Pests and Parasites                                     29
       Honey badgers                                       30
       Wax moths                                           31
       Ants and hive beetles                               32
6. Record Keeping & Resources                              33
       Hive occupation records                             34
       Elephant movement records                           35
       Predicted conditions for success                    36
       The science and research behind the manual          37
       Introduction to the HEC Co-Existence Toolbox        38
       Helpful websites and resources                      39
       Author and acknowledgements                         40
                                                 1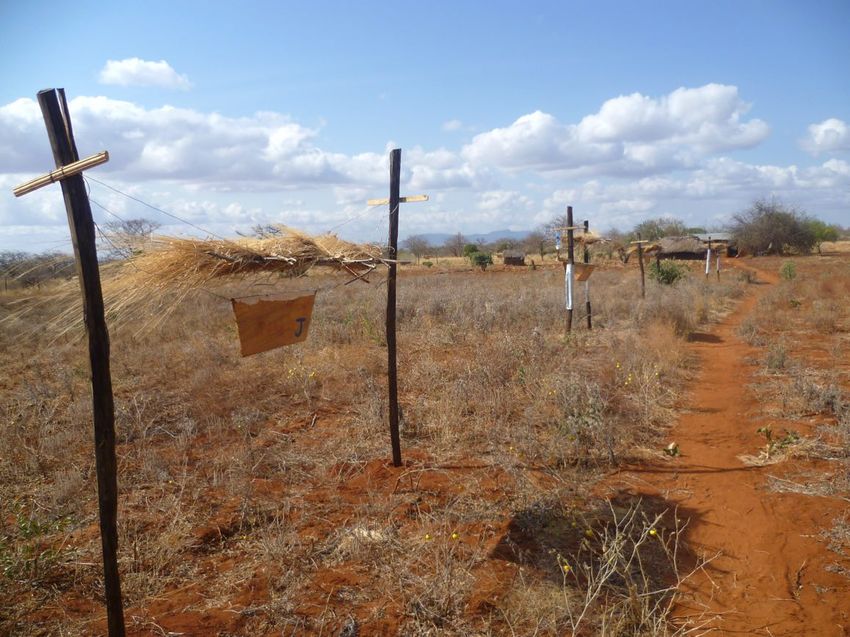
Chapter One

                Introduction
Save the Elephants, African Elephants and African Honey Bees

                               2
Save the Elephants’ Mission
   To secure a future for elephants and sustain the beauty and ecological integrity of the
   places they live, to promote man’s delight in their intelligence and the diversity of their
           world, and to develop a tolerant relationship between the two species.

              Four Pillars: Research, Protection, Grassroots, Education
The Save The Elephants charity was founded in 1993            Save The Elephants works closely with government and
by Dr. Iain Douglas-Hamilton, OBE, who made a                 non-governmental organisations, universities and
pioneering study of elephant behaviour in the late '60s       research institutions to ensure the long-term
in Lake Manyara National Park, Tanzania, and has been         conservation of elephants in Africa. STE manages the
at the forefront of elephant research and conservation        the Elephant Crisis Fund to provide emergency
continent-wide ever since. Explorers, conservationists        response funding to high-impact partners across Africa
and elephant scientists serve as fellow trustees and          and Asia to battle the ivory crisis in a three-pronged
advisors to the board.                                        approach of anti-poaching, anti-trafficking and
                                                              demand-reduction. The ECF has funded more than 255
Save The Elephants’ programs focus on research,               projects in 36 countries as of July 2019. We are
education, grass-roots conservation, monitoring and           involved in surveys to establish population trends and
protection and includes projects across the four              risk mapping, providing critical information used by
regions of Africa. Research projects range from               CITES and the IUCN to assess the conservation status
investigations into the dynamics of elephant society at       of the African elephant. We recognise the need to
a molecular level through to ranging behaviour of             reconcile elephants with their human neighbours and
savannah and forest elephants using cutting-edge GPS          our Elephants and Bees Project is core to our mission
collars. We are at the forefront of technological             to investigate innovative and cost-effective methods to
developments designed to track and analyse elephant           reduce conflict as well as exploring the cultural
movements, providing vital information for land-use           relationships between people and elephants.
management plans aimed at reducing conflict with
humans and allowing elephants continued access to             Please see www.savetheelephants.org for more details
vital parts of their range.                                   on STE’s overall organisation’s program.

                                                          3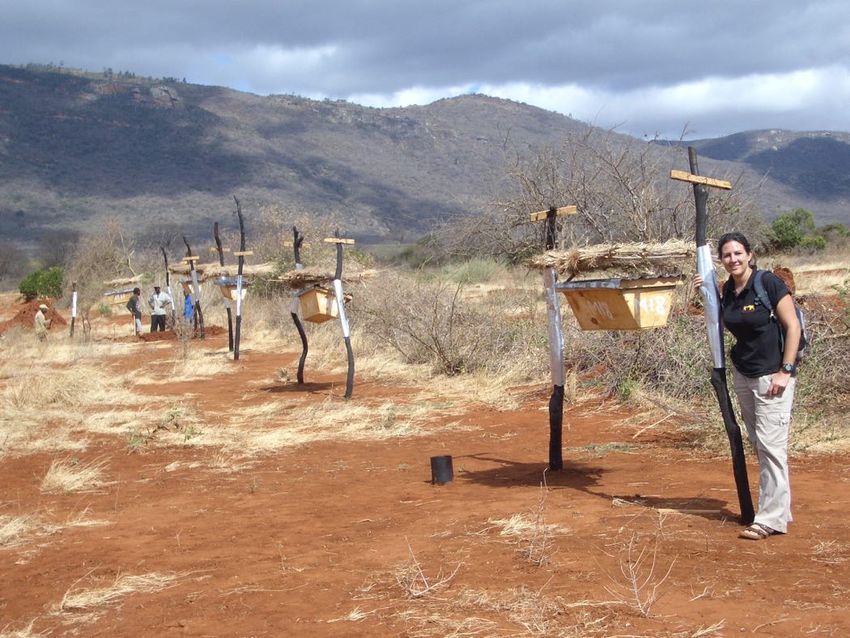
Elephant Behaviour and Human-Elephant Conflict
Elephants in Kenya are not confined to national parks and reserves and hence interactions with farmers,
particularly crop raiding, pose serious social, political, economic and conservation problems in Kenya as it
does in many other parts of Africa. Accordingly, research efforts are now focused on finding effective,
appropriate farmer-managed deterrents especially in ‘conflict’ zones where large electric fences are neither
feasible nor affordable. This Beehive Fence Construction Manual is the output of collaborative research by
The Elephants and Bees Project at Save the Elephants, in partnership with Oxford University and Disney’s
Animal Kingdom investigating the use of bees as a natural deterrent for crop raiding elephants.

Elephants avoid Bees
                             Building on traditional           Trial beehive fences have now been built around
                             Kenyan folklore, playback         dozens of farms in Kenya and 18 other countries in
                             research conducted with           Africa and Asia. This research has involved monitoring
                             elephants in Samburu and          the effect of the beehive fences on deterring crop-
                             Buffalo Springs National          raiding elephants as well as understanding how
                             Reserves in Kenya have            farmers adapt to the new technology. Beehive fences
                             demonstrated that                 have been proven to be highly successful in stopping
                             elephants will run from           elephants from entering farms and crop raiding. When
                             the sound of disturbed            cared for properly, the bees can produce a large
                             honey bees. Additionally,         amount of honey that can be sold for a significant
                             when they do run away,            increase in household income. Beehive Fence farmers
the elephants also emit a unique low frequency “bee            are benefiting from this “Elephant-Friendly HoneyTM”
alarm rumble” vocalization which warns neighbouring            and awareness and tolerance for elephants is slowly
elephants to retreat as well. These behavioural                increasing. This manual is intended to encourage
discoveries have revealed that elephants appear to             farmers and wildlife managers across Africa to manage
retain a negative memory about honey bees which                human-elephant conflict in an innovative, sustainable
‘scares’ them away from an area. Anecdotes from                and beneficial way.
pastoralists and local people tell us that elephants can
be stung around the eyes, the trunk and behind the
thinner skin of the ears which must be painful enough
to make them wary of future encounters with these
                                                                                               Elephant-Friendly
insects.
                                                                                               HoneyTM is a healthy
With assistance from The Elephants and Bees Project,                                           and valuable product
rural farmers are using this knowledge to protect their                                        of the beehive fence
fields from crop raiding elephants. They are building                                          which enhances
beehive fences of strong posts round their farms on                                            livelihoods and family
which they hang beehives at regular 20 meter spaces.                                           income.

                                                           4
Elephants and people competing for space
The African elephant is perhaps the most iconic land mammal on the continent. Catastrophic poaching in the 1970’s
and 80’s saw their populations plummet to a mere fraction of pre 1970’s numbers. An effective international ivory
trade ban implemented by CITES in 1989, combined with improved wildlife management strategies, has resulted in
rising elephant numbers, particularly in East and Southern Africa. However, these elephants are increasingly
discovering their historic range is increasingly settled by people. With landscape-level developments and huge
agricultural expansion blocking historic migratory routes, incidence of human elephant conflict is on the rise.
Elephants tend to crop-raid at night time, and farmers are often left with no choice but to shout, throw stones or
bang iron sheets to try to scare them away. This confrontation leads to heightened aggression and some elephants
may charge and attack, often leading to terrible injuries or deaths of both people and elephants.

                                         Natural migration
                                         Elephants are herbivores and have no reason to attack man unless in self-
                                         defence. Family groups travel with the young protected and guided by the
                                         older females and matriarch. Teenage bulls leave their families and join up
                                         with older bull elephants where they learn how to find seasonal water and
                                         food. As these elephants migrate through the landscape looking for food
                                         and water they often take advantage of nutritious crops. Keeping key
                                         migration corridors clear of farms and development will reduce the chance
                                         of conflict incidents.

                                         The loss of key individual elephants
                                         Unfortunately both people and elephants are sometimes killed due to
                                         conflict over resources. Wounded elephants can go wild with pain which can
                                         be very dangerous to anyone in their path. Fatal wounds resulting in the
                                         death of an elephant is not only illegal, and should be avoided at all costs,
                                         but also causes stress within the family. There is evidence that elephants
                                         who have lost a family member due to conflict or culling may become more
                                         aggressive to humans in the future.

                                         Barriers to conflict
                                         It is best to stop elephants from entering a farm as once they are inside and
                                         feasting on crops it can be difficult to chase them away safely. Farm barriers
                                         include wooden fences, thorn brush, hedges, chilli oil covered ropes, cow
                                         bells and stone walls. Electric fences can be good deterrents but are often
                                         much too expensive. Usually a combination of barriers and deterrents is a
                                         good idea. In this manual we describe how to construct beehive fence
                                         around individual farms but it is important to try combining multiple
                                         elephant deterrents.

                                                               5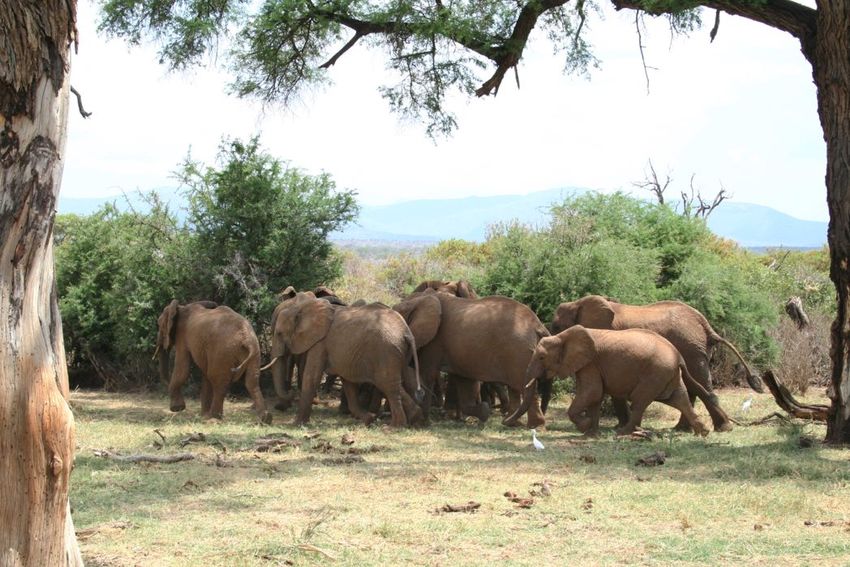
Chapter Two

                   Beehives
Traditional hives, Kenyan top bar hives, Langstroth hives and
              dummy hives in the beehive fence

                              6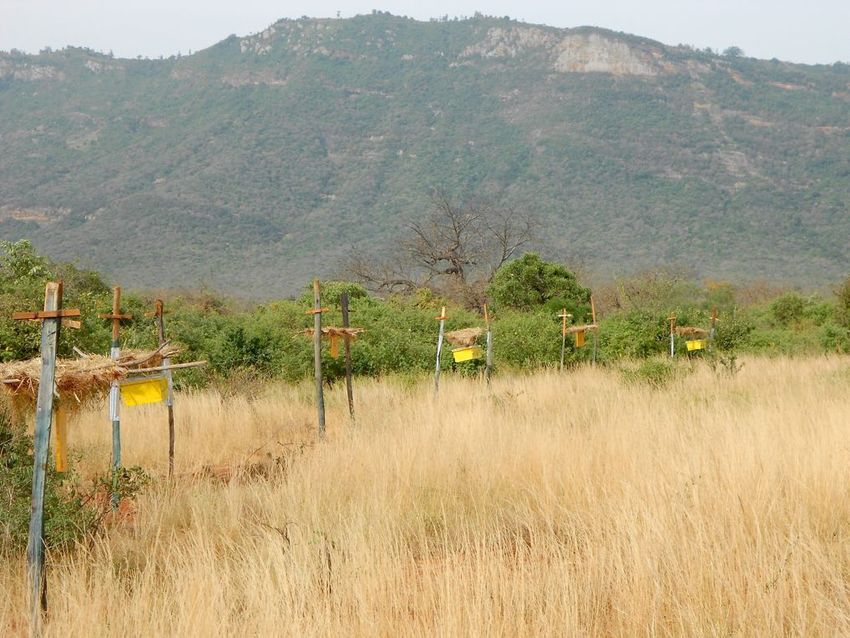
Traditional, KTBH or Langstroth Hives?
Beehive fences can be made with any type of beehive. If you already own or are using beehives on your farm it is
very cheap and easy to convert your existing beekeeping project into a protective beehive fence. Strip bark hives,
log hives, basket hives and professional timber can be hung from posts to create a beehive fence. Essential to all
hives is some kind of shade to keep the bees cool but other than this feel free to adapt the resources you have.
Below, the table summarises suggestions for the use of three types of beehives and enables you to make your own
decision on which hives to use.

                      Traditional Log                 Kenyan Top Bar                          Langstroth
                           Hives                       Hives (KTBH)                            Beehives
 Cost              Much cheaper, free if made      More expensive to make as          Most expensive type of hive
                   from hollowed out tree          materials like plywood, cedar      and usually bought from a
                   trunks. Often present in        top bars, nails and varnish        beekeeping company. Expect
                   communities and simply          need to be bought. Expect to       to pay roughly $60 for a full
                   need to be moved into a         pay roughly $35 per hive.          beehive.
                   fence structure to deter crop
                   raiding elephants.

 Construction      Simple covers need to be        Construction requires some         Intricate and complex and
                   made to close off the           basic carpentry skills and         requires a skill carpenter to
                   entrances to the hive leaving   tools. If our design is followed   construct. A super box is
                   just a few small gaps for the   one man can make 3 hives in        stacked above the brood
                   bees to enter.                  a day. “Dummy hives” can be        chamber. “Dummy hives” can
                                                   used to increase fence length.     increase fence length.

 Harvesting        Not so easy to harvest as       Easy to harvest as one top         Very easy to harvest. Honey
 ease              access to the hive is only      bar is lifted out and harvested    can be extracted from the
                   from one direction. Highly      at a time. Honey comb comes        honeycomb which can be
                   disturbing to the bees so       out in natural, attractive         then returned to the
                   bee stings and hive             curved shapes that match the       superbox. Once a hive is
                   abandonment is common           shape of the beehive. Usually      strong, frequent honey
                   after harvesting.               the comb is cut off the top        harvesting is possible.
                                                   bar.

 Honey             Honey from traditional hives    Honey is pure and brood-free       Honey is pure without brood
 quality and       tends to be mixed with          as you only harvest honey          and, if correctly extracted, is
 quantity          brood which can attract a       from the honey chamber. Less       free of wax. Minimal smoke
                   lower price. Heavy smoke        smoke makes sure the honey         use means truly top-quality
                   used to calm the bees can       tastes natural and can fetch a     honey selling at a premium
                   cause a smokey flavour to       top price at market if well        rate. Full hives can weigh as
                   the honey which reduces         filtered. The larger honey         much as 40kgs and honey
                   value. Due to their size most   chamber of KTBH can yield          harvests can be as much as
                   log hives harvesting is         5-15kg per harvest.                10-12kgs per superbox.
                   usually around 5-7kgs.

 Effectiveness     Effective against elephants.    Effective against elephants.       Effective against elephants.
 against           See King et al., (2009) for     See King, (2010) for trial         See King et al., (2017) for trial
 elephants         trial results.                  results.                           results.

                                                               7
Beehive Fences using Traditional Hives

            The First Beehive Fence in Laikipia, Northern Kenya
Following the scientific demonstration of elephant’s        An intruding elephant trying to enter the farm will
fear of African honeybees, the Beehive Fence concept        avoid the solid structures and be channelled between
was designed and first trialled in Laikipia in 2007.        them. As the elephant tries to push through the wire
Traditional log beehives were hung between wooden           it causes the attached beehives to swing violently,
posts under small roofs made of thatched sticks and         disturbing and releasing the bees to irritate or sting
grass. Some of the log hives were bought from               the elephant.
Tharaka, Meru at a cost of US$4-6 per hive and others
were found in the local area and moved into the             This style of beehive fence is ideal if you already own
beehive fence at no cost.                                   traditional log beehives as the cost of construction
                                                            will be minimal. You may want to adopt a simpler
As detailed above, posts in this trial were spaced 6m       roofing style as illustrated further on in this manual.
apart allowing the hives to be spaced 8m apart. The         Our latest research has shown that beehives can be
beehives were able to swing freely, suspended by            placed 10m apart and still be effective so do try this
tightly secured fencing wire to the top of the posts.       to get a longer fence line.
Each hive was interlinked to the next with strong
fencing wire that hooks into the hanging wire of each       (Refer to King et al., 2009 for details of this study)
beehive.

                                                        8
Beehive Fences with Kenyan Top Bar Hives
Beehive posts
should be 3m
apart
Kenyan Top Bar Hives and the next stage
of Beehive Fence Design - the bee hut.
Three 80cm long Kenyan Top Bar Hives can be constructed out
of one 8’x4’ 9mm piece of plywood using our design (p11-15).
This KTBH design (adapted from Jones, 1999) incorporates a
vertical queen excluder made of coffee wire to keep the brood
separate from the honey chamber to ease harvesting and to
increase the value of the honey.
The rain-proof roof is made from an iron sheet and is protected
from the sun by a flat-thatched roof. The hive is hung by drilling
small holes in the side walls and feeding through strong plain
wire. This is looped around the top of the posts placed 3m
apart.
An elephant attempting to enter the farm will instinctively try to
pass between the beehives. This pressure on the wire will cause
the beehives to swing, aggravating the bees and causing them
to swarm out.
(Refer to King, 2010, for KTBH trial results)
9Beehive Fences using Langstroth Hives
Langstroth beehive design
Langstroth beehives are made of rectangular or square boxes that
fit neatly one on top of the other. The larger brood chamber on
the bottom contains a set of frames containing a thin foundation
strip of beeswax that is held in place with fine strips of wire. Once
the bees have occupied the brood chamber, and built up the
foundation combs with beeswax and brood, a second ‘super’ box
should be placed on top. In between the two boxes lies a queen
excluder wire mesh that lies as a horizontal sheet over the top of
the brood chamber combs. This prevents the queen from
travelling up into the super box which allows the worker bees to
fill the super box with pure wax comb and honey stores. This is
the section that you harvest for honey leaving the brood chamber
alone.
Rain proof iron
sheet roof
Super box with
smaller frames to A super on top of a queen excluder and
collect honey brood box, held in place with a wire
150 mm
Queen excluder made of piece of coffee wire with
strengthening light wooden strips nailed to the outside.
470 mm Large brood chamber with frames containing a
starter wax foundation
245 mm Small wooden blocks with holes drilled through
the sides enable the hanging wire to pass through
Floor of beehive needs to be nailed to the bottom
of the brood chamber
Bee entrance
holes
(Refer to King et al., 2017, for trial results)
10Using “Dummy Hives” in the Beehive Fence
The beehive fence design requires hanging a beehive every 10 meters to create a strong barrier to raiding
elephants. If you spread the beehives further apart than 10 meters, the wire is difficult to connect tightly and the
barrier becomes less effective. To protect the boundary of 1 acre of farm land you therefore need 24 beehives, quite
expensive and demanding in terms of occupancy rates for the density of bees in semi-arid areas. We have
successfully tried installing “dummy hives” every second beehive and can recommend this design if you have few
beehives or a big farm boundary that needs protection. We recommend 8’x4’ 9mm plywood sheets for cutting out
dummys in the silhouette of a beehive. Shapes reflecting either KTBH or Langstroth are possible and our designs for
cutting dummy hives are included below.
55cm 55cm 28cm 28cm 28cm 28cm
10cm
35cm
80cm 60cm
35cm
35cm
60cm 80cm
80cm
A 240m beehive fence consisting of 12 beehives and 12 “dummy” beehives can protect 1 acre of farm land. 12
beehives are much more realistic for full occupations and beekeeping than 24 beehives.
Real
Dummy Real
Beehive Beehive Beehive
Dummy
Beehive ing
nnect
.....co ...
wire..
11Step by Step Construction of KTBH hives
Construction of the beehive fences using Kenyan Top Bar Hives is easy and following these
simple steps will help ensure that your beehive fence is constructed correctly with an
optimum chance of occupation by bees.
1. Wood panel preparations
The following design shows the sizes of each plywood panel that is
needed to build a KTBH hive. Standard 9mm plywood usually comes
in 2.4m x 1.2m sheets and you will find that three 80cm long beehives
can be made from one sheet. Follow the design below to cut out each
side of the beehive. 3/4 inch planed wood can also be used to make
top bar beehives so long as it is not too heavy to hang. The length
and width of each beehive can be made to suit your budgets and
resources but don’t make them too heavy. Plywood can warp and
bend in heavy rain or humid environments so consider using planed
wood in high rainfall areas.
Top Tip: Draw all pieces of the design onto the plywood sheet like a jigsaw before starting to cut.
This ensures you get the most value out of each sheet. Keep all cut offs as they will help you later for
internal parts.
122. Construction of KTBH beehive
Before you glue and nail the pieces of together, sand down the
edges to ensure a smooth surface and to prevent getting
splinters while you work. Using simple wood glue to seal the
pieces together will help prevent ants and insects from crawling
into the hive. Once glued, nail the pieces of the beehive together
using plenty of one inch nails.
For the front end of the hive, nail the front piece 2cm back into
the hive leaving a small lip at the front. This gives the bees a
place to rest at the entrance to their hive.
The 44cm long top bars should be cut from strips of
natural wood, cedar or grevaria are both good
choices. The only critical measurement is that the
top bars must be 3.2m wide. Either grooves or
points can be carved to encourage the bees to lay
down wax.
This beehive design is adopted and adapted from
Jones (1999) “Beekeeping as a business” by the
International Bee Research Association.
Top Tip: Rub a small amount of bees wax along each of the top bars to help attract bees to the hive
and to show them where to start laying their foundation comb.
133. Queen excluder
Saw one top bar in half (long ways) and
nail a piece of coffee wire in between
the two halves. Using small strips of
leftover plywood, fashion the remaining
structure of the queen excluder to fit
the inside of the tapered beehive. The
coffee wire should be tightly nailed
Coffee wire has small enough between the wooden strips and should
holes to prevent the queen from fit snugly inside the beehive.
entering the honey section of the
hive.
4. Fitting the queen
Thin strips of plywood nailed to the
inside of the hive will enable the top excluder
Leave space for six top bars bars to sit neatly. The queen excluder should be held in
between the entrance of the hive place six top bars back from the
and the queen excluder. entrance of the hive. Thin strips of left
over plywood should be nailed length-
ways down the side of the hive leaving
a 3.2cm gap for the queen excluder to
slide into place. Ideally the queen
excluder should be removable but you
Drill holes in
may need a small nail to hold it in
each corner for
securely in place. The long strips of
hanging hive.
wood will become a ledge enabling the
top bars to sit neatly inside the hive.
Drill two holes into the front of the beehive
for the bees’ entrance to the hive.
Top Tip: At this stage its a good idea to varnish the outside of the beehives with a non-insecticide
based varnish or bright white or yellow paint to protect the hives from degrading in the sun. If you use
a varnish ensure it has a polyeurethrene base as this is non-poisonous to the bees. The inside must not
be painted or varnished.
145. Top bars and roof
The top bars are the only part of the beehive that have to be measured
accurately. The bars need to be exactly 3.2cm wide - the proven distance
apart that bees like to make their comb. This includes a small gap that the
bees leave for passing between combs so they can store honey and feed
their brood. You may find it worth the investment to get these thin strips
of top bars cut with an industrial machine saw. If you don’t manage to cut
the top bars exactly to 3.2cm the bees tend to build the honeycombs over
the join of the top bars. This isn’t a disaster, it just means that you’ll find it
harder to harvest honey as several top bars will get ‘stuck together’.
The top bars should fit tightly 6. Sealing the hive
together across the top of the
Fitting the top bars into the hive should create a
beehive.
sealed chamber beneath. This be helpful during
harvesting as bees will only be able to fly out of
the gap made by a removed top bar. If you have
spare wood you can cut and place a flat piece over
the top of the bars to create a ‘lid’ which will help
keep the hive cooler under the metal roof and
keep bugs out of the hive.
Strong wire should be looped through 7. The roof
drilled holes ready for hanging. A waterproof roof is essential to keep the bees dry.
Corrugated iron sheets are ideal for this as the water flows
off the roof and away from the hive. You need to make the
roof wider and longer than the hive so that the hive is
totally protected from the rain. If you buy 3x1m iron sheets
you can roof 4.5 beehives if you cut each roof sheet into 1m
x 65cm strips.
50cm
90cm
Wooden frame
Nail the iron sheets firmly to
Holes for attaching to the sides and top of the
hive with ends of hanging wooden frame.
wire.
Top Tip: Drill two holes into the front of the iron sheet to allow the ends of the hanging wire to loop through
and tie the roof to the beehive. This stops the roof flying off in strong winds and helps stop honey badgers from
breaking into the hive. Hammering a 4-inch nail through the iron sheet creates a perfect sized hole.
15Chapter Three
Building a Beehive Fence
Step-by-step building process, live Commiphora posts,
maintenance tips, and using bees to protect trees
16Constructing the Beehive Fence
1. Measuring field for posts
Posts should be planted in a 3m-7m-3m-7m arrangement with
beehives and dummy hives hung alternatively between the posts
3m apart. Strong plain wire will be used for connecting each unit
7m apart. You should construct your beehive fence at the outer
perimeter of your farm to ensure maximum visibility to
approaching elephants. There is some evidence they recognise the
shape of beehives and will avoid them on sight. Leave any other
3m 7m 3m
fence barriers you have in place with the beehive fence as the first
barrier line to elephants.
2. Treating wooden posts
Wooden posts used to hang beehives should ideally be 8 or 9 foot
long. A termite-resistant fencing pole should be ideally used. If you
use ‘normal’ wood they will need to be treated with an insecticide
and left to dry before planting. Used engine oil is a good bee-
friendly alternative. Nearby trees should not be felled to make
posts as this is essential bee forage. Some Commiphora tree
species will re-grow to create a live bio-fence to hang your
beehives. Do not paint oil on or hammer nails into live posts.
3. Digging holes
Post holes should be dug to approximately 2.5 feet. A simple
measure for this is the length of your arm from finger tip to armpit.
It helps to hammer in stones around the base of the post and to
tightly pack the soil when erecting the posts. Weak or unstable
posts will fall over in heavy rain or when the hive is very heavy with
honey. This is a crucial step for constructing a strong and stable
fence as shallow holes will bring big issues later on.
4. Hanging the hives
Once the posts are firmly embedded in the ground you should
hammer in a strong 4 inch nail at the side and near the top of each
post. If you are using live posts, try to use natural notches or branch
forks on the posts to hang the hives. The hive should be hung at
chest height for ease of harvesting, maximum visibility for
approaching elephants, and to be out of reach of honey badgers.
See our honey badger deterrent section for more ideas for effective
deterrents.
175. Thatching shade roofs for the beehives
If left in the sun the hive will overheat and the bees will become
aggressive and leave. A simple thatched grass or stick roof is an easy
solution to keep the hive cool. It is also another swinging element to
the beehive fence that further disturbs elephants trying to enter the
farm. A lattice frame made out of sticks creates a strong base for the
thatched shade. You should sandwich plenty of grass between two
lattice work frames and use small twists of binding wire to hold the
structure together. A strong, thick shade will last much longer than a
thin one. Painted plywood rectangles are a good alternative (below).
6. Wiring together the beehive fence
The thatched shade should hang freely a foot above the hive for clear
air circulation. Hang the shade by attaching binding wire to each corner
and loop this around the post. This makes it easy to lift the shade off for
honey harvesting or if it drops over time. Each beehive and dummy hive
in the fence should be interlinked to the next using pieces of strong
plain wire. This interlinking wire should be attached to a loop made in
the wire hanging the beehive and must be on the inside of the fence so
the beehives will swing should an elephant try to enter. The wire should
be chest-height so livestock can safely pass underneath.
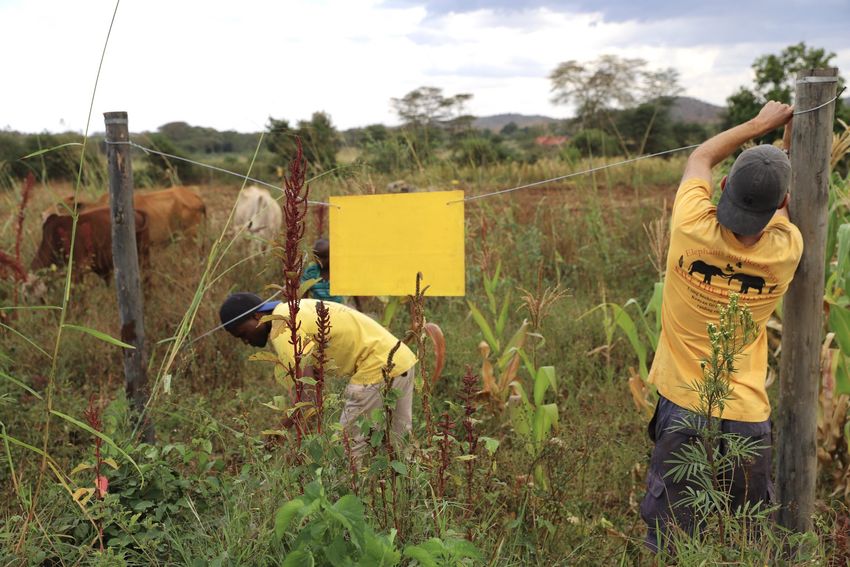
The author standing next to a section of beehive fence constructed before the planting season in the
community of Sagalla, just outside of Tsavo East National Park, Kenya.
.....connecting wire
.....
Top Tip: Paint numbers onto the beehives after they have been hung on the fence line.
Numbers help to keep accurate records of occupation and honey harvesting events and are a
deterrent to potential thieves.
18Using Commiphora Posts for a Living Fence
Live Posts - Bio-fence to hang beehives
Certain Commiphora tree species can be cut for posts and, if given a
day or two to rest after cutting, can be replanted as both a post and as
a tree. Once the roots have started to regrow, shoots and leaves will
start to grow providing natural shade for the beehives. The roots will
help to keep the post strong for supporting the beehives and will
create a living “bio-fence” that should require very little maintenance
and even provide food for your bees at certain times of year.
Commiphora species also provide good gums and resins for bees.
Cutting and preparing the posts
The ideal height for a Commiphora post is 9ft (2.75m) though the
width can be different depending on if you’ll be hanging a beehive or
a dummy hive. It’s better not to cut down larger trees than necessary,
so try to select the right size before beginning to cut. Posts for
dummy hives with a diameter of 8-10cm are sufficient. Posts for
beehives should have a base diameter of 12-15cm to support a full
hive weighing up to 40kg! Small branches can be left on to encourage
the tree to regrow. Cut posts should be stored upright in the shade of
a tree before replanting, ideally for not longer than 3-4 days.
Planting the posts
To ensure the post is stable at the base, you should dig a hole 2.5ft
deep. This should leave ~7ft of post above the ground which is the
ideal amount to securely hang a beehive. Leave 2 inches of loose soil at
the bottom to allow the roots to take hold. Once the post has been
‘planted’, refill the remaining space and use your digger to firm up the
soil around the post. You can put a few rocks between the post and
the edge of the hole to help support it while it starts to regrow. Do not
hammer nails or paint with oil as this will kill the tree.
Post replacement
Unfortunately, sometimes posts will fail to regrow and eventually die.
This may happen due to termites, because the tree was unhealthy or
because it was left for too long before re-planting. If you notice a post
turning brown or the bark beginning to crack then you’ll need to
replace it. If you need to replace a post for an occupied hive you can
dig a hole adjacent to the existing post during the day and then
transfer the hive over during the evening while in your beesuit. Dead
posts can be used to make great fertiliser!
19Common Issues & Maintenance Tips
Post maintenance & low beehives
As beehives get heavy with honey or if there has been heavy rainfall, the
posts can start to lean inwards and can suddenly snap if weak. If the
beehive gets too low it also becomes vulnerable to predators such as
honey badgers who can reach up and grab the hive. Posts should either be
replaced or dug back into the soil using stones for extra support. If all else
fails, consider connecting a 3rd post along the top to keep the two upright
posts apart. If the hive falls, lift it up immediately to stop ants and pests
accessing the honey inside and to help stop the bees from absconding.
Wiring smart
If you have to move, take down or adjust a beehive in the fence it can be
tricky to remove the wiring suspending the hive. Before hanging, you can
create wire loops at each corner of the hive that the main hanging wire
can be attached to. This will make moving, re-hanging and adjusting the
hives a lot easier. In strong wind, it’s possible that the shade roofs can be
blown upside-down or knock on the beehive. To prevent this, attach a
small piece of wire at each corner of the shade and to the wire loops on
the hive. Alternatively, create 4 small loops in the wire hanging the hive
and fix the shade on this way.
Water & feeding of bees in dry season
As the dry season approaches the bees will come under stress as their
natural sources of water and nectar dry up. You must provide clean water to
help the bees survive the dry season. If you see any signs of agitation or
swarming behaviour you should start feeding the bees with a 1:1 sugar
water solution to keep them in your hive. These bottles should be hung in a
nearby tree at least 10m from the hive to make it safe and easy for you to
re-fill without disturbing the hive. One cup of water every few days should
make sure your bees survive the dry season. Remember to put a few sticks
in the bottle so any bees that fall in the bottle can climb out!
Damaged shades
If your shades become damaged and allow too much direct sunlight
through then the hive will become overheated and the bees may leave. If
you are using plywood shades you will find that a few seasons of heavy rain
and hot sun will degrade them. Strong thatched shades will last longer than
plywood. It is important not to wait too long before thatching and replacing
your damaged shades as this may undo a lot of your hard work! It may be
difficult to replace a shade on an occupied hive so this can be done at
night.
20Bees Protecting Trees from Elephants
Several colleagues are also using beehives to protect certain trees
from elephant damage. In South Africa Elephants Alive are
successfully using beehives of Apis mellifera scutellata bees hung
on branches of Marula Trees to reduce the likelihood of elephants
breaking the branches (refer to Cook et al. 2018).
Photo: Robin Cook
Visit www.elephantsalive.org
for more information
Photo: Tamsin Lotter
Photo: Mike Kendrick
Hives can either be hung from hooks embedded into the
woodwork OR on platforms that enable easier access to
the hives for cleaning and harvesting.
Hanging beehives around the trunk of particularly
precious trees could be one way to reduce bark
stripping or trees being pushed over until the tree
has grown large enough to withstand elephant
damage.
Photo: Steeve Ngama
In Gabon researchers in The Gamba have shown that
highly active beehives filled with Apis mellifera adansonii
bees can be hung up to reduce forest elephants
Loxodonta africana cyclotis from damaging fruit trees
(refer to Ngama et al., 2016).
21Chapter Four
Beekeeping
Beekeeping introduction, hive management, honey
harvesting and honey processing
22Introduction to Beekeeping
Once your hives are constructed and installed you will want wild bee colonies to colonise them swiftly. Following
occupation, you’ll need to manage your hives properly so that the bees don’t abscond and so you have the best chance
of harvesting honey. Collectively this is known as beekeeping.
Key terms
Brood: Honeybee eggs and larvae that are raised in Nectar: A sweet liquid secreted by the flowers of
brood comb. plants used by bees to make honey.
Brood nest: The area of a colony in which brood is Propolis: A resin-like substance made by bees from
reared. collecting gums & resins from trees and used as glue
within the beehive. It has antiseptic properties.
Capped comb: Full honeycomb where bees have
sealed the cells of honey with a white wax cap. Queen: The leader of the colony. She lays all the eggs
and releases pheromones to direct the workers and
Colony: Family unit of bees comprising a queen, up to
drones.
a few hundred drones, and up to 50,000 worker bees.
Queen cell: A special, elongated cell in which a larvae is
Drone: Male bees in a colony, raised from unfertilized
fed royal jelly so that it develops into a new queen.
eggs.
Royal Jelly: A nutritious milky substance produced by
Hive tool: Simple instrument used to open hives,
worker bees from water and pollen used to rear a new
remove frames and to scrape off excess propolis or
queen.
wax.
Worker: Female honeybees that carry out most of the
Pollen: Powdery substance collected by bees from
functions in a beehive. Workers do not mate and do not
flower stamen and stored or used to feed the brood.
lay eggs.
Colony overview
Worker bees do all the work in the hive – rearing larvae, building wax
honeycomb, guarding and cleaning hive, tending the queen, receiving nectar
from other workers returning from the field, converting nectar and storing it as
honey, storing pollen, and even ventilating the hive to control temperature and
humidity. Young worker bees begin life as ‘nurse bees’ who feed and rear the
brood. They then progress into ‘field bees’ who go out to forage for nectar,
pollen, water, and propolis. Older worker bees will become ‘guard bees’ and
defend the hive from pests and predators or ‘scout bees’ who will search for
potential new beehives.
The queen bee is the only fully developed female and leaves the
hive only once or twice in her life to mate with drones. She
produces many different pheromones to attract worker bees and
direct them to their various functions within the hive. A colony
without a queen cannot operate properly.
Drone bees (males) are raised from unfertilized eggs. Their only
function is to mate with the virgin queen, who stores the semen for Drone
the rest of her life and uses it to lay brood. She is able to lay either
drone (unfertilized) or worker (fertilized) eggs, depending on the
needs of the colony.
23Encouraging Colonisation
Diverse vegetation
Ideally the area surrounding your farm has diverse wild vegetation to give
bees enough resources to build strong, healthy hives. Ensuring large trees,
particularly Acacia species, are present will be a big help to the
productivity of your bees. Different plants flower at different times of year,
so a wide variety of species will help make pollen and nectar resources
available for the bees for as much of the year as possible. Certain crop
types including moringa, sunflowers and cassava are highly attractive
sources of forage whereas single crop types will be less attractive to bees.
Attractants
Attractants will encourage swarms of bees to colonise your hives. The best
attractant is beeswax - a frame with a fresh foundation wax is ideal.
Propolis is also attractive to bees and can be rubbed around the hive
entrance. Lemongrass or lemongrass oil is highly attractive to bees and can
also be rubbed at the entrance. Honey itself is NOT a good attractant and
will only attract pests like ants. A hive that already had bees will colonise
more quickly than a new one. Bright hives (painted yellow or white like
flowers) help attract bees.
Clean hives
Maintaining clean hives is also crucial - bees are very clean themselves and
want a clean home. They will not move into a hive that is dirty or has
become inhabited by wasps, spiders, moths, lizards or even some snakes
so be sure to check unoccupied hives at least once per month for cleaning
and to remove any unwanted guests. Prune (but do not clear) grass and
vegetation under the hives to minimise access to pests.
Providing water
All living things need water and honeybees are no exception. Bees will fly
up to 3km from their hive to search and forage for water. It is used for
many essential functions in the hive including honey production, brood
rearing, production of royal jelly and even to control the temperature and
humidity of the hive during the dry season. When scout bees are out
searching for a new home they will take note of any water sources in the
area. If there are no natural water sources in the area then providing a
container filled with clean water will encourage wild swarms to occupy
your hives.
24Maintaining and Managing Occupied Hives
African Honeybees can be very aggressive and give you a painful sting. They are most aggressive during the
daytime so all beekeeping that occurs around houses or farmsteads should be carried out in the evening hours to
avoid conflict with children and livestock on the farm. Avoid opening occupied beehives if it is raining or windy.
Opening a beehive to add a superbox or harvest honey will disturb the bees and trigger them to attack. There are
a few important precautions to take to ensure you aren’t stung and can complete your beekeeping session with
as little impact on the bees as possible.
Protective clothing
You must make sure to cover all exposed skin. Wearing a beesuit is ideal
as they are designed to prevent bees from stinging through the
material. Wear long clothes underneath, gumboots, beekeeping gloves
and a baseball cap on to keep your face clear. You will need a work light
for beekeeping after dark. Bees react very aggressively to white light so
use a red light if possible as bees cannot see this colour. Try not to wear
any perfume or aftershave before approaching a hive - they will attack!
Smoking the hive
Smoke masks alarm pheromones produced by disturbed bees so will
decrease their aggression while beekeeping. A smoker can be bought
from any beekeeping supply shop but you can also make your own. It is
helpful to apply a few puffs of smoke before you removed the hive roof
and as you lift each frame out. Good smoking materials include wood
shavings, small sticks and compact dry grass. Make sure you don’t over-
smoke the bees or direct a lit flame towards the hive.
Slowly, but surely
Opening a beehive and becoming surrounding by angry, buzzing bees
can be quite intimidating at first. Be assured that your beekeeping
clothing will prevent bees from getting in or stinging you. Work slowly,
remove one frame at a time and don’t forget to use your smoker if the
bees start become aggressive. If you are stung, remain calm and slowly
walk away from the hive if necessary. Sudden movements and loud
noise will only attract more bees. You can use your smoker to mask the
Photo…?
alarm pheromone on the sting.
Avoid crushing bees
As you lift out honey comb frames to check the colony for pests,
parasites, and for honey production be very careful as you handle the
bees. Its easy to crush bees by accident and not only is this not good
but the smell will also anger the other bees and cause more aggression.
Try to find a soft brush or bunch of leaves to gently brush the bees back
into the hive before removing any frames. A short but firm tap of the
frame on the hive should knock the bees back into the hive.
25Checking your hives
The most important part of beekeeping is regularly checking on the
health and progress of your bee colonies. By looking at the colony size,
behaviour, honeycomb, brood, honey and pollen stores over time you
will learn to understand what is happening in the colony and what
action you can take to help the colony grow, remain strong, produce
lots of honey and be effective at deterring crop raiding elephants. If
you do need to take action, inspections will help show you how
effective your intervention has been. You should be looking to answer
questions such as:
• How is the brood developing in the different stages (eggs,
larvae, capped cells)?
• Are the cells filled with honey and pollen?
• Are there any pests or diseases affecting the hive?
• How busy is the hive entrance?
• Are there many bees coming and going from the field?
• Are there guard bees protecting the entrance to the hive?
• Are the bees using the water source that you have provided?
The Brood Box
If you have Langstroth beehives, you need to wait for the brood box to fill with a
healthy bee colony before you add the superbox. This can take anywhere
between 2 weeks and 4 months depending on conditions. If you need to remove
frames it is important that they are returned in the same order. It is important
not to add the superbox too soon as this will create a large empty space of
which pests may take advantage. Once there are 5-6 frames of honeycomb with
active bees, brood and some honey stored you can add the meshed queen
excluder and super box that will become the honey production area.
The Superbox
After the queen excluder and superbox are added, worker bees will start moving
up to expand the colony’s stores with more honeycomb, honey and small
amounts of pollen. Only worker bees are small enough to pass through the
queen excluder into the superbox so honey produced here will be pure and free
of brood. The brood box should NOT be harvested for honey so that the queen
is left as undisturbed as possible. This area is the factory producing new bees
and it’s essential that the colony remains strong for repeat harvesting and
effective elephant deterrence.
Small Colonies
Small colonies will focus on brood rearing to build up the population of the hive.
As the colony grows, the number of worker bees needed for brood production
and maintenance will decrease. They will be released from these duties to now
forage for water, nectar, pollen and propolis. Do not expect a honey harvest
from a small colony. Instead, be patient and ensure they have the right
conditions to survive the dry seasons and grow when forage is abundant. If
managed correctly, a small colony can grow into a large, strong one and
produce lots of honey in future seasons.
26Honey Harvesting and Processing
Honey harvesting can be the most exciting part of beekeeping and is an extra financial reward for all your hard
work maintaining your fence and caring for your bees! Harvesting at the right times and in the right way ensures
you will receive the maximum amount of honey while causing minimal disruption to your bees. Honey production
is greatest when there are abundant flowering plants, so harvesting towards the end of this vegetation bloom
should give you a good yield while still leaving plenty of stored honey in the brood chamber. Honey should not
be harvesting during the dry season or from the brood chamber at all. This will cause substantial stress to your
bees and likely lead to them absconding.
Honey harvesting
Start by applying a few puffs of smoke into the entrance and under the
lid at to mask any alarm pheromones. Next, check the amount of honey
present in each frame. As a general rule, only frames with complete
honeycomb containing at least 75% capped honey should be harvested.
Frames containing small combs or large amounts of uncapped honey or
empty cells should be left and checked again the following season. Full,
capped frames should be taken out using your hive tool and brushed with
your bee brush to remove any bees. Frames should be put into a bucket
and covered with a mosquito net or cloth to keep away bees and bugs.
Honey processing - KTBH or Traditional
Harvesting from the honey chamber of a KTBH or traditional beehive will
provide you with sheets of pure wax comb filled with nothing but
delicious honey. The cut honeycomb should be smashed and filtered
through a fine mesh material into a bucket. Either leave the honeycomb
overnight to drain or squeeze the comb to release the honey. Leftover
wax is a valuable resource that can be made into beeswax products or
new foundation wax strips.
Candles and lip balms
Here are two quick recipes to make use of
Lip Balm - Ingredients required: 200g Olive Oil,
any spare beeswax:
50g Beeswax, 50g Coconut Oil, 20g Honey, 10ml
Vanilla Essence. Makes 300ml of Lip Balm (20 x 15ml
Beeswax Candle - Ingredients required:
tins)
Beeswax, Candle Wick, Mold, Cooking Oil
1. Gently melt the beeswax in a pan or double
1. Gently melt the beeswax in a pan or boiler.
double boiler.
2. Add the olive and coconut oils and stir just until
the wax re-melts then remove from the heat.
2. Coat the mold with a layer of cooking
oil, cut the wick and dip it in the melted 3. Add the honey and vanilla. Mix just until it starts
beeswax. to thicken and all the ingredients are thoroughly
combined.
3. Secure the wick at the bottom of the
4. Pour into tins or containers while still liquid and
mold and pour in the melted beeswax.
allow to cool before sealing. You can gently re-
4. Allow to fully cool for ~5 hours before melt the mixture if it solidifies before you’ve
use. Any shape mould can be used. finished pouring!
27Processing Honey from Langstroth Hives
Processing honey harvested from Langstroth hives can produce pure, wax-free honey, though it does require extra
resources and time. If you do have a spinning centrifuge facility or the option to buy one, we highly recommend
processing your honey in this way. For the full process you will need:
• A sealed room • Decapping tool • Set of sieves or muslin cloth
• Hand centrifuge • 2-3 buckets • Plastic spatula or scraper
• Metal or plastic trays • Cooker to sterilise jars • Honey jars and lids
1. Before you start, ensure that all equipment and work surfaces are fully clean and dried with no water droplets.
Bring a pan of water to the boil and put in your jars and lids to make sure they are clean and sanitary so honey can
be stored safely. Ideally place these jars onto trays into a kitchen cooker to sterilise the jars above 100C.
2. Start by holding the frames one at a time above a metal catching tray and removing the wax cell caps using your
decapping tool or even a fork. Keep all wax cappings as a resource to make candles and lip balms.
3. Once fully decapped, load the frames into the centrifuge and spin rapidly. Turn the frames a few times to ensure
all honey is removed from both sides. Keep the empty frames with honeycomb to replace any removed for
harvesting. You can also put a new superbox on a brood hive with old honey comb frames (assuming no disease).
4. After all frames have been spun, open the tap at the bottom of the centrifuge to pour the honey carefully
through the first sieve and into a bucket below. Use your spatula to scrape all excess honey from the sides.
5. Wearing gloves or at least thoroughly cleaned hands, hand-squeeze decapped wax and any broken honeycomb
to extract the honey from here. Keep this beeswax to sell or make candles and lip balms if you have access to
6. Gently pour the honey through each subsequent sieve and cloth to filter out all wax particles until you are left
with pure, clear honey!
7. Pour the filtered honey into the clean, dry jars and secure the lid tightly. Add labels and decoration.
8. Make sure to thoroughly clean and rinse all your equipment once you are finished as leftover drops or traces of
honey will attract ants and bees.
Elephant Friendly Honey
Honey harvested from beehive fences has been coined as ‘Elephant-Friendly Honey’. The elephants are deterred
from entering farms during their natural foraging activities ensuring that farmers are less disturbed by elephants
and, we hope, will become more tolerant of elephants walking near their farmland. Simple labels can be made for
honey jars to advertise the unique source of the honey and this will attract interest and support for more beehive
fence projects. Keep a record of how many kilos of honey is taken from each hive.
28Chapter Five
Pests and Parasites
Honey badgers, wax moth, ants, hive beetles and
prevention & management
29Honey Badgers
Honey Badgers are very special animals. They are nocturnal (active at night) and are mostly solitary but do
occasionally hunt in pairs. Besides honey, they feed on several animals including rodents, birds, lizards, insects, rats,
mice, scorpions and they hunt and eat very venomous snakes like cobras, puff adders and mambas. They are famous
for being fearless and will stand up to lions and elephants! Tourists love seeing honey badgers in the wild and they are
famous for their bravery.
Honey Badgers & Beehive Fences
Honey badgers are a particular risk to beehives hung in a beehive fence
as the posts offer an easy access route to the hive as they can easily grip
onto wood. Rather than killing these rare, important animals, ensure your
hives are protected with strong deterrents that will keep your honey safe
year after year. Plan to either a) stop the honey badger climbing the post
or b) stop the honey badger ripping open the beehive once it reaches the
hive. If you have the budget, you may chose to add more than one
deterrent.
Iron Sheet Deterrents
This is a method we have used for many years and is relatively cheap and
easy. We suggest you buy a 3m iron sheet (approx $8) and cut 70cm
strips from it (roughly 8 pieces per iron sheet) to wrap around the posts.
If you have live Commiphora posts don’t nail the iron sheet onto the live
post, use wire woven tightly through small holes in the iron sheet to hold
the iron sheet onto the post. This system works if your posts remain
upright as the honey badger can’t get his claws into the metal.
Sometimes we find these metal sheets house pests like spiders can
suffocate live posts.
Nzumu’s Cage Deterrent
This innovative metal cage was designed by our project officer in Kenya
and it stops the honey badger from landing on the hive and ripping open
the metal roof. The spikes are pretty nasty to walk on, but they are static
so would not actively harm the honey badger. To make these, buy a large
1.2m x 2.4m grid wire mesh sheet from a hardware store that are typically
used for construction and cut it in half. Bend the corners over to make a
cage and cut out the corners to neatly attach the sides together. Leave
gaps to slot the cage over the hanging wire. Approximate cost per
deterrent of $4.
Metal Cone Deterrent
As honey badgers can easily climb up the wooden posts we have
experimented with attaching a metal cone umbrella to the posts with
some success. The advantage of this is that it doesn’t suffocate live posts
like iron sheets nor do they harbour any pests. The idea works well if the
cone is secured central on the posts but if it leans to one side or is not
wide enough, the honey badgers can climb over. We also found these are
tricky to attach at the top, we welded small attachment pieces of metal to
the top but the cost of manufacture started to become prohibitive.
30Wax Moths
After the Honey Badger, Wax Moth are the biggest threat to your honeybee colonies. They can affect the wax within
the beehives and can destroy that hard-earned honeycomb in little time if left unchecked. Wax moths can enter
hives at night when the bees are less active and lay their eggs, particularly in joins and crevices that the bees may
struggle to reach. Once the moth larvae hatch they begin feeding on wax, pollen, hive debris and brood, tunnelling
their way through the honeycomb as they eat. They leave behind an extremely sticky web and lots of waste -
conditions that often lead the bees to consume their honey and leave the hive. As always, prevention is better than
the cure, and there are a few ways you can help prevent max moth infestations.
Entrance reducers
Wax moth are more easily able to enter a beehive through larger gaps. Strong
honeybee colonies will naturally fill the gap at the entrance to the hive with
propolis specifically to keep pests out. However, this can take several months
with a newly occupied colony that first needs to become established and build
honeycomb. You can help prevent wax moth infestations during this critical
stage of development by fitting a small piece of wood or a tight-fitting stick in
the entrance to reduce the size of the ‘door’. Other gaps that a wax moth may
use to enter the hive should be filled in the same way.
Checking hives & keeping strong colonies
Strong and healthy honeybee colonies will fare much better when attempting
to fight off potential wax moth invaders. Hives should be checked at least
every month for pests (wax moth, honey beetles etc.) and for the levels of wax
comb and honey. Frames infested with wax moth should be removed and any
evidence on the body of the hive should be scraped off and removed. During
the dry season the bees will slowly consume their honey stores to ensure their
survival until the next rainy season. You can assist here by providing a solution
of 1:1 sugar and water to keep up the strength and resilience of the colony
during this time. Don’t forget to put in sticks so the bees don’t drown!
Cleaning hives after an infestation
Unfortunately wax moth invasions do sometimes cause a colony to leave.
However, it should also be noted that once a colony decides to abscond they
will stop fighting off any wax moths. Without regular checks it is difficult to
know if the bees left due to a wax moth infestation or another reason. If you
have an empty hive containing wax moth a thorough clean is critical.
Any evidence of wax moth or infested comb on the frames, lid, or hive body
should be scraped off and burned or fed to your chickens. Boiling water
should then be used to clean all the frames, hive and lid before being left to
dry in the sun for 24 hours. Only then should the hive be reassembled, re-
waxed and hung in it’s position in the fence.
31Ants and Hive Beetles
Ants and Grease
Ants are a common pest that the beehive fence farmer should not forget
to consider. Left unchecked, they are capable of attacking the hive over
the period of several nights, leaving the colony weak and unable to
protect themselves. Colonies that have been under siege from ants over
multiple nights will be more aggressive during the day. Ants are most
interested in consuming the brood within the colony and will most likely
carry out their raids during the evening hours when bees are less
aggressive. Ensure that the wires connecting the hive and the shade to
the posts are greased in the middle. Ants are unable to walk over grease
as their legs will get stuck and thus prevent them reaching the hive.
Hive Beetle
Hive Beetles are another common pest to be aware. There are two
common types - the Small and Large Hive Beetle. Both types can feed on
just about everything within the hive - honey, wax, brood, pollen and even
food regurgitated from guard bees. Similar to wax moth, they will lay their
eggs in hard-to-reach places within the hive. Heavy infestations cause the
hive to become ‘slimed out’ forcing the colony to abscond.
Any Hive Beetles found during an inspection should be removed and killed
to prevent them from reentering the hive. Entrance reducers can be used
to make it more difficult for the beetle to get inside. Similarly, any cracks
or openings (except for the entrance) should be filled with sticks or spare
pieces of wood. Grease will also help restrict access. Strong colonies will
be able to fight off most potential invaders but small colonies or those
weakened during the dry season may be vulnerable.
Long grass
It is sensible to keep some vegetation under your beehives as cleared
ground absorbs a lot of radiation from the sun and may cause your hives to
overheat. However, long grass or other vegetation that has grown tall
enough to reach your hives will provide a means of access for several types
of unwanted insect pest. You should regularly cut back this vegetation to
prevent this from happening. Once again, if you have a particularly
aggressive colony this should be done during the evening hours while
wearing your beesuit.
32You can also read