Best Practice Guidelines for Cleanliness of Rotary Valve and Unloading equipment for Bulk deliveries.
←
→
Page content transcription
If your browser does not render page correctly, please read the page content below

Best Practice Guidelines for Cleanliness of
     Rotary Valve and Unloading equipment for
                   Bulk deliveries.

Rotary Valve Cleaning with safety grid in place.   Rotary valve set up for “discharge Operations”.

Compressor and Rotary valve - side operation       Showing Rotary valve position

                                                    Issue 1          November 2013

                                                                                                     1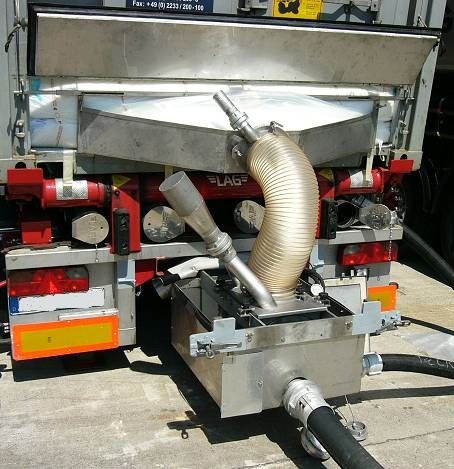
DISCLAIMER

This document is intended for information only and sets out guidelines for the safe Unloading of Bulk
chemical products via the Rotary Valve system and at the same time mitigating the chance of
contamination. The information provided in these guidelines is provided in good faith and, while it is
accurate as far as the authors are aware, no representations or warranties are made with regards to its
completeness. It is not intended to be a comprehensive guide for the Unloading of Bulk chemical
products via the Rotary Valve system. No responsibility will be assumed by ECTA or the co-authors in
relation to the information contained in these Guidelines.

                                                                                                          2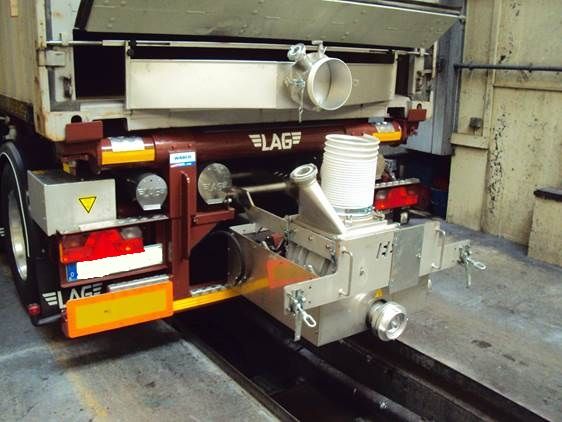
TABLE OF CONTENTS
                                                    Page No

1       Introduction                                     4

2       Objectives and Scope                             4

3       Roles and Responsibilities                       5
        3.1 Site Management & Site Operators,            5
              Transport Management & Drivers
        3.2 Training & Communication of Drivers          5
              & Unloading Operators

4       PPE                                              6

5       Product Segregation                              7

6       Customer Instructions for Unloading              7

7       Handover Responsibilities and Legislation        8

8       Dual Person check list                           8

9       Container Preparation and Cleanliness            9

10      Operations                                       13

11      Chassis and Rotary Valve Cleanliness             15

12      Fit for Unloading                                23

13      After Delivery – Disassembly                     23

14      Further Cleaning / Cleaning Station              23

15      Contacts                                         25

                                                              3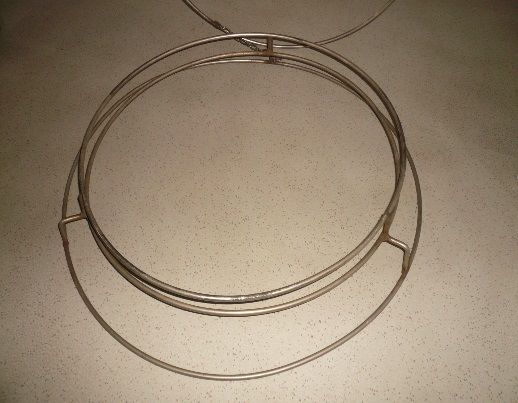
1.0 INTRODUCTION
NB These guidelines should be read in conjunction with the ECTA/Cefic Guidelines :-
Reference is made to the following ECTA Guidelines which are available online at www.ecta.com
BBS Safe Driving of Vehicles
Best Practice Guidelines for Safe (un)loading of Road Freight vehicles, covering Technical,
Behavioural and Organisational aspects.
Best Practice Guidelines for the Safe Working at Height in the Chemical Logistics Supply Chain
Best Practice Guidelines for the Safe Use of “Lined” ISO Box Containers for the movement of Dry
Bulk Products
Best Practice Guidelines for the Safe Tipping of Silo Tanks
ECTA codes
Continuous efforts to improve safety and reduce the incidence of contaminations during the transport
and discharging of Bulk products and the associated handling of chemicals, are part of the overall aim to
improve the safety & performance of both the chemical industry and the transport industry.
Analysis of statistics indicates that contamination, although low in frequency, have the potential to be
very high in costs; this excludes the cost of additional man hours required to restore the status quo.
Further analysis shows human factors to be the most significant cause. It is therefore essential to
increase the known requirements during unloading by influencing these human behaviours.
These guidelines aim at offering guidance regarding the overall safety of unloading operations both
from an organisational, technical and behavioural point of view.
2.0 OBJECTIVE AND SCOPE
The objective of these guidelines is to provide assistance in the prevention or elimination of
contamination of product conditions and situations during unloading operations, recognising the need
for interaction between the different parties involved.
These guidelines define the responsibilities and roles of the different parties involved in
unloading operations, in particular operators and drivers.
The scope of these guidelines includes the safe unloading of chemical and non-food products by
operators and drivers at production sites, storage terminals, customers, receivers and covers the
unloading of bulk chemicals.
In all circumstances, the applicable national or international regulations should always be complied with
and take precedence over the recommendations made in these guidelines.
The guidelines are of a voluntary nature. Individual companies may decide to apply the guidelines either
in full, or in part, according to their own judgement (risk based assessment) and in light of their specific
circumstances.
4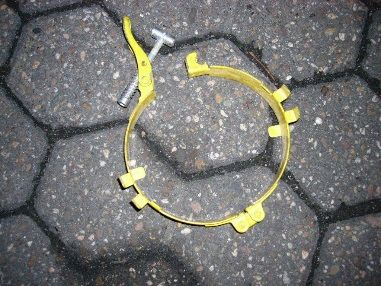
The objectives provide guidance about
The conditions required to allow safe unloading operations thereby mitigating the
potential for contamination.
The different unloading systems, the hazards and operational risks and precautions to be
taken.
Responsibilities and roles in unloading operations
The minimum training requirements
3.0 ROLES and RESPONSIBILITIES
3.1 Site Management & Site Operators, Transport Management & Drivers
Communication at (un)loading sites is one of the most common sources for discussion and unsafe
actions during (un)loading.
For assuring that drivers and operators understand each other when communicating during the
(un)loading process a common language has to be found. For international transport, drivers and
operators often do not share a common language; both drivers and operators should be familiar with a
fixed set of the most common expressions in a shared language.
Both transport companies and (un)loading locations should make sure that their drivers/operators have
knowledge and can make use of at least the fixed set of expressions in English.
Transport companies and (un)loading sites should ensure that their drivers and operators obtain the
required skills. This can also involve the development of supporting means (e.g. leaflets, apps,
handbooks).
Rather than instructing by elaborate sentences, pictures or pictograms can be used
The expressions required to be known by both drivers and operators are the ones defined in
Transperanto (www.transperanto.org ).
Many of these expressions are also conveyed in pictogram see: www.transperanto.org
3.2 Training and Communication of Drivers and Unloading Operators
It is recommended that all activities associated with the movement of dry bulk products in box
containers are performed by professional companies that have a proven experience in handling and
logistics of dry bulk products.
These companies have the ability to identify the critical activities in the supply chain and can:-
• Identify and mitigate all risks and hazards for each activity (such as static electricity and dust
explosion etc.)
• Identify the severity of the risks for each activity by the use of a Risk Matrix
• Identify persons who may be involved in the work associated with known risks
• Develop training programmes for each Risk/Hazard
• Train all involved personnel and conduct refresher training when required including the
recording and maintenance of personnel files that training has been conducted.
5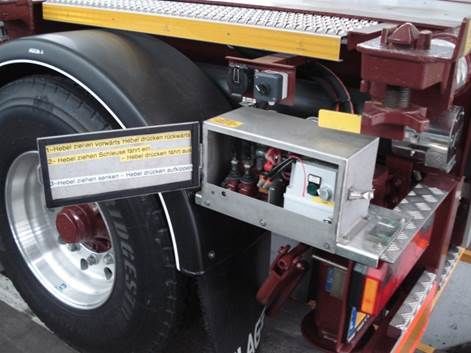
4.0          Driver PPE Requirements for Bulk delivery to chemical sites

         The document covers only general PPE requirements that are applicable for general chemical products of most sites. For specific chemical plant
         environments, additional specific PPE may be required in accordance with the relevant safety data sheet (SDS) and risk assessments. These additional PPE
         requirements are not included in the present document and are to be communicated to the carrier with sufficient notice or will be made available by the
         chemical plant.

         PPE                 Reference to standard                                                                                                                           Description

                                                                                                                                             Protection against liquid droplets/splashes Minimum EN 166 with side protection. This side protection is guaranteed if
                                                                                                                                             special shaped spectacles are used. If straight shape spectacles are used, side protectors are to be present.
Safety Spectacles        EN 166-3 with side protection

                                                           Type 2 : Drivers loading and unloading bulk granulates or other solid chemicals
                                                                                                                                             Product giving rise to “dust” may require alternate PPE.

                                                                                                                                             For packaged goods, drop and swap and bulk products protective clothing which covers arms + legs + body is sufficient.

                                                                                                                                             A jumpsuit or vest + trousers are acceptable.
Protective clothing      Arms + legs + body covered
                                                                                                                                             It is recommended that clothing should not have “pockets”, to prevent items falling from pockets into the product and
                                                                                                                                             discharge system.

                                                                                                                                             Steel toe, antistatic, absorption around heel. Safety boots are acceptable too. Steel sole (EN 20345-S3) is not
Safety shoes             EN 20345 S1 – closed
                                                                                                                                             recommended as it is uncomfortable for driving. Clogs, even EN 20345 are not acceptable.

Helmet                   EN 397                                                                                                              Industrial helmet protection. Safety caps do not provide sufficient protection from falling objects.

Hearing Protection       EN 352-3 Ear Defender on Helmet                                                                                     Ear defenders and ear plugs
                         EN 352-2 Ear Plugs
                                                           without danger classification

Safety gloves                                                                                                                                Safety gloves.
(Suitable for Bulk
work)
                                                                                                                                             High-visibility clothing for professionals – warning vest
Warning vest             EN 471
                                                                                                                                             Same standard of high visibility clothing is already required for ADR as well as for all drivers in most European countries.

Fall arrest harness      EN 361                                                                                                              See Note Best Practice Guidelines for the Safe Working at Height in the Chemical Logistics Supply Chain. www.ecta.com

                                                                                                                                                                                                                                                               6
5       Product Segregation/Cleaning methods

5.1     The rotary valve and discharge equipment are designed to cover the delivery of a wide range of
        (chemical) products. When the correct cleaning, set up and disassembly procedures are
        followed as per these guidelines, the risk of product contamination is mitigated.

5.2     Dedicating equipment to a single product or grade of products is one method to reduce the
        chance of product cross contamination. However, this is not always possible due to cost or
        equipment requirements.

5.3     The next consideration is “similar products” being grouped for the delivery equipment being
        utilised, e.g. a particular type of polymer or product and its grades, would be handled by the
        same delivery equipment. This method must be supported by correct cleaning and checking
        procedures both during and between delivery discharges.

5.4     There is then the final step of broader product segregation e.g. powders, solids, types of
        chemical products etc. Volume (number of deliveries) to receiver or activity levels are an
        important element for both the supplier and the LSP to consider in the correct and efficient use
        of the delivery equipment in planning dedicated or semi dedicated equipment duties.

5.5     When accepting product to be carried with bag in box, alu van or van box technologies;
        consideration must be given to the product characteristics and the cleaning regimes required to
        remove all trace of the material from the delivery equipment and system.

5.6     This should be discussed with the supplier or producer of the product before undertaking the
        activity. A cleaning regime should be agreed and must be communicated to the LSP despatch
        office and driver to ensure it is planned and carried out.

5.7     Product cross contamination can occur where the cleaning is not robust or rigorous enough or
        where the preparation in equipment set up is not applied correctly, see Section 11. The dual
        person check in Section 8 reflects the need for the receiver to cross check the work undertaken
        by the LSP’s driver in this important step of the delivery.

6       Customer Instructions for Unloading

The details listed in Section 9 through 14 cover the expectations between loading
operatives, driver and unloading operatives. These should be clear with each party’s role
and activity described and for best practice within job instructions. It is recommended that
drivers undergo site induction and training before delivering product to site. See

        “Best Practice guidelines for Safe (un)loading of Road Freight vehicles, covering
        Technical, Behavioural and Organisational aspects”.              www.ecta.com

                                                                                                          7
7       Handover Responsibilities

NB      The main message communicated to consignees is that the goods are considered to have been
delivered, (also valid for bulk deliveries), when the truck is "ready for unloading" at the consignee's
premises, and that the driver is the agent of the consignee, and not of the supplier, during the
unloading process. Therefore the consignee has the responsibility to check and control the unloading
equipment and the unloading process.

Also according to the CMR terms (Article 30.1) the consignee has a responsibility to check the cargo
before delivery takes place:

    http://www.jus.uio.no/lm/un.cmr.road.carriage.contract.convention.1956/doc.html#157

Summary Incoterms 2000/2010

The summary/commentary of the 2000 Edition of the Incoterms states that DDP " ...means that the
seller delivers the goods to the buyer ... not unloaded from any arriving means of transport at the named
place of destination ...". The summary/commentary to the 2010 Edition of Incoterms states that DDP
means "... the seller delivers the goods when the goods are placed at the disposal of the buyer ... on the
arriving means of transport ready for unloading at the named place of destination". This simply repeats,
and adds nothing to, what is contained in the Incoterm itself.

8       Dual Person Check

Following the above statements (section 7) it is recommended that the receiver of the product being
delivered takes an active part (checking presented documentation, cleanliness of the unloading
equipment, correct silo for the product delivery etc) in the delivery process for example with a delivery
checklist. This should define the responsibilities at unloading and should be jointly signed for between
the Site operative and the Carrier Driver.

A checking system is recommended to ensure safe and secure delivery of product and to mitigate
contamination issues.

                                                                                                            8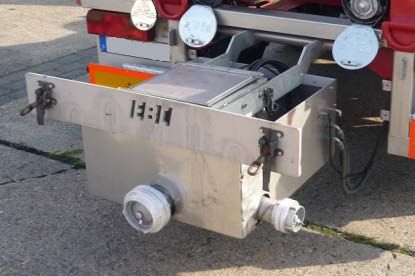
9 Container Preparation and Cleanliness - Checks before Loading/Unloading

Although this Best Practice Guideline is mainly focussing on the cleanliness of the unloading equipment, it is considered as very important, that the following points are already
checked before loading, so the container is fit for purpose and there is no risk of associated contamination:

General application for Container Cleanliness Process – Delivery Procedure Audit
 Step     Responsible                 Process Description                                      Tools                                                Quality Critical Elements

   1     Customer         Supplier / Customer Order                       Business and customer requirements to be            - Option to present ECD or liner certificate to customer (on request)
         Service          Quality Critical: List exceptional and          captured in the Order template.                     -
                          agreed customer requirements in the                                                                 - Loading times, Delivery times plus any special requirements.
                          instruction issued to the carrier.
   2     Carrier          Pickup of empty container at terminal or        Carrier check list including container and          - Container outside: free from damages which affect the integrity
                          other such location                             chassis cleanliness (outside appearance)              of the container, clean, odour free, rust free especially around the
                          Quality critical: check container on ‘fit for   inspection regimes.                                   roof hatches. See picture left
                          load’                                                                                               - Chassis: undamaged, clean, odour free.
                                                                                                                              - Recommended use of an interchange document between parties.

                                                                           roof/ top of container is bowed down.
                                                                          In case the roof / or top of the container is
                                                                          not flat, rain water may enter into the
                                                                          container, below that hatch.
   3a    Carrier          Installation of liner                           Carrier container check list covering               - Container inside: dry, clean, odour free, ready for liner installation
                          Quality critical: Install the correct type of   cleanliness and ‘fit for purpose’ including liner   - Twist and bend loading sleeves (create ‘swan neck’ and tie in a
                          new liner and place seal at letterbox.          certificate (inside appearance).                      bow) and suspend inside the roof liner attachment point (if
                                                                                                                                applicable), after lining & in advance of loading.
                                                                                                                              - Complete liner certificate (provide copy for customer or customer
                                                                                                                                upon request).
  3b     Carrier          Check cleanliness of ‘alu box’ or ‘van box’     Carrier provides Europe Cleaning Document           - ECD according to customer specification.
                          container.                                      (ECD), reloading confirmation (in case of           - Reloading confirmation.
                          Quality critical: container inspection          same reload with no cleaning required)
   4     Site Logistics   Check-in of truck / container on site           - ECD checklist (if required) or Liner              - Check ECD against agreed requirements.
                          Quality critical: Shipment id, time-stamp       Document
                          ‘in’, ECD docs etc.

                                                                                                                                                                                           9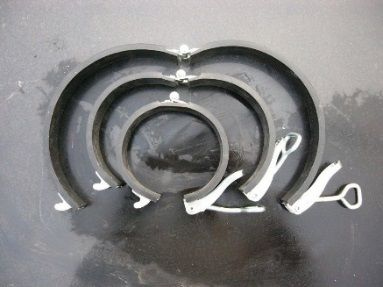
5    Site Logistics   Inspection upon site arrival                    Equipment Checklist including container     - Container outside: free from damages which affect the integrity
                      Quality critical: Inspect container and         inspection                                    of the container , clean, odour free, rust free, no rust or
                      (chassis cleanliness)                                                                         watermarks around the roof hatches. See above point 2
                                                                                                                  - Chassis: undamaged, clean, odour free Non-compliance
                                                                                                                    (rejection) identified via customer requirements.
                                                                                                                  - Note. For intermodal movements the loading chassis may not be
                                                                                                                    the delivery chassis.
6    Carrier          Prepare equipment to load                       Carrier Driver Handbook – loading           - Ensure top of container is clean.
                      Quality critical: Open container and                                                        - Install liner around roof hatches with proper devices (loading
                      prepare for loading                                                                           rings).
                                                                                                                  - Inspect inside and seals of roof hatches.
                                                                                                                  - If loading rings are not used the liner is drawn up and attached to
                                                                                                                    the loading chute
                                                                                                                  - Prevent ingress of water, dirt or foreign objects.
7    Site Logistics   Load product into container                     Customer / Receiver Packing List            - Correct silo number for loading.
                      Quality critical: load correct batch and
                      quantity
8    Carrier          Sealing of container after loading              Carrier Driver Handbook – close liner and   - Twist and bend loading sleeves (create ‘swan neck’ and tie in a
                      Quality critical: Close liner. Close and seal   container                                     bow) and suspend inside the roof liner attachment point (if
                      all roof hatches                                                                              applicable).
                                                                                                                  - Close all loading hatches and seal each individual hatch with the
                                                                                                                    seal numbers provided by loading point or carrier.
9    Site Logistics   Prepare CMR / Delivery documentation            CMR and Delivery Note documents             - Prepare necessary CMR and customer delivery Note documents.
     (Check out)                                                                                                  - Add correct batch number loaded etc.
                                                                                                                  - Add seal numbers applied to roof hatches, container doors and
                                                                                                                    other sealed points.
                                                                                                                  - Use weigh tickets to record proper net weight.
                                                                                                                    Goods issue correct net weight.
10   Carrier          Transport container to shipping terminal        CMR / Delivery Note documentation           - Ensure customer documents are kept with the shipment until
                                                                                                                    delivery.
11   Carrier          Pick-up of container at destination             Carrier container collection checklist      - Container (outside): free from damages which affect the integrity
     (Container)      terminal                                                                                      of the container, clean, odour free, rust free (especially around
                      Quality critical: identify shipment and                                                       the roof hatches)
                      container ‘fit for unload’                                                                  - Validate container collection with CMR and Delivery Note

12   Carrier          Check unloading equipment at destination        Carrier Unloading Equipment check (may be   - Ensure cleaning and last cargo records for container, appliances
                                                                                                                                                                            10
(Equipment) terminal part of container collection checklist) and rotary valve are available for future reference.
Quality critical: Chassis and unloading Carrier Driver Handbook: use and check of - Check if pressure and temperature gauges, filter and cooler are
equipment inspection. Proper procedures hoses, check on equipment cleanliness present and have no apparent defects.
to ensure equipment cleanliness Carrier procedures on ‘product segregation’, - Check if airlines, hoses, rotary valve and chassis are undamaged
chassis cleaning (incl. toolboxes, airlines, …), and clean.
unloading hoses (labelling, checks, cleaning),
rotary valves (check, cleaning, …)
13 Carrier Receipt of correct paperwork at Carrier checked, ECCMR and Delivery Note - Ensure all agreed documentation is present including CMR,
destination terminal paperwork Delivery note.
Quality critical: correct documentation - Ensure all original customer documents are available (CMR,
set ( including customer delivery note that Delivery Note).
has unloading requirements)
14 Carrier Arrival at receiver/unloading site.
15 Receiver Receipt of cargo Receiver verifies cargo and container. - Check CMR and Delivery Note (and date and time stamp).
Quality critical: identify cargo, container - Visually inspect container for id code and seal numbers.
and seals. - Mark unloading silo number on the carrier documentation and
CMR.
16 Receiver Prepare Unloading Carrier truck and container unloading - Ensure driver has proper instructions.
Quality critical: document correct checklist. - Receiver should check the cleanliness, preparation and set up of
unloading location(s). delivery equipment.
17 Carrier Provide sample to receiver Carrier Driver Handbook. See also ECTA/Cefic Follow Carrier Driver Handbook. See also ECTA/Cefic guidelines on
Quality critical: sampling. guidelines on sampling contained in :- sampling contained in :-
“Best Practice guidelines for Safe (un)loading of “Best Practice guidelines for Safe (un)loading of Road Freight
SAMPLE TAKING If possible a “Safety Road Freight vehicles, covering Technical, vehicles, covering Technical, Behavioural and Organisational
Liner” should be used. This design allows Behavioural and Organisational aspects”. aspects”. www.ecta.com
ground level sampling. When sampling at
www.ecta.com
the top is required, Working at Height When sample taking it is common practice to
measures must be implemented. hold a sample bag below/ around the
sampling point. See picture right Be aware
The special designed sampling point is that in that area little particles of dust, rust or (sample taking at the designed sampling point… at the rear of the
located at the inside of the back of the paint may be present and can fall into the
container and can be reached by opening container) (rust and dirt at the back outside and inside of the
sample bag.
the unloading “hatch” container)
1118 Carrier Unloading of container at receiving site Carrier Driver Handbook –correct unloading, - Ensure all equipment (unloading hose, airlines, rotary valve) is
Quality critical: clean unloading hose, apply receivers unloading conditions as clean.
rotary valve, follow receivers unloading marked on delivery note or suppliers - Blow down unloading hose.
instructions instruction. - Properly connect unloading hose to truck and to receiver’s silo, it
is recommended that hose clamps or suitable mechanisms are
used.
- Connection to silo should be the last activity in the preparation for
delivery.
19 Receiver Unloading of container at receiver site Receiver site operating instructions. - Verify the activities of the driver in the preparation for delivery.
Quality critical: clean unloading hose, - It is recommended there is a sign off (see Point 8 above) between
rotary valve, follow customer’s unloading carrier and receiver before beginning to physically transfer the
instructions material
- Connect the discharge hose to receiving silo.
20 Carrier Unloading of container at receiver site Carrier Driver Handbook - Follow receiver’s unloading instructions (max temperature, max
pressure, …), if there are differences contact Producer of product
for clarification
- In case water or moisture is discovered, stop unloading and notify
despatch office.
21 Carrier Complete unloading Carrier Driver Handbook – complete - Properly disconnect hoses after emptying truck
Quality critical: disconnect unloading unloading - Avoid spills. If these occur, report to the receiver (& Supplier,
hose, avoid spills despatch office) and clean up as required.,
22 Carrier Cleaning of unloading equipment Carrier Driver Handbook – clean unloading - Avoid spills. If these occur, report to the receiver (& Supplier,
equipment after unloading despatch office) and clean up as required.,
- differentiate cleaning based on dedication of flows, separation of
product types, etc)
23 Receiver Check-out Check-out - Note any special unloading incidents and unloading times on the
Quality critical: verify completion of Supplier CMR and Delivery Note CMR document
unloading - Signed, named and dated for driver and receiver.
- Retain one CMR for carrier, one CMR copy to stay at receiver.
24 Carrier Leaving receiver’s site Carrier Driver Handbook – de-install liner - Carried out as instructed with the despatch office.
1210 Operational
10.1 Preparation for loading - Bag-in-Box Container:
Visually inspect the container for damages and is “fit for loading”:-
check that the roof is not badly dented,
man lids are not below roof level, as this will allow possible water ingress at the man lid
area.
check that the container floor is dry, swept out properly, that there is no sign of
condensation or other such contamination on the walls & roof.
preventive actions regarding rust around the man lids and letterbox area should be taken
and the liner is installed correctly.
make sure that the unloading sleeve is correctly fitted (not under the inner liner) and all
liner attachments are fixed to the container in the correct locations
close the filling necks, using swan neck method, suspend and close man lid covers until
arrival at the loading station.
seal all openings.
10.1.1 At the loading station:
Check the container with the operator, a joint sign off to the condition of the container and
the liner installation is recommended.
Have loading rings available to secure liner at manlid area to prevent the liner from
collapsing.
If loading rings are not used the liner is drawn up and attached to the loading chute.
Ensure during loading no objects fall into the inner liner (e.g. seals, rings, helmet, ear plugs,
gloves, equipment on filling gantries etc), that could contaminate the product.
Expanded Type Loading Ring Flat Type configuration Loading Ring
If spillages occur on to the top of the liner, this must be reported and resolved by the
loading site. Note. Product on the outside of the liner can effect liner fitment and cause
issues in delivery.
After loading: Twist the filling necks and close them off, to avoid ingress of foreign material
(see pictures below).
If not done by loading site operator, driver to seal the opened manlid again and note
numbers on the transport documents. Report any abnormality / non-conformity to the
loading site operator.
13Swan neck correctly fitted and tied Swan neck incorrectly fitted and tied
10.2 Preparation for loading - Non-Pressurised Alubox/Vanbox:
Visually inspect the container for damages and is “fit for loading”
Check the cleaning certificate and confirm cleanliness by inspecting the inside of the box.
Make sure that manlid gaskets are fit for purpose and all screws are tightened properly.
Top lid screw
Gasket
Top view of van box manlid
10.2.1 At the loading station:
Check the container with the operator, a joint sign off to the condition of the container is
recommended.
After loading: If not done by loading staff, seal all openings and note numbers on the
transport documents.
1411 Chassis and Rotary Valve Cleanliness
The rotary valve has a major function when unloading containers, whether this is bag in box or
alubox/vanbox. Due to this key function the driver has to ensure the following points make it fit for
purpose:
11.1 Introduction.
Under no circumstances should a person put their hands, finger or objects inside the rotary valve
when the power is engaged, this includes the top or outlet area.
NB All power MUST be disengaged, de-energised and NOT simply set in neutral. Engine must be
turned off!
11.1.1 Compressed air lines are used to clean and blow down the equipment. Under NO
circumstances should air be used to blow dust etc from overalls or person.
11.1.2 Eye protection must be worn when using compressed air lines.
11.1.3 Gloves should be worn (see PPE schedule) when setting up and handling equipment which
can come into contact with products.
11.1.4 The cleaning of the discharge equipment, the rotary valve, the top plate, the flow control
valve, the hose etc is a critical step in preventing cross contamination of previous cargo or
other such contaminates.
11.2 Lack of correct maintenance
The photographs below show in detail the lack of correct maintenance, this area has a major impact
on the risk of contamination of product.
It is essential that LSP’s have in place a preventative maintenance programme to ensure “fit for
purpose “equipment at all times.
Rust in all areas that could fall into the product Product granules from previous load
15Broken grid General lack of inspection
eg not clean see loose product on chassis frame
11.3 Visual Inspection.
11.3.1 Drivers can only see parts of the delivery equipment, they cannot see inside the rotary valve
body or inside non clear hoses or pipes etc.
11.3.2 However, where it is reasonably expected a person could see from looking down, through or
into the equipment, then this should be part of the joint inspection process.
Rotary Valve outlet Rotary Valve blades Inside of Rotary Valve outlet
1611.3.3 This includes those areas highlighted in the checklist shown below
Example of Joint Inspection check sheet
Date
Registration number of chassis
Name of checker
Task to carry out Signature
Blind caps of air intake,
product outlet and top
cover in place.
Check inside for
cleanliness (especially
spaces between rotor
and both side caps).
No granule or powder
residues are visible.
Unlock blind caps and
check product outlet
flange and air intake for
cleanliness.
Check spherical
assembly for
cleanliness:
- Top plate (with return
air connection)
- Connecting hose
between flow regulator
and rotary
- Flow regulator(ABC-
tundish for Alu-boxes)
- Return air filters
Check if product
conveying hose and air
hoses are covered with
blind caps on both
sides. Unlock blind caps
and check hoses inside
for cleanliness.
Remarks:
1711.3.4 Tools such as flash lights or external illumination can be used to aid the inspection process.
11.3.5 If, during the visual inspection and during the setting up phase, the driver notes any materials
stuck or unable to be removed by air blowing, this must be reported to the LSP’s despatch
office for further advice.
11.4 Conveying Air Line system.
The air that feeds the rotary valve to “blow forward” the product must pass through a filtration
system.
Air intake filtration system for SDU chassis.
The filter must remove particulates and other such air borne debris that can be pulled into the air
intake system.
11.4.1 The air intake must be away from any exhaust system on the power unit / compressor, and
above ground level to ensure it does not introduce debris etc into the discharge system. For
example above the truck cabin.
Air intake independent from engine
Air filter under housing
Compressors air intake filter on tractor unit.
18Compressed Air Filter, typically 5micron in size, to the rotary valve.
11.4.2 The filter system should have a pressure gauge before and after the filters mechanism. The
intention of this is to monitor the pressure differential across the filter. A difference in
readings across the two gauges indicating any blockage on the filter and also indicates the
presence of a filter.
11.4.3 All filters used must be on a maintenance/inspection regime. This should be checked by a
qualified person, especially when the filters may need to be stripped down from the
compressed air system, rather than a simple filter cartridge change.
11.4.4 After working on the compressed air system or when refitting filters etc the system should be
blown forward for 5 -10minutes to ensure there is nothing in the system that could blow
through in the first delivery operation.
11.5 Equipment assembly and cleanliness check prior to commencing unloading.
The receiving site operator should check the container number and product identification with the
transport order before allowing the delivery of product.
11.5.1 The correct sequence of set up is to prevent the entry of foreign bodies, equipment or other
such items into the discharge process and hence through to the receivers storage silo or
production.
11.5.2 Driver and site operators need to consider the areas they are working in for “pick up” of
external contamination; mud, dirt, grime, other products in discharge area that may be on
the ground to debris on the chassis etc from being on the road.
11.5.3 When setting up, drivers and site operators should follow an agreed BBS protocol that
defines their responsibilities. E.g. driver operating their equipment – site operator plant
equipment. Driver must observe site rules at all times and only begin to assemble and clean
equipment when given permission to proceed from the site operator.
11.5.4 Check the area for delivery to ensure flat and suitable ground. Release and slide out the
rotary valve at the rear of the vehicle. Leave the top plate in position which covering the
rotary valve blades and discharge equipment. Ensure the drive system is turned off and the
operating handle in neutral.
19Operating handle for rotary Sliding out the rotary valve for set up of equipment
11.5.5 Remove the rotary valve cover and fit the safety guard over the top. Clean the rotary valve
using the compressed air line, blowing down and into the rotary valve blades and body.
Engage power to the system and turn the rotary valve at slow speed. This process is to
remove any debris or possible contamination that has entered since previous clean. Remove
safety grid and re fit the blank plate, this is to prevent anything dropping into the now clean
rotary valve. When this section is completed power MUST be disengaged with the engine
turned off. As this is moving machinery, consideration must be given for the installation of
interlocks and cut outs to prevent injury.
11.5.6 Remove the top plate from the tool box and clean before assembly, blow down with the
compressed air line. The equipment MUST NOT be placed directly onto the ground during
cleaning. This is to prevent the equipment coming into contact with loose gravel, dirt or rain
water etc. Inspect that there are no contaminants; foreign objects e.g. dirt and grime etc.
before proceeding to fit onto the rotary valve. Refit the top plate cover to prevent anything
entering the system.
Cleaning the top plate Fitting top plate on rotary valve
11.5.7 Blow clean the vent pipe and then fit to the rotary valve body. Fit a clean vent bag tightly to
the vent pipe but leave loose for it to be able to inflate in use.
11.5.8 Before starting this next section of the delivery, the driver should ensure they have site
permission to break seals and open the container. This includes signatures on the delivery
checklist or paperwork etc. Check the seal number on the rear hatch corresponds to that
recorded on the paperwork. Remove the seals and dispose of correctly. Unlock the
discharge hatch. Care must be taken when opening and lifting the discharge hatch as the
locking mechanism and hinges can be stiff. Secure opening by using the safety chain or rope.
2011.5.9 Remove the tundish, clean thoroughly using the compressed air line. When clean, attach the
tundish to the discharge opening at the rear of the container. Ensure the retaining bolts are
fully extended and fixed in place.
11.5.10 Remove the flow control valve from the tool box and thoroughly clean using the compressed
air line. Check the condition of the seal. Do not place the flow control valve on the floor
during cleaning and when cleaned.
Ancillary equipment toolbox
11.5.11 After opening the liner, pull the discharge spout through the tundish opening and then fit the
flow control valve on to the tundish, ensure the flow control valve is closed. The flow control
valve should fit tightly and securely into the top rotary valve via the top plate gasket.
11.5.12 Hang the vent pipe from the rear of the container. Do not climb on the chassis to do this.
Top plate flow control valve Vent pipe and vent bag
2111.5.13 Remove the correct discharge hose for the product (ensure product compatibility) from the
trailer.
Thoroughly clean with the compressed air line.
Check hose condition,
check for holes;
damages in body;
check the end connectors are in good order;
check the seals in the couplings to be present and in good condition
11.5.14 When using site hoses, drivers should check :-
with site operators they are correct and product compatible
clean and ends covered
and are fit for purpose
11.5.15 The product conveying hose is connected to the rotary valve and the other end remains
loose. The driver starts the compressor (wearing hearing protection) for about 5 minutes to
blow air through all product touching parts. This operation is a safety measure to avoid the
potential for contamination.
11.5.16 In case the receiver/supplier wishes a purging by product the driver, prior to starting the
compressor connects a purge bag at the end of the product conveying hose. The driver then
opens the flow control valve to let an agreed/appropriate amount of product flush the rotary
valve and the conveying hose. The product taken for purging must be disposed in a waste bin
at consignee’s site according to local legislation.
NB A purge bag is NOT a sample bag
On completion of the product purge:-
close the flow control valve,
switch off the engine and remove the purge bag.
visually inspect the product in the purge bag for foreign objects or other such materials.
Repeat the process if purge bag is not free of contaminants.
11.5.17 Discharge system is now ready for delivery. Follow site instructions related to site operator
and when the hose is connected to the receiver’s silo. Secure hose connections by safety
clamp to prevent hose disconnecting.
The silo Number MUST be allocated and the number entered onto the Delivery Checklist by
the site staff BEFORE connecting to the silo. It is recommended there is a sign off (see Point 8
above) between carrier and receiver before beginning to physically transfer the material.
2212. Prior to tipping of container:
NB Site operator to check Twist locks that ALL are secure, and that container is correctly fixed
on the trailer chassis.
See “Best Practice Guidelines for the Safe Tipping of Silo Tanks” www.ecta.com
The discharge of the product should now take place. The agreed level of supervision should take
place to ensure a safe and secure delivery.
13. After Delivery – Disassembly and disconnection of equipment.
13.1 After completion of the unloading, the unloading equipment is to be cleaned during
disassembly. Switch the power off to the rotary valve and conveying air system. The
driver/operator disconnects the hose from the silo and the driver fits a purge bag to the end
of the hose. There are other systems used when disconnecting eg blow residue back into
liner via the flexible hose.
13.2 Remove flow control valve. Clean the flow control valve using compressed air gun and place
in the tool box. Push the empty liner discharge sleeve back through the unloading hatch into
the container for later appropriate disposal / recycle.
13.3 Remove and clean the tundish before securing to the side of the chassis.
13.4 Remove the top plate. Place the safety grid over the rotary valve. Blow clean the top plate
with compressed air and return to the tool box.
13.5 With the safety grid in place and the purge bag fitted to the end of the discharge hose (see
13.1), blow clean the rotary valve using compressed air. The rotary valve should be turned at
slow speed. Eye protection must be worn when using the compressed air line. Do not put
fingers or equipment into the path of the blades or the rotary valve.
13.6 When the rotary valve is clean secure the blanking plate over the top.
13.7 Remove the hose and blow clean with compressed air, remove the purge bag, replace the
hose caps on the two ends and return to its hose carrier. Replace the end cap onto the hose
carrier and secure for transport.
13.8 The driver must clean the discharge area of any product that has been spilled during cleaning
or the delivery process.
14.0 Further Cleaning / Cleaning station
14.1 If during those steps in section 13, do not remove all product then there will be a
requirement for further cleaning techniques. Drivers should speak with their despatch office
for direction on this.
14.2 In the event that cleaning by air is not sufficient, other methods of cleaning will need to be
considered eg SQAS assessed cleaning station to remove such residues (see 14.4).
After washing down, the equipment must be dried and blown with air to remove all traces of
water. Where cleaning products are used, it is essential that all traces of the product are
removed.
2314.3 After cleaning, the driver or the personnel of the cleaning station inspects all parts
thoroughly. If the design of the rotary does not allow an easy inspection from both sides (air
intake / product outlet) tools like a flashlight should be used.
14.4 Cleaning all parts at a SQAS cleaning station, 3rd party LSP approved cleaning facility or at an
operating terminal of the carrier is recommended. Use of a SQAS cleaning station may be
affected by the availability to be reached within an acceptable economical range.
14.5 Rotary valve must be cleaned after every unloading process – even for the use of dedicated
equipment – with a minimum by compressed air. All parts of the rotary (blue arrow, see
below) and the peripheral parts (red arrows, see below) like filters, connections, air hoses,
etc. must be cleaned. If approved by consignee the cleaning by air can be performed on site.
Residue product / dust can so be disposed into the used liner.
Equipment set up
The rotary valve should be designed to allow easy inspection from each side, air intake and product
outlet. Although this does depend on the style, type, and manufacturer of such equipment and that
chosen by the carrier for use.
Rotary valve inlet / outlet
24CONTACTS
Dow Benelux Europe
Tore Kojedahl
Jan Timmers
T+47 3557 7000
T+ 31 1156 72652
M+47 9769 7059
M+ 31 628 270 789
tore.kojedahl@ineos.com
jtimmers2@dow.com
Michael Koch
T +41 62 767 68 38
M +41 79 286 10 41
Gabriel Olivera
michael.koch@bertschi.com
T+49 2232/1892-10
M+49 171/8630 540
Olivera.g@schmidt-heilbronn.de
Luc Van de Velde
Tel: + 32 3210 36 47
GSM: + 32 475 27 23 31
Luc.vandevelde@ineos.com Walter Schoor
T +49 (0)2233 599140
M+49 (0)172 2504433
walter.schoor@talke.com
Huub Vergoossen
T +31 46 722 2758
F +31 10 264 4838 Johan Veraghtert
Huub.Vergoossen@SABIC-europe.com T+32 3560 7683
M+32 476 20 9458
johan.veraghtert@katoennatie.com
Robert Brownbridge
T +44 1642 669 024
M +44 777 412 8467 Jonny Carlred
robert.brownbridge@InterBulkgroup.com T+ 46 31 63 9700
M+46 705 61 6121
jonny.carlred@nordic-bulkers.se
Dow Benelux Europe Colin V Humphrey
Michel Pieters T +32(0)2 741 86 81
T+ 31 1156 72652 F +32(0)2 741 86 82
M+ 31 628 270 789 M + 44 (0) 781 732 5834
mpieters2@dow.com colinvhumphrey@ecta.com
25You can also read