Command Fitness Guide Command/Unit Physical Training (PT) and Fitness Enhancement Program (FEP) 2011
←
→
Page content transcription
If your browser does not render page correctly, please read the page content below

Command Fitness Guide

         Command/Unit

      Physical Training (PT)

               and

Fitness Enhancement Program (FEP)

              2011

                1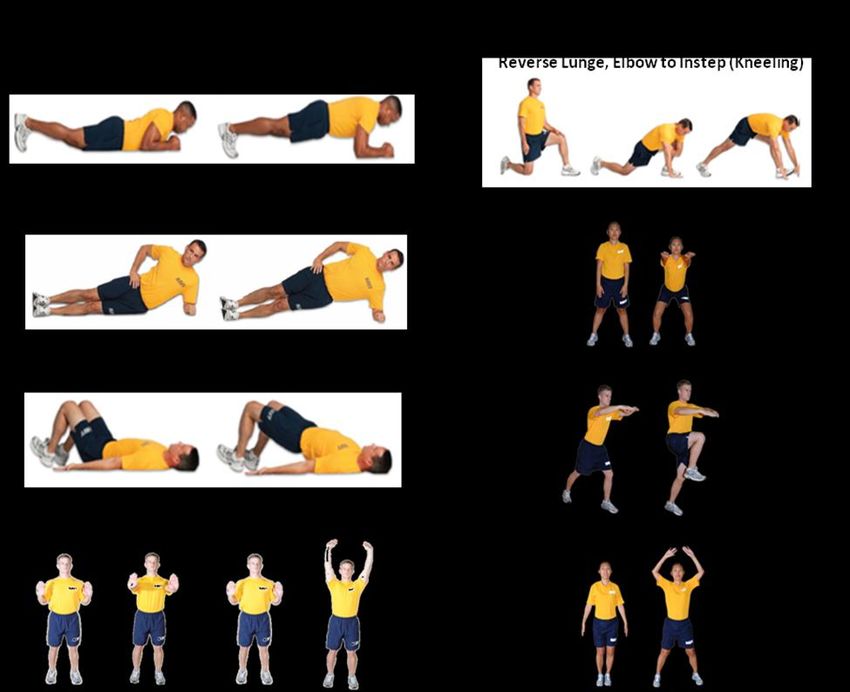
Table of Contents
                                                                             Page

Chapter 1: Command Physical Readiness Program Overview..….………………………. 3

Chapter 2: Fitness Enhancement Program (FEP) Requirements ………………………… 5

Chapter 3: Activity Guidelines…………………………………………………………………. 9

Chapter 4: Command/Unit Physical Training (PT) Components…………………………… 17

          Pre-physical Activity Questions ………………………………………………….. 18

          Dynamic Warm-up Exercises Illustrations……………………..………………… 19

          Standardized PRT Warm-Up…………………..…………………….…………… 25

          Dynamic Exercise Quick Reference Guide……………………….…………….. 26

          Top 12 Navy Stretches…..………………………………………………………… 30

          Top 12 Stretches Quick Reference Guide………………..……….…………….. 34

          Things to Avoid While Stretching….……………………………….….…………. 35

          Contraindicated/High Risk Exercises ………………………………………..….. 36

Appendixes

A. Sample Workouts……………………………………………………………………………. 39

B. Improving PRT Scores……………………………………………………………………… 47

C. FEP Monthly Tracking Log...………………………………………………………………. 50

D. Glossary of Terms …………………………………………….......................................... 52

                                       2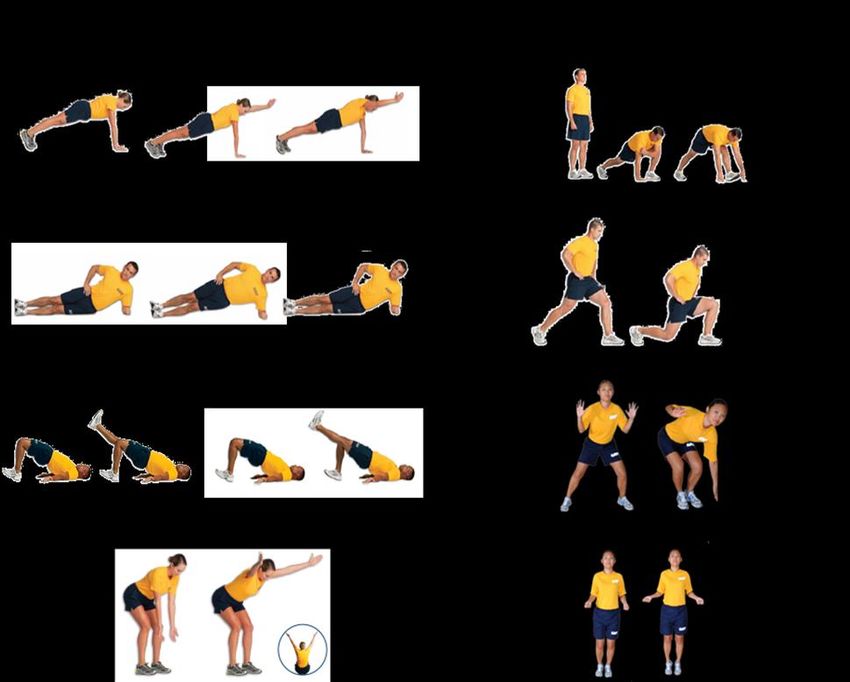
CHAPTER 1

        Command Physical Readiness Program Overview
1. Overview

The command physical fitness program is the command’s action plan to maintain and/or
improve the fitness and health of the entire crew.

2. Program Strategies
Key program strategies enhance opportunities for physical activity, increase knowledge,
increase availability/access to nutritious foods and decrease availability to foods with
high calories and low nutrients. Environmental and policy strategies that target the
entire command and community (not just individuals) help support healthy behaviors.
These strategies are likely to be sustained for a longer period of time than individually
oriented strategies.

3. Medical Screening
All members must complete required medical screening to monitor their health status
and screen for risks factors. All members participating in command/unit Physical
Training (PT) must have answered “Yes” to question 1 of the Pre-physical Activity
Questions (Is your PHA current?) and have answered “No” to questions 2-4. The four
questions are to be asked prior to every command/unit PT session.

4. Command/Unit PT
Command/Unit PT is any command led fitness activity. Command/unit PT must be lead
by a qualified Command Fitness Leader (CFL), Assistant Command Fitness Leader
(ACFL) or Morale Welfare Recreation (MWR) Specialist per OPNAVINST 6110.1J. All
participants must wear the Navy Blue and Gold Physical Training Uniform (PTU).

5. Procedures
Follow the below are the procedures for an effective command/unit PT session:

   a. Schedule a location and time for command members to meet.
   b. Publish location and time to all participants.
   c. Instruct all participants to bring water (if water is not readily available).
   d. Always have a plan. Know in advance what exercises will be used in the PT
      session.

                                              3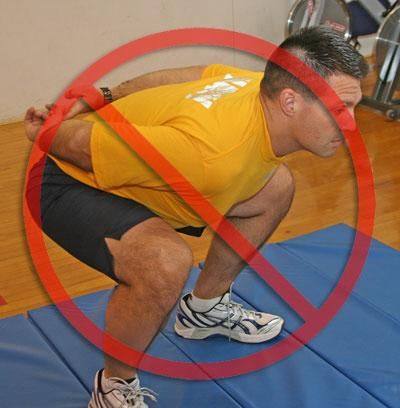
e. Ensure ACFLs know their role during the sessions.
   f. Take muster before and after.
   g. Read out loud the 4 Pre-physical Activity questions before Command/unit PT.
   h. Start with a 5-10 minute dynamic warm-up exercise (Chapter 5, Dynamic Warm-
up).
   i.    Provide directions on alternate options for personnel with limited exercise
capabilities.
   j.    End the session with a cool down and stretches for 5-10 minutes (see
recommended stretches).

6. Command/Unit PT Guidelines
       a. Activity Guidelines (Chapter 3), provides details on designing PT programs.

     b. Command/Unit PT Components (Chapter 4), provides details on the component
of command PT. CFLs and ACFLs need to familiarize themselves with this information
prior to conducting Command/Unit PT or Fitness Enhancement Program (FEP).

7. Quality Over Quantity
Monitor participants during activity. Perform movements in a controlled manner.
Remember quality over quantity. When form declines (to the point of volatile fatigue), it
is time to stop the movement.

8. Commercial Programs
The Navy does not endorse any commercialized fitness programs. CFLs/ACFLs are
not authorized to display videos of programs during PT sessions. These programs do
not take into account different fitness levels at command PT.

9. Emergency Response Plan
A safety plan must be in place for summoning emergency assistance. Consult local
medical facilities for guidance. At a minimum, the plan will include telephone numbers,
location of nearest AED and procedures for summoning aid and clear directions for
emergency response personnel to avoid confusion and ensure their prompt arrival.
Include guidance for contacting base security personnel to assist with rapid access of
emergency personnel to test site.

                                              4
CHAPTER 2

          Fitness Enhancement Program (FEP) Overview

1. Overview
Per OPNAVINST 6110.1J, “Commanding officers (COs) shall establish and monitor a
Fitness Enhancement Program (FEP).”

2. Program Administration
    a. Program Management. FEP is managed by the CFL on behalf of the CO. The
CFL is responsible for administering all aspects of the program. ACFLs play an
important role in assisting the CFL in conducting FEP activities, documenting
participation, and monitoring progress.

    b. Program Participation. The FEP is a command-wide program to improve fitness
and nutrition. Any member that fails to meet Physical Fitness Assessment (PFA)
standards is required to be formally enrolled into a monitored FEP. For command-
directed enrollment for other than official PFA failure, local written policies (to include
check-in (BCA) failures and borderline PFA status) are strongly recommended.

   c. Program Requirements. Mandated FEP requirements are:

     (1) Written Counseling for FEP Enrollment. Enlisted members are to be issued a
NAVPERS 1070/613 (page 13) and officers are to be issued a Letter of Notification
(LON) to officially inform them of FEP and nutrition requirements. The Page 13 will be
generated via NSIPS and may be edited to reflect command specific program
requirements. The LON will be generated via PRIMS or manually.

     (2) FEP PT. FEP sessions will only be led by designated CFLs, trained ACFLs or
MWR fitness specialists. It is the CFL’s responsibility to ensure ACFLs administering
FEP are familiar with the OPNAVINST 6110.1J requirements and the contents of this
guide.

    (3) FEP Hours. Unless otherwise directed by command mission/commitments,
FEP activities are to be conducted during normal working hours (a minimum of 3 times,
maximum of 5 times, per week for a total of at least 150 minutes).

      (4) FEP Nutrition. Nutrition plays an important role in performance, weight
management, and disease prevention. Each member enrolled in FEP must select a
nutrition option based on individual needs. Each option must include goal setting, long-
term behavior modification and ongoing support. See Nutrition Resource Guide for
more detailed information. CFLs will select the nutrition option in the FEP section of
PRIMS.

                                             5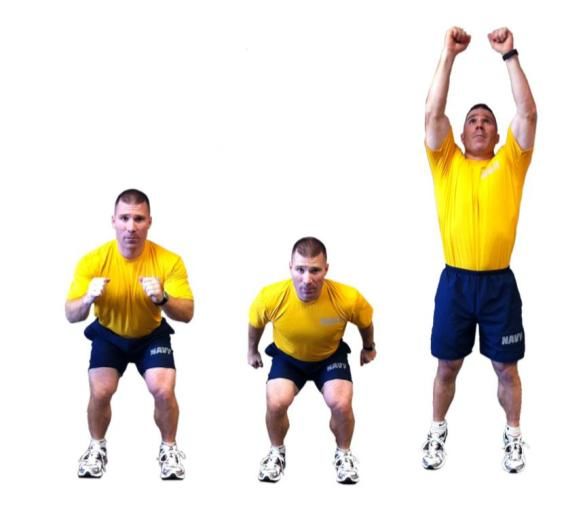
(a) Shipshape: Complete the approved course requirements.

(b) Registered Dietitian (RD): Meet with an RD and follow sessions as indicated by
provider. Medical Nutrition Therapy for weight management recommends one initial
appointment and 3 follow-up visits at a minimum.

  (c) Self-directed: Create an individual plan including behavior change goals to improve
dietary habits and body composition, as needed, by utilizing credible resources as noted
in the Nutrition Resource Guide.

            (1) Nutrition courses such as Mission Nutrition

          (2) The Good Nutrition Reading List, which is posted on the Physical
Readiness Program

            (3) Websites: Navy and Marine Corps Public Health Center links

           (4) Education materials such as the Navy Operational Fueling

       (d) Other Commercialized Programs: Participate in a national weight loss
program/center that incorporates a support component (at own expense).

    d. FEP Documentation. All FEP records are the property of the command and are
to be maintained for 5 years. FEP documents include:

      (1) Weekly PT sessions

      (2) Weekly body weight

      (3) Monthly mock PFA, including BCA and PRT

      (4) Nutrition education. Maintain documentation of any courses/programs
     offered, completed and declined.

    e. FEP Participation and Monitoring. Members are required to remain enrolled in
FEP until passing one official PFA. Members failing the BCA will be removed from FEP
upon meeting standards during the next regularly scheduled command PFA.
Members failing the PRT will remain in FEP until successfully passing an official PRT
with an overall PRT performance of a “Good” or better in all PRT components. If
member is waived from the BCA and/or the same PRT event for which member failed,
he/she will remain on FEP until the member is able to successfully pass the failed event
during an official PFA. Monthly FEP PFAs, including BCAs, do not constitute an official
PFA and may not be used to determine duty screening eligibility or enlistment/extension
eligibility.

                                            6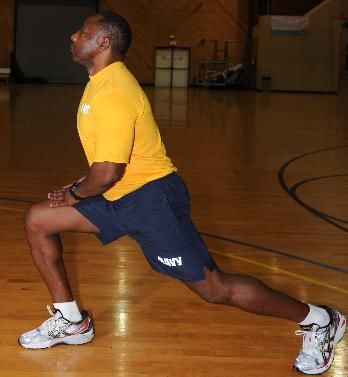
f. Progress. Progress may be assessed via program participation records and
monthly mock PRT and BCA results. The progress of each member will vary and will
depend on members’ age, health status, and beginning fitness and body composition
levels.

        (1) PRT. Improved mock scores are the number one indicator of improvement
for fitness. For specific details on progress see, “Assessment of Progress” section of
Chapter 3.

       (2) BCA. Members assigned to FEP due to BCA failure are not authorized to
participate in the FEP mock PFA until they are within BCA standards. Those members
are required to actively participate in all other FEP requirements. Training emphasis
should focus on decreasing body fat versus weight loss. Adequate progress is 1-2
pounds per week or 1-2% body fat per month and should not exceed more than 5% of
body weight in any week. Males tend to lose at the higher rate of 1-2 pounds per week
due to higher amounts of lean body mass, where females should anticipate ½ to 1
pound per week. Progress should be evaluated utilizing weight loss OR decreases in
body fat composition as they may not occur at the same rate. Early decreases in body
fat percentage may be minimal or delayed despite weight loss of 1-2 lbs per week due
to individual variance in fat deposition.

   g.  Nutrition and Weight Management CFLs and ACFLs need to have a basic
understanding of general nutrition resources to only provide general guidance to
command members. The CFL has an important role in making referrals to nutrition
experts. CFLs and ACFLs do not provide diets, recommend calorie intakes or provide
nutrition counseling. The Nutrition Resource Guide provides available and credible
nutrition resources for members to utilize to develop their individual plan.

   h. FEP Session Uniform Requirements.

      (1) Uniform. The blue and gold Navy PTU is the official uniform for command/unit
PT, the PFA and FEP.

     (2) Footwear. Running shoes will be comfortable and support the planned
exercise. Athletic socks must be worn and shall not extend above mid-calf. Low cut
socks are permitted. CO has final authority to ensure safety of the command.

     (3) Local Resources. Command CFLs, ACFLs, Dietitians, local health promotions,
medical department representatives, Shipshape facilitators, and MWR fitness
professionals can aid in structuring a member’s individual program to produce the
greatest benefit. See the Navy Physical Readiness Nutrition Resource Guide
(NPRNRG) for more details.

3. Lessons Learned/Best Practices.

                                           7
a. Each member requires an individualized plan. The member should play an active
role in developing their plan for obtaining a healthier lifestyle, as well as meeting Navy
fitness standards. Monthly data is recorded in PRIMS. Review each member’s
progress at least monthly. An FEP plan provides at a minimum:

       (1) Exercise goals: How will the member acquire the recommended amount of
exercise each week?

      (2) Nutrition goals: What nutrition resources will be utilized and what are the
goals within that program?

      (3) Progress monitoring: FEP tracking logs with weekly PT and body weight and
monthly BCA and PRT scores reviewed monthly.

   b. Partner with MWR for assistance with command/FEP PT. MWR fitness
specialists are the experts in the field and trained to assist with group and individualized
programs.

    c. Promote additional calorie expenditure outside of FEP PT. Members focusing on
weight loss will require daily activity. Walking is a great way to increase moderate
intensity exercise and is sustainable especially when access to facilities is limited. For
example, participate in the “10,000 Steps Challenge” by using a pedometer to track
daily steps. Walking 10,000 steps per day equals 5 miles and ~500 calories burned per
day. This equates to 3500 calories burned per week, the amount required to lose one
pound of body fat.

  d. Group PT Guidance.

     (1) Chapter 3 Provides group exercise guidance.

       (2) Limit formation runs. Large running groups alter stride lengths, over-training
the least fit and under-training the most fit. Use PRT run times to group members into
3-4 like-fitness levels.

      (3) Avoid fitness programs that over-train, increasing the risk of overuse injuries to
muscles and joints. Limit long runs and incorporate speed work to improve run
performance.

     (4) Avoid contraindicated exercises (Chapter 4) at all command led PT sessions.

     (5) Promote a variety of activities beyond regimented, group calisthenics and
formation runs and incorporate appropriate rest and recovery periods.

     (6) Provide members with the knowledge and skills, command direction, and
monitoring to maintain a healthy lifestyle and mission accomplishment.

                                             8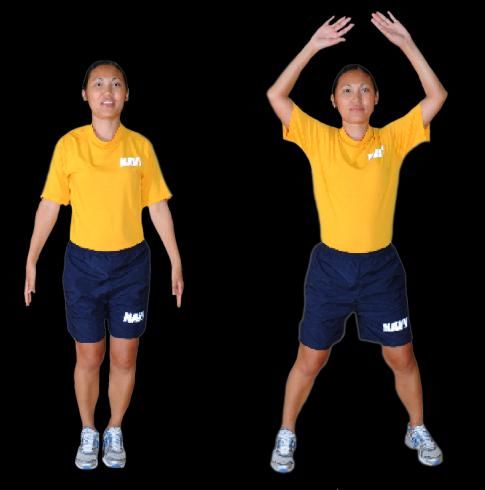
Chapter 3

                                Activity Guidelines
1. Purpose
This resource has been developed to assist commands in conducting a safe effective
fitness program.

2. Resources
There are many fitness resources available to assist with fitness enhancement. In
addition to weekly PT sessions, MWR fitness professionals are available at military
installations to assist in designing and/or conducting command/FEP sessions. MWR
fitness professionals are your exercise specialists qualified to provide individual plans to
members. Contact your local MWR for available services.

3. Program Design
All command led PT sessions consist of the following components in this order:
   a. Pre-physical Activity Questions
   b. Dynamic Warm-up                     5 - 10 minutes
   c. Pre-planned PT Session              20 - 45 minutes
   d. Cool-down                           3 - 5 minutes
   e. Stretching                          5 - 10 minutes
More detailed descriptions are found in “Command PT Components,” Chapter 4.

4. Contraindicated Exercises.
Contraindicated movements are potentially dangerous to the body. Any exercise that
incorporates extreme movements that cause extension or flexion of a joint beyond its
normal range, involves excessive, rapid or repetitive twisting around a fixed base,
and/or requires advanced skills/strength to perform correctly is considered to be
contraindicated for command led PT. More effective and safer exercises exist,
therefore contraindicated exercises are to be avoided at all command led PT sessions.
See Chapter 4,”Contraindicated Exercises” for a list of exercises and stretches.

5. Basic Fitness Terms

The FITT Principle (Frequency, Intensity, Time and Type) is the basis for fitness
program design. For a list of exercise-related terms, refer to Appendix C.

                                             9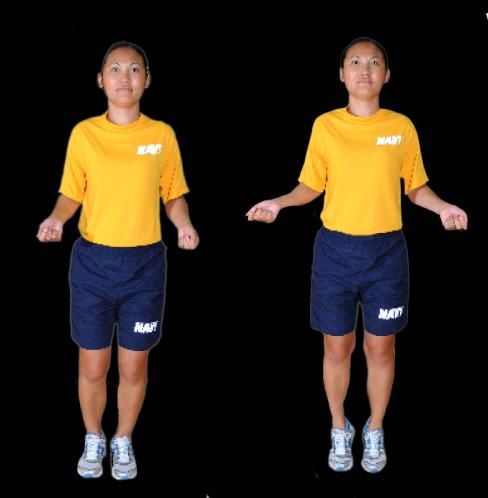
a. Frequency: the number of training sessions conducted per week. The frequency
of sessions is largely dependent upon the intensity exerted (i.e. higher intensity is
performed less frequent than lower intensity)

    (1) Cardiorespiratory training may be conducted for at least 30 minutes at a
moderate intensity, 5 days a week or 25 minutes at a high intensity 3 days per week.

           (a) Examples of moderate intensity activities include: brisk walk (3 mph or
faster), bicycling (slower than 10 mph), and water aerobics.

         (b) Examples of high intensity activities include: jogging/running, swimming
laps, jumping rope, and circuit training.

      (2) In addition to cardiorespiratory training, perform strength training consisting of
8 to 10 exercises, focusing on major muscle groups, 2 or more days per week.

        (a) Strength training can be conducted using free weights/machines or using
body weight, resistance bands or body bars.

          (b) A sample circuit training plan is provided in Appendix A.

    b. Intensity: The level of physical effort required to perform an activity at any given
time. There are several ways to measure intensity: Target Heart Rate Training Zones,
Borg Rate of Perceived Exertion (RPE), or the talk test.

     (1) Target Heart Rate. Calculate maximum heart rate (220-age = beats per
minute (bpm). Target heart rate training zone is 50-85% of the maximum heart rate.

     Determining Training Heart Rate Zones Based on Age and Exercise Intensity

Age in     Maximum Target Heart Rate              Moderate        Target Heart     Vigorous
years      Heart Rate for Moderate                Intensity         Rate for       Intensity
                        Intensity                                  Vigorous
                                                                    Intensity          (10-sec
              (bpm)       (50-70% of max)                                               count)
                                                   (10 sec         (70-85% of
                                                    count)            max)
   20          200            100-140               17-23            141-170            23-28
   25          195             98-136               16-23            137-166            23-28
   30          190             95-133               16-22            134-162            22-27
   35          185             93-129               16-22            130-157            22-26
   40          180             90-126               15-21            127-153            21-26
   45          175             88-122               15-20            123-149            20-25
   50          170             85-119               14-20            120-145            20-24
   55          165             83-115               14-19            116-140            19-23
   60          160             80-112               13-19            113-136            19-23

                                             10
(2) The Borg RPE scale ranges from 1 to 10, with a score of “1” representing very
light exertion and a score of “10” representing maximum effort. Members should be
exercising between an RPE of 4-6 during low to moderate intensity training sessions
and 8–9 during high intensity training sessions.
Rate of Perceived Exertion (RPE) Chart
Very Light Activity
1 (Anything other than sleeping, e.g., watching TV, riding in a car, etc.)
Light Activity
2-3 (Feels like you can maintain for hours, e.g., easy to breathe and have a
conversation)
Moderate Activity
4-6 (Feels like you can exercise for hours, e.g., breathing heavily, can hold a
short conversation)
Vigorous Activity
7-8 (On the verge of becoming uncomfortable, e.g, short of breath, can speak
a sentence)
Very Hard Activity
9 (Very difficult to maintain exercise intensity, e.g., can barely breathe or
speak a single word)
Max Effort Activity
10 (Feels almost impossible to keep going, e.g, completely out of breath and
unable to speak)
(3) Talk Test. The simplest way to measure relative intensity. As a rule of
thumb, if you're doing moderate-intensity activity you can talk, but not sing during the
activity. If you're doing a vigorous-intensity activity, you will not be able to say more
than a few words without pausing for a breath.
3. Time: The number of minutes of activity.
(1) The amount of time depends on the intensity. The more intense the exercise,
the shorter the time may be.
(2) Consistent, daily exercises is required to maintain a healthy weight, consistent
daily exercise is required to lose body fat. All members should strive to increase activity
outside of FEP. The recommended minutes of moderate activity per week for different
levels of weight loss are provided:
(a) 150 min for minimal weight loss (Examples of training types and duration:
Intensity Level Recommended Recommended
(High/Moderate/Low) Duration Rest
Interval High 20-30 min 3-5 min between
intervals
Circuit Moderate to High 20-30 min 30 sec – 90 sec min
Training between sets
Strength Moderate 30 min 30 sec - 2 min between
Training sets
d. Type. The actual activity performed.
(1) To prevent boredom and injuries associated with overtraining, use a variety
of exercises throughout the week.
(2) Be creative, use team competitions that challenge members to increase
intensity.
Examples of cardiorespiratory and strength training exercises:
Strength Training Strength Training
Aerobic Circuit w/o Circuit w/ Calisthenics
Resistance Resistance
Running
Squats Jumping Jacks
Total Body Elliptical
Plyometrics Deadlifts Grapevine
Exercises Rower
Plank Powercleans Steam Engines
Swimming
Push Press Knee Blocks
Metabolic Circuit
Chest Press
Speed Bag
Upper Body Seated Row Straight Jabs
Jabs Push up
Exercises Overhead Press Hooks
Hooks Dips
Bicep Curl Uppercuts
Uppercuts
Triceps Extension
Split Squats
Lower Body Squat Squat
Alternate Lunge
Exercises Cycling Glute Bridge Lunge
High Knees
Lunge Side Lunge
Box Step
6. Warm-Up and Cool-down
Each PT session shall begin with a warm-up and end with a cool-down period.
a. Dynamic Warm-up. The purpose of the warm-up is to adequately prepare the
body for physical activity. The activities performed in the warm-up routine should mimic
the activities that will be performed during the exercise session. Warm-up period lasts
between 5-10 minutes, starting with low intensity and gradually increasing in intensity as
12the warm-up progresses. Eliminating the cool down can lead to increased wear and
tear on muscles, increased risk for injury, and decreased performance. Take time to
warm-up. Benefits include:
(1) Reducing the potential for muscle and connective injuries.
(2) Increasing blood flow to exercising muscles. The more blood that reaches
the muscles, the easier the delivery of nutrients required for energy production.
(3) Increasing oxygen delivery to the muscle, crucial during a workout.
(4) Increasing blood flow to the heart which leads to reduced risk for exercise-
induced cardiovascular events.
b. Cool-down. The purpose of the cool-down period is to gradually lower the heart
rate and respiratory rate to pre-activity levels. Eliminating the cool-down (dropping to
the deck after cardio) can cause blood to pool in the lower extremities decreasing the
body’s ability to return blood to the heart and brain. This can cause an irregular heart-
beat, dizziness, nausea and fainting. Using the last 3 to 5 minutes of the workout,
gradually reduce the intensity to lower the heart rate, followed by stretching.
7. Recommended Stretches
a. Flexibility is an important but often overlooked component of exercise. Include
exercises geared towards improving flexibility into each PT session.
b. A static stretching exercise session will be led after the PT session because
muscles are warmer and more pliable after exercise.
c. Use static (slow and controlled) stretches instead of ballistic (fast and/or
bouncing) stretches. The optimal hold time for static stretches is 15-30 seconds (8-15
echo count).
8. Overload
In order to make improvements in fitness, you must physically work at a level beyond
what you are accustomed to. The three factors that are manipulated to induce exercise
overload, frequency, intensity, and time.
9. Progression
a. The rule of progression is to gradually implement an exercise program. Avoid
doing too much, too soon or too fast, to minimize set-backs and injuries.
b. Pay specific attention to time and intensity when starting a workout program.
(1) Initial intensity and time should reflect the beginning fitness level of the
13individual. The average aerobic intensity should be that which can be maintained for 15
minutes. For some, this may be a walking, walk/run, or alternate cardio program.
(2) Always increase time first when increasing overload, then increase intensity
(e.g. a member able to jog for 15 minutes per session should increase the time
gradually to 30 minutes before increasing speed).
(3) Increase in 5-10% increments per week. For example, if a member is running
1 mile, do not increase above 1.1 miles the following week or if jogging 15 minutes, do
not increase the following week to 16.5 minutes.
(4) More is not always better. After a certain weekly amount of exercise, fitness
improvements are negligible and the potential for injury increases. Members exhibiting
signs of tendonitis, continuous ankle, knee, or other pain, and feel fatigued on a regular
basis, may be exercising too much and should seek medical advice.
10. Assessment of Progress
There are three levels of progression for fitness.
a. Phase 1: Initial Stage. The goal of the initial stage is to adapt the body to
exercise and focus on proper form. Typically consists of lower intensity activity for
shorter duration (e.g., run/walk). Programs initiated too aggressively may result in
increased injuries. If a member is actively participating in activity three or more times
per week without progress, refer to medical for evaluation.
b. Phase 2: Improvement Stage. The goal of the improvement stage is to increase
overall exercise stimulus, following the FITT principles, to allow for significant
improvements. Individuals may progress quickly during this phase with solid
preparation in phase 1.
c. Phase 3: Maintenance Stage. The goal is to maintain achieved levels of fitness
once goals are achieved. Re-evaluate fitness goals at this time. Diversification in
training is important for long term success to prevent overuse injuries and maintain
members’ interest in activity.
The chart below provides guidelines for progression for frequency, intensity and
duration of PT sessions for sedentary members.
14Training Progression for Sedentary Individuals
Program Stage Week Exercise Exercise Exercise
Frequency Intensity Duration (min)*
(%HRR)
Initial Stage 1 3 40-50 15-20
2 3-4 40-50 20-25
3 3-4 50-60 20-25
4 3-4 50-60 25-30
Improvement 5-7 3-4 60-70 25-30
8-10 3-4 60-70 30-35
11-13 3-4 65-75 30-35
14-16 3-5 65-75 30-35
17-20 3-5 70-85 35-40
21-24 3-5 70-85 35-40
Maintenance 24+ 3-5 70-85 20-60
ACSM, Guidelines for Exercise Testing and Prescription ,8th Edition
* Pre-planned PT session not including time for warm-up, cool down and stretching.
11. Recovery
The recommended time to work out is 3-4 times per week with light activity days to rest
and recover. Common mistakes in fitness programs include:
a. Participating in the same work out. For example: exercising on the stationary
bike or elliptical for 20 minutes 3 times per week. The body will adapt and you will not
see improvements. Vary workouts and continue to challenge the body with increased
intensity to see improvements in fitness.
b. Failing to prepare for PFA. Participating in cardio and strength workouts at least
3 times per week is adequate to prepare most members to pass the PFA.
c. Only participating in running, crunches, and sit ups. There are more effective
ways to improve your PRT score without overusing the same muscles. See Appendix
A.
1512. Overcoming Obstacles to Physical Activity
The following tips are provided for assisting with PT obstacles.
Obstacle Strategy
I do not have time (work, family) Plan ahead. Make time and mark it on your
calendar. Aim for earlier in the day to prevent
last minute commitments from becoming an
excuse.
I do not have anyone to go with Develop a buddy system. Members are more
likely to PT on off days if someone else is waiting
for them.
I am so tired after work Schedule activity early in the day.
Look at eating patterns. Have you fueled
properly during the day to give you consistent
energy? Look at sleep habits as well. Can you
go to bed one hour earlier?
I have small children that I have to get Trade babysitting with a friend. Do exercises
home to with your children – walking with a stroller, have
them ride a bike while you walk or jog.
The weather… Use the confined spaces workout indoors.
I do not have access to a gym A gym is not required. Body weight, resistance
bands and work out videos can be used.
I have to….. Lose the excuses! This is a priority. Rate it that
way in your day. Once a routine is established, it
becomes second nature like brushing teeth and
getting dressed in the morning.
16Chapter 4
Command/Unit Physical Training (PT) Components
This chapter provides the components of command/unit PT to facilitate a safe and
effective PT program per OPNAVINST 6110.1J. The Physical Readiness Program and
CNIC fitness professionals work closely to develop curriculum and train CFLs and
ACFLs in proper program design and execution. The 5-day CFL course provides the
tools and resources for conducting diverse and challenging command PT sessions.
The following information is provided as a reference.
An additional tool for CFLs/ACFLs is the Navy Operational Fitness and Fueling Series
(NOFFS). The NOFFS work outs were developed by industry experts, The Athletic
Performance Institute, to provide comprehensive workouts to removes the guess work.
Each workout is designed with a warm up (pillar prep and movement prep), strength,
cardio, and stretching (flexibility) component. Certified NOFFS instructors located
throughout the fleet received training on this program and can assist in incorporating it
into your PT. Visit http://www.navyfitness.org/ for more information.
17Pre-physical Activity Questions
(1) Do you have a current PHA? If no, you may not participate today.
(2) Do you have chest pain (with or without exertion), bone or joint pain, high blood
pressure or high cholesterol? If yes, have you been cleared, by your medical provider,
to participate in PT?
(3) Have you had a change in your medical status since the last time you were
asked these questions?
(4) Are you ill today or know of any medical condition that may prevent you from
participating in physical activity today?
For PRT Only:
(5) Did you answer yes to any PARFQ questions? If yes, do you have a PFA
medical waiver/clearance form on file? If no, you may not participate today.
In addition to asking the above questions, CFLs are also responsible for the
following during the PRT:
Prohibit participation if recovering from illness/surgery or if health changes have
occurred since completing the PARFQ.
Direct any member who experiences chest pain, shortness of breath, arm, and/or neck
pain, to withdraw from the test and call or escort the member to medical.
Ensure drinking water is readily available at test site. Identify if any member has sickle-
cell traits. If so, 8 oz. of clear fluids must be administered before, during, and after the
test.
Ensure all members are dressed appropriately and wearing proper footwear.
182011
Dynamic Exercise Illustrations
19Dynamic Warm-Up Exercises
Pillar Bridge (30 Sec Hold) Lateral Pillar Bridge (30 Sec Hold)
Push up tall on your elbows & tuck chin so head Lie on your side with forearm on the deck under
is in line with body your shoulder – feet stacked together
Maintain a straight line from ears to ankle Keep body in a straight line from your ear to
Feet shoulder width apart your ankles
Hold for 30 Seconds Hold for 30 seconds
Complete for time, repeat on opposite side
Pillar Bridge w/ Arm Lift
Assume pillar position with feet wider than
Dynamic Lateral Pillar Bridge
shoulder width apart
Lie on your side with your forearm on the deck
Engage torso & alternate reaching up & out with
under your shoulder – feet stacked together
arms – 2 second hold
Push your hips off the deck, creating a straight
Keep shoulders & hips square to deck with arm line from ear to ankle, hold for 1-2 sec & return
reach to starting position
Repeat for reps & repeat on opposite side
Pillar Bridge w/ Alternating Hip Flexion Pillar Bridge w/ Abduction
Start in push-up position with hands directly • Lie on side with forearm on deck, feet stacked
below shoulders & feet shoulder width apart together
Keeping your hips & torso still, draw one knee • Keep elbow under shoulder, push your hip off
towards your chest keeping your back leg the deck, straight line from ankle to shoulder
straight • Lift your top leg into the air as if you were doing
Return to starting position & repeat with a lateral jumping jack
opposite leg for prescribed reps on each leg, one • Complete reps, repeat on opposite side
foot should always be in contact w/ the deck
Move with control & alternate sides each rep
20Glute Bridge (30 Sec Hold) Y’s (Bent Over)
Lift hips to create a line through knees, hips & Hinge at waist, back flat & chest up
shoulders Glide shoulder blades back & down & raise
Keep back flat & torso engaged throughout the your arms over your head to form a Y
movement Initiate movement with shoulder blades,
Keep toes pulled up to your shins not arms & keep thumbs up throughout
Hold for 30 seconds Lower arms back to start & repeat for reps
Glute Bridge w/ Knee Extension
Lift hips to create a line through knees, hips &
shoulders T’s (Bent Over)
Alternate extending knees – hold 2 sec. ea Hinge at waist, back flat & chest up
Keep back flat & torso engaged & head on the Glide shoulder blades back & down & raise
deck throughout the movement your arms over your head to form a T
Initiate movement with shoulder blades,
not arms & keep thumbs up throughout
Lower arms back to start & repeat for reps
Glute Bridge Marching (Hip Flexion) Chest Press / Shoulder Press
Lift hips to create a line through knees, hips & Simulate you are performing a push-up in the air
shoulders in front of your body.
Lift one knee towards your chest, hold 2 sec. Once you get back to the starting position, then
Althernate legs for prescribed reps with each leg proceed into an overhead should press.
Keep back flat & torso engaged & head on the Make sure you use a narrow hand-stance and
deck throughout the movement keep elbows tucked in during the shoulder press
to ensure you are engaging the tricep (back arm)
muscle.
21Reverse Lunge, Elbow to Instep (Kneeling) Basic Squat
Kneeling, take half step forward with left foot Stand with feet slight wider than shoulder width
Place right hand on deck & left elbow inside of apart.
left foot Squat down to a comfortable depth (this will
Hold for 2 sec. vary from member to member)
Place left hand outside foot & push hips to the Do not go below thighs parallel to the deck (i.e.,
sky a 90 degree bend in the knees)
Complete reps, then repeat on opposite side Return to starting position
To make this exercise more difficult, perform a 3
count down and a one count up
The 3 countdown will also be slower and will
allow the members to focus on good technique
(knees remains above the ankle and all
movement will be performed at the hips/buttock
lowering down)
Reverse Lunge, Elbow to Instep (In Place)
Place right hand on deck & left elbow inside of
left foot. Hold for 2 sec.
Place left hand outside foot & push hips to the
sky
Keep back knee off deck & contract rear glute
Alternate sides each rep
Split Squat
Take a low split position with your weight
primarily supported on your front leg
Keep your torso engaged, tall posture and don’t
let knee touch the deck
Alternate legs every 5 seconds until working
Reverse Lunge, Elbow to Instep (In Place w/ time elapsed
Rotation)
Place right hand on deck & left elbow inside of
left foot. Hold for 2 sec.
Next, rotate right arm & chest to the sky as far as
you can. Hold for 2 sec & return
Place left hand outside foot & push hips to the
sky
Alternate sides each rep
22Lateral Squat Three Side Steps Touch the Deck
Stand with feet wider than shoulder width apart, In the defensive position, take 3 side steps to the
shift hips to the side and down right and touch the deck
Push through your hip to return to start position Make sure to maintain a partial squat and
Keep your opposite leg straight, back flat and remain low
chest up Return to defensive position and take 3 side
Alternate sides each rep steps to the left and touch the deck
This completes one repetition
Quick Feet / High Knees
Start In the defensive position (feet slightly
wider than shoulder width and hands at waist
level)
Perform a quick shuffle of feet until call for high
knees (run in place)
Gradually increase the height of the knees and
exercise tempo
To increase difficulty, count down from 10 in
high knees position
Knee Blocks/ Alternating Knee Blocks
With both arms raised above your head, contract
your abs and lower both arms to your right knee
to perform a knee block
Perform a certain number of repetitions
Repeat on left side
Perform alternating knee block by alternating
from right to left side after one repetition
23Jumping Jacks Squat Jumps
Stand with arms at your sides, feet straight and This exercise will be used to introduce the
close together member to plyometric moves
Bend knees and jump up while spreading arms Stand with feet slight wider than shoulder width
and legs at the same time. apart.
Lift arms to ears and open your feet to wider Squat down to a comfortable depth (this will
than shoulder width vary from member to member)
As you return from jumping up bring your arms Do not go below thighs parallel to the deck (i.e.,
back down to your sides and at the same time a 90 degree bend in the knees)
bring your feet back together Perform a vertical jump
Perform basic jumping jacks using the 4 count Emphasis should be on proper form and
military cadence technique NOT how high the member can jump
or the number of repetitions
Please remind them that they will land with “soft
knees” and with as little impact as possible
Jump Rope
Simulate jumping rope to prepare the body for
high impact activity
This should NOT be one of your first warm-up
exercises
Vary this exercise by using the following
techniques: double jump, single foot, and
alternating feet/shuffle.
24Standardized PRT Warm-Up
This standardized dynamic warm-up is designed to target all the muscles used during
the Navy PRT. If performed correctly, it will prepare the muscles for the test by
increasing the range of motion, temperature, and blood flow to the muscles. This
standardized warm-up should NOT fatigue the individual and will actually improve
his/her performance on the test. Highly recommend you explain this to your command
before conducting the standardized PRT warm-up.
Exercises:
1. 10 military four-count Pec Fly w/ Overhead Raise
2. 10 military four-count Chest Press / Shoulder Press
3. 10 military four-count Basic Squat
4. 10 military four-count Calf Raise
5. 10 military four-count Knee Blocks to the right
6. 10 military four-count Knee Blocks to the left
7. 10 military four-count 3 Side-Step Touch the Deck *
8. 30 seconds of Quick Feet followed by 30 seconds of High Knees *
* If the member has lower body joint problems and should not do high-impact exercises,
they can perform the Basic March in lieu of 3 Side-Step Touch the Deck (#7) and/or
perform High Marching in lieu of Quick Feet / High Knees (#8).
- After performing the standardized warm-up, give individuals 5 minutes to perform an
individual warm-up and stretching as needed.
- After the Navy curl-up, have all members perform a hip flexor stretch to relax the hip
flexors for the run.
- After the run, have all members walk for 5-10 minutes as a cool-down. Take all members
through the 12 flexibility exercises (30 second hold using an echo count) after the cool-down.
Encourage members to hydrate well after the PRT.
252011
Dynamic Exercise Quick Reference
Guide
2627
28
29
Navy Selected Top 12 Stretches

Stretch 1: Chest Stretch
                           Description: In a standing position, gently clasp both of your
                           hands and place them on the back of your neck. Slowly pull
                           your elbows back until you feel a stretch on your chest. Do
                           not pull your head forward or place tension on the neck

                           Caution: You can do this as a partner assisted stretch but
                           they should not force the stretch by aggressively pulling back
                           on the elbows.

Stretch 2: Posterior Shoulder Stretch
                 Description: Place your left hand on the back side of your right arm
                 above your elbow on the front of your body and gently pull your arm
                 across your body. You should feel a stretch on back side of your
                 shoulder and upper arm. Repeat to stretch opposite side of your
                 body.

Stretch 3: Triceps Stretch
                  Description: Take your left arm and reach behind your back. By
                  placing your right hand on the back side of your left arm, gently push
                  back to achieve a stretch on the left triceps muscle. Repeat on
                  opposite side.

Stretch 4: Outer-Hip-and-Low-Back-Stretch
                                       Description: While in a long sitting position
                                       (legs in front of you with knees straight),
                                       cross your right leg over the left. Your right
                                       foot should be on the ground at
                                       approximately your left knee level. Take
                                       your left elbow and place it on the outside of
                                       your right knee and gently push your knee
                                       towards the left side of your body. You
                                       should feel a stretch on the outer portion of
                                       your right hip and in your low and mid back
                                       region. Repeat to opposite side.

                                          30
Stretch 5: Abdominal Stretch
Description: On your stomach,
place your hands beneath your
shoulder and gently push up until
you feel a stretch on your abdominal
muscles. Do not fully lock out your
elbows and hyperextend your back.
Note: If you feel any discomfort in
your low back while performing this exercise, you can reduce the tension by using the
“propped on elbow” position.
Stretch 6: Low Back Stretch
Description: While lying on your back,
gently pull one or both knees to your
chest. You should feel a stretch in your
low back and buttocks.
Stretch 7: Piriformis Stretch
Description: While you are lying on your
back, gently cross your right leg over your left
thigh (both knees are bent at 90 degrees).
Take both hands and place on the back side
of your left thigh. Gently pull towards your
chest until your feel slight tension in your right
buttock and outer thigh. Repeat on opposite
side.
Note: If you are experiencing low back pain
after performing physical activity, seek medical assistance. This exercise should be
performed to increase flexibility in this region and may assist in decreasing pain.
Stretch 8: Hip Flexor Stretch
Description: In a standing position, place your right foot
approximately 3 to 4 feet in front of your left foot (like a
lunge). Slowly bend both knees until you lower your body
towards the ground. Your left knee should almost be at 90
degrees. Gently push your left hip forward to feel the stretch
in the front of your hip. If you don’t feel the stretch, gently lean
your upper body back.
31Tip: Since you use this muscle group during the Navy Curl-Up, this stretch should be
performed after the curl-up event to prevent cramping and prepare this muscle group for
the cardio event.
Stretch 9: Quadriceps Stretch
Standing Description: In a standing position, with a slight bend
in your left knee, grab your right ankle with your right hand and
maintain your balance. Gently pull your right foot towards your
buttocks while making sure your knees is aligned with the body
(make sure knee is not sticking out and it is directly below your
hip). You can also stretch out your trapezius (neck) muscles
during this quadriceps stretch (neck muscles) by bringing your
chin to the opposite side of your chest. Repeat to opposite side.
Note: If you are having difficulty balancing you can hold on to a
wall or perform this stretch while lying on your side.
On-the-Ground Description: While lying on your side, with a
slight bend in your left knee, grabs
your right ankle with your right
hand and maintains your balance.
Gently pull your right foot towards
your buttocks while making sure
your knees is aligned with the body
(make sure knee is not sticking out
and it is directly below your hip. Repeat to opposite side.
Stretch 10: Modified Hurdler Stretch
Description: While sitting in a v-position, gently pull your left foot
towards your groin area. Your right leg will remain straight with a
slight bend in the knee. Gently lean forward and reach for your
toes on your right leg to stretch out your hamstring.
Note: The stretch will be more difficult if you try to perform the
hamstring stretch if you pull your toes back towards your body
(vs. pointed).
32Stretch 11: Groin or Butterfly Stretch
Description: While sitting with the upper body nearly
vertical and legs straight, bend both knees, and bring the
soles of the feet together. Pull feet toward your body.
Gently place your hands on your feet and your elbows on
your knees. Pull your upper body slightly forward as your
elbows push down. You should feel a stretch in your groin
area.
Stretch 12: Calf Stretch
Description: In a push-up position,
cross the left foot over the right. With
the right knee straight, gently push the
right heel toward the deck. You will feel
a stretch in the right calf. Hold for 15
seconds. Repeat to opposite side.
Note: Your body should remain in a
straight line from your shoulders to your
ankle to prevent low back injury and to
strengthen your core muscles.
33Top 12 Navy Stretches Quick Reference Guide
Stretch 1: Chest Stretch 4: Outer Hip / Low Back Stretch 7: Piriformis Stretch 10: Modified Hurdler
Stretch 2: Posterior Shoulder Stretch 5: Abdominal Stretch 8: Hip Flexor Stretch 11: Groin or Butterfly
Stretch 3: Triceps Stretch 6: Low Back Stretch 9: Quadriceps Stretch 12: Calf
34Things to Avoid While Stretching
5. Avoid spinal rotations, they are bad for the
1. Avoid extreme hyperextension of the spine back.
(arching the back).
6. Do not perform circular motions.
2. Avoid locking any joint and always keep a
slight bend in the knee when performing
standing stretches.
3. Never force a movement.
4. Avoid forward flexion of the spine.
35Contraindicated Stretches
It is best to completely avoid contraindicated positions or stretches. Although it is not
guaranteed that an injury will result, the chances are much increased. There are safe
and effective alternatives to contraindicated stretches. Even if you do not feel pain while
performing a contraindicated stretch, damage may be occurring which will show up
later.
This stretch may cause an Leaning too far forward
Deep squats put too much
individual to get dizzy places excessive
pressure on the knees
(extreme hyperextension) pressure on lower back
The Hurdler's stretch
This stretch puts too much places excessive
Avoid the knee extending
stress on the knees and pressure on the tendons
beyond the toes
ligaments and ligaments of the
bent knee
36Contraindicated/High- Risk Exercises
Contraindicated Rationale Alternative Exercise
Exercises
Donkey Kicks Places excessive pressure, Glute Bridge
hyperextension of low back
Deep Knee Bends Overstretches ligaments of the knee Reverse Lunges
Deep Knee Lunges Places excessive pressure on the Reverse Lunges
forward knee
Windmill Places a tremendous amount of stress Toe Tap to the Front
on the low back and supporting muscles / Toe Tap to the Rear
Cherry Pickers Places excessive pressure on the low Bicep Curls
back and supporting muscles Knee Blocks
Steam Engines
Flutter Kicks Place excessive pressure on low back Bicycles/
and/or cervical spine Plank/Isometric hold
Hello Dollies Places excessive pressure on the low Bicycles/Plank
back
Jack Knives Places excessive pressure on the low Bicycles/Plank
back
8-Count Can lead to increased compression of Plank/Side Bridges/
Bodybuilders the spine, potentially leading to stress Alternating
fractures and/or muscles strains Superman
Mountain Climbers Increased compression of the spine Plank / Side Bridges
during rotation.
Ballistic Wood Incorporates ballistic/bouncing Knee Blocks/Steam
Chops movements which are considered a Engines/Standing
contraindicated movement Side Crunch
Star Bursts Ballistic movement Jumping Jacks/
Plyo-Jacks
Simultaneous arm Hyperextends the back and places Alternate opposite
and leg lifts on pressure on spine arm, opposite leg/
stomach or Bird dog (alternate on
swimmers hands and knees)
Hurdler’s Stretch Places excessive pressure on flexed Modified Hurdler’s
knee joint Stretch
Standing Hamstring Places excessive pressure on the low Modified Hurdler’s
Stretch back Stretch
Quadriceps Stretch Places excessive pressure on both knee Standing Quadriceps
(sitting on knees) joints Stretch / Lying
and lying back Quadriceps Stretch
37Contraindicated Rationale Alternative Exercise
Stretches
Sit and Reach Places excessive pressure on low back Modified Hurdler’s
(Hamstring) Stretch
Standing Toe Touch Extreme unsupported lumbar flexion,
increases pressure on back and small
muscles
Yoga Plow Places excessive pressure on cervical Superman
intervertebral disks (alternating arms)
Neck Can pinch anterior cervical nerves and Gently lower your
Hyperextension and over compress cervical intervertebral chin to your chest
Neck Rolls disks (Do not perform neck
circles)
Lumbar Rolls Can over compress the lumbar Toe Tap to the front/
intervertebral disks Toe Tap to the rear
Swimmer’s Arm Could lead to shoulder instability and Standing Chest
Stretch (clasp hands predisposition to injury as well as places Stretch (using a
behind back and lift) excessive pressure on low back doorway)
Chest Fling Backs Involves ballistic, controlled movements Standing Chest
Stretch (using a
doorway)
Wide Circle Sun Overstretches ligaments of the shoulder Pec Fly w/Overhead
Gods and could possibly damage shoulder Raise
cartilage
38_____________________________
Appendix A
Sample Workouts
39Sample Training Schedules
Sample 3-Day Per Week Command/Unit PT/FEP Training Schedule
Monday Tuesday Wednesday Thursday Friday
Dynamic
5 min 10 min 10 min
Warm-up
20 min LSD
- - 20 min Interval
30 min Total
Pre-Planned 20 min or
Body Metabolic
Activity Strength Repetition
- Circuit -
Circuit
Cool Down 5 min 5 min 5 min
Stretch 5 min 5 min 10 min
Total Time: 55 min 50 min 45 min
Sample 5-Day Per Week Command/Unit PT/FEP Training Schedule
Monday Tuesday Wednesday Thursday Friday
Dynamic
10 min 5 min 5 min 5 min 5 min
Warm-up
20 min
15 min 30 min
Pre-planned Sprints* 30 min 30 min
Pace/Tempo 3 mile LSD
Activity or Total Body Total Body
Training or
High Metabolic Metabolic
or Fartlek
Intensity Circuit Circuit
Mock PRT Training
Circuit*
Cool-down 5 min 5 min 5 min 5 min 5 min
Stretch 5 min 5 min 5 min 5 min 5 min
Total Time: 40 min 45 min 30 min 45 min 45 min
* Limit high intensity workouts to no more than 2 times per week.
40Sample Circuit Training Layout
Sample Strength Training Exercises
Activity Beginner Level Intermediate Level Advanced Level
Push-ups
Push-up on Knees Regular Push-up 3-Count Down Push-up
Squats
¼ Squats 3-Count down Squat Squat w/ Body Bar or Tubing
Curl-ups Basic Curl-up (until
fatigue then proceed to Basic Curl-up Reverse Curl-up or Curl-up w/ Medicine Ball
crunch)
Triceps Super Set Push-up on knees (w/
(10 push-ups,10 military narrow hand stance) Regular Push-up (w/ narrow hand 3-Count Down Push-up (w/ narrow-hand stance)
presses. Repeat cycle Military Press (w/out stance) Military Press (w/out resistance) Military Press (w/ no resistance or w/ tubing)
for entire circuit) resistance)
Lunges Stationary Lunge Reverse Lunge
¼ Lunge
(w/ or w/out body bar) (may use body bar)
Core Strength:
(20 seconds each)
Exercises performed on Exercises performed w/ arms straight Incorporate Push-up in exercise (e.g., Push-up, R Side
Plank
elbows (slight bend in elbow) Plank, Push-up, L Side Plank, Push-up)
R Side Plank
L Side Plank
3-Count Down Dip (w/ 10 second isometric hold in
Dips (on step or bench) Basic Dip 3-Count Down Dip
down position after each set of 10 reps)
Calf Raises
Basic Calf Raises 1 Leg Calf Raises or use Body Bar Simulate Jump Shot
Core Strength: Back
Strength Basic Bridge for 20 to 30 Basic Bridge w/ 1 leg straight (Hold 20 to Basic Bridge w/ 1 leg straight (Switch sides every 10
second hold (Repeat) 30 second each side) seconds)
41Activity Beginner Level Intermediate Level Advanced Level
Step-up 2-3 Level Step-up 2 Level Step-up
(One foot remains on 1 Level Step-up
30 seconds each leg (Add hand weights to increase difficulty or jump shot
top of platform to 30 seconds each leg
(May use body bar) after each step up)
reduce injury)
Step-Squat-Step Side Step w/out band or Side Step w/ medium resistance band Side Step w/ heavy resistance circle band
light resistance(yellow or
red) (blue band) (black or grey band)
Bicep Curl
Low Resistance Tubing Medium Resistance Tubing Heavy Resistance Tubing w/ 3 Count Down
42Sample Cardiovascular & Plyometric Exercises
Activity Beginner Level Intermediate Level Advanced Level
Football Player Shuffle Beginner will only raise their Participants will raise
Participants will raise knees to chest and high knee position
(Quick Feet and High knees to parallel and time will knees to chest and high
will last (20 to 30 seconds) and participants will call out time (in
Knees) be limited in high knee knee position will last 10 to
seconds)
position (5 to 10 seconds) 20 sec
Low Impact Jumping Jack Jack-Jab Series
Jumping Jacks Regular Jumping Jack
(only using arms) Ex: Jack-Right Jab-Jack-Left Jab
Jump Rope Basic move w/ 2 feet on
Alternate Feet Same exercise as Intermediate
(simulate jumping rope) ground
Both Feet (20 sec)
Line Jumping Hop the Fence
Both Feet Right Foot (10 sec)
(Side-to-Side) (Exaggerated movement)
Left Foot (10 sec)
Same Exercise
Box Drill Same Exercise Same Exercise
Increased Rest Period
Speed Bag Same Exercise Same Exercise Same Exercise
3 Side-Step and Touch
the Deck Same Exercise Same Exercise Same Exercise
43Sample Metabolic Circuit Exercises
Activity Beginner Level Advanced Level
Push-up on ground followed w/ Military Press in
Upper-body Strength Add a body bar to this exercise.
air
Plyometrics Line Hopping Side-to-Side Incorporate Hurdles (Members will jump over these sideways)
Core Strength Basic Bicycle Bicycle on exercise ball
Lower-body Strength & Cardio Steam Engines Same exercise as Beginner
Chest Press w/ Tubing
Upper-body Strength Same exercise as Beginner
(use partner if even numbers)
Walking Plank (Plank on elbows to push-up position and return to
Core Strength Basic Plank
elbows)
Carioca Ladder
Plyometrics/Footwork (or alternating wide march-narrow march at fast Carioca Ladder (Incorporate high knees, in/out (hop scotch), etc).
pace)
Superman (5 sec hold w/ alternating arm and
Core Strength Superman - Alternate arms and legs (not at the same time)
leg).
Cardio Jumping Jack Jack-Jab or Jumping Jack w/ Plyo Jump
Upper-body Strength Bent Over Row (w/ tubing or body bar) Increase difficulty w/ tubing or bar weight
Cardio and Plyometrics Box Step Box Step w/ Plyometric Jump
Upper-body Strength Bicep Curls w/ Tubing or Body Bar Increase tube resistance or bar weight
Cardio Mock Jump Rope Same exercise as Beginner
Core Strength Side Plank Side Plank w/ Oblique Twist
Plyometrics Box Step Same exercise as Beginner
Upper-body Strength Triceps Dip on Bench Use 3 Count Down
Lower-body Strength Stationary Lunges Stationary Lunges w/ Medicine Ball Chop
Core Strength “In and Outs” in the V position Jack Knives or Pikes on Medicine Ball
Cardio and Plyometrics Low Impact Speed Skater High Impact Speed Skater (Hop side to side)
Core Strength Basic Bridge Bridging w/ one leg or doing a hamstring curl or exercise ball
Cardio Side Shuffle (w/ boxer Crossover Punch) Same exercise as Beginner
44Sample Circuit Training Exercises for Confined Spaces
Activity Beginner Level Advanced Level
Negative Push-up, Altered Hand Stance, Resistance Push-up,
Upper Body Basic Push-Up
etc.
Jump Rope: One Foot Jump Rope or Jump Rope
Cardio Jump Rope (Both feet jumping)
Shuffle/Alternating Kicks
Core Crunches Crunches on an Exercise Ball
Plyometrics Side to Side Line Jumping w/ Both Feet Side-to-side Jumping (over Hurdles)
Back Extension Prone (on belly). ** If this hurts
member’s back, have them do Superman
Core Strength Back Extensions on Exercise Ball
(alternating opposite arm and leg in the prone
position).
Dot Jumping: Hop Scotch.
Dots will be placed in the order of “5” on a die.
The exercise sequence: (start w/ 2 feet wide
Plyometrics on the bottom dots- Hop forward w/ feet Same exercise as Beginner
together to middle dot and hop forward w/ feet
wide to top 2 dots. Return to start by going
backwards.
Lower-body Strength Basic Squats 3-Count Down Squat or use Body Bar or Tubing w/ Squat
Increase difficulty w/ resistance of tubing or weight of body
Upper-body Strength Bicep Curls (w/ tubing or weights)
bar/dumb bells
Pick up the Tempo (but make sure you maintain good form)
Cardiovascular Glute Kickers
20 Degree Side Bends/Standing Side
Crunches
Core and Lower Body Same exercise as Beginner
(knee goes to elbow)
Overhead Tricep Extension (w/ tubing or body
bar, keep Elbows tucked in). Can modify this
Upper-body Strength Increase difficulty w/ resistance of tubing or weight of body bar
exercise to a supine (on back position) and
perform “Skull Crushers”
Perform a Lower Box Step to Engage more of the Legs. Can
Cardiovascular Box Step
also add a Plyo-Jump at the end of the Box Step.
Lower-body Strength Side-lying Leg Raises (for outer hip) Side-lying Leg Raises w/ tubing or ankle weights
45You can also read