Creating a Playlist in iTunes - Quick Start
←
→
Page content transcription
If your browser does not render page correctly, please read the page content below
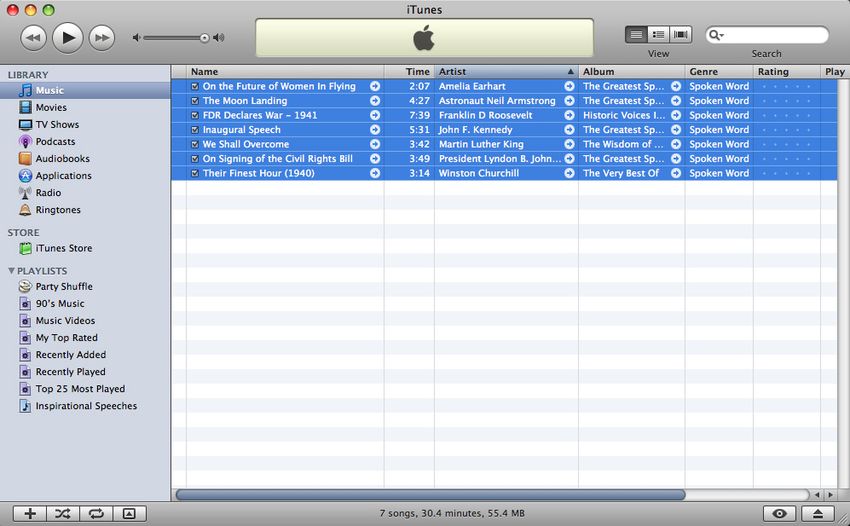
Quick Start

Creating a Playlist in iTunes
iTunes is an easy-to-use application for organizing, importing, storing, playing, and sharing
digital audio and video content. You and your students can add content to your iTunes
library by importing a music CD, files from another location, or downloading purchased
music, feature length movies, television shows, audiobooks, and free podcasts from the
iTunes Store. The iTunes U area of the iTunes Store offers access to curriculum and lectures
from hundreds of leading academic institutions, all available at no charge. iTunes content
can then be synced with an iPod or iPhone for learning on the go.
Files in an iTunes library can be organized into “playlists,” allowing you to have separate
groups of music or other sound files for each project. In this activity, you’ll import tracks
from a CD, then organize your files in a playlist.

iTunes in the Classroom
Using audio is a compelling way to reinforce text and visuals to cement learning. For
example, audiobooks can assist English language learners with models of spoken
language, and songs from an earlier time period can enhance the study of history.
Students can also readily use items in their iTunes library in projects they create with iLife
and iWork applications, such as a movie created with iMovie or a slideshow produced
with Keynote. Students can quickly share their iTunes libraries with others in the
classroom when sharing is selected in iTunes Preferences.
iTunes can be used to inspire your students in many ways. For example, students in a U.S.
History or Language Arts class could listen to speeches that have changed the world as
they study the power of the spoken word. For such a lesson, you could import audio files
and create a playlist of great 20th century speeches, such as John F. Kennedy’s inaugural
address, Martin Luther King Jr.’s “We Shall Overcome” speech, and Franklin D. Roosevelt’s
declaration of war in 1941.
After discussing the ways in which these words have influenced history and affected
individual lives, your students could research and assemble their own playlists of speeches
by 21st century leaders and creators who are empowering and changing their generation.
Students could then write their own inspirational speeches that pay homage to these
leaders.
Quick Start                                               2
                                           Creating a Playlist in iTunes

     Goals
     In this activity, you will:
     • Import tracks from an audio CD
     • Create a playlist
     • Search for, change the order of, and delete tracks from a playlist

     What You Will Need
     Before you organize music or other audio into a playlist in this activity, you will first
     import tracks from a CD into iTunes. You will need an audio CD with music or other sound
     files that you would like to import into your iTunes library.
     Software needed:
     • iTunes

     Time
     This activity will take approximately 30 minutes to complete.

     Getting Started
■■   Open iTunes by clicking its icon in the Dock or by double-clicking its icon in the
     Applications folder.

       Note: If this is the first time you have opened iTunes, you will need to answer a few
       setup questions before continuing with the activity.

     The iTunes window appears. The top of the window has playback controls and a volume
     slider on the left, a pane that displays information about the currently playing track in the
     middle, and View buttons that allow you to change how items are displayed and a Search
     field on the right.

       Playback     Volume                                                   View     Search
       controls      slider                                                 buttons    field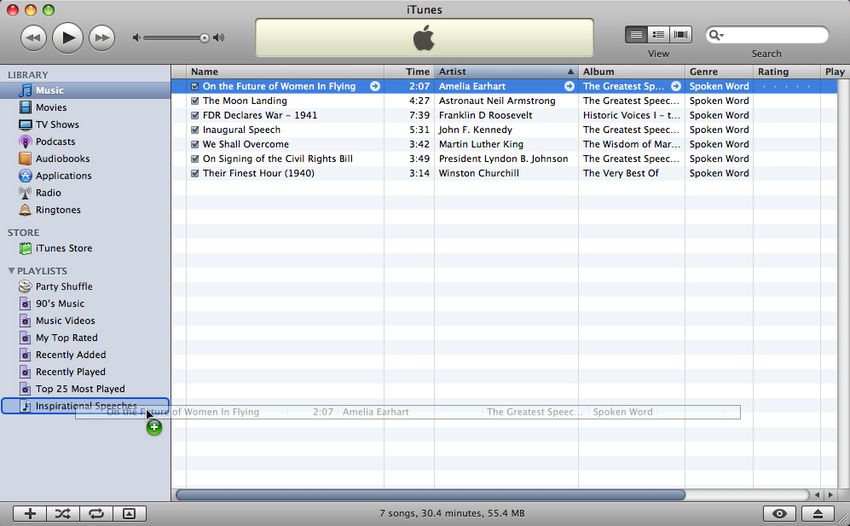
Quick Start                                           3
                                         Creating a Playlist in iTunes

    At the left of the iTunes window is the Source list where several categories (Library,
    Store, Playlists) and folders aid in acquiring, organizing, and managing your digital media.
    Clicking a selection in each category displays the contents of that selection in the main
    window area to the right of the Source list. Because the Music library in this example does
    not have any files yet, no items are listed.

    The lower left of the iTunes window includes buttons to create a playlist, shuffle the music
    in a selection for random playback, repeat music when iTunes has played all the tracks in
    a playlist or other selection, and to show and hide the album artwork and video viewer. To
    the right are the Browse and Eject Disc buttons.

      Note: Other buttons may appear at the bottom of the window when a device (such
      as iPod) is connected to the computer or when certain items are selected in the
      Source list.

    Importing Music or Other Audio from a CD
    Next, you’ll import the tracks on an audio CD.
1   Insert a CD that contains music or other audio tracks in your computer. (See “What You
    Will Need.”)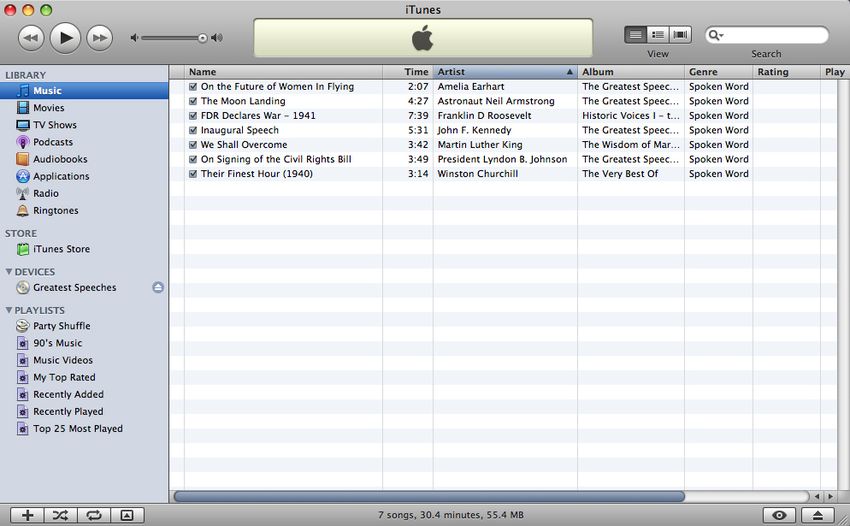
Quick Start                                            4
                                        Creating a Playlist in iTunes

    After the CD mounts, the Device category appears in the Source list and displays the
    generic name “Audio CD.” If you are connected to the Internet, iTunes automatically
    searches an online database to retrieve the album name and music track information and
    displays that name in the Source list.

2   After you have inserted the audio CD in the computer, a dialog appears asking you
    whether you want to import it. Click Yes.

      Note: If you only want to import some of the tracks on a CD, you would click No in
      the dialog in step 2. When the list of songs on the CD appears in the iTunes window,
      click to deselect (remove the checkmark from) any songs you don’t want to import. By
      default, all the tracks are selected. When you have only the tracks you want selected,
      click the Import CD button that appears at the bottom right of the iTunes window.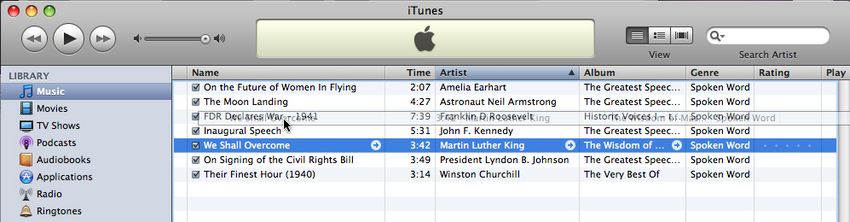
Quick Start                                             5
                                          Creating a Playlist in iTunes

    iTunes begins importing the tracks from the audio CD into your iTunes Music library.
    The status of the importing process is shown in the information pane at the top of the
    window. In the main part of the window, an orange circle appears next to the track
    currently being imported. After each track has been imported, a green checkmark appears
    next to that track.
3   When iTunes starts playing a track from the CD, click the Stop button in the playback
    controls.
    The playback will slow down the importing and conversion process. (If you don’t want the
    songs to play back while importing and converting files at any time, you can change this
    setting in the Advanced pane of iTunes Preferences.)
4   When the import process is complete, eject the disc by clicking the Eject Disc button at
    the bottom of the iTunes window or by clicking the Eject button next to the CD’s name
    under Devices in the Source list.
5   Repeat steps 1 to 4 for any additional audio CDs you want to import.

      Note: Music or audio can also be imported from other sources, or purchased and
      downloaded from the iTunes Store. Items you download from the iTunes Store are
      automatically added to your iTunes library. You can import other music and sound
      files by dragging them from the hard disk or their other location to the iTunes
      window or by choosing File > Import in iTunes.

    Working with Playlists
    Now that you have some audio to work with, it’s time to create a playlist to organize
    the audio you imported. Playlists make it easy to manage audio or music for any type of
    project. Be sure to give the playlist a name that will make it easy for you and students to
    identify later.

    Creating a Playlist
1   Click the Add Playlist (+) button at the bottom left of the iTunes window to create a new,
    untitled playlist that appears under Playlists in the Source list.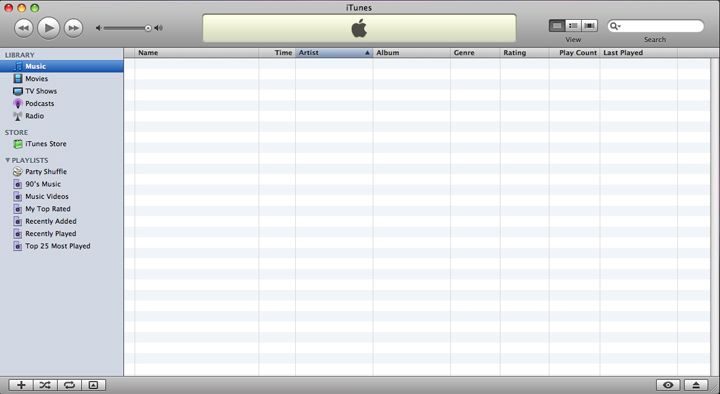
Quick Start 6
Creating a Playlist in iTunes
2 Type a name for the new playlist, then press the Return key.
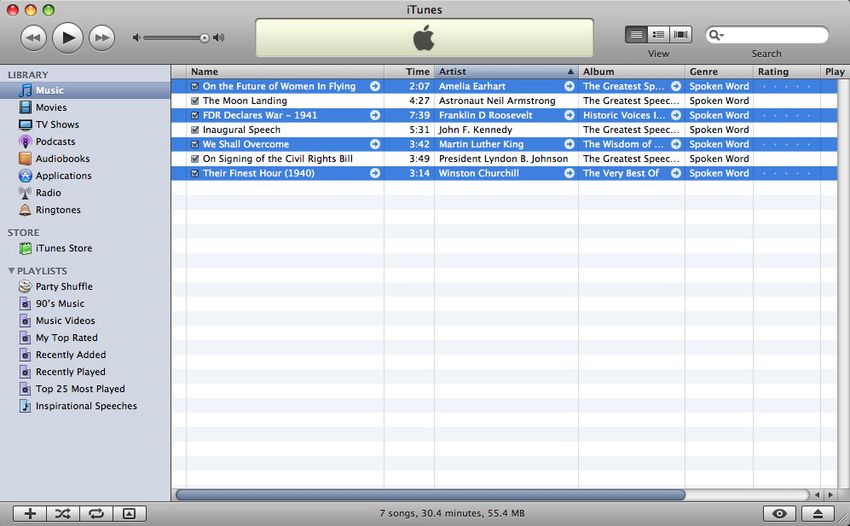
In this example, this playlist is called “Inspirational Speeches.”
The renamed playlist moves to a new position under Playlists because Source list entries
are sorted alphabetically.
Adding Audio Tracks to a Playlist
Next, you’ll add some of the tracks you imported to your new playlist.
1 Under Library in the Source list, click Music.
All the tracks that you imported earlier are displayed in the iTunes window.
2 To add a track to the playlist, drag it from the list to the name of the playlist in the Source
list. When the playlist name is highlighted, release the mouse button.
The track is added to the playlist.
Next, you’ll learn how to add multiple tracks to the playlist at the same time.
3 To add tracks that are adjacent to each other, follow these steps:
a Click the first track to select it. Press the Shift key, then click the last track you want to
select.
All the tracks are highlighted.
Quick Start                                              7
                                           Creating a Playlist in iTunes

    b Drag any of the selected tracks to the playlist to add all the selected tracks. When the
      playlist name is highlighted, release the mouse button to complete the process.
       All the tracks are added to the playlist.

4   To add tracks that are not adjacent to each other, follow these steps:
    a Click the first track to select it. Press the Command key, then click each additional track
      to be added to the playlist.
    b When all the desired tracks have been selected, drag any selected track to the playlist.

5   When you are done adding tracks to the playlist, click the name of the playlist in the
    Source list to see the contents of that playlist.
6   Double-click a track to play it. Click the Stop button in the playback controls when you are
    done.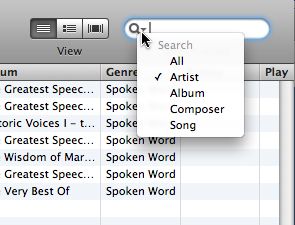
Quick Start                                              8
                                           Creating a Playlist in iTunes

    Searching for Tracks
    When an iTunes library contains a lot of music, it can be more difficult to locate the tracks
    you want to add to a playlist. You’ll learn how to use the search tools next.
1   Click Music under Library in the Source list.
2   To locate one or more tracks, click in the Search field in the upper right of the iTunes
    window, and type a word, phrase, name, or other item to search for.
    As you type, iTunes reduces the entries displayed to match the search criteria. You can
    make the search more specific by clicking the magnifying glass icon in the Search field
    and choosing Artist, Album, Composer, or Song.

3   Add any additional tracks to the playlist, using the steps in “Adding Audio Tracks to a
    Playlist.”
4   When you’re done with the search, click the gray X button at the right of the Search field.

    Changing the Playlist Order
    Music tracks are displayed in the order that they are added to a playlist. You might want
    to play the songs or audio files in an order that differs from the way in which they were
    added. Rearranging tracks is particularly helpful if you are combining music and spoken
    word tracks (such as narration about the music) in a presentation or project. You can
    easily rearrange tracks in a playlist.
1   Click the playlist that you created in the previous steps to select it.
    The tracks it contains appear in the main area of the iTunes window.
2   Click any track and drag it up or down to change its order in the list.
    As you drag up or down, the track’s new position is indicated by a thin black line.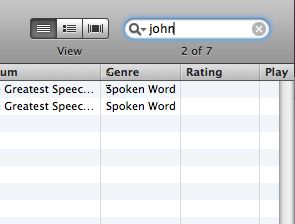
Quick Start                                         9
                                             Creating a Playlist in iTunes

3   If you want to play tracks in the playlist in a random order, click the Shuffle button located
    just to the right of the Add Playlist (+) button.

    Clicking the Shuffle button causes iTunes to randomly rearrange the tracks before you
    begin playback.

      Note: When the Shuffle button is active, you will not be able to rearrange tracks
      manually as described here.

    Cleaning Up
    You can easily remove tracks from a playlist or the Music library or delete a playlist,
    making room for new music or playlists.

    Removing a Track from a Playlist
1   Click the playlist in the Source list to display the playlist’s tracks.
2   Click the song to be removed, then press the Delete key.
3   Click Remove in the dialog that appears.
    The song is removed from the playlist, but not from the iTunes Music library.

    Removing a Song from the Library
1   Click Music under Library in the Source list.
2   Click the song to be removed in the list that appears, then press the Delete key.
3   Click Remove in the dialog that states that moving the song will also remove it from any
    iPhone or iPod that syncs to this iTunes library.

      Note: The song will also be removed from any playlist that it has been placed into.

4   In the next dialog that appears, click Keep File or Move to Trash.

    Deleting a Playlist
1   Select the playlist you want to remove under Playlists in the Source list, then press the
    Delete key.

2   Click Delete in the dialog that appears.
Quick Start 10
Creating a Playlist in iTunes
Wrapping Up
iTunes makes it easy for you and your students to manage a variety of audio and video
files for projects. Audio that has been properly organized into playlists can be readily
located when students are using applications in the iLife and iWork suites, providing even
more efficient project management. Be sure to experiment with the many other features
of iTunes to see just how this software can make your digital life more organized.
Next Steps
Now that you’ve gotten started with iTunes, you’re ready to use it with your lessons
to enhance teaching and learning. The additional activity ideas that are included here
suggest a few more of the ways you can use iTunes with your students. When you want
to gain further skills in using the software to implement these and other activities, you
can use the resources listed in “Learn More,” below.
Learn More
The following are some of the resources you can use to find out more about using iTunes.
Help
When you’re working in iTunes, onscreen help is available at any time by choosing
Help > iTunes Help.
iTunes at a Glance
This tutorial provides everything you need to know about iTunes:
www.apple.com/support/ipod101/tunes
A Tour of iTunes U
To see an introductory video for iTunes U, go to
www.apple.com/education/itunesu_mobilelearning/landing.html. Or from the iTunes
Store, click iTunes U on the left of the iTunes Store window, then click the “iTunes U learn
more” button.
Additional Activity Ideas
Illuminating the Past—History
You and your students can create a playlist of music from a different time period to better
understand peoples’ points of view during that era and also to look at how their views
changed. For example, a collection of music from a specific wartime period could be used
to demonstrate shifting attitudes toward that war.
Listen to Read—Language Arts
You can use iTunes to provide reading centers for ELL students and others who would
benefit from hearing literature read aloud. For example, with the Lit2Go site available in
iTunes U, you can download audio files for Beowulf, The War of the Worlds, and writings by
Patrick Henry, Frederick Douglass, and Susan B. Anthony. Students can then listen to the
works and read along using printed versions that are provided as PDFs.Quick Start 11
Creating a Playlist in iTunes
Dr. Biology Speaks—Science
Using engaging resources from the Arizona State University School of Life Sciences,
students can hear about a wide range of science topics, from microbes in space, to
why roses are red, to marine life conservation. You can create an iTunes playlist for
your students from the many past Ask a Biologist and Science Studio audio podcasts,
accessible without charge via iTunes U. Students can also visit the Ask a Biologist site to
pose their own questions about biology.
Bringing History to Life—History
Students can compare and contrast the ideas of Jefferson and Madison with an audio
podcast of Clay S. Jenkinson, a first-person interpreter of Jefferson, in conversation with
James Madison scholar Jack Rakove. This Stanford University podcast is accessible via
iTunes U. After listening to the podcast, students can produce additional questions
for Jefferson and propose how he would have answered them—and create their own
podcast of a question and answer session that they save in iTunes.
Learning with Podcasts—All Subjects
Using podcasts with students reinforces key concepts, supplements classroom lessons,
provides resources for auditory learners, and engages students. Podcasts are available in
almost every curricular area and can be subscribed to at no charge from the iTunes Store
and organized and stored in iTunes. Examples of education podcasts include: “Classic
Poetry Aloud,” “AP Biology Podcast,” “Class French Tales,” and “The Video Math Tutor.”
iTunes U in the Classroom—All Subjects
The iTunes U area in the iTunes Store is a broad collection of resources that you can use
to enhance teaching and learning in the classroom. These resources include free lectures,
language lessons, audiobooks, and more that have been produced by universities, K-12
schools, museums, and other educationally focused organizations. Examples include: “MIT
Introductory Biology,” Beginning Algebra,” “Basic Spanish,” and “Life After the Holocaust:
Stories of Holocaust Survivors.”
© 2008 Apple Inc. All rights reserved. Apple, the Apple logo, iLife, iMovie, iPod, iWork, iTunes, Keynote, and Pages are
trademarks of Apple Inc., registered in the U.S. and other countries. iPhone is a trademark of Apple Inc. iTunes Store is a
service mark of Apple Inc., registered in the U.S. and other countries.You can also read