Curriculum For The Drywall Industry - HEALTH AND SAFETY AT WORK - OSHA
←
→
Page content transcription
If your browser does not render page correctly, please read the page content below
HEALTH AND SAFETY AT WORK

           Curriculum For The Drywall Industry

                                      Trainer’s Guide

This curriculum was created by El Centro Humanitario. This material was produced under grant
 SH-20846-SH0 from the Occupational Safety and Health Administration, U.S. Department of
Labor. It does not necessarily reflect the views or policies of the U.S. Department of Labor, nor
does mention of trade names, commercial products, or organizations imply endorsement by the
                                         U.S. Government.

                                                                                                1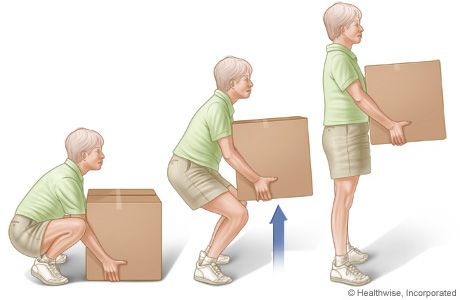
Agenda

Part 1: A healthy and safe workplace
1. Agenda, Introduction and Attendance
2. Hazards in the Drywall Industry
3. Your Rights to Safe and Healthy Work
BREAK
Part 2: What can we do to protect ourselves at work?
1. Personal Protective Equipment
2. Correct Usage of Tools
3. Ergonomics for Workers in the Drywall Industry
4. Negotiating for Better Working Conditions
EVALUATION

 Class Goals:
 Part 1: Workers learn they have the right to be free from hazards at work and about the laws that protect their safety
 at work.
 Part 2: Workers learn to identify their capacity to exercise their rights to safe and healthy work and practice how to
 protect themselves in their work environment.

 Materials for the Class:
 Part 1:
 •Attendance sheet
 •Large paper
 •Markers

 Part 2:
 •Large paper
 •Markers
 •Evaluation Survey
 •Personal Protective Equipment (Gloves, face mask, safety glasses, protective clothing, ear plugs, hard hat, etc.)
 Handouts:
 Part 1:
 •Your rights to healthy and safe work
 •How To Keep Your Day-Laborer Safe Flyer for Employers
 Part 2:
 •Tools and Appropriate PPE
 •Key-ring safety reference booklet

                                                                                                                          2
Part 1: A Healthy and Safe Workplace
1. Agenda, Introduction, and Attendance
Introduce the trainers. Explain the class agenda. Take class attendance.
2. Hazards in the Drywall Industry
Body map activity. Read Fernando’s testimony. Hazard map activity.
Overview For the Instructor:
The following activities will provide students with the basic tools to recognize common
drywall injuries and workplace hazards.
ACTIVITY
Body Map
Have a large diagram of a human body on the whiteboard or flip-chart in front of
the classroom.
Ask students to come forward and mark an "X " on body parts that they think are
being affected by their work.
Explain to students that they can talk to you individually if they do not want to
share their injury or illness with the group.
Ask students to explain why they put those marks on the body.
List the injuries and illnesses that are common among workers in the drywall
industry.
Ask the class to participate in a discussion about this with questions such as:
•It appears that a lot of you experience very similar injuries.* Why do you
think that is?
•Why do you think that these injuries occur?
• What do you think can be done to reduce the likelihood of injury?
Make sure to point out close groupings of marks so they can see that many workers experience
similar pains and injuries.
See an example of a Body Map on the following page.
3Example Body Map
4Trainer reads the following:
Fernando's Testimony
"I’ve drywalled entire rooms without any ventilation for the dust or protective equipment
from the employer. I’ve had employers who will not even give me gloves, hard hat or a
mask to protect myself from dust or falling debris... The safety hazards don’t effect the
employer because they hire us to do the dangerous jobs so they feel it’s okay. Do they
think day laborers are a workforce that doesn’t need to be safe? They pay us very little. But
the little money we make we use to help our family. So the job is good because we can
help our family, but from the security point of view it’s not right. If I have an accident
there will be no insurance or anything to help my family. And all this is caused by the
employer’s desire to save money. Often day laborers will work under many risks that other
workers would not. And that happens because of money. "
Questions for discussion on the testimony of Fernando:
•What do you think about the dangerous conditions at Fernando’s work?
•Can you relate to Fernando’s story of working in a dangerous situation because
someone has to do the job and because he needs the money for his family?
•Do you agree with Fernando that there are many hazards in the drywall industry?
•What are some of the risks to health and safety in the drywall industry?
(Answer: Cut fingers, muscle strains, drywall dust, back problems, falling hazards, cuts, eye
injuries, etc.)
Trainer puts the answers on the wall with pictures.
Overview For the Instructor:
These are just some of the dangers. El Centro’s recent surveys indicate that day laborers are working
some of the most dangerous jobs in the state. The goal of this next activity is to identify hazards at
work when drywalling.
5ACTIVITY
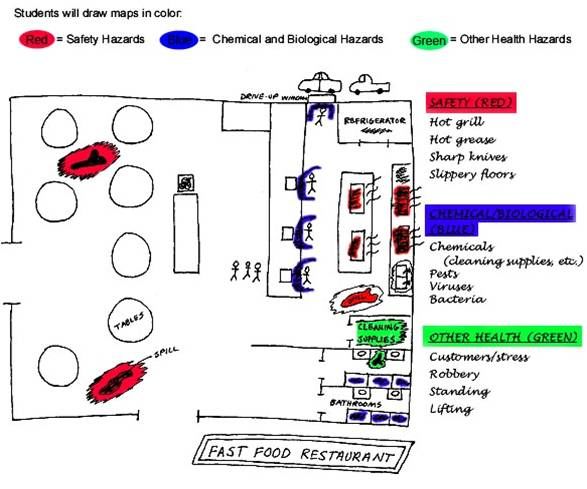
Hazard Map
Students work in small groups to create maps of different types of workplaces. They can use
plain paper and markers. To begin, students must draw a floor plan of a workplace in the drywall
industry. The plan must show work areas, equipment, rooms, etc. Maps can be basic.
When finished, students will decide where hazards are located in their workplaces and mark them.
Using the data sheets as a reference, students should mark these places on the floor plan. Use the
following codes:
• Red for safety hazards and physical hazards.
• Blue for chemical and biological hazards.
• Green for additional hazards.
You can use color codes or other symbols to indicate hazards. You can, for example, use a
different color for safety hazards, physical hazards, chemical hazards and biological hazards.
Remember that the most important objective of this exercise is for the students to identify hazards in their
workplaces so don’t worry too much that the category is correct.
If the student is not sure whether something is dangerous, mark it as a danger and discuss it with
the group.
Students should take about 15 minutes to prepare the maps, and then submit them to the group.
Put the maps up on the wall. Ask the group to participate in a discussion about the maps with
questions like:
•Are there any comments about these maps?
•How can we better protect ourselves from injury at work?
•The law requires employers to protect employees. Is it practical to have the
expectation that employers provide safety equipment for day laborers?
See an example of a Hazard Map on the following page.
6Example Hazard Map
73. Your Rights to Safe and Healthy Work
Your rights under OSHA activity. Pass out the “Know Your Rights” handout.
Overview For the Instructor:
The following activities will provide students with an introduction to OSHA, their basic rights
under OSHA, and the responsibilities of employers to provide a safe and healthy workplace.
Activity
Your rights under OSHA
[Now, all standing.]
On wall is a sign that says YES, on another wall is a sign that says NO.
Explain that as you read a series of questions. If they believe the answer is yes, they move to stand below
the sign that says YES, if they think the answer is NO, they have to stand under the sign that says NO.
•Do you have the right to a safe and healthy workplace?
YES
•Do you have the right to receive information?
YES
•Do you have the right to receive training?
YES
•Are OSHA employees the only ones who can ask employers to change a dangerous
work situation?
NO (You have the right to ask the employer to change the dangerous situation.)
•Do you have the right to make a complaint to OSHA and to participate in the
process?
YES
•Do you have the right to be protected against retaliation?
YES
•Do you have the right to know which chemical products you used at work?
YES
•Does your employer have the right to refuse your request to use Protective Personal
Equipment at work?
NO (You have the right to have Protective Personal Equipment at work)
Share a copy of the “Know Your Rights” and “How to Keep Your Day-Laborer Safe”
handouts to the workers.
8BREAK
Part 2: What can we do to protect ourselves at work?
9Overview For the Instructor:
In the following activities, students will learn to identify their capacity to exercise their rights to
safe and healthy work and practice how to protect themselves in their work environment.
Activity
Hazard Control
Using the hazard maps the students created in the previous exercise, work with these groups to
choose a danger on their maps they think is important.
Students should then take 5-10 minutes to prepare a brief scenario where they as workers
confront their employer to discuss ways the employer can control this risk at work. Discuss with
the students the different hazard control methods.
Depending on the needs and size of the classroom, some students may act as employers and
others as employees or instructors and employers can act as facilitators. If possible, each student
must have a part in who is speaking.
Hazard Control Methods:
Listed by effectiveness
Elimination (Most Effective)
The best way to control a hazard is to eliminate it completely. An example of
elimination: Avoid buying products that contain silica to drywall. When silica is
present, workers face an increased risk of lung cancer.
Substitution
The use of alternative cleaning products that have no toxic chemicals. Products
made with natural or non-toxic ingredients.
Engineering
Engineering controls are another way in which technology can be used to change
the work environment, machine, or equipment to reduce the danger.
Work /Administrative Controls
A change of administrative controls or work practices means changing the way
and the structure of how work gets done. Example: Rather than have an
employee exposed to danger for eight hours a day, the employer may be assigned
to four workers to work for two hours each. This could be used for repetitive
tasks or to any exposure to a chemical hazard.
Personal Protective Equipment (Least effective)
Personal Protective Equipment (PPE) may include, but is not limited to,
respirators and protective equipment for eyes, and gloves. PPE is the least
effective way to protect workers because it does not eliminate the dangerous
situation. If the equipment fails the workers are still exposed to danger.
101. Personal Protective Equipment
Personal Protective Equipment race.
Activity
Personal Protective Equipment Race
Set multiple sets of Personal Protective Equipment (PPE) on a table in front of the group.
(Gloves, face mask, safety glasses, protective clothing, etc) Divide the class into two teams
and have them line up against the wall. The first two students at the front of their lines will
be the first to compete against each other in a race.
The instructor will then hold up a tool and ask the first two students which types of personal
protective equipment they think they would need for protection when using that chemical.
The students will then race to the table to select the appropriate PPE and then back to their
team. Each member on their team will then one at a time put on the PPE correctly and say
the name of the equipment in English as fast as they can. Whichever team completes these
tasks the fastest correctly wins that round.
The game will repeat until each student has a chance to race.
Example of Personal Protective Equipment
112. Correct Usage of Tools
Tool Safety Activity.
Activity
Tool Safety
Pass out the “Tools and PPE” handouts to the class. Have students use the
handouts as a reference. Ask the Students:
What types of tools and/or types of Personal Protective Equipment (PPE) are
used for the following:
•To operate a nail gun?
(Answer on handouts)
• To drive screws into the drywall?
(Drill: Answer on handout)
•To sand drywall?
(Sander: Answer on handout)
•To cut a board?
(Saw/Drywall knife: Answer on handout)
•To drive in a nail?
(Hammer: Answer on handout)
•To apply drywall mud?
(Trowel: Answer on handout)
123. Ergonomics for Workers in the Drywall Industry
What is ergonomics? Ergonomics and Work Conditions. Practice Safe Lifting
Activity.
What is ergonomics?
Ergonomics is the science of designing jobs to accommodate the needs of the worker, rather than
making the worker fit the job requirements.
For many workers, ergonomics may not be high on their list of priorities, but the injuries caused by
poorly designed work conditions can lead to serious injuries over time. These injuries can occur in
the hands, wrists, joints, back, or other body parts. These injuries are called musculoskeletal
disorders.
For employers, building a well-designed job can be expensive at first because they may need to spend
money on equipment or training. However, injuries resulting from poor working conditions can end
up costing more money to the employer in the long run. Employers lose money when employees
miss work because of pain or injury, and it is expensive for employers to have to hire and train new
workers when other workers quit due to injury or illness.
Activity
Ergonomics and Work Conditions
Ask students for examples of working conditions that can cause injury. Write answers on the
board. Emphasize the following points:
•Tools and tasks that require you to twist your hands or joints
•Tasks that require applying too much pressure on parts of the hand, back, wrists or joints
•Tasks that require working with arms outstretched or overhead
•Tasks that require working with back arched
•Tasks that require lifting or pushing heavy loads
13Activity
Practice Lifting Safely
Have students practice lifting objects safely.
WAYS OF LIFTING SAFELY
• Keep your body close to the object.
• Bend at the hips and knees. Gloves can improve your grip.
• Lift smoothly and slowly, keeping the object close to your body. Keep the position
between the knees and shoulders.
• If you have to turn, turn with your feet instead of bending over.
144. Negotiating for better working conditions
During the rest of the class, we practice exercising our rights to a safe and healthy
working environment.
Activity
Let’s examine a common situation
Trainer reads the following story
The employer goes to a worker at a drywall job and says "I need you to go put up sheets
of drywall on the ceiling. The problem is that the worker is unable to reach the ceiling. In
order to reach the ceiling he would need to put a ladder on top of scaffolding and all this
while while holding drywall sheets above his head. The employer says, “You’ll be fine. It’s
a bit unstable, so just be careful. It's already 4pm and I need you to finish by 5pm. Just
get the job done. Thanks, I can always count on you!" The worker hesitates because he
feels that the job is unsafe...
•What rights does the worker have?
•What can the worker do to help the employer get the job done safely and in a
timely manner? (Answer: Workers can work together using the safe ladders, etc.)
•Why is it important for the worker to communicate and negotiate with the
employer?
(Answers may include: clarifying expectations, understanding the risks they'll be exposed
to and minimizing such risks, to talk about the issues, determine their own limits,
understanding the employer's interest.)
•Why is it difficult to negotiate with the employer?
(Answers may include: fear of losing my job, I think we know what the employer will say,
my coworkers are not going to say anything to support me, the solution will cost money
and I know my employer will not want to pay.)
In order to negotiate, it’s important to remember these values:
As a human being, as a worker, I have value. Trainer comment: We must first start valuing ourselves. If we demand better safety
and health protections, we must put great importance on our own well-being.
I do not have to remain silent/quiet. Trainer comment: We often think that to keep our jobs or for our employers, we must
accept its conditions without objection or discussion. We reject that idea, and believe that dialogue leads to new solutions.
There are other options other than just accept or leave. Trainer comment: This is similar to the last value. As workers we
have more choices than to either remain silent or leave our jobs.
15Activity
Steps, Planning, and Tips for Better Negotiation
The Steps of Negotiation:
1.Identify the problem (What is the root of the problem and what you want?)
2.Planning
3.Start the negotiation (There is no perfect time!)
4.Come to an agreement
5.Monitoring and evaluation
6.The struggle continues ...
How do we plan to negotiate?
1.Choose what you want to negotiate and what you’re going to ask for
2.Think of why you’re asking. Plan your message and look for the objective (Ex: I want to
pay $ x.00 for x thing)
3.Analyze the perspectives and interests of the opposing party
4.Know the minimum you could accept.
5. Start negotiating!
Tips for negotiating:
•Separate the problem from the person
•Use an attitude of confidence, firmness and respect
•Think about what you are saying with your face and body
•Look for a solution together
•Say what you want to happen - specifically
•Do not attack the person, do not return insults with insults
•Say, "I feel that ..."
•Talk to the interests of the party, "I’m sure you would want someone who does quality
work and with whom you can trust."
•Instead of being resolute and locked in your position, look for options
•Ask questions
•Talk about the value of your work
•Listen to the person and relate it back to what you’re saying, "I hear you saying ______"
•Use "objective criteria" if possible
•Look forward, not back
16Activity
Play- Practicing Rights
Choose two people to act in the play. One will play the role of Juan, the
employer who is drywalling a large house and needs to hire a day-laborer for a week.
The other student will play Ricardo, a day-laborer who will be hired by Juan. Juan asks
Ricardo to use a ladder balanced on top of an upside down bucket to reach the high
points of the wall to mud a drywall seam. Ricardo knows that the ladder is unsafe on
top of the bucket. Ricardo believes that the job requested of him is not safe and
wants access to an extender pole for his trowel to mud the drywall seam.
Ask students:
•What should Ricardo do?
•What other methods can be used to gain what he needs?
•What other solutions could be used to rectify this dangerous situation?
Write their answers on the wall (in general terms/pictures).
17Summarize all the tactics discussed in class:
1) Know your rights to a healthy and safe work environment
2) Learn a few common words and useful phrases in English to help communicate your
needs.
3) Know the work and dangers, and learn methods of protection.
4) Learn about resources that help employers meet their responsibilities, such as low cost
methods to protect workers.
5) Learn how to negotiate with your employer.
6) Learn how healthy and safe working is beneficial to the employer and the employee.
EVALUATION
Double Check Attendance Sheet for Accuracy
Assist Students in Completing the Evaluation Survey
1819
You can also read


