Decorating Lithuanian Easter Eggs - How to dye, design and etch eggs in the Lithuanian tradition - Balzekas Museum of Lithuanian ...
←
→
Page content transcription
If your browser does not render page correctly, please read the page content below
Decorating
Lithuanian
Easter Eggs

How to dye, design and etch eggs in the Lithuanian tradition
                              Written by Don Astras of ladyowheat.com
About the Artist
Lithuanian folk artist, Ursula Astras, has been sharing her egg
decorating skills for over 37 years. With her family, she has taught
more than 20,000 students to decorate Easter eggs, margučiai dyed
in onion skins. Ursula enjoyed seeing this tradition passed on to
younger generations. She has taught and displayed her art in
Ursula Astras
Lithuanian communities such as Chicago, Detroit, Cleveland,
Putnam (CT), Scranton (PA), Montreal (CAN), Battle Creek (MI), and Grand Rapids (MI).
Currently her eggs are on display at the Balzekas Museum of Lithuanian Culture in Chicago.
Ursula was born in Vilkaviskis, Lithuania, where she learned her art from her mother. She
and her husband, Stanley, immigrated to Grand Rapids, Michigan in 1949. Her daughters,
Alberta and Mary, and sons, Don and Tony, have helped her conduct egg decorating classes.
These have been held in museums, on local television, at summer camps and for various
association groups.
Mrs. Astras also designs art in straw. She is renowned for her straw paintings and
ornaments. Her Christmas tree ornaments have various forms: snowflakes, birds, mobiles
and braided balls. Although these works are traditional, her style is distinctly innovative
and unique. You can see her works on the Lady of Wheat website: ladyofwheat.com. We
will also use her designs for this egg decorating workshop.
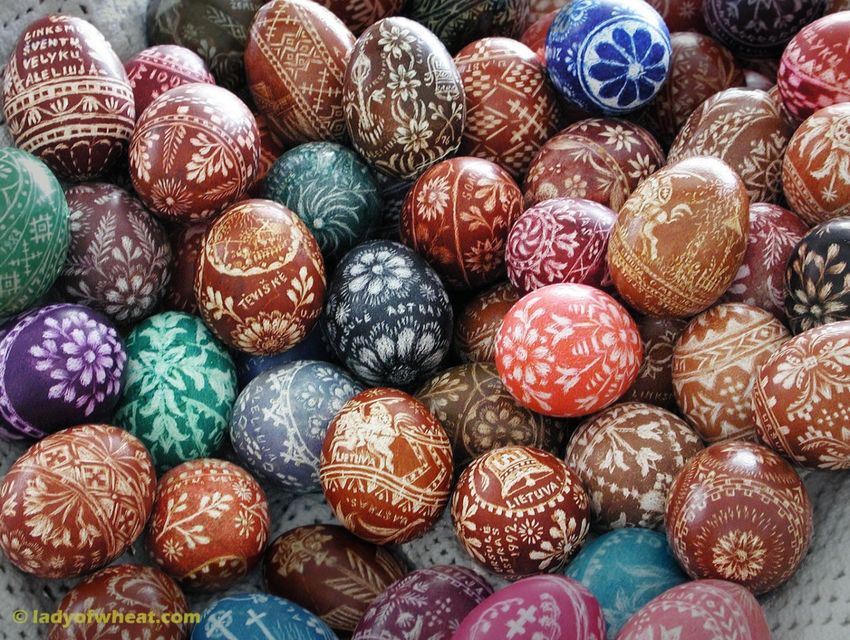
© 2016 ladyofwheat.com Decorating Lithuanian Easter Eggs 1 of 5Techniques Dying Using this recipe to dye and hard-boil at least six eggs: 1. Soak several handfuls of onion skins overnight (in cold water). Boil mixture 15 minutes. Then remove onion skins and strain the solution. Add desired number of eggs to the dye solution. Bring to a boil to hard-boil eggs. Simmer 10 to 15 minutes. Allow solution to cool before removing eggs. 2. The longer the heating period or the greater amount of onion skins, the darker the color. If you remove eggs at different intervals, the color varies from a tan to a rich brown. Small size eggs are stronger. Larger eggs, while more fragile, lend themselves better to a more elaborate design. 3. To obtain various dark shades, place onion-dyed eggs in commercial Easter egg dyes or food coloring. Green and purple dyes give very interesting effects. 4. When the egg has dried thoroughly, place a dab of shortening on a soft cloth or paper towel and rub the egg to add luster and protect the color. Decorating Watch the instructor demonstrate how to hold the knife and egg. 1. When the egg has cooled, begin designing. Use one of the examples from Ursula’s drawings on the next page or on the cover. 2. It is best to begin by partitioning the egg vertically, horizontally or diagonally, with a pencil. The design may then be drawn in these “fields” and scratched away with a knife. Do not get too elaborate because the pencil lines will quickly fade away from handling. 3. You may hold the knife like a pencil or a potato peeler. Place a strip of masking tape over the portion of the uncovered blade. Only a quarter of an inch needs to be exposed. 4. Ursula prefers to hold the knife like a potato peeler and begins by carving designs in quick strokes in one direction. Rotating the egg as she etches. Once the basic design is laid out and etched, go back and strengthen the design with extra strokes. By selectively scratching away the dye, a graceful, delicate design appears on the exposed eggshell. Notice that many of Ursula’s eggs have many very light strokes (see cover). 5. Holding the knife like a pencil may be easier for children and beginners. 6. Whichever way you choose to hold the egg, be careful to not poke through the shell with the tip of the knife. Do not allow it to rest on the table. The pressure from above may crack the shell – always rest it in your hand. 7. To add extra luster and protection, the egg should be coated with clear nail polish. © 2016 ladyofwheat.com Decorating Lithuanian Easter Eggs 2 of 5
Ursula Astras Designs
Feel free to copy or change any of the designs to suite your style to create your own egg art.

© 2016 ladyofwheat.com              Decorating Lithuanian Easter Eggs                     3 of 5
Easter Egg Traditions
Long ago Lithuanians adopted the egg as a symbol of new life (and spring). The golden yolk
represented the sun. Decorated eggs were often used as good luck charms, to ward off evil.

Eggs were an integral part of the Easter feast. However, during Lent it was forbidden to eat
them. Young children would go out and gather eggs from wild birds; the beginning of the
egg hunt tradition. During the feast, members of the family would tap eggs together. The
one, whose egg survived, was believed to be blessed with good luck. Then all members
would share that lucky egg.

Eggs were not always used for food. In the 16th century, decorated eggs were part of a
courtship ritual. In Bohemia, a girl would receive an egg for her engagement (very different
from the diamond rings they receive nowadays!).

Easter eggs, or margučiai as they are called in Lithuanian, were dyed and decorated by
young girls on Holy Saturday. This tradition was passed on from mother to daughter. That is
how my mother learned, too. However, she did not stop at teaching just her daughters.

In Lithuania, egg decorating was repeated twice a year, at Easter and St. George’s Day, the
latter to commemorate the protection of livestock. On that day, the animals were taken out
to pasture after the long winter months inside. This was a significant event for rural folk, for
their livelihood depended on livestock. The egg functioned as a magical charm, to protect
the animals from evil spirits, sickness and wolves. Two decorated eggs were buried under
the barn entrance, which the animals crossed on St. George’s Day to graze in the fields.
Nowadays, the decorated eggs are brought to church.

Although Easter egg decorating is a custom in many nations, each culture interprets the art
form differently. In Lithuania, the two traditional methods are the scratch technique and
the wax resist process.

Frequently Asked Questions
How much time does it take to complete a design?
Ursula has spent up to four hours on one egg.

At that rate, how many eggs does Ursula decorate in one year?
It depended on her mood how many she did. Some years she had etched only four dozen.
Other years she has done up to 10 dozen. If she did not feel like etching eggs, she would
work on straw. She is also well known for her straw paintings and straw Christmas tree
ornaments.

Won’t these eggs spoil?
Decorated eggs can last a long time. We have eggs by my mother that are more than 40 years
old. Because the eggs are hard-boiled, they do rot on the inside and some may explode.
When they are completely dried inside, they will sound like a rattle if you shake them. We
like to keep ours in glass cases to protect them and limit cleanup.

For more information, contact:
Don Astras don.astras@tempestmktg.com 616-458-9200

© 2016 ladyofwheat.com               Decorating Lithuanian Easter Eggs                    4 of 5
You can also read