DESIGN GUIDELINES - Maplestone Sunbury
←
→
Page content transcription
If your browser does not render page correctly, please read the page content below
S U N B U RY

DESIGN GUIDELINES
                    1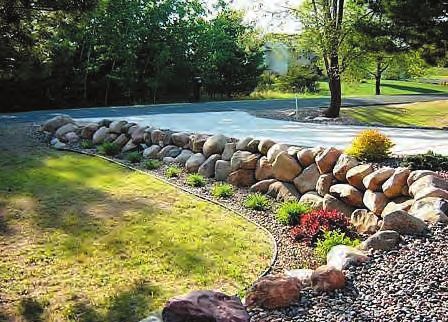
1    Purpose of the Guidelines                             3
         1.1   Approvals & Building Permits                    4
         1.2	Submission Requirements &                        4
              Developer Approval Process
    2    Building Siting & Coverage                            5
         2.1	Siting your home                                 5
         2.2 Site Coverage                                     5
    3    Minimum Setbacks from Boundaries                      6

         3.1 Frontage Setbacks                                 6
         3.2 Rear Setback                                      6
         3.3 Side Setbacks                                     6
         3.4	Exceptions & Encroachments to Setbacks           6
    4    Building Design & Architectural Character             7
         4.1 Building Scale                                    8
         4.2 Architectural Character & Home Design             8
    5    Identical Façade Separation                           11
    6    Designing for a Slope & Retaining Walls               12
    7    External Materials & Colour Selection                 13
         7.2 Acceptable Landscape Materials                    15
         7.3 Colour Selection                                  16
    8    Ancillary Items                                       17
         8.1 Sheds/Outbuildings                                17
         8.2 Letterboxes                                       17
         8.3 Overlooking Screens and Shutters                  17
         8.4 Pools                                             17
         8.5 Clothes Lines & Drying Areas                      17
         8.6 Rain Water Tanks                                  17
         8.7 Solar Panels & Hot Water Systems                  18
         8.8 Fibre to the Home                                 18
         8.9 Parking of Vehicles                               18
         8.10 Plumbing                                         18
         8.11 Air Conditioning Units                           18
         8.12 TV Antennae and Satellite Dishes                 18
    9    Environmentally Sustainable Design                    18
         9.1   Third Pipe                                      18
    10   Landscaping & Fencing                                 19
         10.1 General Landscape Requirements                   20
         10.2 Soft Landscape Requirements                      20
         10.3 Fencing Requirements                             20
         10.4 Side and Rear Boundary Fences                    21
         10.5 Side Fencing to Corner Lots & Reserves:          21
    11   General Requirements & Timing                         22
    12   Appendix 1 – Design Approval Process                  23
    13   Appendix 2 – D
                       esign Approval Application Form        23
    13                 esign Approval Application Form (cont.) 24
         Appendix 2 – D

2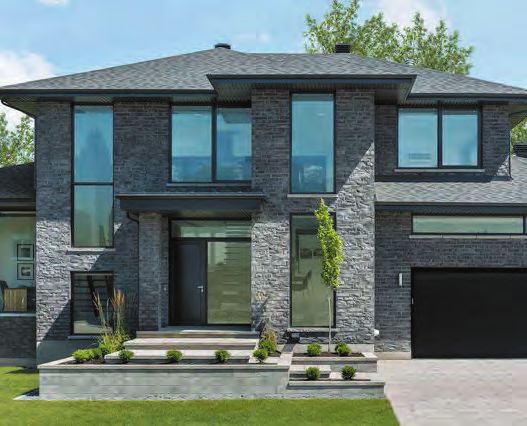
Purpose of
the Guidelines

S EC T I O N 1.0

The key purpose of the Design Guidelines is to assist         The Guidelines will underpin the overall amenity of
all owners in preparing an appropriate contemporary           the area and contribute to creating a vibrant and
design response which reflects current design trends          progressive community that you will proudly call home.
and builds a quality environment for you to enjoy.            They are an important part of assisting landowners to
                                                              create their new residence and to complement the
Design Guidelines create a coherent vision which will
                                                              quality surrounding the streetscape character.
facilitate the development of high-quality construction and
landscaping throughout the community and will assist in       These Design Guidelines may be amended from
protecting your investment and interests. They will assist    time to time at the Developer’s discretion to reflect
you in considering the design of your home and private        changes in design and building trends and amendments
garden, and help you through the initial consideration,       to legislation affecting building approvals.
design process and building of your new home.

                                                                                                                       3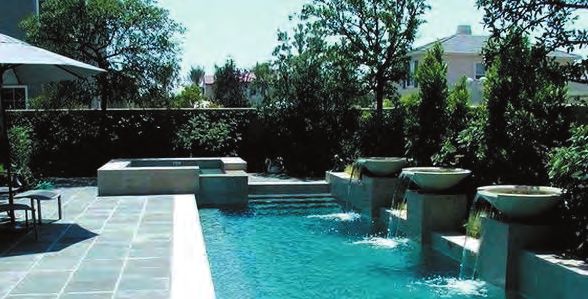
1.1	Approvals & Building Permits

    1.1      A P P ROVA L S & B U I L D I N G P E R M I T S                The DR will use its best endeavours to assess proposals,
                                                                           generally within 10-14 business days of receipt of
    Prior to the approval of the relevant Building Permit
                                                                           a fully completed and compliant application.
    on each residential allotment, the Residential Design
    Guidelines must be considered during the building                      D E S I G N R E V I E W P RO C E SS :
    design phase and incorporated into the final design.
                                                                           Once you have received approval from the DR you
    These Guidelines apply to all allotments in the estate that            must then obtain a Building Permit from the local
    are greater than or equal to 300 square metres in area.                Council or relevant Building Surveyor and/or approvals
    Allotments that are less than 300 square metres in area                from any other relevant authorities required by the
    are required to adhere to the Small Lot Housing Code.                  authority approval process. It is the responsibility of
    In case of a conflict between these Design Guidelines                  the owner to ensure the building works comply with
    and relevant building codes/regulations, the Building                  local, state and ResCode requirements. Neither the
    Regulations and Planning Scheme objectives will prevail.               review panel/reviewer, nor the Developer accepts
                                                                           responsibility for works that don’t comply.
    1. 2	 S U B M I SS I O N R EQ U I R E M E N T S
           & D E V E LO P E R A P P ROVA L P RO C E SS                     Please Note: The final decision of all aspects regarding
                                                                           the Design Guidelines, including rejection and approval
    The sitting and design of your home is required to
                                                                           of submissions, is at the discretion of the DR. The DR
    be approved by the Design Reviewer (DR) before
                                                                           also reserves the right to request further information
    obtaining building permits. It is mandatory that all
                                                                           should they deem it necessary. The DR is not liable for
    plans and other relevant drawings are submitted to
                                                                           any refunds, credit or compensation for its decisions
    the DR for approval. To obtain approval, you must
                                                                           in granting or refusing a submission approval or
    electronically submit the Application for Design
                                                                           any discrepancies that may arise from this work.
    Approval Form (found in the Appendices of this
    document) with A3 PDFs of the documentation listed                     Should you or your builder have any queries
    on the form for approval to DR@sheltonfinnis.com.au                    and need clarification on matters within these
                                                                           Design Guidelines, please contact Shelton Finnis
    The DR will assess all designs and either provide a
                                                                           Architects via email DR@sheltonfinnis.com.au
    notice of approval or specify how the submission
    conflicts with the Guidelines. Designs that                            Below is a simple diagram illustrating the DR process.
    substantially comply with the Guidelines may be                        Refer to the appendix for a full step-by-step guide.
    given a notice of approval with conditions requiring
    the rectification of minor deviations. The DR may
    make suggestions intended to improve the design.

          D E S I G N R E V I E W P RO C E SS

           ST E P 1                             ST E P 2                   ST E P 3                           ST E P 4

           Review Design                        Plans are reviewed         You receive DR approval            Once you have gained all
           Guidelines & Contract                by the DR.                 and advice to obtain               necessary authorities’
           of Sale and contact the                                         a Building Permit                  approvals and a Building
           sales team for advice.                                          for construction.                  Permit you can begin
                                                                                                              construction.
           Send in plans for review
           and approval by the DR.

                                                If your plans do not comply with the Guidelines you
                                                will be asked to resubmit complying plans.

4
2.	Building Siting & Coverage

It is important that the residence is sited on the          • It is essential that the dwelling addresses both street
property so that all homes and associated buildings            frontages with articulation of the built form including
respect each other’s solar access and privacy.                 varying materials, window and door openings.
Additionally, each dwelling should be designed to
                                                            • Lots may not be further subdivided.
maximise the advantages and natural characteristics of
the site. Solar angles, views, slope, prevailing breezes,   • A habitable room and windows must be
relationship to the street, open space, landscaping            located on the secondary street frontage.
and adjoining dwelling type and locations should all be
                                                            • Blank walls to the secondary façade will not be
considered to create a responsive design solution.
                                                               permitted, nor will unarticulated walls of more than 8
Setbacks are important to allow for landscaping within         metres to the secondary façade on two storey homes.
the streetscape, and to provide adequate transition
                                                            • The articulation of the front façade must
between public and private space. These are prescribed
                                                               continue around the secondary street
in the Design Guidelines and must be adhered to.
                                                               frontage for the length of at least 1 room.
Building envelopes that override these setbacks have
been provided for those irregular shaped lots where it      • Blank walls to the secondary façade will not be
is difficult to keep within these setback requirements.        permitted, nor will unarticulated walls of more than 6
In this case, you must build inside the designated             metres to the secondary façade on two storey homes.
building envelope unless otherwise advised by the DR.       •   Corner allotments with proposed crossovers
Controlling how much each lot is covered by                      intended to be located on the side street frontage
buildings protects the estate from feeling overly                may be considered by the DR on an individual basis
built in, and allows for adequate openness to                    but will also be subject to Council approval.
protect and complement the Sunbury landscape.                ou must provide an appropriate corner articulated
                                                            Y
                                                            feature/s to your home that will ‘turn the corner’
2 .1      S I T I N G YO U R H O M E
                                                            for both single and two storey dwellings. One or
Please refer to your specific title within the Contract     more of the following building elements is to be
of Sale for details regarding your specific lot             incorporated into the design as a corner feature;
building envelope (if applicable) and restrictions.
                                                            • A return verandah or balcony.
2 .1 .1   C O N V E N T I O N A L LOT S                     • An articulated step back or setback of wall and/
•   Building envelopes have been prepared for irregular        or altered roof structure, including eaves.
    lots. These building envelopes indicate the area        • A change of building materials that assist
    on each lot where a building can be sited.                 in softening the mass of the building.
•   A front (primary) boundary is deemed to be that
    part of the lot with the street frontage being the      2 .1 . 3 I R R EG U L A R & C U RV E D LOT S
    smallest dimension, unless otherwise noted.             These lots will be considered by the DR on an
•   Only one dwelling may be built on any one lot.          individual basis and is at the discretion of the DR.
•   Lots may not be further subdivided.                     Note that the DR has no discretion on Building
•   All building works must be contained within the         Regulations. The building site coverage is
    building envelope and subject to approved variation.    the area of building/s on the land.
2 .1 . 2 C O R N E R LOT S                                  2.2     S I T E C OV E R AG E
Corner lots have significant impact on neighbourhood        The building site coverage area is calculated
character, and therefore it is important that               by adding the area of the building
corner lot homes are articulated and address their          footprint, including the following:
prominent position as they form a gateway to
adjoining streets. The Design Guidelines set essential      •   A garage or carport,
parameters for a successful outcome throughout              •    verandah, porch and any other roofed building
                                                                a
and the following siting standards apply:                       such as a garden shed, outhouse or pool house,

• The front (primary) boundary is deemed to be that        •   the overhanging balcony and upper level.
   part of the lot with the street frontage being the       Roof eaves are not included in the calculation.
   smallest dimension, unless otherwise noted.              The total site coverage area should not exceed
                                                            60% of the total site area. Current ResCode
                                                            standards will be applied by the DR.                         5
3 Minimum Setbacks from Boundaries

    The Design Guidelines set minimum setback requirements,    •   Any dwelling with a side frontage to a public
    however lots with 15% slope and above should allow             open space or reserve must be set back by
    for wider setbacks to accommodate site benching.               at least 2 metres to that side boundary.
    Eaves (including fascia and gutters) may encroach          •   A garage may be located on a side boundary
    into the minimum setbacks by no more than 0.6m.                that is not a boundary on a corner or reserve
                                                                   frontage. Lots less than 12.5m may be built
    C O N V E N T I O N A L LOT S                                  with zero lot line construction on both side
                                                                   boundaries in accordance with the building
    3.1     F RO N TAG E S E T B AC K S
                                                                   envelope or to the discretion of the DR.
    •   All dwellings must be set back from the
                                                               3.4     EXCEPTIONS & ENCROACHMENTS TO SETBACKS
        primary street frontage by a minimum of
        4 metres and maximum of 5.5 metres.                    The following may encroach into a front and
    •   Garages must be set back a minimum                     rear setback of no more than 1 metre:
        distance of at least 5.5 metres from the front         •   Porches, verandahs and open pergolas that
        boundary (primary street frontage).                        have a maximum height of less than 3.6
    •   Garages are not permitted to be built forward              metres above natural ground level;
        of the main building line of the dwelling and are      •   Eaves, fascia and gutter;
        to be set back a minimum of 0.5 metres from            •   Sunblinds and shade sails;
        the front line of the dwelling/building line.
                                                               •   Screens referred to in regulation 4.19
    •   Any dwelling on a corner lot must be set back              of the Building Regulations;
        from the title boundary abutting the side street
                                                               •   Decks, steps or landings less than 800
        (secondary street frontage) by at least 2 metres.
                                                                   millimetres in height above natural ground.
    •   Dwellings fronting a public open space may be
                                                               The following may encroach into the specified
        set back 3.5 metres from the front boundary.
                                                               side setback by not more than 0.5 metres
    3. 2    R E A R S E T B AC K                               (excluding where there are north facing
    •   All dwellings must be set back from the                windows and/or fire regulations apply):
        rear boundary by at least 3 metres.                    •   Masonry chimneys;
    •   Where vehicular access is via a secondary street       •   Sunblinds;
        frontage, a garage must be set back 2 metres
                                                               •   Screens, but only to the extent needed to protect
        minimum from that secondary street frontage
                                                                   a neighbouring property from a direct view;
        and may be located on the rear boundary or to
        the easement located on that rear boundary.            •   Flues and pipes;
                                                               •   Water tanks;
    3. 3    S I D E S E T B AC K S
                                                               •   Heating and cooling equipment or other services;
    Setbacks greater than 2 metres are encouraged
                                                               •   Landings that have an area of not more than 2
    for planting of trees and associated
                                                                   square metres and are less than 1 metre high;
    landscape elements to provide amenity.
                                                               •   Stairways and ramps;
    No element other than eaves, fascia and gutters
                                                               •   Pergolas and shade sails may encroach
    may encroach into the minimum side setback.
                                                                   subject to building regulations;
    •   The side setback to a conventional lot                 •   Pools can be located 1 metre from
        must comply with ResCode requirements,                     side and rear boundaries.
        and single storey dwellings should have a
                                                               I R R EG U L A R & C U RV E D LOT S
        minimum side setback of 1 metre.
    •   Double storey elements must comply with ResCode        These lots should be generally in accord with the above
        at a minimum but should be set back 2m to allow        and will have their setbacks, siting and floor areas
        for adequate natural light and sufficient transition   reviewed on an individual basis. Building envelopes
        between dwellings and their boundaries.                will take precedence where applicable, however
                                                               the DR will have discretion in their decisions.

6
Building Design &
Architectural Character
S EC T I O N 4.0

                          7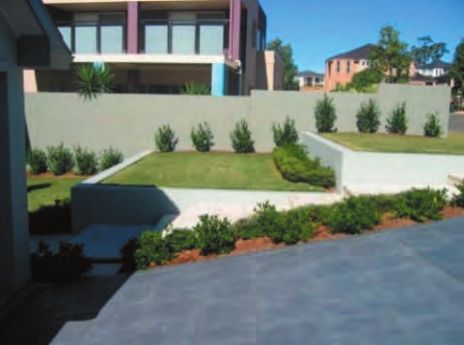
4.1 Building Scale

    No dwelling may exceed two storeys in height                             The minimum areas required per lot type are as follows:
    and ceiling heights for all dwellings must not
                                                                             •   Lots less than or equal to 300m² must
    be less than 2.4 metres above floor level.
                                                                                  have a minimum floor area of 100m²
    4.1.1   M I N I M U M F LO O R A R E A S                                 •   Lots of 301 - 400m²
                                                                                  must have a minimum floor area of 120m²
    To ensure that the buildings adequately address
    the lot size, are not temporary in appearance,                           •   Lots of 401 - 550m²
    and are of the quality expected to address the                                must have a minimum floor area of 150m²
    streetscape, minimum dwelling floor areas apply:                         •   Lots of 551 - 800m²
                                                                                  must have a minimum floor area of 180m²
    Dwelling minimum floor areas listed below
    exclude garages, carports, verandahs,                                    •    ote: The DR retains final discretion
                                                                                 N
    porticos, balconies and alfresco areas.                                      on minimum floor areas.

    4.2 Architectural Character & Home Design

    4. 2.1 C O N T E M P O R A RY D E S I G N                                •   Roof pitches are to be to a maximum of 25 degrees
                                                                                 for a pitched roof, and a minimum of 10 degrees for a
    Dwelling designs must be of a contemporary nature.
                                                                                 flat roof that is not hidden behind a feature parapet
    Simple forms are encouraged, and designs that respond
                                                                                 wall. Alternate roof forms that provide diversity in
    to the fall of the land. Kit homes will not be permitted
                                                                                 the streetscape such as flat, and skillion roofs will be
    and are reviewed at the discretion of the DR.
                                                                                 considered by the DR, provided they comply with the
    Historical styles and detailing such as Federation,                          intent of the Guidelines and complement the design.
    Georgian, Colonial, Italianate and Tudor will not be                     •   The roof behind a parapet feature wall should
    permitted (including features such as finials, turned                        be flat and hidden behind the wall unless it
    posts and ornate mouldings). Some traditional design                         is a pop out feature. (Refer Figure 1).
    elements may be permitted if the overall design is still
                                                                             •   Roofing materials must comply with Section
    considered to be contemporary. The DR reserves the
                                                                                 6 External Materials and Colour Selection.
    right to determine if a design meets these requirements.
                                                                             •   Unless otherwise specified or approved by the
    4. 2. 2 B U I L D I N G A RT I CU L AT I O N & ST R E E T A D D R E SS       DR, all roofs must provide a minimum eaves of
    Your home design will be in accordance                                       450mm (600mm including gutters and fascias) to
    with the following requirements:                                             the street frontage unless behind a feature parapet
                                                                                 or gable wall that is of a contemporary design.
    •   All dwellings must have either a verandah, portico,
                                                                             •   Eaves to the frontage of a dwelling must return and
        porch or other similar entrance feature and must
                                                                                 continue along the connecting return wall and/
        be sympathetic to the overall dwelling design. All
                                                                                 or walls from the said frontage. (Eaves may be cut
        verandahs, porches, balconies and porticos should
                                                                                 back to comply with building regulations relating to
        have a minimum depth of 1.5 metres. The roof should
                                                                                 natural light to habitable widows on a side boundary).
        complement the main roof structure and feature
        lighting should be incorporated into the design.                     •   Walls constructed on side boundaries will be exempt
                                                                                 of eaves unless otherwise directed by the DR.
    •   The main entry/front door or access way to
        the main pedestrian entry must be visible                            •   On a corner allotment, the return eaves must be
        from the primary street frontage.                                        integrated in the secondary frontage façade.
                                                                             •   Eaves to garages set off the boundary must
                                                                                 return the full depth of the garage.

8
4.2 Architectural Character & Home Design

•   Double storey rear and side blank walls over 6m         Figure 1: Examples of pop out roof feature/
    in length should be broken using an alternative         verandah to front façades
    colour or material if a window is not possible. Refer
    to the particular requirements for corner lots.
•   Corner lots must address the secondary street
    frontage with windows and/or a feature such as a
    pergola, balcony, brick detailing, or verandah.
•   Upper level rear façades should be designed to
    the same design quality as a front façade as these
    are visible by neighbours and streetscapes via
    open view corridors throughout the masterplan.
4. 2 . 3 GA R AG E S A N D C A R P O RT S

Garages and carports must be designed to
minimise their visual impact to the streetscape.
In assisting you with your design, the
Guidelines specify the following:
•   The garage must match or complement the home
    materials, roof pitch, design, colour, external
    appearance and quality of construction, must
    be integrated into the body of the design and
    constructed at the same time as the dwelling.
•   The roof must be incorporated within the main
    roof design of a single storey dwelling.
•   It must be set back 0.5 metres behind the main
    façade of the dwelling unless otherwise noted           Figure 2: Examples of good and poor articulation
    or approved to vary this guideline by the DR.
•   Carports are only permitted behind garages and
    residences where not in view from the street.
    The DR reserves the right to limit the area of
    an unenclosed garage or carport under roof.
•   Single garage doors must be 2.4m
    – 3.0m wide maximum.
•   Double garage doors must be 4.8m
    – 5.4m wide maximum.
•   Garage roller doors are not permitted
    but may be used on the rear access
    door where not publicly visible.
•   The garage door opening/s must not exceed 40%
    of the width of the street frontage. 8.5m and 10.5m
    lots will be exempt at the discretion of the DR.
•   A swing-in garage may be permitted at the discretion
    of the DR, if it can be demonstrated that an
    improved and sensitive design solution (drive
    gradient, and dwelling design) will be achieved.
    Front setbacks will apply and will be assessed on a
    case by case basis. The garage wall addressing the
    primary street frontage must include a window/s.
    The garage must complement the dwelling in both
    form and material, be constructed at the same time
    of the dwelling and be a fully integrated design.

                                                                                                               9
4.2 Architectural Character & Home Design

     4. 2.4 T H R E E C A R GA R AG E S                        4. 2 . 5 D R I V E WAY S A N D C RO SS OV E R S

     Three car garages will be assessed on merit by the DR.    •   Driveways must be fully constructed within 3 months
     They must adhere to the design requirements above             of the issue of the Certificate of Occupancy.
     with regard to material, colour, garage door widths and   •   Only 1 driveway and crossover
     an integrated design response. They must not dominate         will be permitted per lot.
     the streetscape and must be articulated as follows:
                                                               •   The driveway gradient is not to exceed 20%.
     •   The design must be split into a double                •   Driveways shall not exceed 4.5 metres in width
         garage and single garage portion.                         at the street crossover and can taper to the
     •   The double garage must follow setback requirements        maximum width of the garage opening.
         above. The single garage portion must be set back a   •   Driveways must have a minimum 0.4 metres
         minimum of 1m behind the double garage portion.           set back from the side boundary for landscaping.
     •   The single garage should read as a separate           •   Driveways must be constructed of the following:
         entity and be finished different to the double
                                                                     •   Brick and/or concrete pavers;
         garage, but in a complementary material
         and colour to the main dwelling.                            •   Coloured concrete.
                                                               	•	Concrete with exposed aggregate
                                                                     is highly encouraged.
                                                                     •   Plain concrete.
                                                               •   A colour sample (or colour photocopy) of
                                                                   the proposed driveway material must be
                                                                   provided with the application submission.
                                                               •   A secondary frontage garage location, entry
                                                                   crossover and driveway to a corner lot must
                                                                   comply with the above requirements.

     Figure 3: Three car garage design examples

10
5.0 Identical Façade Separation
To ensure a diverse streetscape, no two dwellings The DR will assess this on merit depending on
of the same front façade design shall be built how many homes of the same/similar design are
within 6 lots either side of the subject property located within close vicinity of your home.
on the same side of the street. On the opposite
No concept designs and/or façade only submissions
side of the street, the same façade design may be
will be accepted, i.e. submissions must include all
located 3 lots diagonally along from the same façade
information as requested on the Design Approval
across the street. (Refer to the diagram below).
Application Form to initiate the approval process.
The final façade assessment decision will
be at the discretion of the DR.
Figure 4: Façade separation diagram
3 2 1 1 2 3 4 5 6
SIMIL AR /SAME
SIMIL AR /SAME
FAC A D E
FAC A D E
DESIGN
DESIGN
3 houses diagonally across minimum
1 2 3 4 5 6 1 2 3
SIMIL AR /SAME
SIMIL AR /SAME
FAC A D E
FAC A D E
DESIGN
DESIGN
116.0 Designing for a Slope & Retaining Walls
6.1 P L A N N I N G & M A N AG I N G S LO P E • Site cut and fill should not exceed
1-1.5 metres in height.
• Softly battering a site cut and landscaping
to control soil erosion with plants such as
shrubs and groundcover wherever space
allows to produce a soft landscape appeal
and reduce expensive retaining walls.
6.1.1 B E N C H I N G, S I T E E XC AVAT I O N & F I L L 6 .1 . 2 B U I L D I N G R E TA I N I N G WA L L S
On steeper slopes, dwellings are to follow the Sloping sites will require retaining walls for
slope of the land by stepping down with a split- access and the construction of the dwelling.
level design. Cut and fill is to be minimised.
Retaining walls that are greater than 1 metre
If retaining walls are needed in your design, appropriate in height from natural ground level require
professional advice must be sought for conformance to an application for a Building Permit.
current engineering standards and building regulations.
Retaining walls that are visible to the
Details about any benching and associated streetscape and part of the landscaping
structural elements designed to blend into the of your home should be as follows:
landscape are to be provided in the design
• No taller than 1-1.5 metres
submission and reviewed by the DR.
above the natural ground.
The following guide will help you minimise • Of masonry construction such as
the impact of your site works to your blockwork, brickwork, stone or cast
neighbouring site and the streetscape: concrete. If constructed of concrete,
they must be a rendered or paint finish.
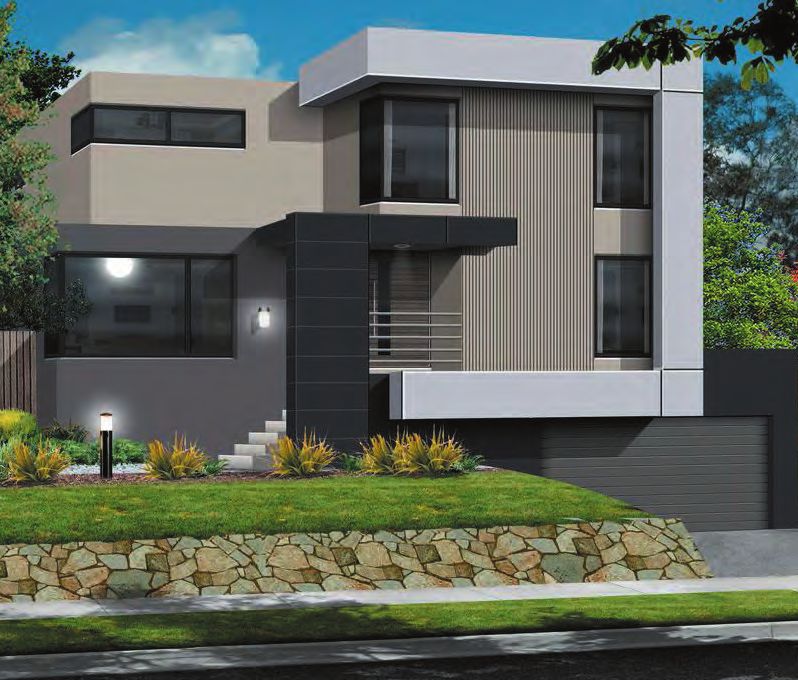
Figure 5: Examples of designs responsive to a sloping site:
Top Left: Designed by Metricon Homes
Right: Designed by Renmark Homes
Bottom Left: Designed by Abbott Builders
12External Materials
& Colour Selection
S EC T I O N 7.0
It is important to control colour and material
to create a sense of place and a coherent high-
quality neighbourhood character. The materials
also need to be durable and long lasting to
reduce future maintenance or repairs.
To ensure a diverse mix of finishes throughout,
and to encourage a good level of articulation, a
façade that includes more than 40% face brick,
must be complemented by use of a complementary
brick colour or alternative material.
137.1 Acceptable Materials & Cladding Systems
7.1.1 WA L L S 7.1 . 3 GA R AG E D O O R S
Acceptable materials and cladding • Pre-finished Colorbond panels are encouraged.
systems for external walls are: • Timber can be used on garage doors and
• Face brickwork, bagged brick/concrete blockwork. must be stained or paint finished.
• Rendered brick or blockwork. • Cement sheet cladding must be paint finished.
• Earth wall construction. • Metal cladding such as Corten or similar steel
• Natural stone construction and cladding. pre-painted finish is acceptable. Colours
should merge with the tone or colour of
• Aluminium/metal Colorbond cladding systems.
the wall finish or subtly complement.
• Cement sheet cladding systems must
be paint finished or rendered.
• Weatherboards/natural timber cladding is
encouraged to help break up hard surfaces and
provide warmth to the material and colour palette. It
is a high maintenance material however and should be
limited to 50% of the materials used. At the discretion
of the DR, a greater percentage may be accepted.
• Composite timber cladding should be considered
such as Ecoply and Perma Timber.
• Recycled timbers are also encouraged.
7.1 . 4 G L A Z I N G
• Acceptable window and door frame types include
7.1. 2 RO O F I N G
stained or natural cedar, stained or painted
Roofing materials must complement the design hardwood; natural or pre-coloured aluminium frames.
and style of the proposed dwelling. • Double-glazing or specification of energy
• Roof sheeting is to be non-reflective efficient glass are encouraged.
(muted tones are preferred). • Use of reflective, frosted, coloured or patterned
• Untreated galvanised or zinc finished, tray deck or film will be assessed upon merit, must be of high
fibre cement roof materials will not be approved. quality and enhance the façade treatment.
• Colorbond metal roofing is preferred.
• Concrete roof tiles are acceptable in
a shingle style and grey tone.
147.2 Acceptable Landscape Materials
7. 2 .1 PAV I N G A N D D R I V E WAY S • Selected stone paving.
Driveways, paths and front landscaping should • Gravel or loose stone paths are not
be complemented within three months of permitted in the front garden.
obtaining a Certificate of Occupancy. • Impermeable hard surface materials must
not exceed 40% of the front garden area
Suitable paving and driveway materials are:
including the driveway and front path.
• Plain concrete paving (brush finished
or equivalent for slip resistance).
• Coloured concrete paving and stencil
colour concrete (grey charcoal and
sand and neutral tones only).
• Unit grass pavers.
• Permeable paving systems (colours
to be neutral tones).
7. 2 . 2 GA R D E N R E TA I N I N G WA L L S
Suitable materials are:
• Rendered brickwork/concrete block.
• Timber sleeper retaining walls.
• Prefabricated systems will be assessed on merit by the DR.
157.3 Colour Selection
C O LO U R S E L EC T I O N Figure 6: Examples of suitable colours and application:
Muted colours and finishes shall be used to
blend with the natural setting. Neutral colours
that blend with the greater landscape and that
enhance the architecture are encouraged.
The colour palette should be primarily
neutral tones as illustrated below.
• Windows, doors, detail elements such
as downpipes, and feature panels can
be of accent colours but must still blend
with the overall colour scheme.
• Front doors may be of bright colour, garage
doors must not be red or particularly bright Designed by Pivot Homes: Taupe/Brown Neutral palette
in colour so that they do not stand out.
White Neutral palette Grey Neutral palette Accent door colours
168 Ancillary Items
8 .1 SHEDS /OUTBUILDINGS Figure 7: Example of acceptable letterbox designs
• Rear sheds are to be a maximum of 3 metres
height and no greater than 10 square metres in
area. They must be finished in a non-reflective
material and in a colour to match the residence.
• A shed or outbuilding may be located 1 metre
from a side and rear boundary provided it
does not exceed 3.6m maximum height.
8.2 L E T T E R B OX E S
Letterboxes should be designed to complement
and match the dwelling, using similar materials,
colours and finishes. Single post supporting
letterboxes will not be permitted.
8.3 OV E R LO O K I N G S C R E E N S A N D S H U T T E R S
The siting of the dwelling should take into
consideration the impact of potential overlooking
into adjacent lots. Where a lot on an adjacent
boundary has been built upon, the provisions of
Building Regulation 419 will apply to that boundary.
If screening is required (or desired for your
own privacy from an existing neighbouring
dwelling) the following must be considered:
• Screening of windows from overlooking Figure 8: Examples of acceptable pool arrangement
must be incorporated in the design.
• Raised decking and terraces should not be
extended to within 1m of a side or rear boundary
to allow for a screen or screen planting buffer.
• The use of aluminium roller shutters
to windows is prohibited.
8 .4 PO OL S
Privacy and noise attenuation is key and must be
considered when installing a pool on a lot.
Landscaping should be provided around the border
of the pool in order to buffer noise between
dwellings and, where suitable, water features are
encouraged to dampen noise between residents.
8.5 C LOT H E S L I N E S & D RY I N G A R E A S
Clothes lines and drying areas shall be located
so that they are not visible to public viewing.
8.6 R A I N WAT E R TA N K S
Rain water tanks are encouraged as an environmental
initiative however they must be positioned to
restrict them from public view. A minimum of 1,000
litres should be provided by each residence.
178 Ancillary Items
8. 7 S O L A R PA N E L S & H OT WAT E R SY ST E M S • Commercial vehicles, boats, trailers, caravans
and campervans and vehicles greater than
Solar hot water systems are encouraged,
1 tonne carrying capacity, should not be parked
however the water drum is not permitted on
in view of the street and should be parked
the roof of a dwelling. All external hot water
behind the front building line of the residence
systems must be installed out of public view.
and be screened by fencing/gates.
Solar panels may be installed on the roof,
8 .1 0 P LU M B I N G
however avoid installation on a roof face that
fronts a streetscape. Exposed plumbing must • All external plumbing (except for gutters and
be painted to match the roof colour. downpipes) including spa pumps/motors
are to be concealed from public view.
Solar hot water piping for residence or swimming pools
are permitted provided they are located on the roof • No exposed plumbing waste piping is permitted.
and installed at the same pitch angle as the roof and, • Taps are not to be free standing and are to
where practical, they are to be located at the rear of the be attached to the wall of the dwelling.
property to minimise visual impact from public viewing.
8 .1 1 AIR CONDITIONING UNITS
Tanks for such systems are not permitted to be located
on the roof and must be screened from public view. • Evaporative units and their exposed components
are to be located below the roof ridge line and
8.8 F I B R E TO T H E H O M E towards the rear of the property to minimise
A fibre optic network will be provided to this visual impact. They are to be colour toned to
estate. It is encouraged that homes are designed match adjoining wall or roof colour. The units
and built to utilise this technology for today’s shall be of low-profile type and, wherever
and the future entertainment media platforms. appropriate, be fitted with noise baffles.
Contact the DR for further information. • Air conditioning units/condensers must be
located at ground level and out of public view.
8.9 PA R K I N G O F V E H I C L E S
8 .1 2 T V A N T E N N A E A N D S AT E L L I T E D I S H E S
• All passenger vehicles should be parked
in a designated parking area such as the • TV antennae and other antennae are generally to be
driveway and garage or any designated street contained within the roof space and not visible.
parking allocated within the estate. • Where antennae are to be externally
• No vehicles are to be parked on any nature mounted, they are to be located at the rear
strip or front yard of a residence. of the property and below the roof line to
minimise visual impact/public viewing.
9 Environmentally Sustainable Design
Sustainable homes are beautiful. They utilise natural reverse brick veneer, thermal mass walls and
materials, are oriented to ensure we make the floors, and insulating floors, walls and ceilings.
most of our sunshine and are low in cost to run.
Dwellings and associated buildings on a lot are required
Good environmental design positively contributes
to meet the energy efficiency objectives and standards
to the biodiversity, conservation and water cycle
as applicable in the relevant Building Regulations.
management, and the reduction of greenhouse gases
9.1 THIRD PIPE
Consider your building material selection, insulation,
Photovoltaic cells and incorporate passive solar A recycled water network has been provided
elements and strategies into the design of your to each property to provide non potable water
home. Some typical building practices include for toilet flushing and garden irrigation.
18Landscaping
& Fencing
S EC T I O N 10
Landscaping should be well designed to suite the
style of residence and should be low maintenance.
1910.1 General Landscape Requirements
The Sunbury landscape consist of rolling hillsides 10.2 S O F T L A N D S C A P E R EQ U I R E M E N T S
of native grasses. To enhance this semi-rural
The planting of tall trees and large garden beds in the
environment, the following general standards apply:
front garden create a high-quality environment.
• All front gardens shall be planted with indigenous
To ensure this, the following minimum
or native plants and have an open feel.
landscape works shall apply:
• The front gardens must be designed to be
drought tolerant, and the same is highly • You must plant at least one tree of mature
recommended for side and rear gardens. height of 4m in the front garden.
• Planting density shall be appropriate to achieve a • Plant drought tolerant species and
closed canopy within a five year period following utilise organic or mineral mulches.
occupancy sign off and landscape establishment. • Retaining walls or courtyard defining walls
• A minimum soft landscaped area of 60% of the are acceptable in the zone between the front
total front garden is to be installed. The soft boundary and the front of the dwelling but must
landscape should consist of turf, garden beds be complementary in finish and design to the main
and permeable surface materials including house. Refer to section 7.2.2 Garden Retaining Walls.
decorative stone aggregate or pebbles. Front • All planted batters must incorporate
gardens cannot be entirely pebbled. Tan suitable landscaping options and must
bark must be natural or black in colour. not exceed a slope of 1:4.
• To ensure an adequately landscaped environment, at 10.3 F E N C I N G R EQ U I R E M E N T S
least 20% of the allotment should not be covered by
To encourage and protect the open, semi-
impervious surfaces. An impervious surface includes
rural appeal of the setting, no fences shall be
a dwelling, a garage or carport, a verandah, a garden
constructed along the front boundary or within
shed, a footpath, a swimming pool, outdoor paved
the front garden up the side gate/return fence.
areas, a driveway or any other sealed surfaces.
• Excavation depths should not be greater than
1m below natural ground level and terrace the
ground in segments rather than in large cuts.
• For efficiency, an irrigation system
should be installed to garden beds.
2010.4 S I D E A N D R E A R B O U N DA RY F E N C E S 10.5 S I D E F E N C I N G TO C O R N E R LOT S & R E S E RV E S
• Side/return fences shall be parallel to the primary • Feature fencing such as brick, stone or
frontage and set back not less than 1 metre from timber batten fencing is encouraged on
the relevant front corner of the dwelling. side fencing that fronts a reserve.
• Side boundary fencing between properties must • A paling fence is permitted, however it must
not continue past the side fence return. This be set back at least 8 metres from the
uniform setback will create an open streetscape front boundary to open up the corner of
and enhance the landscaping of the estate. the lot for visibility around the corner.
• Side and rear boundary fencing must not • Irregular shaped lots will be assessed on merit.
exceed 1.8 metres in height measured from • The extent of fencing to be shown on the
the natural ground. It must be constructed design plans with the submission checklist
of a timber paling fence with a capping. as an endorsement that the fencing will be
carried out as per the fencing requirements.
Figure 9: Typical side and rear fencing detail
2111 General Requirements & Timing
1 1.1 S I G N AG E 11.3 TIMING
Signage is not permitted on residential The following requirements must be adhered to:
lots with the following exceptions;
• You must commence construction of your dwelling
• Builders or tradespersons identification within two years of your settlement date and
required during dwelling construction. These complete the construction of the dwelling within
signs must be removed within 10 days of the one year of commencement of construction.
issue of the Certificate of Occupancy; • Incomplete building works must not be
• Only one sign advertising the sale or lease of a left for more than three months without
complete dwelling is permitted. These signs must be work being carried out on them.
no greater than 10sqm in size and must be removed • Internal windows furnishings which can be
within 10 days of the property being sold or leased; viewed by the public must be fitted within three
• There are to be strictly no signs to be erected (3) months of occupancy. Sheets, blankets, or
for the purposes of advertising the sale of similar materials for which window furnishing is
a vacant lot other than any sign that relates not their primary use, will not be permitted.
to the sale of such lot by the Developer. • Landscaping of your front garden must be
• Any business conducted from the dwelling completed within 6 months of receiving
is not to be advertised by use of signs. your Certificate of Occupancy.
1 1. 2 M A I N T E N A N C E O F LOT S
• The Purchaser shall not allow any rubbish
including site excavations and building
materials to accumulate on a lot.
• (Unless the rubbish is neatly stored in a suitably
sized industrial bin or skip) or allow excessive
growth of grass or weeds upon the lots.
• The Purchaser shall not place any rubbish
including site excavations and building materials
on adjoining land, reserve or in any waterway.
• The Vendor or its Agent may enter upon and have
access over a lot at any time without creating any
liability for trespass or otherwise to remove rubbish,
maintain, slash or mow a lot and the Purchaser agrees
to meet the Vendor’s reasonable costs of doing so.
2212 Appendix 1
D E S I G N A P P ROVA L P RO C E SS
Below is a step-by-step guide for obtaining approval for your proposed dwelling: Standard Lots
ST E P 1 ST E P 5
• Purchase Lot. Builder lodges for Building Permit.
• Confirm requirements of the Lot.
ST E P 2 ST E P 6
Have your builder prepare the required documents Building Permit issued.
& drawings for the Design Reviewer (DR).
ST E P 3 ST E P 7
Review of the submission by the DR. Commence construction.
ST E P 4
Approval/rejection or conditional
approval by the DR.
13 Appendix 2
D E S I G N A P P ROVA L A P P L I C AT I O N FO R M
Lot No:
Street Address:
Owner’s Name:
Mobile: Email Address:
Current Postal Address:
Home Phone: Business Phone: Builder:
Contact Name & Number:
Mobile: Email Address:
2313 Appendix 2
D E S I G N A P P ROVA L A P P L I C AT I O N FO R M ( C O N T. )
Site Plan (scale 1:200) indicating: date, reference number of drawing, north point,
building envelope, lot area from all boundaries, outbuildings, crossover and driveway
location, clothes line, letterbox, water tank and capacity, and pool position if
applicable, extent of earthworks – cut and fill, retaining walls and batters.
Floor plan/s (scale 1:100) indicating: date, reference number of drawing, north
point, dwelling area calculation indicating all rooms, windows, and external doors &
dimensions, external fixtures and nominated floor levels, position of air conditioning,
solar units, satellite dishes and locations of data points within the home along with the
position of the ONT in the meter box for the fibre optic supply, and roof plans.
All elevation plan/s (scale 1:100) indicating: date, reference number of drawing, north point,
all wall heights and external finishes including garage door type, roof pitch, eaves depth, air
conditioning unit, solar units, water tanks and all external building such as garden sheds, pergolas,
BBQs, etc. Relevant cross sections showing height of walls on boundaries; cut and fill details,
including retaining walls and driveways gradient where applicable should also be included.
Landscape plan/s (scale 1:100) indicating: date, reference number of drawing, north point, contours at
500mm intervals, proposed earth works, planting schedule inclusive of the minimum number of native
trees to the front garden (refer to your lot size for requirements) boundary fencing, water tank/s retaining
walls and materials including dimensions. Proposed driveways and paths materials and gradients, out
buildings and pools if applicable. Decks, pergolas and other similar structure are to be included.
Fence plan (see items 4.3a, 4.3b, and 4.4) is included within the checklist
and requires the client’s signature as endorsement.
Submission checklist of requirements is provided as part of the Design Approval Application
Form and checklist included in this document – refer to the Appendices of these Guidelines.
Schedule of external colours and materials; supply either a coloured
photocopy or colour sample chips for checking by the DR.
Energy rating for the dwelling.
The DR will endeavour to assess proposals in the shortest possible time, generally within ten – fourteen
working days of receipt of a compliant application, if all of the above documentation is provided. The
Design Approval Form checklist forms a part of the design approval process and must be completed when
submitting to the DR. Delays will occur if the checklist and/or the required information is not provided or
is incomplete. It is the responsibility of the owner and the owner’s agent (builder or designer) to ensure
complete documentation; no responsibility will be accepted by the DR for incomplete submissions.
Applications cannot be assessed until all the above information is available. No facsimile
will be accepted. The DR also reserves the right to request further information.
Please submit the above documentation to:
605 Sunbury Rd Design Reviewer
C/- Shelton Finnis
DR@sheltonfinnis.com.au
24Notes
25Notes 26
M A P L E S T O N E S U N B U RY. C O M . A U
You can also read