Ford Fiesta
Model Introduction Training For
Approved Motor Body Repairers
←
→
Page content transcription
If your browser does not render page correctly, please read the page content below

Ford Fiesta Model Introduction Training For Approved Motor Body Repairers

The all-new Ford Fiesta is the first small car segment application of the
company’s kinetic design philosophy first introduced with the iosis and iosis X
concept cars and builds on the premium feel of latest production models like the
new Mondeo and Focus. Each new Ford has been created in a new
interpretation of this form language, translating the trademark bold graphic
elements and proportions to create a family of distinctive models. The result is
a new Fiesta that joins a family of vehicles immediately identifiable as new
generation Fords, yet with distinctive character to appeal to their target
audiences.

All-new Fiesta asserts its own air of confidence, stylishness and individuality.
Contents

Overview                                                                                                      4

New Technical Specifications                                                                                  8

Body                                                                                                          16

Supplemental Restraint System                                                                                 41

   This self-study programme highlights the design and function of new vehicle models,
   new automotive components or new technologies.

   The self-study programme is not a repair manual!
   All values given are intended as a guideline only.

   For maintenance and repair work, always refer to the current technical literature.
                                                                                         REFERENCE!   NOTE!
                                  Copyright © 2009 Ford Motor Company of Southern Africa.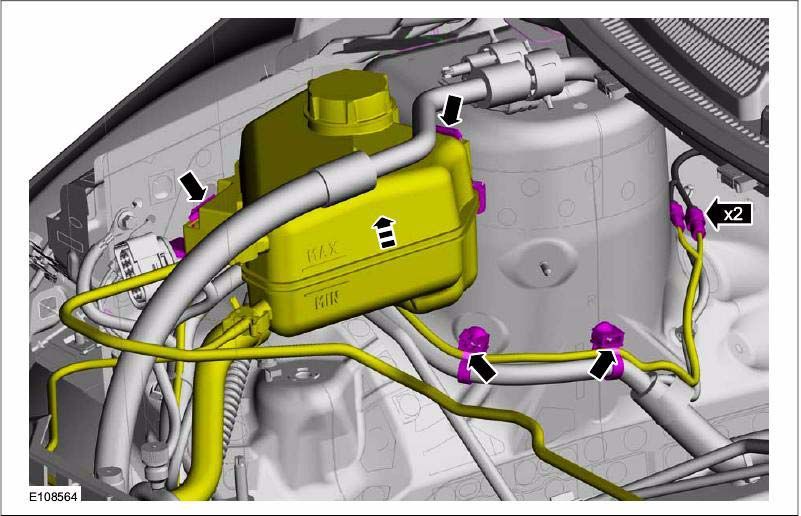
Overview

    Kinetic Design
    Energy in Motion

    The new Fiesta marks a new era in Ford design, a step into the future. The
    Fiesta embodies the spirit of Ford’s new Kinetic Design movement, which
    translates into energy in motion. It is bold and independent. It is distinctive and
    emotional. It is athletic and muscular. Even when standing still it looks poised,
    ready to strike at any moment. The new Fiesta is also the first major product of
    Ford’s global product revitalisation strategy process.

    Foxy Eyes

    The bold new cat-eye headlamps add even more visual intrigue. It invites you
    closer, hinting at a stirring personality behind those daring eyes. It is sexy, sultry
    and captivating.

    The Shout

    The large sporty front grille proudly announces the strong new face of Ford. It is
    constantly shouting and proclaiming your existence boldly to the world.
    Perfected to suit a lifestyle that demands both fashion and practicality. Why
    whisper when you can shout?

    Ready to Pounce

    The Fiesta imparts a highly dynamic stance and controlled tension. Every line
    conveys a sense of agile muscularity, the look of energy in motion.

    The Silver Lining

    A touch of class is added with the silver character line which accentuates the
    higher belt-line and window profile. A simple expression that underlines your
    presence.

4                      Copyright © 2009 Ford Motor Company of Southern Africa.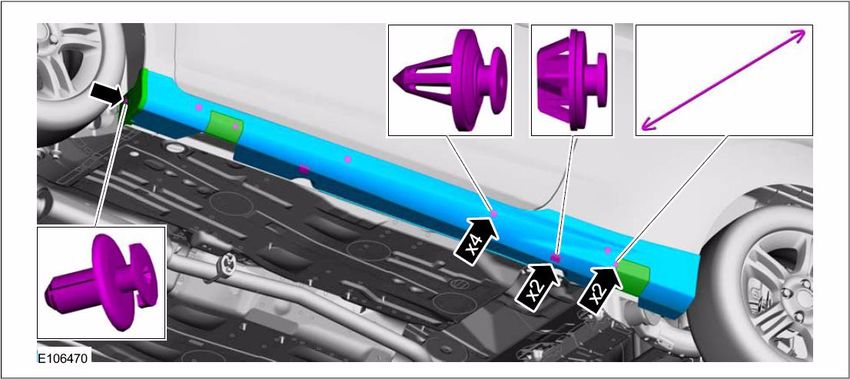
Overview

     1.6TDCi Engine                                    1.4 Sigma & 1.6 Ti-VCT Engine

  1.4-litre Sigma engine & 1.6 Ti-VCT engine

  The new 1.6 Ti-VCT engine (88kW @ 6000 rpm and 149Nm @ 4250 rpm) is
  class-leading, getting you to 100km/h in sub 10-second time while returning a
  fuel consumption of just 5.9l/100km, with CO2 emissions of 139g/km. The 1.4l
  engine boldly offers 71kW @ 5750 rpm and 125Nm @ 4500 rpm, with CO2
  emissions of 138g/km.

  1.6TDCi engine

  The 1.6 turbo diesel engine has been refined and improved, offering a satisfying
  66kW @ 4000 rpm and 200Nm/1500 rpm with CO2 emissions of only 110g/km.

     ENGINE                     1.4                      1.6                  1.6 TDCi
      Types                     1.4L                    1.6L                     1.6L
  Capacity (cc)                1388                     1596                     1560
 Bore and stroke
                             76 x 76.5                79 x 81.4                75 x 88.3
      (mm)
Compression Ratio             11.0 : 1                 11.0 : 1                18.0 : 1
Power (kW) @ rpm            71 @ 5750                88 @ 6000                66 @ 4000
Torque (Nm) @ rpm          125 @ 4500               149 @ 4250                200 @ 1500
 CO2 emissions                  138                      139                     110
                                                                         Turbo Diesel Com-
   Fuel system         Multipoint injection     Multipoint injection
                                                                         mon Rail injection

                    Copyright © 2009 Ford Motor Company of Southern Africa.                   5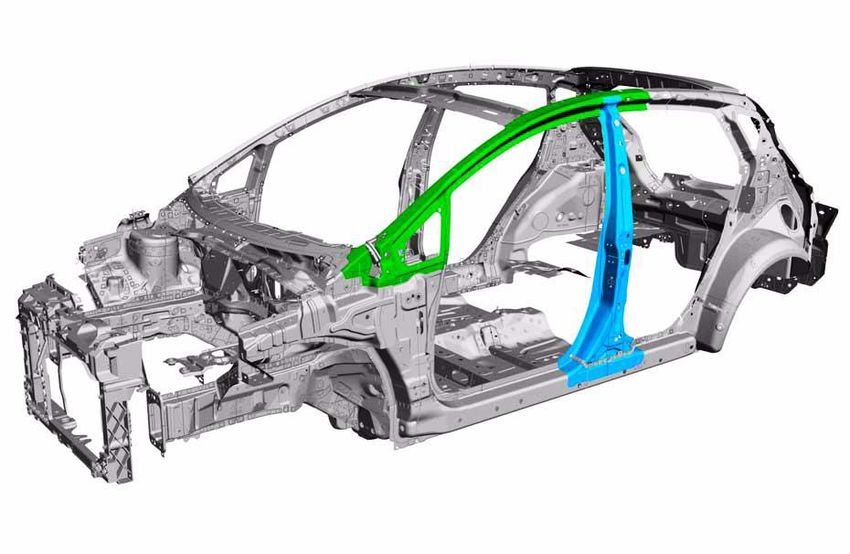
Overview
                                                        Fiesta Ambiente
                                                  1.4l, 1.6l and 1.6TDCi Engine
                                                  5-door Hatch
                                                  5-speed iB5 Manual Transmission

    Overview

    The new Ford Fiesta is the car for now.
    A revolutionary style icon; it redefines what a small hatch should be. The New
    Fiesta demonstrates that small cars can be styling and sophisticated and yet
    stay true to Fiesta's traditional strengths of practicality, value for money, agility
    and safety.

    Key Features

       •   Dual Airbags
       •   Standard Air conditioner with pollen filter
       •   Twin chamber Halogen Reflector headlights
       •   Manual central locking
       •   Cap less fuel filler neck with misfuel inhibit (petrol and diesel)

                                                           Fiesta Trend
                                                   1.4l and 1.6l
                                                   5-door Hatch
                                                   5-speed iB5 Manual Transmission

    Overview

    Confident Driving
    The real beauty of the new Fiesta is that it is as easy to maintain as it is to drive.
    Engineered and built in Germany you experience the build quality, attention to
    detail and innate reliability every time you get behind the wheel. The new Fiesta
    offers great fuel economy which means more money in your wallet, and that
    means less to worry about at the end of the day.

    Key Features

       •   Standard air conditioner with pollen filter
       •   Radio/CD with MP3 compatibility
       •   Immobiliser
       •   Power steering
       •   Remote Central locking with 2 flip keys
       •   15" alloy wheels
       •   ABS/EBD
       •   Dual airbags
       •   Power mirrors
       •   Power windows
       •   Bluetooth vehicle interface and voice control

6                      Copyright © 2009 Ford Motor Company of Southern Africa.
Overview
                                                    Fiesta Titanium
                                               1.4l and 1.6l
                                               5-door Hatch & 3-door hatch
                                               5-speed iB5 Manual Transmission

Overview

The Choice is Yours
The new Fiesta is available in 3 door and 5 door body styles, powered by the
refined and improved 1.6 turbo diesel, 1.4 petrol engine and a new 1.6 petrol
engine. Both petrol engines were engineered to offer great power and fuel
efficiency and still be environmentally friendly. All engines feature a new slick 5-
speed gearbox. So whether you prefer a torquey diesel engine or an
enthusiastic petrol engine, there’s a Fiesta for you.

Key Features

   •   Standard air conditioner with pollen filter
   •   Radio/CD with 6 speakers
   •   USB jack
   •   Power steering
   •   Central locking
   •   16" alloy wheels
   •   ABS/EBD
   •   2 airbags
   •   Power mirrors
   •   Power windows
   •   Leather steering wheel & Halogen Projector Headlamps

                   Copyright © 2009 Ford Motor Company of Southern Africa.             7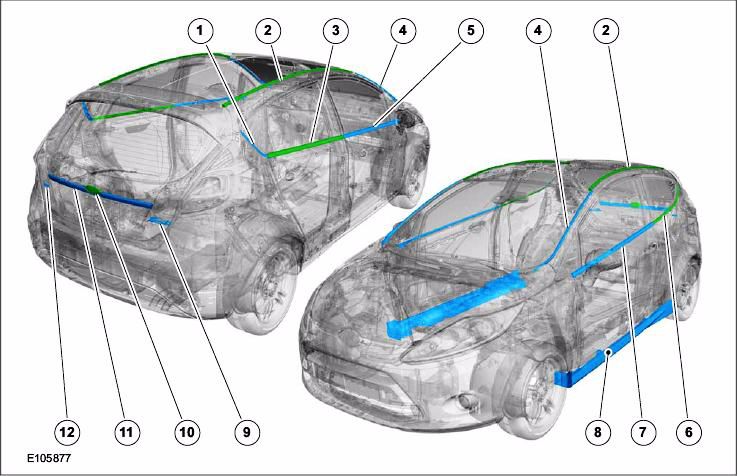
Technical Specifications

             Dimensions

                                       2489mm

                                       3950mm

    1428mm

                                       1474mm

                                       1973mm

8                  Copyright © 2009 Ford Motor Company of Southern Africa.
Technical Specifications

                         New Technical features

Chassis
• Front axle: McPherson struts
• Rear axle: Twist-beam axle
• Electric power steering

Fuel System
Cap less fuel tank filler pipe

Electrics
• Air conditioning (manual or with EATC (Electronic Automatic Temperature
Control))
• Central module configuration
• Audio system with separate multifunction display and advanced menu
navigation

Body
• Two body versions (3-door and 5-door)
• A- and B-pillar reinforcement made from ultra high-strength boron steel
• Power windows with pinch protection (driver side only)

DLC (Data Link Connector) installation position

The DLC is located beneath the light switch behind the instrument panel. The
DLC can be accessed by opening the storage compartment on the driver side.

                   Copyright © 2009 Ford Motor Company of Southern Africa.     9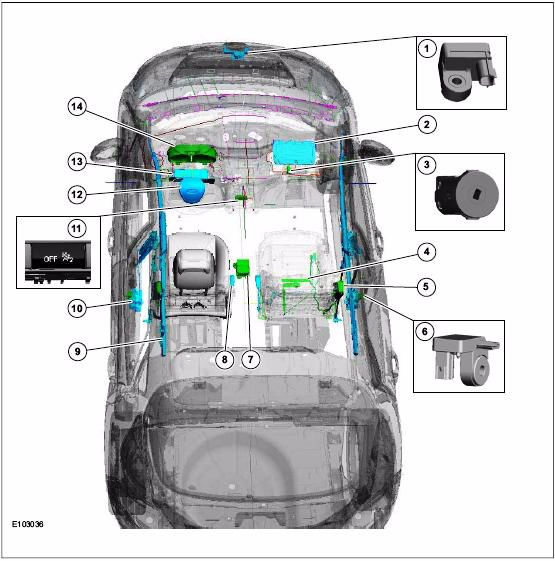
Technical Specifications

             Front Suspension
       General
       A newly developed McPherson front suspension with L-shaped lower arms is
       used. The lower arm bushes have been enlarged compared with the previous
       model. This further improves front axle rigidity. The shock absorbers are gas
       shock absorbers.

     1 Stabilizer bar link                             5 Subframe
     2 Stabilizer bar                                  6 Lower arm
     3 Suspension unit                                 7 Subframe attachment point
     4 Shock absorber unit

             Rear Suspension
       General
       Characteristics of rear axle:
       • Twist-beam axle (torsionally rigid axle)
       • Single-pipe gas shock absorbers with stable damping performance for
       optimum handling
       • Axle suspension uses large rubber bushes for optimum ride comfort.

       Function
       If compression takes place on both wheels evenly (for example when a load is
       placed on the vehicle), the whole axle unit swivels evenly in the rubber-metal
       bearings. If only one wheel is compressed, the cross-beam twists (undergoes
       torsion) and acts as a stabilizer.

10                           Copyright © 2009 Ford Motor Company of Southern Africa.
Technical Specifications
1 Shock absorber 3 Twist-beam rear axle
Twist-beam rear axle receiver bearing
2 Spring 4 This minimises track and toe changes
Front Wheel Sensor
The ABS sensor rings are built into the seals in the front wheel bearings. The
wheel sensors are joined to the main wiring harness using a separate
connecting cable.
Copyright © 2009 Ford Motor Company of Southern Africa. 11Technical Specifications
Power Steering
1 Steering gear 6 Electric power steering motor
2 Steering column 7 Joint shaft
Universal joint
3 Steering shaft 8 Comments: Part of transfershaft assembly
4 Steering column height and length adjustment 9 Tyre-rod
5 PSC (Power steering control) module
General
This vehicle employs electric power steering.
The electric power steering is integrated into the steering column.
As soon as the steering wheel is moved, an electric motor (electric power
steering motor) assists the steering movement. The rotary motion of the motor
is transferred directly to the steering shaft using a worm gear.
The hydraulic power steering pump is therefore no longer required.
Advantage: The electric power steering is only active when a steering
movement occurs. This decreases the load on the engine and therefore
reduces the fuel consumption.
The electric power steering consists of the following main components:
• Electric power steering motor,
• Reduction gear,
• Steering torque sensor,
• PSC module.
12 Copyright © 2009 Ford Motor Company of Southern Africa.Technical Specifications
Overview of operation
When a steering movement occurs, it is detected by the steering torque sensor.
The signal from the steering torque sensor is used by the module to calculate
the power of the steering assistance.
The module drives the motor with the corresponding current.
The rotary movement of the motor is transferred directly to the steering shaft
through a worm wheel.
A Joint shaft D Steering column
B Reduction gearset E PSC module
Torsional shaft with driving toothed wheel and
C steering torque sensor F Electric power steering motor
Copyright © 2009 Ford Motor Company of Southern Africa. 13Technical Specifications
Fuel System
Capless fuel tank filler pipe
NOTE: The locking unit in the fuel tank filler pipe is available as an
individual spare part.
The conventional fuel tank filler cap is dispensed with for this vehicle.
A spring-loaded locking flap closes off the upper end of the fuel tank filler pipe in
place of the filler cap.
The fuel tank closing flap underneath seals off the fuel system to the outside.
In its rest state, the locking flap lies on a flange worked into the fuel pump
nozzle guide (cannot be seen in the illustration).
When the fuel pump nozzle is introduced, the locking pin is pushed downwards.
The fuel pump nozzle guide is now pressed against the compression spring
force by the shape of the fuel pump nozzle.
The action of pressing away the fuel pump nozzle guide in the direction of the
compression spring releases the locking flap and the fuel pump nozzle is
admitted.
The diameter of the fuel pump nozzle is decisive here. The fuel pump nozzle
guide is constructed in such a way that only a fuel pump nozzle of the correct
size can release the locking mechanism.
As the fuel pump nozzle is introduced further, the spring-loaded tank closing
flap is opened.
Advantage:
• Incorrect refuelling of diesel vehicles with the fuel-pump nozzle at the service
station (petrol instead of diesel) is no longer possible.
• There is no dirtying of the hands from screwing off the fuel tank filler cap.
Instructions on refuelling from a reserve fuel can:
There is a funnel in the vehicle for refuelling from a reserve fuel can (applies to
both diesel and petrol vehicles).
The diameter of the funnel is matched to the type of engine in the vehicle
(diesel or petrol).
NOTE: Always insert the funnel until it reaches the stop. Otherwise there
is the danger that the tank closing flap may not be fully open.
14 Copyright © 2009 Ford Motor Company of Southern Africa.Technical Specifications
NOTE: The locking unit in the fuel tank filler pipe is available as an
individual spare part.
1 Compression spring 4 Locking pin
2 Guide-fuel pump nozzle 5 Fuel tank closing flap
3 Locking flap
Copyright © 2009 Ford Motor Company of Southern Africa. 15Body
Jacking and Lifting
WARNING: Always position the vehicle on a hard level surface. If the
vehicle must be jacked up on a soft surface use load spreading blocks
under the jack. Always chock the wheel diagonally opposite the jacking
point. Failure to follow these instructions may result in personal injury.
CAUTION: It is important that only the correct jacking and support
locations are used at all times.
NOTE: When using the vehicle jack, refer to the owner guide for correct
operating instructions.
16 Copyright © 2009 Ford Motor Company of Southern Africa.Body
Body Construction
General
Two design principles have prevailed in body design. The body design can
either be an integral body-frame or a frame with all attached superstructures.
Mixed versions are also possible, with the design significantly increasing the
stability of the frame. In all versions, the passenger cell must be preserved in
the event of an accident. To this end, the front and rear ends are designed so
that they absorb the energy of the impact via crumple zones.
The use of modern design and manufacturing methods, and the use of body
panels whose reshaping and strength properties have been finely balanced,
mean that despite the requirements can be met.
Integral body-frame
The integral body-frame is completed with ancillary components, such as doors,
hood, bumpers and other components. The advantages of this are:
• Maximum passive safety due to the stable passenger cell.
• Defined deformation behavior at the front and rear.
• High torsional rigidity and high flexural strength.
• Weight reduction.
• Economical manufacturing technology.
The safety of the driver and passengers is paramount for every body design.
There are two key safety aspects in the body:
• Safety body cell.
• Crumple zone.
Copyright © 2009 Ford Motor Company of Southern Africa. 17Body
The safety body cell is characterized by the following design features:
• Stable pillars, door sills and door profiles.
• Integrated side impact protection in the doors.
• The doors are designed to open in the event of extreme deformation.
Deformation behavior
Different materials and design features lead to staged deformation of the front
and rear of the vehicle in an accident. The passenger cell remains undamaged,
and the driver and passenger are not shut in.
1 Bolted sheet metal crash element 2 Front side member 3 Rear side member
The bolted crash element is made of high-strength steel. Built-in pre-determined
folding points prevent damage to the cross member during gentle impacts. The
use of bolts means that this can be quickly and cheaply replaced.
Side members can be manufactured from panels of different thicknesses.
These are joined together through laser welding. These panels are called
tailored blanks.
NOTE: Follow model-specific instructions when repairing tailored blanks.
The rear of the vehicle, like the front of the vehicle, has structures which protect
the passenger cell through staged deformation in the event of an accident. The
design layouts, however, are adapted to the requirements of the rear area.
18 Copyright © 2009 Ford Motor Company of Southern Africa.Body
A- and B-Pillar Reinforcement
The A- and B-pillar reinforcement is made of the highest strength boron steel.
These sheet metal parts can only be replaced as a complete unit during repairs
and that section repairs are not possible.
Special installation and removal requirements must be observed during repairs.
Special tools are also required. Relevant instructions are available in the current
service literature.
Replacing B-Pillar Outer Panel
Drill out the 13 spot wields at the lower section of the panel and cut on the lower
section in the designated areas.
Copyright © 2009 Ford Motor Company of Southern Africa. 19Body
Cut the top section of the panel 100mm below the inside of the door frame and
drill out the 43 spot wields.
Set the heat gun to 170 Degrees Celsius and apply heat to the lower section of
the panel to loosen the bonder. The outer panel can now be removed and the
section can cleaned and prepared.
20 Copyright © 2009 Ford Motor Company of Southern Africa.Body
Cut the replacement panel to size to allow for butt joints. Apply bonder to the
lower section of the B-Pillar. Remember not to apply bonder in areas where
wielding takes place.
Fit the replacement panel and spot wield in the 43 designated areas.
Copyright © 2009 Ford Motor Company of Southern Africa. 21Body
Join the panel at the joints with full seam wields using MIG welding equipment
and spot wield the lower section.
22 Copyright © 2009 Ford Motor Company of Southern Africa.Body
Exterior Trim
1 Trim strip-rear side window (5-door) 7 Trim strip-door window (3-door)
2 Roof strip 8 Rocker panel moulding
3 Trim strip-rear door window 9 Tailgate lettering
4 Windshield strip 10 Tailgate emblem
5 Trim strip-front door window 11 Trim strip-tailgate
6 Trim strip-rear side window (3-door) 12 Variant sign-tailgate
System Operation
Depending on the way in which they are attached, the components can either
be reused or need to be replaced.
Components which are attached with adhesive tape should be detached with a
plastic wedge.
Component Description
Windshield strip
Depending on the way in which they are attached, the components can either
be reused or need to be replaced.
Components which are attached with adhesive tape should be detached with a
plastic wedge.
Copyright © 2009 Ford Motor Company of Southern Africa. 23Body
Windshield strip (continued)
Roof strip
The trim strip is glued.
A new trim strip will need to be replaced after the old one has been removed.
24 Copyright © 2009 Ford Motor Company of Southern Africa.Body
Trim strip-front door window (5-door)
The trim strip is a push-fit.
The trim strip can be reused after it has been removed.
Trim strip-door window (3-door)
The trim strip is a push-fit.
The trim strip can be reused after it has been removed.
Copyright © 2009 Ford Motor Company of Southern Africa. 25Body
Trim strip-rear side window (5-door)
The trim strip is a push-fit.
The trim strip can be reused after it has been removed.
Trim strip-rear door window (5-door)
The strip is secured with adhesive tape.
A new trim strip will need to be fitted after the old one has been removed.
26 Copyright © 2009 Ford Motor Company of Southern Africa.Body
Trim strip-rear side window (3-door)
The strip is secured with adhesive tape.
A new trim strip will need to be fitted after the old one has been removed.
Rocker panel moulding
Copyright © 2009 Ford Motor Company of Southern Africa. 27Body
Rocker panel moulding (continued)
On each side the rocker panel moulding consists of:
- Front end cap
- Jacking point cover (front)
- Jacking point cover (rear)
The moulding is retained with clips, securing strips and adhesive tape.
The trim strip can be reused after it has been removed.
Tailgate lettering
The lettering is retained with adhesive tape.
A new one will need to be fitted after the old one has been removed.
Tailgate emblem
The lettering is retained with adhesive tape.
A new one will need to be fitted after the old one has been removed.
28 Copyright © 2009 Ford Motor Company of Southern Africa.Body
Tailgate emblem (continued)
Trim strip-tailgate
The trim strip is a push-fit.
It can be re-used after removal.
Copyright © 2009 Ford Motor Company of Southern Africa. 29Body
Tailgate variant sign
The sign is secured with adhesive tape.
A new one will need to be fitted after the old one has been removed.
Headlamps and Bumpers
Headlamps
1 High beam headlamp 3 Side lamp
2 Turn signal indicator 4 Low-beams
30 Copyright © 2009 Ford Motor Company of Southern Africa.Body
Headlamps (continued)
The following types of headlamp are used:
• Conventional headlamps with free-form reflectors and
• Projector headlamps.
Conventional incandescent bulbs are fitted as the light source.
Incandescent bulbs for dipped and main beam:
• Dipped beam: H7
• Main beam: H1
Projector headlamps
Projector headlamps have the following advantages compared with
conventional headlamp systems:
• Greater range and optimum radiance,
• More even distribution of the light beam.
Removing and Installing Headlamps
Top View Side View
A
A
B
D
C
B
C
Removing
Remove the plug connector (D) from the rear of the headlamp.
Loosen and remove the 3x screws pictured A, B & C
Installing
Installation is done in the reverse order.
Copyright © 2009 Ford Motor Company of Southern Africa. 31Body
Bumpers
1 Front bumper 4 Rear bumper
2 Fog lights 5 Rear fog lamp
3 Air deflector 6 Cover, bumper
The bumpers are painted in the body colour as standard for all vehicle variants.
The replacements bumper cover is only available in grey.
Removing and Installing Front bumpers
To remove the front bumper cover both front headlamps need to be removed
(Refer: removing and installing front headlamps p.26)
A
B
C D
32 Copyright © 2009 Ford Motor Company of Southern Africa.Body
Removing and Installing Front bumpers (continued)
Once headlamps have been removed loosen 4x Screws A and B on both sides
of the vehicle.
Loosen screws C and D as well.
For vehicles with parking aid.
Loosen clips A and B and lift coolant reservoir (C) out of its position.
Disconnect X2 plug connector.
Detach 5x cable ties from vehicle body.
B
A
C
Copyright © 2009 Ford Motor Company of Southern Africa. 33Body
Removing and Installing Front bumpers (continued)
For all vehicles.
Remove 4x screws from both left and right fender linings.
Removing fog lamps if equipped. (Both sides)
A
Disconnect plug connector (A) from fog lamps.
34 Copyright © 2009 Ford Motor Company of Southern Africa.Body
Removing fog lamps (continued)
A
B
Loosen screws A and B.
Lift X4 retaining clips and remove fog lamp from the rear.
Removing and Installing Front bumpers (continued)
A
A
B B
Two people will be needed to slide the bumper cover forward off the
alignment pins (A) and to release the retaining clip (B) at the bottom of the
bumper cover.
Copyright © 2009 Ford Motor Company of Southern Africa. 35Body
Removing front bumper grills.
Lift the four retaining clips (A) on the upper grill and pull it out in the forward
direction.
A A
A
A
Release the X18 retaining clips on the lower grill and pull it out in the forward
direction.
Installing
Installation is done in the reverse order.
36 Copyright © 2009 Ford Motor Company of Southern Africa.Body
Removing and Installing Rear bumper
Remove rear mud flaps on both sides if equipped.
Loosen screws A and B and remove plastic deflector.
A
B
Copyright © 2009 Ford Motor Company of Southern Africa. 37Body
For vehicles with parking aid:
Remove plug connector A
A
For all Vehicles:
Remove plug connector (A) from rear fog lamp and loosen screws B.
B B
A
B B
B B
A
B B
38 Copyright © 2009 Ford Motor Company of Southern Africa.Body
Two people will be needed to slide the bumper cover up and forward off the
alignment pins.
3-Door Model:
A 5mm drill bit will be needed to drill out the plastic wields A. Loosen 4X screws
B from rear fog lamp and unclip X12 plastic retaining clips to remove lower
bumper skin.
B B
A
A
Copyright © 2009 Ford Motor Company of Southern Africa. 39Body
5-Door Model:
Loosen 4X screws A from rear fog lamp and unclip X12 plastic retaining clips to
remove lower bumper skin.
Installing
Installation is done in the reverse order.
40 Copyright © 2009 Ford Motor Company of Southern Africa.Restraint System
Supplemental Restraint System
Safety precautions when working on airbag
General:
• Testing, removing, installing and repair work may only be
performed by qualified personnel.
• Never perform tests with a test lamp, voltmeter or ohmmeter.
• Pyrotechnic components may only be tested while installed, using
suitable vehicle diagnostic, testing and information systems.
• Before handling pyrotechnic components of the restraint system
(such as to unplug the connector), the person concerned must
“discharge static”, for instance by briefly grasping hold of the door
striker plate.
• Always disconnect power supply when working on pyrotechnic
components of the restraint system.
• One minute is necessary after disconnecting the battery to allow for
the RCM backup power to become depleted.
• The battery must be connected with the ignition SWITCHED ON. If
pyrotechnic components of the restraint system are inexpertly
repaired, this may result in unwanted triggering after connecting
the battery. There must not be anyone in the vehicle while you are
connecting the battery.
• Pyrotechnic components must never be opened or repaired. Always
use new parts.
• Pyrotechnic components which have been dropped onto a hard
surface or which show signs of damage must not be used.
• Pyrotechnic components of the restraint system must be installed
immediately after being removed from their packaging.
• If the work is interrupted, pyrotechnic components must be placed
back into the packaging.
• Pyrotechnic components of the restraint system must not be left
lying unattended.
• Always “wash hands” after handling pyrotechnic components of
the restraint system which have been triggered.
• When connecting pyrotechnic components of the restraint system,
there should be no-one in the vehicle other than the person
performing the work.
• Storage and transport must be in accordance with the statutory
regulations of the countries in question.
• Pyrotechnic components must never be treated with grease,
cleaning agents or similar.
• Pyrotechnic components must not be exposed to temperatures
higher than 100 °C even for brief periods of time.
Copyright © 2009 Ford Motor Company of Southern Africa. 41Restraint System
Airbags
• Following removal, airbag units must be stored with cushioned side facing
upwards.
• Always renew airbag unit if fabric is contaminated by oil, grease, paint,
solvent or similar.
• There is no specified interval for renewing airbag units.
Always keep to the following sequence when renewing airbag units:
1. Remove the old airbag unit and set it down with the cushioned side facing
upwards.
2. Remove the new airbag unit from the transportation container and set it
down with the cushioned side facing upwards.
3. Immediately place old airbag unit in transportation container.
4. Install new airbag unit in vehicle.
Side airbag
• We recommend using genuine seat covers (same as original equipment).
• It is NOT permissible to use seat covers or protective covers which have not
been approved for use on Ford seats with side airbags.
• The backrest foam fill is not to be cut away in the area of the side airbag.
• When installing, make sure seam is straight in area of side airbag.
• All upholstery clips (metal and plastic clips) must be renewed.
• We recommend using only genuine upholstery clips (same as original
equipment).
• When installing, all new upholstery clips must be fitted in the same positions
as the original ones.
• For safety reasons, the cover should always be renewed if it is damaged
(tears, burn marks, etc.) in the area of the side airbag, as otherwise the side
airbag will not inflate properly.
• The backrest cover in the area of the side airbag is never to be repaired (on
account of special thread and precisely defined seam).
• Always replace the backrest padding after the side airbags have been
triggered.
• All damaged components must be replaced after an accident. The original
airbag unit can still be used if no signs of damage are found.
• If side airbag units are renewed, remove sticker with airbag number from
new side airbag unit and stick it over old sticker on seat pan.
• Never pierce cover in area of airbag and sensor mat with upholstery needle
or similar pointed objects.
42 Copyright © 2009 Ford Motor Company of Southern Africa.Restraint System
Belt pretensioner in the retractor
• Always replace mechanically damaged (dented, cracked) belt pretensioner
units.
• Never point the open end of a belt pretensioner at another person.
• When connecting belt pretensioner unit, all mechanical parts (including
those of the three-point seat belt) must be properly anchored.
Disposal of pyrotechnic units
• Pyrotechnic components (e.g. belt pretensioners, belt force limiters, airbag
units) that have not been triggered must be disposed of in original packaging
and in accordance with national regulations. Please contact the Importer (or
appropriate distribution centre) should you require more information.
• Pyrotechnic components ignited in an accident can be disposed of together
with commercial refuse.
Copyright © 2009 Ford Motor Company of Southern Africa. 43Restraint System
Overview
General
Three different versions are available:
Version 1 comprises the following components:
• Single-stage driver airbag,
• Single-stage passenger airbag,
• Driver and passenger belt pretension in the retractor,
• Front crash sensor,
• Driver and passenger safety belt buckle switch,
• Passenger seat occupancy sensor,
• RCM (restraint control module).
Version 2 comprises the following components:
1. Components of version 1,
2. Driver and passenger side airbag (upper body and head),
3. Driver and passenger crash sensor,
4. Knee airbag.
Version 3 comprises the following components:
• Components of version 1,
• Driver and passenger side airbag (upper body),
• Driver and passenger crash sensor,
• Knee airbag,
• Driver and passenger head airbag.
Module number Description
3- and 5-door model with driver and pas-
8V51-14B321-Ax
senger airbag
5-door model with driver and passenger
8V51-14B321-Bx airbag, side airbag (upper body and
head) and knee airbag
5-door model with driver and passenger
8V51-14B321-Cx airbag, side airbag (upper body), knee
airbag and head airbags
3-door model with driver and passenger
8V51-14B321-Ex airbag, side airbag (upper body and
head) and knee airbag
3-door model with driver and passenger
8V51-14B321-Fx airbag, side airbag (upper body), knee
airbag and head airbags
44 Copyright © 2009 Ford Motor Company of Southern Africa.Restraint System
Component Location
Safety belt buckle switch driver and passenger
1 Front impact sensor 8 side
Head airbag driver and passenger side
2 Front passenger airbag 9 (optional)
PAD (passenger airbag deactivation) switch Belt pretensioner in the retractor driver and pas-
3 (optional)
10 senger side
4 Seat occupant sensor passenger side only 11 PAD indicator light (optional)
5 Side airbag driver and passenger side (optional) 12 Driver airbag
Crash sensor driver and passenger side
6 (optional)
13 Knee airbag (optional)
Instrument cluster with airbag indicator light and
7 RCM (restraint control module) 14 safety belt warning light
Copyright © 2009 Ford Motor Company of Southern Africa. 45Restraint System
System operation and Component description
Control diagram
Airbag indicator light and safety belt warning
1 light in instrument cluster
9 PAD indicator light
2 Driver airbag 10 RCM (restraint control module)
3 Front passenger airbag 11 PAD deactivator switch
Driver and passenger belt pretensioner in the
4 retractor
12 Seat occupancy sensor (passenger only)
5 Driver and passenger side airbag 13 Safety belt buckle switch (front only)
6 Knee airbag 14 Crash sensor (front only))
7 Driver and passenger head airbag 15 Front impact sensor
8 PCM (power control module)
46 Copyright © 2009 Ford Motor Company of Southern Africa.Restraint System
System Operation
When the ignition is switched on, the RCM performs a self-diagnostic.
All components of the safety system, apart from the driver and passenger safety
belt buckle switches and the seat occupancy sensor, are checked. If a fault is
detected, the airbag indicator light is activated for 8 seconds after the ignition is
switched on. The first 8 seconds of the ignition cycle always follow the same
pattern: on for the first 3.2 seconds, the off for 4.8 seconds. Only after these 8
seconds can the airbag indicator light be used as a fault indicator.
Triggering of the airbags and belt pretensioners is dependent on the impact
speed and the impact angle.
In the normal situation the signal to the PCM is linked to a triggering of airbags.
However, in the event of a side-on collision with Version 1 (no side airbags), the
signal is likewise sent to the PCM, even though no airbags have been triggered.
The same applies in the event of a collision from behind: no airbags triggered,
but a signal is sent to the PCM. Due to this signal the PCM interrupts the fuel
supply to the engine so that the engine switches off.
The RCM must be renewed after the airbag has been triggered. When the
RCM is replaced, the module must be configured with IDS (Integrated
Diagnostic System).
Safety Belt Warning Indicator
The safety belt warning light is controlled by the RCM via the HS-Can (controller
area network) data bus. The following signals are evaluated by the module for
control purposes:
• Driver safety belt buckle switch,
• Passenger safety belt buckle switch,
• Passenger seat occupancy sensor,
• Vehicle speed signal via the HS-Can data bus.
Driver side function
When the ignition is switched on, the RCM checks by means of the safety belt
buckle switch to see whether the driver side safety belt is fastened.
If a road speed of approx. 25km/h has been reached and the safety belt is not
fastened, the safety belt warning lamp lights up and an audible signal is
sounded.
Copyright © 2009 Ford Motor Company of Southern Africa. 47Restraint System
Passenger side function
When the ignition is switched on, the module checks whether the passenger
seat is occupied by a person and whether this person is wearing a safety belt.
The seat occupancy sensor and the safety belt buckle switch pass this
information to the RCM.
If a road speed of approx. 25km/h has been reached and the passenger is not
wearing a safety belt, the safety belt warning lamp lights up and an audible
signal is sounded.
Deactivation/activation of the safety belt warning light
The safety belt warning light can be permanently deactivated. To do this:
• Turn the ignition switch to position “ll”,
• Within a period of 60 seconds, slowly close and reopen the safety belt
buckle nine times, then leave it open.
• The safety belt warning light flashes three times to confirm the status
change.
Component Description
Seat occupancy sensor
The seat belt occupancy sensor consists of several sensor cells and is
integrated into the foam structure of the passenger seat.
It recognizes whether a person is sitting in the passenger seat.
The sensor is used in vehicles which have a safety belt warning light.
It does not disable the passenger airbag.
The seat occupancy sensor is integrated into the seat cushion and is not
available as an individual part.
48 Copyright © 2009 Ford Motor Company of Southern Africa.Restraint System
Belt pretensioner in the retractor
1 Electrical connector 2 Ignition unit
The belt pretensioner is integrated into the retractor and installed on the driver
and passenger sides.
On the outside of the safety belt retractor there is a metal tube, at the upper end
of which a pyrotechnic igniter is located. It is connected with the metal tube via
joining connector.
Side airbag
Two different side airbags are installed depending on the equipment version.
In vehicles without a head airbag, there is a side airbag which protects the area
of the upper body and head.
In vehicles with a head airbag, there is a side airbag which protects the area of
the upper body.
Knee airbag
The knee airbag is installed in the instrument panel, below the steering wheel.
In the event of a head-on collision, it protects the knee and leg area and
prevents the driver from slipping down under the safety belt.
Copyright © 2009 Ford Motor Company of Southern Africa. 49Restraint System
PAD deactivator switch
Pad deactivatorswitch indicator light
1 PAD deactivator switch 2 switch unit
The PAD deactivator switch can be fitted as an option on all versions.
This feature is prepared at the factory and must be completed by the authorized
dealer.
A kit consisting of a deactivator switch (lock switch) and a switch panel with
integrated PAD indicator light is obtainable for this purpose.
The deactivator switch is installed in the glove box.
The switch panel with integrated PAD indicator light is fitted underneath the air
conditioning control unit.
After the components are installed, the RCM must be programmed with IDS.
The driver can operate the PAD deactivator switch with the vehicle key to
deactivate the passenger airbag.
When the passenger airbag is deactivated, the PAD indicator light comes on.
50 Copyright © 2009 Ford Motor Company of Southern Africa.Notes: Copyright © 2009 Ford Motor Company of Southern Africa. 51
www.fordabrc.co.za
You can also read