Destiny Library Manager - Essentials Webinar - Participant Guide
←
→
Page content transcription
If your browser does not render page correctly, please read the page content below

Destiny Library Manager
Essentials Webinar

                     Participant Guide
12001A v12.0

Destiny® Library Manager™
     Essentials Webinar

      Participant Guide

         Version 12.0

                          © 2014 Follett School Solutions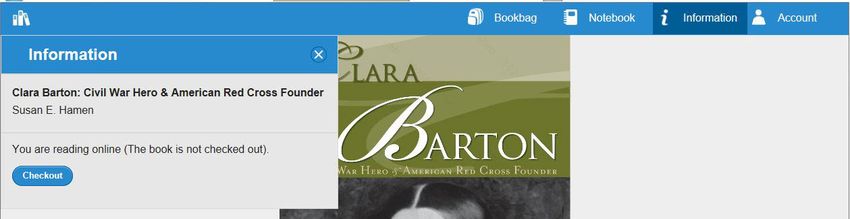
Participant Guide

Published by Follett Schol Solutions, Inc.
1391 Corporate Drive, McHenry, Illinois 60050-7041
Phone: (800) 323-3397 | Fax: (815) 578-5572
http://www.follettsoftware.com

© 2014 Follett School Solutions
All Rights Reserved.
Printed in the United States of America.

12001A v12.0
Special Notes to the Participants

Welcome to the Destiny Library Manager Essentials Webinar training.
This training introduces you to Library Manager and the fundamentals of
using the product.

During the training, please do not hesitate to ask questions. Your facilitator
may take notes to respond to questions later in the training when the related
topic arises.

We want you to be confident in your ability to use Destiny Library Manager,
and we know that this Essentials training simply opens the door to some of
the power of this product. Because we know that you’ll want to explore other
features and functionality as you grow more confident, we provide a number
of videos and quick reference guides for your product that are available
through the Videos and more… link in Destiny Help, as well as on Follett
Community. If you can’t find what you’re looking for, please don’t hesitate to
contact your Follett representative as additional trainings not yet posted may
be available to you and your school or district.

We’re delighted that you are a Follett customer, and we look forward to
providing you with the training, professional development, and services you
need to achieve success.

Who Should Take This?
Librarians, information technology personnel, and others assigned a role
using Library Manager.

                                                               © 2014 Follett School Solutions
© 2014 Follett School Solutions

Agenda

                     Description                       Participant Objectives

Introduction

Library Manager Overview                         ●● Access and navigate
                                                    Destiny Library Manager.
This module describes how to navigate
the software and access the Destiny Help         ●● Use on-page and online
System.                                             Help systems to locate
                                                    additional information.

Catalog Searches and Configuration               ●● Execute Basic and Power
                                                    searches.
The search features in Library Manager
accommodate all types of users in a library      ●● Conduct a Visual search.
or school, from early learners to power          ●● Perform a search in
users, through the Destiny Classic and              Destiny Quest.
Destiny Quest® search interfaces. This
module describes Library Manager’s Basic,        ●● Customize the catalog.
Power, and Visual search options. This
module also explains how to set up catalog
settings.

Circulation Loan Periods and Policies            ●● Create new and edit
                                                    existing circulation types.
Library policies define the circulation
periods for library materials and are based      ●● Create new and edit
on circulation types, patron types, and the         existing patron types.
library calendar, all of which work together     ●● Edit the library calendar.
to enable Library Manager to assign due
dates. This module explains how to set up        ●● Explain and set up
library loan periods and policies.                  appropriate Site
                                                    Configuration circulation
                                                    settings.

Circulation Basics                               ●● Circulate materials.

In addition to enabling library staff to check   ●● Change due dates.
materials out and in with ease, Library          ●● Explore patron and copy
Manager’s circulation features allow them to        information.
set special due dates and generate overdue
notices. The module also explores features
that allow library staff to gather information
on individual copies and patrons.

                                                                © 2014 Follett School Solutions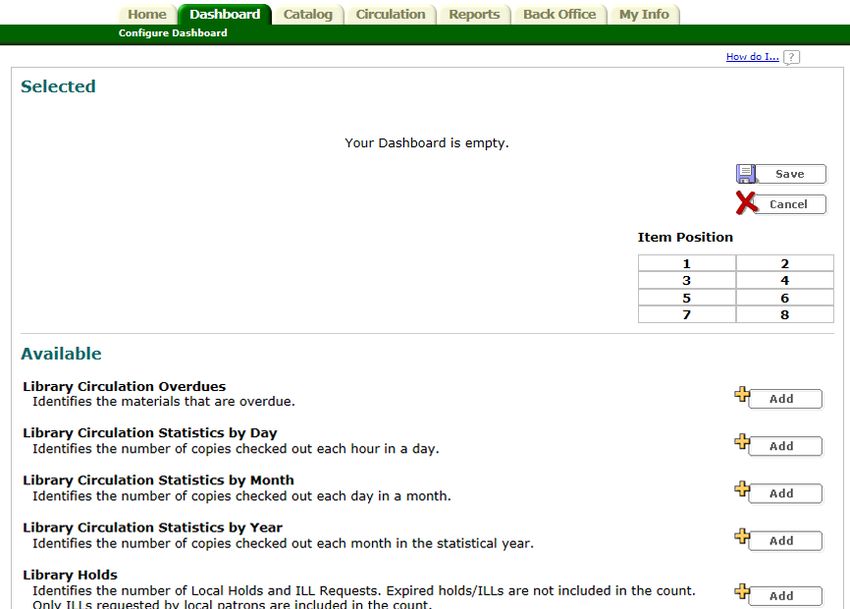
Description                  Participant Objectives

         Collection Management                           ●● Import title records
                                                            without creating
         One of the primary tasks in collection             duplicates.
         management and development is adding
         resources to the collection. This module        ●● Add titles by using
         explores methods for adding and importing          resource databases, such
         title and copy records to avoid creating           as Follett’s Alliance Plus®
         duplicate records, ensure accurate collection      Online database.
         reports, and enable patrons to find the
                                                         ●● Add copies to existing
         materials they need easily.
                                                            title records.

         Reports Overview                                ●● Generate Current
                                                            Checkouts/Fines
         Library Manager’s Reports feature offers           reports and notices.
         several options for gathering circulation
         information and tracking fines and other        ●● Understand how to find
         policy-related data. This module describes         other preformatted
         how to create reports that show current            reports that provide
         checkouts and fines and generate overdue           valuable information
         notices.                                           about library resources
                                                            and patrons.
                                                         ●● Configure the
                                                            Dashboard tab.
         Digital Content and EBooks                      ●● Describe how to set up
                                                            and use One Search.
         Patrons can use Destiny Library Manager
         to access digital content and eBooks.           ●● Identify the purpose
         They can use the One Search™ feature               of Digital Content
         to search multiple resources — including           Subscriptions.
         the library collection and online free and      ●● Discuss how to search
         subscription databases — simultaneously.
                                                            for and access Follett
         In addition, Follett offers various Digital
                                                            eBooks.
         Content Subscriptions. This module reviews
         these features and discusses setting up         ●● Understand how to set up
         and circulating Follett eBooks with Follett        Follett Shelf for your site.
         Shelf™, a virtual bookshelf that gives your
         patrons 24/7 access to eBooks.

© 2014 Follett School Solutions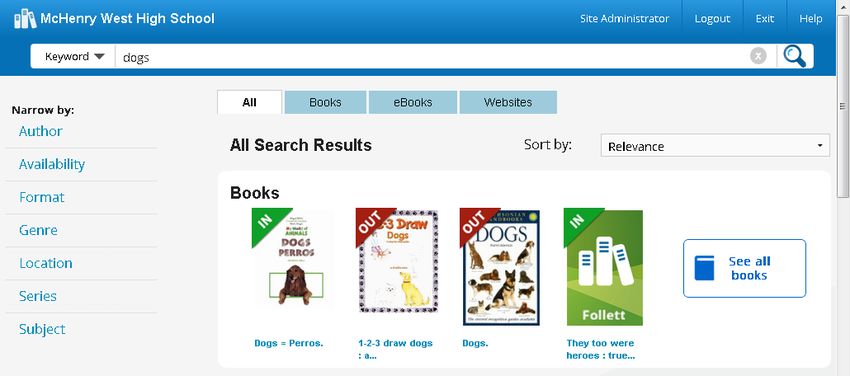
Contents
Library Manager Overview  � �������������������������������������������������� 1

Catalog Searches and Configuration ����������������������������������� 5

Circulation Loan Periods and Policies ������������������������������ 15

Circulation Basics ������������������������������������������������������������ 21

Collection Management ����������������������������������������������������� 27

Reports Overview �������������������������������������������������������������� 33

Digital Content and EBooks ���������������������������������������������� 37

Appendix A - Setting Up WebPath Express ������������������������ 45

Appendix B - Setting Up Reading Program
             Subscription Services ���������������������������������� 49

Appendix C - Setting Up the Standards Subscription
             Service  � �������������������������������������������������������� 55

Resources ������������������������������������������������������������������������� 57

Course Survey  � ������������������������������������������������������������������ 59

                                                                    © 2014 Follett School Solutions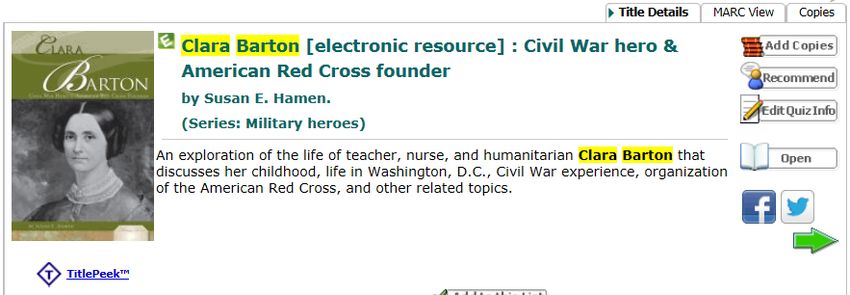
© 2014 Follett School Solutions
Module
                   Library Manager Overview
 1

  Learning Objectives
  As a result of completing this module, you should be able to:
  ●● Access and navigate Destiny Library Manager.
  ●● Use on-page and online Help systems to locate additional information.

  Getting Started
  This module describes how to navigate the software and access the Destiny
  Help System.

  Logging in
  You may want to make a note of Destiny’s URL, or web address, and create
  either a bookmark or shortcut for future access.

  To log in, first select your site name hyperlink. Then click the Login button in
  the upper right corner. When the login screen appears, enter your username
  and password. If Library Manager is the only Destiny product your site uses,
  the login screen appears immediately.

  Any user of Destiny Library Manager is a patron. The patron who logs in
  to the system has access to a range of features and functionality. A patron
  who does not log in to the system is called a Guest and has access to basic
  functionality only, such as searching the catalog.

                                          1
                                                                  © 2014 Follett School Solutions
Navigating
Breadcrumbs Tabs
Subtabs
Options
Tabs identify the five major functional areas of Library Manager:
Dashboard, Catalog, Circulation, Reports, and Back Office.
●● The Dashboard provides a quick graphical or textual view of the most
current circulation statistics, as well as holds and overdue materials
information.
●● The Catalog tab allows you to search for, add, and update item records.
●● The Circulation tab allows you to check items out and in, place holds and
request interlibrary loans (ILLs), and assess fines.
●● The Reports tab enables you to generate preconfigured and customized
reports.
●● The Back Office tab enables administrative tasks such as setting up loan
policies, managing patron records, and conducting inventory.
Options are the functions associated with each tab. The list of options
changes as you select a different tab.
Subtabs are additional functions of a particular option. Some options have
multiple subtabs. Selecting a subtab takes you to a new screen and a
different function.
Breadcrumbs indicate the path of tabs and subtabs you have navigated. It
is important to use the breadcrumbs to back out of a function because using
the browser back arrow may log you out of Destiny.
2
© 2014 Follett School SolutionsDestiny Help System
The Destiny Help System allows you to locate information on hundreds of
topics. The real-time information is hosted on a Follett server and is updated
regularly.
On-page Help allows you to locate information regarding the screen/page or
a specific field that displays currently.
Online Help allows you to locate information on any topic, regardless of
which screen or page displays currently.
In addition to Library Manager’s Help System, eLearnings on many topics are
available when you log in to the Customer Portal on Follett’s Home page at
http://www.follettsoftware.com. You can find instructions for accessing the
eLearnings at the back of this guide.
3
© 2014 Follett School Solutions4 © 2014 Follett School Solutions
Module
                  Catalog Searches and
 2                Configuration

  Learning Objectives
  As a result of completing this module, you should be able to:
  ●● Execute Basic and Power searches.
  ●● Conduct a Visual search.
  ●● Perform a search in Destiny Quest.
  ●● Customize the catalog.

  Getting Started
  The search features in Library Manager accommodate all types of users in
  a library or school, from early learners to power users, through the Destiny
  Classic and Destiny Quest search interfaces. This module describes Library
  Manager’s Basic, Power, and Visual search options. This module also explains
  how to set up the catalog settings.

  Basic Searches
  The default Basic search function allows patrons to use simple search terms
  or phrases to locate materials and to set limiters to narrow their search
  results. Its buttons provide the ability to perform five types of searches:
  Keyword, Title, Author, Subject, and Series.

  A Keyword search displays the largest number of titles in the search results
  as it searches all title, author, subject, series, and note tags (fields of
  information) in the district’s MARC (title) records.

                                          5
                                                                  © 2014 Follett School Solutions
Power Searches
A Power search is a more complex search interface that allows patrons to
use Boolean operators and additional limiters to perform a more precise
search.
Boolean operators are words that link search terms to broaden or narrow
search results. These operators are AND, OR, and NOT.
A limiter is a means of limiting a search to a particular field or fields.
6
© 2014 Follett School SolutionsLimiting a Search
Both the Basic and Power search options let patrons limit their search to a
particular Location, Material Type, Reading Level, and other limiters.
Library Manager limiters:
●● Location (available in Basic and Power search) allows patrons to narrow the
search to materials owned by their school, the entire district, or a group of
schools (such as all elementary, middle, or high schools).
●● Material Type (available in Basic and Power search) allows patrons to
narrow the search to a specific material type, such as Book or Video.
●● Publication Year (available in Power search) allows patrons to narrow the
search to any material published during a specific year or range of years.
●● Call Number (available in Power search) allows patrons to narrow the list of
search results to a specified call number range.
●● Circulation Type (available in Power search) allows patrons to narrow the
search to materials that share a particular circulation type. The default is All
Circulation Types; click the Update button to limit the search to one or more
of the eight types listed, such as Reference, Audiovisual, and DVDs.
●● Award Winner (available in Basic and Power search) allows patrons to
narrow the search to award-winning materials by selecting Literary Prizes
or a specific state from the drop-down list. Once patrons select one of those
options, they refine the search further by selecting a specific award. The
Destiny Administrator must enable this limiter on the Edit District screen.
Destiny updates the list of award winners automatically once a month.
●● Reading Level (available in Basic and Power search) allows patrons to
narrow the search to books that are not too easy or too hard for them to
read. Patrons can enter values between 0.1 and 20.0 in one or both fields.
●● Interest Level (available in Basic and Power search) allows patrons to
narrow the search to books that should interest students in a particular grade
level. Patrons must select grade levels in both the From and to fields.
●● Reading Programs (available in Basic and Power search) allows patrons
to narrow the search to books that match particular reading levels from the
Accelerated Reader®, Reading Counts!® , Lexile®, or Fountas and Pinnell
Reading Programs based on reading levels and point values. This feature is
available only with a Reading Program Service Digital Content Subscription.
The Online Resources checkbox (available in Power search) allows patrons
to include the library’s online resources in a search. Selecting this function
opens a list of available resources to choose from. Online Resources are
automatically included in a Basic search. This function is available if One
Search is enabled.
7
© 2014 Follett School SolutionsVisual Search
Destiny’s Visual search feature allows patrons to click on a series of pictorial
buttons to search for resources instead of entering search terms.
Visual searches use two types of buttons: group and search (or URL)
buttons. Click on the Visual subtab to display the group buttons. Group
buttons represent broad topics to help guide patrons toward a particular area
of interest. Clicking on a group button displays the search buttons. When
patrons click a search button, the Search Results screen opens and shows
a list of the resources in the library’s collection that match the search topic.
8
© 2014 Follett School SolutionsSearch Results
Search results are organized by material type in subtabs on the Search
Results screen.
The Titles subtab lists materials in your library that match the search term.
This includes Follett eBooks.
The Digital Resources subtab lists videos, pictures, or sound files from a
digital provider.
The Web Sites subtab lists the websites that have information about
the search term. This tab is only available to sites with a subscription to
WebPath Express™.
The One Search subtab lists resources in your online databases.
Searching with Universal Search
Universal Search, an interface in Destiny Library Manager, makes it easy
to find resources in your library’s entire catalog with one quick search. You
can do one search and find everything from eBooks to print materials to
digital resources from One Search, Webpath Express, and your subscription
databases. See the Videos and more… link in Destiny Online Help for more
information.
9
© 2014 Follett School SolutionsSearching With Destiny Quest
Destiny Quest is a highly graphical search interface included with Destiny
Library Manager. It engages K–12 students and helps them easily locate
appropriate library materials that meet their classroom needs and personal
interests.
Access Destiny Quest by clicking on the Destiny Quest option on the
Catalog tab. The Destiny Quest Home page contains The Top 10 Books,
Resource Lists, and New Arrivals.
To access Destiny Quest, a workstation must have the following:
●● One of these browsers—Microsoft Internet Explorer version 7 or higher, Apple
Safari, Mozilla Firefox, or Google Chrome.
●● Monitors with a minimum screen resolution of 1024 x 768.
Quest’s Simple Search function allows patrons to enter a keyword search
term in the Find field and select Go! to locate library materials. Patrons can
access Simple Search within every main link in Destiny Quest: the Find field
appears at the top of each screen.
10
© 2014 Follett School SolutionsThe Advanced Search feature in Destiny Quest is comparable with the Power
search in Destiny Classic. It allows patrons to use Boolean operators (AND,
OR, NOT) to narrow or expand searches, but in Destiny Quest, patrons add
another limiter line to indicate AND and fill in a But I don’t want field to
indicate NOT.
Visual Search in Destiny Quest functions in the same manner as it does in the
Classic Catalog and uses the same predefined groups and searches. Clicking
the Visual Search link opens the Visual Search window.
11
© 2014 Follett School SolutionsCatalog Configuration Options
You can customize the way your catalog displays by navigating to the Site
Configuration option, Back Office tab, Catalog subtab.
The customization options include the following:
Destiny Quest Options…
●● Default theme for Destiny Quest: You can select the default theme for
Destiny Quest. Guests and logged-in patrons still have the ability to change
the theme they see. If a logged-in patron selects a different theme, the last
theme they selected appears when they log in again.
●● Show patron pictures in MyQuest: If pictures are attached to patron
records, this setting displays or hides them when patrons use the Friends
feature in MyQuest.
Language Support…
These options allow your patrons to choose to view select screens in Destiny
in French or Spanish. After you save the configuration, the options appear as
buttons on the Catalog tab under the option menu. In this section, you can
also choose the default language for select pages.
Library Title Display Settings…
Library Reviews: Select the format for displaying the reviewer’s name on
reviews or choose to hide the reviewer’s name.
Quiz/Level Based Searches…
These five settings allow patrons to limit their searches by a particular
reading program and reading/interest level, if this information is in the MARC
record.
12
© 2014 Follett School SolutionsSearch Settings…
●● Enable search suggestions in Destiny Quest: This setting turns on the
Auto-suggest feature in Destiny Quest.
●● Filter search suggestions: This setting allows you to enter specific words
that you do not wish to appear in the Auto-suggest drop-down list. It does
not stop the patron from using the word as a search term, but it does
prohibit others from seeing it in the list.
●● By default, show limiter options in Basic Search: When enabled, this
setting displays all the limiter fields on the Basic search screen.
Top 10 Titles
This setting displays the top 10 titles that circulated in the library in the
past thirty days. You may choose to have Library Manager only count titles
checked out by students, particular material types, or call number ranges.
13
© 2014 Follett School Solutions14 © 2014 Follett School Solutions
Module
                    Circulation Loan Periods
 3                  and Policies

  Learning Objectives

  At the end of this module, you should be able to:
  ●● Create new and edit existing circulation types.
  ●● Create new and edit existing patron types.
  ●● Edit the library calendar.
  ●● Explain and set up appropriate Site Configuration circulation settings.

  Getting Started
  Before setting up your patron and circulation types, you should gather the
  following information:
  ●● A list of patron groups, such as students, faculty, staff, parents, and
     volunteers. This is the list of patron types.
  ●● A list of circulation periods for the different types of materials in the library
     collection. This is the list of circulation types, which in some cases may be
     based on patron type. Your list might look something like this:

         Material             Students               Faculty             Substitutes

  Regular                     2 weeks               90 days               2 weeks

  Overnight                       1 day             2 weeks                1 day

  Audiovisual                 1 week                30 days               2 weeks

  ●● A copy of the library policy handbook or a list of the circulation policies for
     the library.
  ●● The library calendar.

                                             15
                                                                        © 2014 Follett School Solutions
Circulation Types
Once you identify your patron types and the loan policies for the types of
materials in your collection, you are ready to set up those policies in Library
Manager. To do so, select the Back Office tab and the Library Policies
option. Select the Circulation Types subtab to edit these policies.
Library Manager assigns the default circulation type to any new copies you
add. Click the Edit icon to make any changes to a circulation type. To add a
new circulation type, click the Add Circulation Type button. Make decisions
on the following options:
Loan Period: period of time patrons are allowed to keep library materials.
You can customize these for different patron types.
Grace Period: number of days a checkout is not yet considered overdue and
for which a fine is not calculated.
Renewable: number of times a patron can renew a particular item before
Library Manager blocks the transaction.
Fine Increment: amount incurred for each open day that a checkout is
overdue.
Max Fine: upper limit or cap of a fine. In addition, Library Manager can
automatically charge a fine to a patron based on the purchase price in the
copy record when a checked out copy is marked lost. If a purchase price is
missing, Library Manager assesses the max fine.
Overdue to Lost Days: number of days library material can be overdue
before the copy status changes automatically to lost.
16
© 2014 Follett School SolutionsPatron Types
After editing the settings for circulation type, select the Patron Types
subtab under the Back Office tab, Library Policies option to edit these
additional library loan policies.
The Library Manager installation provides two preset patron types: Faculty
and Student (the latter is the default patron type). To edit the policies for
one of the patron types, select the Edit icon to its right and make decisions
on the following options.
Max Checkouts: number of copies of all circulation types a person of this
patron type can check out at any time.
Max Holds: maximum number of holds a patron can place at one time.
Ready Holds Expire in days: number of days an available copy is held
for a patron until it is released for the next patron in the hold queue or
placed back on the shelf for circulation to others.
Pending Holds Expire in days: number of days a patron hold remains
active in the hold queue.
Default Hold Priority: order of patrons in the hold queue.
Block check outs and renewals if the patron has fines or overdue
items: Library Manager alert that blocks checkout of additional items when a
patron owes fines or has overdue materials. You can override the block.
17
© 2014 Follett School SolutionsCirculation Site Configuration Options
You can customize your circulation options through the use of the Site
Configuration option on the Back Office tab. The customization options
below appear on the Circulation subtab.
Allow library materials to circulate to all patrons in the district:
enables interlibrary loans with other sites or schools (for district installs
only).
Calculate library loan periods based on calendar/open days (offers two
options):
●● Calendar: This setting calculates due dates according to the calendar,
including weekends, holidays, and any other library closed days in the loan
period. This setting works hand-in-hand with the Loan Period setting in
Library Policies.
●● Open: This setting calculates due dates based on open days in the Library
Manager calendar only. It does not count closed dates such as weekends and
holidays as part of the loan period. The patron has a due date of x number
of open days. For example, if your library is open five days a week and you
want to set a two-week loan period, set the loan period to ten days, not
fourteen days.
Note: If a calculated due date falls on a closed day, the due date moves to
the next open day.
18
© 2014 Follett School SolutionsDisplay patron pictures: This option displays patron pictures by default in
circulation functions.
Preferred Barcode Symbologies: Destiny can assign barcode numbers to
library materials and patrons automatically, and this option tells Destiny the
symbology you are using or plan to use.
Customize User-Defined Patron Field Names: This option allows you to
name the user-defined patron fields and select whether any user-defined
fields display in circulation functions.
Library Calendar/Hours
It is important to update the Library Manager library calendar regularly as
Library Manager uses it to assign due dates, calculate fines, manage holds,
and report circulation statistics. To ensure that Library Manager’s calculations
are accurate, you should mark closed dates for the entire school year, either
at the end of the previous school year or the first day you return at the
beginning of the new school year.
Closed dates are marked “Closed” and highlighted in gray. If an unscheduled
closed day occurs (due to bad weather, for example), you can mark the date
closed retroactively when school opens again. Upon returning to school,
simply select the Back Office tab, Calendar Hours option and click on all
dates the school was unexpectedly closed. While the due dates for checked-
out items do not change, Library Manager does not assess fines for items due
on the dates you close retroactively. Library Manager counts only open days
when calculating fines.
19
© 2014 Follett School Solutions20 © 2014 Follett School Solutions
Module
                   Circulation Basics
 4

  Learning Objectives
  At the end of the module, you should be able to:
  ●● Circulate materials.
  ●● Change due dates.
  ●● Explore patron and copy information.

  Getting Started
  In addition to enabling library staff to check materials out and in with ease,
  Library Manager’s circulation features allow them to set special due dates
  and generate overdue notices. The module also explores features that allow
  library staff to gather information on individual copies and patrons.

                                         21
                                                                  © 2014 Follett School Solutions
Checking Out
To check out library materials to patrons, click the Circulation tab. By
default, the Check Out option is selected.
You have two checkout choices:
●● To Patron subtab: Use this subtab to check out items to individual patrons.
●● By Homeroom subtab: Use this subtab to check out items to students using
the library during class time.
Checked Out and Items Out Sections
Checked Out section—identifies the last copy checked out during a
circulation session
Items Out section—lists all copies checked out to a particular patron
22
© 2014 Follett School SolutionsChanging Due Dates
Select the Change icon under the Checked Out section on the Check Out
screen.
Checking In
The Check In option looks similar to the Check Out option, but you do not
check in items by patron as you do with the Check Out option—you check in
by item only. Recently checked in items appear in the Most Recently Checked
In section. This section is helpful for confirming items were checked in. The
list holds the 10 most recent checkins.
●● Record in-library use checkbox—This option counts in-library use of
materials that are not officially checked out (e.g., reference books).
●● Create Fine button—This button allows you to assess a fine for a damaged
book immediately after checking in the item.
23
© 2014 Follett School SolutionsCopy Status
The Copy Status option displays information about a particular copy,
including current and previous checkout information. In addition, on this
screen, you can edit the copy record, add a hold, mark the copy lost, print
new barcode labels, or add a note to the copy record.
From the Check In screen, click the copy barcode number of an item
recently checked in to open the Copy Status screen. You can also access
Copy Status information by clicking on the Copy Status option and
scanning the barcode or typing the name or barcode of a title.
24
© 2014 Follett School SolutionsPatron Information
The patron information section is in the top portion of the Check Out
screen. In the patron information section of the Check Out screen, you
can perform the following tasks.
●● View patron information
▪▪ Click the patron’s barcode hyperlink to display the Patron
Status screen.
●● Manage fines
▪▪ Click the Fines link to display any fines for this patron, create or
waive fines, or mark them as paid.
●● Print a patron transaction receipt
▪▪ To print a receipt showing all transactions, select the Receipt
button. To print just the daily transactions, click on the Only
today’s check outs checkbox. After you make your selection, a
new window containing the transaction information opens.
Note that you can also view the patron’s homeroom from the patron
information section of the Check Out screen.
25
© 2014 Follett School Solutions26 © 2014 Follett School Solutions
Module
                    Collection Management
 5

  Learning Objectives
  At the end of this module, you should be able to:
  ●● Import title records without creating duplicates.
  ●● Add titles by using resource databases, such as Follett’s Alliance Plus Online
     database.
  ●● Add copies to existing title records.

  Getting Started
  One of the primary tasks in collection management and development is
  adding resources to the collection. This module explores methods for adding
  and importing title and copy records to avoid creating duplicate records,
  ensure accurate collection reports, and enable patrons to find the materials
  they need easily.

  Importing Titles Records
  When your library receives a book order from a publishing firm that provides
  MARC and copy records, performing a title import is the most efficient way to
  add the title and copy records to Library Manager.

                                             27
                                                                     © 2014 Follett School Solutions
To import the records, select the Catalog tab, Import Titles option. The
Import Titles screen contains four sections:
Title Matching
Before importing a title record, Library Manager checks to see whether it is
a duplicate (or match) of a record already in the district’s collection. In the
Title Matching section, you set up how you want Library Manager to handle a
match: retain the existing record or replace it with the incoming record.
The Strict option (recommended) performs the most comprehensive check
to avoid creating duplicate MARC or bibliographic records. When using the
strict matching rules, Library Manager determines that an incoming record
is a duplicate of an existing record if the two records share all the following
information:
●● A standard number—LCCN, ISBN, or ISSN
●● First 150 characters of the title (Field 245_a)
●● Material type (e.g., video, book, sound recording)
●● Material type subtype (if present)
●● First 20 characters of the author’s name (Fields 100, 110, or 111) (if
present)
Note: Library Manager ignores the author field if the Remove the author
requirement checkbox is selected.
●● Publication date (if present)
Copy Matching
Library Manager next determines whether an incoming copy is a duplicate of
one in the library’s collection by comparing barcode numbers and site names.
●● Skip the incoming copy if its barcode matches an existing copy’s
barcode—The import summary report provides information you need to
investigate why a barcode number in the vendor import file matches one
already in the collection.
●● Replace the existing copy with the incoming copy if the barcodes and
the titles match—updates the information in the existing copy records.
●● Always add the incoming copy record and assign it the next available
barcode—ignores barcode numbers in incoming records and assigns new
ones to every incoming copy. Use this option when the vendor hasn’t
assigned barcode numbers.
28
© 2014 Follett School SolutionsAssign Copy Information
If all the imported copy records are for one site (library), you can add the
following information to copy records if it is missing: circulation types, copy
categories, sublocations, vendors, and funding sources.
Import File
The Import File section provides options to select the import file, add the
imported titles to a resource list, limit the Job Summary, and preview the
import before completing it.
Importing MARC Records From Follett Titlewave®
Titlewave is a collection development and curriculum support tool available
from Follett. It offers access to purchase more than 1 million K–adult books,
eBooks, and high-quality, curriculum-focused audiovisual materials for PreK–
12 schools.
Titlewave is integrated in Destiny and is accessible to the Site Administrator
by default. Access is controlled by the Access to Titlewave permission.
You can access Titlewave order history by navigating to the Titlewave
option, Order History subtab.
29
© 2014 Follett School SolutionsClicking the Import button on the Order History screen takes you through
the import process just discussed. Destiny selects the correct file based on
the Import button clicked. Once you import the file, the Import Date and
Download Date columns are populated on the Titlewave Details screen.
For more information on Titlewave, visit the Titlewave website at
http://www.titlewave.com/.
Adding Titles With Records From Resource Databases
If the title you wish to add does not have a district record, it may have a
title record in Follett’s Alliance Plus Online database, which contains more
than 8 million MARC records. Using an Alliance Plus Online database record
saves time by eliminating the need to create a record manually. To avoid
duplication, it is important to search for the item before adding a new title to
the database.
30
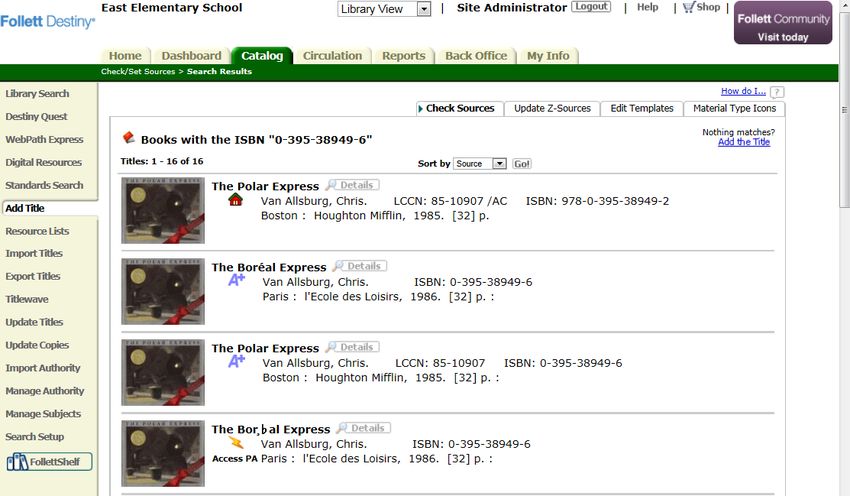
© 2014 Follett School SolutionsThe house icon represents a title record that already exists in the district’s
collection in Library Manager.
The A+ icon represents a title record in Follett’s Alliance Plus Online
database. If no matching title exists in Library Manager, use this source.
The lightning bolt icon represents a title record located in a library database
that was set up as a Z-Source in your software.
Adding Copies
To add copies to an existing district record, click on the title or its Details
button. The Title Details screen opens with additional information about the
item. Select the Add Copies button to add a copy to this record.
The steps for using resource databases are basically the same as adding a
copy to an existing district record.
31
© 2014 Follett School SolutionsAdding a Title Record Manually
When electronic sources don’t provide the correct record, or any record at
all, for an item you are adding to the collection, you may need to create a
record manually by using Library Manager’s Easy Editor or MARC Editor. For
more information on manually adding a title record, refer to on-page Help.
32
© 2014 Follett School SolutionsModule
Reports Overview
6
Learning Objectives
At the end of the module, you should be able to:
●● Generate Current Checkouts/Fines reports and notices.
●● Understand how to find preformatted reports that provide valuable
information about your library resources and patrons.
●● Configure the Dashboard tab.
Getting Started
Library Manager’s Reports feature offers several options for gathering
circulation information and tracking fines and other policy-related data. This
module describes how to create reports that show current checkouts and
fines and generate overdue notices.
Current Checkouts and Fines Report
The Current Checkouts/Fines report helps you track unresolved
transactions in your library. The report can include checkouts, overdue
copies, and fines. You have the option to run reports or notices.
33
© 2014 Follett School SolutionsDepending on how you format, limit, and sort a report, you can generate
reports on the following:
●● Patrons with overdue copies and outstanding fines, grouped by homeroom.
●● Graduating patrons with any checkouts, grouped alphabetically by patron
name.
●● Only patrons with outstanding fines.
Depending on how you limit the patrons and materials, you can generate the
following notices:
●● Overdue notices
●● Fine notices
●● Bills for books presumed lost
You can choose to distribute notices internally, by mail, or by email. You
also have the option to address the notice To the Parent or Guardian of:
Patron’s Name.
34
© 2014 Follett School SolutionsOther Reports
In addition to the Library Manager’s preformatted reports, Report Builder
enables the creation of custom reports. Visit online Help or the eLearnings
for more information on custom reports.
Dashboard
Navigate to the Dashboard tab.
If you have the appropriate access level permissions, you can personalize the
Dashboard with graphical, at-a-glance views of data as well as with a variety
of your most commonly used reports in Library Manager.
Click the Configure button to add and remove reports from your Dashboard
or to rearrange their order. If you have Destiny® Textbook Manager™ or
Destiny® Asset Manager™, the Dashboard can integrate those reports as
well.
35
© 2014 Follett School Solutions36 © 2014 Follett School Solutions
Module
                   Digital Content and EBooks
 7

  Learning Objectives
  At the end of the module, you should be able to:
  ●● Describe how to set up and use One Search.
  ●● Identify the purpose of Digital Content Subscriptions.
  ●● Discuss how to search for and access Follett eBooks.
  ●● Understand how to set up Follett Shelf for your site.

  Getting Started
  Patrons can use Destiny Library Manager to access digital content and
  eBooks. They can use the One Search feature to search multiple
  resources — including the library collection and online free and
  subscription databases — simultaneously. In addition, Follett offers various
  Digital Content Subscriptions. This module reviews these features and
  discusses setting up and circulating Follett eBooks with Follett Shelf, a virtual
  bookshelf that gives your patrons 24/7 access to eBooks.

  One Search
  One Search allows patrons to search multiple resources, including the library
  collection and online free and subscription databases, simultaneously.
  ●● A Basic search searches these resources automatically. The One Search
     results are available on the One Search subtab.
  ●● To access One Search results in a Power Search, click on the Include Online
     Resources checkbox. Then select the databases you want to include or
     choose Select All. Click Search.

  Note: Destiny automatically sets up over 15 preloaded databases for
  customers who activate One Search for the first time.

                                          37
                                                                   © 2014 Follett School Solutions
Before patrons can access One Search, the Destiny Administrator or Site
Administrator must activate the service and assign the appropriate access
levels and permissions. On the Follett Customer Portal are eLearnings on
setting up and using One Search.
Digital Content Subscriptions
Follett’s Digital Content Subscriptions provide access to curated, standards-
aligned content and tools to integrate digital resources with physical
materials.
Available Digital Content Subscriptions include the following:
●● WebPath Express provides today’s K–12 kids with a safe, fun, and familiar
search tool that integrates trustworthy, relevant websites into your library
catalog while filtering out questionable content. You can limit WebPath
Express website searches to specific grade levels.
●● Follett’s Reading Program Service enhances your library records with
reading program information for Accelerated Reader, Reading Counts!, Lexile,
Fountas and Pinnell and other popular reading programs.
●● Follett’s Standards subscription automatically aligns your library resources
and educator-reviewed websites with national and state standards, helping
you find appropriate materials by using fast and convenient searching
options.
●● TitlePeek™ is a subscription service that displays the book cover in the
search results along with varied additional content, such as the title profile,
table of contents, brief summary, author notes, first chapter or excerpt, and
published reviews. Books in your collection are matched with TitlePeek by
means of their ISBN numbers.
Instructions for activating these Digital Content Subscriptions appear in
the Appendix of this guide. More information on these services and other
subscription services is available on the Follett website.
FollettShelf
Follett Shelf is a hosted virtual bookshelf that provides access to eBooks
purchased through Follett. Destiny Library Manager has a seamless interface
with Follett Shelf, allowing users to search for eBook titles in the same
manner as any other titles in Library Manager
With Destiny Library Manager and Follett Shelf, you can:
●● Discover Follett eBooks from within Destiny, including Destiny Quest on
mobile devices.
●● Share Follett eBook content across your Destiny district.
●● Provide direct single sign-on access to Follett Shelf from Destiny.
●● Access Follett Shelf administration functions, including comprehensive usage
reporting, from within Destiny.
38
© 2014 Follett School SolutionsSearching for and Accessing Follett eBooks
You can search for Follett eBooks in the same way you search for other
library materials. To use a Basic or a Power search to search for eBooks in
Destiny Classic:
1. Navigate to the Library Search screen.
2. Enter a search term in the Find field.
3. Select any limiters to narrow your search.
●● To limit your search to Follett eBooks, select Electronic Book (eBook)
from the Material Type drop-down list. Select the Limit to Follett eBooks
checkbox that appears.
●● To search for all types of materials, including eBooks, select Any Type from
the Material Type drop-down list.
4. Select one of the following search buttons to begin your search: Keyword,
Title, Author, Subject, or Series.
After performing a search, Follett eBooks display on the Titles subtab of the
Search Results screen. The green eBook icon indicates that the Material
Type is a Follett eBook.
39
© 2014 Follett School SolutionsIn a search results list, Follett eBooks display as In, Out, or Unlimited
copies. If an eBook is Out, you cannot open or check it out. Users with the
appropriate permissions can place a hold on the eBook once they open it in
Follett Shelf.
Clicking the Details button brings you to the Title Details screen in
Destiny.
Clicking the Open button from the search results list or from the Destiny
Title Details screen opens the eBook.
40
© 2014 Follett School SolutionsPatrons can read the eBook online or check out the eBook. The options
available depend on the configuration of access levels in Follett Shelf:
●● Reading the book online is real time. It compares with a student taking
a reference book off the shelf. When a patron closes the eBook, it is
immediately available for other students to use:
▪▪ Patrons can read Follett eBooks online for short-term use (e.g.,
research, preview a title).
▪▪ The patron has exclusive use of the eBook as long as it is in active
use. When the patron closes the eBook, it becomes available to other
patrons. If the eBook allows unlimited access, multiple patrons can
access the book simultaneously.
▪▪ If another patron wants to access an open eBook and no other copies
are available, this patron gets a message that the eBook is not
available.
▪▪ If a patron does not perform any activity within the book for 15
minutes, the eBook is made available to other patrons.
●● Checking out the eBook allows access to eBooks for an extended period
anywhere patrons have access to Destiny. It provides patrons with exclusive
use of the eBook for the duration of the loan period or until it is returned:
▪▪ When a patron selects the Checkout option, the book is placed in the
patron’s Bookbag in Follett Shelf and in My Info in Destiny.
▪▪ If a patron does not return the book, the book is automatically
checked in at the end of the loan period.
To check out an eBook, click the Checkout button on the Information screen.
Once a patron checks out an eBook, he or she can continue to read the
eBook or close it and access it later from the My Info tab in Destiny or the
Bookbag icon in Follett Shelf.
The Follett Enlight™ eReader delivers one consistent reading environment,
whether you or your students are reading from a desktop, tablet, or
smartphone. It also allows students to highlight and make notes.
41
© 2014 Follett School SolutionsTo choose Follett Enlight as your preferred eReader:
1. Click on your username in the top right corner of the screen.
2. Select Preferences from the drop-down menu.
3. Choose Follett Enlight (Cloud) for reading eBooks online or Follett
Enlight (App) for reading checked-out eBooks offline.
More information about the functionality of Follett Enlight and accessing
Follett eBooks from a mobile device is available in the Destiny Help system
and from www.follettshelf.com.
You can also search for and access eBooks from Destiny Quest and the
Destiny Quest Mobile app.
42
© 2014 Follett School SolutionsSetting Up Follett Shelf
Before patrons can access Follett Shelf from Library Manager, it must be set
up at your site. If you want your patrons to access your Follett eBooks from
Destiny, you can set up your Follett Shelf to authenticate patrons with patron
information in Destiny. If you do so, you do not have to maintain a separate
set of patron accounts in Follett Shelf. Detailed instructions for setting up
your site can be found in the Destiny Help system by clicking the Follett
Shelf button and selecting the Set up Follett Shelf link.
You can change guest and patron access levels in Follett Shelf by clicking the
Tools button, Setup option. Then click the Access Levels option.
To access Follett eBook loan policies, click the Tools button, Setup option.
From this screen, select the Policies option. As patrons access Follett
eBooks, the patron type assigned to them in Destiny is added to Follett Shelf,
and the default setting for the eBooks Circulation Type is assigned. You can
limit access to certain eBooks by setting up the appropriate Patron Types and
Circulation Types.
43
© 2014 Follett School Solutions44 © 2014 Follett School Solutions
Appendix A - Setting Up WebPath
Express

WebPath Express
Enabling WebPath Express (Site Administrator must complete)

1. From the Back Office tab, select the Site Configuration option.

2. Click the Site Info subtab.

3. Confirm that the Site Customer Number is entered and correct.

4. Select the Use WebPath Express checkbox, and then click Save.

                                     45
                                                              © 2014 Follett School Solutions
Setting Up Access Levels
Once WebPath Express is activated, you need to enable the appropriate
permission for your patrons to search WebPath Express:
1. From the Back Office tab, select the Access Levels option.
2. Click the Edit button next to the access level you are editing.
3. Select the Search WebPath Express option under the Library Catalog
Search Access section.
4. Select the Submit WebPath Express permission to allow the access
level to submit suggestions on the types of topics they want to include
in WebPath Express. It is advisable to enable this permission only for
librarians, staff, and teachers.
Note: Your Destiny administrator must set up the SMTP (mail) server for
the submit-a-suggestion link to appear.
46
© 2014 Follett School SolutionsConfiguring WebPath Express
You can customize WebPath Express to limit the list of websites appropriate
for certain grade levels by following the steps below:
1. Log in to the site as the Site Administrator.
2. From the Catalog tab, select the Search Setup option.
3. Select the Enriched Content Searches subtab.
4. Select the Edit icon adjacent to WebPath Express Settings.
5. To limit the websites that appear in the search results to those suitable
for a grade level, select the appropriate group checkboxes from the Grade
Level list. To allow patrons the option to view all relevant sites regardless
of grade level, select the Allow students to view all websites checkbox.
6. Click Save to save your changes.
You can choose to display or hide the monthly themes and Spotlight in
WebPath Express:
1. Log in as the Site Administrator.
2. From the Back Office tab, select the Site Configuration option.
3. Locate the WebPath Express Options... section, and select or deselect
the Show WebPath Express monthly themes and Spotlight option.
4. Click Save. A dialog box opens confirming the change.
47
© 2014 Follett School Solutions48 © 2014 Follett School Solutions
Appendix B - Setting Up Reading
Program Subscription Services

Accelerated Reader or Scholastic Reading Counts!
To Activate the Accelerated Reader or Scholastic Reading Counts! Reading
Program Service (Site Administrator must complete):

1. From the Back Office tab, select the Site Configuration option.

2. Click the Site Info subtab.

3. Confirm that the Site Customer Number is entered and correct.

4. Select the Use Reading Program Service (RPS)—AR/RC checkbox.

5. If you have an Enterprise subscription, select
   Enterprise subscriber.

6. In the Days between  updates field, enter a
   number between 1 and 99.

7. Click the Save button at the top of the screen.

                                      49
                                                             © 2014 Follett School Solutions
If you have an Enterprise subscription, Destiny adds permanent reading level
and quiz information automatically to MARC (title) records that are in the
reading program. After that, Destiny updates the information automatically
based on the frequency chosen. You can update the information manually by
clicking the Update button.
If you have a non-Enterprise subscription, you need to upload your quiz files
and then download the reading program information to your title records in
the catalog.
Enabling the Search Limiter
Once you activate the Reading Program Service, you need to enable the
search limiter:
1. From the Back Office tab, select the Site Configuration option.
2. Click the Catalog subtab.
3. In the Quiz/Level Based Searches... section, select the Support
Accelerated Reader Searches checkbox and/or Support Reading
Counts! Searches checkbox.
4. Click the Save button.
Your patrons can now limit their searches to the books in the Reading
Program(s). When they conduct a search, the quiz number and point value
appear in the Search Results and Title Details screens within the copy
description.
50
© 2014 Follett School SolutionsLexile
To activate the Lexile Reading Program Service (Site Administrator must
complete):
1. From the Back Office tab, select the Site Configuration option.
2. Click the Site Info subtab.
3. Confirm that the Site Customer Number is entered and correct.
4. Select the Use Reading Program Service (RPS)—Lexile checkbox.
5. Click the Save button.
Once you enable the Lexile Reading Program Service, Destiny updates the
Lexile information for your collection automatically on a monthly basis. The
frequency can be changed by the Destiny Administrator at the district level.
You can update the information manually by clicking the Update button.
51
© 2014 Follett School SolutionsEnabling the Search Limiter
Once you activate the Reading Program Service, you need to enable the
search limiter:
1. From the Back Office tab, select the Site Configuration option.
2. Click the Catalog subtab.
3. In the Quiz/Level Based Searches... section, select the Support Lexile
Measure Searches checkbox.
4. Click the Save button.
Your patrons can now limit their searches to books with a Lexile Measure
range or Code or both. When patrons conduct a search, the Lexile
information appears in the Search Results and the Title Details screens
within the copy description.
52
© 2014 Follett School SolutionsFountas and Pinnell
To activate the Fountas and Pinnell Reading Program Service (Site
Administrator must complete):
1. From the Back Office tab, select the Site Configuration option.
2. Click the Site Info subtab.
3. Confirm that the Site Customer Number is entered and correct.
4. Select the Use Fountas and Pinnell checkbox.
5. Click the Save button.
Once you enable the Fountas and Pinnell Reading Program Service, Destiny
updates the Fountas and Pinnell information for your collection automatically
on a monthly basis. The frequency can be changed by the Destiny
Administrator at the district level. You can update the information manually
by clicking the Update button.
53
© 2014 Follett School SolutionsEnabling the Search Limiter
Once you activate the Reading Program Service, you need to enable the
search limiter.
1. From the Back Office tab, select the Site Configuration option.
2. Click the Catalog subtab.
3. In the Quiz/Level Based Searches... section, select the Support
Fountas and Pinnell Searches checkbox. Please be sure to read the note
on the screen.
4. Click the Save button.
Your patrons can now limit their searches to the books with a Fountas
and Pinnell level. When patrons conduct a search, the Fountas and Pinnell
information appears in the Search Results and the Title Details screens
within the copy description.
54
© 2014 Follett School SolutionsAppendix C - Setting Up the Standards
Subscription Service
To Activate the Standards Subscription Service (Site Administrator must
complete):
1. From the Back Office tab, select the Site Configuration option.
2. Click the Site Info subtab.
3. Confirm that the Site Customer Number is entered and correct.
4. Select the Use Standards checkbox.
5. Click the Save button.
55
© 2014 Follett School SolutionsSetting Up Access Levels
Once you activate the Standards Subscription, you need to enable the
appropriate permission for your patrons to search based on standards:
1. From the Back Office tab, select the Access Levels option.
2. Click the Edit button next to the access level you are editing.
3. Select the Search Standards option under the Library Catalog Search
Access section.
56
© 2014 Follett School SolutionsResources
Destiny Help System
Destiny’s Help system allows you to locate information on hundreds of
topics. This real-time information hosted on a Follett server is updated
regularly.
Destiny offers two ways to access the Help system: online Help and on-page
Help.
Online Help allows you to locate information on any topic, regardless of
which page or screen displays currently.
On-page Help allows you to locate information regarding the page, screen,
or specific field that displays currently.
57
© 2014 Follett School SolutionseLearnings
Did you know that Follett has eLearning modules available to all customers
with current support subscriptions? There are a variety of eLearnings
available on the topics covered in this training. Access these materials
through the Videos and more… link in Destiny Help or through Follett
Community at www.follettcommunity.com.
Technical Support
For help with configuration of Destiny, operational issues, troubleshooting, or
problems with your peripheral hardware, contact Technical Support via phone
at 800.323.3397 or email at techsupport@FollettSoftware.com.
58
© 2014 Follett School SolutionsCourse Survey
Your comments are very important to us. The feedback you provide helps us
to improve current and future courses to better meet your needs. Please take
a moment to complete the course survey.
Course Survey: www.follettsoftware.com/contactdata
Course Task ID (provided by instructor):___________________________
Zip Code (confirm with instructor):_________________________________
59
© 2014 Follett School SolutionsYou can also read