Developing a Payroll Desktop Application in VB.NET: from User Interface to Back End Code - Arrow@DIT
←
→
Page content transcription
If your browser does not render page correctly, please read the page content below
Dublin Institute of Technology
                                                                                                            ARROW@DIT
Instructional Guides                                                                       School of Multidisciplinary Technologies

2014

Developing a Payroll Desktop Application in VB.NET:
from User Interface to Back End Code
Jerome Casey
Dublin Institute of Technology, jerome.casey@dit.ie

Follow this and additional works at: http://arrow.dit.ie/schmuldissoft
     Part of the Engineering Education Commons

Recommended Citation
Casey, J. (2014). Developing a Payroll Desktop Application in VB.NET: from User Interface to Back End Code,/i>. Software guide for
undergraduate students. Dublin Institute of Technology.

This Other is brought to you for free and open access by the School of
Multidisciplinary Technologies at ARROW@DIT. It has been accepted for
inclusion in Instructional Guides by an authorized administrator of
ARROW@DIT. For more information, please contact yvonne.desmond@dit.ie,
arrow.admin@dit.ie, brian.widdis@dit.ie.

This work is licensed under a Creative Commons Attribution-Noncommercial-
Share Alike 3.0 License
Higher Cert/Bachelor of Technology – DT036A
Visual Basic Programming 1
Building the User Interface
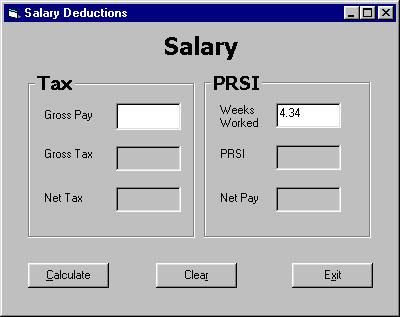
The program serves as an example of a more complex application than the previous example. The
user enters their Gross Salary and the number of weeks they worked for the month and the
program calculates their salary deductions, including Net Pay. Although the figures refer to 2006,
this example can be easily updated to include other salary deductions such as for Pension,
Universal Social Charge etc.
Program 1: A Program To Calculate Salary Deductions
The three steps to creating a Visual Basic program are as follows
(i) Create the interface (i.e. generate, position, and size the objects)
(ii) Set properties of objects (i.e. configure the appearance of the objects)
(iii) Write the code that executes when events occur
A new program is to be created that allows:
(i) The input of Gross Pay and the Number of Weeks Worked
(ii) The output of Gross Tax, Net Tax, PRSI and Net Pay.
The user-interface should look similar to the figure shown below.
The Toolbox Toolbar is used to draw
2 groupboxes,
4 labels for output,
7 labels for titles,
2 textboxes
3 command buttons
lblSalary
grpPRSI
grpTax
txtWeeks
txtGrossPay
lblPRSI
lblGrossTax
lblNetPay
lblNetTax
cmdCalc cmdExit
cmdClear
jerome.casey@dit.ie 1Editing the Properties of the Controls:
The settings of the object controls are entered by first selecting the individual control in the Form Window and
then selecting the property in the Properties Window, as shown in the table.
Object Name Property Setting
frmSalary Text Salary Deductions
Width 400
Height 333
grpTax Text Tax
Width 182
Height 151
Font MS Sans Serif, Bold ,12
grpPRSI Text PRSI
Height, Width, Font same as grpTax
lblSalary Text Salary
Font Tahoma, Bold ,18
txtGrossPay Text ...leave blank…
Tabindex 0
txtWeeks Text 4.34
Tabindex 1
lblGrossTax Text lblGrossTax
Autosize False lblNetTax
BorderStyle FixedSingle lblPRSI
Apply the same settings for lblNetTax lblPRSI lblNetPay lblNetPay
The remaining labels will not be used in the code so you can leave the are all output
Name Property with the default setting. labels
cmdCalc Text &Calculate
cmdClear Text Clea&r
cmdExit Text E&xit
Editing the Look of the Interface:
When all the controls are complete, then changing the appearance of the controls may be considered namely
control size, alignment etc. This is important to keep a consistent look for all forms.
Selecting Multiple Controls:
More than one control can be selected by holding and then using the left-click to select all the controls
required.
In the grpTax groupbox, select the 3 controls txtGrossPay, lblGrossTax, lblNetTax.
Goto:
(i) Format > Make Same Size > Both
(ii) Format > Align Lefts
In the grpPRSI groupbox, select the 3 controls txtWeeks, lblPRSI, lblNetPay and repeat as above.
You can also select the controls horizontally and align their centres. txtGrossPay, txtWeeks, and their labels.
While selected you can use the up/down arrow keys to nudge the controls one pixel at a time into position.
New Concepts in the Property Window:
In the table above the Tabindex Property and Access keys are introduced. The benefits of these properties are
seen when the program is run.
With the txtGrossPay textbox, the Tabindex property set to 0 this means the cursor will be sitting in this
textbox when we run the program.
Access keys are inserted by adding an & character in the Text property before the desired letter. This is
indicated on the control by underlining the appropriate letter. When the program is run, the accelerator key
can be used instead of clicking on the command button, e.g. hold + C for the Calculate button.
To make a label visible, set its BorderStyle property to 1 - Fixed Single
jerome.casey@dit.ie 2Managing Visual Basic Projects:
As an application is developed, a user works with a project to manage all the different files that make up the
application.
A simple project typically consists of:
(i) One project file that keeps track of all the components (.vbp).
(ii) One file for each form (.frm).
This design/file structure is the critical to understand in any simple Visual Basic project.
Optionally, one file for each class module (.cls).
Optionally, one file for each standard module (.bas).
Optionally, one or more files containing ActiveX controls (.ocx).
Optionally, a single resource file (.res).
[These options are not introduced in this semester module]
The project file (.vbp) is simply a list of all the files and objects associated with the project, as well as
information on the environment options set. This information is updated every time the project is saved. All of
the files and objects can be shared by other projects as well.
When all the development for a project has been completed, the project can be converted into an executable file
(.exe).
This .exe file can then be distributed without consideration to the initial ‘building blocks’ for the project.
Saving the Program Elements:
Save any changes you make to the project or form by clicking on the Save All icon in the Toolbar.
The front-end of the application is now complete.
The back-end is activated by clicking on the Calculate command button when the program is run.
In the next lecture the code is to be added and the concept of variables, the DIM statement and IF blocks are
introduced.
jerome.casey@dit.ie 3Background - Salary Deductions for the Year 2006
Monthly cut-off point & Gross Tax:
The standard rate cut-off point is €32,000 per year for a single person. All income earned up to
that amount is taxed at the standard rate of 20%. Any balance earned above that is taxed at the
higher rate of 42%.
Tax is deducted every month from income, so the monthly cut-off point is €32,000/12=
€2,666.67, i.e. you can earn up to this amount per month and be taxed at 20%. Any balance
earned above this, will be taxed at 42%.
To calculate Gross Tax you need an IF statement.
If Gross < Monthly Cut-off then
Gross Tax = 20%* Gross
If Gross > Monthly Cut-off then
Gross Tax = (20%* Monthly Cut-off) + (Balance*42%)
Tax Credits & Net Tax:
The older system of Tax free allowances was replaced by the Tax credit system in 2001.
For a Single person the Single Tax Credit is €1,630. There is also a PAYE Tax Credit of €1,490,
giving a Yearly Tax Credit of €3,120 or a Monthly Tax Credit of €3,120/12 = €260.00.
Personal Tax Credits 2005 2006
Single Person € 1,580.00 € 1,630.00
PAYE Credit € 1,270.00 € 1,490.00
Total Yearly Tax Credit € 2,850.00 € 3,120.00
Monthly Tax Credit € 237.50 € 260.00
Every month Gross Tax is calculated based on the following:
Net Tax = Gross Tax – Monthly Tax Credit
PRSI:
If you earn greater than €400 per week you are in Class A1. In this class, PRSI is deducted at 2% on the first
€127 earned per week and PRSI of 6% is deducted on any balance earned over that.
PRSI = 127*no_weeks* 2% + [GrossPay – (127*no_weeks)]* 6%
Note: on average there are 4.34 weeks in a month (365/12/7 = 4.34).
Net Pay = GrossPay – PRSI – Net Tax
Examples: (Based on 2006 Figures)
Gross Pay Gross Tax Net Tax PRSI Total Net Pay
Deductions
e.g.1 € 1,500.00 € 300.00 € 40.00 € 67.95 € 107.95 € 1,392.05
e.g.2 € 3,000.00 € 673.33 € 413.33 € 157.95 € 571.28 € 2,428.71
e.g.3 € 1,000.00 € 200.00 €0 € 37.95 € 37.95 € 962.05
jerome.casey@dit.ie 4Calculations:
e.g.1 Gross of €1,500 < Monthly cut-off point €2,666.67
Gross Tax = (20%* Monthly Cut-off) + (Balance*42%)
= 20%* 1500
= €300
Net Tax = €300 - €260.00 = €40.00 (Monthly Tax Credit = €260.00)
PRSI = 127*4.34*2% +[(1500)-127*4.34]* 6%
= 11.02 + 56.93 = €67.95
e.g.2 Gross of €3,000 > Monthly cut-off point €2,666.67
Gross Tax = (20%* Monthly Cut-off) + (Balance*42%)
= (20%* 2,666.67)+ ((3,000 - 2,666.67)*42%)
= 533.33 + 140
= €673.33
Net Tax = €673.33- €260.00= €413.33 (Monthly Tax Credit = €260.00)
PRSI = (127*4.34*2%) +([(3000)-127*4.34]* 6%)
= 11.02 + 146.93 = €157.95
e.g.3 Gross of €1,000 < Monthly cut-off point €2,666.67
Gross Tax = 20%* 1000
= €200
This is less than the Monthly Tax Credit of €260.00. (You can’t have negative tax!)
Net Tax = €0
PRSI = 127*4.34*2% +[(1000)-127*4.34]* 6%
= 11.02 + 26.93 = €37.95
jerome.casey@dit.ie 5Adding Code
The three steps to creating a Visual Basic program are as follows
(i) Create the interface (i.e. generate, position, and size the objects)
(ii) Set properties of objects (i.e. configure the appearance of the objects)
(iii) Write the code that executes when events occur
When a Visual Basic program runs, the form and its controls appear on screen. Normally, nothing happens until
the user takes an action, such as left-clicking a control or pressing a key. Such an action is called an ‘event’, the
programmer writes code that reacts to an event by performing some function.
Code:
Code consists of statements that carry out tasks.
Properties of an object are changed in code with statements of the form:
objectName.objectProperty = setting
where objectName is the name of the form or the control, objectproperty is one of the properties of the
object, and setting is a valid setting for that object.
Such statements are called assignment statements, they assign values to properties
The statement
txtBox.Text = “12”
sets the value in the text box to 12.
The statement
txtBox.Text = ""
clears the contents of the text box, i.e. it invokes the blank setting.
Events:
Most events are associated with objects.
Two sample events are specified cmdButton_Click and txtSalary_Keypress.
The statements to be executed when an event occurs are written in a block of code called an “event procedure”.
The structure of an event procedure is:
Private Sub objectName_objectEvent() etc....
....add Code here....
End Sub
The word Sub in the first line signals the beginning of the event procedure, and the first line identifies the object
and the event occurring to that object.
The last line signals the termination of the event procedure.
The code statements to be executed appear between these two lines.
(Note: The word Private indicates that the event procedure cannot be invoked by an event from another form,
this will be revisited at a later stage.
The word Sub is an abbreviation of Subroutine.)
For instance, the event procedure here clears the contents of the text box when the command button is clicked.
Private Sub cmdClear_Click() etc....
txtBox.Text = ""
End Sub
jerome.casey@dit.ie 6Note the following examples of Event Procedures:
Private Sub cmdEdit_Click() etc....
txtBox.Text = "Hello"
End Sub
Private Sub cmdFormat_Click() etc....
txtBox.ForeColor = Color.DarkRed
End Sub
Private Sub cmdHide_Click() etc....
txtBox.Visible = False
End Sub
Arithmetic Operations:
The five standard arithmetic operations are
Addition
Subtraction
Multiplication
Division
Exponentiation ( squared, cubed, ‘to the power of’)
Addition, subtraction, and division are denoted in Visual Basic by the standard symbols +, - and / respectively.
However, the notations for multiplication and exponentiation differ from the customary mathematical notations.
Visual Basic Notation:
Multiplication: a*b (The asterisk * is the upper character of the 8 key.)
Exponentiation: a^r (The caret ^ is the upper character of the 6 key.)
The use of bracketing / parentheses (,) is also extremely common in the development of complex calculations, so
as to keep the mathematical logic correct.
Declaring Variable Types :
So far, a distinction has not been made between variables that hold strings and variables that hold numbers.
There are several advantages to specifying the type of values (string or numeric) that can be assigned to a
variable.
A statement of the form
Dim variableName As String
specifies that only strings can be assigned to the named variable.
A statement of the form
Dim variableName As Single
specifies that only numbers can be assigned to the named variable.
The term Single derives from single-precision real number, the term String denotes the variable can only
contain text information (therefore the variable cannot be used in mathematical problems).
A DIM statement is said to declare a variable.
Programs may run correctly if the Dim statements are omitted, but usually the omission of DIM statements leads
to an error in coding or in execution of programs.
Declaring variables at the beginning of each code window or at the start of each event procedure is regarded as
good programming practice because it makes programs easier to read and helps prevent certain types of errors.
jerome.casey@dit.ie 7Private Sub cmdCompute_Click() etc...
Dim interestRate As Single
Dim principal As Single
Dim phrase As String
interestRate = 0.0655
principal = 100
phrase = "The balance after a year is "
lblBalance.Text = phrase & (1 + interestRate) * principal
End Sub
Several DIM statements can be combined into one. For instance, the first three DIM statements of the example
above can be replaced by
Dim sngInterestRate As Single, sngPrincipal As Single, strPhrase As String
Visual Basic actually has several different types of numeric variables. So far, only single-precision numeric
variables have been used. Single-precision numeric variables can hold numbers of magnitude from as small as
1.4 x 10^-45 to as large as 3.4 x 10^38.
Similarly ‘constants’ are declared by using the CONST statement. Constants are different to variable in that they
are assigned a value as they are declared, and cannot be re-assigned at runtime (during program execution). The
classic example of the constant declaration is for PI, 3.142
CONST PI As Single = 3.142
IF BLOCKS (Conditional statements):
An ‘IF block’ allows a program to decide on a course of action, based on whether a certain condition is true or
false.
A block of the form
If condition Then
action1
Else
action2
End If
causes the program to take action1 if condition is true and action2 if condition is false.
Each action consists of one or more Visual Basic statements. After an action is taken, execution continues with
the line after the If block.
The following program finds the larger of two numbers input by the user.
The condition is Val(txtFirstNum.Text) > Val(txtSecondNum.Text), and each action consists
of a single assignment statement.
With the inputs 4 and 1, the condition is true, and so the first action is taken.
With the inputs 3 and 7, the condition is false, and so the second action is taken.
Private Sub cmdFindLarger_Click() etc....
Dim largerNum As Single
If Val(txtFirstNum.Text) > Val(txtSecondNum.Text) Then
largerNum =Val(txtFirstNum.Text)
Else
largerNum =Val(txtSecondNum.Text)
End If
lblResult.Text = "The larger number is "& largerNum
End Sub
jerome.casey@dit.ie 8Further conditions can be added, with a final condition applicable if all previous conditions have not been
satisfied.
If condition1 Then
action1
ElseIf condition2 Then
action2
ElseIf condition3 Then
action3
Else action4
End If
This block searches for the first true condition, carries out its action, and then skips to the statement following
END IF. If none of the conditions is true, then ELSE action is carried out. Execution then continues with the
statement following the block.
In general, an IF block can contain any number of ELSEIF clauses. As before, the ELSE clause is optional.
Private Sub cmdShow_Click() etc....
Dim decCosts As Decimal, decRevenue As Decimal, decProfit As Decimal,
decLoss As Decimal
decCosts = Val(txtCosts.Text)
decRevenue = Val(txtRev.Text)
If decCosts = decRevenue Then
lblResult.Text = "Break even"
ElseIf decCosts < decRevenue Then
decProfit = decRevenue - decCosts
lblResult.Text = "Profit is " & decProfit
Else
decLoss = decCosts - decRevenue
lblResult.Text = "Loss is " & decLoss
End If
End Sub
jerome.casey@dit.ie 9Program 1: A Program to Calculate Salary Deductions – The Code
Code Indenting and Comments:
1. Double-click on the cmdClear command button (held in the form, frmSalary) to open the Code window and
attach the following below to the code block. The code is indented (as shown below) using the tab key, which
allows easier reading/scanning of the code text. This is very important in maintaining proper presentation of
code.
The creation of ‘remarks’, or uncompiled code is achieved using an apostrophe at the beginning of the remark
text (which in turn changes the code colour to green). Remarks are important also as they allow a program
developer to leave a ‘trail’ of ideas or important points relating to structure or portion of code (for historical
review)
Private Sub cmdClear_Click(sender As Object, e As EventArgs) Handles cmdClear.Click
'add some code to reset all the textboxes and labels
txtGrossPay.Text = ""
txtWeeks.Text = ""
lblGrossTax.Text = ""
lblNetPay.Text = ""
lblNetTax.Text = ""
lblPRSI.Text = ""
'put the cursor back in the txtGrossPay textbox ready for entry
txtGrossPay.Focus()
End Sub
2. Go back to the Form Design window and Double-click on the cmdExit command button to open the Code
window and attach the following code to the code block:
Private Sub cmdExit_Click(sender As Object, e As EventArgs) Handles cmdExit.Click
End
End Sub
3. Again Double-click on the cmdCalc command button to opens the Code window, and add the code shown
overleaf
Finally, the program is run and tested using the previously suggested Gross Pay values of €1,500, €3,000 and
€1,000. Check your program with the values in the table below.
Examples: (Based on 2006 Figures)
Monthly cut-off = €2,666.67 Monthly Tax Credit = €260.00
Gross Pay Gross Tax Net Tax PRSI Total Deductions Net Pay
e.g.1 € 1,500.00 € 300.00 € 40.00 € 67.95 € 107.95 € 1,392.05
e.g.2 € 3,000.00 € 673.33 € 413.33 € 157.95 € 571.28 € 2,428.71
e.g.3 € 1,000.00 € 200.00 €0 € 37.95 € 37.95 € 962.05
Test the access keys set at design-time using:
Alt + C for calculate; Alt + R to clear; Alt + X to exit the program
Note: An advantage of having the constants located at the top of the program is that it makes it easier to change
these values as they change from budget to budget. Additionally named constants make formulae easier to read.
Const decMonCutoff As Decimal = 2666.67
Const decMonTaxCredit As Decimal = 260
jerome.casey@dit.ie 10The complete code for all 3 click events
Public Class frmSalary
Private Sub cmdCalc_Click(sender As Object, e As EventArgs) Handles cmdCalc.Click
'1. Declare the Variables
Dim decGrossTax As Decimal
Dim decGrossPay As Decimal
Dim decPRSI As Decimal
Dim decNetTax As Decimal
Dim decNetPay As Decimal
Dim sngWeeks As Single
Const decMonCutoff As Decimal = 2666.67
Const decMonTaxCredit As Decimal = 260
'2. Input values
decGrossPay = Val(txtGrossPay.Text)
sngWeeks = Val(txtWeeks.Text)
'3. Calculate the Gross Tax
If decGrossPay < decMonCutoff Then
decGrossTax = decGrossPay * 0.2
Else
decGrossTax = decMonCutoff * 0.2 + (decGrossPay - decMonCutoff) * 0.42
End If
'4. Calculate the NetTax
decNetTax = decGrossTax - decMonTaxCredit
'5. Note Tax can't be negative so add an IF block to check this
If decNetTax < 0 Then
decNetTax = 0
End If
'6. Calculate the PRSI
decPRSI = 127 * (sngWeeks) * 0.02 + (decGrossPay - 127 * sngWeeks) * 0.06
'7. Calculate the Net Pay
decNetPay = decGrossPay - decPRSI - decNetTax
'8. output all results to their labels
use FormatCurrency to format as Euros to 2 decimal places
txtGrossPay.Text = FormatCurrency(decGrossPay, 2)
lblNetPay.Text = FormatCurrency(decNetPay, 2)
lblGrossTax.Text = FormatCurrency(decGrossTax, 2)
lblNetTax.Text = FormatCurrency(decNetTax, 2)
lblPRSI.Text = FormatCurrency(decPRSI, 2)
End Sub
Private Sub cmdExit_Click(sender As Object, e As EventArgs) Handles cmdExit.Click
End
End Sub
Private Sub cmdClear_Click(sender As Object, e As EventArgs) Handles cmdClear.Click
'add some code to reset all the textboxes and labels
txtGrossPay.Text = ""
txtWeeks.Text = ""
lblGrossTax.Text = ""
lblNetPay.Text = ""
lblNetTax.Text = ""
lblPRSI.Text = ""
'put the cursor back in the txtGrossPay textbox ready for entry
txtGrossPay.Focus()
End Sub
End Class
jerome.casey@dit.ie 11You can also read