En es fr F6FBM36S1 F6FBM36S2 - Instruction Manual Instrucciones para el uso Notice d'Utilisation - Fulgor Milano
←
→
Page content transcription
If your browser does not render page correctly, please read the page content below
F6FBM36S1
             F6FBM36S2

en        Instruction Manual

es   Instrucciones para el uso

fr       Notice d’Utilisation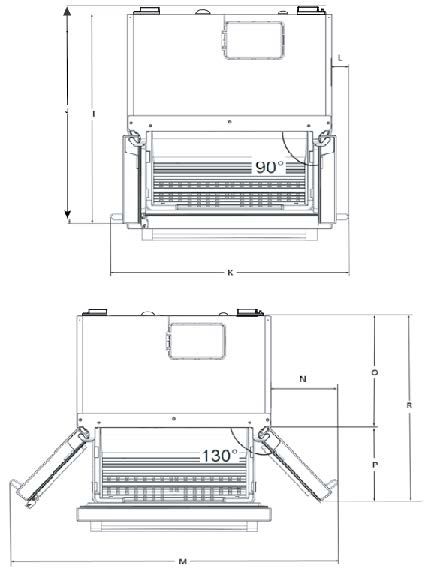
Congratulations on the purchase of your new Refrigerator! This refrigerator has been manufactured
in modern facilities with the utmost care and meticulous quality controls. We are so confident in the
quality of this product that we back it with a two year parts and labor warranty, and five years on the
sealed system! Please read this entire user manual before using your product, to ensure you understand
all of its features and benefits and know how to operate it properly. This manual should be kept in an
easily accessible location and passed on to any future owners.

This guide will help you use the product quickly and safely.

Please read the user guide carefully before installing and operating the product.

  symbols used throughout this manual and what they represent.

                                                                  Fill this out and keep for future reference
                Important information and
                useful tips.                            Model

                                                        Serial No
                Risk of life and property.              Date of Purchase

                                                        Original Purchaser
                Risk of electric shock.                 Dealer

                                                        City
                The product’s packaging
                                                        State
                is made of recyclable
                materials, in accordance with           Zip Code
                the National Environment
                                                        Country
                Legislation.
1 Your Refrigerator 4 4 Preparation 17
2 Important instructions for safety and 5 Display and operating the product 18
environment 6
5.1 Indicator panel . . . . . . . . . . . . . . . . . . . . .18
2.1 General safety . . . . . . . . . . . . . . . . . . . . . .6 5.2 Sabbath Mode . . . . . . . . . . . . . . . . . . . . .19
. . . . . . . . . . . . . . . . . . . . . . .7 5.3 Showroom Mode . . . . . . . . . . . . . . . . . . .19
2.1.2For products with a water dispenser . . . . . .7 5.4 High Temp Error . . . . . . . . . . . . . . . . . . . .19
2.2 Intended use . . . . . . . . . . . . . . . . . . . . . . .7 5.5 Freezing fresh food. . . . . . . . . . . . . . . . . .21
2.3 Children’s safety. . . . . . . . . . . . . . . . . . . . .7 5.6 Recommendations for preserving frozen food. . 21
2.4 Package information. . . . . . . . . . . . . . . . . .7 5.7 Placing the food . . . . . . . . . . . . . . . . . . . .21
5.8 Deep-freeze information . . . . . . . . . . . . . .21
3 Installation 8 5.9 Removing door shelves. . . . . . . . . . . . . . .22
3.1 Before Installation. . . . . . . . . . . . . . . . . . .12 5.10 Moving the FlexiLift Door Shelf . . . . . . . . .22
. . . . . . . . .12 5.11 Glass shelves . . . . . . . . . . . . . . . . . . . . . .22
3.3 Inset installations . . . . . . . . . . . . . . . . . . .13 5.12 Crisper bins . . . . . . . . . . . . . . . . . . . . . . .22
3.4 Electrical connection. . . . . . . . . . . . . . . . .13 5.13 Deli Drawer . . . . . . . . . . . . . . . . . . . . . . .22
. . . . . . . . . . . . . . . . . . .13 5.14 Humidity controlled crisper . . . . . . . . . . . .23
3.6 Illumination lamp . . . . . . . . . . . . . . . . . . .14 5.15 Ice container . . . . . . . . . . . . . . . . . . . . . .23
3.7 Door/Drawer Open Warning . . . . . . . . . . .14 5.16 Butter & Cheese section . . . . . . . . . . . . .23
3.8 Water connection . . . . . . . . . . . . . . . . . . .14 5.17 Door flappers . . . . . . . . . . . . . . . . . . . . . .23
3.9 Connecting the water hose to the . . . . . . . . . . . . . . .24
refrigerator . . . . . . . . . . . . . . . . . . . . . . .14 5.19 IonGuard . . . . . . . . . . . . . . . . . . . . . . . . .24
3.10 Connecting the water line to the
water supply. . . . . . . . . . . . . . . . . . . . . . .14 6. Maintenance and cleaning 25
3.11 Installing the Internal Water Filter. . . . . . .15 . . . . . . . . . . . . . . . . .25
3.12 Before using the water dispenser . . . . . . .16 6.2 Protecting the plastic surfaces . . . . . . . . .25
3.12.1Using the Ice Maker . . . . . . . . . . . . . . . .16
3.13Transportation of the product . . . . . . . . . . .16 7. Troubleshooting 26
3 / 29 EN Refrigerator / User Manual1 Your Refrigerator
*3
*12 *4
11
*5 *10
9 1
*8
*6
*7
2
13 14
*16 15
9- Water dispenser
1- Fridge compartment 10-
2- Bottom Freezer 11- Fan Cover
3- Display/indicator panel 12- Water filter
4- Butter & cheese section 13- Ice container
5- FlexiLift Door Shelves 14- Frozen Food Storage Bın
6- Bottle shelf 15- Freezer Drawer
7- Deli Drawer 16- Separator
8- Crispers
C are not included in the product you have purchased, then those parts are only valid for other models.
4 / 29 EN Refrigerator / User ManualRefrigerator Shelf Weight Limitations
Fridge compartment cantalever shelves, those that only have rear supports, are tested for max 25 kgs
(55 pounds) per each part.
Crispers will hold up to 15 kgs (33 pounds) per each one. Deli Drawer will hold up to 20 kgs (44
pounds).
Ice container bin holds up to 10 kgs (22 pounds), it is for usage without ice. Freezer bin will hold up to 24
kgs (53 pounds) and drawer holds up to 30 kgs (66 pounds).
8 pounds = 4 kgs
55 pounds = 25 kgs
8 pounds = 4 kgs
105 pounds = 48 kgs
33 pounds = 15 kgs
13 pounds = 6 kgs
44 pounds = 20 kgs
22 pounds =10 kgs 48 pounds = 22 kgs
Up to 11 pounds / 5 kgs day ice production
66 pounds = 30 kgs
5 / 29 EN Refrigerator / User Manual2 Important instructions for safety and environment
This section contains safety instructions that will
damage.
Failure to follow these instructions shall void any
warranty.
WARNING:
A in the appliance enclosure or in the
built-in structure, clear of obstruction.
onto it! There is the risk of electric shock!
WARNING: Do not use mechanical
devices or other means to accelerate pulling on the cable, always pull out by grabbing the
A the defrosting process, other plug.
than those recommended by the
manufacturer.
systems. Such systems are harmful for the product.
WARNING: Do not damage the
A refrigerant circuit. repairing procedures.
WARNING: Do not use electrical
appliances inside the food storage carried out by the Authorized Service Agent. The
B compartments of the appliance, Manufacturer shall not be held liable for damages that
may arise from procedures carried out by unauthorized
unless they are of the type
recommended by the manufacturer. persons.
freezer compartment. They may burst!
2.1 General safety -
als to clean or defrost the refrigerator. Steam will cause
8 years old and by persons whose physical, sensory short circuit or electric shock since it would get into
or mental capabilities were not fully developed or contact with the electrical parts in the refrigerator!
who lack experience and knowledge provided that
they are supervised or trained on the safe usage of door and drawer as a means of support or step. This
the product and the risks it brings out. Children must will cause the product to tip over or parts of it get dam-
not play with the product. Cleaning and maintenance aged.
should not be performed by children unless they are
supervised. cutting tools.The refrigerant that might blow out when
the gas channels of the evaporator, pipe extensions or
use. surface coatings are punctured may cause skin irrita-
refrigerator with any material.
There is the risk of electric shock!
there is the risk of fire or explosion!
by a fuse complying with the values in the rating
plate. Have the grounding installation made by a gases (e.g. spray) as well as the explosive materials
qualified electrician. Our company shall not be liable should never be kept in the appliance.
for any damages that may arise when the product is
used without grounding in accordance with the local product. Spilling water on an electrical component may
regulations. cause electric shocks or risk of fire.
Do not tuck the power cord under the product. Do
not put heavy items on the power cord. The power medicines, scientific materials and etc.) that require a
cord should not be bent, crushed, and come into precise temperature control in the refrigerator.
contact with any heat source.
6 / 29 EN Refrigerator / User ManualImportant instructions for safety and environment
2.2 Intended use
time, unplug and unload the food in it.
use. It is not suitable for commercial use and it
at the blue light with optical tools.
must not be used out of its intended use.
problems may occur in case of putting things on top
of the product. arisen from incorrect usage or transportation.
your body get caught by the moving parts inside the 2.3 Children’s safety
product.
from tampering with the product.
2.1.1 HCA warning
If your product’s cooling system contains R600a:
Before you throw away your old
This gas is flammable. Therefore, pay attention to not
damaging the cooling system and piping during usage refrigerator or freezer:
and transportation. In the event of damage, keep your A
product away from potential fire sources that can cause
the product catch a fire and ventilate the room in which children may not easily climb inside.
the unit is placed.
You can identify the type of gas used in
2.4 Package information
your product by referring to the the model/
C serial tag located on the left wall of the manufactured from recyclable materials in
upper compartment. accordance with our National Environment
WARNING: Never dispose the product Regulations. Do not dispose of the packaging
A in fire. materials together with the domestic or other
wastes. Take them to the packaging material
collection points designated by the local
2.1.2 For products with a authorities.
water dispenser
Pressure for cold water inlet shall be maximum
90 psi (620 kPa). If your water pressure exceeds
80 psi (550 kPa), use a pressure limiting valve
in your mains system. If you do not know how to
check your water pressure, ask for the help of a
professional plumber.
If there is risk of water hammer effect in
your installation, always use water hammer
prevention equipment in your installation.
Consult professional plumbers if you are not
sure if there is a water hammer effect in your
installation.
Do not install on the hot water inlet. Take
precautions against of the risk of freezing of the
hoses. Normal operating water temperatures
should be between 33F° (0.6°C) minimum and
100F° (38°C) maximum.
Use only potable water.
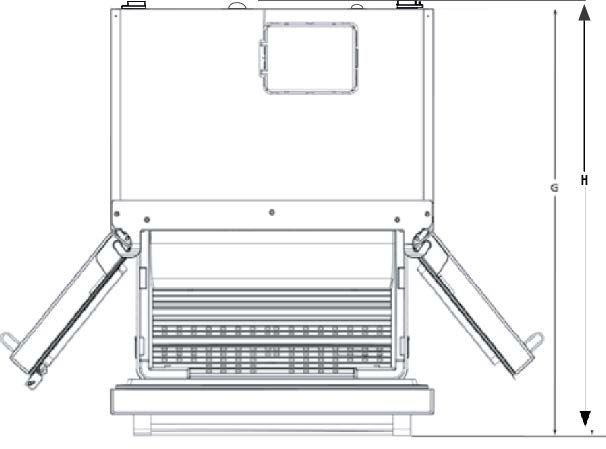
7 / 29 EN Refrigerator / User Manual3 Installation
Allow 2’’ (50mm) min. clearance
between the top of refrigerator
and alcove
71 ¹¹/16
6
5/1
36 1
Electrical
Outlet
Water Line
Minimum clearances
Recessed water
line
Top View Recessed electrical outlet
2” ceiling 5/8” from sides and 1-3/8”
the back.
Allow 1 3/4” min. clearance at the rear for
23 5/8” (600mm) proper
Allow air(35
1 3/8’’ circulation
mm) mm. and water/electrical
clearance at 25” (635 mm)
Cabinet rear for proper airconnections
circulation and water/ Countertop
electrical connections
9/16” (15mm) min, widt
8 / 29 EN Refrigerator / User ManualInstallation
!
"
" Height-Overall “A’’ Height-TopOfCabinet Depth-CabinetOnly “C” Depth-Without Handles “D”
“B” “O”
"
69 3 /4” ( 1771 mm ) 67 5/16”( 1710 mm ) 23 5/8” ( 600 mm ) 26 13/16” ( 680.5 mm )
"
Depth-With Handles Width-Cabinet “F” Depth-DrawerOpen “G” TotalDepth-DrawerOpen “H”
" “E”
29” ( 737 mm ) 35 3/4”( 908 mm ) 45 9/16” ( 1157 mm ) 46 3/16” ( 1173.5 mm )
9 / 29 EN Refrigerator / User ManualInstallation
Height-Overall “A’’ Height-TopOfCabinet Depth-CabinetOnly “C” Depth-Without Handles “D”
“B” “O”
69 3 /4” ( 1771 mm ) 67 5/16”( 1710 mm ) 23 5/8” ( 600 mm ) 26 13/16” ( 680.5 mm )
Depth-With Handles Width-Cabinet “F” Depth-DrawerOpen “G” TotalDepth-DrawerOpen “H”
“E”
29” ( 737 mm ) 35 3/4”( 908 mm ) 45 9/16” ( 1157 mm ) 46 3/16” ( 1173.5 mm )
Min Clearance From the Top: 2” inches
Min Clearance From the Sides: 5/8” inches
Min Clearance From the Back: 1 3/8” inches
10 / 29 EN Refrigerator / User ManualInstallation
Depth-Doors Open90° “I” Total Depth-Doors Width-Doors Open90° Width-Doors Open90°-
Open90° “J” WithHandles “K” FromCabinetToHandle “L”
42 1/4” ( 1072.6 mm ) 43 1/16” ( 1094 mm ) 41 11/16” ( 1059.2 mm ) 3” ( 75.6 mm )
Width- Doors Open130°- Width-Doors Open Depth-Doors Open 130” Depth Doors Open 130° “R”
FromHandleToHandle “M” 130°- FromCabinetTo “P”
Handle “N”
60 1/4” ( 1530.2 mm ) 12 1/4” ( 311.2 mm ) 15 3/8” ( 391 mm ) 39’’ ( 991mm )
11 / 29 EN Refrigerator / User ManualInstallation
3.1 Before Installation 3.2 Appropriate installation location
measurements are sufficient to receive the from heat sources such as cooktops, ovens,
product and that the appropriate electrical and space heaters, radiators and stoves at least
plumbing connections are present. 2” (5 cm) away from electrical ovens. Product
kept in humid places after installation.
as rugs or carpets.
prevent wobbling.
temperature falls below 50F°/10ºC.
If two refrigerators are to be installed side
C by side, there should be at least 1 1/2”
(4 cm) distance between them.
installation of the product. To make the product
ready for use, make sure that the electricity
installation is appropriate before calling the around the appliance to ensure free air
circulation.
electrician to have any necessary arrangements
carried out. gap of at least 1 3/8” (35 mm) between the
refrigerator and the rear wall. To ensure this,
Part number of the filter is 4918450200 and attach the gray, circular buffers, to be installed
you can use this part number when ordering on the rear back metal cover of the refrigerator.
replacement filters. These are shipped inside the crisper drawer in
the Fresh Food compartment.
Preparation of the location and electrical
C installation at the place of installation is
under customer's responsibility.
Plumbing: The refrigerator should only
C be connected to the cold water line.
Product must not be plugged in during
B installation. Otherwise, there is the risk of
WARNING: Installation and electrical
connections of the product must be carried
B Manufacturer shall not be held liable for
damages that may arise from procedures
carried out by unauthorized persons.
WARNING: Prior to installation, visually
check if the product has any defects on
A it. If so, do not have it installed. Damaged
products cause risks to your safety.
12 / 29 EN Refrigerator / User ManualInstallation
3.3 Inset installations 3.4 Electrical connection
cabinetry or in an alcove, be sure there is Circuit.
adequate airflow around the product for proper
functionality. This refrigerator requires at least but any failure of the GFCI could cause
2” from the top of the unit to the ceiling or food spoilage, which is not covered by the
enclosure, 5/8” on each side and 1 3/8” in the manufacturer’s warranty.
back.
regulations.
or alcove, be sure the parts shown below are
installed on the unit. after installation.
circulation part or multi-plugs.
unscrew before the installation WARNING: Damaged power cable must
B
WARNING: If the product has a failure, it
should not be operated unless it is repaired
Install the vertical
metal bracket and screw.
B
the risk of electric shock!
3.5 Adjusting the feet
recommend lowering the feet to secure the
if the product is not balanced. Twist the feet in
The longer screw must the desired direction according to the illustration
be used on the top.
the doors.
WARNING: First unplug the product.
Product must not be plugged in when
B
electric shock!
13 / 29 EN Refrigerator / User ManualInstallation
3.9 Connecting the water
3.6 Illumination lamp hose to the refrigerator
Do not attempt to repair yourself but call the
1.
lamps do not go on. inlet valve.
The lamp(s) used in this appliance is not suitable 2. Connect the water line (C) to the inlet valve (B) and
for household room illumination. The intended tighten by hand to secure it. It is not necessary to use
purpose of this lamp is to assist the user to place pliers, but if there is a leak, you may tighten slightly
foodstuffs in the refrigerator/freezer in a safe and with a pair of pliers.
comfortable way.
3.7 Door/Drawer Open Warning
door of your product is left open for 1 minute. This
warning will be muted when the door is closed or if
any of the display buttons are pressed.
Display
3.10 Connecting the water line
to the water supply
Connect the water line to a water supply valve. If a
valve is not present or you are not sure, consult a
3.8 Water connection qualified plumber.
First you must connect the water hose to the
refrigerator.
WARNING: Refrigerator and the pump, if
A any, must be unplugged during connection.
14 / 29 EN Refrigerator / User ManualInstallation
3.11 Installing the Internal
Water Filter
Installing the internal water filter consists of two
steps:
1. Press and hold the Freezer Temp Set key for 3
seconds, or until the no ice icon appears in the display.
2. Slide the filter cover forward to open the filter
compartment.
3. Tilt the bypass plug down and pull straight out to
remove it.
4. Insert the filter into the housing and push it up to a
horizontal position.
5. Close the filter cover and push it back into place.
6. Press and hold the Freezer Temp Set key
again for 3 seconds.
You have successfully installed your filter.
The Filter End of Life warning will appear in
approximate 130 days, requiring you to replace
key for 3 seconds, or until the Filter End of
Life Warning goes out in the display.
BYPASS PLUG
15 / 29 EN Refrigerator / User ManualInstallation
3.12 Before using the water dispenser
The water system connections should be made stick together if they are left in the bin for too
long.
tools.
3.13 Transportation of the product
1. Unplug the product before transporting it.
only with water. Do not attempt to connect to
2. Remove water connections.
3. Secure the shelves, accessories, crisper and etc. in
bled out of the system before the intial use. the refrigerator by adhesive tape before repackaging it.
To remove the air in the line, place a container
beneath the water dispenser nozzle and depress C Packaging must be tied with thick tapes or
strong strips and the rules of transportation
the dispenser paddle for 1-2 minutes until only printed on the package must be followed.
water comes out.
A WARNING: Packaging materials
consumed.It will take approximately 12 hours packaging materials in a safe place away
before the water being dispensed cools down to from reach of the children.
refrigerated temperatures.
paddle before removing your container, as this
will reduce the potential for dripping into the
dispenser tray.
3.12.1 Using the Ice Maker Freezer Temp Set
no ıce icon ıce on key
The ice maker is not turned on from the factory.
Freezer Temp Set key for 3 seconds, or until the no
ice icon ( ) disappears in the display.It will take
approximately 1-2 days for the ice bin to fill with
ice.If a power outage occurs while the refrigerator
is running, the ice cubes may partially melt and
then stick together when the re-freeze. If the power
outage is prolonged, the ice cubes may turn into
water, causing leakage. If such a problem occurs.
16 / 29 EN Refrigerator / User Manual4 Preparation
Before starting to use the product, check that all
preparations are made in accordance with the C You will hear a noise when the compressor
starts up. The liquids and gases sealed
instructions in sections "Important instructions for within the refrigeration system may also
safety and environment" and "Installation". give rise to noise, even if the compressor is
Clean the interior of the refrigerator as not running and this is quite normal.
recommended in the “Maintenance and
cleaning (Page 25)” section. Ensure that
C Front edges of the refrigerator may
feel warm. This is normal. These areas
interior is dry before operating. are designed to be warm to avoid
Plug the refrigerator into the grounded wall condensation.
outlet. When the door is opened the interior
illumination will turn on. To allow the fresh food compartment keep its
Run the refrigerator without putting any food ideal storage temperature, sensor must not be
for 6 hours and do not open its door unless covered by food.
absolutely required.
Do not allow the food to touch the temperature
sensor in fresh food compartment.
17 / 29 EN Refrigerator / User Manual5 Display and operating the product
5.1 Indicator panel
Touch-control indicator panel allows you to set the temperature and control the other functions of the
refrigerator. Just press the relevant buttons for function settings.
10 13
1 2 3 45 6 789 11 12 14 15 16
Note: Keys 2, 14, 15, and 16 have two functions. The second function has a “b” after the number below.
1-Power key
Press and hold this key for 3 seconds to turn the refrigerator on and off. 10-Filter Change icon
The filter reset icon will illuminate when it is time to replace the water
2-Quick Cool Key filter. (For instructions on how to do that, see page 12.)
Press this key to turn on the Quick Cool option, which drops the
temperature in the Fresh Food compartment to its lowest setting (33 F°) 11-Freezer Compartment temperature display
The set temperature of the Freezer compartment will be shown in
for two hours. It will return to the previously set temperature after this time. this display.
2b. Vacation Mode
12-Eco-Extra icon
If you hold the Quick Cool key for three seconds, you will turn on the
The Eco-Extra icon will be illuminated when Eco-Extra is turned on.
Vacation Mode. In Vacation mode the Fresh Food compartment will stay
(See 15b for more information on this option.)
at 50 F° while the Freezer maintains its set temperature. You will know
that Vacation Mode is on by the dashes in the Fresh Food temperature 13-Quick Freeze Indicator
display (6) and the illumination of the “beach umbrella” (7). Press and
display will be illuminated when the Quick Freeze option is turned on.
hold the Quick Cool key for 3 seconds to turn this option off. (See 15 for information on that option.)
3- Fresh Food Temperature set key 14-Freezer Temperature set key
Press this key to change the temperature in the Fresh Food section from
between -8 F° and 5 F°.
between 33 F° and 40 F°. The set temperature will be displayed in the
14.b. Ice Maker on/off key
Fresh Food temperature display (6).
Press and hold the Freezer Temp Set key for 3 seconds to turn the Ice
4- Power “off” indicator light Maker on and off.
15-Quick Freeze key
turned on. Once the refrigerator is turned on, the red light will go out. Press and hold the Quick Freeze key to turn on the Quick Freeze opti-
on, which will drop the temperature in the Freezer to its lowest setting
5-Quick Cool Indicator (-8 F°
temperature.
you know the Quick Cool option is on.
15b. Eco-Extra key
6-Fresh Food Temperature display
The set temperature in the Fresh Food compartment will be displayed Press and hold the Quick Freeze key for 3 seconds to turn on the
here. Eco-Extra option. In this mode
the refrigerator will operate in its most efficient way. It will only stay in
7-Vacation Mode indicator
The “beach umbrella” icon will be illuminated when Vacation Mode is this mode while the doors remain closed.
turned on. You will also see dashes in the Fresh Food temperature display.
16. Alarm Off key
8- High Temp Warning If the doors remain open for more than 1 minute, or if an error is
detected, an alarm will sound. If this key is pressed, the alarm will be
The red exclamation point will be illuminated if the temperature in Freezer silenced.
is too high after the initial 72 hours of operation. (See page 19 for more
16b. Filter Change Timer Reset
details)
9-Ice Maker Off icon key for 3 seconds to reset the timer. The filter reset light will come on
The ice cubes with a slash through them will be illuminated when the ice after 130 days of operation.
maker is turned off.
*optional: Figures in this user manual are schematic and may not match the product exactly. If the
C models.
18 / 29 EN Refrigerator / User ManualDisplay and operating the product
5.2 Sabbath Mode
Fresh Food Temp Set key
Press the Fresh Food Temp Set Function key for 3 seconds to activate or deactivate the Sabbath Mode.
will appear in the display. The cooling algorithm is set according to the sabbath fashion. If the user does
not deactivate the Sabbath mode, the refrigerator will automatically cancel it in 72 hours.
5.3 Showroom Mode
Power Fresh Food Temp Set key Freezer Temp Set Alarm Off
Showroom Mode is an option primarily used in dealer's showrooms. It allows the product to be turned
on without the operation of the fans and cooling system. To activate this mode, Press and hold “Power”
Then press “Fresh Food Temperature Set” key to activate. To deactivate, press and hold the “Power” &
5.4 High Temp Error
High Temp Error Icon
The High Temp Error icon is displayed when the Freezer temperature is too warm after the initial 72 hours of
operation. If the Freezer temperature reaches 28Fº (-2.2ºC) or higher, and doesn’t drop below 16 Fº (-9ºC)
within 12 hours, the High Temp Error icon will be illuminated, an alarm will sound and the set temperature
the alarm will be silenced, but the icon and flashing temperature will continue until the Freezer gets below
16Fº (-9ºC). If the Freezer does not cool below 16Fº (-9ºC) in the next 3.5 hours, the audible alarm will
the circuit to which the refrigerator is connected. If the icon continues to return, an authorized service agent
should be called to inspect the unit.
19 / 29 EN Refrigerator / User ManualOperating Temperatures
Freezer Fridge
Compartment Compartment Explanations
Setting Setting
5F°/-15°C 39 F° /4°C This is the normally recommended setting.
These settings are recommended when the ambient temperature
-4F°/-20°C 37 F° / 3°C
exceeds 86 F° /30°C.
Use when you wish to freeze your food in a short time. Your
Quick Freeze 39 F° / 4°C refrigerator will return to its previous mode when the process is
over.
Use this function when you place large quantities into the fridge
5 F° /-15°C or compartment or when you need to cool your food quickly. It is
Quick Fridge
colder recommended that you activate Quick Fridge function 4-8 hours
before placing the food in the compartment.
20 / 29 EN Refrigerator / User ManualOperating the product
5.5 Freezing fresh food 5.7 Placing the food
Freezer Various frozen food such
container before putting them in the refrigerator. compartment as meat, fish, ice cream,
shelves vegetables and etc.
room temperature before putting them in the
Fridge
refrigerator. Food in pans, covered plates
compartment
and closed containers
shelves
and in good quality.
Fridge Small and packaged food or
them from drying even if they are going to be compartment beverage (such as milk, fruit
stored for a short time. door shelves
Crisper Vegetables and fruits
tear-proof and resistant to cold, humidity, oils Delicatessen products (cheese,
Deli drawer
butter, salami and etc.)
packaging must be completely sealed.
5.8 Deep-freeze information
You can keep the freshness of food for many
they are thawed and they should never be re-
months (at 5 F° / -15°C or lower temperatures in
frozen.
the deep freeze).
food at one time.The quality of the food is best
preserved when it is frozen right through to the
core as quickly as possible.
C Divided the food into portions according
to your family’s daily or meal based
consumption needs.
causes the cooling system to operate C Pack the food in an airtight manner to
prevent them from drying even if they are
continuously until the food is frozen solid.
going to be stored for a short time.
5.6 Recommendations for
preserving frozen food
To ensure the quality achieved by the frozen food
manufacturer and food retailler is maintained,
follow the steps listed below:
1. Put packets in the freezer as quickly as possible
after purchase.
2. Make sure that contents of the package are labelled
and dated.
3. Check whether the "Use By" and "Best Before"
dates on the packaging are exceeded or not.
21 / 29 EN Refrigerator / User ManualOperating the product
5.9 Removing door shelves 5.11 Glass shelves
You can remove the door shelves to clean them. You can remove the glass shelves to clean them.
First, empty the food inside them. Be careful when removing the shelves since they
Push the desired shelf up to remove it. are heavy.
Do not remove the door shelf when there is food 5.12 Crisper bins
in it.
(in some models)
Crisper bins allow you to prepare the food for
freezing. You can also use these compartments to
store your food at a temperature a few degrees
below the fridge compartment.
You can increase the inner volume of your
5.10 Moving the FlexiLift Door Shelf refrigerator by removing any of the chiller
*optional compartments:
Moving the FlexiLift door shelf can be fixed in 3 1. Pull the compartment towards yourself until it
different positions. stops.
In order to move the shelf, push the buttons on the 2. Lift the compartment about 7/16’’ (1cm) up
side evenly. Shelf will be movable. and pull towards yourself to remove it from its
Move the shelf up or down. seating.
When the shelf is in the position that you want,
release the buttons. Rack will be fixed again in the 5.13 Deli Drawer
position where you have released the buttons. The Deli Drawer is designed with cool air
circulation intensified around it. This allows for
items stored in the drawer to be generally fresh
food compartment than average Fresh Food
temperatures.
If required, remove door shelves prior to Deli
Drawer removal
22 / 29 EN Refrigerator / User ManualOperating the product
5.14 Humidity controlled crisper 5.16 Butter & Cheese section
Humidity levels of the vegetables and fruit are Store food such as butter, cheese and margarine in
kept under control with the feature of humidity- this section.
controlled crisper and the food is ensured to stay
fresh longer.
We recommend you to place the leafy vegetables
such as lettuce, spinach and the vegetables which
are sensitive to humidity loss, in a horizontal
manner as much as possible inside the crisper, not
on their roots in a vertical position.
While the vegetables are being placed, individual
weights of the vegetables should be taken into
consideration. Heavy and hard vegetables should
be put at the bottom of the crisper and the
5.17 Door flappers
a door flapper
Movable a is intended to prevent the
lightweight and soft vegetables should be placed cold air inside the refrigerator from escaping
on top. outside. Sealing is provided when the gaskets on
Never leave vegetables inside the crisper in the door presses on the surface of the door flapper
their bags. This will cause them to decompose while the fridge compartment doors are closed.
prematuraly. If you wish to keep vegetables
separate, use perforated paper bags or similar
materials to do so. Certain fruits such as pears,
apricots, peaches or apples generate high levels of
ethylene gas. Do not place them with other fruits
and vegetables which do not, as this will cause
them to decompose faster.
5.15 Ice container
The ice container is used to collect ice produced
by the ice maker. Do not put water in it to make ice
as it may break. The ice container is not used for
storing foods.
C The ice machine may drop ice when the
ice container is opened.
23 / 29 EN Refrigerator / User ManualOperating the product
5.18 ActiveFresh Blue Light
Crispers of the refrigerator are illuminated with
blue light. Food stored in the crispers continue
their photosynthesis by means of the wavelength
effect of blue light and thus, preserve their
freshness and preserves their vitamin content.
5.19 IonGuard
(in some models)
the fridge compartment air duct. Thanks to this
system, air-borne bacteria and oderizing molecules
are removed from the air.
5.20 Odor filter
Odor filter in the air duct of the fridge compartment
prevents build-up of unpleasant odors in the
refrigerator.
24 / 29 EN Refrigerator / User Manual6. Maintenance and cleaning
The life of the product is extended and common 6.1 Avoiding bad odors
problems are reduced, if it is cleaned regularly. Materials that may cause odor are not used in the
production of our refrigerators. However, due to
B WARNING: Unplug the product before
cleaning it. inappropriate food preserving conditions and not
cleaning the inner surface of the refrigerator as
Never use gasoline, benzene or similar required can bring forth the problem of odor . Pay
substances for cleaning purposes. attention to following to avoid this problem:
Never use any sharp and abrasive tools, soap,
household cleaners, detergent and wax polish Food residuals, stains, etc. can cause odor .
for cleaning. Therefore, clean the refrigerator with baking
Dissolve one teaspoon of baking soda in 1 pint soda dissolved in water every 15 days. Never
of water. Soak a cloth with the solution and use detergents or soap.
wring it thoroughly. Wipe the interior of the
refrigerator with this cloth and dry thoroughly. Microorganisms spreading out from uncovered
Make sure that no water enters the lamp containers can cause unpleasant odors.
housing and other electrical items. Never keep the food that is past its expiration
If you will not use the refrigerator for a long date or has spoiled in the refrigerator.
period of time, unplug it, remove all food inside,
6.2 Protecting the plastic surfaces
Check regularly that the door gaskets are clean. Do not put liquid oils or oil-cooked meals in your
If not, clean them. refrigerator in unsealed containers as they damage
To remove door and body shelves, remove all of the plastic surfaces of the refrigerator. If oil is
its contents. spilled or smeared onto the plastic surfaces, clean
Remove the door shelves by pulling them up. and rinse the relevant part of the surface at once
with warm water.
install.
Never use cleaning agents or water that
contain chlorine to clean the outer surfaces and
chromium coated parts of the product. Chlorine
causes corrosion on such metal surfaces
25 / 29 EN Refrigerator / User Manual7. Troubleshooting
Check this list before contacting a servicer. Doing so will save you time and money. This list includes
frequent complaints that are not related to faulty workmanship or materials. Certain features mentioned
herein may not apply to your product.
The refrigerator is not working.
The power plug is not fully seated. >>> Plug it in outlet completely into the socket.
The fuse connected to the socket powering the product or the main fuse is blown. >>> Be sure the unit
and hold the Power button for three seconds to turn the unit on.
Condensation on the side wall of the fresh food compartment (MULTI ZONE, COOL,
CONTROL and FLEXI ZONE).
The door is opened too frequently >>> Take care not to open the product’s door too frequently.
The environment is too humid. >>> Do not install the product in humid environments.
holders.
The product’s door is left open. >>> Do not keep the product’s door open for long periods.
The thermostat is set to too low temperature. >>> Set the thermostat to appropriate temperature.
Compressor is not working.
In case of sudden power failure or pulling the power plug off and putting back on, the gas pressure
in the product’s cooling system is not balanced, which triggers the compressor thermic safeguard.
The product will restart after approximately 6 minutes. If the product does not restart after this period,
contact a servicer.
Defrosting is active. >>> This is normal for a fully-automatic defrosting product. The defrosting is
carried out periodically.
The product is not plugged in. >>> Make sure the power cord is plugged in.
The temperature setting is incorrect. >>> Select the appropriate temperature setting.
The power is out. >>> The product will continue to operate normally once the power is restored.
The refrigerator’s operating noise is increasing while in use.
The product’s operating performance may vary depending on the ambient temperature variations. This
is normal and not a malfunction.
The refrigerator runs too often or for too long.
The new product may be larger than the previous one. Larger products will run for longer periods.
The room temperature may be high. >>> The product will normally run for long periods in higher room
temperature.
The product may have been recently plugged in or a new food item is placed inside. >>> The product
will take longer to reach the set temperature when recently plugged in or a new food item is placed
inside. This is normal.
Large quantities of hot food may have been recently placed into the product. >>> Do not place hot food
into the product.
The doors were opened frequently or kept open for long periods. >>> The warm air moving inside will
cause the product to run longer. Do not open the doors too frequently.
The product may be set to temperature too low. >>> Set the temperature to a higher degree and wait
The fresh food compartment or freezer door washer may be dirty, worn out, broken or not properly
settled. >>> Clean or replace the washer. Damaged / torn door washer will cause the product to run for
longer periods to preserve the current temperature.
26 / 29 EN Refrigerator / User ManualTroubleshooting
The freezer temperature is very low, but the fresh food compartment temperature is
adequate.
The freezer compartment temperature is set to a very low degree. >>> Set the freezer compartment
temperature to a higher degree and check again.
The fresh food compartment temperature is very low, but the freezer temperature is
adequate.
The fresh food compartment temperature is set to a very low degree. >>> Set the freezer compartment
temperature to a higher degree and check again.
The food items kept in fresh food compartment drawers are frozen.
The fresh food compartment temperature is set to a very low degree. >>> Set the freezer compartment
temperature to a higher degree and check again.
The temperature in the fresh food compartment or the freezer is too high.
The fresh food compartment temperature is set to a very high degree. >>> Temperature setting of
the fresh food compartment has an effect on the temperature in the freezer compartment. Wait until
the temperature of relevant parts reach the sufficient level by changing the temperature of fresh food
compartment or freezer compartments.
The doors were opened frequently or kept open for long periods. >>> Do not open the doors too
frequently.
The product may have been recently plugged in or a new food item is placed inside. >>> This is
normal. The product will take longer to reach the set temperature when recently plugged in or a new
food item is placed inside.
Large quantities of hot food may have been recently placed into the product. >>> Do not place hot food
into the product.
Shaking or noise.
The product is making noise of liquid flowing, spraying etc.
The product’s operating principles involve liquid and gas flows. >>> This is normal and not a
malfunction.
There is sound of wind blowing coming from the product.
The product uses a fan for the cooling process. This is normal and not a malfunction.
There is condensation on the product’s internal walls.
Hot or humid weather will increase icing and condensation. This is normal and not a malfunction.
The doors were opened frequently or kept open for long periods. >>> Do not open the doors too
frequently; if open, close the door.
There is condensation on the product’s exterior or between the doors.
The ambient weather may be humid, this is quite normal in humid weather. >>> The condensation will
dissipate when the humidity is reduced.
The interior smells bad.
The product is not cleaned regularly. >>> Clean the interior regularly using sponge, warm water and
carbonated water.
Certain containers and packaging materials may cause odor. >>> Use containers and packaging
materials free of odor.
27 / 29 EN Refrigerator / User ManualTroubleshooting
organisms may spread out of unsealed food items and cause bad odor. Remove any expired or spoiled
foods from the product.
The door is not closing.
Food packages may be blocking the door. >>> Relocate any items blocking the doors.
product.
The ground is not level or firm. >>> Make sure the ground is level and sufficiently firm to bear the
product.
The vegetable bin is jammed.
The food items may be obstructing with the upper section of the drawer. >>> Reorganize the food
items in the drawer.
If The Surface Of The Product Is Hot.
High temperatures may be observed between the two doors, on the side panels and at the rear grill
while the product is operating. This is normal and does not require service maintenance! Be careful
when touching these areas.
A WARNING:
If the problem persists after following the instructions in this section, contact your vendor or an
A WARNING:
California to cause cancer.
28 / 29 EN Refrigerator / User Manual¡Le felicitamos la compra de su nuevo frigorífico . Este frigorífico se ha fabricado en instalaciones
modernas con el máximo cuidado y meticulosos controles de calidad. ¡Tenemos plena confianza en la
calidad de nuestro producto y lo apoyamos con una garantía de dos años para las piezas y la mano de
obra, y de cinco años para el sistema sellado. Antes de utilizar el producto lea este manual por completo
para garantizar que haya entendido todas las características y beneficios y como operar el producto de
manera adecuada. El presente manual se debe guardar en un lugar accesible y se debe entregar a los
futuros dueños.
Esta guía le ayudará a utilizar el aparato de forma rápida y segura.
Por favor, lea la guía del usuario antes de instalar y operar el aparato.
observe los símbolos utilizados en el presente manual y su significado.
Rellene y guarde para futuras consultas
C Información importante y consejos
útiles.
Modelo
Número de Serie
A Riesgos para la vida y la propiedad. Fecha de Compra
Comprador Original
B Riesgo de descarga eléctrica. Concesionario
Ciudad
Estado
El embalaje del aparato está
hecho con materiales reciclables, Código Zip
de acuerdo con la Legislación
Ambiental Nacional. País1 El frigorífico 3 4 Preparación 16
2 Instrucciones importantes respecto a 5 Pantalla y uso del producto 17
la seguridad y el medio ambiente 5
5.1 Panel de indicadores . . . . . . . . . . . . . . . .17
. . . . . . . . . . . . . . . . . . .5 . . . . . . . . . . . . . . . . . . . . .18
2.1.1 Advertencia de HCA . . . . . . . . . . . . . . . . . .6 . . . . . . . . . . . . . . . . . . .18
2.1.2 Para aparatos con dispensador de agua . . .6 5.4 Error de Alta Temperatura . . . . . . . . . . . . .18
2.2 Uso previsto . . . . . . . . . . . . . . . . . . . . . . . .6 5.5 Congelación de alimentos frescos . . . . . . .20
. . . . . . . . . . . . . . . . . . . .6 5.6 Recomendaciones para conservar los alimentos
2.4 Información de paquete . . . . . . . . . . . . . . .6 congelados. . . . . . . . . . . . . . . . . . . . . . . . . . . . . 20
5.7 Colocación de los alimentos . . . . . . . . . . .20
3 Instalación 7 5.8 Información sobre la congelación . . . . . . .20
3.1 Antes de Instalación. . . . . . . . . . . . . . . . .11 5.9 Cómo retirar los estantes de la puerta . . . .21
3.2 Lugar de instalación adecuado . . . . . . . . .11 5.10 Mover el Estante FlexiLift de Puerta. . . . . .21
3.3 Instalaciones Insertadas . . . . . . . . . . . . . .12 5.11 Estantes de vidrio . . . . . . . . . . . . . . . . . . .21
3.4 Conexión eléctrica . . . . . . . . . . . . . . . . . .12 5.12 Cajones de verdura . . . . . . . . . . . . . . . . .21
3.5 Ajuste de las patas . . . . . . . . . . . . . . . . . .12 5.13 Cajón de Charcutería . . . . . . . . . . . . . . . .21
3.6 Luz de iluminación . . . . . . . . . . . . . . . . . .13 5.14 Cajón refrigerante con control de humedad22
3.7 Aviso de Puerta/Cajón Abierto . . . . . . . . . .13 5.15 Contenedor de hielo . . . . . . . . . . . . . . . . .22
3.8 Conexión de agua. . . . . . . . . . . . . . . . . . .13 . . . . . . . .22
3.9 Conexión de la manguera de agua al 5.17 Aletas de puerta . . . . . . . . . . . . . . . . . . . .22
frigorífico . . . . . . . . . . . . . . . . . . . . . . . . .13 5.18 ActiveFresh Luz Azul . . . . . . . . . . . . . . . .23
3.10 Conexión de la linea de agua al suministro de 5.19 IonGuard . . . . . . . . . . . . . . . . . . . . . . . . .23
agua . . . . . . . . . . . . . . . . . . . . . . . . . . . .13
3.11 Instalar Filtro de Agua Interno . . . . . . . . . .14 6. Limpieza y mantenimiento 24
3.12 Antes de utilizar el dispensador de agua. .15 6.1 Cómo evitar los malos olores . . . . . . . . . . .24
3.12.1Uso de la máquina de hielo. . . . . . . . . . .15 6.2 Proteger las superficies de plástico . . . . . .24
3.13 Transporte del aparato . . . . . . . . . . . . . . .15
7. Solución de problemas 25
2 Frigorífico / Manual del usuario1 El frigorífico
*3
*12 *4
11
*5 *10
9 1
*8
*6
*7
2
13 14
*16 15
9- Dispensador de agua
1- Compartimento frigorífico 10- Estante de vidrio ajustable
2- Congelador inferior 11- Tapa del ventilador
3- Pantalla/panel indicador 12- Filtro de agua
4- 13- Contenedor de Hielo
5- Estantes de Puerta FlexiLift 14- Cajón de Almacenamiento de Alimentos
6- Botellero Congelados
7- Cajón de Charcutería 15- Cajón del congelador
8- Cajón de verduras 16-
C usted ha comprado las piezas que no se incluyen en el aparato, entonces esas piezas son solo válidas
para otros modelos.
3 Frigorífico / Manual del usuarioLimitaciones de peso del estante del frigorífico
Los estantes cantaleta del compartimiento refrigerador, los que sólo tienen soportes traseros, están
probados para un máximo de 25 kg (55 libras) por cada pieza.
Los crispers tienen una capacidad de hasta 15 kg (33 libras) por cada uno. Cajón de Charcutería puede
mantener 20 kg (44 libras).
El contenedor de hielo tiene una capacidad de hasta 10 kg (22 libras), es para el uso sin hielo. El
depósito de hielo tiene capacidad para 24 kg (53 libras) y el cajón tiene capacidad para 30 kg (66
libras).
8 pounds = 4 kgs
55 pounds = 25 kgs
8 pounds = 4 kgs
105 pounds = 48 kgs
33 pounds = 15 kgs
13 pounds = 6 kgs
44 pounds = 20 kgs
22 pounds =10 kgs 48 pounds = 22 kgs
Up to 11 pounds / 5 kgs day ice production
66 pounds = 30 kgs
4 Frigorífico / Manual del usuario2 Instrucciones importantes respecto a la seguridad y el medio ambiente
Este capítulo contiene información de seguridad aplastarse ni entrar en contacto con ninguna fuente
que le ayudará a evitar el riesgo de lesiones de calor.
personales o daños a la propiedad.
El incumplimiento de estas instrucciones anulará
cualquier garantía del aparato.
ADVERTENCIA: Mantenga libres
de obstrucciones las aberturas de
A ventilación, tanto las que están en
el cierre de la unidad como las que
están en la estructura incorporada.
ADVERTENCIA: No utilice ningún
agua. ¡Existe el riesgo de descarga eléctrica!
dispositivo mecánico, ni ningún otro
A aparato, para acelerar el proceso Nunca desenchufe tirando del cable, siempre tire
de descongelación, salvo los agarrando el enchufe.
recomendados por el fabricante.
ADVERTENCIA: No dañe el circuito
A refrigerante. electricidad. Estos sistemas son perjudiciales para el
aparato.
ADVERTENCIA: No utilice
aparatos eléctricos dentro de los limpieza y las reparaciones.
B compartimentos para alimentos del
aparato, a menos que sean del tipo servicio técnico autorizado. El fabricante no se hace
recomendado por el fabricante. responsable de los daños que puedan surgir de los
procedimientos realizados por personas no autorizadas.
2.1 Seguridad general en el compartimiento del congelador. Pueden explotar.
-
8 años y por personas cuyas capacidades físicas, dos por vapor para limpiar o descongelar el frigorífico.
sensoriales o mentales no se hayan desarrollado El vapor provocará un cortocircuito o una descarga
completamente o que carezcan de experiencia y eléctrica, ya que entraría en contacto con las piezas
conocimientos, siempre que estén supervisados o eléctricas del frigorífico.
formad Los niños no deben jugar con el aparato. La
limpieza y mantenimiento no deben ser realizados por y el cajón, como medio de apoyo o escalón. Esto hará
niños, a menos que estén supervisados. que el aparato se vuelque o que se dañen partes del
mismo.
mientras está en uso.
de perforación o de corte. El refrigerante que puede
salir disparado cuando se perforan los canales de gas
Autorizado! ¡Existe el riesgo de descarga eléctrica! del evaporador, las extensiones de las tuberías o los re-
vestimientos de la superficie puede causar irritaciones
conexión a tierra protegida por un fusible que cumpla en la piel y lesiones en los ojos.
con los valores de la placa de características. Haga
que la instalación de la toma de tierra sea hecha frigorífico con ningún material.
por un electricista calificado. Nuestra empresa no se
responsabiliza de los daños que se produzcan si el existe el riesgo de incendio o explosión!
aparato se utiliza sin conexión a tierra de acuerdo con -
la normativa local. bles o productos que contengan gases inflamables (por
No coloque el cable de alimentación debajo del pro- ejemplo, sprays), así como materiales explosivos.
ducto. No coloque objetos pesados sobre el cable
del aparato. Derramar agua sobre un componente
de corriente. El cable de corriente no debe doblarse,
5 Frigorífico / Manual del usuarioInstrucciones importantes respecto a la seguridad y el medio ambiente
eléctrico puede causar descargas eléctricas o riesgo de las mangueras. La temperatura del agua en
de incendio. funcionamiento normal debe estar entre 0,6°C
- (33F°) como mínimo y 38°C (100F°) como
camentos sensibles al calor, material científico y otros)
máximo.
que requieran un control preciso de la temperatura.
Utilice únicamente agua potable.
de tiempo, desenchúfelo y descargue los alimentos 2.2 Uso previsto
en él.
azul con herramientas ópticas.
doméstico. Este aparato no es apto para su uso
comercial, por lo que no debe utilizarse para
la puerta y causar lesiones o daños. Pueden produ- fines distintos de los previstos.
cirse problemas similares en caso de poner cosas
encima del aparato. almacenar alimentos.
de su cuerpo no quede atrapada por las partes móvi- responsabilidad derivada de un uso o transporte
les del interior del aparato. incorrecto.
2.1.1 Advertencia de HCA 2.3 Seguridad infantil
R600a: que manipulen el aparato.
Este gas es inflamable. Por lo tanto, preste atención a no
dañar el sistema de refrigeración y las tuberías durante PELIGRO: Riesgo de que los niños
el uso y el transporte. En caso de daños, mantenga queden atrapados. Antes de tirar el
el aparato alejado de posibles fuentes de fuego que antiguo frigorífico o congelador:
puedan provocar que el aparato se incendie y ventile la
habitación en la que está colocado. A
que los niños No puedan trepar
El tipo de gas utilizado en su producto se fácilmente al interior.
puede identificar mirando la etiqueta de
C modelo/serie situada en la pared izquierda
del compartimento superior. 2.4 Información de paquete
ADVERTENCIA: No tire nunca el aparato
A al fuego. fabrican con material reciclable, de acuerdo con
nuestra Reglamentación Nacional para el Medio
2.1.2 Para aparatos con Ambiente. No desechar el embalaje junto con
dispensador de agua la basura doméstica ni similares. Llévelos a los
La presión para la entrada de agua fría será de puntos de recolección de material de embalaje
designados por las autoridades locales.
del agua supera los 550 kPa (80 psi), utilice una
válvula limitadora de presión en la red eléctrica. desecho.
pida ayuda a un fontanero profesional.
en su instalación, siempre use un equipo de
prevención de golpes de ariete en la instalación.
Consulte a fontaneros profesionales si no está
seguro de que no hay un efecto de golpe de
ariete en la instalación.
No instale en la entrada de agua caliente. Tome
precauciones contra el riesgo de congelación
6 Frigorífico / Manual del usuario3 Instalación
Deje un espacio mínimo de 2"
(50 mm) entre la parte superior
del frigorífico y el hueco.
71 ¹¹/16
6
5/1
36 1
Toma de
corriente
Línea de agua
Espacio libre mínimo
Línea de agua
empotrada Toma de corriente
Vista superior
empotrada
2'' del techo 5/8' de los lados y 1-
Deje un espacio mínimo de 1 3/4" en la parte 3/8'' de la parte trasera.
trasera para la correcta circulación del aire y
25'' (635mm)
23 5/8” (600mm) Deje unlas conexiones
espacio mínimoeléctricas y de
de 1 3/8" agua.
(35 mm) en
Encimera
Armario la parte trasera para la correcta circulación del
aire y las conexiones eléctricas y de agua.
9/16'' (15mm) de ancho mínimo
7 Frigorífico / Manual del usuarioInstalación
!
armario
no incluye asa
en general
parte superior del
armario
incluye asa
"
" Altura-Total “A’’ Altura-Parte Superior Profundidad-Sólo Profundidad-Sin Asas “D”
del Armario“B” Armario “C” “O”
"
69 3 /4” ( 1771 mm ) 67 5/16”( 1710 mm ) 23 5/8” ( 600 mm ) 26 13/16” ( 680,5 mm )
"
Profundidad Con Asas Ancho-Armario “F” Profundidad- ProfundidadTotal-
" “E” CajónAbierto “G” CajónAbierto “H”
29” ( 737 mm ) 35 3/4”( 908 mm ) 45 9/16” ( 1157 mm ) 46 3/16” ( 1173,5 mm )
8 Frigorífico / Manual del usuarioInstalación
Altura-Total “A’’ Altura-Parte Superior Profundidad-Sólo Profundidad-Sin Asas “D”
del Armario“B” Armario “C” “O”
69 3 /4” ( 1771 mm ) 67 5/16”( 1710 mm ) 23 5/8” ( 600 mm ) 26 13/16” ( 680,5 mm )
Profundidad Con Asas Ancho-Armario “F” Profundidad- ProfundidadTotal-
“E” CajónAbierto “G” CajónAbierto “H”
29” ( 737 mm ) 35 3/4”( 908 mm ) 45 9/16” ( 1157 mm ) 46 3/16” ( 1173,5 mm )
Espacio libre mínimo desde la parte superior: 2” pulgadas
Espacio libre mínimo desde los lados: 5/8” pulgadas
Espacio Libre Mínimo Desde la Parte Trasera: 1 3/8” pulgadas
9 Frigorífico / Manual del usuarioInstalación
Profundidad-Puertas Profundidad Total- Ancho-Puertas Ancho-Puertas Abiertas
Abiertas90° “I” Puertas Abiertas90° Abiertas90° ConAsas 90°-DeArmarioAlAsa “L”
“J” “K”
42 1/4” ( 1072,6 mm ) 43 1/16” ( 1094 mm ) 41 11/16” ( 1059,2 mm ) 3” ( 75,6 mm )
Ancho-Puertas Ancho-Puertas Ancho-Puertas Abiertas Profundidad Puertas
Abiertas130°- DeAsaAlAsa Abiertas130°- 130” “P” Abiertas 130° “R”
“M” DeArmarioAlAsa “N”
60 1/4” ( 1530,2 mm ) 12 1/4” ( 311,2 mm ) 15 3/8” ( 391 mm ) 39’’ ( 991mm )
10 Frigorífico / Manual del usuarioInstalación
3.1 Antes de Instalación ADVERTENCIA: La instalación y las
conexiones eléctricas del aparato deben
hueco son suficientes para acoger el producto
y que existen las conexiones adecuadas de B Autorizado. El fabricante no se hace
responsable de los daños que puedan
electricidad y fontanería.
derivarse de los procedimientos llevados a
Válvulas de psi kPa bar
cabo por personas no autorizadas.
presión de línea
de agua ADVERTENCIA: Antes de la instalación,
compruebe visualmente si el aparato tiene
A
Presión Máxima de 90 620 6.2
Funcionamiento:
Los aparatos dañados causan riesgos para
Presión máxima 80 550 5.5
su seguridad.
para el dispositivo
de válvula 3.2 Lugar de instalación adecuado
limitadora
distancia mínima de 30 cm (12") de fuentes
Requisitos eléctricos
de calor tales como encimeras, hornos,
Tensión 120V AC calefactores de espacios, radiadores y estufas, y
Frecuencia 60 Hz a una distancia mínima de 5 cm (2") de hornos
Corriente 15 A eléctricos. El aparato no debe ser sometido a
la luz directa del sol ni mantenerse en lugares
húmedos después de la instalación.
cercano para la instalación del aparato. Para
que el aparato esté listo para su uso, asegúrese alfombras o moquetas.
de que la instalación eléctrica es la adecuada
uniforme para evitar que se tambalee.
En caso contrario, llame a un electricista
cualificado para que realice los arreglos temperaturas inferiores a 10ºC /50°F.
necesarios.
agua interno. El número de pieza del filtro es C lado del otro, debe haber al menos 1 1/2”
(4 cm) de distancia entre ellos.
4918450200 y puede utilizar este número de
pieza cuando pida filtros de repuesto.
alrededor del aparato para garantizar la libre
La preparación de la ubicación y la circulación del aire.
C instalación eléctrica en el lugar de
instalación es responsabilidad del cliente. debe haber un espacio de al menos 35 mm (1
Fontanería: Es importante que el 3/8”) entre el frigorífico y la pared trasera. Para
C frigorífico se conecte únicamente a la garantizar esto, coloque los amortiguadores
línea de agua fría. circulares grises que se instalarán en la cubierta
El aparato no debe estar enchufado metálica trasera del refrigerador. Éstos vienen
durante la instalación. De lo contrario, en el interior del cajón de los alimentos frescos.
B ¡existe el riesgo de muerte o lesiones
graves!
11 Frigorífico / Manual del usuarioYou can also read