From Squishy Circuits to Robotics
←
→
Page content transcription
If your browser does not render page correctly, please read the page content below
From Squishy Circuits to Robotics
                       Kristy Reinhartz
                Kreinhartz@dadeschools.net
              website: reinhartz.wikispaces.com
               David Lawrence Jr. K-8 Center
                       Mail Code: 5005
                    Phone: 305-354-2600

For information concerning IMPACT II opportunities including
Adapter and Disseminator grants, please contact:

                   The Education Fund
                   305-558-4544, Ext. 113
                   e-mail: IMPACT@educationfund.org
                   website: www.educationfund.org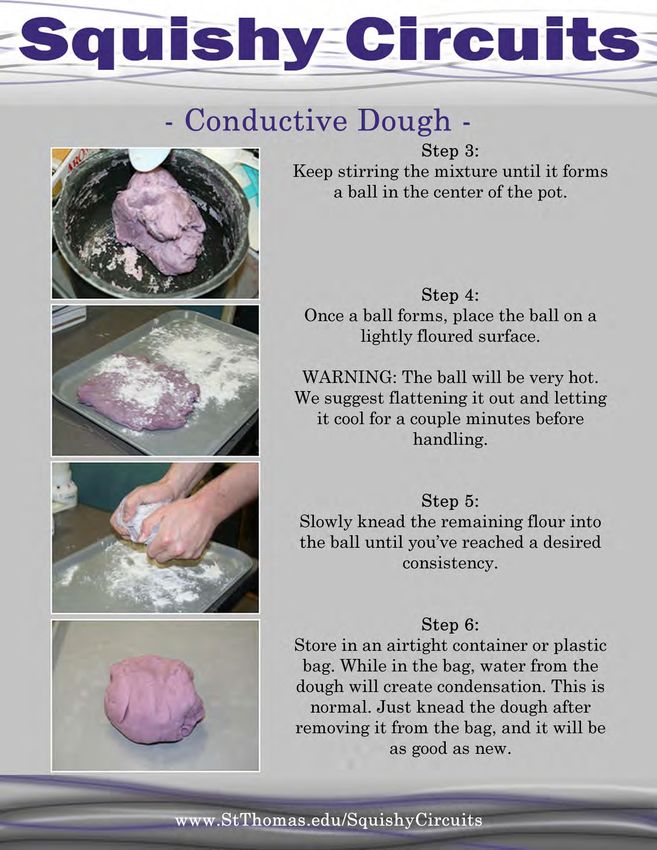
Table of Contents
Goals and Objectives:.................................................................................................................................... 3
Common Core State Standards: .................................................................................................................... 3
English Language Arts Standards in Science & Technical Subjects for Grade 6-8- Reading ......................... 3
English Language Arts Standards in Science & Technical Subjects for Grade 6-8- Writing .......................... 3
English Language Arts Standards in Science & Technical Subjects for Grade 6-8- Speaking & Listening ..... 4
Sunshine State Standards: ............................................................................................................................ 4
National Science Education Standards Grades 5-8: ...................................................................................... 5
Standards for Technological Literacy- All Ages: ............................................................................................ 5
Course Outline/Overview ............................................................................................................................. 6
Lesson Plans & Step-By-Step Implementation Guide: .................................................................................. 6
Lesson 1: Engineering in Our Daily Lives ....................................................................................................... 7
Lesson 2: Squishy Circuits ............................................................................................................................. 9
Extensions: .................................................................................................................................................. 13
Resource List ............................................................................................................................................... 13
Appendix ..................................................................................................................................................... 14

                                                                                                                                                               2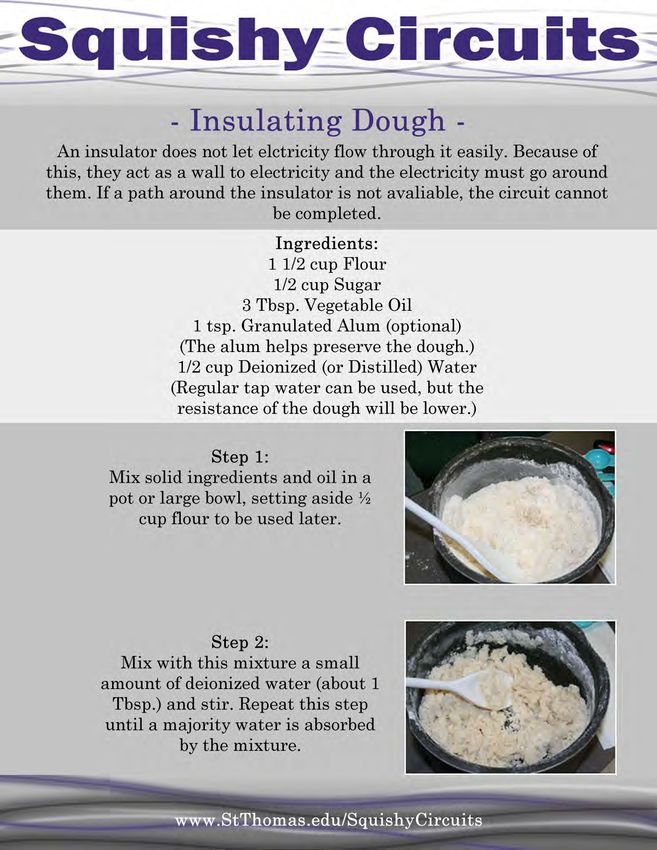
Goals and Objectives:
Students will learn about conductors, insulators, and resistance.
Students will learn about open circuits, closed circuits, and short circuits.
Students will learn about series circuits and parallel circuits.
Students will learn that different circuit designs result in different electrical behaviors.
Students will learn about current flow and the operational differences between series
and parallel circuits.
Students will learn to predict outcomes and draw conclusions.
Students will learn about teamwork and working in groups.
Common Core State Standards:
(http://www.corestandards.org/)
English Language Arts Standards in Science & Technical Subjects for Grade 6-8- Reading
CCSS.ELA-Literacy.RST.6-8.1 Cite specific textual evidence to support analysis of science and
technical texts.
CCSS.ELA-Literacy.RST.6-8.2 Determine the central ideas or conclusions of a text; provide an
accurate summary of the text distinct from prior knowledge or opinions.
CCSS.ELA-Literacy.RST.6-8.3 Follow precisely a multistep procedure when carrying out
experiments, taking measurements, or performing technical tasks.
CCSS.ELA-Literacy.RST.6-8.4 Determine the meaning of symbols, key terms, and other domain-
specific words and phrases as they are used in a specific scientific or technical context relevant
to grades 6–8 texts and topics.
CCSS.ELA-Literacy.RST.6-8.6 Analyze the author’s purpose in providing an explanation,
describing a procedure, or discussing an experiment in a text.
CCSS.ELA-Literacy.RST.6-8.7 Integrate quantitative or technical information expressed in words
in a text with a version of that information expressed visually (e.g., in a flowchart, diagram,
model, graph, or table).
CCSS.ELA-Literacy.RST.6-8.9 Compare and contrast the information gained from experiments,
simulations, video, or multimedia sources with that gained from reading a text on the same
topic.
CCSS.ELA-Literacy.RST.6-8.10 By the end of grade 8, read and comprehend science/technical
texts in the grades 6–8 text complexity band independently and proficiently.
English Language Arts Standards in Science & Technical Subjects for Grade 6-8- Writing
CCSS.ELA-Literacy.WHST.6-8.1 Write arguments focused on discipline-specific content.
CCSS.ELA-Literacy.WHST.6-8.2 Write informative/explanatory texts, including the narration of
historical events, scientific procedures/ experiments, or technical processes.
CCSS.ELA-Literacy.WHST.6-8.4 Produce clear and coherent writing in which the development,
organization, and style are appropriate to task, purpose, and audience.
3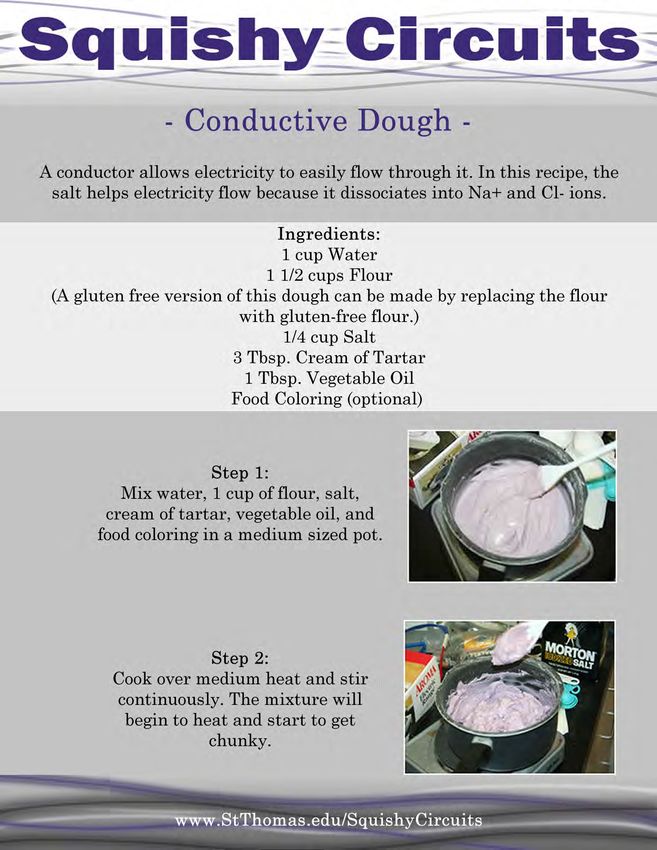
CCSS.ELA-Literacy.WHST.6-8.5 With some guidance and support from peers and adults, develop
        and strengthen writing as needed by planning, revising, editing, rewriting, or trying a new
        approach, focusing on how well purpose and audience have been addressed.
        CSS.ELA-Literacy.WHST.6-8.6 Use technology, including the Internet, to produce and publish
        writing and present the relationships between information and ideas clearly and efficiently.
        CCSS.ELA-Literacy.WHST.6-8.7 Conduct short research projects to answer a question (including a
        self-generated question), drawing on several sources and generating additional related, focused
        questions that allow for multiple avenues of exploration.
        CCSS.ELA-Literacy.WHST.6-8.8 Gather relevant information from multiple print and digital
        sources, using search terms effectively; assess the credibility and accuracy of each source; and
        quote or paraphrase the data and conclusions of others while avoiding plagiarism and following
        a standard format for citation.
        CCSS.ELA-Literacy.WHST.6-8.9 Draw evidence from informational texts to support analysis
        reflection, and research.
        CCSS.ELA-Literacy.WHST.6-8.10 Write routinely over extended time frames (time for reflection
        and revision) and shorter time frames (a single sitting or a day or two) for a range of discipline-
        specific tasks, purposes, and audiences.

English Language Arts Standards in Science & Technical Subjects for Grade 6-8- Speaking &
Listening
       CCSS.ELA-Literacy.SL.8.1 Engage effectively in a range of collaborative discussions (one-on-one,
       in groups, and teacher-led) with diverse partners on grade 8 topics, texts, and issues, building on
       others’ ideas and expressing their own clearly.
       CCSS.ELA-Literacy.SL.8.3 Delineate a speaker’s argument and specific claims, evaluating the
       soundness of the reasoning and relevance and sufficiency of the evidence and identifying when
       irrelevant evidence is introduced.
       CCSS.ELA-Literacy.SL.8.4 Present claims and findings, emphasizing salient points in a focused,
       coherent manner with relevant evidence, sound valid reasoning, and well-chosen details; use
       appropriate eye contact, adequate volume, and clear pronunciation.
       CCSS.ELA-Literacy.SL.8.5 Integrate multimedia and visual displays into presentations to clarify
       information, strengthen claims and evidence, and add interest.
       CCSS.ELA-Literacy.SL.8.6 Adapt speech to a variety of contexts and tasks, demonstrating
       command of formal English when indicated or appropriate. (See grade 8 Language standards 1
       and 3 here for specific expectations.)

Sunshine State Standards:
    •   MA.912.S.1.1: Formulate an appropriate research question to be answered by collecting data or
        performing an experiment.
    •   SC.6.P.11.1 Explore the Law of Conservation of Energy by differentiating between potential and
        kinetic energy. Identify situations where kinetic energy is transformed into potential energy and
        vice versa.

                                                                                                          4
•   SC.7.P.11.3 Cite evidence to explain that energy cannot be created nor destroyed, only changed
      from one form to another.
  •   SC.7.N.1.3 Distinguish between an experiment (which must involve the identification and
      control of variables) and other forms of scientific investigation and explain that not all scientific
      knowledge is derived from experimentation.
  •   SC.6.N.1.5 Recognize that science involves creativity, not just in designing experiments, but also
      in creating explanations that fit evidence.

National Science Education Standards Grades 5-8:
      CONTENT STANDARD A: Science as Inquiry
      As a result of activities, all students should develop
          •        Abilities necessary to do scientific inquiry
          •        Understandings about scientific inquiry
      CONTENT STANDARD B: Physical Science
      As a result of their activities, all students should develop an understanding of
          •        Transfer of energy
      CONTENT STANDARD E: Science and Technology
      As a result of activities, all students should develop
          •        Understandings about science and technology

Standards for Technological Literacy- All Ages:
      Design
          •       Standard 8: Students will develop an understanding of the attributes of
                  design.
          •       Standard 9: Students will develop an understanding of engineering design.
          •       Standard 10: Students will develop an understanding of the role of
                  troubleshooting, research and development, invention and innovation, and
                  experimentation in problem solving.

                                                                                                          5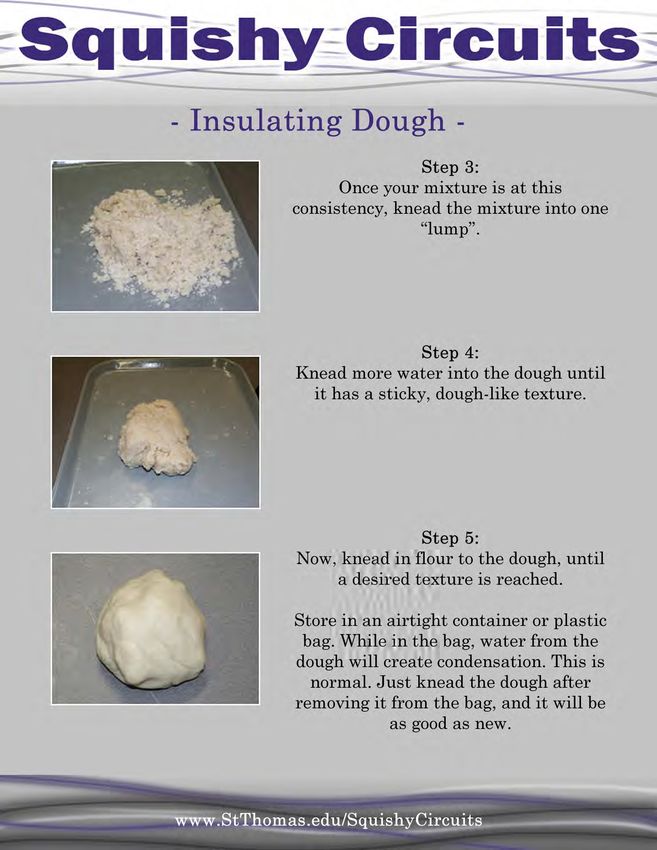
Course Outline/Overview

The STEM Elective offered at David Lawrence Jr. K8 Center is a hands-on, project-oriented, inter-
disciplinary introductory engineering course. The class is a one credit course designed to address
national educational standards in Science, Technology, Engineering, Math, and the Arts. Most of the
activities which take place in the classroom during the first part of the school year are centered around
the Miami-Dade County SECME Competition. So, my students learn about the engineering design
process and the concepts of mechanical energy while building mousetrap cars. In addition, the students
learn about electrical energy and robotics while preparing for the robotic hand competition. This lesson
plan was used to get students ready to build the robotic hand.

This project was inspired by a lesson plan found online by Perry Roth-Johnson & Chris Nguyen at BEAM
UCLA (http://beam.ucla.edu/sites/default/files/docs/Squishy_Circuits.pdf). Electrical Circuits are the
foundation of our modern, technology-driven lives. Everything from simple light bulbs to complex
devices like iPhones depend on electrical circuits in order to function. The main point of this lesson is to
give students in my STEM Electives a hands-on experience with circuits. Students will work with a non-
traditional circuit technology, learn to solder, and finally build a robot with their new soldering skills.
This experience includes an introduction to circuits using conductive playdough and insulating
playdough, followed by the use of learn- to-solder kits and ladybug soldering robot kits.

Lesson Plans & Step-By-Step Implementation Guide:
The following implementation guide is a summary of the lessons I followed during the curricular unit for
a group of middle school students enrolled in a STEM/Critical Thinking Elective. Each lesson plan can be
adapted to meet the desired objectives or available time.

                                                                                                           6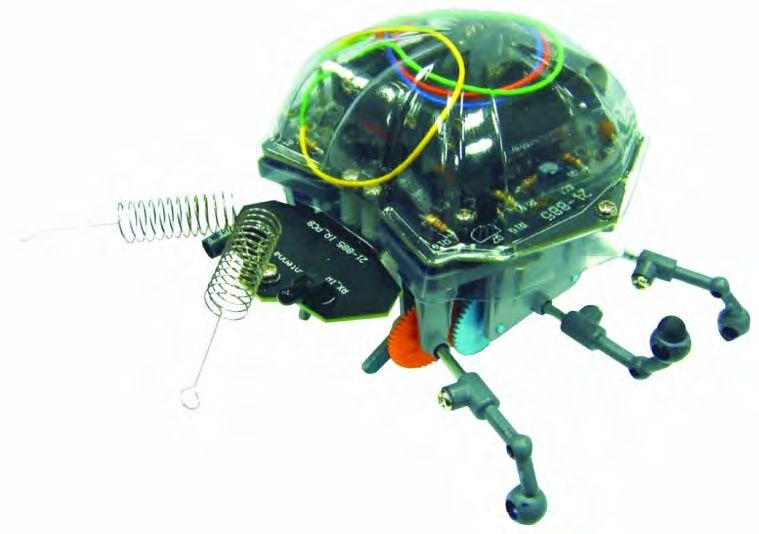
Lesson 1: Engineering in Our Daily Lives
Kick-Off: In order to get students to start thinking about how important Engineering is as a career, ask
them to think about how different their world is today from those of their parents and grandparents.
Share with them a story about how teenagers enjoying music at home has changed over time. For
example, younger students of today are not familiar with a cassette tape. Show pictures of music
players from different periods of time.

Materials & Resources:
      Computer
      Projector
      Internet

                                                                                                           7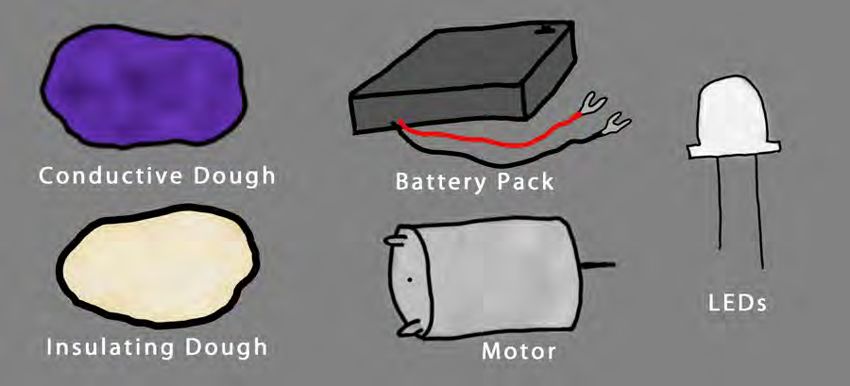
Activities and Strategies:
    1. Ask students to list 5 items that they own or use on a daily basis that they cannot imagine living
        without.
    2. Next, ask them to describe how they believe the items evolved into their current forms.
        Students can sketch or give written descriptions.
    3. Now, ask the students to list all of the different types of people who influenced the creation,
        design, and evolution of each item.
    4. Students should be encouraged to imagine the backgrounds, careers, education, and lifestyles of
        the people who were involved in the evolution of their items.
    5. After being given time to work on their responses without the use of the Internet, students
        should be allowed to go on the Internet and research any missing gaps in their responses.

Assessment: Students will be given the opportunity to present their findings to the rest of the class and
will be graded with a rubric.

Extension: As an extension to this activity, students are encouraged to bring in pictures or items from
their homes which exemplify one of the items they listed in their responses.

                                                                                                          8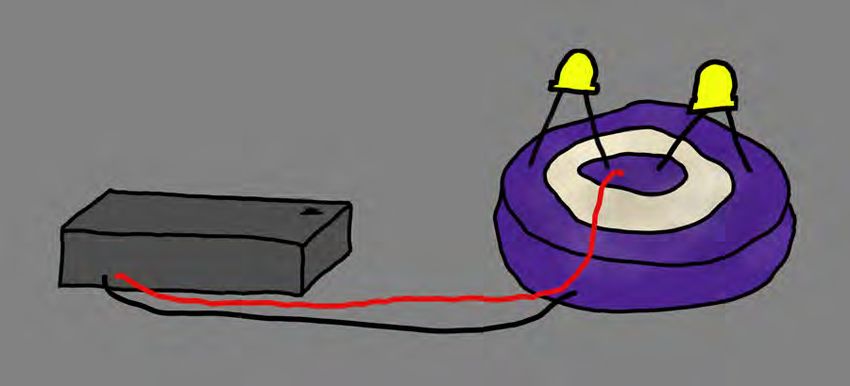
Lesson 2: Squishy Circuits
This lesson is available online from the University of St. Thomas at
http://courseweb.stthomas.edu/apthomas/SquishyCircuits/PDFs/Squishy%20Circuits%20Classroom%20
Guide.pdf and from BEAM UCLA at http://beam.ucla.edu/sites/default/files/docs/Squishy_Circuits.pdf.

Background Information:
This lesson plan includes recipes for two kinds of playdough: conductive dough and insulating dough.
These two kinds of playdough can be used together to introduce kids to the fundamental concepts that
make electrical circuits work. Sparkfun.com has an excellent introduction to circuits as well as a
simulation of current flowing through a simple circuit. The link for the website is
https://learn.sparkfun.com/tutorials/what-is-a-circuit.

The following background information is from the Sparkfun website:
        A battery or a wall outlet has a certain number of volts. This is a measurement of the
        electrical potential produced by the battery, or the utility grid connected to the wall outlet.
        In order for electricity to do any work, it needs to be able to move. It’s kind of like a blown-up
        balloon; if you pinch it off, there is air in there that could do something if it’s released, but it
        won’t actually do anything until you let it out.
        Electricity can only flow through materials that can conduct electricity, such as copper wire.
        Electricity wants to flow from a higher voltage to a lower voltage.
        I f you create a conductive path between a higher voltage and a lower voltage, electricity will
        flow along that path. And if you insert something useful into that path like an LED, the flowing
        electricity will do some work for you, like lighting up that LED. Huzzah!

        Every source of electricity has two sides. You can see this on batteries, which have metal caps
        on both ends, or your wall outlet that has two (or more) holes. In batteries and otherDC (Direct
        Current) voltage sources, these sides (often called terminals) are named positive(or “+”),
        and negative (or “-”).
        A circuit is a circular path, which is always required to get electricity to flow and do something
        useful. A circuit is a path that starts and stops at the same place.

        The reason we want to build circuits is to make electricity do useful things for us. The way we do
        that is by putting things in the circuit that use the current flow to light up, make noise, run
        programs, etc.

                                                                                                               9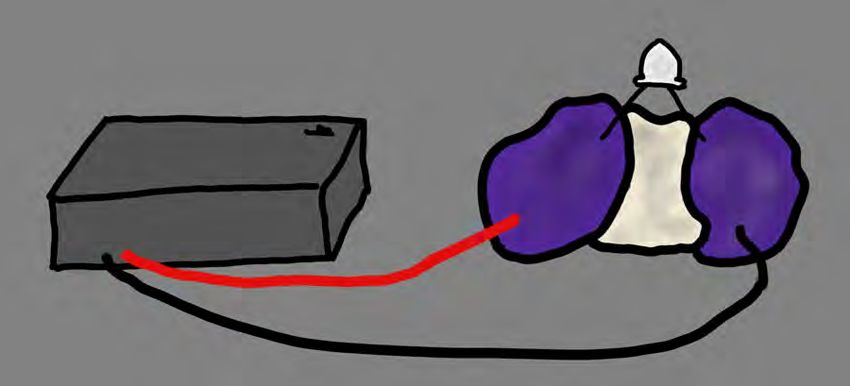
These things are called loads, because they “load down” the power supply, just like you’re
“loaded down” when you’re carrying something. The same way you could be loaded down with
too much weight, it’s possible to load down a power supply too much, which will slow down the
current flow. But unlike you, it’s also possible to load down a circuit too little - this may let too
much current flow (imagine running too fast if you weren’t carrying any weight), which can burn
out your parts or even the power supply.
Short Circuit-DON’T DO THIS, but if you connect a wire directly from the positive to the negative
side of a power supply, you’ll create what is called a short circuit. This is a very bad idea.

If you DON’T put anything in to restrict the current flow, there won’t be anything to slow down
the current, and it will try to be infinite! Your power supply can’t provide infinite current, but it
will provide as much as it can, which may be a lot. This could cause your wire to burn up,
damage the power supply, drain your battery, or other exciting things. Most of the time your
power supply will have some sort of safety mechanism built into it to limit the maximum current
in the event of a short circuit, but not always. This is the reason all homes and buildings
have circuit breakers, to prevent fires from starting in the event of a short circuit somewhere in
the wiring.
A closely related problem is accidentally letting too much current flow through part of your
circuit, causing a part to burn up. This isn’t quite a short circuit, but it’s close. This most often
happens when you use the incorrect resistor value, which lets too much current flow through
another component such as an LED.

The bottom line: if you notice that things are suddenly becoming hot or a part suddenly burns
out, immediately turn off the power and look for possible short circuits.
Open Circuit- The opposite of a short circuit is an open circuit. This is a circuit where the loop
isn’t fully connected (and therefore this isn’t really a circuit at all).

                                                                                                   10
Unlike the short circuit above, nothing will get hurt by this “circuit”, but your circuit won’t work
either. If you’re new at circuits, it can often be hard to find where the break is, especially if you’re
using breadboards where all the conductors are hidden.
If your circuit doesn’t work, the most likely cause is an open circuit. This is usually due to a
broken connection or a loose wire. (Short circuits can steal all the power from the rest of your
circuit, so be sure to look for those as well.)
TIP: if you can’t easily find where your circuit is open, a multimeter can be very useful tool. If you
set it to measure volts, you can use it to check the voltage at various points in your powered
circuit, and eventually find the point where voltage isn’t getting through.
The following background information is from the BEAM UCLA website referring to the dough
which will be used to make the circuit models:
A conductor allows electricity to easily flow through it.
The conductive dough contains salt, which helps electricity flow through the dough because
the salt (sodium chloride, or NaCl) dissociates into sodium (Na+) and chlorine (Cl-) ions.
An insulator does not let electricity flow through it easily. Because of this, they act as a wall to
electricity and the electricity must go around them. If a path around the insulator is not
available, the circuit cannot be completed. The insulating dough recipe does not use salt, so no
ions are available to allow electricity to flow.
The insulating dough also uses distilled water that contains little or no ions, whereas the
conductive dough uses tap water that usually contains some ions.
All materials have a property called resistance, which is related to how easily it allows
electricity to flow through it.
Insulators have a high resistance.
Conductors have a low resistance.
Insulators act as “walls” that block electricity from flowing.
Conductors act as “roads” that allow electricity to easily travel along them.
In order to build a circuit, we must provide a continuous path for electricity to flow from a
power source (for example, a battery), through a conductor, into a device that uses the power
(for example, a light bulb), and back through another conductor to the power source. This is
called a closed circuit.
If this continuous path is broken anywhere, electricity will not flow and the light bulb will not
work. This is called an open circuit.
If the conductors in a closed circuit are touched together, it forms a new type of undesirable
circuit called a short circuit. Electricity will still flow through the circuit, but the light bulb
will not work. This is because the light bulb has a higher resistance than the conductors, and
the electricity is “lazy” – it would rather travel through the conductors when they are touching
than exert extra effort to travel through the light bulb.
There are two types of closed circuits: series and parallel circuits.
11Series circuits only provide one path for electricity to flow.
Parallel circuits provide multiple paths for electricity to flow.
Materials & Resources :
Flour , salt, cream of tartar, vegetable oil, food coloring, sugar, deionized or distilled water, granulated
(powdered) alum, 9V batteries, heavy-duty 9V snap connectors, 10 mm LED assortment (Evil Mad
Science http://evilmadscience.com/productsmenu/partsmenu/368), tap water, hot plate, non-stick pan,
plastic spatula, sturdy spoon, worksheet,
Activities and Strategies:
1. Teacher or students make the dough according to the recipe listed below:
a. Conductive dough recipe [http://youtu.be/cpUFL5LZpv4]
i. 1 cup (tap) water
ii. 1 1/2 cups flour
iii. 1/4 cup salt
iv. 3 Tbsp. cream of tartar
v. 1 Tbsp. vegetable oil
vi. food coloring (optional)
b. Insulating dough recipe [http://youtu.be/Wz8rGNt-iEQ]
i. 1 1/2 cup flour
ii. 1/2 cup sugar
iii. 3 Tbsp. vegetable oil
iv. 1/2 cup deionized (or distilled) water
v. 1 tsp. granulated alum (optional)
2. Students follow along on worksheet and build Squishy Circuits
3. Students design and build their own circuits. For example, they can build circuit sculptures. First,
have the students sketch their designs on paper. Then, they can build and test their designs.
Assessment:
Informal assessment takes place while students are working with the dough and building the Squishy
Circuits. Informal discussions continue afterwards. Discuss which types of circuits worked and which
didn’t, ask students what is the difference between a series and parallel circuit is, and why one dough
conducts electricity and the other doesn’t. A formal assessment could be in the form of a test or quiz or
presentation.
Tips from BEAM UCLA:
Don’t connect the 9V battery directly to the LED, it may burn the LED out.
Try not to mash the two types of dough into each other. This makes it difficult to separate them
for future classes.
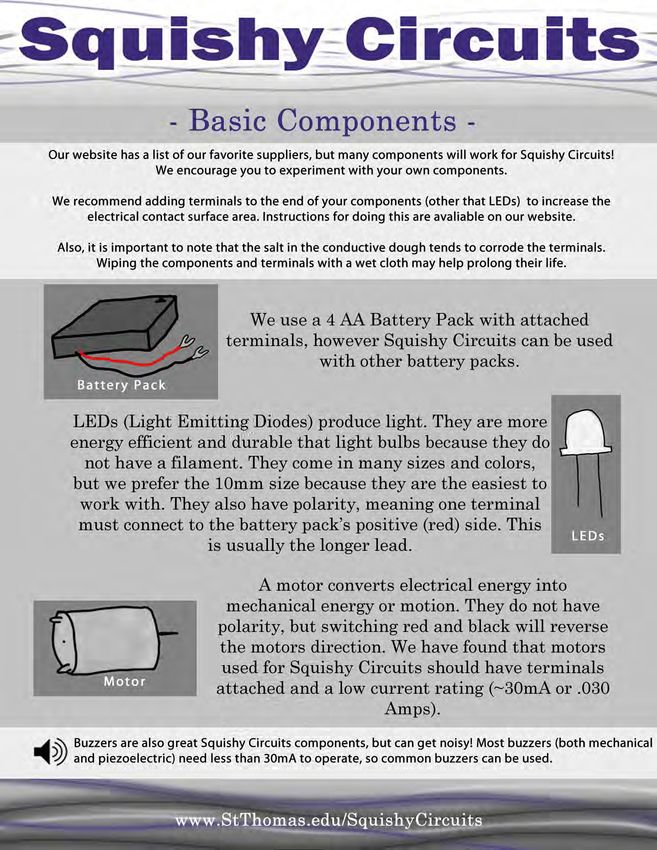
The LED only works in one direction. This is called polarity. Notice how one “leg” of the LED is
slightly longer than the other one. The longer leg should always be attached to the positive (red)
wire from the battery.
12Sometimes, thin strands of insulating dough will still conduct some electricity, and the LED will
become dimly lit. If this happens, use it as an opportunity to discuss resistance!
Don’t cross the wires on the battery connectors – this will short out the battery! It may heat up
and explode.
Warn students to always be careful when experimenting with electricity. High voltages and high
currents can be deadly. For example, they should never stick wires or other objects into wall
sockets. It’s best to always do these activities with adult supervision.
Extensions:
If you are comfortable with taking the next step with this lesson, you can introduce the basics of
soldering to your students by ordering ELENCO Learn-to-Solder Kits from Amazon.com. After the
students have practiced with the kits, they can try out their new skills by making a Ladybug Robot Kit
which requires soldering. Volunteers from the community or parent organizations are often available to
come into your classrooms to assist with these types of activities. This is also a possible extension for an
afterschool club.
Resource List
http://beam.ucla.edu/sites/default/files/docs/Squishy_Circuits.pdf
http://www.tryengineering.org/sites/default/files/lessons/serpar.pdf
http://courseweb.stthomas.edu/apthomas/SquishyCircuits/PDFs/Squishy%20Circuits%2
0Classroom%20Guide.pdf
http://youtu.be/cpUFL5LZpv4
http://youtu.be/Wz8rGNt-iEQ
http://shop.evilmadscientist.com/productsmenu/partsmenu/368
http://www.teachengineering.org/view_lesson.php?url=collection%2Fumo_%2Flessons
%2Fumo_robotsandhumans_lessons%2Fumo_robotsandhumans_less2.xml&state=Com
mon+Core+State+Standards+for+Mathematics#objectives
http://www.ted.com/talks/annmarie_thomas_squishy_circuits.html
13Appendix
1415
16
17
18
19
Squishy Circuits Basics
                    University of St. Thomas - Squishy Circuits Program
                           www.StThomas.edu/SquishyCircuits

                             What you will need for this activity:

Begin with one lump of the conductive dough. Insert the battery pack’s wires into the dough on
                     opposite sides. Next, insert a LED into the dough.

                          Does the LED light up?         Yes         No

                                                                                          20
Separate the conductive dough into two pieces. Plug one wire from the battery pack into each
piece and bridge the gap with a LED.
Does the LED light up? Yes No
Now take the LED out and flip it around so that each “leg” or terminal is in the opposite piece of
conductive dough.
Does the LED light up? Yes No
The LED only works in one direction. This is called polarity. Take the LED out. Notice how one
“leg” is slightly longer than the other one. The longer terminal should be attached to the positive or
red wire from the battery pack.
Next, with your LED on, take the two pieces of conductive dough and push them together or add
some dough to connect them.
Does the LED light up? Yes No
21In the last step, the LED went out. This is because a short circuit was created. Electricity flows in
a loop called a circuit which begins and ends at the battery pack.
Electricity takes the path of least resistance, meaning it goes through whatever loop is easiest to
flow through. In this case, the conductive dough is less resistive than than the LED, so the
electricity chooses to go around the LED and through the dough.
Separate the two pieces, the LED should once again light up because the electricity must go
through the LED to complete the circuit.
Create a “sandwich” with the insulating dough between two pieces of conducting dough.
Does the LED light up? Yes No
The insulating dough does not let electricity flow through it easily. It acts like a wall to electricity.
Therefore, the electricity has to go around the insulating dough and through the LED which lights
the LED. Now we can create Squishy Circuits that do not have to be separated.
Create your own Squishy Circuits by combining multiple LEDs, a motor to create motion, or
perhaps a buzzer for sound! Share your creations with our online community at:
www.Facebook.com/SquishyCircuits
22You can also read