GroupWise to Outlook: How Do I?
←
→
Page content transcription
If your browser does not render page correctly, please read the page content below
GroupWise to Outlook: How Do I?
Group-     Outlook
Wise
Function   Function     How to
Proxy      Delegate     From the File tab, click Account Settings and then Delegate Access from the
                        drop-down menu. In the Delegates Window, click Add.

                        Select the Exchange users you wish to add as delegates from the Duke
                        University Global Address List or the Law School address Book. When you've
                        finished selecting users, click OK.

                        By default, Outlook gives delegates "Editor" permissions for the calendar and
                        tasks folders. Editors have the ability to read, create, and modify items in
                        your mailbox. You can modify individual delegate permissions at a later time
                        by selecting a delegate's name from the Delegates dialog box, and then
                        clicking Permissions.

                        Once you have made your selections, click OK.
Busy       Scheduling   The Scheduling Assistant helps you find the best time for your meeting.
Search     Assistant
                        The free/busy grid shows the availability of attendees. A green vertical line
                        represents the start of the meeting. A red vertical line represents the end of
                        the meeting.

                        The Room Finder pane contains suggested times for the best time for your
                        meeting (when most attendees are available). To select a meeting time, click
                        a time suggestion in the Room Finder pane in the Suggested times section,
                        or pick a time on the free/busy grid.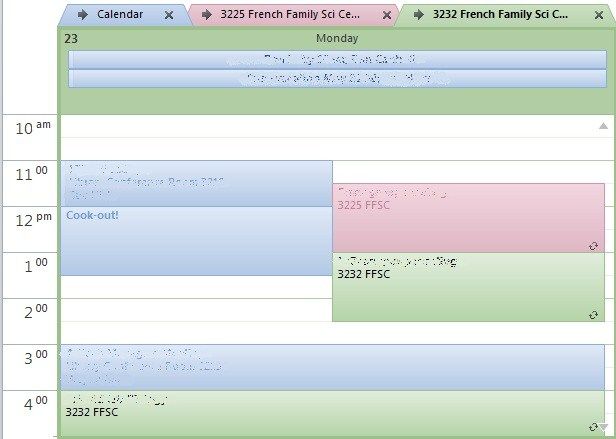
GroupWise to Outlook: Page 2 of 8

                         Note If the Room Finder pane doesn’t appear, on the Meeting tab, in the
                         Options group, click Room Finder.

Vacation    Automatic    You can set up Microsoft Outlook 2010 to automatically respond to people
Message     Replies      who send you e-mail messages

                           Click the File tab.
                           Click Automatic Replies.
                           Select Send automatic replies.

                           If you want, select the Only send during this time range check box to
                         schedule when your out-of-office replies are active. If you do not specify a
                         start and end time, auto-replies will be sent until you select the Do not send
                         automatic replies check box.
                           On the Inside My Organization tab, type the response that you want to
                         send to Duke community members who have Exchange accounts.
                           On the Outside My Organization tab, select the check box for Auto-reply
                         to people outside my organization, and then type the response that you
                         want to send while you are out of the office. Select whether you want replies
                         sent to your contacts only or to anyone (outside Duke’s Exchange user
                         community).
Junk Mail   Use a Rule   Outlook Junk Mail handling is currently not functional, due to interference
                         with a spam filter within Exchange. In order to filter out junk mail, you will
                         need to use rules. Simplified instructions follow.

                             1. Right click on the message in the message list that you wish to have
                                go straight to another folder.
                             2. Select Rules, then Always Move Messages From:
GroupWise to Outlook: Page 3 of 8
3. In the resulting window, click on the folder to which you would like
the messages moved (in this case, the Junk Mail folder) and click on
OK.
4. Advanced users. If you find that the rule does not capture all
instances, you can create a rule that searches for particular words in
the sender’s address. When you right click on the message, select
Create Rule… In the resulting window, click on Advanced Options.
Click on the condition “with specific words in the sender’s address.”
In the text box labeled “Step 2” click on “specific words” to open
another window where you can add search terms. Be very specific to
avoid potentially moving too much email. After saving your search
terms, follow the rule creation instructions to define the destination
folder and save the rule. Be sure to check on the results of your rule
to avoid missing email that may be important to you.
5. All rules can be viewed, edited, disabled and deleted under Rules on
the Home tab of the ribbon.
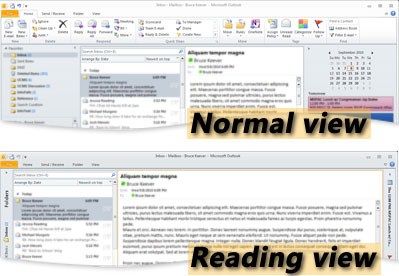
Panels in Navigation Switch mail reading views
Groupwise in Outlook
In Mail, two views are available — Normal and Reading. In Reading view,
the Navigation Pane, To-Do Bar, and the Outlook ribbon are all minimized.
This view provides additional width for the Reading Pane.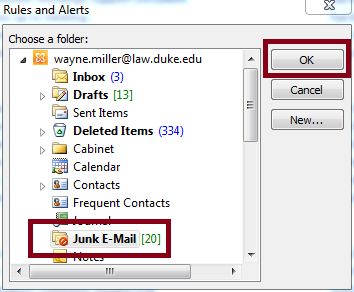
GroupWise to Outlook: Page 4 of 8
To turn on Reading view, on the status bar, click .
To turn on the default Normal view, on the status bar, click .
When minimized, you still have full access to the items in the Navigation
Pane and To-Do Bar. Click either and a temporary expanded view appears.
Likewise, when the ribbon is minimized, you can click a tab and the full
ribbon temporarily appears.
You can use the buttons available on the View tab of the ribbon to minimize
or expand the Navigation Pane, To-Do Bar, and ribbon individually. To
minimize them manually use the appropriate arrow at the top of panel to
move them ( or ). Use the equivalent arrows to minimize or maximize the
ribbon:
Multiuser Calendar You can view multiple calendars at one time in Outlook. Open the calendars
Calendar Overlay you want to view and view them in separate windows or side-by-side or in an
View Overlay mode.
1) Click on the Calendar tab in the Navigation pane.GroupWise to Outlook: Page 5 of 8 2) Then check the calendars in the navigation pane to select the calendars that you want to view in the Overlay mode. (If you don’t see calendars that you want to access, you will need to add them. Use Add Calendar under the Home tab. See above regarding how someone should delegate access to you.) 3) Once you have checked all the calendars, you can observe that all the calendars will get opened in a side by side manner to one another.
GroupWise to Outlook: Page 6 of 8

                         4) Now to view the Calendars in an Overlay mode, Right click on any
                         Calendar in the view window and then select the option that says ‘Overlay’.

                         5) The Calendars are now overlaid. If you want other calendars to be
                         overlaid, right click on that particular calendar and then select the ‘Overlay’
                         option from the list.

Email        Signature   Create a signature
Signatures
GroupWise to Outlook: Page 7 of 8
Open a new message. On the Message tab, in the Include group, click
Signature, and then click Signatures.
Click on New to define a new signature. Select a signature under Default if
you want it to be appended to every message.
If you want to manually add a signature to a message, on the Message tab, in
the Include group, click Signature, and then click the signature that you
want.
Email Read From Home tab, click New E-mail.
receipt Receipt
/read Navigate to Options tab, and From Tracking pane enable Request a Read
(Propertie Receipt option, now click Send to send it to recipient.
s)
By enabling this option, the recipient will typically be asked if he is willing to
send the receipt back to the sender.
If the recipient agrees, you receive the receipt in your inbox. On opening the
receipt, it will be showing the time/date of mail, when it was sent and when
it was read.
Check Mailbox Outlook 2010 - Check the Size of Your Mailbox
Mailbox Size
Size Currently, all Exchange email accounts have a quota limit that, when
exceeded, prevents you from sending and eventually receiving any email.
All Duke Law users should be configured to auto archive older messages intoGroupWise to Outlook: Page 8 of 8
Archives once a week.
From the File tab, under Info, you will see your current storage usage.
The tools under “Clean-up” can assist you in reducing your space, but they
should be used with caution. Contact the help desk if you have questions.
Web Web http://exch2010.oit.duke.edu
Access Access
Quick Turn on or On the View tab, in the Layout group, click Reading Pane, and then click
View off the Right, Bottom, or Off.
Reading
Pane This must be done for each folder; there is no global on or off in Outlook.You can also read