How to create and distribute content on OneNote - Glow Blogs
←
→
Page content transcription
If your browser does not render page correctly, please read the page content below

How to create and distribute content on
OneNote.
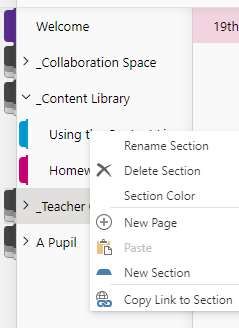
Table of Contents

Introduction …………………………………………………….…………….……………3

To Set Up a One Note Notebook………………………………………………………..3

To Access an Existing One Note Class Notebook………………….……………….4

Sections Overview………………………………………………………………………...5

Setting up sections and pages………………………………………………………….6

Adding Content to a Page………………………………………………………………..7

Home’ Tool Bar…………………………………………………………………………….7

    Spelling………………………………………………………………………………..7
    Typing and editing text……………………………………………………………….8
    Tags ……………………………………………………………...……………………8
    Dictate………………………………………………………………………………....9

Insert Toolbar………………………………………………………………………………9

    File……………………………..……………………………………………………..10
    Picture……………………..…………………………………….……………….. …10
    Link……………………..………………..………………………………………….. 11
    Inserting a video…………………………………………………………………….11
    Audio……………………..…………………………………………………………..12
    Stickers and Emoji……………………..……………………………………………12

Draw Toolbar……………………..……………………………………………………….12

View Toolbar………………………………………………………………………………13
     Immersive Reader……………………..……………………………………………14

Distributing tasks to pupils……………………..………………………………………15

Distributing tasks via assignments……………………………………………………16

Correcting pupil tasks……………………..……………………………………………17
                                                            2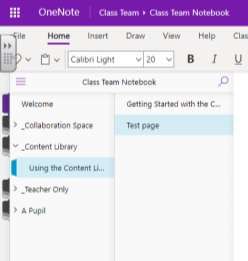
Introduction
OneNote is essentially a digital ring binder. It organised into sections and subsections.
There are pages within each section, just like a physical ring binder.
OneNote pages can support a range of content (e.g. text, images, links to websites
and sound recordings). These pages can be distributed to pupil work folders and will
be stored there as evidence of learning. Pupils can access their personal work folders,
complete the tasks and then be given feedback from their class teacher. You do not
need to save any work on One Note as this is done automatically.
This tutorial is designed to take teaching staff through the steps involved in adding
content to a OneNote page and then distributing this page to pupils. The tasks within
this guide do not have to be completed in order.
To Set Up a One Note Notebook
Only follow these steps if your class notebook has not yet been set up.
Go to the class Team, select class notebook from the top menu then set up a
class notebook.
A drop down menu will appear. Select blank notebook.
You will then have the option of editing the four folders in each pupil’s individual
section. You can now change the name of these folders, delete them or add in
additional folders. One Note will make these changes for every pupil in the team.
When you are ready, select create.
3To Access an Existing OneNote Class Notebook
Go to your class Team
Select ‘class notebook’ from the menu at the top of the page.
Select ‘open in browser’
N.B. There is an option to open OneNote in the app. The layout and features are
slightly different and opening in it this way will not affect any work you have done in
the browser version.
You will now be taken to your OneNote class notebook. You will see the different
sections that it is organised into on the left hand side. If you click on a section you will
see the subsections within it. Now click on one of these subsections to see the pages
they contain on the column to its right.
section page
section
within a
section
4Sections Overview
There are some key sections within your OneNote notebook and they can be used in
different ways:
Collaboration space
Pupils can view and edit pages within this section. They can use this section to
work on tasks together while logged into their individual OneNote accounts. For
example, pupils could each add their research findings to a OneNote page as
part of a class project.
Content library
Pupils can view but not edit pages within this section. This is where you file your
pages/tasks before distributing them to pupils. If necessary, pupils will be able
to find relevant pages and copy them to their own work folders.
Teacher only
Only you can see pages within this section. You can use this section when first
creating new resources that you don’t want pupils to see or access before
adding them to the content library.
Pupil folders
Where pupil work will be completed, marked and stored as evidence of learning.
5Setting up Sections and Pages
To rename, add or remove a section or page, right click on it and select the command
you require. To right click on a Mac computer, press the control (ctrl) key and tap the
mouse button or laptop track pad.
For example, to add a new section to your content library, click on the content library
to open it, right click on any existing sections within it (eg. using the content library)
and select new section. You can follow these same steps to add a new page.
A page is essentially a document that will contain pupil tasks or any other content you
have created. You will create and store pages in the teacher only section so that only
you are able to view them. When complete, you can transfer them to your content
library and then distribute them to pupil folders.
Add a new page to the teacher only section.
Right click on the section within it (this usually says using the
Task teacher only section) then choose new page.
At the very top of the page, type Test. This will now be the title
of the page.
6Name the page by adding text
here.
New pages will appear as
untitled pages in this column
Adding Content to a Page
‘Home’ Tool Bar
When you click on home you will see menu options appear below. This tutorial will
now take you through some of the features that can be accessed from this menu.
Please refer to the diagram below if you are unsure.
home
spelling
text editing
dictate
undo tags
Spelling
OneNote automatically sets this to U.S. spelling. Click on the arrow (v) to the right of
the spelling icon to change it to U.K. spelling. You will have to do this every time you
use OneNote as it doesn’t save this setting.
7Typing and editing text
You can add and edit text in a similar way to Microsoft Word. Use the undo button to
undo previous commands.
Click on the space below the page title. A text box will appear (if it
doesn’t you can still add text). The size of the text box can be altered
by hovering the cursor on one of its edges and clicking the mouse
to then drag it to the size you need.
page title
Task
text box
Type this is a test page that contains a range of OneNote
content.
Now change the colour, style and size of the font in the same way
that you would in Microsoft Word.
Tags
Use this tool to draw attention to words or lists. For example, you can write to do lists
or mark tasks as important.
Type a word or sentence.
Click on the tags icon and decide how you want to tag it.
To do list can be used to create a list of tasks that pupils can tick when
completed.
Type the following underneath the sentence you have just
written.
Success Criteria 1
Task Success Criteria 2
Success Criteria 3
Edit the font as necessary.
Click and drag the cursor over the text to highlight it, click on
the tags icon and then select to do list.
Click on the boxes to add a tick. Click again to remove the tick.
8Dictate
Use this tool to say what you want to type and One Note will do the typing for you!
Click on the area of the page where you want to begin typing.
Click on the arrow (v) to the right of the dictate icon and select the language
you want.
Now click on the dictate icon and say what you want to it to type for you. Wait
until it has finished typing what you have said then click on the icon again to
finish.
To add punctuation, say the punctuation you want OneNote to type. For
example, by saying “question mark” at the end of a sentence, it will include a ?.
Click on the position you want the next piece of text to
appear on the page.
Task Click on the dictate icon and say “the dictate tool was
used to type this sentence full stop”
Don’t forget to wait until the text has appeared before
clicking the dictate icon to stop.
Insert Toolbar
Click on insert to see a new menu appear just below. This tutorial will now take you
through some of the features that can be accessed from this menu.
insert menu options
file
9File
Use this tool to insert files stored on your computer or on a web-based storage
platform, such as OneDrive. The full content from the file can be inserted into the
OneNote page or you can alternatively insert a link to the file.
Click on the position where you want the file to appear.
Select file then attachment to insert a link to a document. Make sure you select
the file tool just below insert. See the diagram on page 9 if you are unsure.
Select file then printout to insert the actual content from the document into your
OneNote page.
Create a new Word document and type this is how
a document looks when it has been inserted as a
printout anywhere on the page.
Task
Select file > save as then name it Test file. Now
save it to your desktop.
Now follow the instructions above to insert a file as
an attachment and as a printout.
Picture
This function enables you to insert pictures that you have saved to your computer or
new pictures from the web. There is also an option to use your computer camera to
take a picture.
To save a picture to your desktop:
Use Google images to find a picture.
Right click on the picture and select save image as.
Select desktop on the menu to the right and name the file.
You can alternatively drag the image on to the OneNote page. This will not work
for all image formats.
To insert a picture:
Select picture from the insert menu then choose where you want to access the
picture from (eg. desktop).
Find the image you want and double click on it to select it.
10 Click on the page to select where the picture will appear.
Select picture then from online.
Task Select any picture you like by searching for something specific
or by selecting from the categories listed.
Now select insert.
You can now resize the picture by clicking on it then dragging
the edges into position.
Link
You can use this feature to add a link to any website.
Open a new browser and search for Kiddle. Go to the Kiddle
web page (https://www.kiddle.co/)
Click on the URL (web address) to highlight it then hold down
crtl+c to copy it. On a Mac, hold down cmd+c.
Now go back to your OneNote page, click on the page
position and select link from the toolbar.
Task Now hold down ctrl+v to paste it into the address box. On a
Mac, hold down cmd+v.
Finally, type the text you want to appear on your One Note
page into the display text box (eg. Kiddle search engine)
then click insert. Pupils will be taken to the website when they
click on this text.
Inserting a video
To insert a video, you can follow the same process as inserting a link. Alternatively,
you can copy and paste the video link directly onto the OneNote page and press
return. This will embed the video into the page (i.e. the video itself will appear on the
page).
11Audio
This feature enables you to insert a voice recording.
Click on the position in which you want the voice recording to
appear.
Select audio. One Note will start recording immediately.
Task Say this is a test voice recording then press stop when you
are finished.
The audio recording will now appear as an icon on the page
You can delete the recording by clicking on it and pressing the
backspace key on your keyboard.
Stickers and Emoji
Use these features to add fun images to the page. Alternatively, press the windows
key on your keyboard and a full stop to access a wider range of emoji.
Select where you want stickers or emoji to appear.
Task
Use this feature to insert several images in different places.
Draw Toolbar
Click on draw to see a new menu appear just below. This tutorial will now take you
through some of the features that can be accessed from this menu.
highlighter and pen
You can draw on the page with a pen or highlighter. This function can be useful
when marking pupil work.
12 Drawings can be deleted in the following ways:
o Use the rubber to delete parts of a drawing.
o Click on the marquee tool, create a box around the area you want to
delete, click on the box and then press the backspace key on your
keyboard to delete it.
o Go to the home toolbar and click on the undo button.
text
marquee tool
rubber undo
Select where you want your drawings to appear. You might
need to click enter several times to extend the page.
Task
Use the different pen types in different colours.
Try deleting them in different ways.
Select the text button to return to typing as normal.
View Toolbar
This toolbar contains features that allow you to view a page in different ways. You can
also change the page background colour.
13Immersive Reader
The immersive reader function opens the page in immersive reader. This is a tool
that helps support pupils in their reading by allowing them to:
o hear the text
o change the font
o change the text size
o change the background colour
o focus in on one line
o translate the text to a different language.
Select immersive reader on the view toolbar.
Press the play button to hear the text on your OneNote page.
Now click on each of the icons below to try the other features it
offers.
Task
Select to return to your OneNote page.
14Distributing tasks to pupils
Once your page is complete, you can distribute it to individual pupils, groups of pupils
or everyone in the class Team. This is done from the Class Notebook toolbar.
Full class
select distribute page
select distribute page from the dropdown menu
Individuals
select distribute page
select individual distribution
follow the instructions on the window that pops up on the right
Groups
select distribute page
select group distribution
Select students or click on new group to add pupils to a group
Give the group a name and add pupils to the group
Choose the work folder you want it to go into.
15Distributing OneNote tasks via Assignments
OneNote tasks can alternatively be distributed via assignments. The benefit of this is
that pupils ‘hand in’ the assignment which saves time checking for completed tasks.
To distribute tasks in this way:
o Create the OneNote page within your teacher only folder
o Go to assignments within the class Team and create a new assignment
o Click on add resources and select the OneNote option in the next window
o Go through your OneNote folders until you find the page you want to distribute
o Select attach
o Now ensure that you have completed the Assignment form as necessary. This
will automatically be sent to every member of the Team, unless you specify
otherwise.
Deleting tasks from pupil folders
To delete a page that has been distributed to pupil folders, select distribute
page and choose delete page from the drop down menu. A separate menu
will appear on the right. Select the folder that the page is in then select the
page you want to delete.
16Correcting pupil tasks
Pupil tasks can be marked in various ways by using the skills taught in this tutorial.
You do not need to go into individual pupil work folders to find completed tasks.
Instead, select Class Notebook then Review Student Work.
A popup box will appear on the right hand side. Click on the relevant folder and page
to select the page you want to correct. You will now be able to click on individual
pupil names to access the page in each of their OneNote folders.
Marking ideas
Use the draw function to highlight words or sections of work, draw circles
round sections of work or mark answers as correct/incorrect.
Use stickers and emoji to give praise. Scroll down to the doodle frame
stickers which can be edited with personal comments.
Type comments in a different colour.
Make a voice recording of feedback.
There is no need to save what you have done or hand work back to the pupil.
They will see your comments the next time they log into OneNote.
17You can also read