G52GUI CSS Tutorial Contents
←
→
Page content transcription
If your browser does not render page correctly, please read the page content below
1    CSS Tutorial

    G52GUI CSS Tutorial
    Contents
    Introduction .................................................................................... 1
    Selectors ........................................................................................ 1
    Declarations .................................................................................... 4
    Styling your GUI ............................................................................... 5
    Styling FXML vs. Styling HTML .............................................................. 8
    Useful Links .................................................................................... 8

    Introduction
    Cascading Style Sheets, or CSS, is a styling language for describing and setting the layout
    for markup languages. Most commonly, it is used to set the styling and format of HTML and
    XHTML in websites, but it can be used with any type of XML document, including FXML.

    .button {                                           /*   Set style for all buttons */
        -fx-text-fill: #dddddd;                         /*   Sets font colour (hex) */
        -fx-background-color: #444349;                  /*   Sets background colour */
        -fx-padding: 5px;                               /*   Inner spacing on all sides */
    }

    .button#ok {                                        /* Set style for just OK button */
        -fx-font-weight: bold;                          /* Set font to bold */
    }

    The above code is an example of the CSS layout style for setting the properties of an
    object. This code will set the text colour, background colour and padding (inner spacing)
    for all buttons. Additionally, for only the ‘ok’ button, the font is set to bold. As the name
    implies, CSS properties are cascading, meaning that in the markup hierarchy, objects will
    inherit the properties of their parent, unless it is otherwise stated.

    This tutorial will introduce the basics of CSS, along with its use with JavaFX and
    FXML/Scene Builder 2. Following this, a small example of styling the tutorial GUI is given.
    It is important to remember that CSS cannot change the content or structure of your FXML
    file, it can only affect the appearance – CSS is not a scripting language.

    Selectors
    There are two main types of identifiers when using CSS: classes and ids. The former is
    used when you want to give a series of objects the same properties, such as giving all
    buttons the same colouring style, or setting the font for a particular type of label. The ID
2 CSS Tutorial
is used to define the properties for a single object where you want to identify that specific
item in your FXML document.
The format for accessing classes in CSS is to precede its name with a full-stop “.”, e.g.
.button will be used to set the properties for all items with the class “button”. Similarly,
the properties of individual items can be changed using the “#” symbol, appending it to
the ID, e.g. #ok will allow you to change the properties of an object with id “ok”.
Note that there may be multiple objects of different classes with the same ID, such as a
label and a text-field both named “firstname”. You can distinguish between these by using
the class identifier, which forms a ‘parent’ of each object:
.label#firstname{
/* styling for label named firstname */
}
.text-field#firstname{
/* styling for text-field named firstname */
}
The above code shows the chaining of classes and ids to be more specific in your styling.
This is also the case with style cascading, where an element will inherit features of its
‘parents’ in the XML layout. The following snippet of code demonstrates an example FXML
layout. While this has been simplified greatly, it is similar in idea to the tutorial example:
a Pane containing a SplitPane, which contains a left and a right AnchorPane. These
contain labels and a text-field: the left contains two labels; the right contains one label
and one text-field.3 CSS Tutorial
The above example can be styled using the following example stylesheet. For now we
won’t actually show the styling code, but identify which objects will be affected by each
selector block.
.root {
/* Sets the default style for all items */
}
.anchor-pane {
/* Sets the default style for all items contained in an AnchorPane */
/* Overrides any previous properties of parent tags or root */
}
.anchor-pane#right {
/* Sets the style for the AnchorPane with id “right” (only) */
}
.anchor-pane .label {
/* Sets the style for any Labels that are children of an AnchorPane */
}
.label,
.text-field {
/* Sets the common properties of all Labels and TextField */
}
#left .label {
/* Sets the style for all child Labels of a tag with id “left” */
}
.label#label-italic {
/* Sets the style for a Label with id “label-italic” */
/* Note the lack of spacing between the class and id */
}
.anchor-pane #label-bold {
/* Sets the style for tag with the id “label-bold” in an AnchorPane */
/* The space means the id belongs to a child, not an AnchorPane */
}
.anchor-pane.label#label-bold {
/* An unambiguous equivalent of the above block: specifies the style
of a Label with id “label-bold” that is a child of an AnchorPane */
}
The above code outlines a few different ways of using CSS. There is versatility in the
cascading of styles, but often it can cause unintended effects if not checked properly. An4 CSS Tutorial
example of this is the use of spacing between classes and ids. In the last three cases, you
can see the distinction between the .class#id and .class #id in that the first will look
for an object of that class with that id, where as the second will look for an object with
that id that is a child of the class.
It is also possible to set common properties of multiple classes without using the
cascading, but simply using the comma-separation of classes as the block selector: see
.label, .text-field which will set the style properties for all labels and all text-fields
regardless of their hierarchy.
Note that the Pane is the parent tag for all objects, so the properties set for it will
cascade down to all its children unless they are overridden. This is the same, then, for the
AnchorPane, and indeed the styling for the right AnchorPane (.anchor-pane#right).
The .root class is the parent for all objects, so any properties set in the .root selector
will be the global values unless overridden for specific classes.
Psuedo-classes are one additional type of selector. These are classes with an appended
state, which is used to distinguish the style between certain actions. Pseudo-classes are
appended to a selector with the colon operator ‘:’, e.g. .class:state. These allow you
to override certain style of a class based on certain actions, although the types of
interactions are quite limited. The most common state is “hover”, which will trigger when
the mouse is moved over it. Having a pseudo-class does not override the properties of the
main class, unless specified explicitly in the CSS file. Other general pseudo-states include
“pressed” and “focused”.
Declarations
Aside from selectors, declarations are needed to actually set the properties of your style.
These describe the various properties, from fonts and colours to borders and padding. In
JavaFX, all property declarations begin with “-fx-”. These are added to the selector
blocks and will set the properties of the elements that match up to this.
Declarations are made up of two parts: the property name and its value, separated by a
colon:
-fx-property-name: value; /* comment */
Each separate declaration must end with a semi-colon ‘;’. If the same declaration is
called multiple times in the same selector block, the last call is the one that is used.
Property values typically come in 3 types: the numeric value, e.g. for setting the size of
something; text value, e.g. font types or urls; and colours. Numeric value properties can
often have the units specified, such as when setting the size of a border you can specify
centimetres (cm), pixels (px), or points (pt). Note when setting font-size, this is normally
in pt, e.g. 11pt.
String values vary more on the property, for example, you can specify a border type as
‘solid’ or ‘dashed’, or the font-family, ‘Arial’ or ‘sans-serif’.5 CSS Tutorial
Colour types are slightly different in that you can set the using a named colour (e.g. red),
using hexadecimal values (#F0AAAA), or even by specifying the red-green-blue values
(rgb(240, 170, 170)). A colour picker tool for getting the rgb or hex values is available
here, and a list of pre-named colours in JavaFX can be found here.
Some declarations allow a chain of properties that sets multiple properties in one line. For
example, the –fx-font property:
.root { /* base properties for all objects */
-fx-font: bold 12pt “Arial”
}
This is equivalent to the following:
.root { /* base properties for all objects */
-fx-font-family: “Arial”;
-fx-font-weight: bold;
-fx-font-size: 12pt;
}
Note that for font-family, the given value is a string of three fonts. This effectively means
that the font will be Arial, unless it is not found in the font library of the system it is
running on, in which case it will be Helvetica. If neither of those is present, it defaults to
the system’s base sans-serif font.
To set the font colour, the declaration parameter name is ‘text-fill’, e.g.
–fx-text-fill: blue;
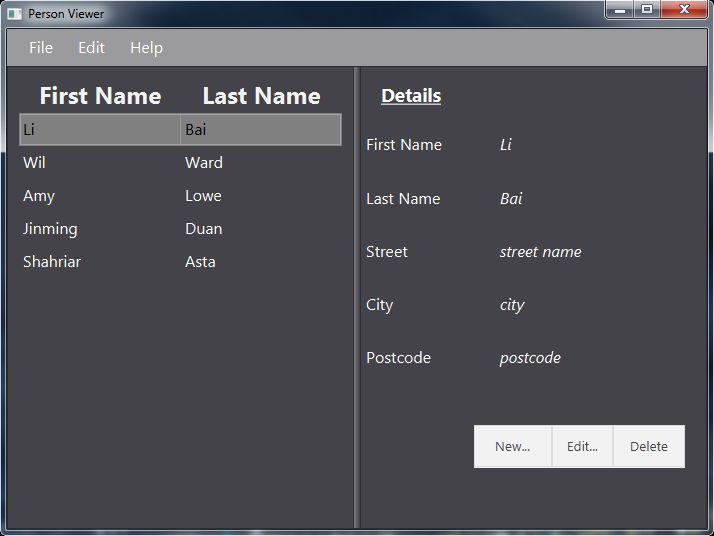
Styling your GUI
Now you have an understanding of CSS, you can apply it to your PersonView from the
tutorials. It is important to note that the ‘id’s in CSS are NOT the same as ‘fx:id’. The
former is used by the styling, the latter by
the Controller. First, we will look at the
PersonView.fxml file in SceneBuilder. For
your labels on the right hand side of the right
AnchorPane, e.g. firstNameLabel, select
each of them. On the right hand side of
SceneBuilder, in the ‘Properties’ tab, set the
‘Style Class’ to “information”. Make sure you
click the ‘+’ button. For the “Details” Label,
add “details” as its ‘Id’ in the CSS properties
tab. Save in SceneBuilder, and refresh your
Project in Eclipse.6 CSS Tutorial
.root { /* base properties for all objects */
-fx-font: 12pt "Arial"; /* set default font */
-fx-text-fill: #dddddd; /* set default text colour */
-fx-background: #444349; /* set background colour */
-fx-base: #444349; /* set base window colour */
-fx-focus-color: transparent; /* remove focus colour */
-fx-accent: #808080; /* selection colour */
}
.menu-bar, /* menu bar and menu items */
.context-menu {
-fx-background-color: #f2f2f280; /* set to be 50% transparent (rrggbbaa) */
}
.context-menu .label { /* set text colour for menu labels */
-fx-text-fill: #444349;
}
.table-view { /* make table view transparent */
-fx-base: transparent; /* base colour */
-fx-control-inner-background: transparent; /* background colour */
-fx-table-cell-border-color: transparent; /* border colour */
-fx-table-header-border-color: transparent; /* header border colour */
}
.table-view:row-selection, /* set selection properties */
.table-view:col-selection {
-fx-background-color: transparent; /* make transparent */
-fx-text-fill: #444349; /* change selection colour */
}
.table-view .column-header-background {
-fx-background-color: transparent; /* make header transparent */
}
.table-view .column-header, /* remove borders for table contents */
.table-view .filler {
-fx-border-color: transparent;
-fx-background-color: transparent;
}
.table-view .column-header .label { /* set properties of header label */
-fx-text-fill: #f2f2f2;
-fx-font-size: 18pt; /* increase font size (from 12pt) */
}
.label.information { /* labels with class ‘information’ */
-fx-font-style: italic; /* make italics */
}
.label#details { /* label with id ‘details’ */
-fx-font-size: 14pt; /* increase font size (from 12pt) */
-fx-font-weight: bold; /* make font bold */
-fx-underline: true; /* underline text */
}
.button { /* properties for all buttons */
-fx-font-size: 10pt; /* decrease font size (from 12pt) */
-fx-text-fill: #444349; /* change text colour */
-fx-pref-height: 30px; /* set preferred height */
-fx-padding: 10px; /* set inner padding */
-fx-background-color: #f2f2f2; /* set background colour */
-fx-background-radius: 0; /* make button have sharp corners */
-fx-border-radius: 0; /* make border have sharp corners */
-fx-border-color: #dddddd; /* set border colour */
-fx-border-width: 1px; /* set border thickness */
}7 CSS Tutorial
The above code is the CSS to style your GUI. To add this project, create a new File in your
‘view’ package (right-click ‘view’ > New > Other… > General > File). Name it
‘MyTheme.css’, and copy the above code into it.
There a multiple ways to assign a stylesheet to a Scene. The first way, we will assign it
within Scene Builder. Open RootLayout.fxml in Scene Builder, and select the
BorderPane. On the right hand side, again in ‘Properties’, click the ‘+’ under
‘Stylesheets’. Navigate to your ‘src/view’ folder and select ‘MyTheme.css’. Save and
refresh your project. Running the project now should style both the RootLayout and the
embedded PersonView.fxml due to the nature of the FXML hierarchy.
However, if you click either the New… or Edit… buttons, the new window is NOT styled by
your CSS file. This is because it belongs to a separate Scene. The next step is an example
of how to assign a stylesheet programmatically to a window.
For the PersonEdit window, you can assign the stylesheet in Scene Builder, as with the
RootLayout, or add the following line of code to your showPersonEdit() method after
the new Scene is created:
Scene scene = new Scene(personEdit); // !! Existing code !!
scene.getStylesheets().add(“view/MyTheme.css”); // Add stylesheet8 CSS Tutorial
Styling FXML vs. Styling HTML
This section is for those who are familiar with CSS for styling websites, to highlight the
differences between using CSS with JavaFX and HTML. There are some notable
distinctions.
All declaration begin with –fx- when styling FXML files
There are no selectors for specific tags, like div for when styling HTML
o You should use the class equivalent, like .button for
Most objects inherit the Node tag, which has a specific set of pseudo-classes
o Not all pseudo-classes are supported
o :active is replaced by :pressed
o :focus is replaced by :focused
The FXML CSS parser will return an Exception when a declaration is not valid for that
object
o This can be useful to find where styling is not working as it should
The color declaration for changing the font colour does not work consistently
o You should use -fx-text-fill instead
Neither –fx-background or –fx-border can be used to chain commands, so the sub-
declarations should be called, e.g.
o –fx-background-color, -fx-background-image
o –fx-border-color, -fx-border-width
The width and margin declarations are not valid
o You can set the preferred width using –fx-pref-width
The FXML CSS parser does not support comma separated strings of font families
Useful Links
Oracle JavaFX 8 CSS Reference:
http://docs.oracle.com/javase/8/javafx/api/javafx/scene/doc-files/cssref.html
Oracle Tutorial Styling a JavaFX UI with CSS:
http://docs.oracle.com/javase/8/javafx/user-interface-tutorial/apply-css.htm
W3 Schools CSS Tutorial:
http://www.w3schools.com/css/
W3 Colour Picker / RGB to Hex Converter
http://www.w3schools.com/tags/ref_colorpicker.aspYou can also read