Indigo Platform Documentation - Release 15.0.1 AfricanLII
←
→
Page content transcription
If your browser does not render page correctly, please read the page content below
Indigo Platform Documentation
                   Release 15.0.1

                       AfricanLII

                        Sep 16, 2021
Contents

1   Contents           3

2   Documents         55

Index                 57

                       i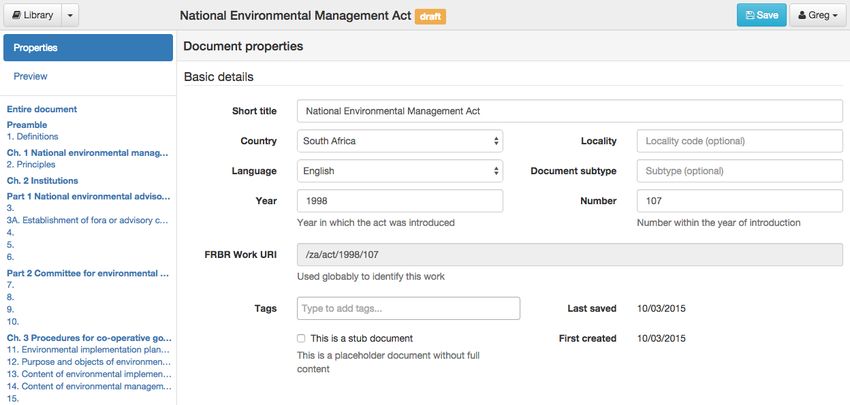
ii
Indigo Platform Documentation, Release 15.0.1

Indigo is AfricanLII’s document management system for managing, capturing and publishing legislation in the Akoma
Ntoso format, built and maintained by Laws.Africa with a grant from Indigo Trust.
Visit our GitHub repository to find out how you can contribute to the project.
The Indigo platform is a Django python web application with three components:
    • a web application for managing and editing documents
    • a read-only REST API for vending published legislative documents in HTML and XML
The main REST API supports the creation, editing and management of a library of legislative documents. The public
read-only API provides access to published documents in XML, HTML or other formats.

Contents                                                                                                       1
Indigo Platform Documentation, Release 15.0.1 2 Contents
CHAPTER          1

                                                                                                      Contents

1.1 Installing and Running Indigo

This guide is for developers who want to install and run their own instance of the Indigo platform.
Indigo is a Django web application that can be run as a standalone project, or as part of an existing Django project.
This guide will explain how to run Indigo as a standalone project.

1.1.1 Requirements

Indigo requires:
    • Python 3.6+
    • PostgreSQL 9.3+
    • Ruby 2.6.0+ for Slaw
    • An AWS S3 account and bucket for storing attachments
    • wkhtmltopdf for generating PDFs
    • pdftotext for reading PDFs
Optional but useful:
    • An SMTP server to send email through, or an appropriate service
Using Heroku/Dokku means that we’re using well-document and widely understood mechanisms for specifying de-
pendencies and configuration across multiple languages. It takes care of all this for you and we highly recommend
using them.

1.1.2 Installing Indigo Locally

   1. Ensure you have Python 3.6+ installed

                                                                                                                   3
Indigo Platform Documentation, Release 15.0.1
2. Clone the github.com/laws-africa/example-indigo repository. It has all Indigo’s dependencies for Python and
Ruby described in it:
$ git clone https://github.com/laws-africa/example-indigo
$ cd indigo
3. Setup and activate the virtual environment:
$ python3 -m venv env
$ source env/bin/activate
4. Install Python dependencies:
$ pip install -r requirements.txt
5. Ensure you have PostgreSQL installed and running. Create a postgresql user with username and password
indigo, and create a corresponding database called indigo:
$ sudo su - postgres -c 'createuser -d -P indigo'
$ sudo su - postgres -c 'createdb indigo'
6. Run the Django database migrations to setup the initial database:
$ python manage.py migrate
$ python manage.py update_countries_plus
$ python manage.py loaddata languages_data.json.gz
7. Then create the superuser:
$ python manage.py createsuperuser
8. Finally, run the server:
$ python manage.py runserver
9. Visit the website to login: http://localhost:8000/
10. Configure a language and a country:
• Visit http://localhost:8000/admin
• Under Indigo API click Languages, then click Add Language in the top right corner
• Choose a language from the dropdown list and click Save
• Under Indigo API click Countries, then click Add Country in the top right corner
• Choose a country and primary language from the dropdown lists
• Click Save
11. Now go back to http://localhost:8000/ and your country will be included in the list.
Ruby dependencies
You won’t be able to import documents yet. First, you’ll need to install Ruby and the Slaw parser library. We strongly
recommend installing and using RVM or a similar Ruby version manager. You’ll need at least Ruby version 2.6.
Once you’ve install Ruby, install Bundler and the Indigo dependencies:
4 Chapter 1. ContentsIndigo Platform Documentation, Release 15.0.1
$ gem install bundler
$ bundle install
You can test that Slaw is installed:
$ slaw --version
slaw 10.6.0
PDF support
Indigo creates PDF files using wkhtmltopdf. Install it as appropriate for your platform.
Indigo reads from PDF files using pdftotext, which is part of the poppler-utils package. Install it as appropriate for
your platform.
Django Customisation
You can now easily change Django settings, add your own modules, change URLs, etc. You simply need to create
your own settings file, import the settings from Indigo, and update manage.py to reference your new settings file. For
example:
1. Create a python module folder my_app:
$ mkdir my_app; touch my_app/__init__.py
2. Create my_app/settings.py so that it looks like this:
from indigo.settings import *
# override any Django settings, as you would normally.
# add your own apps, eg:
# INSTALLED_APPS = ('my_app',) + INSTALLED_APPS
# add your own URLs
# ROOT_URLCONF = 'my_app.urls'
# etc.
3. Update manage.py so that it references your new my_app.settings file:
#!/usr/bin/env python
import os
import sys
if __name__ == "__main__":
os.environ.setdefault("DJANGO_SETTINGS_MODULE", "my_app.settings")
from django.core.management import execute_from_command_line
execute_from_command_line(sys.argv)
4. Run your updated app with python manage.py runserver
1.1. Installing and Running Indigo 5Indigo Platform Documentation, Release 15.0.1
1.1.3 Production Installation
Indigo requires some non-Python dependencies. This guide explains how to deploy Indigo and these dependencies on
Heroku or Dokku. Dokku uses Docker to emulate a Heroku-like environment on your own servers (or cloud).
Note: We don’t recommend using Heroku for production because some Indigo functionality – such as parsing new
documents – can take longer than the 30 seconds Heroku allows for web API calls. However, Heroku is great for
quickly trying Indigo out.
Installation on Heroku and Dokku are similar and only really differ in the commands that are run. We describe using
Dokku below, and assume that you have already have Dokku installed.
1. Ensure you have PostgreSQL installed and running. Create a postgresql user with username indigo, and create
a corresponding database called indigo. For example:
$ sudo su - postgres -c 'createuser -d -P indigo'
$ sudo su - postgres -c 'createdb indigo'
2. Create a new Dokku application:
$ dokku apps:create indigo
3. (optional) Create a new AWS S3 account and bucket for storing attachments. You’ll need the AWS Access Key
Id and AWS Secret Access Key in the next step. You can safely skip this step if you don’t care about saving
attachments just yet.
4. Set config options as follows (ensure you enter your correct database and AWS settings):
$ dokku config:set indigo \
DATABASE_URL=postgres://indigo:DATABASE-PASSWORD@DATABASE-HOST/indigo \
DISABLE_COLLECTSTATIC=1 \
DJANGO_DEBUG=false \
DJANGO_SECRET_KEY=some random characters \
AWS_ACCESS_KEY_ID=aws access key \
AWS_SECRET_ACCESS_KEY=aws secret access key \
AWS_S3_BUCKET=your-bucket-name
5. Deploying requires using git push to push to dokku. So you’ll need to add dokku as a git remote on your local
host. If you have cloned the example-indigo repo from above, you can do this:
$ git remote add dokku dokku@DOKKU-HOSTNAME:indigo
6. Now deploy to dokku using git push dokku. This is how you deploy any and all updates:
$ git push dokku
7. Create the an admin user by running this command on the Dokku server:
$ dokku run indigo python manage.py createsuperuser
8. Visit your new Indigo app in your browser at https://your-dokku-host.example.com
9. Configure a country:
• Visit https://your-dokku-host.example.com/admin
• Under Indigo API click Countries, then click Add Country in the top right corner
6 Chapter 1. ContentsIndigo Platform Documentation, Release 15.0.1
• Choose a country and primary language from the dropdown lists
• Click Save
1.1.4 Background Tasks
Indigo can optionally do some operations in the background. It requires a worker or cron job to run the
django-background-tasks task queue. Indigo tasks are placed in the indigo task queue. See django-
background-tasks for more details on running back-
ground tasks.
To enable background tasks, set INDIGO.NOTIFICATION_EMAILS_BACKGROUND to True.
1.2 Configuration
Config options are mostly passed to Indigo as environment variables. These are the options you can set:
• AWS_ACCESS_KEY_ID
Required for production. The AWS access key ID for the account with write-access to the S3 bucket used for
storing attachments.
• AWS_SECRET_ACCESS_KEY
Required for production. The AWS secret access key for the account with write-access to the S3 bucket used
for storing attachments.
• AWS_S3_BUCKET
Required for production. The name of the S3 bucket for storing attachments.
• AWS_S3_HOST
The regional S3 endpoint to use. Optional. Default: s3-eu-west-1.amazonaws.com
• DATABASE_URL
Required. The URL of the database to use
• DJANGO_DEBUG
The Django DEBUG setting. Everything other than true means False. This should always be false in
production. Default: true
• DJANGO_DEFAULT_FROM_EMAIL
The Django DEFAULT_FROM_EMAIL setting: who do emails come from? Uses SUPPORT_EMAIL by default.
• DJANGO_EMAIL_HOST
The Django EMAIL_HOST setting. The SMTP host through which to send user emails such as password resets.
• DJANGO_EMAIL_HOST_PASSWORD
The Django EMAIL_HOST_PASSWORD setting. The SMTP password.
• DJANGO_EMAIL_HOST_PORT
The Django EMAIL_HOST_PORT setting. The SMTP port (default: 25).
• DJANGO_EMAIL_HOST_USER
The Django EMAIL_HOST_USER setting. The SMTP username.
1.2. Configuration 7Indigo Platform Documentation, Release 15.0.1
• DJANGO_SECRET_KEY
Required if DJANGO_DEBUG is not true. The Django SECRET_KEY setting. In production you should use
a random (and secret) string.
• GOOGLE_ANALYTICS_ID
Google Analytics ID for website tracking. Only used when DEBUG is False.
• SUPPORT_EMAIL
Required Email address users can email for help.
• INDIGO.DOCTYPES
A list of (label, code) pairs of Akoma Ntoso document types that can be created, such
as ('Act', 'act'). See http://docs.oasis-open.org/legaldocml/akn-core/v1.0/os/part1-vocabulary/
akn-core-v1.0-os-part1-vocabulary.html#_Toc523925025
• INDIGO.EMAIL_FAIL_SILENTLY
Should email sending fail silently?
• INDIGO.GSHEETS_API_CREDS
JSON of Google Sheets API credentials token details, if you want Indigo to be able to talk to Google Sheets
directly. Otherwise, Indigo will use CSV export and the Google Sheet will need to be publicly accessible.
For details on setting up Google Sheets for API access, see https://medium.com/@denisluiz/
python-with-google-sheets-service-account-step-by-step-8f74c26ed28e
• INDIGO.NOTIFICATION_EMAILS_BACKGROUND
Should notification emails be sent asynchronously in the background? Default is False. See django-background-
tasks documentation.
1.2.1 Authentication
Indigo uses django-allauth for user authentication and social accounts, configuration is as per the django-allauth doc-
umentation.
Social Accounts
By default, Indigo doesn’t have any social account authentication enabled. To enable a social provider, follow the
documentation for django-allauth. Namely, you’ll need to:
1. Include the account provider in INSTALLED_APPS:
INSTALLED_APPS = INSTALLED_APPS + (‘allauth.socialaccount.providers.google’,)
2. Get the appropriate client and secret keys from the provider, and create a social app in the admin interface.
1.3 Using the Indigo Platform
Welcome to the guide to using the Indigo platform to manage and maintain a collection of legislation documents. This
guide is for law librarians and others who are familiar with writing legislation documents and want to know how to
use the Indigo Platform.
8 Chapter 1. ContentsIndigo Platform Documentation, Release 15.0.1
Note: Indigo cannot be used with Internet Explorer. You must use Chrome, Firefox, Safari or Edge.
Note: Throughout this guide we refer to documents. These are generally legislative Acts but may also be related
legislative documents such as regulations or by-laws.
Contents:
1.3.1 Managing Your Account
Logging In
You need to log into your Indigo account to import and edit documents. You may be able to view documents without
logging in.
To log in, click the Log in button in the top-right corner, enter your email address and password, and click the Log in
button.
Creating an account
New accounts must be created manually. Please email the address in the login window to get an account.
Note: Administrators: visit /admin/auth/user/ on your indigo instance to create a new account. Always use
an email address for the username.
Resetting your password
You can reset your password if you’ve forgotten it.
1. Click the Log in button in the top-right corner.
2. Click I forgot my password.
3. Fill in the email address you use for your account.
4. Click Reset password.
5. Indigo will send you an email with a link to reset your password. Click the link in the email and follow the
prompts to change your password.
6. Go back to the login page, click Log in, enter your email address and your new password, and click Log in.
Changing your name or email address
You can change your profile details after you’ve logged in.
1. Click your button with your name or email in the top-right corner.
2. Click the Profile menu item.
3. Update your details.
4. Click Save changes.
1.3. Using the Indigo Platform 9Indigo Platform Documentation, Release 15.0.1
Changing your password
You can change your password after you’ve logged in.
1. Click your button with your name or email in the top-right corner.
2. Click the Profile menu item.
3. Click Change your password.
4. Enter your new password twice to confirm it.
5. Click Change password.
Logging out
You don’t need to log out.
If you need to log out,
1. Click your button with your name or email in the top-right corner.
2. Click Log out.
1.3.2 Indigo Principles
The Indigo platform works a bit differently to other consolidation platforms you might be familiar with. Understanding
these differences will help make explain why the Indigo platform doesn’t look like a text editor such as Microsoft Word.
Structure, Content and Presentation
A key goal of the Indigo platform is to allow content to be published for a wide variety of media and devices, including
print, desktop web browsers, mobile phones and others that we don’t yet know of. It’s important that a document can
be formatted appropriately for each medium. For example, a printed document will include the Table of Contents at
the start of the document, while a web browser and a mobile phone will display the Table of Contents differently to
help users navigate the document effectively.
To achieve this, the platform must capture the metadata, content and structure of the document separately from its
presentation.
• Metadata describes the document as a piece of work and includes information such as its title, publication date,
language and country. This data allows users to classify, browse and search for documents and is also used when
presenting the document.
• Structure is the heirarchy of the document, including chapter, part and section information. Capturing the
structure makes it possible to provide intuitive user experiences, such as an interface for browsing through a
document by section or linking between different sections of a document or between documents.
• Content is the actual words of the document, including headings, tables and paragraph numbers, and forms the
core of the document.
• Presentation is how the document is physically presented to the user and includes typography, layout, colour
and formatting.
Note: Notice that presentation is separate from structure and comes last in the logical pipeline of managing a
document. The same metadata, content and structure can be presented in many different ways.
10 Chapter 1. ContentsIndigo Platform Documentation, Release 15.0.1 Here is an example piece of legislation that illustrates the difference between content, structure and presentation. The Indigo platform focuses on capturing the metadata, structure and content of documents. It provides some support 1.3. Using the Indigo Platform 11
Indigo Platform Documentation, Release 15.0.1

for basic presentation of a document–primarily HTML–and allows others to build on the captured structure to provide
new presentation layers. This means the hard work done to capture a document in Indigo will keep paying off over
time as the support for the underlying data format grows.

Note: It’s more important to capture the content and structure of a document than exactly match the presentation of
the original.

A good example of this separation of content, structure and presentation is the guide you’re reading right now. You
can read this guide in at least four different forms, each with its own style of presentation:
     • As a website
     • As a PDF
     • As a single downloadable webpage
     • As an Epub e-book
This is all possible because the guide is written using reStructured Text, a simple text format for writing documentation
that focuses on content and structure and ignores presentation. Here’s what the reStructured Text source for this section
looks like::
Structure, Content and Presentation
-----------------------------------

A key goal of the Indigo platform is to allow content to be published for a wide
 ˓→variety of media and devices, including print, desktop web browsers, mobile phones

 ˓→and others that we don't yet know of. It's important that a document can be

 ˓→formatted appropriately for each medium. For example, a printed document will

 ˓→include the Table of Contents at the start of the document, while a web browser and

 ˓→a mobile phone will display the Table of Contents differently to help users

 ˓→navigate the document effectively.

To achieve this, the platform must capture the **metadata**, **content** and
 ˓→**structure** of the document separately from its **presentation**.

- **Metadata** describes the document as a piece of work and includes information
 ˓→such as its title, publication date, language and country. This data allows users

 ˓→to classify, browse and search for documents and is also used when presenting the

 ˓→document.

- **Structure** is the heirarchy of the document, including chapter, part and section
 ˓→information. Capturing the structure makes it possible to provide intuitive user

 ˓→experiences, such as an interface for browsing through a document by section or

 ˓→linking between different sections of a document or between documents.

- **Content** is the actual words of the document, including headings, tables and
 ˓→paragraph numbers, and forms the core of the document.

- **Presentation** is how the document is physically presented to the user and
 ˓→includes typography, layout, colour and formatting.

.. note::

    Notice that presentation is separate from structure and comes *last* in the
˓→logical pipeline of managing a document. The same metadata, content and structure
˓→can be presented in many different ways.

Here is an example piece of legislation that illustrates the difference between
 ˓→content, structure and presentation.

                                                                                                    (continues on next page)

12                                                                                             Chapter 1. Contents
Indigo Platform Documentation, Release 15.0.1
(continued from previous page)
.. image:: content-vs-structure.png
A compiler converts this plain text into the different formats listed above, presenting it in the best way for each format.
As the author, all I need to do is ensure the content and the structure are well expressed in the reStructured Text format,
and the compiler does all the hard work to make it look good. I don’t need to worry about styling the document at all.
See also:
You can see the full reStructuredText source for this guide at https://github.com/laws-africa/indigo/tree/master/docs.
Akoma Ntoso
Under the hood, Indigo uses the Akoma Ntoso standard for legal documents. This is an XML standard that allows us
to capture the content and–most importantly–the structure of the document. Akoma Ntoso supports a wide range of
documents (acts, bills, debates, gazettes, etc.) but we only use the act document type. Documents such as by-laws,
statutory instruments and government notices also fall under this type.
See also:
See http://www.akomantoso.org/ for more background on Akoma Ntoso.
Akoma Ntoso is designed to support the many varying structures of legislative documents used throughout the world.
As a result, the format is rich and expressive but quite complicated. Indigo works with only a subset of what is allowed
by Akoma Ntoso and does its best to hide this complexity from the user.
It can be useful to understand what Akoma Ntoso looks like. Here is the XML that corresponds with the content and
structure from above:
1.3. Using the Indigo Platform 13Indigo Platform Documentation, Release 15.0.1
As you can see, the Akoma Ntoso XML for a section is complicated! If you understand the format you can edit the
XML directly, otherwise we recommend you use the editor.
What Indigo Does for You
Indigo automates some parts of managing legislation. It can do this because it understands the structure of the docu-
ment.
1. Indigo generates the cover page for a document based on the metadata you supply. You must not include a cover
page in the content of the document.
2. Indigo generates a full Table of Contents with Parts, Chapters, Sections and Schedules. You must not add a
Table of Contents to you document; it’s important that you don’t so that Indigo doesn’t get confused.
14 Chapter 1. ContentsIndigo Platform Documentation, Release 15.0.1
3. Indigo manages typefaces and font sizes for you. This is a presentation issue and is therefore dependent on what
device or media the document is being targeted at. Indigo uses the structural information you provide to decide
how the document should look on different devices.
4. Indigo handles indentation for you, based on the document structure. It knows when a subsection is a child of
a section and will sort out the indentation appropriately, you don’t need to worry. In fact, Indigo completely
ignores tabs and spaces when it imports documents.
Next, we’ll take you through how to use the Indigo platform to manage and capture legislation.
1.3.3 Works and the Library
A work is an Act, a by-law, a regulation, and so on. In Indigo, a work doesn’t have any content – it’s just a description
of the basic details of the act (or by-law, etc.). A work can be associated with many documents, each of which is an
expression of the work.
An Indigo work is uniquely identified by its FRBR URI. Documents are linked to a work through a common FRBR
URI.
Documents inherit a number of fields from a work, such as the FRBR URI, publication date, repeal status, etc. These
details are managed at the work level, not at the document level.
You must create a work before you can import a new document.
Library
The library lists all the works and documents in the system. You can filter them by country and by tag and search for
them by title, year and number.
Searching
Search for a document by typing in the search box. This will limit the documents to only those that match your search.
Searches ignore case and match against title, year and number. Clear the search by clicking the x button.
1.3. Using the Indigo Platform 15Indigo Platform Documentation, Release 15.0.1 Filtering by Country To show only documents for a particular country, choose the name of the country from the list. Filtering by Tag Tags are a powerful way to group and manage documents however you need to. You can add as many tags as you like to a document. Change a document’s tags by clicking on the document name and changing them in the Basic details section of the Properties page. You can filter the documents to show only those with one or more tags. To do so, click the tag in the list of tags on the right. The number next to the tag is the number of documents that have that tag. Tags you are filtering by are highlighted in blue. If you choose to filter by multiple tags, only documents with all of the chosen tags will be shown. Editing Works To edit a work, click through to the work from the library or a linked document. To create a new work, use the New Work option in the library menu. Work Details Short title is the generally used title of the work. Most pieces of legislation declare what the short title will be. Country the country that this legislation is applicable to. Locality (optional) the area within the country that this legislation applies to. This is not applicable for national legislation and can be left blank. If used, this should be a widely accepted code for the region. For example, in South Africa the list of municipality codes is available on Wikipedia. Document subtype (optional) is the subtype of the work. Choose (none) for general Acts. Year is the year of the work, generally the year it was first introduced in Parliament. Number is the number of the work within the year. Most Acts are assigned a sequential number within the year of introduction. If you don’t have a number available (eg. for by-laws) use a reasonable short form of the work’s name or, as a last resort, use nn for not numbered. Use cap123 for Chapter 123 in a Cap-based numbering system. FRBR Work URI is the URI used to identify this work and is calculated from the other metadata. It uniquely identifies this work. You cannot edit this value. Note: Administrators can add new countries and subtypes through the Admin interface. Click on your name in the top-right corner and choose Site Settings. Promulgation Publication date (optional) is the date on which this work was officially published, in the format YYYY-MM-DD. Publication name (optional) is the name of the publication in which it was published, such as National Gazette. 16 Chapter 1. Contents
Indigo Platform Documentation, Release 15.0.1

Note: Administrators can set the publication names which are available in the drop-down list. Click on your name in
the top-right corner and choose Site Settings, then edit a country in the Indigo Editor section.

Publication number (optional) is the number of the publication in which it was published, such as a gazette number.
Assent date (optional) is the date on which the President or other authority assented to the work, in the format
YYYY-MM-DD.
Commencement date (optional) is the date on which the bulk of the work comes into force, in the format
YYYY-MM-DD. If parts of the work come into force on different dates, place an editorial comment inline in the
document indicating this.

Repeal

Repealing work The work which repealed this work, if any.
Repeal date (optional) is the date on which the work was repealed, in the format YYYY-MM-DD.

1.3.4 Managing Documents

Importing a new document

You can create a new document by importing an existing file, such as a PDF or a Word document. Indigo uses Apache
Tika to import from a wide range of document types, including:
    • MS Word (.doc and .docx)
    • Rich Text Format (.rtf)
    • PDF
    • Plain text (.txt)
Simple documents such as Word (.doc) and RTF produce the best results.

Note: Follow these tips for getting the best results when importing documents:
    • Prefer RTF or Word (.doc and .docx) documents; use PDFs only as a last resort
    • Remove the Table of Contents at the start of the document
    • Convert images to text

To import a document:
   1. Click the arrow next to the Library button and choose Import a document.
   2. Drag and drop the file to import into the box, or click the button to choose a file to upload.
   3. Wait for the document to be imported. This make take up to 10 minutes, especially for large documents.
Once you have imported a document you will need to proof it to ensure that the various components have been correctly
captured. Indigo doesn’t always get everything right. Look for these errors after importing:
    • Check that parts and chapters have been identified correctly.
    • Check that numbered sections have been identified correctly.

1.3. Using the Indigo Platform                                                                                    17
Indigo Platform Documentation, Release 15.0.1
• Check that numbered lists aren’t broken in the wrong places.
• Check that schedules have been matched correctly.
See also:
See the section on Editing Documents for more details.
Indigo will do its best to extract text information from the imported document. You will still need to fill in all the
metadata such as the document title, year of publication, etc.
Deleting a document
You can delete a document by going to the document Properties page and scrolling down to the Danger Zone section
and clicking the Delete this document button.
Note: You cannot delete a published document. Mark it as a draft first.
Note: Only users with the Can delete document permission can delete a document. An Administrator can change
this for you in the Admin area.
Note: If you delete a document by accident an administrator can undelete it for you.
Administrators: visit /admin/indigo_api/document/ and click on the document to recover, scroll down to
find the Deleted checkbox, uncheck it and click Save.
Editing Metadata
The metadata is important for describing the document and making it available through the API.
18 Chapter 1. ContentsIndigo Platform Documentation, Release 15.0.1
Basic Details
Work The details of the work this document is linked to. Change the work by clicking the button.
Short title is the generally used title of the document. Most pieces of legislation declare what the short title will be.
Language is the language of the document.
Tags is a free-form collection of tags for this document. Use tags to manage your documents during editing and even
after publication. To add a new tag, click in the box, type a new tag and press enter or comma. You can add as many
tabs as you like. To delete a tag, either backspace or click the x next to the tag’s name.
Note: Administrators can add new countries, languages and document subtypes through the Admin interface. Click
on your name in the top-right corner and choose Site Settings.
Draft and Publishing
Draft controls whether the document is available publically. While you are editing the document, this should be
checked. Outside users cannot see draft documents. Once a document is ready to be used by outside users, uncheck
this box to indicate it is published.
Note: You cannot delete a published document. Mark it as a draft, first.
Amendments
The Amendments section records amendments that have been applied to reach this version of the document. If you
are not editing the latest version of the document this must only include those amendments that have been applied to
reach this point.
To record an amendment, you need the following information about the amending document (the document that
caused the amendments to happen):
• the title
• date of publication (date at which the amendments took place)
• the FRBR URI of the document
If the amending document is already in the library, you can choose it from the list and have all these details filled in
automatically.
To create a newly amended version of a document, edit the version just before the new amendments need to be applied
and click Clone Document to create a copy, and then edit that copy.
Attachments
The Attachments section lets you attach files to your document. This is generally used to link a source PDF, Word or
other file with your document, but you can upload any file you like. When creating a new document by importing a
file, the file is automatically added as an attachment.
To upload a new file, click on Attachments and then click the Choose Files button.
You can change the name of an attachment by clicking the pencil (edit) icon.
1.3. Using the Indigo Platform 19Indigo Platform Documentation, Release 15.0.1
Defined Terms Analysis
Indigo can find defined terms in a document and associate occurrences of a term with its definition. It does this
by looking for a section called Definitions or Interpretation and looking for sentences that look like
definitions. It then looks through the document to find uses of any defined terms it has found.
To find and link terms, click Analysis and then Find and link defined terms.
When viewing a document, Indigo marks the definition of a defined term in bold.
Important: Defined terms are lost when a section is edited. It’s best to find and link defined terms just before
publishing a final document, or after doing a batch of updates.
1.3.5 Editing Documents
If you’re capturing a new document we recommend first capturing it using a standard word processor like Microsoft
Word. Once you have the bulk of the document, import it into Indigo.
Indigo looks for structure in a document by looking for keywords such as chapter and part. It can identify different
aspects of a document:
• Preface
• Preamble
• Parts and chapters
• Sections, subsections and numbered lists
• Schedules
Note: Indigo ignores presentation details such as font size, bold and italicised text, and indentation because those
elements are used inconsistently by different authors. Indigo will apply new presentation rules based on the structure
of the document.
Making and Saving Changes
The easiest way to make an edit is to use the Table of Contents on the left part of the document page to find the section
in which to make the change.
1. Click on the heading of the part, chapter or section you wish to edit. Choose the smallest element that contains
what you wish to change.
2. Click the Edit button in the top right corner of the document.
20 Chapter 1. ContentsIndigo Platform Documentation, Release 15.0.1
3. Indigo will show the simple editor. Notice that the content of the editor is the textual content of the section
you’re editing, without any formatting and with very simple layout.
4. Make the changes you require.
5. Click the green tick at the top-right corner where you clicked the Edit button.
6. Indigo will process your change and replace the editor with the new content.
• If you’ve made an edit Indigo cannot understand, clicking the green tick will show an error. Correct your
edit and try again.
• To abandon your changes, click the X icon near the green tick.
8. Click the blue Save button to save your changes to the server.
Note: Bear these tips in mind when editing:
• Indigo can take a long time to process large sections. Choose the smallest containing element when editing.
• Use the existing content as a guide for how to format new content.
Editing Structure
Indigo cares about the structure of a document, not font sizes or layout. This means you need to follow a few simple
conventions and Indigo will do all the hard work for you.
Here is an example of the simple formatting used by Indigo:
1.3. Using the Indigo Platform 21Indigo Platform Documentation, Release 15.0.1
Chapter 8 - Environmental management co-operation agreements
35. Conclusion of agreements
(1) The Minister and every MEC and municipality, may enter into environmental
˓→management co-operation agreements with any person or community for the purpose of
˓→promoting compliance with the principles laid down in this Act.
[[Section 35(1) inserted by section 7 of Act 46 of 2003]]
(2) Environmental management co-operation agreements must-
(a) only be entered into with the agreement of-
(i) every organ of state which has jurisdiction over any activity to which such
˓→environmental management co-operation agreement relates;
(ii) the Minister and the MEC concerned;
(b) only be entered into after compliance with such procedures for public
˓→participation as may be prescribed by the Minister; and
(c) comply with such regulations as may be prescribed under section 45.
Indigo understands how to convert this into the XML that represents a chapter, section 35, subsections etc.
Notice that under subsection 1(a) above there is a sublist with items (i) and (ii). We don’t bother trying to indicate that
it is a sublist, Indigo will work that out based on the numbering.
You can think of this as focusing on the content of the document and using very simple presentation rules guided
by a rough understanding of the structure. Compare this with an editor like Word which focuses heavily on the
presentation of the content.
Chapters, Parts, Sections, etc.
Follow these guidelines to tell Indigo about the structure of your document:
• Start the preface like this:
PREFACE
• Start the preamble like this:
PREAMBLE
• Start a chapter like this:
Chapter 2 - Interpretation
• Start a part like this:
Part 1 - Applications
• Start a section like this:
1. Definitions
• Numbered subsections must have a number in parentheses at the start of the line:
22 Chapter 1. ContentsIndigo Platform Documentation, Release 15.0.1
(1) The content of section 1.
(2) The content of section 2.
• Subsections or statements without numbers can be written as-is:
A statement without a number.
• Numbered sublists must have a number in parentheses at the start of the line:
(a) sublist item a
(b) sublist item b
• Start a Schedule like the example below. The heading and subheading are optional, you can leave them out if
necessary:
SCHEDULE
HEADING First Schedule
SUBHEADING Laws to be repealed
The text of the schedule.
Tables
Often a piece of legislation will include tables, for example in Schedules.
The easiest way to edit these is to click the Edit Table button at the top right corner of the table.
• Simply type your changes into the table and click Update when you’re done.
• Use the buttons in the toolbar to add and remove columns and rows, and to set cells as heading cells.
• To merge cells, use the mouse to select the cells and click Merge cells.
• To split merged cells, select the cells and click the Merge cells button again.
Editing Tables in the Simple Editor
You can also edit tables in the simple editor. Indigo uses the same text format for tables that Wikipedia uses.
See also:
Be sure to read Wikipedia’s tutorial for writing tables.
Use this table generator website to easily start building a new table for a document.
Don’t use class="wikitable" even though they recommend it.
This code:
{|
|-
! header 1
(continues on next page)
1.3. Using the Indigo Platform 23Indigo Platform Documentation, Release 15.0.1
(continued from previous page)
! header 2
! header 3
|-
| row 1, cell 1
| row 1, cell 2
| row 1, cell 3
|-
| row 2, cell 1
| row 2, cell 2
| row 2, cell 3
|}
produces a table that looks like this:
Header 1 Header 2 Header 3
row 1, cell 1 row 1, cell 2 row 1, cell 3
row 1, cell 1 row 1, cell 2 row 1, cell 3
Notice how we don’t explicitly make the header row bold. We simply indicate in the structure that those cells are
headers by using ! at the start of the cell’s line instead of the normal |. Indigo will format the cell appropriately.
Telling Indigo to Ignore Special Items
Sometimes it’s useful to be able to tell Indigo not to interpret a line specially. Do this by starting the line with a
backslash \.
This is particularly useful when a paragraph starts with a text that Indigo would normally interpret as a section or
subsection. For example:
Fill in this form:
\1. State .......................................
\2. Date Received ..........................
\3. Checked ..................................
\4. Certificate Issued .......................
\5. Certificate No. ..........................
\6. Treasury Receipt No. .................
By starting each line with \ Indigo knows that it shouldn’t treat those lines as section numbers.
Adding new Chapters, Parts and Sections
You can easily add a new chapter, part or section to a document. To do so:
1. edit the chapter, part or section just before where the new one needs to go
2. at the bottom, add the new chapter, part or section heading and content
3. click the green Update button
Links
Add a link in the text of your document using this syntax:
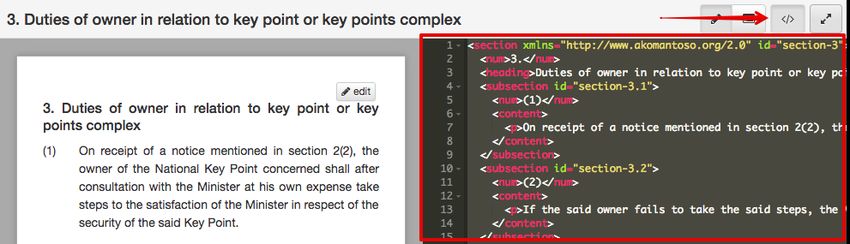
24 Chapter 1. ContentsIndigo Platform Documentation, Release 15.0.1 [link text](http://example.com/page) That will create a link like this: link text Images You can embed an image in your document using this syntax:  That will create an image using the image.png file added to your document as an attachment. Downloading PDF and Standalone HTML You can download PDF and standalone (self-contained) HTML versions of a document. These are useful for distribu- tion and archiving. Go to Preview and click the Download button. Downloaded and PDF documents can have a colophon, which is a page right at the start of the document which contains copyright, ownership and other information. A colophon is automatically chosen for a document based on document’s country. Note: Administrators can add new colophons through the Admin interface. Click on your name in the top-right corner and choose Site Settings. Viewing the XML It can be useful to see what the Akoma Ntoso for a piece of the document looks like. Click the Show Code button to do this: 1.3.6 The Admin Area Indigo has a backend Admin area that lets adminstrator users control some internal settings of how Indigo works. Only adminstrator (staff) users have access to this area. 1.3. Using the Indigo Platform 25
Indigo Platform Documentation, Release 15.0.1

Logging In

To log into the Admin area:
     1. Log into Indigo
     2. Click your name in the top-right corner
     3. Click Site Settings

Note: If the Site Settings option isn’t visible, then you aren’t a staff member and don’t have permission to view the
admin area.

Permissions

Indigo uses Django’s permission system to control who can create, edit, delete and publish documents. This can help
prevent documents from being deleted and published accidentally.
Permissions can be assigned to individual users, or to groups. Users who belong to groups get permissions from those
groups.
To edit permissions,
     1. Click on Users or Groups in the Admin area.
     2. Choose the user or group to edit (or create a new user or group)
     3. Scroll down to the permissions boxes.
The permissions that are important are:
indigo_api | work | Can add work Allows the user to create new works. This doesn’t allow a user to edit existing
      works.
indigo_api | work | Can change work Allows the user to edit existing works.
indigo_api | work | Can delete work Allows the user to delete works.

Note: Only give work permissions to experienced users.

indigo_api | document | Can add document Allows the user to create and import a new document. This doesn’t
      allow a user to edit existing documents.
indigo_api | document | Can change document Allows the user to edit existing documents.
indigo_api | document | Can delete document Allows the user to delete documents.
indigo_api | document | Can publish and edit non-draft documents Allows the user to mark a document as pub-
      lished (not a draft) and, along with the change permission, edit published documents.

Note: Only give the delete and publish permissions to experienced users.

indigo_api | annotation | Can add annotations Allows the user to annotate (add comments) to documents.
indigo_api | annotation | Can change document Allows the user to edit their annotations.
indigo_api | annotation | Can delete annotation Allows the user to delete their annotations.

26                                                                                          Chapter 1. Contents
Indigo Platform Documentation, Release 15.0.1 Adding New Admins To give admin permissions to a user, which allows them to log into the Admin area: 1. Click on Users in the Admin area. 2. Click on the user you wish to make an Admin. 3. Check the Staff status checkbox in the Permissions section and click Save. 1.4 Introduction to the Terminology of Law What do you understand by the word “law”? It is a word which can have many meanings, but in the language of law publishing, it means a piece of legislation which regulates the way in which things are done or should be done in many spheres of life, especially in public, in order to maintain good order and prevent the growth and flourishing of anarchy. Law according to the Roman Dutch and British systems has developed over several centuries. A great deal of the language is therefore antiquated and sometimes quite difficult to understand. Note: This content is adapted with permission from a training guide prepared by Adrienne Pretorius for AfricanLII. 1.4.1 Levels of legislation In South Africa, we have three levels of legislation. These are national, provincial, and municipal. Most jurisdictions have at least two levels: national and local government. National legislation: This is usually published as Acts and Regulations and/or Rules. See the later sections on publication of an Act. Provincial legislation: When our nine provinces were established, they already had a number of Ordinances which authorised them to make bylaws at municipal level. In addition to being allowed to retain many of their Ordinances when the changes were made from four to nine provinces, they were allocated certain levels of legislative involvement in respect of which they were granted the power to draft, debate on, pass and eventually publish Acts and Regulations and/or Rules. The old Ordinances were gradually repealed, and very few of them are still in existence today. When provincial legislation originally got under way in the early 1990s, the early provincial Acts used to be called laws, but they are now all called Acts. Municipal legislation: This is usually published as Bylaws. As most jurisdictions publish Acts, Regulations and/or Rules, we are going to concentrate on this level of legislation. Note: From here onwards, any reference to an Act or Acts also applies to other types of legislation. You will learn about some of these later. 1.4.2 Publication of Acts A Gazette is an official newspaper, and in most countries, legislation as well as a large variety of other legal notifi- cations are published in gazettes. In South Africa, Acts are usually published by means of a Government Notice in Gazettes. There are some exceptions. For example, our Public Service Act of 1994 does not have an Act number; it is Proclamation 103 of 1994. This is very unusual in terms of our legal system, which falls into a classification known as Roman-Dutch law. We follow this system because the first colonial settlers were Dutch, and they introduced the same system that they used in their home country of Holland. 1.4. Introduction to the Terminology of Law 27
Indigo Platform Documentation, Release 15.0.1

A Gazette has a number of important features:
     • Firstly, the type of Gazette (national or provincial) is shown clearly on the cover (first page) of the Gazette.
       Either our national coat of arms or the coat of arms of one of our nine provinces will appear on that page,
       together with the words “National Gazette” or “Provincial Gazette”.
     • Secondly, the date must appear on the first page. This is extremely important. Do you know why? The reason
       is that the date of commencement of an Act is often linked to the date of publication.
     • Thirdly, there will be a Gazette number. This information helps us when we are searching for missing legisla-
       tion.
     • Below those details will be a short paragraph telling us who assented to the Act (agreed that it could be published
       and made available to the public). This section will include the Government Notice (or Provincial Notice)
       number and the date on which the Act is promulgated. This is also sometimes referred to as the date on which
       the Act was signed into law.
     • This is followed by the number and year of the Act, as well as its short title.

Note: IT IS IMPORTANT TO NOTE THAT THE FRONT COVER DOES NOT FORM PART OF THE ACT, AND
THAT THERE ARE OFTEN ERRORS ON THIS PAGE (THE COVER). NEVER TAKE THE NUMBER, YEAR OR
TITLE OF AN ACT FROM THIS PAGE. YOU MUST CHECK AGAINST THE DETAILS INSIDE THE GAZETTE
AND IN THE SHORT TITLE OF THE PUBLISHED ACT.

Other information on the first page will usually include the volume number of the Gazette and the place in which the
Gazette was printed. In the case of South African Acts, this is often Cape Town, but most of our Gazettes are printed
in Pretoria (Tshwane), where the official premises of the Government Printer are situated.

1.4.3 Types of Act

Acts fall into a number of categories. The two main categories are principal and amendment Acts. Others include
Appropriation Acts and Division of Revenue Acts, which regulate the spending of public money (these are said to be
ephemeral – the information which they contain changes on a regular basis).

Principal Acts

Principal Acts are by far the most important category of Act. They lay the foundation for court decisions.

Note: Always remember that Statute law and judicial precedent (Court judgments) form the foundation of any justice
system.

Amendment Acts and other amending notices

It is important to note that it does not matter how many times a principal Act is amended; it will ALWAYS retain its
original number (for example, Act 71 of 2008). The only time the Act number may change is in a case where an error
has been made in the Statutes books and the Act has inadvertently been incorrectly numbered. I can think of only one
instance where this has happened, and it was long before I became a Statutes editor. It is far more likely that the short
title will be changed altogether (in other words, the Act is renamed).
In most countries, principal legislation may be amended by principal Acts, amendment Acts, and subsidiary legislation.
Some Acts do not provide for this, or provide specifically for amendment only by Act. Remember that principal Acts
may also contain at least one repeal, if the Act replaces an existing Act dealing with the same area of law.

28                                                                                              Chapter 1. Contents
Indigo Platform Documentation, Release 15.0.1
Amendments of any kind cannot be made if the amending provisions are not in operation. Always check before you
start updating, and also check for whether certain provisions commence on different dates from the rest of the Act.
It is also important to know that amendment Acts do not always amend only one Act. The short title may therefore
not be a guide as to which Act is amended. For example, a Revenue Laws Amendment Act may amend several Acts
or every Act dealing with revenue (State income), or only one or two, and it may also amend other Acts.
1.4.4 Components (parts) of an Act
A law or Act is usually made up of a number of different components or parts. Some of these are:
• The title, usually called the “short title”, which is the name by which the Act is known. The short title often has
a reference to the date of commencement (see the later section dealing with dates of commencement)
• Details with regard to the date of promulgation (publication); who assented to (approved) the legislation; which
language was signed (in multilingual countries/jurisdictions); and what the date of commencement is
• The long title, which explains briefly why the Act was made
• An Arrangement of Sections (this is not part of the law, but assists in navigating through an Act or other piece
of legislation, especially lengthy documents)
• Chapters or Parts, identified by their headings (these are subdivisions used to arrange the information in an Act
or other piece of legislation. In some countries, especially those which were once under British rule, the Acts
are known as Chapters or by a Latin abbreviation, “Cap”)
• A number of sections/regulations/rules (according to the nature of the legislation)
• Side headings to the various sections (as with the Arrangement of Sections, these are not part of the law, but
assist in navigating through an Act or other piece of legislation)
• A section containing definitions (the meaning of words as used in the particular Act. This is a very important
section, because words have different meanings in different contexts; and in law, we very often have to look at
other Acts to see what a certain word means in context)
• Subsections/subregulations/subrules (as above)
• Paragraphs (usually (a), (b), and so on)
• Subparagraphs (usually identified by small Roman numerals: (i), (ii), (iii), and so on)
• Schedule(s)
• Tables and diagrams.
The short title is the commonly known name of a law or Act, as it is called in most countries. It usually includes the
number of the Act and the year in which it belongs. Many years ago, Acts were always passed in the year to which
they were allocated. For example, all Acts passed in 1984 were printed and published before the end of 1984. As
the years have gone by, parliamentary sessions have become longer and less orderly, and as a result, less legislation is
passed in each year.
However, Acts which have not been promulgated and published in the year in which they are allocated will be passed
in a subsequent year, but will still retain the original year in the number. For example, we are still waiting for
the Protection of State Information Act 41 of 2013 (known commonly in South Africa as the “Secrecy” Act) to be
published. The number has been allocated, but the Act has not yet been promulgated. Even if it is published only in
five years’ time, it will still be Act 41 of 2013. In some cases, Acts which are awaiting promulgation are repealed
(removed from the Statutes book) without ever being made available to the public except in Bill form.
Note:
1.4. Introduction to the Terminology of Law 29Indigo Platform Documentation, Release 15.0.1
• A reference to “the Statutes book” refers nowadays to the computerised record of all principal and amendment
Acts published and still operative in terms of South African law. Many years ago, this was a physical book (or
rather, a very large set of books) containing these records, and a repeal entailed physically removing the record
of the particular Act from the official book.
• A Bill is a preview of what an Act will contain. Some Bills are passed after their first version has been published,
while others may go back time and again for further revision by the various Parliamentary committees.]
The long title is a summarised breakdown of what the purpose of the Act is. It may be presented in only a few words,
in some cases, while in others, particularly financial measures, it can run to several pages.
The Arrangement of Sections/Regulations/Rules is an aid to navigating through a document, especially a very long
one. It does not form part of the law, and in fact, many Acts have no Arrangement of Sections. If you are ever involved
in law revision and consolidation, you will probably be asked to insert an arrangement of Sections wherever there isn’t
one.
Chapters and Parts are subdivisions in South African Acts. There is no set pattern as to how these are applied in an
Act. Sometimes there are Chapters only, and sometimes Parts only. In some cases, Chapters are divided into Parts. So
there is no hard-and-fast rule regarding the use of Chapters and Parts in South African legislation. In some countries,
a reference to a “Chapter” is a reference to an Act, and is usually abbreviated to “Cap”, as mentioned above.
Sections are the “meat” of an Act. They flesh out the provisions relating to the subject matter of an Act. They are
numbered in sequence, but insertions are often made at a later stage, modifying the original numbering section by
inserting, for example, a new section 13A.
The side headings to sections (also referred to sometimes as “marginal notes”) do NOT form part of the law, and can
be edited and/or replaced when revising and consolidating legislation. In an ordinary revision service, it is not wise
to change these side headings, because people tend to refer to a particular section by that side heading as well as the
number of the section.
Paragraphs, subparagraphs and items are further subdivisions in an Act (and are sometimes even further subdi-
vided), but they depend on a higher level of the hierarchy of the Act (see the section below on the hierarchy of the
components of an Act) – they will usually not be found standing independently in an Act.
We refer later to “lists” of legislation in Acts. This means any sequential arrangement of information, so it could refer
to the sections, paragraphs, and so on, as well as what are generally known as “lists” (see the section below on the
hierarchy of the components of an Act, where there is a list of words).
Schedules fall into many different categories. The majority of them will contain amendments and/or repeals of leg-
islation. However, many of them contain provisions supplementary to the text of the Act in which they appear. For
example, an Act dealing with the establishment of a new council may contain the constitution, functions and duties
of the council and its members. The South African Labour Relations Act 66 of 1995 contains a Code of Dismissal
in one of its numerous Schedules. Acts relating to the Defence Force or Police or other protective bodies often have
their regulations in a Schedule following the text of the Act. The South African Criminal Procedure Act 51 of 1977
has schedules relating to various categories of crime according to how severely these offences are punishable.
Whatever form it may take, a Schedule to an Act always contains supplementary information of importance in meeting
the objectives of the Act. There is usually an indication of the section which governs the Schedule, and by referring to
that section number, you will be able to see what the purpose of the Schedule is. A Schedule may also be governed by
a number of sections.
Tables and diagrams can cause problems. It may not always be possible to position insertions of this kind exactly
where they appear in the Gazette. For this reason it is advisable not to refer to tables, illustrations or diagrams by page
number or by phrases such as “the diagram below”. Each individual table, illustration or diagram should be given a
specific label.
30 Chapter 1. ContentsYou can also read