INSTALLATION INSTRUCTIONS - iSpring Reverse Osmosis Water Filtration Systems & OWNER'S MANUAL Ver. 04/2020
←
→
Page content transcription
If your browser does not render page correctly, please read the page content below
iSpring Reverse Osmosis Water Filtration Systems

INSTALLATION INSTRUCTIONS
  & OWNER’S MANUAL                                        Ver. 04/2020

 Copyright ©2005-2020 ISPRING WATER SYSTEMS, LLC. All rights reserved.
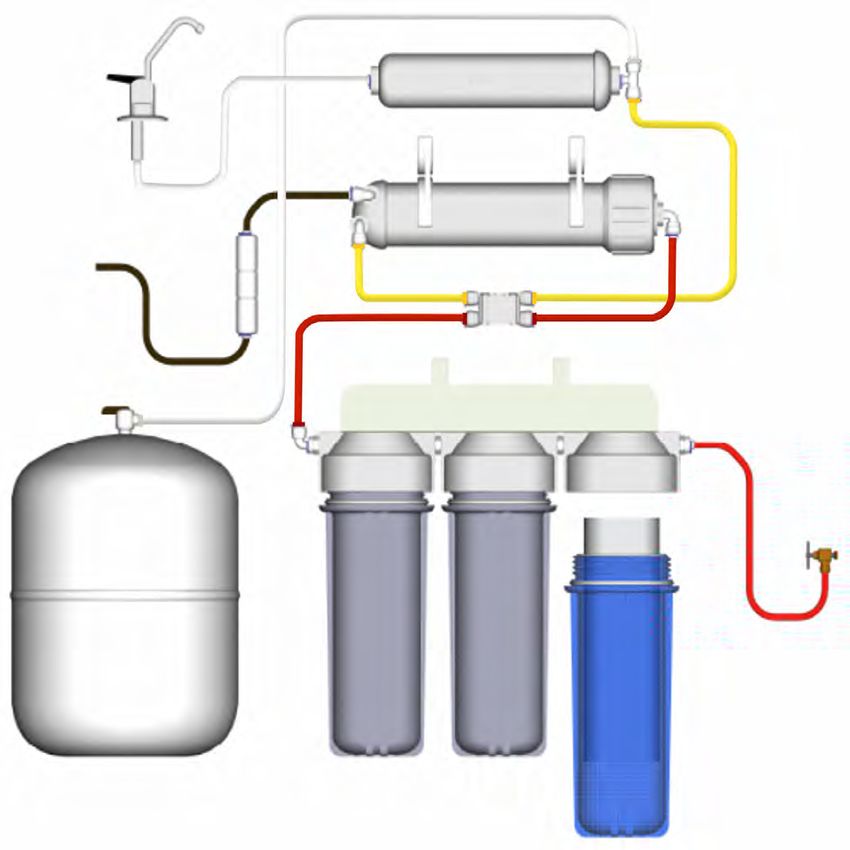
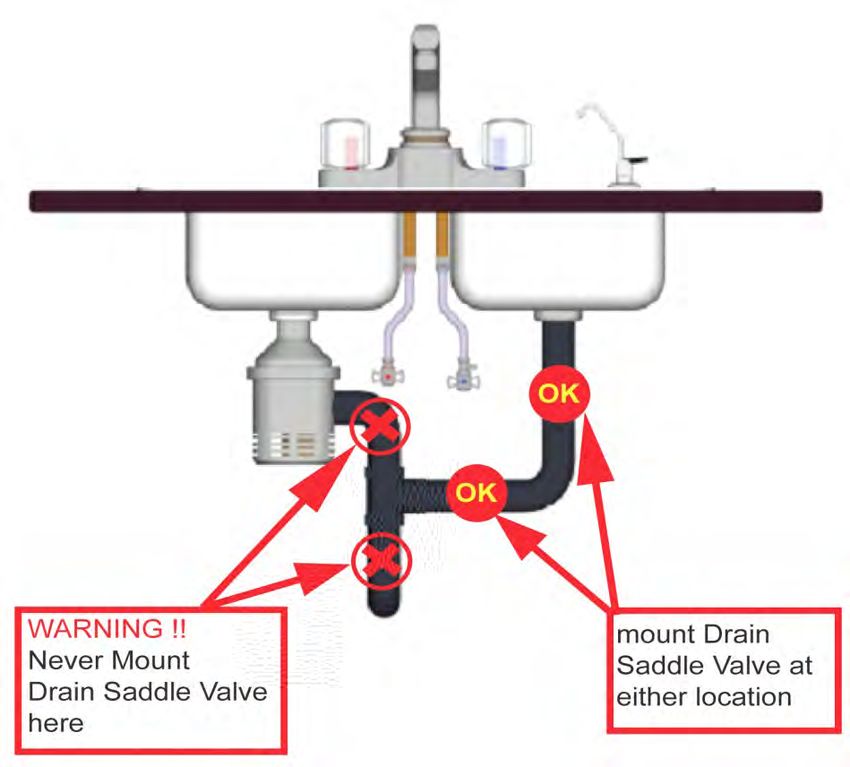
Table of Contents

Introduction .................................................................................. 1
Parts Checklist.............................................................................. 2
Tools List ....................................................................................... 3
Product Overview ......................................................................... 3
5-Stage RO System Filtration Process ....................................... 4
Tubing Connection Guide ............................................................ 6
Preparation.................................................................................... 7
Installation..................................................................................... 8
  RO Faucet Installation .................................................................................. 8

  Porcelain Sink .............................................................................................. 9

  Feed Water Supply Installation ................................................................... 10

  Mounting the Drain Saddle ......................................................................... 11

  Install the Tank Ball Valve ........................................................................... 12

  RO Membrane Cartridge Installation .......................................................... 13

System Start-Up .......................................................................... 14
Preventative Maintenance ......................................................... 17
Cleaning Procedures.................................................................. 19
Troubleshooting ......................................................................... 21
Warranty ...................................................................................... 22
Warranty Registration ................................................................ 23
Introduction
     Congratulations! You have purchased one of iSpring’s finest residential
             Reverse Osmosis (RO) Drinking Water systems.

                  We stand behind our products

     iSpring has been dedicated to providing high quality drinking water to
families across the United States since 2005.

    From various residential water filtration systems that purify your water in
everyday life, to drinking water faucets that deliver pure, healthy, and tasty
water to you and your family, iSpring strives for high standard products and
aims to make excellent drinking water accessible for all households.

     At iSpring, we strive for high standard products and aim to make excellent
drinking water accessible for all households.

    With affordable pricing, solid quality, prompt delivery, and top-notch
customer service, we hope to assist in bringing you great water for years to
come.

iSpring Water Systems                                                     Page 1
Parts Checklist
    Your new iSpring RO system should include the following items. If any
item is missing, please contact the online retailer, or iSpring directly. Please
take a few moments to check all of the following components.

     RO Machine Head                  RO Membrane                3 Pre-Filter Housings and
* (membrane not yet installed)                                        Filter Cartridges

     Water Storage Tank             RO Drinking Faucet              Feed Water Adapter

      Color Tubing Set                 Drain Saddle                     Tank Valve

      Housing Wrench                  Leak Stop Valve           Spare O-Rings and Fittings
                                                                (Package quantity may vary)

iSpring Water Systems                                                       Page 2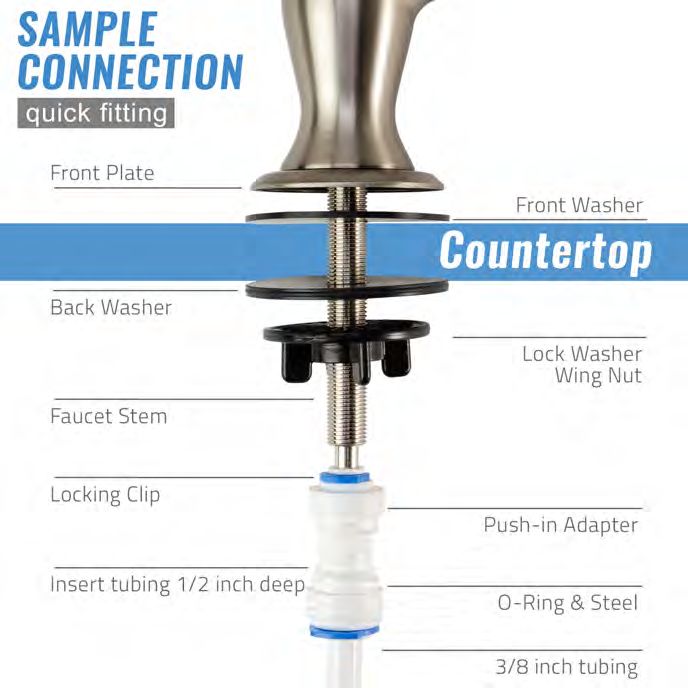
Tools List
Make sure you have the following tools ready to use.
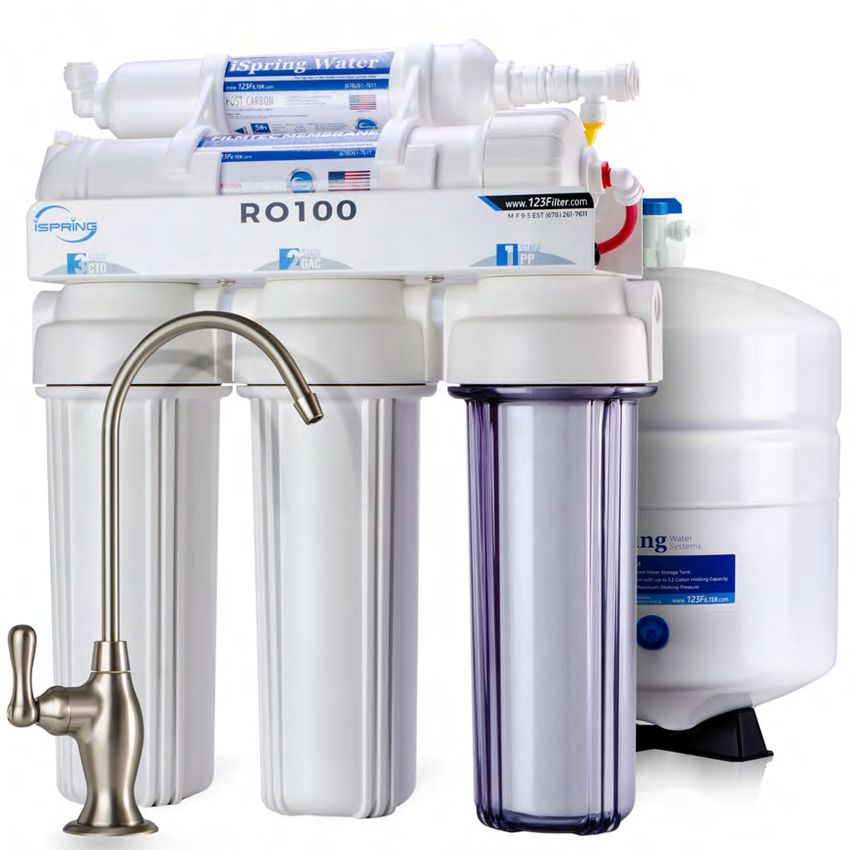
Product Overview
Please inspect the entire system before the installation. If any part is
missing or damaged, please contact the online retailer or iSpring directly for
assistance.
Front View Back View
iSpring Water Systems Page 3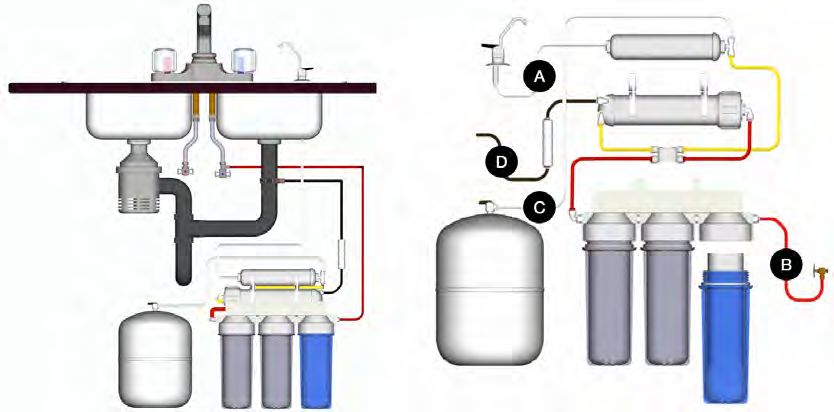
5-Stage RO System Filtration Process

       Faucet
                                                        5th

                                                        4th

                  Flow
                Restrictor

Wastewater
 (To Drain)

                                               Auto Shut-Off Valve                  Flow Direction
                                                                                   (Feed Water In)

                                                                                      Feed Water
                                                                                      (Tap Water)

         Pressure Tank                   3rd            2nd                  1st

   Stage                      Description                     Service Life
   1st stage                  Sediment Pre-filter             6 months
   2nd stage                  GAC Pre-filter                  6 months
   3rd stage                  Carbon Block Pre-filter         6 months
   4th stage                  RO Membrane                     24-36 months
   5th stage                  Polishing Inline Filter         6-12 months

   iSpring Water Systems                                                           Page 4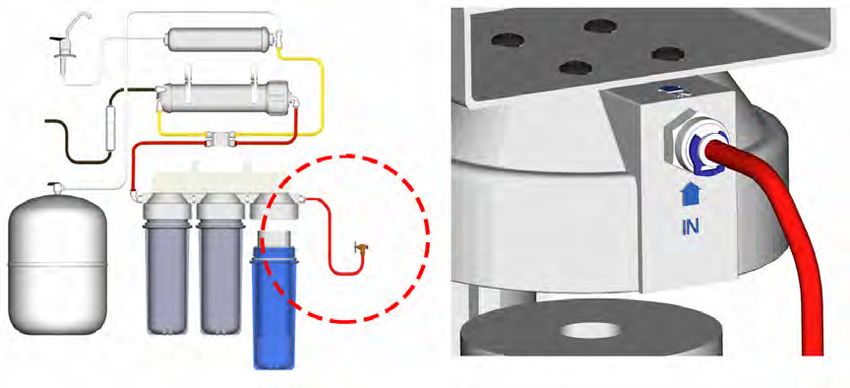
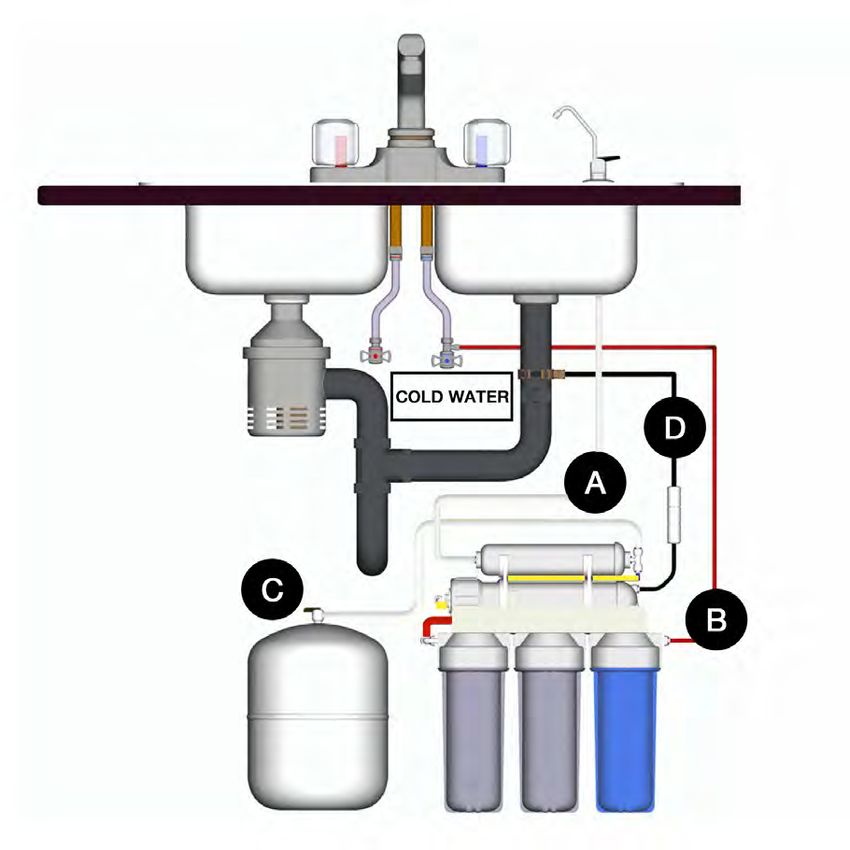
Please follow the color-coded tube connections to complete the installation.

     4 Connections            Tube Color                   Description

 A    RO Faucet               White           Pure Water to the Faucet

 B    Feed Water Valve        Red             Feed Water to RO System

 C    Tank Ball Valve         White           Pure Water to Storage Tank

 D    Drain Connector         Black           Discharge Water to Drain

iSpring Water Systems                                                          Page 5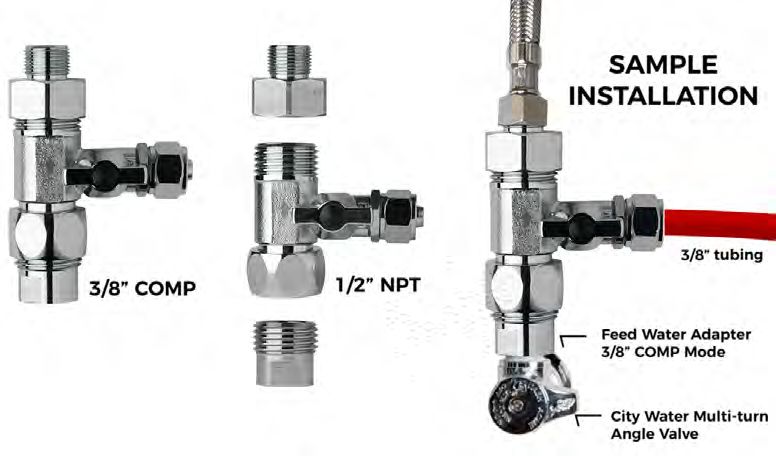
Tubing Connection Guide

Cut the tubing squarely, and insert
tubing into the lock fitting (be sure the
lock fitting is flush for a secure insert).
Push tubing inward while pushing the
lock fitting outward and insert the lock
pin.

Pull on the tubing gently to ensure it is
tightly fitted.

CAUTION: Before cutting supplied tubings, predetermine the length by measuring the
                  distance between the components to be connected.

To Attach Tubing                                 To Release Tubing

                                                 To Insert Locking Clip

iSpring Water Systems                                                       Page 6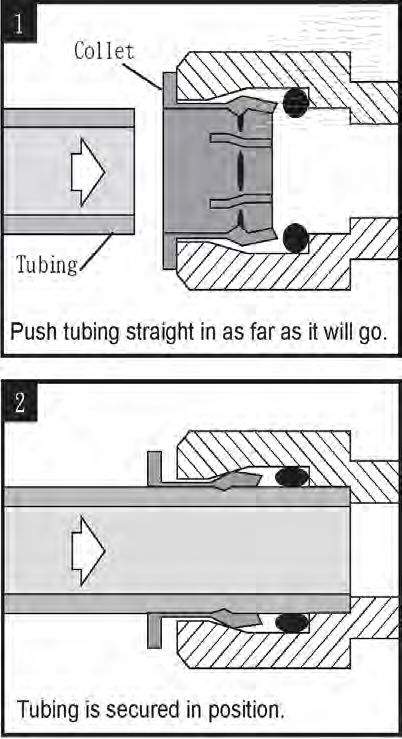
Preparation
Determine the location for installation of the RO system.
Determine the location for installation of the RO faucet.
You may use the existing predrilled hole on the sink. Make sure the
washer is big enough to cover the hole.
If you drill a new hole on the countertop or sink, make sure that drilling
the hole will not damage any pipe or wiring underneath the
countertop or sink.
Determine the location for the water storage tank.
The pressure storage tank can stand up straight or lie down at the
desired location.
The maximum distance between the storage tank and the RO faucet
is 15 feet. The system will produce a faster flow at the RO faucet if
you use the shortest tubing possible from the tank to the RO faucet.
Before Installation: Shut Off the Water Supply
Locate both the cold and hot water supply shut-off valves underneath
the sink. Turn OFF both the cold and hot water shut-off valves.
Only hook up the water supply to the RO system from the COLD water
feed line. CAUTION: Hot water will permanently damage the RO
system.
If no shut-off valve is located under the sink, turn off the main water
supply at the entry to the house.
CAUTION
DO NOT USE WATER THAT IS MICROBIOLOGICALLY UNSAFE OR OF
UNKNOWN QUALITY WITHOUT ADEQUATE DISINFECTION BEFORE
OR AFTER THE SYSTEM.
iSpring Water Systems Page 7Installation
RO Faucet Installation
The RO faucet may be installed on any flat surface. Check the underside of
the location for any interference. You may use the existing predrilled hole
on the sink. Make sure the washer is big enough to cover the hole. If you
drill a new hole on the countertop or sink, make sure that drilling the hole
will not damage any pipe or wiring underneath the countertop or sink.
1. Determine the desired location for your RO faucet on your sink surface.
2. Place masking tape or duct tape on the location where the hole will be drilled.
3. Use a variable-speed drill set on slow speed and drill with a 1/8 inch (3 mm)
drill bit to make a center hole at the select location. Use lubricating oil to keep
the drill bit cool while drilling.
4. Enlarge the hole using a 1/4 inch (6.4 mm) drill bit following factory-approved
methods or approved plumbing practices.
5. Enlarge the hole to a 7/16 inch (11 mm) diameter. Keep the bit well oiled and
drill slowly.
6. On top of the sink, insert the front plate, the rubber washer, through the faucet
to the sink hole.
7. Under the sink, install the large metal (or rubber) washer and the wing nut
(lock washer) over the threaded stem. Screw on the nut and tighten.
8. Slide the push-in fitting up the push-in adapter on the base, then lock it in
place by sliding the blue clip under the collet. Insert the White tubing about 1/2
inch into the push fitting, and again, secure it with the blue clip.
iSpring Water Systems Page 8Porcelain Sink
To drill on a porcelain sink, a spring-loaded Relton-style drill set is
strongly recommended in order to prevent chipping. Avoid high speed
drilling during the initial cutting of porcelain as this can cause chipping.
See the following figures.
Recommended drill bit set for a
porcelain sink
iSpring Water Systems Page 9Feed Water Supply Installation
Tapping into the COLD WATER line
CAUTION: The water supply to the unit MUST be connected to the COLD WATER
LINE. HOT WATER will severely damage your RO System.
1. Turn off the Cold Water Line via the Cold Water Supply Valve (CWSV) under
the sink. Open the kitchen faucet to release any pressure and make sure the
water has stopped before proceeding to the next step. Get a towel or bucket to
catch any water drips. Disconnect the Kitchen Faucet Connector (KFC) pipe
from the CWSV.
2. Check to make sure the O-ring is seated inside the Feed Water Adapter
female end, and twist it onto the CWSV. Tighten it using a wrench or pliers.
3. Twist the KFC onto the male end of the Feed Water Adapter. Turn the handle
of the Feed Water Adapter to the perpendicular OFF position. Turn on the
CWSV slowly, and ensure you are getting a proper seal.
4. Connect the 3/8” RED tubing to the Feed Water Adapter.
Feed Water Adapter with Bushing to convert 3/8” COMP to 1/2” NPT
5. Connect the feed water tubing to the RO system. Once the feed water adapter
has been installed, connect the tubing (RED) to the first stage (clear housing)
of the RO system.
iSpring Water Systems Page 10Mounting the Drain Saddle A Drain Saddle is used to make a waste water connection with the drain under the sink and is designed to fit around a standard 1 1/2-inch OD drain pipe. The drain saddle should always be installed before (above) the p-trap and on a vertical or horizontal drain. To avoid clogging the drain line with debris, do not install the drain saddle near a garbage disposal. iSpring Water Systems Page 11
1. Choose a spot on the drain pipe that is convenient for installing the drain
      saddle. A horizontal pipe is recommended to minimize the dripping sound.

   2. Drill a 1 /4” hole in the drain pipe, and paste the black sticky pad around the
      hole.

   3. Cut the BLACK tubing end to make a 45 degree angle. Insert the tubing into
      the 1/4” hole in the drain pipe, install the back plate, and tighten the two
      screws with hex nuts while the tubing remains in the hole.

   4. Insert Lock Clip. Pull the tubing lightly to make sure it is secure.

Install the Tank Ball Valve

NOTE: Do not tamper with the air valve on the lower side of the storage
tank. It has been preset at 8–10 psi by the manufacturer.

   1. Unplug the plastic cap on the top of the tank.
   2. Connect the ball valve to the thread. Make sure it is tight, but not overly tight.
   3. Place the storage tank in the desired location either horizontally or vertically.
   4. Connect the WHITE tubing from the post carbon inline filter (5th stage) to the
      tank ball valve.
      (See 5-Stage RO system diagram.)
   5. Turn the tank ball valve off.

                                        Off Position                On Position

iSpring Water Systems                                                           Page 12
RO Membrane Cartridge Installation
1.) Disconnect the tubing from the fitting as shown in the diagram
below.
2.) Remove the membrane housing from the plastic mounting clip.
Remove the membrane housing’s end cap by turning
counterclockwise as shown in the diagram below.
3.) Insert the RO membrane cartridge into the housing as shown in the
diagram below. The O-rings on the product water tube of the RO
membrane cartridge MUST FULLY SEATED in the membrane
housing for proper operation. Also, make sure that the Brine Seal on
the membrane seals with no gaps or wrinkles inside the membrane
housing. Once the RO membrane cartridge is installed, replace the
end cap and reconnect the tubing.
iSpring Water Systems Page 13System Start-Up
Make sure ALL the tubing are connected to the correct locations.
Double-check the security of all connections BEFORE TURNING ON the
water supply. See the following checklist.
A. ) The faucet tubing connects to the post carbon inline filter (5th stage).
One end of the inline filter is marked “connect to faucet.”
B. ) The feed water tubing connects to the 1st stage of the unit.
C. ) The storage tank tubing connects to the other end of the post carbon
inline filter (5th stage) at the union tee fitting. (3/8” white tubing)
D. ) The wastewater tubing from the drain saddle connects to the flow
restrictor.
iSpring Water Systems Page 141. Turn on both the cold water supply and the undersink feed water valve, and
close the tank ball valve. If any leaks are noted, turn off the valve and correct
before proceeding.
2. Open RO faucet for continuous flow.
3. Check the system for leaks; tighten where necessary.
4. After five minutes, the water will start to drip out of the RO faucet. Let it drip for
about 10 minutes and then flip the handle to the closed position. Turn on the
tank ball valve. It will take one to three hours for the storage tank to fill,
depending on the local water pressure.DO NOT DRINK THE FIRST TANK OF
WATER PRODUCED BY YOUR NEW SYSTEM.
5. After the tank is full (you will hear the water stop), flush the system by placing
the RO faucet in the open position until the water is completely discharged.
6. Upon complete discharge of the storage tank, turn the RO faucet’s handle to
the closed position and let the refilling process begin. This process could take
one to three hours to complete.
7. After the second tank is filled, the pure water is ready for you to enjoy.
8. Check for leaks daily during the first week of use and periodically thereafter.
9. You may notice that the water is milky colored during the first week. This is an
indication of air bubbles in the water; it is normal and safe to drink.
iSpring Water Systems Page 15Tube, Components, and Connection Assembly
Feed Water Adapter Connection Drain Saddle Connection
Feed Water Line Connect to 1st Stage of RO unit
3rd Stage Tubing (water out) Auto Shut-Off Valve
4th Stage Tubing (water in) Waste water line/RO Water Line
(water out)
3/8” White Water Line to Storage Tank/
Yellow Water Line to the RO membrane
housing, Water Out port
3/8” Faucet Tubing connected to inline filter
(5th stage)
iSpring Water Systems Page 16Preventative Maintenance
The following recommendations will help your system achieve maximum
efficiency in RO water production.
1. Filter maintenance
a. Filters may be stored for several years.
b. Place the sealed unopened filter in an airtight container to
prolong its shelf life and prevent it from absorbing unwanted
odors.
2. Membrane maintenance
a. The dry-packed membrane typically has a two-year shelf life. To
prolong the shelf life, keep the unopened dry membrane in the
refrigerator.
b. Once used, run the RO system every day for at least 10–15
minutes (about one gallon or four liters of drinking water) to help
maintain the membrane’s performance.
c. If you will not be using the RO system for several weeks, drain
the storage tank completely. Fill the tank and drain it twice before
using the RO system again.
3. Filter and membrane change procedures
NOTE: THIS RO SYSTEM CONTAINS FILTERS THAT MUST BE
REPLACED AT REGULAR INTERVALS IN ORDER TO MAINTAIN PROPER
PERFORMANCE. USE ONLY FACTORY-APPROVED FILTERS.
Please see Page 4 for the recommended intervals for changing the filters.
Local water conditions and quality may dictate more frequent changes.
Use a drip pan to catch any water that may spill when the filter housing is
removed.
a. Shut off the water supply.
b. Turn off the tank ball valve by turning it 90 degrees.
c. Turn on the RO faucet for continued water flow.
d. Lift the filter housing up 1 inch and slide the housing wrench in.
Use one hand to hold the system and the other hand to turn the
wrench clockwise (viewing from the top) to open the housing.
iSpring Water Systems Page 17Note: If the housing is too tight to open, try unplugging the fitting
or tubing in order to release the air and water pressure inside the
housing.
e. After opening the housing, remove the used filter and put the
new filter into the housing. Make sure the O-ring is in place, turn
the housing counter clockwise to close, and tighten.
f. Repeat the previous step on the second filter change.
g. Turn on the water supply and make sure there are no leaks.
h. Let the water drip from the faucet for about 10 minutes. A water
flow of less than 1 cup (8 oz. or 240 ml) per minute may indicate
that it’s time to replace the RO membrane cartridge.
i. Membrane change procedures:
• Unscrew the cap of the membrane housing.
• Slide out the used membrane and discard it.
• Insert the new membrane with two O-rings into the
housing first, then the end with black brine seal around
the membrane. Be sure it is fully seated into the bottom
end. See the following picture or Step E.) RO Membrane
cartridge Installation for more details.
• Screw the cap back onto the membrane housing,
making sure the O-ring is still in place.
• It may take 10–20 minutes for the new membrane to run
at a normal flow rate.
When the water flow is optimal, turn on the tank ball valve. After
one minute, turn off the RO faucet and complete the filter change
procedures.
iSpring Water Systems Page 18Cleaning Procedures
The following system and tank cleaning procedures are recommended to
be done every 12-18 months.
1. Shut off the source water supply to the RO system.
2. Open the RO faucet and depressurize the RO system and storage tank.
3. Remove the pre-filter cartridges, post-filter cartridges, and RO membrane.
Discard or prepare them for cleaning. If the RO membrane element is to be
reused, a disinfectant solution should be used in the permeate tube outlet (see
picture below) to remove bio-film before reinserting the membrane into the
housing.
4. Wash the internal housing areas with warm soapy water using a clean brush
(do not scratch the surface of the housings). Remove the existing O-ring or
prepare it for cleaning. Be sure to clean the O-ring grooves thoroughly.
5. Rinse off all housing pieces with clean water to remove soap.
6. Replace the O-rings and lubricate them according to the manufacturer’s
instructions.
7. Pour the recommended amount of disinfectant solution into each of the clean
housings and replace the housing on the RO system.
8. Disconnect the RO storage tank from the system.
9. RO storage tank cleaning procedures:
Recommended items:
• Tank sanitizer feeder or small filter housing with fittings and tubing (see
Figure 8)
• Disinfectant solution
• Pressure gauge and air pump
a. The tank should be empty. Check the air’s pre-charge pressure with an
accurate gauge (low pressure type 0-12 lbs.) The average tank
pressure should be 6–8 psi when the tank is empty.
iSpring Water Systems Page 19b. Fill the tank sanitizer feeder with the recommended amount of
disinfectant, and connect the feeder to the water supply and RO
storage tank.
c. Turn on the water supply and force the water and disinfectant solution
into the RO storage tank. The storage tank should feel heavy when
filled.
d. The disinfectant solution should remain in the tank for a minimum of 10
minutes. If the tank has not been sanitized in more than a year, leave
the solution in the tank for 20 to 30 minutes. Turn off the water supply
valve and the RO storage tank valve. Disconnect the sanitizer feeder
and connect the RO storage tank to the RO unit (the tank ball valve
should remain closed).
10. Open the feed water valve and the RO faucet until water flows freely from the
spout. Close the RO faucet. Hold the disinfectant solution in the RO system,
including the tubing and faucet, for a minimum of 10 minutes. Open the tank
ball valve.
11. Shut off the feed water valve and open the RO faucet. Let the water run out
until the flow stops at the RO faucet.
12. Open the feed water valve. Let the water flow freely from the faucet for three
minutes. Shut the water off at the source water supply with the RO faucet
open.
13. When the flow of water has stopped at the RO faucet, remove the filter
housing sumps and membrane housing from the RO system. Replace the
filters and membrane according to the recommended service life.
14. Replace the housings on the RO system. Open the source water valve and
allow the water to flow from the faucet.
• Flush the system to remove any remaining disinfectant prior to consuming
the water.
• Keep a maintenance record for the RO system that includes information
about replacement parts, when a service was performed, and names of
service providers.
iSpring Water Systems Page 20Troubleshooting
Note: Turn off the system before servicing or inspecting.
PROBLEM CAUSE SOLUTIONS
Milky colored water √ Air in system o Air in the system is a normal
occurrence with the initial
startup of the RO system. The
milky appearance will
disappear with normal use
within one to two weeks.
Noise from faucet √ Air gap faucet o Will cease after system shuts
down.
√ Location of drain saddle o Relocate the drain to above
the water trap.
√ Restriction in drain line o Blockage can sometimes be
caused by debris from a
garbage disposal or
dishwasher.
Small amount of water √ System just starting up o The tank will normally require
coming from RO drinking two to three hours to fill. Low
faucet √ Air pressure in the water pressure and/or
storage tank is low temperature can reduce the
production rate.
o Add pressure to storage tank.
The pressure should be 8–10
PSI when the tank is empty.
Slow production or no √ Low water pressure o Add a booster pump.
water coming from RO √ Crimps in tubing o Make sure tubing is straight.
drinking faucet √ Clogged pre-filters o Replace pre-filters.
√ Dirty membrane o Replace membrane.
Water tastes or smells √ Post carbon is depleted o Replace post carbon.
unpleasant √ Dirty membrane o Replace membrane.
√ Sanitizer not flushed out o Drain the storage tank and
refill it overnight.
No drain water √ Clogged flow restrictor o Replace flow restrictor.
Leaks √ Fittings are not tightened o Tighten fittings as necessary.
√ Twisted O-ring o Replace the O-ring.
√ Misalignment of hole in the o Realign the drain saddle
drain saddle valve valve.
iSpring Water Systems Page 21Warranty This Limited Warranty extends to the original purchaser of the system only. This warranty covers all Manufacturer-supplied items only that prove to be defective in material, workmanship, or factory preparation. This warranty covers parts only; all labor is excluded from this warranty, including, but not limited to, services related to the removal, replacement, installation, adjustment, maintenance, and/or repair of the unit or its components items. excludes all non-Manufacturer labor required for any servicing of the unit, including, but not limited to, servicing related to installation, adjustment, maintenance, and repair of the unit. This warranty applies only for the first full calendar year from date of purchase. The following items are excluded from this warranty: membranes, filters, O-rings, and all other parts or components that require regular replacement as a result of ordinary usage. Disclaimers: This Limited Warranty applies only if the system is installed, used, and maintained in compliance with all instructions and requirements enclosed with the system. This warranty will be void for failure to observe the following conditions: 1. The system is to be used with potable water supply only. 2. Feed water pressure to the unit is no less than 45 PSI (30 PSI for systems with built-in booster pump) and no greater than 70 PSI. 3. The system is to be used on water supplies with chlorine concentrations of 1.0 mg/L (ppm) or less. 4. Feed water temperature to the unit must be no less than 40°F and no more than 100°F. 5. Total dissolved solids (TDS) in feed water must be less than 750 mg/L (ppm). 6. Feed water must have a pH between 4 and 8. 7. Turbidity must be less than 1.0 NTU. 8. SDI must be less than 5. 9. Feed water must be completely free of iron, manganese or hydrogen sulfide. While the testing was performed under standard laboratory conditions, actual performance may vary. The Manufacturer does not know the characteristics of your water supply. The quality of water supplies may vary seasonably or over a period of time. Your water usage may vary as well. Water characteristics can also change if the drinking water appliance is moved to a new location. The Manufacturer assumes no liability for the determination of the proper equipment necessary to meet your requirements, and we do not authorize others to assume such obligation on our behalf. This Limited Warranty does not cover any Manufacturer-supplied items that are defective as a result of the use of improper parts, equipment or materials. This warranty does not cover alterations or modifications of the unit or failure of a unit caused by such alterations and modifications. This Limited Warranty does not cover malfunctions of the unit due to tampering, misuse, alteration, lack of regular maintenance, misapplication, fouling due to hydrogen sulfide, manganese or iron, scaling from excessive hardness, turbidity greater than 1.0 NTU, Silt Density Index (SDI) greater than 5.0 SDI, or excessive membrane hydrolysis due to chlorine levels in excess of 1.0 mg/L (ppm). In addition, damage to the unit due to fire, accident, negligence, act of God, or events beyond the control of the Manufacturer are not covered by this warranty. Incidental and Consequential Damages Limitation: The Manufacturer will not be responsible for any incidental or consequential damages as a result of the failure of this unit to comply with express or implied warranties or any defect in the unit, including but not limited to, lost time, inconvenience, damage to personal property, loss of revenue, commercial losses, postage, travel, telephone expenditures, or other losses of this nature. In case some states do not allow the exclusion or limitation of incidental or consequential damages, you may choose to return the system. If you choose to keep it, you insist this exclusion STILL apply to iSpring Water Systems Page 22
you.

Owner’s Warranty Responsibilities: As a condition of this Limited Warranty, the owner must ensure that periodic maintenance of

the system is performed as described in the literature enclosed with the system. Neglect, improper maintenance, abuse,

modification, or alteration of the unit will invalidate this Warranty. Should your unit develop a defect or otherwise fail to perform

in accordance with this warranty, you should contact the retailer from whom the product was originally purchased.

Implied Warranties: The implied at-law warranties of merchantability and fitness for a particular purpose shall terminate on the

date one year after the date of purchase.

NOTE: IN CASE SOME STATES DO NOT ALLOW LIMITATIONS ON HOW LONG AN IMPLIED WARRANTY LASTS,

YOU MAY CHOOSE TO RETURN THE SYSTEM. IF YOU CHOOSE TO KEEP IT, YOU AGREE THAT THE ABOVE

LIMITATIONS STILL APPLY TO YOU.

                                    Warranty Registration

To register your product for the warranty, please visit our website at
123filter.com and go to the “Warranty Registration” tab.

We provide a 30-day money back guarantee, a 1-year manufacturer warranty, and
lifetime tech support for all of our products. However, we do not have the order
information from websites other than 123Filter.com (Amazon, Home Depot, etc.), so
please be sure to fill in that information upon registration of your system. If you have
any questions or concerns about your product, please do not hesitate to call or email
us, or put it in the notes/comments upon your warranty registration. Your satisfaction
is our business!

If you are happy with our products and service, please show your
support by writing a product review on Amazon, even just a single
line. It takes you just a minute, but means a lot to us. Thank you!

iSpring Water Systems                                                                                                   Page 23
iSpring Water Systems Page 24
3020 Trotters Parkway
          Alpharetta, GA 30004, USA

            123Filter.com

For questions, comments, or technical support, please

                   contact us at:

            Support@iSpringFilter.com

                 (678) 261-7611

   Monday-Friday 8:30 a.m. - 5:30 p.m. EST
You can also read