Maplesoft-MAA Placement Test Suite User Guide
←
→
Page content transcription
If your browser does not render page correctly, please read the page content below
Maplesoft-MAA
Placement Test Suite

           User Guide

 © Maplesoft, a division of Waterloo Maple Inc. 2006
  © The Mathematical Association of America 2006
No part of this book may be reproduced, stored in a retrieval system, or transcribed, in any form or by any means — electronic, mechanical, photocopying, recording, or otherwise. Information in this document is subject to change without notice and does not represent a commitment on the part of the vendor. The software described in this document is furnished under a license agreement and may be used or copied only in accordance with the agreement. It is against the law to copy the software on any medium except as specifically allowed in the agreement. Copyrights © 2006 Maplesoft, a division of Waterloo Maple Inc. © 2006 The Mathematical Association of America Trademarks Maplesoft, Maple, Maple T.A., Maple Application Center, Maple Student Center, and Maplet are all trademarks of Waterloo Maple Inc. Java and all Java-based marks are trademarks or registered trademarks of Sun Microsystems, Inc. in the United States and other countries. Waterloo Maple Inc. is independent of Sun Microsystems, Inc. W3C is a trademark (registered in numerous countries) of the World Wide Web Consortium; marks of W3C are registered and held by its host institutions: MIT, INRIA, and Keio. MathML Mathematical Markup Language is a trademark of W3C. Linux is a registered trademark of Linus Torvalds. Red Hat is a registered trademark of Red Hat, Inc. Microsoft, Internet Explorer, Windows, Windows NT are registered trademarks of Microsoft Corporation. Netscape is a registered trademark of Netscape Communications Corporation. Blackboard, Building Blocks, and the Blackboard Learning System are trademarks/registered trademarks of Blackboard Inc. in the United States and/or other countries. Usage by permission. WebCT is a trademark of WebCT, Inc. All other brand names or product names are trademarks or registered trademarks of their respective companies. ISBN
Contents

       Preface ..................................................................................... vii
         Audience ........................................................................................... vii
         In This Guide .................................................................................... vii
         Conventions ...................................................................................... vii
 1 Placement Testing .................................................................... 1
 1.1     Role of Placement Testing .................................................................                        1
 1.2     Benefits of the Placement Test Suite ................................................                              1
 1.3     Placement Test Subjects ....................................................................                       2
 1.4     Getting Started Roadmap..................................................................                          4
 2 Using the Placement Test Suite............................................... 5
 2.1 System Overview................................................................................ 5
           Placement Testing Administrator ............................................................... 5
           Students ....................................................................................................... 5
           Proctors ......................................................................................................... 6
 2.2 Class Home Page................................................................................ 6
           Creating a Class Home Page ....................................................................... 6
           Logging On ................................................................................................... 8
           Main Menu ................................................................................................... 9
 2.3 Assignment Editor: Setting up Placement Tests ........................... 10
           Assignment Visibility ................................................................................ 11
           Assignment Types ...................................................................................... 11
           Assignment Properties .............................................................................. 13
 2.4 Scheduling Placement Tests............................................................ 16
 3 Analyzing Results .................................................................... 17
 3.1 Setting Cut-Scores ........................................................................... 17
           Methods for Setting Cut-Scores ................................................................ 17
 3.2 Record Keeping ................................................................................ 17
 3.3 Placement Test Suite Gradebook .................................................... 18
 3.4 Gradebook Views.............................................................................. 18
           Generating Reports .................................................................................... 19
           Student Statistics ...................................................................................... 19
           Placement Test Weighting ........................................................................ 20
           Assignment Statistics ................................................................................ 21

                                                             iii
iv • Contents
Item Statistics ............................................................................................ 22
3.5 Administration ................................................................................. 24
Student Roster ........................................................................................... 24
4 Additional Resources .............................................................. 27
4.1 Question Banks and the Help System ............................................ 27
Question Banks .......................................................................................... 27
Assignments ............................................................................................... 27
Help System ............................................................................................... 28
Index ................................................................................................... 29Preface
Audience
The information in this guide is intended for persons who, using the
Placement Test Suite, will establish, administer, and maintain the
mathematics placement testing system on your campus.
In This Guide
• Role of placement testing
• Benefits of the Placement Test Suite
• Placement Test Suite overview
• Class home page: logging on, main menu
• Assignment Editor: setting up placement tests
• Analyzing results: cut-scores, records, gradebook
• Additional resources: question banks, help system
Conventions
This guide uses the following typographical conventions.
• Arial bold font - dialog, menu, text field, key, filename
• Arial bold Important - information that must be read and followed
• Arial bold Note - additional information relevant to the section or
procedure
• Century Schoolbook bold - new term
• italics - section or Help system cross-reference
viiviii •
1 Placement Testing

1.1 Role of Placement Testing
Students enter college with diverse goals, backgrounds, and abilities. A
mechanism is therefore needed to place these incoming students into the
appropriate first mathematics course.

While there is a consensus among professional testmakers that education
decisions should not be based solely on a single test score, tests typically play
a dominant role in how an institution views each student’s placement profile.

1.2 Benefits of the Placement Test Suite
The Placement Test Suite is a system that offers validated placement tests
developed by the Mathematical Association of America (MAA) within Maple
T.A., an online testing environment.

The tests used in the Placement Test Suite were developed by panels of college
and university faculty and administered to students at several institutions.
The resulting data were analyzed, and if necessary, the tests were modified
until a reliable set of placement tests resulted. For several decades, colleges
and universities have trusted this set of tests.

The Maple T.A. infrastructure permits flexible scheduling, immediate
grading, and rapid generation of reports. In addition, you are able to
customize tests for your institution by adding randomly-generated parameters
to questions and using different assignment types to satisfy your testing
needs.

                                        1
2 •
1.3 Placement Test Subjects
The available placement test subjects areas are as follows.
Number Recommended
Placement Test
of Questions Time Limit
Arithmetic and Skills 32 40 minutes
Basic Algebra 25 30 minutes
Algebra 32 45 minutes
Advanced Algebra 25 30 minutes
Trigonometry and 30 45 minutes
Elementary Functions
Calculus Readiness 25 30 minutes
Each tests consists of 25 to 32 multiple-choice questions that can be
administered in 45 minutes or less. Standard mathematical notation is used,
so questions appear just as they would in a textbook.
Four forms of each test are provided and all forms of a particular test have the
same number of questions. This allows for flexibility in test delivery.1.3 Placement Test Subjects • 3 Figure 1-A Example Question
4   •

1.4 Getting Started Roadmap
To set up a placement test, review the information in this guide as follows.

System Overview                • Placement Testing
                                 Administrator domain
                               • Student domain
                               • Proctor domain
Class Home Page                • Creating a class home page
                               • Logging on
                               • Main menu
                               • Navigating the system
                               • Help system
Assignment Editor              • Setting up placement tests
                               • Locking assignments
                               • Assignment visibility
                               • Assignment types
                               • Assignment properties
Scheduling Placement Tests     • Setting start and end times

Analyzing Results              • Setting cut-scores
                               • Record keeping
                               • Gradebook
                               • Generating reports
                               • Student, placement test,
                                 and question item
                                 statistics
                               • Administration
2 Using the Placement Test
Suite
2.1 System Overview
Four types of users interact with the Placement Test Suite.
• Placement Testing Administrators install and set up placement tests,
and review results in the Gradebook
• System Administrators manage system preferences.
• Students complete placement tests.
• (Optional) Proctors validate student identity and grant placement test
access.
Placement Testing Administrator
As the Placement Testing Administrator, you control the rules and policies for
placement tests. You control availability and due dates, and set grading
parameters. Grades are automatically recorded in the system Gradebook.
These grades can be downloaded in a comma- or tab-delimited file and
incorporated into other systems for use in determining student placement.
Your Placement Test Suite class has its own Class Home Page URL, which
is the entry point for all system interaction for you, your students, and
proctors. The class contains placement tests, resource files, and the class
gradebook, and also gives you access to several system tools.
Students
Students must follow the guidelines set by your institution for scheduling
and taking their test. Through the Class Home Page, students may register in
your class (if permitted), select placement tests as you make them available,
56 •
and review the results of tests they have completed (if you make them
available).
Note: To prevent students who are not in your class from registering, you can lock
your class. You must then upload a class roster file so that your students can sign
in and take tests.
Proctors
Class Proctors can log in from your Class Home Page to validate a student's
identity prior to administering a proctored test.
2.2 Class Home Page
You or your system administrator creates a unique (new empty) class Web site
or one based on shared material.
Creating a Class Home Page
To create a new class, you must first obtain a registration code from your
system administrator.
Once you have your registration code and class registration instructions,
create your new class home page or copy a shared class.
To create a new class home page:
1. Start at the server root address. For example, http://servername:port.
2. At the root address, you are given the following options:
System Administrator
Register for a new class
Find your class
3. Click the Register for a new class link to begin the class registration
process.
4. From the Select Class Template drop-down list, select a class template or
Root Empty Class and click OK.
5. Enter your registration code.
The registration code is the alphanumeric password that authorizes you to
create a copy of a shared class or to create a new, empty class. You obtain it
from the person sharing the class or your system administrator.2.2 Class Home Page • 7
6. Complete the class registration form and click Finish.
Class Name Select a unique name for your class, which is displayed as
part of your Class Home Page. The class name must be
between 5 and 50 characters long. It cannot contain the
characters , or &.
Instructor Enter your name. On this system, a name can contain only
(Placement the alphabetic letters a through z and A through Z, together
Testing with a - (hyphen) and ‘ (apostrophe). The first character must
Administrator) be alphabetic. The middle initial can be empty or a single
Name alphabetical character.
Email Address Enter your email address. This field is optional, but
recommended.
Password Select a password to access your Gradebook and create
assignments. The password must be at least 5 and no more
than 12 letters or numbers. Spaces are not allowed. For your
security, the password does not display on the screen. To
confirm the correct password, enter it twice.
Class Home Page You must select a unique home page URL for your class. The
URL system informs you if you have chosen a duplicate URL.
Select a short string of letters or numbers that will make an
easy-to-remember home site for your class. You must use
between 3 and 16 characters, but only a though z, A through
Z, and 0 through 9 are allowed. No punctuation, spaces, or
special characters can appear in a Class Home Page URL.
7. The Registration Complete screen opens, displaying the link to your class.
Click the link to open your class home page. You can log in as placement
testing administrator and review the contents of the class.
8. Add this link to your browser favorites.
To create a copy of a shared class:
You must be provided with a class URL, a registration code, and browser
instructions to navigate to the specified Class Home Page.
1. Navigate to the specified Class Home Page, and click the Instructor login
link to proceed to the next screen.8 •
2. Click the Register a copy of this class link to initiate registration of your
shared class.
3. When prompted, use the registration code you received from your system
administrator or course coordinator to create your new class, which
contains all the question banks and assignments of the shared parent
class.
Logging On
Whether your system administrator provided you with a Class Home Page
URL and Placement Testing Administrator (Instructor login) password, or
you created your own class home page, open a browser and navigate to this
site.
Figure 2-A Class Home Page
The Class Home Page displays the class and placement testing administrator
name, and the following links for students, placement testing administrators,
and proctors.
• Assignment list indicating the name and type of test, associated points,
availability, that is, scheduled dates and times, and specific policies, for
example, time limit. Clicking the assignment name launches the test.
• Instructor or Placement Testing Administrator login.
• Proctor login.
• Student registration via the Register as a student in this class link.2.2 Class Home Page • 9
• Placement results via the View my results in this class link.
• Quick links allowing you to search for a class or display a list of browser
configurations.
Main Menu
As the placement testing administrator, you must use the Instructor Main
Menu.
To log in to the Instructor Main Menu:
1. Click the Instructor login link. The Instructor Login dialog opens.
2. Enter the password provided by your system administrator or the one you
created and click Enter. The Instructor Main Menu window opens.
The Instructor Main Menu provides access to:
• Assignment Editor - selecting and scheduling placement tests
• Question Bank Editor - creating questions
• Gradebook - analyzing results from placement tests, uploading a class
roster
• System Tools - uploading and installing a course module
When you place your mouse over the links, tool tips are displayed.
Figure 2-B Instructor Main Menu
Navigating To navigate in the Maple T.A. system, use the system navigation
buttons located at the left. Do not use the back and forward browser buttons.
Accessing the Help System Click the help icon from any page to access
the online help. Students can get help by clicking the same icon in a
placement test.10 •
2.3 Assignment Editor: Setting up Placement
Tests
The Assignment Editor main menu lists placement tests.
In the Assignment Editor main window, you can:
• Reorganize the order of displayed placement tests using the drop-down
button.
• Open placement tests for editing by clicking the placement test name link.
Figure 2-C Assignment Editor
To activate other options, move your mouse over the placement test name. Six
option buttons are displayed.
edit Edit placement tests.
copy Copy placement tests.
delete Delete placement tests.
hide/show Hide/show placement tests on the Class Home Page.
print Print placement tests. Clicking the link displays the
print preview of the placement test. You then have
the option to print the placement test or click Back to
return to the Assignment Editor.
summary View a summary of the placement test.
Assignment Locking When a placement test is opened for edit, the system
checks and warns the placement testing administrator whether the placement
test has associated student records in the Gradebook or is currently in use by
a student.2.3 Assignment Editor: Setting up Placement Tests • 11 Note: The number of students currently using the placement test is displayed in the Active field of the Assignment Editor main menu. • If the placement test is currently in use, the placement test is locked so that a placement testing administrator cannot edit it. • If a placement testing administrator is editing the placement test, the placement test is locked for editing so that new active tests cannot be started during the editing process. Students who try to start the placement test while it is locked are notified with a warning message. Assignment Visibility By default, placement tests are not displayed to students. You can select which test to display by using either of the following methods. • In the Assignment Editor main menu, click the show option available on mouse rollover of the placement test name. • In the Set Policies tab of the Assignment Editor window, check the Visible check box to include the placement test in the list of placement tests displayed to students on your Class Home Page. Assignment Types The Assignment Editor allows you to set up policies for your placement tests. In the Set Policies tab of the Assignment Editor window, you can choose the type of assignment.
12 •

Figure 2-D Assignment Editor, Set Policies Tab

Homework Students are presented with an assignment consisting of any
number of placement testing administrator-selected questions. Questions are
delivered either in a specified or random sequence. Student responses during
sessions are recorded (but not graded) after every question, so assignment
sessions can be interrupted and returned to upon next login. Students must be
registered in the class and log in to begin a Homework assignment. By
default, homework assignments can be attempted multiple times for credit. To
limit the number of attempts a student can make on a particular assignment,
see Setting Assignment Requirements: Limiting Student Access to Assignments
on page 14. Results for every attempt at a Homework assignment are recorded
in the Gradebook for the class.
2.3 Assignment Editor: Setting up Placement Tests • 13

Practice Anonymous Practice assignments are similar to Homework
assignments; however, students are not required to login. Any number of
questions can be included, and the assignment is delivered in a specified or
random sequence. Graded assignment reports are produced upon conclusion
of the assignment, but results are not recorded in the Gradebook. Students
can view their results at the end of the session. Results can be printed, but are
only available for as long as a student displays them. No permanent record is
maintained.

Proctored Exams All Proctored Exams require a proctor to authorize
students submitting their test for grading. You can require proctor
authorization to validate student identity and grant placement test access at
the start of a test. Students must be registered in your class. They are
required to provide their student log in and password to access placement
tests in addition to proctor authorization.

There are two types of proctors: Global and Local.

 • Global proctors are defined by the system administrator and can give
   authorization for any class.
 • Local proctors are defined by the placement testing administrator and can
   give authorization only for a particular class.
Proctors can give authorization directly, at the student's computer, or
remotely through the Proctor Tools Main Menu. In both cases, the proctor
must sign in by giving a login name and password. To give authorization
remotely, the proctor must login using the Proctor Login option on the Class
Home Page.

To set up proctors, you must use System Tools. For details, refer to the
Adding a Proctor help page in the Maple T.A. help system.

Assignment Properties
In Assignment Properties, set the following for placement tests.

 • Passing score
 • Time limit
 • Number of questions on a page
 • Maximum number of times a placement test may be taken
14 •

Setting a Passing Score You can set a passing score for the placement test.
If you set a score, the system assesses each placement test attempt as either
Pass or Fail, and records this information in the Gradebook automatically.
The field shows the total available score for the placement test (for example,
out of 10), which varies according to the composition of your placement test.

Setting a Time Limit You can set a time limit for the test. If you set a limit,
the program shows the student the time remaining during the course of the
test. If the time limit expires during the test, the system informs the student,
and does not allow the student to enter responses to any more questions.

    Note: The timer does not stop until the student runs out of time or clicks Grade.
    The timer will continue to run even if the student clicks Quit and Save.
Setting the Maximum Number of Attempts You can set the maximum
number of times a student can take a placement test. If the student attempts
more than the maximum amount, a message is displayed indicating the
restriction. If the placement test is a Proctored Exam, the student can click
the Exception button displayed in the restriction message screen. A proctor
can then provide authorization.

Setting Assignment Requirements: Limiting Student Access to
Assignments You can restrict access to an assignment so that only students
meeting certain criteria can take the assignment. You can also create
assignment requirements that refer to the current assignment, even if you are
working with a new assignment that has not yet been saved. The assignment
on which you are working is now listed along with all other available
assignments in the Criterion specification box. This is useful when you want
to ensure minimum competencies in prerequisite topics. For example, you can
limit access to students who have already passed an earlier assignment.

To restrict assignment access:
 1. From the Assignment Editor screen in the Set Policies tab, click
    Advanced. The Set Policies - Advanced screen with a Requirements field
    is displayed.
2.3 Assignment Editor: Setting up Placement Tests • 15
2. To set criteria, click Design. A Criterion 1 rule based field opens. The
program adds input fields for the first criterion, as shown:
The program automatically propagates the settings in the Criterion panel to
the Requirements panel, and updates the criteria in this field as soon as you
select a different option from the list. You do not need to take any action to
add the criterion to the text area.
Note: You can also enter the criterion directly in the Requirements field, but using
the Designer is recommended.
Criterion Options
• The first drop-down list gives a choice between has and has not.
• The drop-down list in the middle lists a range of states and actions, as
shown.
• The drop-down list on the right lists all of the assignments for the class,
including the assignments whose restrictions you are defining.
• Adding an OR Criterion: Click the Add alternative criterion button
immediately below the list of assignments. The program adds the list
fields for another criterion.
• Adding an AND Criterion: Click the Add additional criterion button at the
bottom right of the form, below the frame that encloses the criterion fields.
The program adds another criterion group, in a separate frame.
• Deleting a Criterion: To delete an OR criterion, click the Remove criterion
button inside the frame for that criterion group. The program deletes the
last criterion from the group. You may have to change the settings for the16 • remaining criteria in the group to set the requirements that you want. To delete an AND criterion group, click the Remove criterion button at the bottom of the form, below the last criterion group. The program deletes the last group. You may have to change the settings for the remaining groups to set the requirements that you want. • Save Changes to Criterion: To close the Set Polices -Advanced page and save changes made to the criteria, click the Set Policies tab. 2.4 Scheduling Placement Tests Using the calendar function in the Scheduling group box of the Set Policies tab, you can set Start and End times for each placement test. These times govern the availability of the placement test to students accessing your Class Home Page. Scheduled times refer to your server clock and system's time zone set by your system administrator. Before and after the indicated availability window, the placement test is still displayed in the placement test list viewable by students on your Class Home Page, but it cannot be selected. Note that unavailable placement tests appear in the list of placement tests on the Assignment Editor Main Menu page. Additionally, unavailable placement tests will appear in the student’s past results page, if the student completed them.
3 Analyzing Results

3.1 Setting Cut-Scores
The points at which placement decisions based on test results change are
called cut-scores. These scores reflect the minimum level of mathematics
preparation needed to begin study in a course.

Methods for Setting Cut-Scores
 • Faculty judgement of expected student performance: faculty rates
   each question on the test in response to a criterion such as “What percent
   of students beginning this course would be expected to answer this
   question correctly?”
 • Use of enrolled student’s performance: use actual test performance of
   students enrolled in the course to determine what the cut-scores should
   be.
 • Sampling within courses: give the test to a small sample of students.
 • Use of institutional quotas: set the cut-scores based on the number of
   students that can be accommodated in each course.

3.2 Record Keeping
Annual improvements in placement effectiveness are based upon precise
knowledge of the outcome of previous results. With the Placement Test Suite,
you can maintain important records, such as:

 • Copies of the tests given
 • Cut-scores used

                                     17
18 • • Statistics: number of students tested, mean score, mean duration, lower quartile, median score, upper quartile, and success rate • Individual student records, including records of each test attempt 3.3 Placement Test Suite Gradebook Session scores are automatically recorded in the Gradebook for placement tests requiring students to login. The Gradebook stores information for each student, such as the placement test start time, the time spent on the placement test, and the individual question performance. The Gradebook allows you to: • View, analyze, and report scores and statistics for students, placement tests, and question items • Review and edit student results for specific graded sessions • Create reports organized by student, placement test, or by question item • Export grades to comma-delimited or tab-delimited (.txt) files • Complete administrative tasks, such as changing passwords, uploading and managing class rosters, and sending messages to students To access the Gradebook: • From the Instructor Main Menu, click Gradebook. 3.4 Gradebook Views The Gradebook provides three views of placement test data. • Student Statistics tab displays a list of students and their grades • Assignment Statistics tab displays summary statistics for each placement test • Item Statistics tab displays summary statistics for each question on an placement test For information on the Administration tab, see Administration on page 24.
3.4 Gradebook Views • 19

Generating Reports
You can change placement test weighting, grades, or add comments from
within a generated report.

To generate a report in the Gradebook:
 1. In the Student, Assignment, or Item Statistics tab, select the placement
    test(s) to include in the report.
 • To include more than one placement test, press the CTRL key and click
   the placement tests.
 • To include all placement tests, click Select all.
 2. Select the data to include in the report from the Show Results, Date
    Range, Display, and Grade Style group boxes.
 3. Select Printer-Friendly Table to display the report in a separate window.
    Otherwise, the report displays below the Get Report button.
 4. Select Download this table as: to obtain a comma, or tab file of the data.
 5. Click Get Report.

Student Statistics
On the Gradebook Student Statistics tab, you can select from the following
options to build reports.

 • Assignment(s) - To specify placement tests to include. (Use CTRL to select
   more than one placement test.)
 • Show Results - To display results, for example, best or most recent.
 • Date Range - To specify date range, placement tests completed within that
   date range will be included in the report.
 • Display - To display date and time the placement test was started, the
   time required to complete, and the Student ID.
 • Grade Style - To indicate presentation style for the grade.
20 • • Printer-Friendly - To display the report in a separate window. Figure 3-A Student Statistics Tab From the generated report, you can view a student record report or change the weighting for placement tests. Placement Test Weighting After you generate your placement test grade report from contents of the Student Statistics tab, you can set weighting for each placement test with respect to the cumulative grade for the class. Click %Weight in the report. The Set Weightings window opens.
3.4 Gradebook Views • 21

Figure 3-B Example Report from Student Statistics Tab

Assignment Statistics
In the Assignment Statistics tab, you can select from the following options to
build a report.

 • Assignment(s) - To include in your report (use CTRL to select more than
   one placement test).
 • Date Ranges - To specify date range. Placement tests completed within
   that date range are included in the report.
 • Printer-Friendly - To display the report in a separate window.
Figure 3-C Assignment Statistics
22 •

The following is a sample report covering a single placement test.

Figure 3-D Example Report from Assignment Statistics

This report provides the following information.

 Item             Description

 Assignment       The name of the assignment presented as a
                  link.

 #Assignments     The total number of assignments taken by
                  students. This number might be greater than
                  the number of students if the assignment
                  allows for multiple submissions of work.

 Mean Score       The average score of all assignments taken.

 Mean             The average time taken by students to complete
 Duration         the assignment (in minutes).

 Lower            The score that ¼ of the students scored at or
 Quartile         below.

 Median Score     The score that ½ of the students scored at or
                  below.

 Upper            The score that ¾ of the students scored at or
 Quartile         below.

As with the other Gradebook reports, results presented allow you to access
more detailed information by clicking the name of an assignment.

Item Statistics
The system collects statistical data on the questions used in your placement
tests. It can produce various statistical analyses based on item usage and
student performance automatically.

On the Item Statistics tab, select from the following options to build a report.

 • Assignment(s) - To specify items from particular placement tests (use
   CTRL to select more than one placement test).
3.4 Gradebook Views • 23 • Date Range - To specify date range. Placement tests completed within that date range are included in the report. • Printer-Friendly - To display the report in a separate window. Figure 3-E Item Statistics From this report, you can: • Click the name of the assignment on the left to view the summary of the assignment as set in the Assignment Editor. • Click the title of an individual problem or question to preview it. • Click a column title to view statistical item analysis. For example, the Success Rate of an item is the average normalized score on that item. With each item graded between 0.0 and 1.0 (that is, normalized), the average score is computed over the set of all scores recorded for that item in the current assignment.
24 •

3.5 Administration
The Gradebook Administration tab displays a list of all students registered in
the course, including their names and logins. You can use this to:

 • Edit student information for individual students.
 • Upload a class roster using the Upload Roster option. For details, see the
   following section.
Figure 3-F Administration Tab

Student Roster
Before the Gradebook can begin tracking student performance, it must have a
student roster. You can create a roster by:

 • Uploading a roster. See Uploading a Class Roster below.
 • Allowing students to register themselves for your course. See Student
   Registration on page 25.
Uploading a Class Roster You can upload a class roster using the Upload
Roster option on the Administration tab. The system uploads a text file (for
example, *.txt and *.rst) that has one line for each student and has the
following format:

   first name, middle initial, last name, student ID, login, password, email

 • The fields that are underlined are required.
 • First name must be at least one alphabetical character.
 • Middle initial must be no more than one alphabetical character.
 • Last name must be at least one alphabetical character.
 • Student ID must be at least five alphanumeric characters.
3.5 Administration • 25

 • Login, password, and email are optional, but if a login is provided for a
   student, a password must also be provided.
 • If no login is provided the system generates a login and password, which is
   displayed on the next page. You must print this page. If it is not printed,
   the automatically generated login and passwords will be lost.
 • The fields can be delimited by space, tab, or comma characters.
 • If you have a null field, for example, the student did not provide a middle
   initial, use two consecutive delimiters.

To upload a class roster:
   Important: Create your class roster as a text file and save it.
 1. In the Gradebook, click the Administration tab.
 2. Click Upload Roster.
 3. Select your File Type based on the type of delimited text file or
    spreadsheet.
 4. To locate your class roster, click Browse. Navigate to the file.
 5. Click Ok. A screen listing the students' names, logins, and passwords is
    displayed.
 6. Click Ok. You return to the Administration tab.
Student Registration Students can register for your class using the Register
as a student in this class link in the Class Home Page.

Figure 3-G Student Registration through Class Home Page

They must complete the form on the Student Registration screen. You can
lock access to this form of registration by using the System Tools. For more
information on managing your system, see the Maple T.A. online help.
26 •
4 Additional Resources
4.1 Question Banks and the Help System
Maple T.A. uses question banks, for example, questions from class
homework, test items, or other class problem material, as the basis for
constructing assignments.
Question Banks
Question bank files are plain-text files, with a .qu extension, structured
according to the Maple T.A. question bank syntax.
Question banks are organized into topics, which contain individual
questions. Topics help organize questions to match the structure of your
course. They can also indicate learning objectives and other organizational
schemes. Every question bank has at least one topic, and every topic has at
least one question.
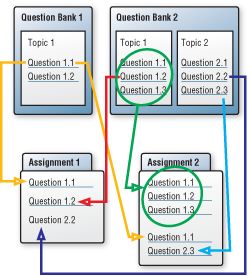
Assignments
Assignments are created by selecting questions from question banks. The
assignments you create can be organized such that Maple T.A. reorders
questions, generates new questions (based on a range of variables you define),
2728 •
or displays a subset of questions. As such, each student viewing your
assignment can potentially complete a unique set of questions.
Figure 4-A The Relationship between Question Banks and Assignments
Help System
The help system is an extensive resource on the following topics:
• Instructor (Placement Testing Administrator) tasks - using the
Assignment Editor, Gradebook, and System Tools
• Advanced Authoring - Question Bank Editor, question bank structure and
syntax, project elements, question types, mathematical syntax,
algorithmic variables, LaTeX authoring, and plain-text script authoring
.Index
Symbols accessing, 9
.qu file extension, 27 I
A instructor
assignment editor logging on, 8
vs. question bank, 28 main menu, 9
assignment statistics item statistics
overview, 21 overview, 22
assignment tab M
set policies, 11
maximum
B attempts, 14
browser buttons N
navigating, 9
navigating, 9
buttons
back forward, 9 P
passing score
C
setting, 14
Class Home Page
links, 8 Q
proctor use of, 6 question banks
class roster .qu file, 27
text file, 24 introduction, 27
uploading, 24 question mark
help icon, 9
E
edit R
student information, 24 roster, 24
G S
generating reports, 19 scheduling assignments, 16
gradebook students
adminstration tab, 24 visiting class home page, 5
edit student information, 24 student statistics
generating reports, 19 overview, 19
question weighting, 20
H
help icon, 9 T
help system text file
29Index • 30 class roster, 24 U time limit, 14 uploading tool tips class roster, 24 Main Menu, 9 procedure for class roster, 25
You can also read