Predix Edge OS - 2020 General Electric Company - GE.com
←
→
Page content transcription
If your browser does not render page correctly, please read the page content below

Predix Edge OS

                 © 2020 General Electric Company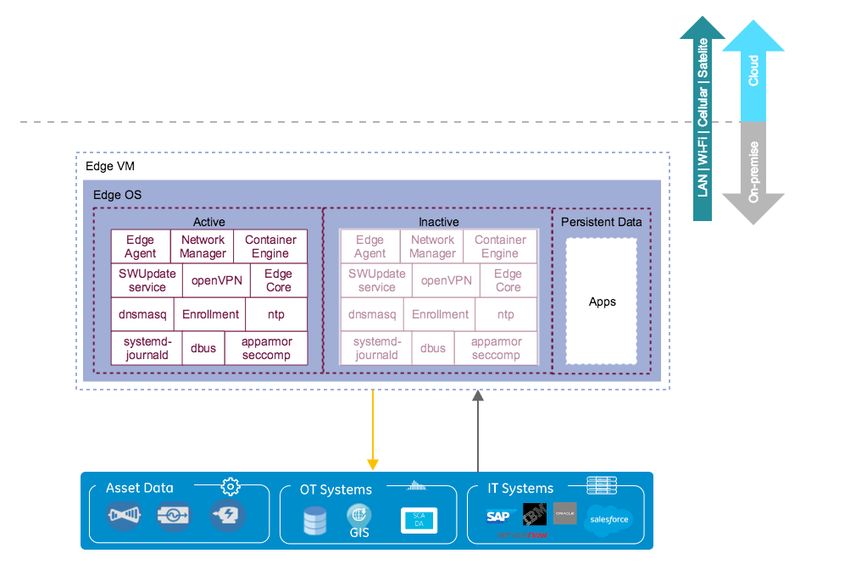
Contents
     Predix Edge Overview                                             1
          Predix Edge OS Architecture                                 1
     Installing Predix Edge OS Virtual Machine                        2
          Predix Edge OS Image                                        2
          Installing Predix Edge on Mac                               2
          Installing Predix Edge on Windows                           3
          Installing Predix Edge on ESXi                              4
     Upgrading Predix Edge OS                                         6
          Upgrading Predix Edge OS                                    6
          Upgrading Predix Edge OS Via PETC                           6
          Upgrading Predix Edge OS Via Edge Manager                   7
     Setting Up Git and GitHub                                        8
          Git and GitHub                                              8
          Install Git                                                 8
          Request a GE Corporate GitHub Account                       8
          SSH Key Setup                                               9
          Create a New Remote Repo in GitHub                          9
          Create a Local Repository                                   9
          Create readme and Commit to Local Repo                      9
          Link the Local Repo to the Remote GitHub Repo              10
          Push the New File to the Remote Repo                       10
     Setup Mac Only                                                 11
          Get Started Setting up Mac for Predix Edge OS              11
          Setting up a Mac for Predix Edge                           11
          Configuring Docker for Mac                                 11
          Configuring Terminal Session Proxies                       12
          Additional Information                                     13
     Predix Edge OS Device Development                              14
          Yocto Project                                              14
          OpenEmbedded                                               14
          BitBake                                                    14
          Layers                                                     14

ii                                                        Predix Edge OS
Base Predix Edge OS                                            15
     Device-Specific Layers                                         15
     What are System Containers?                                    15
     How are System Containers Loaded?                              15
     Adding a New System Container to the Predix Edge OS Image      16
     Configuring and Building Predix Edge OS for Virtual Machines   16
Predix Edge OS Release Notes                                        18
     Predix Edge OS Release Notes 2.4.0                             18
     Predix Edge OS Release Notes 2.3.3                             19
     Predix Edge OS Release Notes 2.3.2                             19
     Predix Edge OS Release Notes 2.3.0                             19
     Predix Edge OS Release Notes 2.2.1                             20
     Predix Edge OS Release Notes 2.2.0                             21
     Predix Edge OS Release Notes 2.1.0                             22

                                                                     iii
Copyright GE Digital
© 2020 General Electric Company.
GE, the GE Monogram, and Predix are either registered trademarks or trademarks of General Electric
Company. All other trademarks are the property of their respective owners.
This document may contain Confidential/Proprietary information of General Electric Company and/or its
suppliers or vendors. Distribution or reproduction is prohibited without permission.
THIS DOCUMENT AND ITS CONTENTS ARE PROVIDED "AS IS," WITH NO REPRESENTATION OR
WARRANTIES OF ANY KIND, WHETHER EXPRESS OR IMPLIED, INCLUDING BUT NOT LIMITED TO
WARRANTIES OF DESIGN, MERCHANTABILITY, OR FITNESS FOR A PARTICULAR PURPOSE. ALL OTHER
LIABILITY ARISING FROM RELIANCE UPON ANY INFORMATION CONTAINED HEREIN IS EXPRESSLY
DISCLAIMED.
Access to and use of the software described in this document is conditioned on acceptance of the End
User License Agreement and compliance with its terms.
iv © 2020 General Electric CompanyPredix Edge Overview
Predix Edge OS Architecture
The Predix Edge Operating System is a baseline Yocto Linux distribution that can be extended and ported
to many bare metal platforms or virtual environments. It is architected around the design goals of small
footprint, security, multi-container-based application hosting, and edge platform management.
Partitions
Figure 1: Predix Edge OS Architecture
As seen in the above diagram, the Predix Edge OS image is divided into three partitions (the scale of the
partitions in the diagram do not reflect actual partition sizes):
1. Active Partition: This partition is the currently running version of the software. (Read Only)
2. Inactive Partition: This partition is used as part of the update process.
3. Persistent Data: This partition is used to store all mutable data and must endure device restarts and
OS upgrades.
When the operating system is updated, the following processes occurs:
1. Active partitions are "snapshotted" to the inactive partition.
2. Updates are applied to the inactive partition.
3. The inactive partition becomes active.
4. The system attempts to reboot.
© 2020 General Electric Company 1Installing Predix Edge OS Virtual Machine
Predix Edge OS Image
The Predix Edge OS images are stored in Artifactory. Use the following information to ensure you can
access the images.
For GE Employees
To access Artifactory downloads, those using a GE email address must first be logged into Artifactory.
Note: If you attempt to download from Artifactory without first logging into Artifactory, you will be asked
to Sign in, which will not work.
1. Go to Artifactory.
2. Click the Log In button.
3. Click the SAML SSO icon.
4. Use your SSO to log in.
5. You can then return to the documentation link to access Artifactory.
For Predix Users
To access Artifactory links in the Predix Edge documentation, you must first create an account on
predix.io. Your predix.io account sign in credentials will be used to access Artifactory.
When you click an Artifactory link, enter your predix.io username (email address) and password in
Artifactory's Sign In dialog.
Image Downloads
• ESXi Developer image - ssh is enabled; code signing is not enforced for applications.
• ESXi Production image - ssh is disabled; code signing is enforced for applications and OS updates.
• Predix Edge Gateway 3002 Production image - ssh is disabled; code signing is enforced for applications
and OS updates.
• Raspberry Pi Developer Image - ssh is enabled; code signing is not enforced for applications.
Installing Predix Edge on Mac
If you access the Internet through a corporate proxy server, please review the tutorial Define network
proxy settings.
Procedure
1. Download and extract the files.
2. If you do not already have VMware Fusion 10, you can download a trial version from https://
www.vmware.com/products/fusion/fusion-evaluation.html.
3. Right-click the extracted predix_edge_OS.ova file and select Open With > VMware Fusion.
4. In the Choose an Existing Virtual Machine dialog, ensure the Predix Edge OS image is selected, and
click Continue.
5. In Save As, enter a name for the Predix Edge OS image, and click Save.
The image is imported.
6. Click Customize Settings and customize the following settings:
2 © 2020 General Electric Companya) For Processors, Memory and Hard Disk, use the following guideline values:
Table 1: Minimum and Recommended Virtual Machine Settings
Setting Minimum Recommended
Processors/CPUs 1 2
RAM 1 GB 4 GB
Hard disk/disk space 8 GB 20 GB*
* Certain applications will require more than the recommended 20GB, particularly Predix Historian
for Linux on Predix Edge. If you are using this application, please consult the Historian requirements
for the disk space recommendation for your tag volume.
b) Network Adapter – Ensure Connect Network Adapter is selected. Select Share with my Mac
to connect to your Mac using Network Address Translation (NAT).
7. Close the settings and click the Play button to launch Predix Edge.
If your version of VMware Fusion is relatively recent, you may see a popup dialog asking if you want to
upgrade. Select Don't Upgrade.
Predix Edge OS starts.
8. For the developer (testing) version of Predix Edge, enter the following credentials:
• user: root
• password: root
Installing Predix Edge on Windows
If you access the Internet through a corporate proxy server, please review the tutorial Define network
proxy settings.
Procedure
1. Download and extract the files.
2. If you do not already have VMware Workstation Pro 14, you can download a trial version from https://
www.vmware.com/products/workstation-pro/workstation-pro-evaluation.html.
3. Right-click the extracted predix_edge_os.ova file and select Open With > VMware
Workstation.
4. When the Import Virtual Machine popup appears, click Import.
5. Select the newly created VM from the left pane. Click Edit Virtual Machine Settings.
6. Configure the following settings.
a) For Memory, Hard Disk and Cores, use the following guideline values:
Table 2: Minimum and Recommended Virtual Machine Settings
Setting Minimum Recommended
Processors/CPUs 1 2
RAM 1 GB 4 GB
Hard disk/disk space 8 GB 20 GB*
© 2020 General Electric Company 3* Certain applications will require more than the recommended 20GB, particularly Predix Historian
for Linux on Predix Edge. If you are using this application, please consult the Historian requirements
for the disk space recommendation for your tag volume.
b) Click Network Adapter. Select NAT: Used to share the host's IP address.
c) Click OK to save settings.
7. Click Power on this Virtual Machine to start Predix Edge OS.
8. For the developer (testing) version of Predix Edge, enter the following credentials:
a) user: root
b) password: root
Installing Predix Edge on ESXi
About This Task
This procedure assumes VMware ESXi is installed on a blade server and the VMware vCenter Server
version is 6.0 or later.
If you access the Internet through a corporate proxy server, please review the tutorial Define network
proxy settings.
Procedure
1. Download and extract the Predix Edge OS files.
2. Login to the vCenter Server UI, or ESXi client UI.
3. Select Actions > Deploy OVA Template.
4. Click Browse to locate the extracted Predix Edge OS file on your computer. Click Next.
5. Enter a Name for the OVF. Select the datacenter and folder for deployment from the list. Click Next.
6. In Select Resource*, select the host that will run the deployed template. Click Next.
7. Review the template details. Click Next.
8. Make the following selections, using the guideline values in the table where applicable. Click Next
when finished.
Table 3: Minimum and Recommended Virtual Machine Settings
Setting Minimum Recommended
Processors/CPUs 1 2
RAM 1 GB 4 GB
Hard disk/disk space 8 GB 20 GB*
* Certain applications will require more than the recommended 20GB, particularly Predix Historian for
Linux on Predix Edge. If you are using this application, please consult the Historian requirements for
the disk space recommendation for your tag volume.
a) Select virtual disk format
b) VM storage policy
c) Datastores
9. Select the destination network. Click Next.
10. Enter the network details for the deployment. Click Next.
11. Review the configuration data for the template. Click Finish. The template is built, which will take a
few minutes. You can view the status in the Recent Tasks view.
4 © 2020 General Electric Company12. Once the Predix Edge OS is created, click Open Console to launch the console for Predix Edge OS.
13. For the developer (testing) version of Predix Edge, enter the following credentials:
a) user: root
b) password: root
© 2020 General Electric Company 5Upgrading Predix Edge OS
Upgrading Predix Edge OS
Before You Begin
For GE Employees
To access Artifactory downloads, those using a GE email address must first be logged into Artifactory.
Note: If you attempt to download from Artifactory without first logging into Artifactory, you will be asked
to Sign in, which will not work.
1. Go to Artifactory.
2. Click the Log In button.
3. Click the SAML SSO icon.
4. Use your SSO to log in.
5. You can then return to the documentation link to access Artifactory.
For Predix Users
To access Artifactory links in the Predix Edge documentation, you must first create an account on
predix.io. Your predix.io account sign in credentials will be used to access Artifactory.
When you click an Artifactory link, enter your predix.io username (email address) and password in
Artifactory's Sign In dialog.
Upgrade Sequence
Predix Edge OS upgrades must be installed incrementally; you cannot skip a minor release (i.e., if you are
running version 2.1.0, you must first upgrade to 2.2.1 and then 2.3.0.). You do not have to install every
patch release (indicated by a change to the third digit in the release number).
Note: Ensure you download the upgrade file for the next version for your specific platform. File names are
in the format meta-edge-xxxx... where 'xxxx' is the platform label.
Obtain Upgrade Image File
Software upgrade files are within the predix-edge folder in the Artifactory Repository Browser.
1. Expand the predix-edge folder.
2. Expand the folder for the version you wish to install (e.g., 2_3_0).
3. Expand the os folder.
4. Expand the tar.gz file for your specific platform.
5. Select the software update (SWU) file and click Download (the option to download the file is also
available by right-clicking the file name).
Once you have downloaded the correct update file, you can deploy it with either the Predix Edge
Technician Console or Edge Manager.
Upgrading Predix Edge OS Via PETC
Procedure
1. Login to the Predix Edge Technician Console (PETC).
6 © 2020 General Electric Company2. Click Update OS.
3. Click Upload OS Update.
4. Click Choose File to navigate to where your software upgrade file was saved.
5. Select the software update file. Click Upload.
6. After the upload has completed, click Apply Update. A confirmation dialog will appear. Click Apply &
Restart to proceed with the upgrade or Cancel to exit without updating.
Upgrading Predix Edge OS Via Edge Manager
Procedure
1. Login to Predix Edge Manager.
2. Navigate to Repository > Packages.
3. From the Action drop-down menu, select Upload. The Upload dialog will appear.
4. Within the dialog, enter the following:
a) Name (required): Value must begin with alphanumeric, can contain alphanumeric, hyphens, and
underscores. Spaces and periods are not allowed.
b) Version (required): Value must be in the format: .. with 18 digits
maximum for each number (e.g., '1.10.2').
c) Type: Select Operating System.
d) Platform: Select Predix Edge.
e) File: Click Choose File to navigate to where your software upgrade file was saved.
f) Vendor, Description and Notes are optional fields, however it is recommended to enter
something helpful in Description and/or Notes.
5. Click Upload.
6. Navigate to Device Manager > Devices.
7. Select the device(s) for which you want to perform the upgrade.
8. From the Device Operations drop-down menu, select Deploy Software.
9. The Select Software dialog will appear. Select the uploaded upgrade file and click Next.
10. Click Close.
11. To monitor the status of the upgrade, click the device the upgrade is being performed on; select
Software from the menu, the upgrade procedure will be listed in the table.
© 2020 General Electric Company 7Setting Up Git and GitHub
Git and GitHub
Git is a version management tool. GitHub is a web-based hosting service for Git repositories. There is a
public GitHub site and an internal, GE corporate GitHub site.
Git and Github are not required for Edge development, but the sample projects and other resources reside
in GitHub.
To learn more about Git, see https://git-scm.com/documentation.
Install Git
Procedure
1. Download and install the latest version of Git for your platform.
Note: For Windows 10 users, many of the examples for this guide were created in a Unix-flavored
environment. You may want Git to auto-convert LFs to CLRFs. See Customizing Git, Formatting and
Whitespace for more information.
2. Enter the following command:
git config --global core.autocrlf true
Request a GE Corporate GitHub Account
Procedure
1. To generate a user account, use your GE SSO to log into GE’s corporate GitHub site.
2. If you see the following sign-in page on your first visit, click Sign in with SAML.
Figure 2: GitHub Login Screen
8 © 2020 General Electric CompanySSH Key Setup
GE’s GitHub does not allow password access. Setting up an SSH key will allow you to pull code out from a
repository and push updates back.
GitHub provides detailed instructions to setup SSH keys for Windows/Linux/Mac operating systems.
Note: If you copy your ssh key to another system, such as a VM, check the file permissions. Only you
should have read/write access. For example, chmod go-rwx id_rsa.
Create a New Remote Repo in GitHub
Instructions for creating a remote repository in GitHub
Procedure
1. Open a new browser tab.
2. Go to https://github.build.ge.com/.
3. Click the green New Repository button.
4. Enter sandbox for the Repository Name.
5. Click Create Repository.
6. Select SSH in the quick setup box and copy the Git address to use when linking the local repo to the
remote GitHub repo.
Create a Local Repository
Instructions for creating a local Git repository
Procedure
1. Open a terminal window to create a local version of the repository.
mkdir sandbox && cd sandbox
2. Create the repository by entering:
git init
Create readme and Commit to Local Repo
Procedure
1. Create our readme file.
echo "# sandbox" >> README.md
© 2020 General Electric Company 92. Commit the readme file to the local repo.
git add README.md
git commit –m "repo initialization"
Link the Local Repo to the Remote GitHub Repo
Procedure
In a terminal window, enter the following:
git remote add origin
The Git address should look something like git@github.build.ge.com:/sandbox.
git.
Push the New File to the Remote Repo
Procedure
To push the new file to the remote repository, enter:
git push –u origin master // -u sets upstream remote
10 © 2020 General Electric CompanySetup Mac Only
Get Started Setting up Mac for Predix Edge OS
These instructions will guide you through installing and configuring Git and Docker for Mac OS. We will
also provide information on how to configure your terminal session proxies if you have not already done
so.
Predix Edge images and containers are built and deployed on several Linux distributions. If you are
interested in developing and testing on an OS more closely resembling the target platform, consider using
the DevBox VM for development (take a look at Quick Start with DevBox).
Docker for Mac is convenient and performs identically to Docker on a Linux host OS in most cases, but
there are some situations in which Docker needs Linux host-system resources to build an image or run a
container. While in general it is a best practice to create platform-independent Docker images, be aware
that certain cases are unlikely to work on Mac.
Dependencies
• Must be working on a Mac with Brew installed (Brew is native to Mac OS).
• Make sure you have created a GitHub account and installed Git.
Additional Information
Intro to Predix Edge and Docker
Setting up a Mac for Predix Edge
Install Git, Docker, and the Cloud Foundry CLI for Mac from the command line.
Procedure
1. Open a terminal window.
2. Run the following command to install Git, Docker, and the Cloud Foundry CLI (used to set up the Time
Series service).
bash2. Select Preferences > Docker.
a) If you are working under a proxy, enter the appropriate no_proxy configuration values for your
company, for example, localhost,127.0.0.1,.ge.com under Proxies > Manual proxy
configuration in the fields Web Server (HTTP) and Secure Web Server (HTTPS).
b) The following value works robustly for both HTTP and HTTPS fields while on BLUESSO, VPN and
home networks: http://PITC-Zscaler-Americas-
Alpharetta3pr.proxy.corporate.ge.com:80 or its IP http://10.114.20.11:80.
c) In Bypass the proxy settings for these Hosts & Domains field, enter:
localhost,127.0.0.1,.ge.com
You may need different proxy settings at different sites. Contact your local IT administrator for the
correct settings.
Configuring Terminal Session Proxies
Instructions for configuring terminal session proxies.
About This Task
Set the http_proxy, https_proxy and no_proxy environment variables for your terminal sessions
so that http requests and ssh calls from the terminal can resolve correctly behind your company proxy. If
you have already configured your proxy environment variables in your bash_profile, you can skip this
step.
The following proxy values work robustly across sites and over VPN (which usually requires a different
proxy).
http_proxy="http://PITC-Zscaler-Americas-
Alpharetta3pr.proxy.corporate.ge.com:80"
https_proxy="http://PITC-Zscaler-Americas-
Alpharetta3pr.proxy.corporate.ge.com:80"
no_proxy="localhost,127.0.0.1,.ge.com"
Alternatively, consult your local IT administrator for information about the proxy addresses in your
location.
Procedure
1. Open terminal.app and append the appropriate values for your GE site into your ~/.bash_
profile file by running the following command:
echo '
export http_proxy="http://PITC-Zscaler-Americas-
Alpharetta3pr.proxy.corporate.ge.com:80"
export https_proxy="http://PITC-Zscaler-Americas-
Alpharetta3pr.proxy.corporate.ge.com:80"
export no_proxy="localhost,127.0.0.1,.ge.com"
' >> ~/.bash_profile
2. Once you have added these addresses to the ~/.bas_profile file, you need to either run the
following command or open a new terminal session:
source ~/.bash_profile
12 © 2020 General Electric CompanyAdditional Information
External link to Docker information.
© 2020 General Electric Company 13Predix Edge OS Device Development
Yocto Project
Predix Edge OS leverages an open source infrastructure (Yocto and BitBake) and software components
(OpenEmbedded) to create a base OS that can be extended with GE-specific customizations.
OpenEmbedded
OpenEmbedded is a build framework that allows developers to create a complete Linux Distribution for
embedded systems. The core of this framework is BitBake, a generic task execution engine that allows
tasks to be run in parallel while working within complex inter-task dependency constraints.
See OpenEmbedded for more information.
BitBake
BitBake is a tool for building software libraries/applications using recipes such as those provided by meta-
openembedded.
• Consumes recipes to create binaries.
• Co-maintained by Yocto and OpenEmbedded.
• Both Yocto and OpenEmbedded maintain collections of open source BitBake layers and recipes that
describe how to build and deploy software components.
• Recipes are text-based configuration files that describe how a software library or application should be
built.
• Recipes define:
◦ Location of source code.
◦ Source code patches (optional).
◦ Custom built settings (optional).
• Recipes are grouped into layers.
• Recipes in upper layers can augment or override layers below.
• Edge OS uses Yocto’s Poky reference Linux Distribution and extends it using OpenEmbedded layers
such as _meta-python_ and meta-oe.
◦ See Poky for more information.
For more information on BitBake, see https://www.yoctoproject.org/docs/2.5.2/bitbake-user-manual/
bitbake-user-manual.html.
Layers
A layer is a collection of recipes and/or configurations that can be used to define how to build and deploy
software packages. Typically, each layer is organized around a specific theme (e.g., in OpenEmbedded,
recipes for building web server software are provided in the layer meta-webserver).
A Predix Edge OS image is built upon multiple layers. It is possible for multiple layers to reference the
same recipe in order to modify the recipe’s settings. In some cases, these modifications may conflict with
14 © 2020 General Electric Companyone another. To resolve these conflicts, BitBake allows you to set the priority for each layer. In this way,
layers that are higher can augment, or override, lower layers.
To add new recipes or customize existing ones, you can create and add a new layer, which you would
assign a higher priority in order for it to supersede lower layers. For example, Predix Edge OS provides
customizations on top of the OpenEmbedded layers with two meta layers:
• meta-edge-base
• meta-edge-predix
Learn more about how to create a new layer.
Base Predix Edge OS
The base Predix Edge OS is provided by the meta-edge-base layer. This is the common operating system
layer that includes platform independent customizations and new recipes for additional packages added
to Edge OS on top of the stock minimal Yocto distribution.
Device-Specific Layers
Adding support for a new device may require platform-dependent recipes and customizations.
For example, different devices may require different initialization procedures:
• A VM-specific layer would typically include an EFI-compatible bootloader and generic device drivers.
• A microcontroller-specific layer would use a simplified boot mechanism and fewer device drivers,
which are specific to its hardware.
For more information on Predix Edge OS layers and how to create new layers, please see Layers on page
14.
What are System Containers?
System containers are regular Docker containers that are pre-loaded with Predix Edge OS. They are
typically responsible for basic system functionality, such as message brokers and administrative consoles.
How are System Containers Loaded?
System containers are Docker applications distributed as compressed tarballs that include the container
tarball and a docker-compose YAML file, which specifies services the container provides and how it should
be deployed. The compressed tarballs are stored in the /opt/system-containers directory in Predix
Edge OS. During system startup, the sc-loader service scans the /opt/system-containers directory
and uses Docker to deploy any system containers found. Adding a new system container to Predix Edge
OS essentially adds a new compressed tarball to the /opt/system-containers directory.
© 2020 General Electric Company 15Adding a New System Container to the Predix Edge OS Image
Procedure
1. System containers are added to the Predix Edge OS image using specific BitBake recipes that
download the container’s compressed tarball and copy it to the Predix Edge OS build directory.
2. To add a new system container you must first upload the container’s compressed tarball to an HTTP
repository, such as Artifactory, and create a new recipe that refers to the repository’s URL. The new
recipe needs to be included as a dependency within the recipe _packagegroup-containers_.
packagegroup-containers.bbpappend
RDEPENDS_${PN}_append = " \
your-new-system-container \
"
3. The new recipe must be saved either in the same layer as the other system containers, or in a new
layer that has a higher priority than meta-edge-predix.
4. The new system container tarball will be located in the /opt/system-containers directory of the
Predix Edge OS image. It will be automatically loaded by the sc-loader service when the system starts
up.
Configuring and Building Predix Edge OS for Virtual Machines
About This Task
Instructions for configuring and building Predix Edge OS for virtual machine target images.
Predix Edge OS is supported for the following:
• qemu86-64 qcow2 image.
• OVA image.
The following are required in order to build Predix Edge OS for virtual machines:
• Configured Predix Edge OS build environment.
• Installed Google repo tool.
mkdir ~/bin
PATH=~/bin:$PATH
curl https://storage.googleapis.com/git-repo-downloads/repo > ~/bin/
repo
chmod a+x ~/bin/repo
Additional information about the Google repo tool in at https://source.android.com/setup/develop/
repo.
• Installed VMware OVF tool for Linux from https://my.vmware.com/group/vmware/details?
downloadGroup=OVFTOOL430&productId=742.
◦ Download the VMware OVF tool and copy it to your build machine.
◦ If you need to build the OVA image, execute the following command.
sudo sh VMware-Workstation-xxxx-xxxx.architecture.bundle
16 © 2020 General Electric CompanyUse the following method to build the repository's target.
mkdir Edge
cd Edge
repo init -u ssh://git@github.build.ge.com/Edge/meta-edge-vmware -m
repo-manifest/meta-edge-vmware-repo-manifest-jenkins.xml -b develop
repo sync --detach --prune
./meta-edge-base/scripts/build.sh -C meta-edge-vmware/build.conf
The resulting OVA image will be at:
• ./build/images/amd64/predix_edge_os.ova
Import the OVA image into VMware Fusion or Workstation. Within VMware, click File > Import.
© 2020 General Electric Company 17Predix Edge OS Release Notes
Predix Edge OS Release Notes 2.4.0
Upgrade Path
Predix Edge OS must be installed incrementally; you cannot skip a minor release (i.e., if you are running
version 2.2.1, you must first install 2.3.3 and then 2.4.0). You do not have to install every patch release
(indicated by a change to the third digit in the release number).
Enhancements
This release contains the following enhancements:
Yocto
The system has been upgraded to Yocto Thud 2.6.3.
Known Issues
This release has the following known issues:
Applications Fail to Start
Applications that use port mapping in their docker compose file may fail to start after an ungraceful
shutdown. This situation is likely to occur after a hardware power cycle or a virtual machine reset. To
work around this issue, gracefully restart the system.
General
• Large container deployments may time out if running QEMU without KVM enabled.
• The only supported virtual disk controller for VMware VMs is IDE; SCSI and SATA are not currently
supported.
• Changes to the system proxy are not propagated into deployed applications. If changing the
system proxy settings after deploying applications, the applications need to be stopped and
restarted for proxy settings to be propagated into the application.
• In some cases, a command will fail to execute and the Docker logs will indicate there is a runc
issue. When this occurs, resend the command.
OVA
• When using VMware Fusion 10, switching networks in the host system may cause Predix Edge OS
VMs to change their IP address (e.g. 192.168.0.5 to 192.168.0.6).
Raspberry Pi 3 B+
• Use Predix Edge OS release 2.1.0 for Raspberry Pi 3 B+. This version is intended only for
development purposes and is not supported for production use.
• Once an imaged SDcard has been used to boot a specific Raspberry Pi board, it cannot be used to
boot another board. The MAC address and model are written to the SDcard on first boot; from that
point on, the SDcard is unique to that board.
◦ E.g., you would encounter this issue if you booted a device, then removed and duplicated that
SDcard. Devices running both the original, and all the duplicates, would come up with the same
address.
18 © 2020 General Electric CompanyPredix Edge OS Release Notes 2.3.3
Known Issue
This release has the following known issue:
Applications Fail to Start
Applications that use port mapping in their docker compose file may fail to start after an ungraceful
shutdown. This situation is likely to occur after a hardware power cycle or a virtual machine reset. To
work around this issue, gracefully restart the system.
Fixed Vulnerability
This release contains fixes for the following security vulnerability:
• CVE-2019-10125
Predix Edge OS Release Notes 2.3.2
Bug Fixes
This release contains the following bug fixes:
Predix Edge Broker Disk Consumption
Resolved an issue where the Predix Edge Broker would consume a large amount of disk space when
encountering an error condition.
Fixed Vulnerability
This release contains fixes for the following security vulnerability:
• CVE-2019-9893
Predix Edge OS Release Notes 2.3.0
Upgrade Path
When upgrading Predix Edge OS, you cannot skip over a version; you must install each version
incrementally. (I.e., if you are running version 2.1.0, you must first install 2.2.1 and then 2.3.0.)
New Features
This release contains the following new features:
Dell Gateway 3002
The Dell Gateway 3002 is a turnkey offering with Predix Edge OS pre-loaded.
• Of the Gateway's I/Os, only the two Ethernet ports are supported:
◦ One designated for WAN.
◦ One designated for LAN.
• Predix Edge Technician Console will be accessible on static IP address 192.168.100.2.
© 2020 General Electric Company 19Known Issues
This release has the following known issues:
General
• Large container deployments may time out if running QEMU without KVM enabled.
• The only supported virtual disk controller for VMware VMs is IDE; SCSI and SATA are not currently
supported.
• Changes to the system proxy are not propagated into deployed applications. If changing the
system proxy settings after deploying applications, the applications need to be stopped and
restarted for proxy settings to be propagated into the application.
• In some cases, a command will fail to execute and the Docker logs will indicate there is a runc
issue. When this occurs, resend the command.
OVA
• When using VMware Fusion 10, switching networks in the host system may cause Predix Edge OS
VMs to change their IP address (e.g. 192.168.0.5 to 192.168.0.6).
Raspberry Pi 3 B+
• Use Predix Edge OS release 2.1.0 for Raspberry Pi 3 B+. This version is intended only for
development purposes and is not supported for production use.
• Once an imaged SDcard has been used to boot a specific Raspberry Pi board, it cannot be used to
boot another board. The MAC address and model are written to the SDcard on first boot; from that
point on, the SDcard is unique to that board.
◦ E.g., you would encounter this issue if you booted a device, then removed and duplicated that
SDcard. Devices running both the original, and all the duplicates, would come up with the same
address.
Predix Edge OS Release Notes 2.2.1
Security Issue
This is an out of band maintenance release for a security issue that exists in components of Predix Edge
OS, versions 2.2.0 and prior. It is recommended you apply this fix as soon as possible, especially if you are
running Predix Edge in a production environment.
Affected versions:
• Predix Edge Virtual Machine (Developer and Production) 2.0.0, 2.0.1, 2.1.0, 2.2.0.
• Predix Edge RaspberryPi 2.1.0.
• Any custom Predix Edge image with a meta-edge-base version 2.2.0 or prior.
• Any custom Predix Edge image that still uses meta-edgeos (any version).
Solutions:
• Predix Edge Virtual Machine: Apply the update to Predix Edge 2.2.1 or start from a fresh 2.2.1 VM.
• Predix Edge Custom Images: Rebuild with the latest meta layers (develop or release branches).
• No fix currently available for prebuilt Predix Edge RaspberryPi images.
• No changes required from Predix Edge application teams beyond updating their platforms.
Upgrade Path
When upgrading Predix Edge OS, you cannot skip over a version; you must install each version
incrementally. (I.e., if you are running version 2.0.0, you must first install 2.1.0 and then 2.2.1.)
20 © 2020 General Electric CompanyNew Features
This release contains the following new features:
General
The meta-edge-base layer includes a patch for CVE-2019-8912, which is a Linux kernel security issue
with a critical Common Vulnerability Scoring System (CVSS) rating of 9.8 (out of 10).
OVA
The production and developer OVA images have been updated to include the fix for CVE-2019-8912.
Known Issues
This release has the following known issues:
General
• Large container deployments may time out if running QEMU without KVM enabled.
• The only supported virtual disk controller for VMware VMs is IDE; SCSI and SATA are not currently
supported.
• Changes to the system proxy are not propagated into deployed applications. If changing the
system proxy settings after deploying applications, the applications need to be stopped and
restarted for proxy settings to be propagated into the application.
• In some cases, a command will fail to execute and the Docker logs will indicate there is a runc
issue. When this occurs, resend the command.
OVA
• When using VMware Fusion 10, switching networks in the host system may cause Predix Edge OS
VMs to change their IP address (e.g. 192.168.0.5 to 192.168.0.6).
Raspberry Pi 3 B+
• Use Predix Edge OS release 2.1.0 for Raspberry Pi 3 B+.
• Once an imaged SDcard has been used to boot a specific Raspberry Pi board, it cannot be used to
boot another board. The MAC address and model are written to the SDcard on first boot; from that
point on, the SDcard is unique to that board.
◦ E.g., you would encounter this issue if you booted a device, then removed and duplicated that
SDcard. Devices running both the original, and all the duplicates, would come up with the same
address.
Predix Edge OS Release Notes 2.2.0
These are the enhancements and known issues for Predix Edge OS, version 2.2.0.
Upgrade Path
When upgrading Predix Edge OS, you cannot skip over a version; you must install each version
incrementally. (I.e., if you are running version 2.0.0, you must first install 2.1.0 and then 2.2.0.)
New Features
This release contains the following new features:
General
Predix Edge OS images are now delivered as platform-specific packages.
© 2020 General Electric Company 21OVA
System packages were upgraded, including Docker to version 18.03.
Known Issues
This release has the following known issues:
General
• Large container deployments may time out if running QEMU without KVM enabled.
• The only supported virtual disk controller for VMware VMs is IDE; SCSI and SATA are not currently
supported.
• Changes to the system proxy are not propagated into deployed applications. If changing the
system proxy settings after deploying applications, the applications need to be stopped and
restarted for proxy settings to be propagated into the application.
• In some cases, a command will fail to execute and the Docker logs will indicate there is a runc
issue. When this occurs, resend the command.
OVA
• When using VMware Fusion 10, switching networks in the host system may cause Predix Edge OS
VMs to change their IP address (e.g. 192.168.0.5 to 192.168.0.6).
Raspberry Pi 3 B+
• Use Predix Edge OS release 2.1.0 for Raspberry Pi 3 B+.
• Once an imaged SDcard has been used to boot a specific Raspberry Pi board, it cannot be used to
boot another board. The MAC address and model are written to the SDcard on first boot; from that
point on, the SDcard is unique to that board.
◦ E.g., you would encounter this issue if you booted a device, then removed and duplicated that
SDcard. Devices running both the original, and all the duplicates, would come up with the same
address.
Predix Edge OS Release Notes 2.1.0
These are the enhancements and known issues for Predix Edge OS, version 2.1.0.
New Features
This release contains the following new features:
General
When upgrading Predix Edge OS, the latest versions of system containers (e.g., PETC and Predix Edge
Broker) are included in the upgrade file.
OVA
VMware tools are now included in the OVA image.
Raspberry Pi 3 B+
A beta development Predix Edge image for Raspberry Pi 3 B+ is now available.
Note: This image is not for production use. It is to be used only as a reference or demonstration tool.
• Supported I/Os:
◦ 2.4GHz and 5GHz IEEE 802.11.b/g/n/ac wireless LAN, -- CLI only, not configurable via PETC.
◦ Gigabit Ethernet over USB 2.0 (maximum throughput 300 Mbps).
22 © 2020 General Electric Company◦ Full-size HDMI.
◦ Four USB 2.0 ports.
• Considerations:
◦ We are shipping this as a 64-bit OS, portability to 32-bit applications will work, but we do not
currently support 32-bit as a platform.
◦ Minimum supported SD card size is 4GB, however, a minimum of 8GB is recommended.
◦ Note that this system has no real time clock (RTC), meaning the device’s clock will be unreliable
until it synchronizes with an NTP server.
Resolved Issues
The following issues were resolved in this release:
• Automatic disk resizingfailure for VMware virtual machines.
Known Issues
This release has the following known issues:
General
• Large container deployments may time out if running QEMU without KVM enabled.
• The only supported virtual disk controller for VMware VMs is IDE; SCSI and SATA are not currently
supported.
• Changes to the system proxy are not propagated into deployed applications. If changing the
system proxy settings after deploying applications, the applications need to be stopped and
restarted for proxy settings to be propagated into the application.
• Under high logging conditions, the system consumes more memory due to caching of logs. GE
recommends restarting the system.
OVA
• When using VMware Fusion 10, switching networks in the host system may cause Predix Edge OS
VMs to change their IP address (e.g. 192.168.0.5 to 192.168.0.6).
Raspberry Pi 3 B+
• Once an imaged SDcard has been used to boot a specific Raspberry Pi board, it cannot be used to
boot another board. The MAC address and model are written to the SDcard on first boot; from that
point on, the SDcard is unique to that board.
◦ E.g., you would encounter this issue if you booted a device, then removed and duplicated that
SDcard. Devices running both the original, and all the duplicates, would come up with the same
address.
© 2020 General Electric Company 23You can also read


