HOW TO BUILD YOUR OWN TAILOR-MADE IOT LINUX OS - CREATING & COMPILING YOUR OWN LINUX ON A RASPBERRY PI 3 USING BUILDROOT & U-BOOT BOOTLOADER ...
←
→
Page content transcription
If your browser does not render page correctly, please read the page content below

Professional eBook

HOW TO BUILD YOUR
OWN TAILOR-MADE IoT
LINUX OS

Creating & Compiling Your Own Linux
on a Raspberry Pi 3 Using Buildroot
& U-Boot Bootloader

         BROUGHT TO YOU BY FIREDOME
What follows is a comprehensive updated guide to building your own custom,
embedded Linux for your next IoT device using the latest versions of Buildroot and
U-Boot bootloader.
The learning process will go from installing Buildroot for customizing the most
used aspects of any Linux system to how to create the different types of images
and configure the networking. The settings shown are to run on a real target,
specifically, the Raspberry Pi 3 model B board, due to its price and availability.

           WHAT YOU ARE GOING TO LEARN

      1.   Serial connection using UART

      2.   Linux build systems

      3.   Toolchains

      4.   Compiling and configuring Linux kernels & modules

      5.   Pre-installing packages

      6.   Configuring system parameters
      7.   Flashing firmware image to an SD card

      8.   Bootloaders (changing default RPI bootloader to U-Boot)

      9.   Static compilation of packages

HOW TO BUILD YOUR OWN TAILOR-MADE IoT LINUX OS                                   2
TABLE
OF CONTENTS

PREREQUISITES……………………………..……. p3              Target packages                    p20
                                              Filesystem Images                  p23
SETTING UP THE                                Bootloaders                        p24
INFRASTRUCTURE…………………....….……. p4
                                            Building                             p24
Serial Connection                    p4
                                              Compilation flow (source)          p25
Connecting UART to RPI 3             p4
                                            Flashing The New Firmware            p28
  Configuring Raspberry Pi 3         p4
                                              Enabling UART output on the
  Raspberry Pi 3 UART pins           p5       Raspberry Pi                       p28
  Plug in the adapter/cable          p5     Mazel Tov! You’ve Built Your First
What’s a Linux Build System?         p10    Custom-made IoT Linux System         p29

Buildroot                            p11    Further reading                      p31

Installing Mandatory Packages        p12
                                            REPLACING THE BOOTLOADER…..... p31
Installing Buildroot                 p12
                                            RPI Bootloading Process              p31
Buildroot Directory Structure        p12
                                              Stage 1                            p31

CONFIGURING AND BUILDING                      Stage 2                            p32
YOUR LINUX SYSTEM………………........... p13        Stage 3                            p32
Configuring                          p13    RPI Bootloading Process with
                                            U-Boot                               p32
  Target Options                     p14
                                            Compile U-Boot Using Buildroot       p33
  Build Options                      p15
                                            Preparing Files                      p34
  Toolchain                          p15
                                            Mazel Tov! You’re Now Using
     What’s a toolchain?             p15
                                            U-Boot Bootloader                    p35
     Selecting toolchain on Buildroot p16
                                            Bonus: Static Compilation
  System Configuration               p18    of Packages                          p38
     Custom scripts                  p18      Compiling Netcat Statically        p38
     Root Filesystem Overlay         p18
  Kernel                             p19    SUMMARY……………………………………….……. p39

HOW TO BUILD YOUR OWN TAILOR-MADE IoT LINUX OS                                    3
PREREQUISITES

1.    Target device: Raspberry Pi 3 Model B
      a. SD card + reader for your PC
2. USB to TTL Adapter cable (FTDI adapter could also work)
3. Build device: Ubuntu (18.04 LTS recommended, for Windows users, WSL works as well)

SETTING UP THE INFRASTRUCTURE

Serial Connection

To connect to control (read and write) the target device, you need some kind of a console. SSH
will be the go-to solution when you have a fully running system with TCP/IP stack, network
interfaces, IP configured and the right SSH server running. Unfortunately, this is not the case
when you develop a system from scratch, you need a direct console connection to all
stdin/out/err of the board, way before you even have an OS installed or an HDMI display driver
loaded (dealing with bootloaders, for example), that’s where UART comes into the picture:
UART (Universal Asynchronous Receiver/Transmitter) is a serial communication protocol in
which data transfers serially, i.e., bit by bit. Asynchronous serial communication is common for
byte-oriented transmission. In Asynchronous serial communication, a byte of data transfers at
a time.

Connecting UART To RPI 3

Configuring Raspberry Pi 3
All you need to do is add the following line to the config.txt file on the /boot partition:

     enable_uart=1

There’s more on this after you create the Linux image.
Once you have set up everything, go to the next step. (Connecting will just give you a blank
console at this point.)

HOW TO BUILD YOUR OWN TAILOR-MADE IoT LINUX OS                                                 4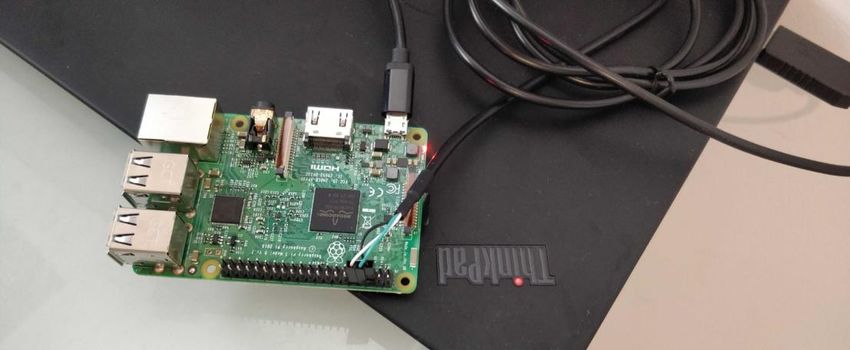
SETTING UP THE INFRASTRUCTURE

Raspberry Pi 3 UART Pins

                                              Source

Plug in the adapter/cable
If you’re using USB to TTL, then simply connect the pins in the following order:

1. Connect the black wire to pin #6 (ground).
2. Connect the green wire to pin #8 (RXD to TXD)
3. Connect the white wire to pin #10 (TXD to RXD)
If for some reason that doesn’t work and you get a blank console, then switch the white and
the green.

HOW TO BUILD YOUR OWN TAILOR-MADE IoT LINUX OS                                                5
SETTING UP THE INFRASTRUCTURE

If you’re using an FTDI board, then connect this way:
Once you plug in the cable, you may connect to the serial port.
The following parameters are necessary to connect to the
Raspberry Pi console, and they apply on both Linux and
Windows
(complete how-to
connect to serial port
on windows/linux):
●   Speed (baud rate): 115200
●   Bits: 8
●   Parity: None
●   Stop Bits: 1
●   Flow Control: None
                                                                  Source

Windows setup:
To know the port name of its            Using PuTTY:
serial port, simply run mode
on a cmd:

                                                                  Source

HOW TO BUILD YOUR OWN TAILOR-MADE IoT LINUX OS                             6
SETTING UP THE INFRASTRUCTURE
Linux terminal setup:
To know the port name of its serial port:
● Built-in (standard) Serial Port: the Linux standard is /dev/ttyS0, /dev/ttyS1, and so on
● USB Serial Port Adapter: /dev/ttyUSB0, /dev/ttyUSB1, and so on.
○ Some types of USB serial adapter may appear as /dev/ttyACM0 ...
You will need to be a member of the dialout group to access this port (for later releases, the
required group is tty). You can check which is necessary with:
ls -l /dev/ttyUSB0
and you will see something like “crw-rw----T 1 root dialout ...”, c means character device, and
root can “read,write” and the group dialout can “read,write” to the port and everyone else
cannot access it.
To find out if you, the current user, is in the group dialout, use the command:
id
If you do not see dialout listed, add yourself with the command
sudo usermod -a -G dialout username
Connect to the terminal:
screen port_name 115200 # e.g. port_name == /dev/ttyUSB0
What’s a Linux Build System?
First, you should read this great intro by Free Electrons. (Slide 6 is enough to read for now.)
The development environment in embedded systems programming is usually quite different
from the testing and production environments. They may use different chip architectures,
software stacks, and even operating systems. Development workflows are different for
embedded developers vs. desktop and web developers. Typically, the build output will consist
of an entire software image for the target device, including the kernel, device drivers, libraries,
and application software (and sometimes the bootloader).
1. Build systems allow an embedded Linux developer to generate a working embedded Linux
system from scratch.
HOW TO BUILD YOUR OWN TAILOR-MADE IoT LINUX OS 7SETTING UP THE INFRASTRUCTURE
2. They automate the process of downloading, configuring, patching, compiling, and
installing all the free software packages.
a. You have a well-known procedure for rebuilding your system from scratch.
b. You can easily integrate patches, bug fixes, or new upstream versions.
c. Your colleagues can easily take over your work since there’s a documented procedure
for system generation.
3. The build system already knows about most free software packages.
a. These packages manage dependencies and already solve cross-compiling issues.
Common build systems for IoT devices are Buildroot, Yocto, and OpenWRT (used mostly for
routers and networking devices).
To run a Linux system in any target device, basically, three things are needed (source):
1. Bootloader, to load the kernel/different OS (discussion later)
2. The Linux kernel, which is the software the bootloader will copy to RAM memory and
interact with the hardware, which gives the ability to execute programs and manage
device drivers
3. The root filesystem (RFS), which is the place where applications and system configuration
are and where user files are stored
So, it’s clear you need to generate both the kernel and the RFS; this is not an easy task in an
embedded system due to the very specific nature of the involved hardware and the peripheral
combinations. Some tools exist to make this task easier for the engineers; they’re usually a
collection of scripts that download, prepare, compile, and deploy the necessary tools and
packages to finally get a binary image the target board will use.
Buildroot, under the GNU software license, is in this category. Created in 2001 by uClibc
developers, it’s for testing small embedded systems built with uClibc. Today, Peter Korsgaard is
the chief maintainer with a very active community of users and contributors, and he is up-to-
date with many new hardware drivers and software packages.
Buildroot
The Buildroot project is defined as “a simple, efficient, and easy-to-use tool to generate
embedded Linux systems through cross-compilation.” It shares many of the same objectives as
the Yocto project, however, it focuses on simplicity and minimalism. In general, Buildroot will
disable all optional compile-time settings for all packages (with a few notable exceptions),
resulting in the smallest possible system. It’s up to the system designer to enable the settings
that are appropriate for a given device.
HOW TO BUILD YOUR OWN TAILOR-MADE IoT LINUX OS 8SETTING UP THE INFRASTRUCTURE
Buildroot is useful mainly for people working with embedded systems. Embedded systems often
use processors that are not the regular x86 processors everyone is used to having in their PCs.
They can be PowerPC processors, MIPS processors, ARM processors, etc.
Buildroot builds all components from the source but does not support on-target package
management. As such, users sometimes call it a firmware generator since the images are
largely fixed at build time. Applications can update the target filesystem, but there’s no
mechanism to install new packages into a running system.
The Buildroot output consists broadly of three components:
1. The root filesystem image and any other auxiliary files needed to deploy Linux to the target
platform
2. The kernel, bootloader, and kernel modules appropriate for the target hardware
3. The toolchain used to build all the target binaries
Installing Mandatory Packages
You need to install the necessary packages that Buildroot needs to work in your Linux system
(you can get the exhaustive list of software and libraries that Buildroot needs to work in the
docs/manual/prerequisite.txt file of Buildroot). you can run the following command:
sudo apt-get install bison g++ flex gettext texinfo patch git-core libtool autoconf
build-essential libncurses5-dev ssh minicom telnet ncurses-base ncurses-bin dialog
screen git wget cpio unzip rsync bc
Installing Buildroot
wget https://buildroot.org/downloads/buildroot-2020.02.6.tar.gz
tar xzvf buildroot-2020.02.6.tar.gz
cd buildroot-2020.02.6
HOW TO BUILD YOUR OWN TAILOR-MADE IoT LINUX OS 9SETTING UP THE INFRASTRUCTURE
Buildroot Directory Structure
The Buildroot directory structure and their description:
● The arch directory: storage for configurations for all the supported architectures
● The board directory: storage for default configurations for different hardware platforms
● The configs directory: where to allocate generic configurations for kernel and packages
● The dl directory: where to copy sources and repositories, as the previous step before
compiling
● The docs directory: contains documentation about Buildroot
● The Linux directory: contains sources and configurations to generate the Linux kernel
● The toolchain directory: contains the recipes to generate the toolchain that works with our
platform
● The output/images directory: where to generate binary images; both RFS and Linux kernel
will copy here
CONFIGURING AND BUILDING
YOUR LINUX SYSTEM
Now, it’s time to configure the Buildroot script for a Raspberry Pi 3 model B configuration. This
will set up all the basic configuration options to work properly with our hardware. Buildroot
already has some preconfigured settings for some of the most popular boards, including RPI,
that you can use, but in this case to learn what to do, create your own Buildroot configuration.
The next steps will briefly and individually cover everything involved in the creation of system
images. Buildroot performs the following steps when you execute it: first, it downloads all the
related source files, compiles the toolchain that will be used to cross-compile the kernel and
the rest of the applications, compiles the Linux kernel, and generates a basic RFS using the
BusyBox tool. Finally, it compiles the configuration files and the third-party applications, and
the system deploys according to the user configuration.
HOW TO BUILD YOUR OWN TAILOR-MADE IoT LINUX OS 10CONFIGURING AND BUILDING YOUR LINUX SYSTEM
Configuring
Inside the Buildroot directory, as non-root user run:
make menuconfig
Please make sure to edit your configuration to match the one shown below.
home/sh/buildroot-2020.02.6/.config – Buildroot 2020.02.6 Configuration
Target Options
For a Raspberry Pi 3 board, set the following target options parameters:
HOW TO BUILD YOUR OWN TAILOR-MADE IoT LINUX OS 11CONFIGURING AND BUILDING YOUR LINUX SYSTEM Build Options Toolchain What’s a toolchain? In software, a toolchain is a set of programming tools used to perform a complex software development task or to create a software product, which is typically another computer program or a set of related programs. A toolchain is a set of distinct software development tools that link (or chain) together at specific stages such as GCC, binutils and glibc (a portion of the GNU Toolchain). Optionally, a toolchain may contain other tools such as a debugger or a compiler for a specific programming language, such as C++. Quite often, the toolchain used for embedded development is a cross-toolchain, or more commonly known as a cross compiler. All the programs (like GCC) run on a host system of a specific architecture (such as x86), but they produce binary code (executables) to run on a different architecture (for example, ARM). This is cross-compilation and is the typical way of building embedded software. It’s possible to compile natively, running GCC on your target (source). More simply, the toolchain is the building block (set of libraries and software) to compile the Linux system for a CPU architecture different from yours. HOW TO BUILD YOUR OWN TAILOR-MADE IoT LINUX OS 12
CONFIGURING AND BUILDING YOUR LINUX SYSTEM

Selecting toolchain on Buildroot
this case, you’ll use the built-in toolchain that comes with Buildroot, with the right kernel
headers for the image.
Kernel Headers - What Are They?
The header files define an interface: they specify how the functions in the source file are
defined.
They are used so that a compiler can check if the usage of a function is correct as the function
signature (return value and parameters) is present in the header file. For this task the actual
implementation of the function is not necessary.
You could do the same with the complete kernel sources but you will install a lot of
unnecessary files. Example: if I want to use the function

  int foo(double param);

In a program, I do not need to know how the implementation of foo is, I just need to know that
it accepts a single param (double) and returns an integer.

HOW TO BUILD YOUR OWN TAILOR-MADE IoT LINUX OS                                             13
CONFIGURING AND BUILDING YOUR LINUX SYSTEM

System Configuration

Entering fun stuff, configure a name, password, and other parameters for your OS:

Custom scripts
Custom scripts will configure (before and after building the image/kernel) certain parameters
and change files, for example, if you use a specific board, you can configure its kernel boot
parameters to enable/disable certain features that are specific to that chip.
Root filesystem overlay
A filesystem overlay is a tree of files that copies directly over the target filesystem after it’s
built. Filesystem overlays are simply directories that copy over the root filesystem at the end of
the build.
You may use this feature to prepare files and directories that will be part of the final root
filesystem (for example a /etc/wpa_supplicant.conf file containing the default Wi-Fi and
password to connect to).

HOW TO BUILD YOUR OWN TAILOR-MADE IoT LINUX OS                                                  14
CONFIGURING AND BUILDING YOUR LINUX SYSTEM

Kernel

Kernel version
Use the following kernel version (Choose “Custom tarball” and enter the following:

  $(call github,raspberrypi,linux,5eeff139ea9135db6e01a58ef613338f1d0899d8)/ linux-
  5eeff139ea9135db6e01a58ef613338f1d0899d8.tar.gz

In-tree device tree source file names
Enter the following:

  bcm2710-rpi-3-b bcm2710-rpi-3-b-plus bcm2710-rpi-cm3

HOW TO BUILD YOUR OWN TAILOR-MADE IoT LINUX OS                                        15
CONFIGURING AND BUILDING YOUR LINUX SYSTEM

Target packages

Here you’ll choose which packages and binaries to install by default on the system.

Under Hardware Handling > Firmware, select:

     → Target packages → Hardware handling → Firmware

HOW TO BUILD YOUR OWN TAILOR-MADE IoT LINUX OS                                        16
CONFIGURING AND BUILDING YOUR LINUX SYSTEM
Under Networking Applications, select:
→ Target packages → Networking applications
↑(-)
HOW TO BUILD YOUR OWN TAILOR-MADE IoT LINUX OS 17CONFIGURING AND BUILDING YOUR LINUX SYSTEM And select iw and iputils packages, as well. Other than that, feel free to add any package you’d like :) Filesystem Images Go with a hardcoded 120MB of / root partition space, using ext4 format. HOW TO BUILD YOUR OWN TAILOR-MADE IoT LINUX OS 18
CONFIGURING AND BUILDING YOUR LINUX SYSTEM

Bootloaders
Skip for now, we’ll come back to this later.

Building
Save and exit, it’s a good idea to copy your .config file to a separated space (git is best).
Now it’s time for compilation, under the buildroot-2020.02.6 directory; run:

  make

Note: There is another way to better keep all your board-specific configs, packets and
patches in a separate directory outside and setup BR2_EXTERNAL during the build. That allows
updating buildroot easily and also keep modifications organized in one place.
This step takes a lot of time to complete. Keep in mind that Buildroot scripts need to download
all of the related resources, including the Linux kernel, and then compile everything. The first
time you run this command, it will take even longer than usual just because the cross-compiling
toolchain needs to be built, so be prepared to wait to have your system image.

HOW TO BUILD YOUR OWN TAILOR-MADE IoT LINUX OS                                                  19
CONFIGURING AND BUILDING YOUR LINUX SYSTEM

If something fails for any reason and you can’t understand why it’s a good practice to run make
clean to remove any files from the previous compilation that might interfere with your new
settings (Buildroot can be problematic when recompiling over and over).
Compilation flow (source)
From a high-level point of view, here is the workflow that Buildroot automates:

       Internet                                                              Host binary (from distribution)
                                                                             Host binary
                                                                             Target binary
                                                                             Buildroot scripts
                              Distribution
      Source code
                               compiler

                                              Host complier

    Package scripts                                              Target complier         Target binaries

 Patches          Build configuration        Extra board files                            Install scripts

                                                                                          Target image

                                                Source

HOW TO BUILD YOUR OWN TAILOR-MADE IoT LINUX OS                                                        20
CONFIGURING AND BUILDING YOUR LINUX SYSTEM
1. Buildroot builds the toolchain, which consists of the cross-compilers and other tools it
needs to compile the target system (green boxes).
2. The source code (blue boxes) for each piece of software downloads from the internet.
3. Using Buildroot scripts (gray boxes), the source is unpacked, patched, configured,
compiled, and installed into the target output directory that forms the root filesystem
(“rootfs”) for the target (purple boxes).
4. Extra files, such as on-device configuration files, also copy into the target output directory.
5. Finally, scripts assemble the final firmware image from the generated rootfs.
After a while, you should see something like this:
INFO: vfat(boot.vfat): adding file ‘rpi-firmware/overlays’ as ‘rpi-firmware/overlays’
INFO: vfat(boot.vfat): cmd: “MTOOLS_SKIP_CHECK=1 mcopy –bsp –i ‘/home/sh/buildroot-2020
e/overlays’ ‘::’” (stderr):
INFO: vfat(boot.vfat): adding file ‘zImage’ as ‘zImage’
INFO: vfat(boot.vfat): cmd: “MTOOLS_SKIP_CHECK=1 mcopy –bsp –i ‘/home/sh/buildroot-2020 ’”
(stderr):
INFO: hdimage(sdcard.img): adding partition ‘boot’ (in MBR) from ‘boot.vfat’ ...
INFO: hdimage(sdcard.img): adding partition ‘rootfs’ (in MBR) from ‘rootfs.ext4’ ...
INFO: hdimage(sdcard.img): writing MBR
sh@LAPTOP- :~/buildroot-2020.02.6$
These lines indicate the SD card image (sdcard.img) for the Pi has generated. It built the image
from the root filesystem in output/target/, which you can inspect:
sh@LAPTOP- :~/buildroot-2020.02.6$ ls –alh output/target/
total 72K
drwxr-xr-x 17 sh sh 4.0K Sep 23 23:09 .
drwxrwxr-x 6 sh sh 4.0K Sep 23 23:24 ..
-rw-r--r-- 1 sh sh 1.4K Sep 23 22:51 THIS_IS_NOT_YOUR_ROOT_FILESYSTEM
drwxr-xr-x 2 sh sh 4.0K Sep 23 23:23 bin
drwxr-xr-x 4 sh sh 4.0K Sep 5 22:10 dev
drwxr-xr-x 11 sh sh 4.0K Sep 23 23:24 etc
drwxr-xr-x 5 sh sh 4.0K Sep 23 23:23 lib
Lrwxrwxrwx 1 sh sh 3 Sep 23 22:51 lib32 -> lib
lrwxrwxrwx 1 sh sh 11 Sep 23 23:09 linuxrc -> bin/busybox
drwxr-xr-x 2 sh sh 4.0K Sep 5 22:10 media
drwxr-xr-x 2 sh sh 4.0K Sep 5 22:10 mnt
drwxr-xr-x 2 sh sh 4.0K Sep 5 22:10 opt
drwxr-xr-x 2 sh sh 4.0K Sep 5 22:10 proc
drwxr-xr-x 2 sh sh 4.0K Sep 5 22:10 root
drwxr-xr-x 3 sh sh 4.0K Sep 23 23:09 run
drwxr-xr-x 2 sh sh 4.0K Sep 23 23:23 sbin
drwxr-xr-x 2 sh sh 4.0K Sep 5 22:10 sys
drwxr-xr-x 2 sh sh 4.0K Sep 5 22:10 tmp
drwxr-xr-x 7 sh sh 4.0K Sep 23 23:24 usr
drwxr-xr-x 4 sh sh 4.0K Sep 23 23:11 var
HOW TO BUILD YOUR OWN TAILOR-MADE IoT LINUX OS 21CONFIGURING AND BUILDING YOUR LINUX SYSTEM On the output/image directory you may see the firmware files: sh@LAPTOP- :~/buildroot-2020.02.6$ ls –alh output/images/ Total 175M drwxr-xr-x 3 sh sh 4.0K Sep 23 23:24 . drwxrwxr-x 6 sh sh 4.0K Sep 23 23:24 .. -rw-r--r-- 1 sh sh 26K Sep 23 23:23 bcm2710-rpi-3-b-plus.dtb -rw-r--r-- 1 sh sh 25K Sep 23 23:23 bcm2710-rpi-3-b.dtb -rw-r--r-- 1 sh sh 24K Sep 23 23:23 bcm2710-rpi-cm3.dtb -rw-r--r-- 1 sh sh 32K Sep 23 23:24 boot.vfat -rw-r--r-- 1 sh sh 120K Sep 23 23:24 rootfs.ext2 1rwxrwxrwx 1 sh sh 11 Sep 23 23:24 rootfs.ext4 -> rootfs.ext2 drwxr-xr-x 3 sh sh 4.0K Sep 23 23:11 rpi-firmware -rw-r--r-- 1 sh sh 153M Sep 23 23:22 sdcard.img -rw-r--r-- 1 sh sh 467K Sep 23 23:12 u-boot.bin -rw-r--r-- 1 sh sh 5.1M Sep 23 23:23 zImage Looks good. Now, burn this image to the Pi’s SD card and start connecting the Pi to the computer. Flashing the New Firmware When Buildroot has completed the build process, the results are stored in the output/images directory. You will find the generated files in the output/images directory. The zImage file is the Linux kernel image that will load in the memory. The sdcard.img file is the RFS (root file system) itself; you need to deflate this file in the SD card that will allocate your system. Also, the bootloader files generate inside the output/images/ rpi-firmware directory; these files do not generate with the make command but download just as a binary format because of the closed nature of the GPU of Raspberry Pi. The bootcode.bin file is the original bootloader that comes with Raspberry Pi. The sdcard.img is the binary image you will flash to an SD memory card. Use https://www.balena.io/etcher/ for the flashing process (supports Mac, Linux, and Windows), which is much easier than using the dd command. HOW TO BUILD YOUR OWN TAILOR-MADE IoT LINUX OS 22
CONFIGURING AND BUILDING YOUR LINUX SYSTEM

Enabling UART output on the Raspberry Pi:
To enable the serial interface on the RPI board, add the following line to the config.txt file on
/boot partition, so the file looks like this:

  start_file=start.elf
  fixup_file=fixup.dat
  kernel=zImage
  disable_overscan=1
  gpu_mem_256=100
  gpu_mem_512=100
  gpu_mem_1024=100
  enable_uart=1

Mazel Tov! You’ve Built Your First Custom-made IoT Linux System

Save all changes, if you’re running on Linux, then type in the sync command to make sure all
changes are flushed.
Eject the SD card safely, put it into the Raspberry Pi, make sure the UART cable is plugged in,
and that using screen/putty you’ve connected to your COM or /dev/ttyS* port.
Turn on the board, and you should receive an output similar to the following:

HOW TO BUILD YOUR OWN TAILOR-MADE IoT LINUX OS                                               23
CONFIGURING AND BUILDING YOUR LINUX SYSTEM

HOW TO BUILD YOUR OWN TAILOR-MADE IoT LINUX OS   24
CONFIGURING AND BUILDING YOUR LINUX SYSTEM

Further reading

1.   How Linux Works by Brian Ward is a great book about many topics in Linux. It’s relevant for
     desktop and server Linux, as well as embedded. It covers basics such as shell commands
     yet still goes into important, complex topics like the X11 window system and the DBus
     messaging bus. It’s the right amount of detail to give you a good mental picture of how
     everything works, while still being approachable.
2.   The very prolific team at Bootlin, a French company that does embedded Linux
     development maintains Bootlin’s Buildroot training. You can pay the company to give your
     entire team training using this material. If you’re willing to read through its slide decks, it’s
     very thorough, although there’s no lecture accompanying it.
3. Packpub book is useful for hands-on training.
The Buildroot user manual is the place to learn about hacking on Buildroot. The various areas
of the build system are well-described and the reference manual for writing new packages is
superb. The downside is that because it is a user manual, not a tutorial, it’s quite dense. You’ll
definitely get familiar with it as you use Buildroot going forward.

REPLACING THE BOOTLOADER

Raspberry Pi comes with its own bootloader built-in, but on a real IoT device, you need to
select and configure a bootloader that will load the kernel, so let’s get things interesting.

RPI Bootloading Process

First, let’s understand how the current RPI bootloader process works.
Raspberry Pi has a fairly complicated boot process with two bootloaders. The first one resides
in built-in ROM and is responsible for starting the GPU. The GPU executes bootcode.bin, the
second bootloader, which, in the end, runs the kernel.

HOW TO BUILD YOUR OWN TAILOR-MADE IoT LINUX OS                                                   25
REPLACING THE BOOTLOADER
Stage 1
To reduce cost, the Raspberry Pi (models A & B) omits any onboard, non-volatile memory used
to store the bootloaders, Linux kernels, and file systems as seen in more traditional embedded
systems. Rather, an SD/MMC card slot is for this purpose. The Raspberry PI compute module
has 4GB eMMC flash onboard.
Stage 1 boot is in the on-chip ROM. Loads Stage 2 in the L2 cache. The Raspberry Pi’s
Broadcom BCM2835 system on a chip (SoC) powers up with its ARM1176JZF-S 700 MHz
processor held in reset. The VideoCore IV GPU core is responsible for booting the system. It
loads the first stage bootloader from a ROM embedded within the SoC. The first stage
bootloader is to load the second stage bootloader (bootcode.bin) from a FAT32 or FAT16 file
system on the SD card.
Stage 2
The second stage bootloader, bootcode.bin, executes on the VideoCore GPU and loads the
third stage bootloader, start.elf.
Stage 3
The third stage bootloader, start.elf, is where all the action happens. It starts by reading
config.txt, a text file containing configuration parameters for both the VideoCore (Video/HDMI
modes, memory, console frame buffers, etc.) and loading of the Linux kernel (load addresses,
device tree, uart/console baud rates, etc.). start.elf can load any file named zImage (the
compiled kernel image).
In short, the standard (non-U-Boot) boot process is as follows:
Stage 1 Stage 2 Stage 3
Bootloader Bootloader Bootloader
Power ROM reads /boot GPU reads - GPU read OS
On /bootcode.bin /boot/start*.elf /boot/config.txt boots
files
- GPU loads
/boot/zImage
Note that on the RPI, the GPU initializes the system and performs the boot’s initial stages.
HOW TO BUILD YOUR OWN TAILOR-MADE IoT LINUX OS 26REPLACING THE BOOTLOADER
RPI Bootloading Process with U-Boot
To trick the RPI bootloader to load U-Boot, set start.elf into loading the U-Boot image instead;
use the compiled u-boot.bin to pass as a kernel image. This is the first thing that runs on the
ARM processor.
The boot process with U-Boot enabled is as follows:
Stage 1 Stage 2 Stage 3
Bootloader Bootloader Bootloader
Power ROM reads/boot GPU reads - GPU read OS
On /bootcode.bin /boot/start*.elf /boot/config.txt boots
files
- GPU loads /boot
/u-boot.bin
Compile U-Boot Using Buildroot
Yes, you can download the U-Boot repository and compile it yourself manually, but for that,
you have Buildroot to automate it and make it part of your build process. So, configure
Buildroot and enter the Bootloaders menu:
HOW TO BUILD YOUR OWN TAILOR-MADE IoT LINUX OS 27REPLACING THE BOOTLOADER
And run make.
At the end of the compilation you should see the U-Boot binary under the output/images
directory:
-rw-r--r-- 1 sh sh 467K Sep 23 23:12 u-boot.bin
Preparing Files
1. Prepare config.txt:
Change it from:
kernel=zImage
to:
kernel=u-boot.bin
a. Don’t forget to add the enable_uart=1 line to the config.txt file, as well.
HOW TO BUILD YOUR OWN TAILOR-MADE IoT LINUX OS 28REPLACING THE BOOTLOADER
2. Prepare the boot commands for U-Boot:
When U-Boot starts, it needs certain configuration to know what to boot next and how,
instead of typing it manually each time, prepare it so U-Boot will read this configuration when it
starts:
a. Create a new boot_commands.txt file and enter:
mmc dev 0
fatload mmc 0:1 ${kernel_addr_r} zImage
fatload mmc 0:1 ${fdt_addr_r} bcm2710-rpi-3-b.dtb
setenv bootargs root=/dev/mmcblk0p2 rootfstype=ext4 console=tty1
console=ttyAMA0,115200 earlyprintk rootwait noinitrd
fdt addr ${fdt_addr} && fdt get value bootargs /chosen bootargs
bootz ${kernel_addr_r} - ${fdt_addr}
b. Compile the commands to the U-Boot format:
mkimage -A arm -T script -C none -n “Boot script” -d boot_commands.txt boot.scr.uimg
c. Copy the newly created boot.scr.uimg file into the /boot partition on your SD card.
3. Copy u-boot.bin to the /boot partition
Mazel Tov! You’re Now Using U-Boot Bootloader
Save all changes. if you’re running on Linux, then type in the sync command to make sure all
changes are flushed.
Eject the SD card safely, put it into the Raspberry Pi, make sure that UART cable plugs in, and
that using screen/putty you’ve connected to your COM or /dev/ttyS* port.
Turn on the board, and you should receive an output similar to the following:
HOW TO BUILD YOUR OWN TAILOR-MADE IoT LINUX OS 29REPLACING THE BOOTLOADER HOW TO BUILD YOUR OWN TAILOR-MADE IoT LINUX OS 30
REPLACING THE BOOTLOADER

Bonus: Static Compilation of Packages

Forgot to add a specific package and don’t want the hassle of recompiling the entire firmware
image just for that? You may use static compilation to get your software running.
Compiling Netcat Statically
Take netcat as an example, first download the source code:

  wget https://netix.dl.sourceforge.net/project/netcat/netcat/0.7.1/netcat-
  0.7.1.tar.gz

  tar -xzvf netcat-0.7.1.tar.gz
  cd netcat-0.7.1

Configure for static compilation:

  ./configure --build x86_64-pc-linux-gnu --host arm-linux-gnueabi LDFLAGS=“-static -
  fPIC”

Compile:

  make

Congrats! now you may copy your compiled file to the IoT device and run it.

   sh@LAPTOP-       :~/netcat-0.7.1/src$ file netcat
   netcat: ELF 32-bit LSB executable, ARM, EABI5 version 1 (SYSV), statically linked,
   BuildID[sha1]=e58628ec60b804d32b0daaaefa6f7ce596b587dd, for GNU/Linux 3.2.0, with
   debug_info, not stripped

If you would like to reduce its size, you may strip it from its symbols using arm-linux-gnueabi-
strip:

   sh@LAPTOP-       :~/netcat-0.7.1/src$ ls -al netcat
   -rwxrwxr-x 1 sh sh 740452 Sep 25 13:14 netcat
   sh@LAPTOP-       :~/netcat-0.7.1/src$ arm-linux-gnueabi-strip -s netcat
   sh@LAPTOP-       :~/netcat-0.7.1/src$ ls -al netcat
   -rwxrwxr-x 1 sh sh 529580 Sep 25 13:16 netcat

HOW TO BUILD YOUR OWN TAILOR-MADE IoT LINUX OS                                                31
SUMMARY

This post has walked you through the steps of using a serial connection, creating
your own Linux IoT embedded image, from the bootloader and all the way to the
kernel and installed packages and drivers using an automated build system.
There’s a lot more to learn about creating your own firmware image and using
Buildroot and its neat features. I hope I’ve provided you with the basics you need
to start.
Good luck!

              Securing the Connected Future
              For on going support and question about Firedome contact:
              www.firedome.io | support@firedome.io | +1 (374) 826-6713 | Copyright © 2021 FIREDOME
You can also read