Refrigerant Management System (RMS) User's Guide - 026-1308 Rev 2 13-APR-2010 - Retail Solutions
←
→
Page content transcription
If your browser does not render page correctly, please read the page content below
026-1308 Rev 2 13-APR-2010

    Refrigerant Management System (RMS)
                            User’s Guide

Retail Solutions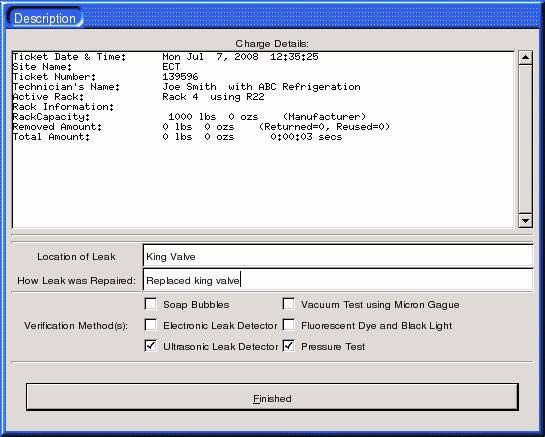
Emerson Climate Technologies
                                                          Retail Solutions Division.
                                                3240 Town Point Drive NW Suite 100
                                                        Kennesaw, GA 30144, USA

                                                                  Phone 770-425-2724
                                                                    Fax 770-425-9319

ALL RIGHTS RESERVED
The information contained in this manual has been carefully checked and is believed
to be accurate. However, Computer Process Controls, Inc. assumes no responsibility
for any inaccuracies that may be contained herein. In no event will Computer Process
Controls, Inc. be liable for any direct, indirect, special, incidental, or consequential
damages resulting from any defect or omission in this manual, even if advised of the
possibility of such damages. In the interest of continued product development, Com-
puter Process Controls, Inc. reserves the right to make improvements to this manual,
and the products described herein, at any time without notice or obligation.

FCC COMPLIANCE NOTICE
This device complies with Class B of Part 15 of the FCC Rules and with Class B of CE
EN 55022.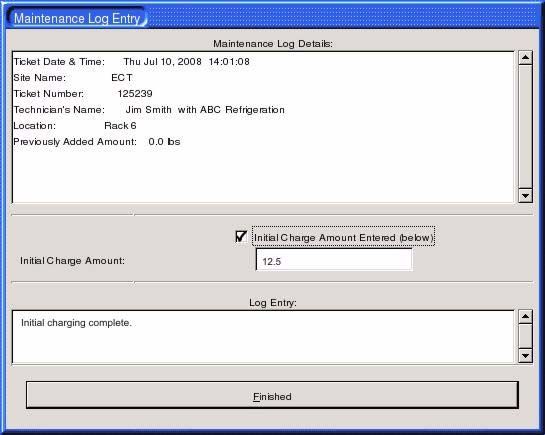

Table of Contents
1 Product Description ...................................................................................................................1
2 Installation ..................................................................................................................................2
 2.1. Physical Install .......................................................................................................................2
 2.2. Refrigeration Piping Install ...................................................................................................3
 2.3. Electrical Install .....................................................................................................................3
3 Start Up .......................................................................................................................................4
 3.1. Setting Up Site Configuration and Racks/RTUs (The System Setup Menu) ........................4
   3.1.1. Site Configuration ...........................................................................................................4
   3.1.2. Rack/RefType Names ......................................................................................................7
 3.2. TCP/IP Network Setup ..........................................................................................................8
4 Operation ..................................................................................................................................11
 4.1. Adding Refrigerant ..............................................................................................................11
   4.1.1. Switching Tanks During Charging ..............................................................................13
   4.1.2. Stopping the Charge ......................................................................................................13
   4.1.3. Final (Post-Charging) Screens .....................................................................................13
 4.2. Removing Refrigerant .........................................................................................................15
 4.3. HVAC ..................................................................................................................................16
   4.3.1. Adding Refrigerant to RTU ..........................................................................................18
   4.3.2. Removing Refrigerant from RTU .................................................................................18
   4.3.3. Changing the Initial Charge of an RTU ......................................................................19
 4.4. Maintenance Entry ...............................................................................................................20
 4.5. Log Review .........................................................................................................................22
 4.6. System Review ....................................................................................................................23
 4.7. About ...................................................................................................................................24
 4.8. FTP Display .........................................................................................................................25
5 Initial Charging ........................................................................................................................26
 5.1. New Install ...........................................................................................................................26
 5.2. Retrofit Install ......................................................................................................................27
 5.3. Adjusting Initial Fill (the Initial Charge Increase/Decrease Buttons) .................................28
6 Scale Calibration .....................................................................................................................30
7 Troubleshooting .......................................................................................................................31
 7.1. RMS Does Not Power Up ...................................................................................................31
 7.2. No Response from the RMS ................................................................................................31
 7.3. Valve Indicators Light, But Valves Do Not Operate ..........................................................31

                                                                                                                             Table of Contents • i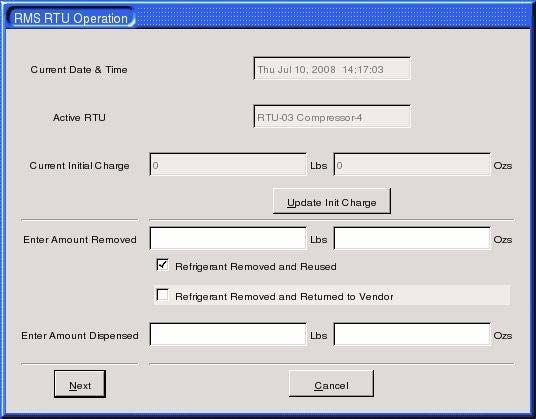
1       Product Description

    The Refrigerant Metering System (RMS) is a computer-controlled system designed to eliminate
    the inconsistencies and guesswork involved in the charging of refrigeration systems. It prevents
    the aggravation of paperwork by handling all refrigerant charging information for record keep-
    ing.
    The RMS was designed and engineered to help comply with the Environmental Protection
    Agency Reporting and Record Keeping Requirements (40 CFR) for Class I and Class II refriger-
    ants. The RMS uses load cell technology along with modern computing hardware and industry
    proven piping techniques to present a compact, accurate system that can handle all aspects of
    refrigeration charging or removal while providing the user with all pertinent information
    needed for precise records.
    The RMS is capable of being configured as a stand-alone system or it can be attached to an exist-
    ing network so all information provided by the RMS can be manipulated offsite.

                                                                                Product Description • 1
2        Installation

2.1. Physical Install

                       18.00"                         18.00"

                                 12.27"

                                           78.20"

                                 65.94"

                                                                   6x o1.09"

                                                                  5x 7.88"

                                                                  15.63"

                                                          1.25"

     Figure 2-1   RMS Dimensions (Front and Right Side View)

     Choose the installation site for the RMS unit. When choosing a location for installation of the
     RMS, keep in mind that refrigerant piping from each refrigeration rack must be routed to the
     RMS enclosure. Choose a position that facilitates the most straightforward routing. Also
     remember that the door on the RMS must be able to open far enough for the insertion and
     removal of refrigerant drums, and the top of the unit may have to be removed for upgrades. See
     Figure 2-1.
     The back of the RMS enclosure has provisions for four mounting points. Be sure to attach the
     enclosure securely so as to prevent the unit from tipping over and putting unnecessary strain on
     the electrical and refrigeration connections.
     Once the enclosure is installed, place the head unit on top of the enclosure an secure with the
     included four nuts.

2 • RMS User’s Guide                                                           026-1308 Rev 2 13-APR-2010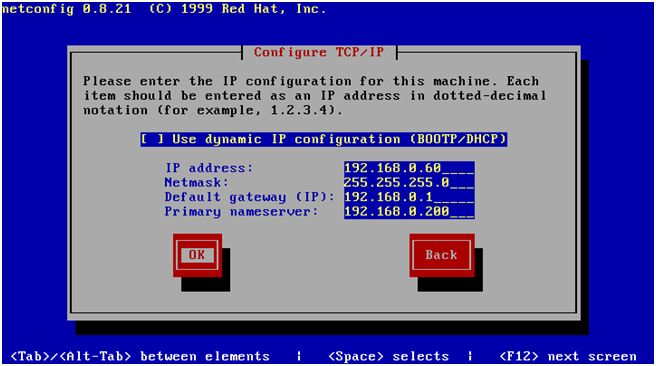
2.2. Refrigeration Piping Install

     The RMS unit provides one copper tubing extension protruding from the RMS enclosure for
     each rack. These extensions provide a convenient means of attaching the required refrigeration
     piping to the RMS. The piping should be routed from the RMS to the proper refrigeration charg-
     ing point(s) on the rack system, preferably one with a “king” valve so as to provide a means to
     shut down the additional plumbing. Be sure that the piping is mounted securely so any slight
     movement of the RMS while inserting or removing refrigerant drums doesn’t put undue stress
     on the piping and joints.

2.3. Electrical Install

     Route a dedicated 120 VAC, 15 amp circuit to the junction box on the side of the RMS enclosure
     (shown in Figure 2-2). Cut the wires to the proper length to land the wires in the bottom of the
     terminal points. Secure any loose wiring. Be sure any and all wiring conforms to all applicable
     electrical codes.
     Connect the pre-wired plugs to their respective connection points on the bottom of the RMS
     head unit. Secure the two green connectors with the screws on the end of the plugs. Connect the
     keyboard (purple) and mouse (green) connectors to there respective receptacles and plug in the
     network cable pigtail to the fitting on the right side of the enclosure.

                                              GROUND
                                              NEUTRAL
                                              LINE

     Figure 2-2    Wiring Terminals

     Turn on the circuit breaker feeding the RMS. The RMS screen will turn on and the unit will
     begin the boot up procedure.

Refrigeration Piping Install                                                            Installation • 3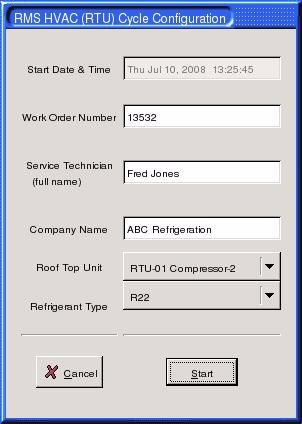
3 Start Up
Once the unit finishes the boot up process, the RMS will display the Main Menu shown on the
left in Figure 3-1.
123456
Enter password
(default "123456")
Click
"System"
MAIN MENU
MAIN MENU
with SYSTEM MENU BUTTONS
Figure 3-1 Default Menu With System Enabled
3.1. Setting Up Site Configuration and Racks/RTUs (The System
Setup Menu)
Click the “System” button to display the System Setup Menu. The RMS will ask you for the system
password. The default is “123456” and may be changed later in the site configuration process (see
Section 3.1.1.4.).
When this password is correctly entered, a new series of system buttons appears on the screen to
the right of the Main Menu buttons, as shown on the right in Figure 3-1.
To fully set up an RMS for your store, you will need to use both the Site Configuration (Section
3.1.1.) and Rack/RefType Names button (Section 3.1.2.)to set up site communications and
specify refrigeration system details.
3.1.1. Site Configuration
The topmost button is “Site Configuration”. Clicking this button will bring up the screen dis-
played in Figure 3-2.
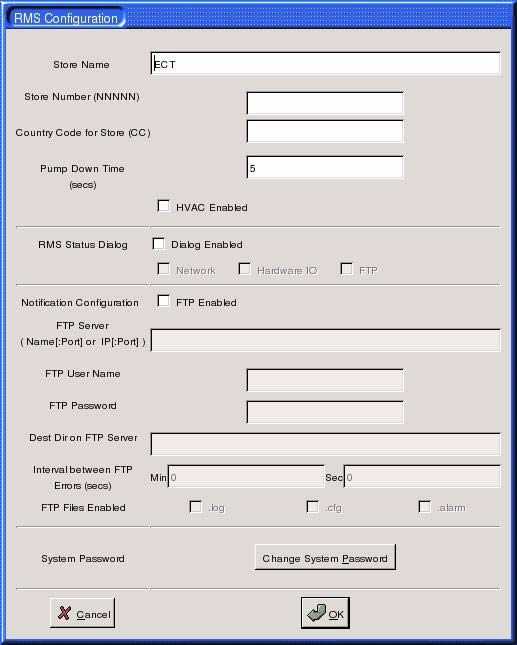
4 • RMS User’s Guide 026-1308 Rev 2 13-APR-2010Figure 3-2 Site Configuration
3.1.1.1. Entering Store Info
• Store Name - Enter the name of the store in this field.
• Store Number - Enter the store number in this field (up to 5 digits)
• Country Code (CC) - If your organization uses country codes to designate international
stores, enter the country code in this field.
• Pump Down Time (secs) - Pump Down Time is the number of seconds the RMS will
delay between closing the main tank valve and closing the rack valve to ensure no residual
refrigerant remains in the piping. The default is 5 seconds.
• HVAC Enabled - If you will use the RMS to track the addition and removal of refrigerant
from RTUs, check the "HVAC Enabled" box. This will cause the "HVAC" button to appear
on the Main Menu, which may be clicked to access the screens necessary to add or remove
charges.
3.1.1.2. RMS Status Dialog
The RMS Status Dialog check boxes control whether an on-screen notification will be given
when problems occur during various RMS system operations. To enable the status dialog, check
the "Dialog Enabled" box, and then check one or all of the following options:
• Network - The status display will notify the user of Ethernet network problems.
• Hardware/IO - The status display will notify the user of computer-related hardware and
software problems.
• FTP - The status display will notify the user of problems during FTP transfers, such as
failed transmissions.
Setting Up Site Configuration and Racks/RTUs (The System Setup Menu) Start Up • 53.1.1.3. FTP Configuration
RMS is capable of utilizing File Transfer Protocol (FTP) to send logs of every charging session
and every configuration change to a network server. This capability is disabled by default, but
the following steps may enable it.
1. Put a check in the "FTP Enabled" checkbox in the RMS Configuration dialog box.
2. In the FTP Server field, enter the IP address or domain name of the server that the RMS
is connected to. If a special port number is required, type this with a colon separating the
IP address from the Port Number (example: for an IP address of 192.168.1.1 on port 8024,
enter "192.168.1.1:8024").
3. In the FTP User Name and FTP Password fields, enter the username and password
used to log in to the FTP server.
4. In the Dest Dir on FTP Server field, enter the destination directory of the FTP server to
which the RMS will upload information.
5. In the Interval Between FTP Transfers field, enter the number of seconds the RMS
will wait before retrying an unsuccessful FTP transfer. This field does NOT affect the inter-
val between successful transfers, only unsuccessful attempts at transfer.
6. In the FTP Files Enabled check boxes, check one or more of the check boxes based on
the types of information you wish to include in the file transfer:
• .log - Logs containing all charge addition/removal and maintenance.
• .cfg - All settings and setpoints for all racks and RTUs in the RMS.
• .alarm - A log of all alarms that have occurred in the RMS.
Once all fields are correctly filled in, the RMS will transfer a log and/or configuration file via
FTP every time a change is made or a charging session is completed. If any of the above
fields are not known, or changes must be made by the IT department before the
RMS is added to a network, be sure the “FTP Enabled” box remains unchecked
until all information is valid.
3.1.1.4. System Password
The default system password, which is required to access the System Setup Menu buttons (Sec-
tion 3.1.), is "123456." For security purposes it is recommended you change the system pass-
word to prevent unauthorized access to the RMS. To do this, click the "Change System
Password" button and follow the on-screen prompts.
3.1.1.5. Saving Changes & Exiting
When finished entering data on the RMS Configuration dialog box, click "Finished" to save
changes and return to the System Setup Menu (Section 3.1.). To return to the System Setup
Menu without saving changes, click the "Cancel" button.
6 • RMS User’s Guide 026-1308 Rev 2 13-APR-20103.1.2. Rack/RefType Names
The second system button is “Rack/RefType Names.” Pressing this button calls up the screen in
Figure 3-3 and allows the names and models/serial numbers of the racks and RTUs, the
type(s) of refrigerant, and the full charge amounts to be stored for each particular install.
Figure 3-3 Rack/Refrigerant Type Name
3.1.2.1. Changing the Rack/RTU Description
The scroll box at the top of the Configure Text dialog box lists all of the racks and RTU compres-
sors that may be set up for use in the RMS. The list includes eight racks, with ID numbers Rack
1 through Rack 8, and 50 RTUs with four compressors each (RTU 01-1 through RTU 50-4). The
IDs may not be changed.
Assign all racks and RTU compressor stages to appropriately numbered IDs in the scroll box.
For example, if your site has four racks and 14 RTUs with two compressors each, use Rack 1 -
Rack 4 to set up your racks, and RTU 01-1/RTU 01-2 through RTU 14-1/RTU 14-2 for RMS
setup. Leave all unused entries in their default configurations, or else change each unused
entry’s Rack/RTU Description to "UNUSED."
To customize this list with info about the site’s racks and RTUs:
1. Left-click the desired entry in the scroll box to highlight it.
2. After left-clicking the row, note the selected rack’s current ID, Rack/RTU Description,
Capacity, and Rack Info are shown in the fields directly below the scroll box.
3. Click where the Rack/RTU Description is, and enter the desired description of the rack or
RTU.
4. Click the Capacity field, and enter the rack or RTU’s refrigerant capacity (in pounds).
5. If the capacity you entered in Step 5 is based on the actual amount of refrigerant measured
in the rack or RTU’s initial charge, put a check in the "Manufacturer or Actual (In)" check
box. Otherwise, if the capacity you entered is based on the manufacturer’s rating only,
leave this box unchecked.
Setting Up Site Configuration and Racks/RTUs (The System Setup Menu) Start Up • 76. In the Rack Info field, enter any pertinent information you wish to store about this system,
such as model numbers or serial numbers.
7. Click "Update Rack/RTU Entry" to save changes to the rack or RTU entry.
8. Click on the next row in the scroll box to set up the next system. Follow these steps for each
rack or RTU you need to set up.
3.1.2.2. Editing the Refrigerant Types List
The RMS supports up to eight different refrigerant type entries. By default, the RMS uses a
refrigerant type list comprising the most commonly used refrigerants in HVAC/R. To add or
change refrigerant types:
1. In the scroll box at the bottom of the Configure Text dialog box, highlight the row that rep-
resents the refrigerant type entry you wish to change.
2. Note when left-clicked, the refrigerant type’s ID and Ref. Type Description appear in the
fields to the right of the Refrigerant Type scroll box.
3. Left-click the Ref. Type Description field, and enter the designator of the refrigerant you
wish to add (for example, R404A, or R22).
4. When finished, click Update Ref. Type to save changes. Repeat these steps for each refrig-
erant type you wish to add or change.
3.1.2.3. Retiring a Rack or RTU
WARNING! Retiring a unit will completely erase
all previously saved data, all charging sessions for the
rack or RTU, and any EPA required leak rate calcula-
tions. This data can NOT be retrieved once a rack or
RTU is retired.
Retiring a unit signifies that the rack or RTU is no longer being used. In the event that a rack or
RTU has to be retired from service:
1. In the scroll box at the top of the Configure Text screen, highlight the rack or RTU you
wish to retire.
2. Locate the "Retire Unit" check box in the fields below the scroll box. Left-click this box
once to place a check in the Retire Unit box.
3. Click "Update Rack/RTU Entry" to retire the rack or RTU.
All historical data regarding the rack or RTU’s charging sessions and leak rate calculations will
be deleted. The rack/RTU’s Rack Info field will be erased, and the Description and Capacity val-
ues will be reset to its default values.
3.2. TCP/IP Network Setup
When connected to a facility network, the RMS has the capability of uploading log and alarm
data to a remote server via FTP. The RMS must be connected to the network using the Ethernet
port located in the junction box on the side of the RMS enclosure (shown in Figure 2-2 on page
3). When this connection is made, you must set up the RMS’s IP address and other information
using the netconfig utility.
8 • RMS User’s Guide 026-1308 Rev 2 13-APR-20101. Hold down the Ctrl and Alt keys, and press F3.
2. The screen will prompt you for a login username. Type root and press Enter.
3. The screen will prompt you for a password. Type default and press Enter.
4. If the RMS says the password is incorrect, repeat steps 2 and 3 again using username root
with password asp7040.
5. When the command prompt appears at the bottom of the screen, type netconfig and
press Enter. The screen will ask if you wish to set up networking. Press Enter to select
"Yes." The Configure TCP/IP screen will be shown (Figure 3-4).
Figure 3-4 Configure TCP/IP Screen in Netconfig
6. If the site network uses DHCP or BOOTP:
6a. Press Space with the "Use dynamic IP configuration" field highlighted. This
will put an "X" in between the brackets, signfiying this option is selected.
6b. Press Tab to highlight the OK button, and press Return.
6c. The Configure TCP/IP dialog will close and return you to the command
prompt. Type reboot and press Enter. The RMS system will reboot and return
to the standard graphical interface.
7. If the site network requires fixed IP information:
7a. Press Tab to select the IP address field. Enter the IP address for the RMS unit
here.
7b. Press Tab to select the Netmask field. Enter the subnet mask used by the net-
work here.
7c. Press Tab to select the Default gateway (IP) field. Enter the IP address of the
primary gateway for this network.
7d. Press Tab to select the Primary nameserver field. Enter the IP address of the
nameserver used by this network.
TCP/IP Network Setup Start Up • 97e. Press Tab to highlight the OK button. Double-check that all entered informa-
tion is correct, and press Enter to save changes and exit. If information needs
to be edited, use Alt+Tab to scroll back to the fields you need to edit. You may
also select "Cancel" if you wish to exit netconfig without saving your informa-
tion.
7f. The Configure TCP/IP dialog will close and return you to the command
prompt. Type reboot and press Enter. The RMS system will reboot and return
to the standard graphical interface.
When reboot is complete, the RMS should be properly configured to perform FTP transfers.
10 • RMS User’s Guide 026-1308 Rev 2 13-APR-20104 Operation
4.1. Adding Refrigerant
Figure 4-1 Add Refrigerant (From Main Menu)
To add refrigerant to the system, click the “Add Refrigerant” button on the Main Menu (Figure
4-1). This will bring up the “RMS Add Cycle Configuration” screen as seen in Figure 4-2.
Figure 4-2 RMS Add Cycle Configuration
1. The Start Date & Time field will automatically be filled in with the current system date and
time, and may not be changed by the user.
Adding Refrigerant Operation • 112. Enter the work order number in the Work Order Number field.
3. Enter the full name of the technician adding refrigerant in the Service Technician field.
4. Enter the name of the company for which the technician named in Step 3 is employed in
the Company Name field.
5. Left-click the down arrow button next to the Rack Selector field. The list that appears
shows the names or descriptions specified in the "Rack/RTU Description" for each of the
eight racks (see Section 3.1.2.1.). Left-click the name or description of the rack to which
you wish to add refrigerant.
6. Left-click the down arrow button next to the Refrigerant Type field. The list that appears
shows the names of the refrigerant types specified in the RMS system configuration (see
Section 3.1.2.2.). Left-click the name of the refrigerant type being added to this rack.
7. If you are adding a charge after fixing a refrigerant leak, put a check in the "Charge After
Repair?" checkbox.
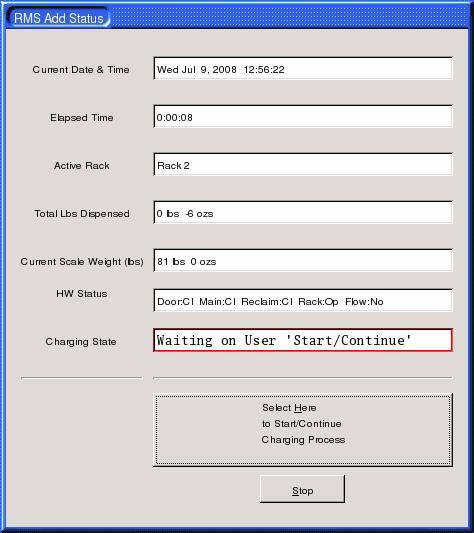
8. Click "Finish." The RMS screen will now show the RMS Add Status dialog box (Figure 4-
3).
Figure 4-3 RMS Add Status
The RMS is now ready for you to add the refrigerant charge. The RMS Add Status dialog box on
the screen will give you information on how the refrigerant charge is progressing, including the
elapsed time, scale weight, and total pounds dispensed. The Charging State field will prompt
you through the various steps of the charging process.
In the beginning, the "Charging State" field should read "Process Start Wait for Door Open." To
add the refrigerant charge:
9. Open the door of the RMS unit ("Charging State" field will change to "Process Start Wait
for Door Closed").
12 • RMS User’s Guide 026-1308 Rev 2 13-APR-201010. Place the refrigerant tank on the scale inside the RMS enclosure.
11. Attach the refrigerant tank to the main valve inside the enclosure using the included hose.
12. Fully open the valve on the refrigerant tank.
13. Close and latch the door on the RMS ("Charging State" field will change to "Waiting on
User Start/Continue").
14. If any additional valves need to be opened to charge the system, open the valve(s) now.
15. Begin the charging by clicking the "Select Here to Start/Continue Charging Process" but-
ton.
When this button is pressed, the RMS will open the valve for the selected rack. The lighted indi-
cator on the right side of the RMS screen will glow to indicate the valve is open. Then, the main
tank valve will open, and dispensing of refrigerant will begin.
As the system is charging, you should see the scale weight decrease and the total pounds dis-
pensed increase in the RMS Add Status screen.
4.1.1. Switching Tanks During Charging
If the tank becomes empty during charging, the scale weight and total pounds dispensed will
stop changing. If more refrigerant needs to be added, you may remove the tank during the
charging process and replace it with a new tank.
16. Open the RMS enclosure door. This will automatically close the main tank valve.
17. Close the valve on the empty refrigerant tank. Disconnect the empty tank and remove it
from the RMS enclosure.
18. Place a new tank on the RMS scale, and connect it to the main angle valve with the same
hose used by the previous tank.
19. Fully open the refrigerant tank valve.
20. Close and latch the door.
21. Click the "Start/Continue" button. The main tank valve will open and charging will
resume.
This process can be repeated as many times as needed to complete the charging process, and the
RMS will automatically keep track of the total amount of refrigerant dispensed.
4.1.2. Stopping the Charge
When the proper amount of refrigerant has been dispensed, click the “Stop” button to start the
pump down cycle. The main tank valve will close and the pump down timer will start. The
amount of time the RMS will remain in pump down is user-configured (see Section 3.1.1.1.,
Entering Store Info). At the end of the pump down timer, the rack valve will close. The charge
addition process is now complete.
4.1.3. Final (Post-Charging) Screens
When the charge addition is complete, the RMS display screen will show one of two screens,
depending on whether or not you checked the "Charge after Repair?" checkbox.
Adding Refrigerant Operation • 13If the "Charge after Repair?" checkbox was left unchecked, the RMS will show a dialog box that
summarizes the details of the charge addition, repeating the user-entered information such as
technician name, work order, etc. and including the total amount of refrigerant dispensed. The
displayed information is for review only. Click "Finished" when finished reviewing this informa-
tion to return to the Main Menu screen.
If the "Charge after Repair?" checkbox was checked, the RMS display will show the “Descrip-
tion” dialog box shown in Figure 4-4. In addition to summary information about the charge
you just added, you must specify information about the leak that was repaired, such as where
the leak occurred, how it was repaired, and what method(s) were used to verify the leak no lon-
ger exists. Enter the information requested, and click "Finished" to save the information and
return to the Main Menu screen.
Figure 4-4 Charging Session Description
The "Description" screen is also used when adding an initial charge to a new rack using the
RMS. Refer to Section 5.1.
14 • RMS User’s Guide 026-1308 Rev 2 13-APR-20104.2. Removing Refrigerant
Figure 4-5 Main Menu (Remove Refrigerant Button Highlighted)
The RMS is equipped with a special valve arrangement that will allow refrigerant to flow from
the rack system to a recovery drum inside the enclosure when the “Remove Refrigerant” process
is initiated.
The process to remove refrigerant works exactly as described for adding the refrigerant. Follow
the same steps outlined in Section 4.1., Adding Refrigerant). Note the following differences
between the process for adding and removing:
• The order of valve opening during the start of a removal operation is: 1) rack valve opens,
2) reclaim valve opens, and 3) main tank valve opens.
• The RMS Add Status screen will show refrigerant added back to the tank as a negative
value in the "Refrigerant Dispensed" field. In other words, if 2 lbs. 7 oz. of refrigerant is
added to the tank, the Refrigerant Dispensed field will show "-2 lbs. -7 oz.".
• When charging is finished, the order of valve closing is: 1) main tank valve closes, 2) pump
down delay is observed, 3) reclaim valve closes, and 4) rack valve closes.
Removing Refrigerant Operation • 154.3. HVAC
Figure 4-6 Main Menu (HVAC Button Highlighted)
The RMS may track the addition and removal of refrigerant from HVAC systems; unlike the
racks, however, the RMS does not use the scale to automatically measure dispensation or
removal. Adding and removing refrigerant from HVAC systems must be performed and mea-
sured manually, and then entered by hand in the RMS.
To add or remove refrigerant from an HVAC unit, you must check the "HVAC Enabled" box in
the System Setup screen (see Section 3.1.1.1., Entering Store Info). When this box is checked,
the "HVAC" button will appear in the Main Menu.
16 • RMS User’s Guide 026-1308 Rev 2 13-APR-20101. Click the "HVAC" button on the Main Menu. The RMS RTU Operation screen will be
shown (Figure 4-7).
Figure 4-7 RMS HVAC (RTU) Cycle Configuration
2. Enter the work order number in the Work Order Number field.
3. Enter the full name of the technician adding refrigerant in the Service Technician field.
4. Enter the name of the company for which the technician named in Step 3 is employed in
the Company Name field.
5. Left-click the down arrow button next to the RTU Selector field. The list that appears
shows the names or descriptions specified in the "Rack/RTU Description" for each of the
four compressor stages for all 50 RTUs (see Section 3.1.2.1.). Left-click the name or
description of the RTU compressor stage to which you wish to add or remove refrigerant.
6. Left-click the down arrow button next to the Refrigerant Type field. The list that appears
shows the names of the refrigerant types specified in the RMS system configuration (see
Section 3.1.2.2.). Left-click the name of the refrigerant type being added to this rack.
HVAC Operation • 177. Click "Finished." The RMS RTU Operation screen will appear (Figure 4-8).
Figure 4-8 RMS RTU Operation
The RMS RTU Operation screen (Figure 4-7) allows you to perform one of three functions:
adding an amount of refrigerant, removing an amount of refrigerant, and updating the recorded
initial charge of the RTU stage.
4.3.1. Adding Refrigerant to RTU
To mark the addition of refrigerant to this RTU, simply enter the amount added (in pounds and
ounces) in the "Enter Amount Dispensed" fields, and click "Next." A dialog box will be displayed
repeating the details of the operation, and showing the new logged "Total Amount Dispensed"
value for this RTU with the amount you just added included in the total.
4.3.2. Removing Refrigerant from RTU
To mark the removal of refrigerant from this RTU, enter the amount removed (in pounds and
ounces) in the "Enter Amount Removed" fields. Then, select one of the check boxes below the
fields to indicate what will be done with the removed refrigerant:
• Refrigerant Returned to Vendor - Select this if the refrigerant will be returned to ven-
dor.
• Refrigerant Reused - Select this if the refrigerant will be re-used elsewhere in the sys-
tem.
Click "Next" when finished entering information. A dialog box will be displayed repeating the
details of the operation, and showing the new logged "Total Amount Dispensed" value for this
RTU with the amount you just removed included in the total.
18 • RMS User’s Guide 026-1308 Rev 2 13-APR-20104.3.3. Changing the Initial Charge of an RTU The "Current Initial Charge" fields on the RMS RTU Operation screen show the initial charge amount entered for this RTU stage in the Rack/RefType Names screen (see Section 3.1.2., Rack/RefType Names). If the initial charge amount needs to be altered, it may be done from this screen by clicking the "Update Init Charge" button. When clicked, the system will prompt you for a password. Note - Distribution of the password required to change initial charge is controlled by customer policy, and may not be obtained from Emerson Climate Technologies. After entering the correct password, a dialog box will appear prompting you to enter the new initial charge amount and a brief description of why the amount is being changed (Figure 4-9). Figure 4-9 RTU Initial Charge Screen Enter the new charge amount in the "Enter New Initial Charge" field (in lbs.). Enter the expla- nation for the charge amount change in the Enter Operation Detail field. When finished, click Next to save changes to the initial charge and return to the RMS RTU Operation screen. HVAC Operation • 19
4.4. Maintenance Entry

     Figure 4-10 Main Menu (Maintenance Entry Button Highlighted)

     The Maintenance Entry feature of RMS is used to log other types of store or site maintenance
     that do not directly deal with adding or removing refrigerants. Examples of operations that may
     be logged here include compressor repairs, addition of oil, condenser fan repairs, and preventa-
     tive maintenance.
     Maintenance Entries are also used to record initial charges for racks and RTUs. The process for
     doing this is explained in Section 5, Initial Charging. For entering maintenance entries not
     related to initial charges:
      1.   Click the “Maintenance Entry” button on the Main Menu.
      2.   Enter the work order number in the Work Order Number field.
      3.   Enter the full name of the technician adding refrigerant in the Service Technician field.
      4.   Enter the name of the company for which the technician named in Step 3 is employed in
           the Company Name field.
      5.   Click the down arrow button next to the "Location" field. If the maintenance operation you
           are logging deals specifically with a rack or RTU already set up in the RMS’s RTU/RefType
           Names screen (Section 3.1.2.), select the name or description of the rack or RTU from
           the drop-down list. If the operation does not deal with a rack or RTU listed here, select
           "Maintenance" from this list.
      6.   Click “Start." The "Maintenance Log Entry” screen will appear (Figure 4-11). This screen
           repeats the data you just entered and allows you to enter a detailed description of what

20 • RMS User’s Guide                                                        026-1308 Rev 2 13-APR-2010
maintenance was completed. Enter a detailed description of the maintenance operation in
the Log Entry box. When completed, click “Finished” button to save and exit.
Figure 4-11 Maintenance Entry
Maintenance Entry Operation • 214.5. Log Review
Figure 4-12 Main Menu (Log Review Button Highlighted)
All the information the RMS gathers about every charging session and every maintenance entry
is stored in the internal memory of the RMS. This information can be analyzed by clicking the
“Log Review” button on the default screen. This button opens the RMS data log shown in Fig-
ure 4-13. All entries are listed with the most recent event appearing first.
Figure 4-13 Log Review
22 • RMS User’s Guide 026-1308 Rev 2 13-APR-2010The bottom of the screen has check boxes labeled “Refrigerant +/- log Entries” and “Mainte-
nance log entries”. Checking both these boxes will display all refrigerant charging sessions and
all maintenance entries. Un-checking either of these boxes will result in log entries of those
types being hidden. In addition, the drop down menu will allow you to limit the displayed log
entries to only those belonging to a particular rack or RTU, or all maintenance entries whose
location is marked as "Maintenance" (see Section 4.4.). These tools make it easier to sort
through numerous entries when searching for a particular record.
If both check boxes are un-checked, the only records available for viewing are the initial
charge(s). The initial charging information is always visible, regardless of check box or drop
down menu settings.
4.6. System Review
Figure 4-14 Main Menu (System Review Button Highlighted)
The “System Review” button on the default screen allows viewing of the system settings without
giving permission to change these values. Changing these values must be done by clicking the
"System" button and entering the appropriate password (see Section 3.1.1.).
System Review Operation • 234.7. About
Figure 4-15 Main Menu (Log Review Button Highlighted)
The “About” button displays the version of the software currently in use by the RMS, as well as
any special functions that are installed.
24 • RMS User’s Guide 026-1308 Rev 2 13-APR-20104.8. FTP Display
Figure 4-16 Main Menu (Log Review Button Highlighted)
If the "FTP Enabled" checkbox is checked in the Site Configuration (see Section 3.1.1.3., FTP
Configuration), the Main Menu will display a button at the bottom of the menu labeled "FTP
Display." Clicking this button will show a dialog box displaying the current FTP settings, such as
the FTP server IP address or domain name, login information, the current FTP status, the result
of the last FTP attempt, and any error messages related to FTP.
Figure 4-17 FTP Status Screen
FTP Display Operation • 255 Initial Charging
5.1. New Install
When the RMS unit is installed in a new installation that has not yet charged the refrigeration
system(s), the initial refrigerant charging will be done via the RMS. This process requires a few
extra steps to ensure that the RMS has all the information necessary to perform the calculations
needed for accurate record keeping.
1. Use the "Add Refrigerant" button on the Main Menu to add the initial refrigerant charge
(see Section 4.1., Adding Refrigerant), following these additional steps:
• Put a check in the "Charge after Repair?" box.
• After adding the refrigerant charge, when the "Charge Details" screen prompts you to
enter the Location of Leak and How Leak Was Repaired, enter in both fields "No leak,
initial fill session."
2. After adding refrigerant, use the "Maintenance Entry" button on the Main Menu to enter a
maintenance entry (see Section 4.4., Maintenance Entry), following these additional
steps:
• In the "Location" field, select the rack whose initial charge you just completed.
• When the Maintenance Log entry screen appears, there will be a window in the middle
of the screen that will display new initial fill amount. The number in this field should
equal the amount of refrigerant added during the initial charge. If this number is not
accurate, put a check in the "Initial Charge Amount Entered" box and enter the correct
charge amount in the field below.
26 • RMS User’s Guide 026-1308 Rev 2 13-APR-2010• In the Maintenance Log box, enter "Initial Charging Complete." If manual alteration
of the initial fill amount was necessary, also include an explanation of why this num-
ber was manually altered.
Figure 5-1 Maintenance Log Details (Used for Initial Charge Entry)
5.2. Retrofit Install
When the RMS is installed at a location that is already in operation, rack refrigerant capacity/
initial fill information must be manually entered into the RMS. This information should be
obtained from records that are already present on site so as to ensure consistency between old
records and the new information stored by the RMS. Once the rack capacity/initial fill values
are acquired, the following steps will update the RMS.
1. Follow the steps outlined in Section 3.1.2., Rack/RefType Names, to enter the correct
initial charge amount to each rack in the rack’s "Capacity" field. If the charge amount you
are entering is based on the actual amount of refrigerant measured in the rack’s initial
charge, put a check in the "Manufacturer or Actual (In)" check box. Otherwise, if the
charge you entered is based on the manufacturer’s capacity rating only, leave this box
unchecked.
2. After updating the rack’s Capacity field with the initial charge amount, use the "Mainte-
nance Entry" button on the Main Menu to enter a maintenance entry (see Section 4.4.,
Maintenance Entry), following these additional steps:
• In the "Location" field, select the rack whose initial charge you just entered in the
Rack/RefType Names screen.
• When the Maintenance Log entry screen appears, there will be a window in the middle
of the screen that will display new initial fill amount. Put a check in the "Initial Charge
Amount Entered" box, and manually enter the same charge amount in the field below
you just entered in the Capacity field for the rack’s Rack/RefTypes Name entry.
Retrofit Install Initial Charging • 27• In the Maintenance Log box, write a note to indicate the initial charge amount was
manually entered in the RMS. Click "Finished" to save and exit.
Repeat these steps for each rack to be logged by the RMS.
5.3. Adjusting Initial Fill (the Initial Charge Increase/Decrease But-
tons)
Figure 5-2 Main Menu With System Buttons (Initial Charge Increase/Decrease
Buttons Highlighted)
In the event that the location makes a change that will alter the amount of refrigerant that
makes up the systems full charge, refrigerant will have to be added or removed to return the sys-
tem to a fully charged state. In this case, any additional refrigerant added to the system should
not be counted as a leak. The RMS provides for this situation by allowing authorized users to
add or remove refrigerant without impacting the leak rate calculations.
NOTE: The Initial Charge Increase and Initial Charge Decrease buttons
may only be used if the rack has already had an initial charge recorded. If
the initial charge has not yet been recorded as per the instructions in Sec-
tion 5.1. or Section 5.2., the rack will not be displayed as a selectable
option in the Initial Charge Increase/Decrease dialog boxes.
1. From the Main Menu, click the “System” button to make the System Menu buttons visible.
2. Choose Initial Charge Increase to add to the initial charge, or Initial Charge Decrease to
remove from the initial charge.
3. The system will prompt you for a password. Note - Distribution of the password required
to change initial charge is controlled by customer policy, and may not be obtained from
Emerson Climate Technologies.
28 • RMS User’s Guide 026-1308 Rev 2 13-APR-20104. The screens that follow are identical to the screens used to add and remove refrigerant
(explained in Section 4.1. and Section 4.2.). Refer to these instructions to add or
remove refrigerant.
5. When the desired amount of refrigerant has been added/removed, the RMS will automati-
cally switch to the Maintenance Entry screen, with the Location automatically set to the
specified rack. In the window in the middle of the Maintenance Entry screen, the new ini-
tial charge amount will be displayed. Check the new value for accuracy and check the “Ini-
tial Charge Amount Entered” box. Add a note to the maintenance log entry explaining that
the initial charge has been changed and for what reason(s). Click “Finished” to save data.
Adjusting Initial Fill (the Initial Charge Increase/Decrease Buttons) Initial Charging • 296 Scale Calibration
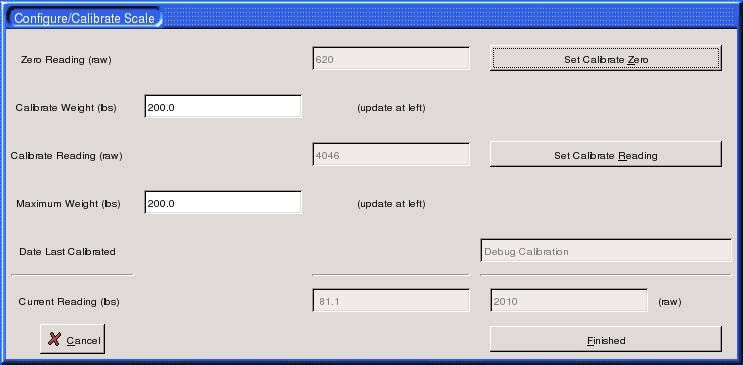
The scale used in the RMS ships from the factory pre-calibrated and should need no adjustment
unless the scale is damaged and must be replaced. The scale may be calibrated when necessary
using the "Scale Calibrate" button in the System Menu.
1. From the Main Menu, click "System" to display the System Menu buttons.
2. Left-click the "Scale Calibrate" button. The "Configure/Calibrate Scale" screen will appear
(Figure 6-1).
Figure 6-1 Scale Calibration
3. Remove all objects from the scale.
4. With the scale empty, click the "Set Calibrate Zero" button.
5. Place an object of known weight on the scale.
6. Enter the weight of the known object in the "Calibrate Weight (lbs)" field (in pounds).
7. Click the "Set Calibrate Reading" button.
8. Verify that the "Current Reading (lbs)" field at the bottom of the screen shows the same
weight as the value you just entered in the "Calibrate Weight (lbs)" field.
9. Remove the object from the scale. With the scale empty, verify the "Current Reading (lbs)"
field now reads "0.0".
10. Click "Finished" to save the calibration data. The scale is now calibrated.
30 • RMS User’s Guide 026-1308 Rev 2 13-APR-20107 Troubleshooting
7.1. RMS Does Not Power Up
1. Check for 120 VAC at the RMS terminal points.
2. If voltage is ok at the terminal points, check the fuse inside the RMS fusible link.
7.2. No Response from the RMS
1. Check that the mouse and keyboard cables are firmly attached to the RMS head unit.
2. Reboot the RMS by cycling power to the unit.
7.3. Valve Indicators Light, But Valves Do Not Operate
1. Check that the plug-in connections in the rear of the enclosure are firmly seated.
2. Check that the relays in the electronics package are firmly seated.
RMS Does Not Power Up Troubleshooting • 31You can also read


