CONCURGOV FEDERAL TRAVELER MANUAL - Version 3.00 April, 2016
←
→
Page content transcription
If your browser does not render page correctly, please read the page content below
CONCURGOV
        FEDERAL
TRAVELER MANUAL

                                    Version 3.00

                                     April, 2016

ConcurGov Federal Traveler Manual                  i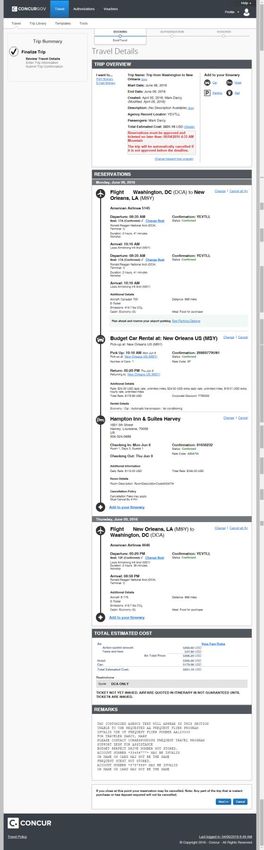
Table of Contents
SECTION 1:              GETTING STARTED ....................................................................................................................1
  Log on to ConcurGov ..............................................................................................................................................1
SECTION 2:              UPDATING YOUR PROFILE ..........................................................................................................2
SECTION 3:              CREATING TRAVEL RESERVATIONS ................................................................................................4
  Review the Travel Policy for Your Agency...............................................................................................................4
  Book an Air Reservation .........................................................................................................................................4
  How to Book Flight or Rail Reservations.................................................................................................................5
  Making Car Reservations ..................................................................................................................................... 15
  Making Hotel Reservations.................................................................................................................................. 18
  Completing the Reservation ................................................................................................................................ 24
SECTION 4:              CREATING, REVIEWING, AND SUBMITTING AN AUTHORIZATION ......................................................... 27
  Creating an Authorization ................................................................................................................................... 27
  View Associated Authorizations .......................................................................................................................... 27
  Creating an Authorization without a Reservation ............................................................................................... 28
SECTION 5:              WORKING WITH EXPENSES & RECEIPTS........................................................................................ 29
  Adding an Expense............................................................................................................................................... 30
  Working with Per Diem Expenses ........................................................................................................................ 30
SECTION 6:              ACCOUNTING ........................................................................................................................ 33
  Allocating Expenses to One or More Accounting Codes ...................................................................................... 34
SECTION 7:              PERFORM PRE-AUDITS AND CONFIRMATION TABS ......................................................................... 36
SECTION 8:              CREATING A VOUCHER FROM AN AUTHORIZATION .......................................................................... 37
  Creating a Voucher .............................................................................................................................................. 37
  Creating Interim Vouchers for Long Term TDY .................................................................................................... 38
SECTION 9:              SPECIAL SCENARIOS ................................................................................................................ 42
  Multi-Segment Reservations ............................................................................................................................... 42
  Canceling/Changing Reservations ....................................................................................................................... 45
  Camp Rates .......................................................................................................................................................... 46

ConcurGov Federal Traveler Manual                                                                                                                                        i
Section 1: Getting Started
Log on to ConcurGov
Access ConcurGov through the internet using the following steps:
Open a supported web browser.
In the address bar, type https://cge.concursolutions.com.
In the User Name field, type your user name, this is your short Active Directory ID@bureau.gov (i.e.
jdoe@usgs.gov).
In the Password field, type your password.
Click the Sign in button.
Note: First time users logging into ConcurGov should read through the Privacy Act Notice and click the
I Agree button.
Note: If this is your first time logging in, you may receive an email to establish a password and security
question. As of 1/12/16, the system isn’t requiring this.
The ConcurGov Home screen appears after logging into the system. From this central location, you can book
reservations, create authorizations, create vouchers, and manage profile settings.
Important Note for Arrangers: User with the Travel Arranger role, will access the Profile drop-down on the
upper right hand of the ConcurGov Home screen to browse for other travelers.
1
ConcurGov Federal Traveler Manual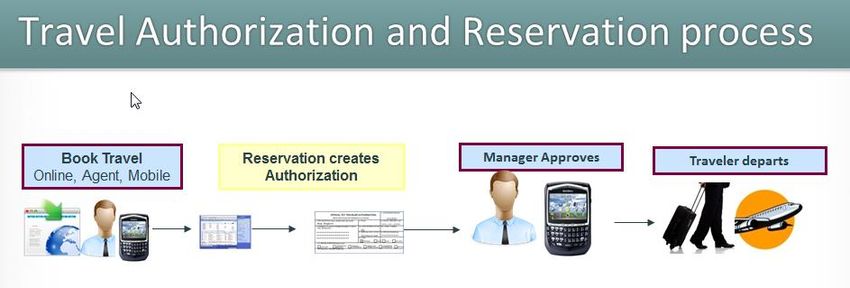
Section 2: Updating Your Profile
A user’s Travel Profile should be reviewed the first-time logging into ConcurGov. Travelers cannot begin booking
a trip until the required fields in the Travel Profile are updated and saved.
On the Menu Toolbar, click the Profile drop-down button, select the Profile Settings link.
Click any of the links located in the navigational panel on the left or the links under the Profile Options
section.
2
ConcurGov Federal Traveler Manual
Click the Personal Information link:
Personal information section - verify that the first, middle, and last names are identical to those on the
photo identification being presented at the airport.
o Enter Duty Station and Residence City, and Residence State if not populated.
Agency Information – verify that the Employee ID is populated and correct.
Duty Station Address section – verify that the Duty Station Address is accurate.
Home Address section - verify that the Home address is accurate.
Contact Information and Emergency Contact sections, verify that this information is accurate. Phone
numbers and email addresses are important so that the Travel Management Center (TMC) can contact
the traveler if there is an issue with a reservation, or other extenuating reasons.
Fill out the Travel Preferences area with Preferred Departure Airport, Special Meal needs, Hotel
Preferences, Car Preferences and any Frequent Traveler Programs.
TSA Secure Flight required fields include with Gender and Date of Birth. In addition, update the DHS
Redress Number or TSA Pre-Check Number (if applicable), to help avoid unnecessary airport
delays/screenings.
Assistants and Travel Arrangers section – add the name(s) of any individuals that are authorized to
book travel for the traveler.
o Verify that the charge card number is loaded in the profile with a current expiration date.
o Click the Save button.
Click the Change Password link to change the current password and set up a password hint.
Click the Save button to save any changes made to the profile.
Note: To save a profile, all fields marked Required must be completed.
3
ConcurGov Federal Traveler Manual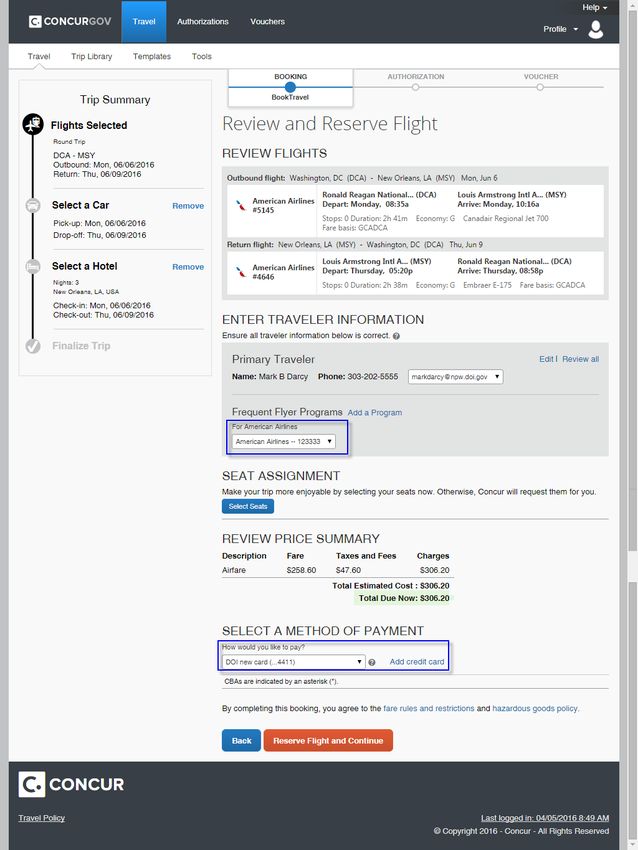
Section 3: Creating Travel Reservations
This section provides the procedures to complete the following tasks.
Review the travel policy for your agency.
Book an air, car and hotel reservation, review an itinerary.
Review and make changes to the Authorization for a trip. After the reservation is booked, an authorization
is automatically created and contains the reservation information.
The following graphic shows the flow of the travel reservation and authorization process.
Note: A travel authorization can be created prior to making a reservation. See Creating an Authorization without
a Reservation in this document.
Review the Travel Policy for Your Agency
Before booking new reservations or creating an authorization, review the travel policies from GSA. Contact the
travel administrator with any questions.
To review the agency’s policy:
From the ConcurGov Home screen, click the Travel Policy link located on the bottom left of the screen.
Book an Air Reservation
ConcurGov provides several access points to begin booking a reservation. From the ConcurGov Home screen,
under the Shortcuts section, click New Booking. Alternatively, click Travel on the Menu Toolbar.
4
ConcurGov Federal Traveler Manual
How to Book Flight or Rail Reservations
On the ConcurGov Home screen, in the left navigation pane, under the Shortcuts section, click the New
Booking link. Alternatively, select Travel on the Menu Toolbar.
Click the Air/Rail button (this is the default tab) to begin entering travel reservation information.
Note: If airfare is not needed, select the appropriate button car , hotel , or rail to make
another type of reservation.
Select the applicable Air/Rail Search button: Round Trip, One Way, or Multi City.
5
ConcurGov Federal Traveler Manual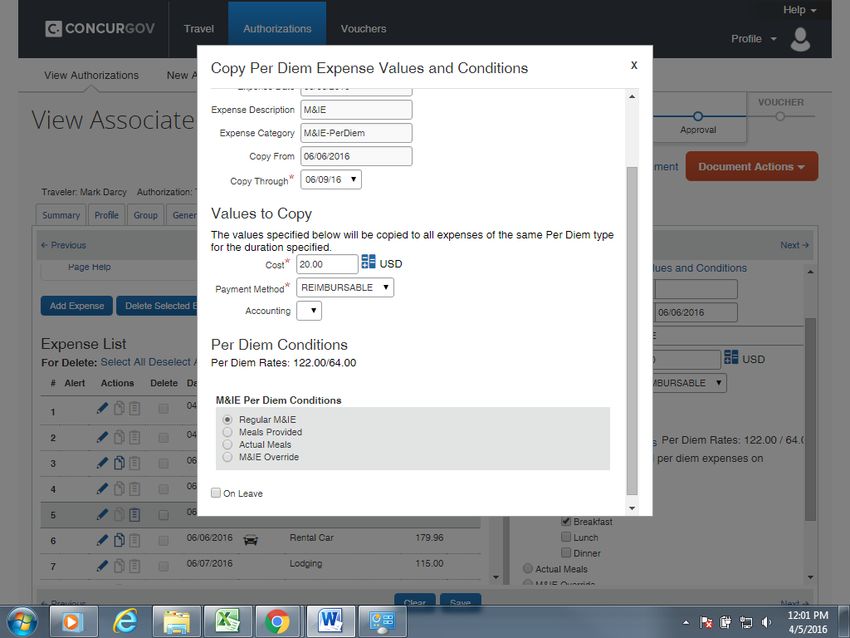
In the Temporary Duty Location area, leave the default Reference Point radio button selected.
Enter a landmark or preferably the city, state of the Temporary Duty Location.
Click the Find Location button. A pop-up suggests locations based on the search information
entered.
Select the correct location from the Location drop-down and click the Choose button.
In the TDY Per Diem Location drop-down, select the appropriate county related to the TDY Per Diem
Location.
In the From and To fields, enter the airports/airport codes related to the TDY Location.
Note: If the Preferred Departure Airport field is updated in the traveler’s profile, the From field
populates with that airport code.
Select the Outbound and Return date and time for the reservation. The default number of hours to
search on either side of the requested time is set to 3 hours.
6
ConcurGov Federal Traveler Manual
Note: Use the drop-down to search for flight times up to +/- 9 hours from the time entered. Increasing
the time window increases the number of flights.
If a car is needed, select the Pick-up/Drop-off car at airport check box.
Other special requests related to the car are specified on the Car Results tab. If a car is not needed, skip
this step. A car can be added later from the Itinerary screen. For more information on reserving a car see
“Making a Car Reservation” in this document.
If a hotel is needed, select the Find a Hotel check box.
Change the Find hotels within field to a distance large enough to return viable hotels options in the
search, i.e. 20 miles.
If staying at more than one hotel during the trip or a hotel is not needed, skip this step. A hotel can be
added later from the Itinerary screen. For more information on reserving a hotel see “Making Hotel
Reservations” in this guide.
Select the default Search flights by Price drop-down list to display flights by price.
Optionally, select the Specify a Carrier check box to specify a specific airline for the reservation.
Click the Search button. The airline/rail options display on a new screen.
7
ConcurGov Federal Traveler Manual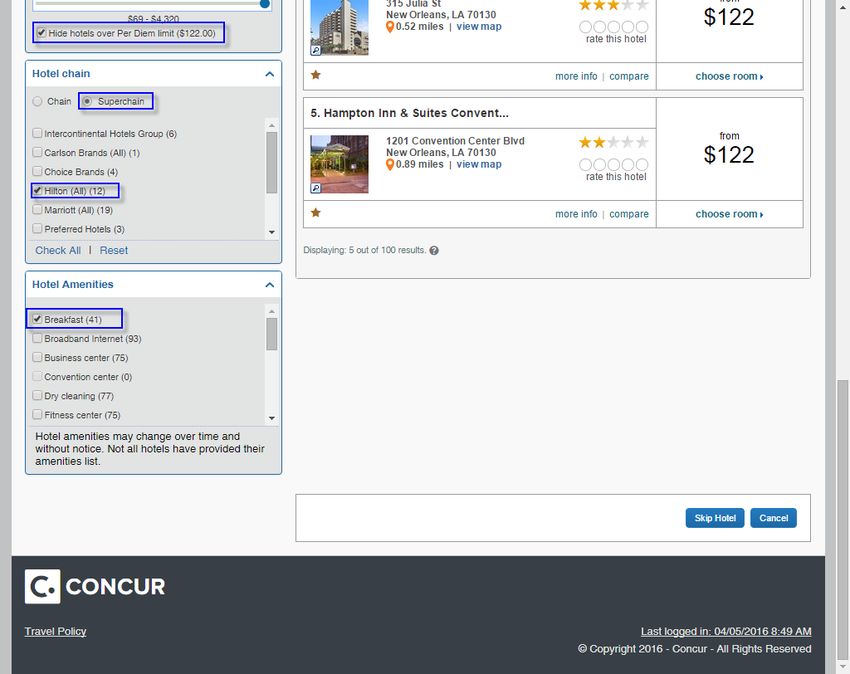
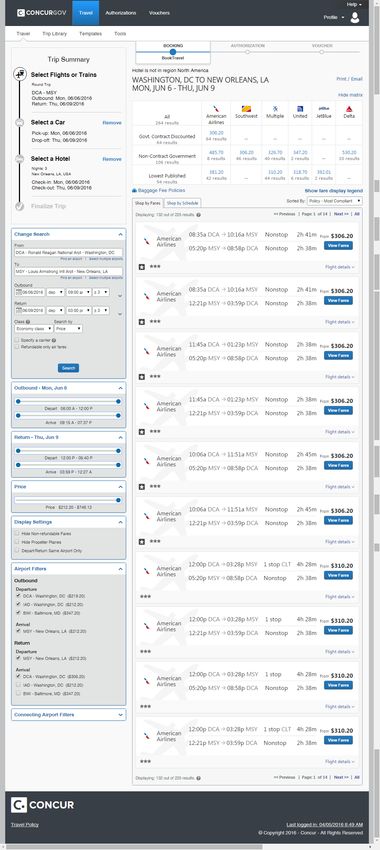
8
ConcurGov Federal Traveler Manual
The city-pair fares display with 3 stars . The least cost fares display with a star in a
square icon. In this example, the first few American Airline flights are identified as
the city pair and least cost fares.
If you are in a market that has multiple airports available, the matrix may show multiple options.
Optionally, use the Shop by Schedule tab and click the Search button to refresh the display. Select flights by
clicking the radio button next to the Outbound flight and next to the Return flight. Click the Price these options
button. ConcurGov shows the estimated round trip fare in the Chosen Carriers section.
The system always proposes the cheapest, most policy compliant flights first to keep the traveler within policy and
to try and achieve cost advantageous travel.
To reserve the selected flight, click on the View Fares button.
The color coding of the Fares and/or Reserve buttons is as follows:
Blue : Indicates there is more than one government contract fare to choose. Indicates the
fare is within policy.
Green Select : Indicates the fare is within policy.
Yellow Select : Indicates there might be a cheaper city-pair fare at a different airport in your
market. Or, there is a cheaper fare that is not a city-pair fare.
Red Select : Indicates the fare is outside of policy. If selecting this fare, additional information
must be entered on the Travel Policy Violation pop-up. This could be a non-refundable fare, non-Contract
carrier fare, or other type of policy violation.
Optionally, click Show fare display legend under the matrix to view the fare legend.
9
ConcurGov Federal Traveler ManualThe “R” represents a refundable fare, “NR” will display non-refundable fares. You may have to click on Shop by
Fares and/or look for lowest published fares in the matrix to find non-refundable options.
To view information about a specific flight, click the Flight details link.
After clicking the View Fares button or the Flight details link, the screen shows additional information about the
flight.
10
ConcurGov Federal Traveler ManualNote: Some city-pair fare flights may have discount city-pair options that are called Govt. Contract Discounted
(Refundable). There are a limited number of seats on these flights that can save even more money if
booked when available. Waiting to reserve the Govt. Contract Discounted rate may result in the rate not
being available.
Note: Use the Fare Rules link to gain an understanding of any travel restrictions, penalties, etc. that may occur if
the flight needs to be changed.
Select the desired flight’s radio button and click the Select button.
11
ConcurGov Federal Traveler ManualThe Review and Reserve Flight screen displays the details related to the selected flight.
In the Review Flights section, verify the flight detail information.
12
ConcurGov Federal Traveler Manual Scroll to the Enter Traveler Information section to view the traveler’s email and frequent flyer program
information.
Note: The Frequent Flyer Program is retrieved from the traveler’s profile, if entered. Optionally, users can
select the Add a Program link to add a travel program for Air/Rail, Car Rental, and Hotels.
Click the Select Seats button to view the Seat Map pop-up and choose a specific seat.
Click any available seat and click the Select Seat button.
13
ConcurGov Federal Traveler ManualNote: After selecting the seat assignment for the leg being shown, the system displays a Seat Map pop-
up for the remaining legs of the trip. When selecting your seat assignment, verify the flight leg. The
last leg may appear before the first leg.
Note: Seat maps may not be available for all flights. Some preferred seats won’t be able to be booked if
there is no Frequent Flyer program entered in the traveler’s profile. If a seat assignment is not
selected here, there are more chances to select a seat on the itinerary. It is recommended to
desginate a seat preference in the traveler’s profile for a better chance to avoid being assigned the
middle seat when seat maps are not available.
Verify the method of payment.
Note: The charge card associated with this travel activity (plane, rail, car rental, or hotel) automatically
defaults. Users can add another card or select a different card if required.
Click the Reserve Flight and Continue button to reserve the flight.
Note: The Review and Reserve Car screen displays if the Find a Car check box was checked. Move forward to
the Making Car Reservations section.
****************
Note: At this point, users can add Car, Hotel, Rail, or Parking reservations to the itinerary by clicking the
appropriate link.
Click the Next button to:
o Display the Trip Booking Information screen if no other reservations are being made
o Display the Review and Reserve Car screen if reserving a car
o Display the Review and Reserve Hotel screen if reserving a hotel but no car
Note: For overnight trips, if a hotel is not tied to the reservation, an Attention pop-up displays that must be
completed in order to continue with the flight reservation.
14
ConcurGov Federal Traveler ManualOn the Trip Booking Information screen, enter the Trip Description field and click the Next button.
Making Car Reservations
If the Pick Up/Drop off Car at airport check box is selected on the Air/Rail tab, the Review and Reserve Car
screen displays after the flight is reserved.
Note: Optionally, a car can be reserved directly by clicking the Car tab on the Travel screen.
When booking a car directly after the Air search, a matrix of car rentals appears. DOI policy is to book a compact
car.
15
ConcurGov Federal Traveler Manual Scroll down the screen to book a car (underneath the matrix).
Note: Rental car search results are automatically sorted by travel policy. DOI travelers should always
choose the cars covered under the DTMO contract - notated by the 3 stars in a circle and
a green Select button. Avoid reserving cars that appear with a yellow Select
button (outside of polciy) or a red Select button (exceeds approved
amounts) to prevent personal liability issues when not using the Government contract rental car
rates.
Click the green Select button for the car being reserved.
16
ConcurGov Federal Traveler ManualThe Review and Reserve Car screen displays details related to the selected car rental.
In the Review Rental Car section, verify the car detail information.
Scroll to the Enter Driver Information section to view the traveler’s email and Rental Car Agency Program
information.
Note: The Rental Car Agency Program is retrieved from the traveler’s profile, if entered. Optionally, users
can select the Add a Program link to add a rental car program.
Verify the method of payment.
Note: The charge card associated with this travel activity (plane, rail, car rental, or hotel) automatically
defaults. Users can add another card or select a different card if required.
Click the Reserve Car and Continue button to reserve the car.
17
ConcurGov Federal Traveler ManualNote: The Hotel screen displays if the Find a Hotel check box was checked. Move forward to the Making
Hotel Reservations section.
To Reserve a Car Without Airfare
On the Travel Authorizations screen, click the Car tab.
In the Temporary Duty Location section, enter the temporary duty station in the Reference Point field
and click the Find Location button.
Select the appropriate location from the Searching for Location pop-up and click the Choose button.
Enter the Pick-up date and Drop-off date fields.
In the Pick-up car at section, select either the Airport Terminal or Off-Airport radio button, and then
enter the location.
Note: Use the Search link to find locations for Off-Airport sites.
Note: Optionally, select the Return car to another location check box and complete the Drop-
off car at field.
Note: Optionally, click the More Search Options link to see additional search preferences.
Click the Search button. The car results display as discussed above.
Note: A Warning pop-up displays reminding users to confirm the vehicle reservation is a Government
rate.
Click the green Select button next to the car being reserved.
Note: Rental car search results are automatically sorted by travel policy. DOI travelers should always
choose the cars covered under the DTMO contract - notated by the 3 stars in a circle and a
green Select button. Avoid reserving cars that appear with a yellow Select button (outside of
polciy) or a red Select button (exceeds approved amounts) to prevent personal liability issues when
not using the Government contract rental car.
On the Review and Reserve Car screen, change information as desired then click the Reserve Car and
Continue button to reserve the car.
On the Travel Details screen, click the Next button.
On the Trip Booking Information screen, complete the information and click the Next button.
On the Trip Confirmation screen, click the Confirm Booking button.
Making Hotel Reservations
If the Find a Hotel check box is selected on the Air/Rail screen, the hotel results appear after the car is reserved.
Note: Optionally, a hotel can be reserved directly by clicking the Hotel tab on the Travel screen.
Hotels can be sorted by Compliance, Preference, Price, Rating, Distance and Policy.
The Lodging Per Diem allowance is displayed at the top of the listing of the hotels.
FedRooms are notated with a brown star. These properties are recommended by GSA
because they usually have cancellation policies up to 4 or 6 p.m. for the date of arrival and are within per
diem.
The E-Receipt Enabled link appears next to some hotels. This link only displays if E-receipts is activated in
the traveler’s profile.
Hotel search results are automatically sorted by distance from the reference point entered in the original
search.
18
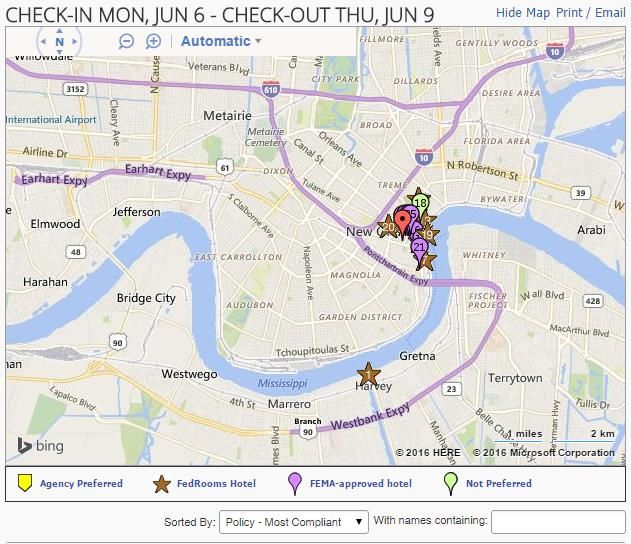
ConcurGov Federal Traveler ManualA map displays with hotel results based on the search criteria.
Use the following tools to manage working with the map:
o Click the Zoom icons to zoom the map in or out. Optionally, use the fly wheel on your
mouse or keyboard to zoom in or out.
o Click the Automatic down arrow to change how the map behaves.
o Click a star or a balloon symbol to get more information about a specific hotel. The legend under
the map describes the map symbols.
o Optionally, click the Hide Map link.
19
ConcurGov Federal Traveler ManualNarrow or expand the search using the following parameters located on the left side of the screen:
Use the Find hotels within fields to expand or narrow the distance from the Reference Point.
Use the Hide hotels over Per Diem limit check box to remove all hotels over the per diem limit.
Select the Chain or Superchain radio button to search for a particular hotel chain.
Use the Neighborhood and Hotel Amenities panels to further narrow the search.
20
ConcurGov Federal Traveler ManualTo reserve a room:
Scroll down the screen to see available rooms.
Click the more info link to view more detailed information for a specific hotel, e.g., Amenities, WiFi
access, and restaurants.
Click the choose room link below the hotel name to view the room selection for the specific hotel.
The Select buttons are color coded as follows:
o Green : Indicates the hotel is within policy.
o Yellow : Indicates the hotel is outside of policy and, if selected, additional information
must be entered. These hotels may still be within per diem but not participating in the FedRooms
program.
o Red : Indicates the hotel is outside of policy and, if selected, additional information
must be entered.
Click the radio button next to the desired room and click the green Select button to reserve the room.
The Review and Reserve Hotel screen displays details related to the selected hotel.
In the Review Hotel Room section, verify the room detail information.
Scroll to the Enter Hotel Guest Information section to view the traveler’s email and Hotel Program
information.
Note: The Hotel Program is retrieved from the Traveler’s profile, if entered. Optionally, users can select
the Add a Program link to add a hotel program.
Verify the method of payment.
Note: The charge card associated with this travel activity (plane, rail, car rental, or hotel) automatically
defaults. Users can add another card or select a different card if required.
Review the Accept Rate Details and Cancellation Policy information and click the “I agree” check box.
21
ConcurGov Federal Traveler Manual Click the Reserve Hotel and Continue button to reserve the room.
Note: This displays the Travel Details screen.
Continue to the Completing the Reservation section below.
22
ConcurGov Federal Traveler Manual23 ConcurGov Federal Traveler Manual
To Reserve a Hotel Without Airfare
On the Travel Authorizations screen, click the Hotel tab.
In the Temporary Duty Location section, enter the temporary duty station in the Reference Point field
and click the Find Location button.
Select the appropriate location from the Searching for Location pop-up and click the Choose button.
Enter the Check-in Date and Check-out Date fields.
Note: Use the Find hotels within fields to expand or narrow the distance from the Reference Point.
Note: Optionally, select the Airport, Agency Location, Address, or Reference Point/Zip Code radio
button as a location around which to search for a hotel.
Note: Optionally, select the With names containing check box and enter the key word characters to
search for a specific hotel.
Click the Search button. A map displays with hotel results based on the search criteria.
Continue booking a hotel using the steps in the Making Hotel Reservations section.
Completing the Reservation
On the Travel Details screen, users can print or email the itinerary. In addition, users can change or cancel any
reservations, select a seat, change the Frequent Flyer Program, add a car, hotel, or rail reservation, view fare
rules, and complete the reservation. Click the appropriate links on this screen to make changes or view these
items.
24
ConcurGov Federal Traveler Manual25 ConcurGov Federal Traveler Manual
On the Travel Details screen, click the Next button to display the Trip Booking Information screen.
On the Trip Booking Information screen, enter the Trip Description field to identify the trip and provide
useful information about the trip.
Select the Trip Purpose using the drop-down menu.
Optionally, select whether to email directions and/or maps to the hotel in the email confirmation.
Click the Next button.
On the Trip Confirmation screen, click the Confirm Bookings button.
Note: The Travel Authorization for the reservation is automatically created. The View Associated
Authorizations screen displays.
o If a hotel is not on an overnight reservation, a pop-up displays prompting the user to indicate the
reason for not booking a hotel from the drop-down list.
o Note: Travelers can search as many times as they want to for various fares, but make sure not to
click Confirm Bookings button until pretty firm about the reservations. ConcurGov uses live
inventory and airlines can charge a fee if they notice Churning (travelers booking inventory and
then making multiple changes to that booked trip). The system may also generate a Churning
26
ConcurGov Federal Traveler Manualerror and prevent the traveler/arranger from making the change. The ConcurGov system will also
email users who have not clicked Confirm Booking that their trip will be canceled unless they
finish the reservation that same day.
The screen defaults to the Summary tab to view the document summary, and users should make any appropriate
changes to the document such as adding expenses in the Expenses & Receipts tab, assigning accounting codes
in the Accounting tab, performing a pre-audit on the Perform Pre-Audits tab, etc. To make changes to the
reservation, click the Document Actions button and select the View/Change Reservations button. After
changes are made, review the pre-audits, stamp and submit the authorization for approval. More details on these
tabs to follow.
Section 4: Creating, Reviewing, and Submitting an
Authorization
This section describes how Authorizations are created after a booking is confirmed. This section explains how to
review the authorization and submit an authorization for approval.
Creating an Authorization
ConcurGov automatically creates an authorization after a booking is confirmed. The authorization provides the
aggregated costs of the reservations and calculates per diem allowance estimates based on the TDY location
selected for the trip.
An authorization can be created without making a reservation. For more information, see Creating an
Authorization without a Reservation below.
View Associated Authorizations
After a booking is confirmed, the View Associated Authorizations screen displays the document toolbar. Use this
toolbar to view the document summary and make changes or add information to the document as appropriate.
Document Summary
The Summary tab, (aka Document Summary) is the primary review tool for travelers to view document details,
including per diem location, reservation information, expenses, accounting, and calculated per diem allowances
for a trip.
The Summary tab sections correspond to the tabs on the document toolbar. Scroll through the Summary screen
to view these sections and click the Details link to the right of the section heading to make changes. Clicking a
Details link changes the focus to the appropriate Document Toolbar tab.
Summary: Provides summary for all sections of an authorization. Users can make all changes to the
Authorization by clicking the appropriate Details links on this screen.
Profile: Add or make changes to the traveler’s profile information. This section can also be used by
Federal Traveler Arrangers who make travel arrangements for others.
27
ConcurGov Federal Traveler Manual Group: Add and view group authorizations (not really used by DOI).
General: View and add document and trip information.
Expenses & Receipts: Add or delete expenses and attach, view or delete receipts.
Exceptions: Displays Other Authorizations i.e. Excess Baggage, Rental Car Authorized.
Accounting: Enter accounting codes.
Totals: Display expenses by summary or category details, accounting details, and advance details.
Perform Pre-Audits: Displays the pass/fail status each item required in the Audit Process. A reason is
required for each audit item that displays Fail.
Confirmation: Apply a status i.e. “Authorization Signed” and then stamp and submit the document for
approval. Provides Document Routing information and Document History.
Using Document Summary to Review Documents
The Summary tab is the primary review tool for approvers and the only place where a traveler, document
preparer, or approver can view calculated per diem allowances for a trip. With the Summary tab, users can:
Navigate to any part of the document to view or make changes.
Review, update, and delete expenses already entered on the document.
Attach or delete receipts/documentation.
Enter comments pertinent to the document.
Stamp and route the document.
Creating an Authorization without a Reservation
This section details how to create an authorization when starting with a reservation. Examples of when online
reservations may not be needed include field work, pre-arranged accommodations, etc.
To create an authorization without a reservation
From the ConcurGov Home screen, under the Shortcuts Authorizations section, click the New link.
Alternatively, click Authorizations New Authorization on the Menu Toolbar.
Note: If the TMC was called to make a reservation, click the New from Agent-booked Trip link.
Choosing this option, requires the Record Locator number to be entered. This code should be on the
emailed itinerary that is sent to the traveler from the Agent.
Select a Document Type – Authorization - from the Document Type drop-down.
Click the Create Document button.
On the Document Information tab, enter the required document information below. The Document Type,
Document Name, Document Date, and TA Num fields pre-populate.
Type Code: Use the drop-down to select a type code. Most travelers choose Trip by Trip, but there are
other options to indicate: Invitational Travel (non-DOI employees), Tour Renewal Travel, Limited
Open and Taxable TDY. Check with your bureau on policies related to allowable Open
authorizations.
Purpose Code: Use the drop-down to select the appropriate purpose code.
Document Detail: Type a detailed description of the details/reason for travel.
Click the Trip Information tab, enter the information below.
Depart Selection: Use the drop-down to select a departure location. This notates whether the traveler is
departing from Residence, Duty Station, or another location. Users on details should choose the
In Travel Status selection when filing multiple vouchers on every voucher except the first
voucher.
Return Selection: Use the drop-down to select a return location. This notates whether the traveler is
returning to Residence, Duty Station or another location. Users on details should choose In
Travel Status selection when filing multiple vouchers until they are ready to submit their final
voucher and return to Residence or Duty Station.
28
ConcurGov Federal Traveler ManualTrip Duration: This field defaults to Multiple days. Use the drop-down if the trip is 12 hours or less, or
12-24 hours with or without lodging.
Comments: Type any comments for the document, or click Preset to add preset comments.
Arrival Date: Type or select the first day of the trip.
Departure Date: Type or select the last day of the trip (or the last day for that TDY location).
Itinerary Location: Enter the TDY location, or use the Itinerary Location Lookup icon to search for
the TDY location.
Enter additional dates and locations if necessary.
The individual Purpose codes are optional.
Use the Unlisted check box if going to a remote unlisted location.
Click the Create Document button.
The next screen defaults to the General tab and users should make any appropriate changes to the document
such as adding expenses in the Expenses and Receipts tab, assigning accounting codes in the Accounting tab,
performing a pre-audit on the Perform Pre-Audits tab, etc. When all changes are made, review the Perform Pre-
Audits tab, then stamp and submit the authorization for approval. These tabs are detailed next.
Section 5: Working with Expenses & Receipts
The expense information in this guide applies to actions taken on authorizations and/or vouchers.
DOI receives an interface file from JP Morgan Chase (this functionality is expected later in our deployment),
almost all charge card expenses are automatically added to the traveler’s voucher when posted to a charge card.
However, there may be times when an expense, such as mileage, shuttles, etc. need to be added to the
document.
Caution: Do not to leave duplicate expenses from the authorization and Itemized expenses pulled from the
Charge Card tab on the voucher.
Entering expenses can be accessed by clicking the Details link in the Expense section on the Summary screen or
clicking the Expenses & Receipts tab on the Document Toolbar. All expenses can be managed from this area,
including itemizing and deleting expenses.
The following table describes the options on the Expense List area:
29
ConcurGov Federal Traveler ManualExpense List Options Description
Select All Click the Select All expenses link to delete all expenses. Deselect
a check box to prevent that expense line from being deleted.
Deselect All Click the Deselect All expenses link to remove the selected
check boxes marked for deletion.
Action column
Click the Edit Expense icon on an expense line to edit the expense in
the Add Expense Details section.
Click the Itemize Expense icon on an expense line to itemize the
expense (related to Charge Card items). This opens the Add Child Expense
Details screen.
Delete Select the check box to identify an expense to be deleted.
Expense Date The date the expense was incurred.
Expense Description The description of the expense.
Amount The amount of the expense. For reconciliation expenses, the Amount can be
negative.
Type The type of expense. Valid values include CC (applied charge card expenses)
and RO (read-only expenses).
Adding an Expense
On the Authorizations Summary screen, click the Details link to the right of the Expenses section or click
the Expenses & Receipts tab at the top of the screen.
The Add Expense Details pane displays to the right of the Expenses List.
On the Add Expense Details pane, there is an optional field called Create Expenses Through field,
where a user can type the date through which the expense should be replicated if needed.
In the Expense Date field, update the date if required.
From the Expense Description drop-down, select an expense description.
o After selecting an expense description, the following fields are available: Cost, Payment Method,
Show Other Details link, Show Per Diem Conditions link (for per diem expenses).
In the Cost field, enter the dollar amount of the expense. Use the Foreign Calculator icon to convert
the cost to another currency.
From the Payment Method drop-down, select a payment method if necessary. The payment method
defaults based on policy and common practice.
Click Save button after adding each expense.
Important Note: To add any additional expenses, click the Add Expenses button on the left side of the
screen or the new expense will overwrite the previously entered expense.
In general, any expense marked with RO (read only) will not be able to be edited.
Working with Per Diem Expenses
Per Diem Expenses (Lodging and M&IE) display under the Expenses & Receipts tab with a few additional options
to allow travelers to claim Actuals, Deduct Meals Provided, Deduct for days of Annual Leave and alter M&IE
amounts i.e. reduce to 55% for extended details or adjust camp rates.
Lodging Fields:
30
ConcurGov Federal Traveler Manualo Copy Per Diem Expense Values and Conditions link: use these fields to change the Lodging
per diem expense for multiple days.
o Expense Description: shows as Lodging.
o Cost: defaults with the lodging reservation cost if booked through ConcurGov or can be manually
entered if booked outside the system.
Note: If the hotel reservation is booked through ConcurGov, you will not be able to delete that
lodging expense or alter the dollar amount until the voucher is created or alternatively changing
the reservation in ConcurGov. In the voucher, you will be able to alter the lodging dollar amount
and delete any inaccurate lodging expense.
o Payment Method: defaults to GOVCC-C but can be changed if for some reason the traveler
could not use the Government card to pay for lodging.
o Show Other Details link: this field isn’t really relevant to the traveler and just has informational
items.
o Show Per Diem Conditions link: radio button defaults to Regular Lodging. Travelers who have
justified and been approved to exceed the per diem allowance under rare circumstances, need to
change the radio button to Actual Lodging or the difference between actuals and allowed will be
reflected on the authorization and deducted on the voucher.
o Click Save if any changes are made in this section.
M&IE Fields:
o Copy Per Diem Expense Values and Conditions link: use these fields to change the M&IE per
diem expense for multiple days.
o Expense Description: shows as M&IE.
o Cost: defaults with the allowable M&IE rate for the TDY location.
o Payment Method: defaults to Reimbursable.
o Show Other Details link: isn’t really relevant to the traveler and just has informational items.
o Show Per Diem Conditions link: radio button defaults to Regular Lodging but has other helpful
options:
31
ConcurGov Federal Traveler Manual Meals Provided radio button: check the appropriate boxes if Breakfast, Lunch, and/or
Dinner are provided and click the Save button.
Actual Meals radio button: use to alter the M&IE Amount for the entire trip i.e. reduce to
55% or reflect a reduced camp rate without a ¾ deduction on first and last day, go back
to the top and use Copy Per Diem Expense Values and Conditions link through the
ending date of the trip and change the Cost to the lower M&IE Amount, and click the
Save button.
32
ConcurGov Federal Traveler Manual To notate annual leave while in travel status, check the On Leave check box, the radio button defaults to
Annual, enter the number of hours in the Hours field.
Section 6: Accounting
Most FBMS Bureaus and Departmental Offices use many different combinations of accounting elements such as
Cost Center, WBS, Fund, and/or Functional Area. There may be times when an office feels it is appropriate to
charge a Work Order or Real Estate Object and those options are available in ConcurGov. All Bureaus/Offices
except for USGS enter the appropriate accounting elements as a new label and then save those labels as
favorites. USGS will be able to Search for their accounting labels/WBS using the Search field.
Select on the Accounting tab.
33
ConcurGov Federal Traveler Manual Click the Add New Accounting link.
Enter a Label for this account code. This can be any name that makes sense to the user.
Enter the current Fiscal Year for this account code.
Enter a combination of:
o Cost Center (mandatory)
o WBS (optional except for USGS)
o Fund (optional may be derived or derived from a partial fund)
o Functional Area (optional may be derived)
Note: Use the Order field if charging a work order for this travel expense. Use the Business Entity,
Building No., Land Number, and/or Rental Unit fields if charging this travel to a Real Estate
Object.
Click the Save Accounting Updates button.
Note: To charge this travel to more than one line of accounting, click the Add New Accounting link,
enter a new Label, enter the Fiscal Year and repeat the steps above to add the new accounting
elements (Cost Center, WBS, Fund, Functional Area etc). Then follow the Allocating Expenses
instructions below to split charges to multiple accounts.
USGS only: Use the Enter Search Criteria section and enter the label with the two digit FY, space, WBS
e.g. 15 GX15AE00COM0000, to be charged in the Accounting field, then click on the appropriate label
to add it to your document.
Allocating Expenses to One or More Accounting Codes
If a document has more than one accounting code, use the allocate cost icon to allocate the expenses
across the accounting codes. The following allocation methods are available:
Date
34
ConcurGov Federal Traveler Manual Expense category/payment method
Expense
Location
Percent
Amount
To allocate by Date, Expense Category, Expense or Location:
Click the Expense Level Allocation tab.
o To allocate by Date: click on the asterisk (*) under the Date column, enter the Begin Date field for
charges for each accounting label and then click the Save Allocation Changes button.
o To allocate by Expense Category/Payment Method: click the Expense Category / Payment
Method link, and use the Organization/Label drop-down boxes to pick the line of accounting for
each Expense Category or Payment Method. Then click the Save Allocation Changes button.
o To allocate by Expense: click the Allocated By Expense link, and use the drop-down boxes to
pick the line of accounting for each Expense. Then click the Save Allocation Changes button.
o To allocate by Locations (requires multiple TDY Locations on the document): click the Allocated
By Location link and use the drop-down boxes to pick the line of accounting for each location.
Then click the Save Allocation Changes button.
To allocate by Percent or Amount:
Click the Document Level Allocation tab.
o To allocate by Amount: click the dollar Amount link under the Amount column, then enter the
appropriate dollar amounts to be allocated to each line of accounting. Then click the Save
Allocation Changes button.
35
ConcurGov Federal Traveler Manualo To allocate by Percent: click the 0 link under the Percent column, then enter the appropriate
percentages to be allocated to each line of accounting. Then click the Save Allocation Changes
button.
Note: Use the Allow Exceptions check box (in the various allocation screens) to provide the ability to
add expenses on the Expenses & Receipts tab and send individual expenses to either account
even if the rest of the document is split 50-50, by date, etc. Allow exceptions is not available when
allocating by amount or expense.
Remember that all Charge Card items still need to be reallocated in FBMS to actually move centrally-billed
charges from default accounts to other accounts when applicable.
Section 7: Perform Pre-Audits and Confirmation Tabs
When the travel/arranger has finished entering the expenses and the accounting on the authorization or voucher,
the traveler needs to sign the document to initiate the routing to the next person or persons in the routing list for
approval. Routing lists may have conditional routing that sends a document through different approvals depending
on whether the conditions were met. This is called conditional routing. An example of conditional routing is an
authorization that includes foreign travel that requires additional approval at a higher level. Some offices may
have multiple reviewers and approvers in the routing list.
Important note: Tickets will not be issued until the final approving official in the routing list approves the
authorization, so it is important that non-refundable reservations are approved within the same 24 hour
period or the reservation will be lost and the traveler will need to re-book.
To stamp a document, follow these steps:
Select the Confirmation tab (or scroll down to the Document Summary section at the bottom of the
Summary tab.)
Status to Apply: Select a status code from the Status to Apply drop-down. Use Authorization Signed
to sign an authorization, use Voucher Signed to sign a Voucher.
Remarks: This field is optional. Enter any explanation/comments about the document that the approving
official(s) needs to see. The remarks are saved with the history of the document and can be viewed in the
Document History area.
Click the Stamp and Submit Document button.
This action shows the items on the Perform Pre-audits tab.
Review the Pre-Audit list:
o If any of the Audit Process status show as FAIL, click on the Justify Pre-Audit Results button.
Enter the justification(s) in the Comments box and click the Save Justification button.
o If they all show with a status of PASS or after you save comments, click the Continue Stamping
the Document button.
Read the important text describing the impacts of legally signing this document and click the Accept
Signature Text button.
This completes signing/stamping the document and shows the next users in the routing list. Click the
Close Post Stamping Document Closure Screen button.
Always use the Log Out words to close ConcurGov and not the normal red x (internet close button) or
else you can lock your document and may need a FATA to unlock it.
36
ConcurGov Federal Traveler ManualSection 8: Creating a Voucher from an Authorization
When travel is completed, the traveler should complete a voucher within 5 business days. Sections 6-8 of this
guide covering Expenses, Accounting, and Stamping the Document work the same in ConcurGov whether the
user is creating an authorization or a voucher. This section recaps the steps to file the voucher for reimbursement.
Creating a Voucher
On the ConcurGov Home screen, in the left navigation pane, under the Shortcuts/Vouchers section,
click the New link. Alternatively, select Vouchers New Vouchers on the Menu Toolbar.
On the New Voucher screen, next to Document Type select Voucher From Authorization from the
Document Type drop-down.
Click the Create Document button.
Scroll down to the document list and click the pencil/paper icon next to the authorization being used
to create the voucher. The authorization must have an approved status to be able to create the voucher.
Review the fields on the Document Information tab. The Document Type, Document Name, Document
Date, and TA Num fields pre-populate.
o Type Code: should populate with trip type from the Authorization, otherwise use the drop-down
list to select a type code.
o Purpose: should populate with trip purpose from the Authorization, otherwise use the drop-down
list to select a type code.
o Document Detail: should populate with trip description from the Authorization, otherwise type a
detailed description documenting the reason for travel.
Review the fields on the Trip Information tab. Note: If revisions to the trip dates or TDY locations(s)
associated with the travel are needed, make those changes from the General tab, after the document is
created.
o In the Depart Selection drop-down list, verify if traveler left from the duty station, residence, or in
cases of extended details choose “IN TRAVEL STATUS” when appropriate.
o In the Return Selection drop-down list, verify if traveler returned to the duty station, residence, or
in cases of extended details, choose “IN TRAVEL STATUS” when appropriate.
o Verify the Trip Duration.
o In the Comments field, type any comments for the document, or click the Preset button to add
preset comments.
o In the Itinerary Location section, review that the Arrival Date reflects the first date of the trip, that
the Departure Date reflects the last date of the trip (or dates for each individual TDY location)
and that the Itinerary location(s) are correct. If needed, use the binoculars to search for various
TDY locations.
o Click the Create Document button. The document is saved on creation.
Select either the Summary or Expenses & Receipts tab, scroll down to the Receipts section. Use the
Attach Receipt Images link to attach scanned receipts or use the Print Fax Cover Page link to fax in
receipts. The bar code on the fax cover page is document and traveler specific.
Select the Expenses & Receipts tab and review the expense details.
o Lodging and Per Diem expenses automatically populate. Use the Edit (paper/pencil) icon to
edit if necessary.
o Review all expenses in the Expense List, use the Edit (paper/pencil) icon to edit dates, costs,
and if applicable payment method for any expenses that differ from amounts listed on the
authorization. Click the Save button after any edits.
o Use the Delete check box next to any expense being deleted from the voucher and then click the
Delete Selected Expenses button.
37
ConcurGov Federal Traveler Manualo Use the Add Expense button to add any new expenses on the voucher. Click the Save button
after any additions and then click the Add Expense button to add another expense if needed.
Repeat until all expenses are added.
o If the expense applies to multiple days, type or select a date in the Copy Through field to
replicate the expense.
o For more detailed information on expenses see Section 5 Working with Expenses of this guide.
Select the Accounting tab; review any accounting codes already selected for the document which are
displayed in the Accounting Applied to TANUM section. Use the edit (paper/pencil) icon to edit if
necessary.
o For more details on using accounting codes, see Section 6 Accounting of this guide.
Select the Totals tab, review the Expense Summary section.
Select the Confirmation tab, in the Status to Apply field, verify that VOUCHER SIGNED is selected.
Click the Stamp and Submit button.
This action shows the items on the Pre-Audit Results for TANUM screen.
Review the Pre-Audit list:
o If any of the Audit Process status show as FAIL, click on the Justify Pre-Audit Results button.
Correct the item(s) or enter the justification(s) in the Comments field for failed items and click the
Save Justification button.
o If all audit items show with a status of PASS or after you hit Save Justifications, click the
Continue Stamping the Document button.
Read the important text describing the impacts of legally signing this document and click the Accept
Signature Text button.
This completes signing/stamping the document and shows the users in the routing list. Click the Close
Post Stamping Document Closure Screen button.
Once approved, the voucher interfaces through FBMS for payment.
To close ConcurGov, on the Menu Toolbar, click the Profile drop down, select the Sign Out link.
Note: Always use the Sign Out words to close and not the normal red x (internet close button) or else
the document may be locked and may need a FATA to unlock it.
Creating Interim Vouchers for Long Term TDY
GSA policy requires travelers to submit a voucher at least every 30 days for extended trips such as details.
Travelers on a trip that is longer than 30 days can create and submit Interim Vouchers. You can create multiple
Interim Vouchers from the same authorization until the Final voucher of the detail. You should not attempt to
remove or alter any expenses from vouchers that have been previously paid.
Note: DOI policy requires travelers to reduce the allowable lodging and M&IE amounts to 55% of the extended
TDY per diem location from Day 1 of the assignment when detailed to the same extended TDY location
for more than 30 days.
How To Create a an Interim Voucher:
On the ConcurGov Home screen, in the left navigation pane, under the Shortcuts/Vouchers section,
click the New link. Alternatively, select Vouchers New Vouchers on the Menu Toolbar.
On the New Voucher screen, next to Document Type select Voucher From Authorization from the
Document Type drop-down.
Click the Create Document button.
Scroll down to the document list and click the pencil/paper icon next to the authorization being used
to create the voucher. The authorization must have an approved status to be able to create the voucher.
Review the fields on the Document Information tab. The Document Type, Document Name, Document
Date, and TA Num fields pre-populate.
38
ConcurGov Federal Traveler Manualo Type Code: should populate with trip type from the Authorization, otherwise use the drop-down
list to select a type code.
o Purpose: should populate with trip purpose from the Authorization, otherwise use the drop-down
list to select a type code.
o Document Detail: should populate with trip description from the Authorization, otherwise type a
detailed description documenting the reason for travel.
Review the fields on the Trip Information tab. Note: If revisions to the trip dates or TDY locations(s)
associated with the travel are needed, make those changes from the General tab, after the document is
created.
o In the Depart Selection drop-down list, verify if traveler left from the duty station, residence, or in
cases of extended details choose “IN TRAVEL STATUS” when appropriate.
o In the Return Selection drop-down list, verify if traveler returned to the duty station, residence, or
in cases of extended details, choose “IN TRAVEL STATUS” when appropriate.
o Verify the Trip Duration.
o In the Comments field, type any comments for the document, or click the Preset button to add
preset comments.
o In the Itinerary Location section, alter the Arrival Date and Departure Date fields to reflect just
the period covered by this voucher.
o Click the Create Document button. The document is saved on creation.
Select the Summary tab.
Note: If this is the final voucher for the extended detail, the Final Voucher check box is
checked as long as the Return Selection shows Residence/Duty Station.
Select either the Summary or Expenses & Receipts tab, scroll down to the Receipts section. Use the
Attach Receipt Images link to attach scanned receipts or use the Print Fax Cover Page link to fax in
receipts. The bar code on the fax cover page is document and traveler specific.
Select the Expense tab, enter/edit any expenses to be vouchered for, do not edit previously paid
expenses. If the M&IE was not reduced on the authorization, make sure to:
o Click on Edit (Pencil/Paper) next to the first day of Lodging
o Use Copy Per Diem Conditions through to change the dates to reflect the voucher dates
o Use the Cost field to enter the reduced 55% rate (an example is shown below)
o Click the Save button
o Click on Edit (Pencil/Paper) next to the first day of M&IE
o Use Copy Per Diem Conditions through to change the dates to reflect the voucher dates
39
ConcurGov Federal Traveler Manualo Use the Cost field to enter the reduced 55% rate
o Click the Show Per Diem Conditions Link and choose the Actual Meals radio button
o Click the Save button
40
ConcurGov Federal Traveler Manual Select the Accounting tab; review any accounting codes already selected for the document which are
displayed in the Accounting Applied to TANUM section. Use the edit (paper/pencil) icon to edit if
necessary.
o For more details on using accounting codes, see Section 6 Accounting of this guide.
Select the Totals tab, review the Expense Summary section.
Select the Confirmation tab, in the Status to Apply field; verify that VOUCHER SIGNED is selected.
Click the Stamp and Submit button.
This action shows the items on the Pre-Audit Results for TANUM screen.
Review the Pre-Audit list:
o If any of the Audit Process status show as FAIL, click on the Justify Pre-Audit Results button.
Correct the item(s) or enter the justification(s) in the Comments field for failed items and click the
Save Justification button.
o If all audit items show with a status of PASS or after you hit Save Justifications, click the
Continue Stamping the Document button.
Read the important text describing the impacts of legally signing this document and click the Accept
Signature Text button.
41
ConcurGov Federal Traveler ManualYou can also read