Instruction Manual - AIR COOLER with remote control OPERATING INSTRUCTIONS
←
→
Page content transcription
If your browser does not render page correctly, please read the page content below
AIR COOLER
                       with remote control

            OPERATING INSTRUCTIONS
                       MODEL NO: R-871

                  Instruction Manual
Important safety instructions: read carefully and keep for future reference.
IMPORTANT SAFEGUARDS
FOR HOUSEHOLD USE ONLY SAVE THESE INSTRUCTIONS
SPECIFICATIONS
Model No R-871
Rated Voltage 220-240V~
Rated Frequency 50/60Hz
Rated Power 65W
Capacity of water tank 6.0L
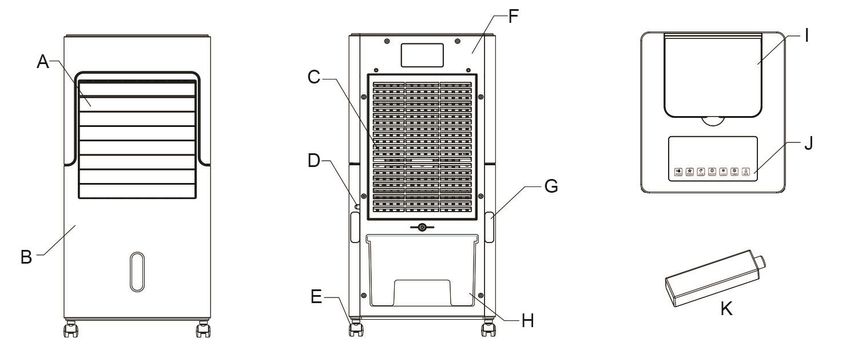
STRUCTURE AND PARTS
A- Manual Louver frame B- Front Board C- Filter
D- Power Cord E- Casters F- Rear Board
G- Power cord storage H- Water tank I- Water fill cover
J- Control Panel K- Ice crystal boxControl panel: 1. MODE : when the product is in working, touch “MODE” one time or more times, the corresponding icon will be light up and the mode is cycled as follows: 2. SPEED : touch “SPEED” one time or more times, the wind speed is cycled as follows: 3. VANE : touch “VANE” one time or more times, automatic horizontal swing will be start or stop , corresponding indicator light will be on or off. 4. COOL : touch “COOL”, cool function start work and indicator light will be light up. 5. TIMER : when the unit is working, touch “TIMER”one time or more times, timer will be cycled as follows : 6. SAVE : first time to touch “SAVE” , all the indicator light will be off, touch again, all the indicator light will be on.
7. The display for temperature and timer share the same display screen. The ambient
   temperature is displayed when the power is turned on, and the corresponding icon lights
   up. Touch “TIMER”, the timer icon lights up. After the timer is set, the ambient
   temperature will be displayed again few seconds later.
8. Touch “ON/OFF” one time at any time, the product will be stopped working. But if in
   “COOL “function, the product will be delayed to shutdown for about 5 minutes, then
   automatic shutdown after the filter is dry.

                               INSTRUCTIONS FOR USE
1. When using the appliance, make sure that it is on a flat and stable surface. Damage
   may occur if it is placed on an incline or decline. If you need cooler more, add ice block
   into upper water slot, see following image:

Note: the ice box should be far way from children to avoid eating
2. Insert the plug directly into a standard AC socket-outlet. Be sure plug fits tightly into
outlet.
3. “COOLING” Touch
Note: don't use this button without water, to avoid damage to parts.
Press the button, the water pump start to work, the wind will be cooler and wet.
3-1 Before operating the unit in Cool mode, make sure the escape valve for the water tank
is properly fixed. Then proceed to add clean water into the water tank. While adding the
water, make sure that you keep an eye on the water level indicator to make sure that you do
not OVER or UNDER FILL the unit. Press the button Cool after you have added the water
and the unit should commence to blow cooler air. When you press the button Cool again, it
will stop working.
3-2 If you find that the air after Step 1) is still not cool enough, you can add additional ice
block into the water tank directly by opening the water tank cover. Be sure not to exceed the
icebox capacity otherwise damage to the unit or electric shock may occur.
3-3 If you wish to use an Ice box instead of ice block, just place it directly into the tank by
opening the water door. It will be good cooling efficiency if you place it in your refrigerator
and let the ice pack freeze for 1 to 2 hours.
3-4 You may complete pull out water tank, then replace water in the water tank or clean
water tank.
4. How to knock down the dust-proof bracket and honeycomb filter
2
1 1. Pull out the dust-proof bracket
2. Rotate the filter knobs outwards
like up photo
3. Take up the honeycomb filter
3
9. To turn off the unit just Touch the ON/OFF.
10. To completely shut the unit off, touch ON/OFF, and remove plug from the socket-outlet.
MAINTENANCE
1. Always remove the plug from the socket-outlet and allow the fan blower to stop acting
before clean it.
2. Clean the external surfaces of the unit with a soft damp (not dripping wet) cloth.
WARNING:
Do not immerse the unit in water.Do not use any cleaning chemicals such as detergents and abrasives. Do not allow the interior (special for the PCB) to get wet as this could create a hazard. 3. After extended periods of use, be sure to replace the water in the tank with fresh clean water at least weekly. Also remember to clean the filter by unscrewing the filter and removing the filter cradle. It should be cleaned in a mild soapy solution and then left to dry before replacing the filter. 4. When the unit is not in use, make sure that it is unplugged from the wall socket, water is drained thoroughly and it is placed back into its original box for storage until later use. 5. In case of malfunction or doubt, do not try to repair the fan yourself, it may result in a fire hazard or electric shock. IMPORTANT INFORMATION FOR CORRECT DISPOSAL OF THE PRODUCT IN ACCORDANCE WITH EC DIRECTIVE 2002/96/EC. At the end of its working life, the product must not be disposed of as urban waste. It must be taken to a special local authority differentiated waste collection centre or to a dealer providing this service. Disposing of a household appliance separately avoids possible negative consequences for the environment and health, deriving form inappropriate disposal and enables the constituent materials to be recovered to obtain significant savings in energy and resources. As a reminder of the need to dispose of household appliances separately, the product is marked with a crossed-out wheeled dustbin.
You can also read


