IPASS USER TUTORIAL - Alert Today Florida
←
→
Page content transcription
If your browser does not render page correctly, please read the page content below
IPASS USER TUTORIAL

IPASS USER TUTORIAL

                                                             Table of Contents
Setting Your Password ................................................................................................................................. 2
Logging into iPASS ........................................................................................................................................ 3
iPASS Dashboard .......................................................................................................................................... 4
Account Information .................................................................................................................................... 4
            Notification Settings ........................................................................................................................ 4

                        Alert Location...................................................................................................................... 5

                        Browser Notifications ......................................................................................................... 5

                        Email Notifications .............................................................................................................. 6

            Profile Information........................................................................................................................... 7

                        Changing Your Password..................................................................................................... 8

                        Two-Factor Authentication ................................................................................................. 8

Agency Information...................................................................................................................................... 9
            Personnel .................................................................................................................................. 10-11

                        User Roles .................................................................................................................... 12-13

                        Search by Name ................................................................................................................ 13

            Training & Pay ........................................................................................................................... 13-16

Contract Information ............................................................................................................................ 17-18
            Documents ................................................................................................................................ 19-21

            Notes .............................................................................................................................................. 21

            Target Areas (Pre-Approved Locations) .................................................................................... 21-22

            Media Releases .............................................................................................................................. 23

            Detail Reports ........................................................................................................................... 24-25

                        Hours ............................................................................................................................ 26-27

                        Citations ....................................................................................................................... 27-28

                        Bicycle Lights ................................................................................................................ 28-30

Invoices .................................................................................................................................................. 31-38
Logging out of iPASS ................................................................................................................................... 38

1|Page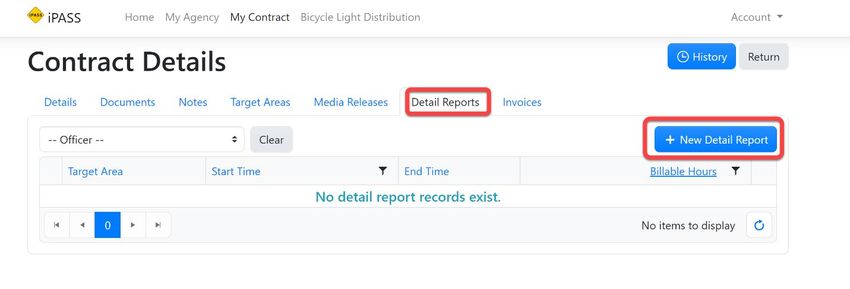
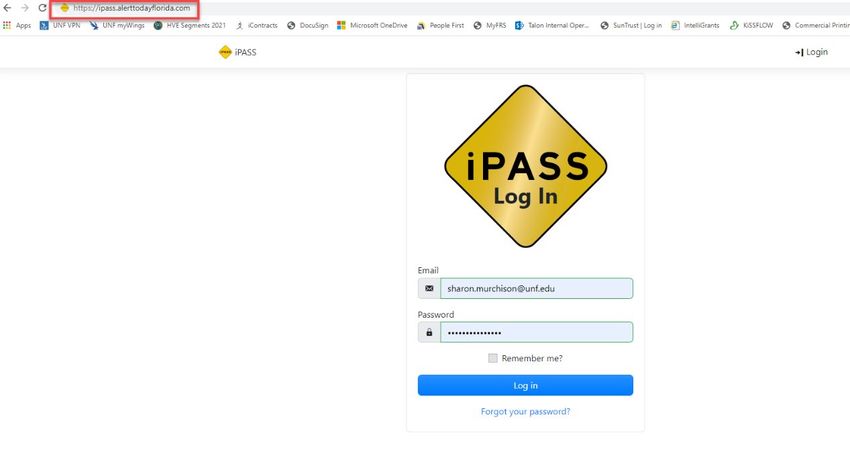
IPASS USER TUTORIAL
Set your password in iPASS. Look for the email from iPASS Website
(Website@iPASS.AlertTodayFlorida.com). Be sure to check your spam/junk folder as it
may appear here. Note: The link in the email is only valid for two (2) days. If the link
has expired, go to https://ipass.alerttodayflorida.com and click on Forgot your

Password.
Reset your Password

2|Page
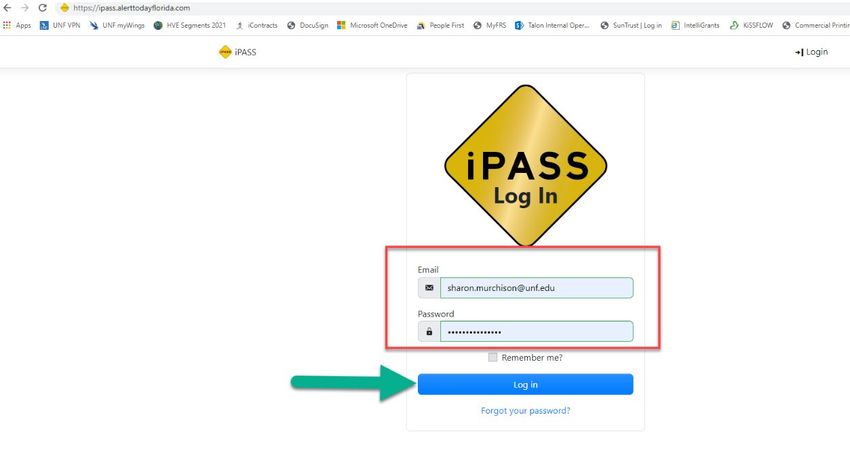
IPASS USER TUTORIAL
Once your password has been set, login to iPASS at:
https://ipass.alerttodayflorida.com

Enter your email address and password and click Log in.

3|Page
IPASS USER TUTORIAL
iPASS Dashboard – This is the first thing you see when you login to iPASS. To return to
this screen at any time, select the Home button or Return button (where available).
The Dashboard is still under development. In the future, you’ll be able to customize
how you want this to look.

To begin, click on Account to set up your Notification Settings.

Click on Notification Settings.

4|Page
IPASS USER TUTORIAL
Alert Location – set the location of where you want to receive popup alerts.
Note: This symbol      is known as the Help Key. Hover over the Help Key (where
available) to get information about what the description field means.

Next, click on Browser Notifications. Select the Browser Notifications you’d like to
receive. Click on the slider button to turn on and off notifications. “Show Desktop
Notifications” must be turned on and you must be logged into iPASS to receive
desktop notifications.

5|Page
IPASS USER TUTORIAL
Click on Email Notifications.

Select the Email Notifications you’d like to receive by using the slider button. Select
Immediate to receive an email notification for every change or select Digest to receive
a single email of notifications that you are subscribed to. Click on the slider button to
turn on and off the notifications. Note: You will not receive an email notification for
changes that have been generated by you under your account. When finished, click
the X to close the session.

6|Page
IPASS USER TUTORIAL
To view or manage your profile settings, click My Profile

You are only able to change your phone number or time zone. Default Time Zone is
set to Eastern Time (US & Canada). To request a name change or email address
change, please contact IPTM for assistance.

7|Page
IPASS USER TUTORIAL
To change your password, enter your Current password followed by New Password,
Confirm new password, and click on Update password.

To enable Two-Factor Authentication, click on Two-factor authentication and select
Setup authenticator app. Follow the instructions on how to configure the
authenticator app.

8|Page
IPASS USER TUTORIAL
Let’s go back to the iPASS Dashboard and select My Agency.

Details about your agency will be listed here.

Note: Selecting the History tab gives you a list of changes that have been made.

9|Page
IPASS USER TUTORIAL
Note: To return to the iPass Dashboard at any time, click the Home button. To return
to the previous screen, click the Return button.

Click on Personnel

All Personnel entries will show up here. Currently, for the 2020-21 contract cycle, this
list will be empty. To add a person to the Personnel list, click on +Add Personnel.

10 | P a g e
IPASS USER TUTORIAL
Complete the Personnel form in its entirety and select a User Role. Click Save when
finished. See Pages 12-13 for an explanation of User Roles.

Added Personnel should look like this:

11 | P a g e
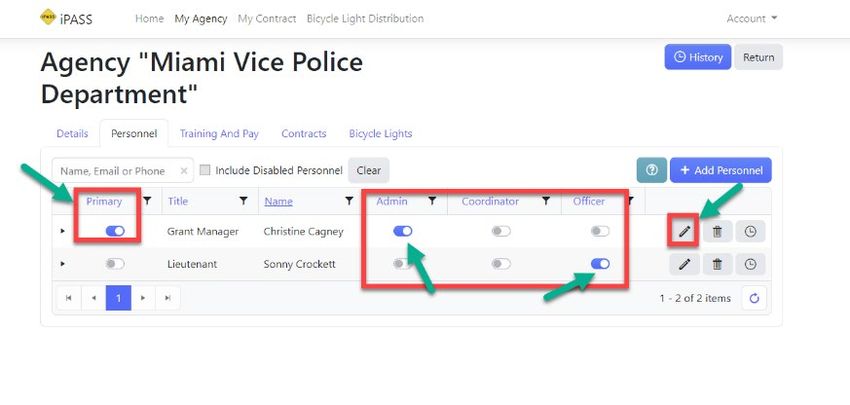
IPASS USER TUTORIAL
Note: You can toggle the User Roles at any time by clicking on the slider button or
selecting the pencil icon to edit the information.

USER ROLES
Primary Contact – Click on the slider button if you want this person to be the primary
contact. The primary contact person is the person whom IPTM will correspond with on
all communication, verbal and written, under the contract. Note: The primary contact
can also be the Admin, Coordinator or Officer.

Email – when you enter the email address, the default is set to Create User Account. If
you wish the person to have a user account in iPASS, they will be sent a welcome email
instructing them to set their password and login to iPASS for the first time. If you do not
wish for the person to have an account in iPASS, simply click the slider button to turn
this off.

Enabled – This is an automatic default. This feature indicates the active status of the
personnel record. If the person leaves the agency, retires, or is no longer participating
in HVE operations, rather than delete the record and information associated with this
person, simply click on the slider button to disable them. To reactivate the person, click
the slider button back to Enabled.

Select the User Role by clicking the slider button to Agency Admin, Personnel
Coordinator, or Officer.

Agency Admin – This person is in charge of administering contract execution and allows
them to create and manage all aspects of the agency interactions with the contract as
long as there is an associated user account.

Personnel Coordinator – This person is in charge of or manages the detail activity
reporting during the contract cycle. They can enter detail activity reports on behalf of
officers if there is an associated user account.

12 | P a g e
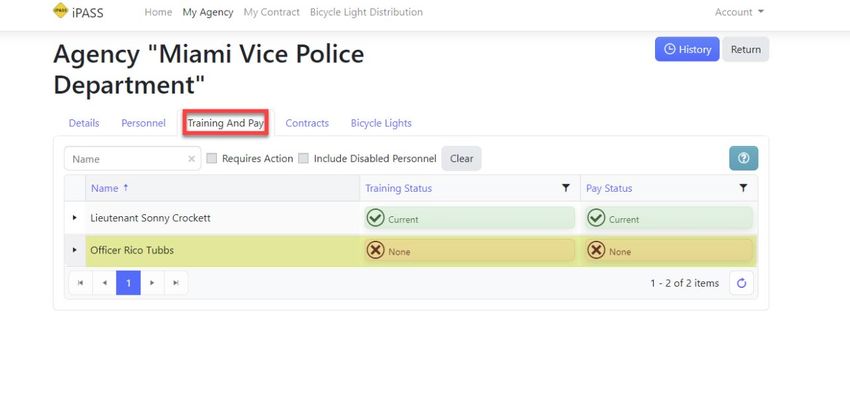
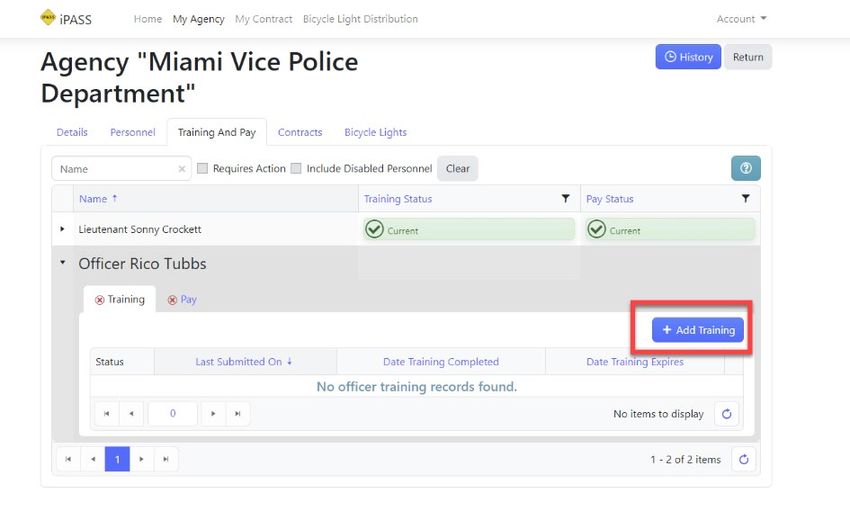
IPASS USER TUTORIAL
Officer – Only an approved officer can work education and enforcement details. The
officer has the ability to enter his/her own detail activity reports if there is an associated
user account. Officers cannot enter detail activity reports on behalf of other officers.
After creating an officer, you'll need to submit the officer's training and pay for
approval.

To search a person by name, simply enter their name, email, or phone number into
the box. You can also include disabled (no longer active) personnel by clicking on the
Include Disabled Personnel.

Click on Training and Pay.

13 | P a g e
IPASS USER TUTORIAL
Click inside the Training Status box.

Click on +Add Training.

Add the date the officer completed training (4-hour Ped Bike Laws course or 2-hour
Online Refresher course) and click Submit For Approval. IPTM will approve or deny
when submitted.

Billable Hours – Default is set to 0.00. This field is to be completed if the agency is
billing for the officer’s attendance at the required training (either 2 hours or 4 hours).
The date of attendance must be within the active (executed) contract period in order
14 | P a g e
IPASS USER TUTORIAL
for the agency to be reimbursed. The officer must be on overtime status to be
eligible. Training is valid for two years. When the officer’s training has expired, you
will see a notification on the Training tab that reflects “Out of Date”. The officer(s)
will then be required to take the 2-hour Online Refresher course.

Complete the pay information by clicking on the Pay tab.

15 | P a g e
IPASS USER TUTORIAL
Click on +Add Pay.

Complete all entries of the pay record and click Submit for Approval. IPTM will
approve or deny when submitted.

Base Rate – Regular rate of pay for the officer.

Overtime Rate – The amount the officer is paid during overtime (time and ½)

Fully Loaded Overtime Rate – This is the amount the agency pays on top of the
overtime. For example: Social Security, Medicare, Retirement, Workers’ Compensation.
Benefits such as health insurance, education pay, incentive pay, car usage, etc. are not
reimbursable under the contract.
Note: If your agency is not claiming the Fully Loaded Overtime Rate, indicate the
amounts as: FICA = 0% Retirement = 0% Workers’ Comp = 0%

16 | P a g e
IPASS USER TUTORIAL
To view Agency Contract details, click on Contracts then click on the magnifying glass
or select My Contract from the iPASS Dashboard.
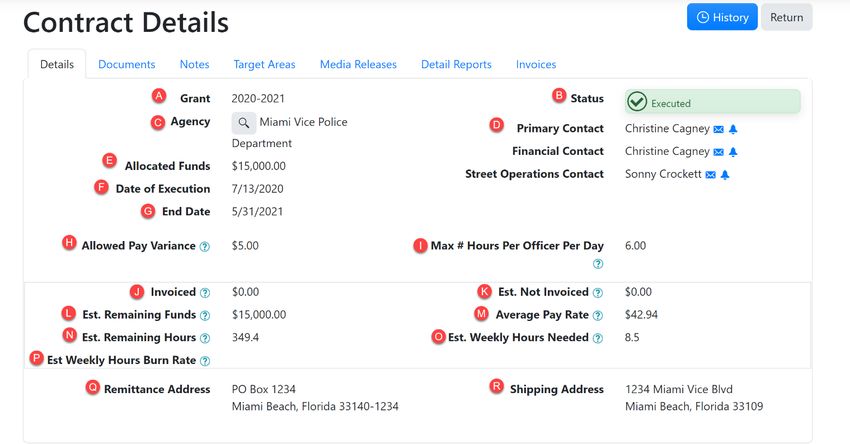
ABOUT THE AGENCY CONTRACT
A. Grant: Year of the contract cycle.
B. Status: What stage the contract is in (Proposal, Finalized, Executed, Withdrawn).
C. Agency: To view information about your agency, click on the magnifying glass.
D. Primary, Fiscal, and Street Operations contacts will be shown here. Notify IPTM
if this information needs to be updated.
17 | P a g eIPASS USER TUTORIAL
E. Allocated Funds: This is the amount the agency was awarded to conduct
education and enforcement details, also known as High Visibility Enforcement
(HVE) details.
F. Date of Execution: This is the date the contract became fully executed.
G. End Date: This is the date the contract ends.
H. Allowed Pay Variance: Any invoiced amount between -/+ $5.00 will be allowed
without additional explanation.
I. Max # of Hours Per Officer Per Day: Maximum number of overtime hours per
officer per day allowed under this contract.
J. Invoiced: The total dollar amount you have invoiced for.
K. Est. Not Invoiced: Estimate of all hours which have not yet been invoiced.
L. Est. Remaining Funds: Estimate of funds remaining under this contract based on
hours that have not yet been invoiced. Estimate is based on the approved pay
rate for the officers.
M. Average Pay Rate: Average of Fully Loaded Overtime Rate for all enabled
officers.
N. Est. Remaining Hours: Estimate of how many billable hours are remaining under
this contract based on the average approved rate for all enabled officers.
O. Est. Weekly Hours Needed: Average number of hours needed per week under
this contract to fully exhaust the available funds based on the average rate of
pay.
P. Est. Weekly Hours Burn Rate: Based on 30-days of detail report activity. This is
an estimate of the number of hours worked per day on average.
Q. Remittance Address: Address where overtime reimbursement checks will be
mailed. Notify IPTM if this information needs to be updated.
R. Shipping Address: Address where educational materials and bicycle lights will
be shipped. Notify IPTM if this information needs to be updated.
18 | P a g eIPASS USER TUTORIAL Click on Documents to view documents for your agency. Documents to be added under this tab will include the fully executed contract, Letter of Support, the agency’s traffic enforcement plan, and/or Letter of Delegation of Signature Authority. To add a document, click the +Add Document and upload your document(s). Select the document type from the drop-down list. Select the file to attach and click +Add. IPTM will approve or deny when submitted. 19 | P a g e
IPASS USER TUTORIAL
To view any of the documents that have been added under this tab, click on the Adobe
Acrobat icon to view the document.

PDF version of Authorized Signer document:

20 | P a g e
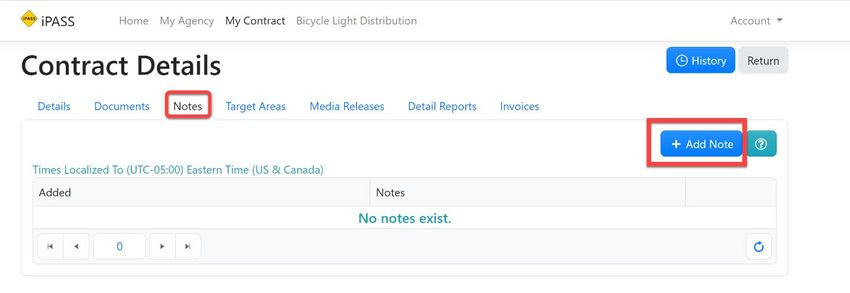
IPASS USER TUTORIAL
Once document(s) have been approved by IPTM, the agency will see a status of
approved or denied.

Click on Notes to view any notes made by the agency or IPTM. To add a note to the
file, click on +Add Note.

To view pre-approved locations, click on Target Areas.

21 | P a g e
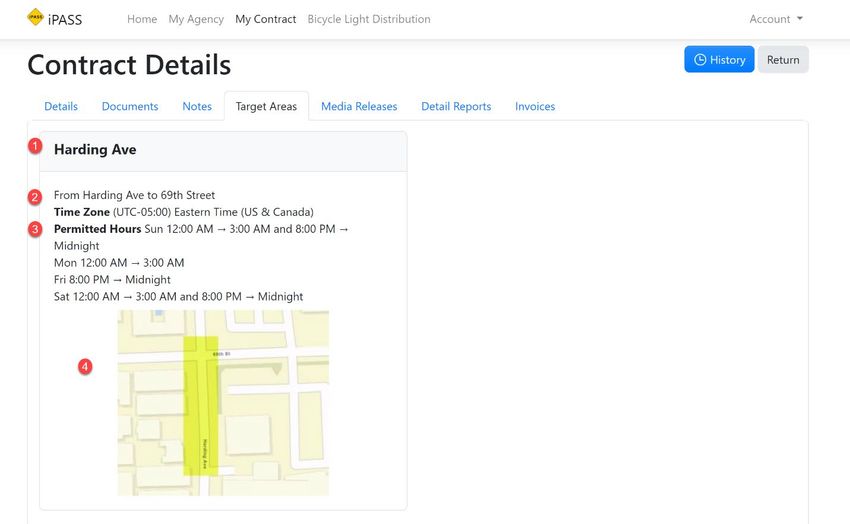
IPASS USER TUTORIAL
Explanation of Target Areas (Pre-Approved Locations):

    1. Description of Roadway Segment
    2. Roadway names
    3. Permitted Days and Hours: In this example, the days this location is to be
       worked are Sunday, Friday, and Saturday from 8pm to 3am. Times are in plain
       text and are grouped by day of the week. At Midnight, times will “overlap” into
       the following day. Sunday will be (8:00pm to Midnight), Monday will be 12:00am
       to 3:00am - the “tail-end” of Sunday); Friday will be 8:00pm to Midnight,
       Saturday will be 12:00am to 3:00 (the “tail-end” of Friday) and again from
       8:00pm to Midnight; and Sunday from 12:00am to 3:00am (the “tail-end” of
       Saturday).
    4. Screenshot of the Roadway Segment

22 | P a g e
IPASS USER TUTORIAL To view and add media releases click on Media Releases and click on +New. Complete the fields for the media release. Name: First Media Release, Second Media Release, Additional Media Date of Release: First media release should be released 7 days prior to when education and enforcement details are to take place. Description of Release: Describe how you have notified the public about the HVE enforcement operations. You can add links to external sites showing your communications. Documents: Add documents by clicking on Select files to show how your media release was presented. Examples include press release documents, screenshots of websites or images. Please do not upload videos. Instead, provide links in the description or wherever they’re hosted. Click Submit For Approval or Save As Draft until you are ready to submit for approval. IPTM will approve or deny when submitted. 23 | P a g e
IPASS USER TUTORIAL
DETAIL REPORTS - To view detail reports that have been previously entered, click on
Detail Reports. To add a new detail report, click on +New Detail Report.

Click on the dropdown list for a list of pre-approved locations. Select the location that
was worked and then select the officer who worked the detail. Note: Officers who
will be entering their own detail reports and have a user account, will only see their
name listed under the Officer field. Enter the date and time of when the detail took
place. You can enter this manually or select the calendar and clock icons to complete
this information. It is strongly recommended to use to the calendar and clock icons.
The default date and time will always be set to current date and time.

24 | P a g e
IPASS USER TUTORIAL
Click +Create Detail Report to add the detail activity.

Date and Time of detail will now be shown. Complete the educational contacts made.

25 | P a g e
IPASS USER TUTORIAL
Click on the Hours tab. If you need to edit the hours, click on the pencil icon.

Edit the date and time. Click on Update to update the hours.

Hours have been now been updated.

26 | P a g e
IPASS USER TUTORIAL
Note: The +Add Hours feature only applies to the same location worked on the same
day. Specifically, when an officer clocks in from a meal break. This feature cannot be
used to enter a new detail report. To add additional hours, click on +Add Hours and
complete the entry.

To enter Citations, click on Citations.

Click on the dropdown list and scroll through the list of citations. Click the appropriate
citation.

27 | P a g e
IPASS USER TUTORIAL
Add the Target – Bicyclist, Motorist, or Pedestrian and click +Add Citation.

Enter the total number of warnings and/or citations given by the officer. This
information will automatically be saved.

To enter Bicycle Light Distribution Assurance Forms click on Bicycle Lights or select
Bicycle Light Distribution from the iPASS Dashboard.

28 | P a g e
IPASS USER TUTORIAL
Click on +New

Click          for more information on Bicycle Light Distribution

Complete the Recipient Name and Date of Distribution. Click on the box that reads
“Check this box to indicate you are signing this document electronically.” Click on
Sign. Note: This is not an F.I. card. You only need to ask for the person’s name. No
identification is required from the person in order to receive the bicycle light. If an
officer does not have a user account in iPASS, they must complete the Bicycle Light
Distribution Assurance paper form. Someone with an iPASS user account can enter
the information and electronically sign the form.

29 | P a g e
IPASS USER TUTORIAL
To view the signed bicycle light form, click the Adobe Acrobat icon to download the
document.

30 | P a g e
IPASS USER TUTORIAL
To add an invoice, click on Invoices and click on +Add Invoice.

Click date range of the un-invoiced items you want to invoice. Click on +Create.

Click +Add for the HVE details that you want to include on the invoice.

31 | P a g e
IPASS USER TUTORIAL
Add Agency Invoice #. The agency invoice # must be unique to your agency and is for
your internal use only. To add Supporting Documentation, click on Select files and
upload your documentation. You must provide documentation showing that the
officers were paid overtime for the hours worked and the overtime rate documented.

32 | P a g e
IPASS USER TUTORIAL
By default, the approved overtime rate from the Pay tab will be used. To edit the pay
rate information, simply edit the rate of pay by clicking in the Rate field. Note:
Overtime rate of pay must be within the -/+ $5.00 rate. If the amount is over $5.00,
please update the officer’s rate of pay and provide an explanation in the Notes field.

To preview the invoice, click on Preview.

33 | P a g e
IPASS USER TUTORIAL
The invoice will remain in Draft status until the authorized signer or signee has
electronically signed and submitted the invoice.

Click on Sign and Submit Invoice. Enter your iPASS password to electronically sign the
invoice and click on Sign and Submit.

34 | P a g e
IPASS USER TUTORIAL
To view the signed invoice, click on the Adobe Acrobat icon to download a copy of the
submitted invoice.

35 | P a g e
IPASS USER TUTORIAL
All pending and approved invoices will be shown under Invoices.

To view a paid invoice, click on the Adobe Acrobat icon to download the paid invoice.

36 | P a g e
IPASS USER TUTORIAL
A copy of the paid invoice will be notated like this:

The Invoice Compliance Checklist is completed by IPTM to inform the agency they
have complied with the terms under the contract to be reimbursed for the submitted
overtime hours.

37 | P a g e
IPASS USER TUTORIAL
A copy of the check issued by IPTM/UNF is also included.

To logout of iPASS, click on Account and select Logout.

38 | P a g e
You can also read