Kent Lake 2017-2018 Science Fair Student Guide - Being Leaders In Science
←
→
Page content transcription
If your browser does not render page correctly, please read the page content below
Kent Lake
2017-2018 Science Fair
    Student Guide

        (A step-by-step guide)

  Being Leaders In Science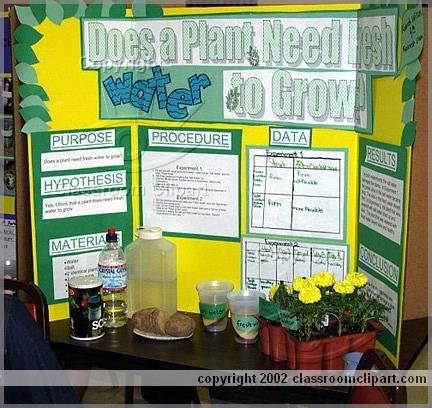
Participating in the Science Fair is a tremendous learning opportunity for
you and your child and it’s also a lot of fun! The purpose of this guide is to
help your child to learn how to do an experiment using the Scientific
Method. Everything you need to know to make a great science project is in
this student guide. The Science Fair is about learning. Your child’s results
may not support their hypothesis, but this is okay. They still have learned
something. Please read over the guidelines and tips before you start and
remember to have fun!

If you have any questions, please contact e-mail Nicole Wesley at
wesley1357@att.net

                                         Important Dates

January 25, 2018 - Registration Forms turned in
February 7, 2018 - Display Boards and Logbooks brought in
February 8, 2018 - Science Fair

                                              Contents

“So where do I begin?” ................................................................ page          1
Safety Information ....................................................................... page       2
The Logbook .............................................................................. page       3
How to do an experiment ............................................................ page             4
Display information ..................................................................... page       8
The Display Board ...................................................................... page        9
Some suggestions for parents .................................................... page               11
Resources ................................................................................... page   13
So, Where do I Begin?
                        “First Things First”

1. PURCHASE A NOTEBOOK
  This notebook will be your logbook, showing what you did and what you
thought during your project. Stay organized from the very beginning by
using your logbook. Your logbook will be turned in with your display
board. See page for more information on the logbook.

2. FIND A TOPIC IN SCIENCE THAT INTEREST YOU
  Ideas for your project can come from all sorts of places. What are your
interests? What do you love? Have you noticed something and
wondered “what would happen if...”? Look at the websites listed on the
Resource page. Write down all of your ideas in your logbook.

3. DESIGN AN EXPERIMENT
  An experiment uses the Scientific Method to answer a question about
your topic that you do not know the answer to without testing. These are
the steps that scientists use to answer a question. See page?? of this
guide for step-by- step instruction on how to do an Experiment Project
and display board. Don’t loose judge’s points by doing a demonstration
and not an experiment. Make your project an experiment.

 4. CAREFULLY READ
    Before you start your project, read through the guidelines, safety
information and tips. Copies of the judging criteria are included so you
know what they will be looking for.

5. PARENTAL HELP
    This a learning experience for your child. The project should be
    student-driven, with parental support. Obviously, Kindergarteners are
    going to need more help and guidance than 5th graders.

                                        -1-
Safety
1.   All projects must be approved by your parents.

2.   All projects must be supervised by an adult.

3.   Use the internet safely and with your parent’s permission.

4.   All experiments using animals or humans as subjects should cause no
     no harm or undue stress to the subject.

5.   Do not eat or drink during the experiment.

6.   Always wash your hands after doing the experiment.

7.   Sharp tools, electric tools, fire, hot liquids and chemicals must be
     supervised and used with adult help.

8.   Wear protective gear as necessary - goggles, gloves, apron.

9.   Glass and other fragile items should not be displayed. Use
     photographs.

10. No open flames or chemicals will be permitted at your display.

                                      -2-

                        THE LOGBOOK
Your logbook is an important part of your project and will be turned in with
your display board. Always write down everything you
do starting with all of your project ideas. Your log book will be a record of
everything you thought and did during your project. Your display board will
be a summary of your logbook.
Purchase a notebook. Start your logbook on day 1. Use pencil to write in
your logbook. Do not use white out or scribble out your entry. If you make a
mistake, draw a line through your writing. Create it as you go, do not copy it
over.
What should be in your logbook?
• put your project name and your name on cover.
• put project name on first page of logbook
• on the second page list the table on contents with page numbers.
• list your project ideas
• your problem written as a question
• research on your topic including sources
• your hypothesis
• list of all your materials
• list all the procedure steps
• results of all trials using charts or graphs
• conclusion
• photos, drawings, diagrams showing aspects of your project
-3-
HOW DO I DO AN EXPERIMENT?Remember, an experiment is a test that you design to find out the answer
to a question. Use the steps of the Scientific Method below in order. Read
all of the steps first. Remember to write everything in your logbook. Take
photographs during every step of your experiment to use on your display
board or in your logbook.
Step 1: Define the Problem - Ask a Question
After you have picked out a topic that interests you, write the question that
you would like the answer to. What do you want to know? Use a separate
page in your logbook for each step. There are three types of Questions.
The Effect Question:
What is the effect of _________________ on _______________?
What is the effect of light on plant growth?
What is the effect of temperature on whipping egg whites?
The How Does Question:
How does the ___________________ affect _________________?
How does the temperature affect mold growth?
How does the amount of light affect the growth of plants?
The Which/What Question:
Which/What __________________ (verb) ___________________?
What paper towel is the most absorbent?
What fertilizer grows the largest radishes?
-4-Step 2: Research and form a HYPOTHESIS
Now that you have written your question it is time to research your problem.
You want to become an expert on your topic just like real scientists do. How
do you become an expert?
1. Read
Read books from the library and at home. Read magazine articles. With
your parents supervision, go on line and read articles on the internet. Write
down what you learn in your logbook along with where you found the
information.
2. Discuss
Talk with your parents and teachers. Talk with experts such as Doctors,
Veterinarians, and other experts who work with your topic.
Write down what you learned in your logbook. (Remember to take a
picture of yourself interviewing people).
Once you have learned everything you can about your topic, you are ready
to write your hypothesis.
Write a Hypothesis:
A hypothesis includes the scientific understanding that explains your
prediction. Ask yourself What do you think will happen and why will it
happen? Write your hypothesis before you start your experiment. Write it in
your logbook.
Example Question: How does the temperature affect mold growth?
Example Hypothesis: I think heat will make mold grow faster.
*** A hypothesis is your best guess. You may find out from your
experiment that you were wrong. But that is okay!
-5-Step 3: Test your hypothesis by doing an experiment
Now comes the fun part - your experiment. Use your imagination to design
an experiment that tests only your question. Your results will either prove or
disprove your hypothesis. Remember to include everything in your logbook.
1. Materials: What do you need to perform your experiment? List every-
thing that you need. Don’t forget the adult supervising you.
2. Write a Procedure: Write the list of steps that you did to perform
your experiment in the order that you do them in. Anyone should be able
to repeat your experiment by reading your procedure.
3. Test your Hypothesis: Follow your procedure and conduct your
hypothesis. Repeat your test at least 3 times. Remember to only
change one thing (or variable) for each test.
Example: Grow mold on the same type of bread in the refrigerator, on
the counter, and under a heat lamp.
Grow the same type of plant in the same soil, with the same
amount of water, but different amounts of exposure to light.
STEP 4: COLLECT YOUR DATA
Write down the results of your experiment every time you test it. Use
charts, graphs, and diagrams to record your data. This makes it easier to
understand your results. This site will help you make professional looking
graphs. http://nces.ed.gov/nceskids/createagraph/
-6-STEP 5: COME TO A CONCLUSION
1. Tell what happened. What were the results of your experiment?
2. Was your hypothesis right or wrong?
3. Would you change anything about your experiment now that you have
finished testing?
4. What questions came up during your experiment, and what further
research could you do to answer them?
5. Most importantly, What did you learn from your results? How does
this apply to real life?
NOW WHAT DO I DO?
1. Re-read the guidelines to make sure that you’ve completed them all.
2. Put together your display board carefully. It should have sections labeled
with each step of the Scientific Method.
3. Use the checklist on page to make sure you’ve done everything required.
-7-DISPLAY INFORMATION MATERIAL A Tri-fold board must be used. Because of set-up limitations there is not the ability to set up other poster boards. You can purchase your board at Staples, Office Max, Joann’s or Michaels (use a coupon if needed.) LETTERING You want the visitors to be able to read your display board from 2-3 feet away. Your title should be 3-4 inches high. Subtitles should be 1-2 inches tall. The mandatory subtitles are: Problem/Question, Hypothesis, Procedure, Materials, Results, and Conclusion. All items should be securely glued onto your board. Do not use pins, staples, or tape. Before you start gluing, lay out your display on the board to decide on best placement and spacing. Make sure your name, grade, and teacher’s name is on both the front and back of your board. COLORS Use contrasting colored paper behind your text and photos to help them pop out. Do not use more than 3 colors. PHOTOS AND GRAPHS Take photos of yourself while performing your experiment. Use photos to show aspects of your procedure. Use graphs and charts in your Results section. These can be computer generated (see helpful websites). Make sure that they have titles and that the graph axes are labeled. DISPLAY ITEMS Your logbook will be displayed with your board. You may also place items related to your experiment in the area in front of your display board. No part of your display should pose a safety hazard. Do not include harmful chemicals, sharp objects, any source of heat or flames, or glass. Do not include moldy items, use photographs. There will be no electrical outlet available. Remember there will be limited space.
-8-
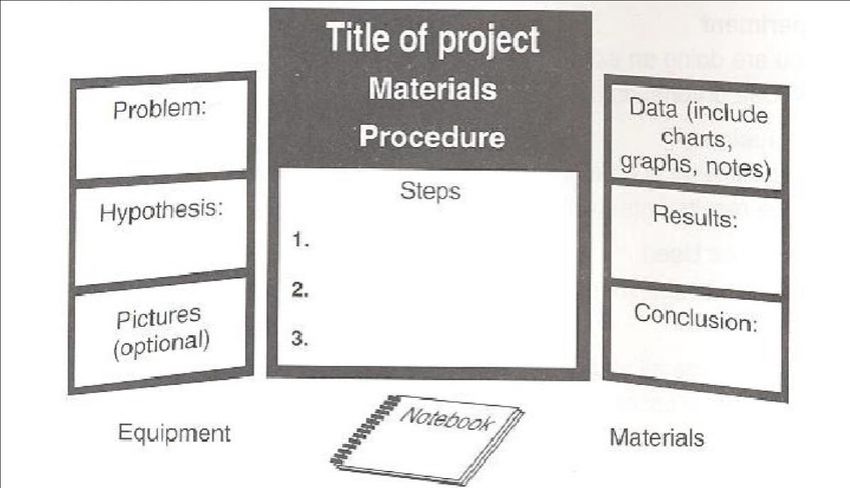
Template for the Display Board
D. Samples of a Completed Display Board-9-
Display Board Checklist
___ Does my display have a title?
___ My display includes all steps of the Scientific Method.
___ I have conducted at least 3 trials of my experiment/test.
___ All charts, graphs, and illustrations are labeled.
___ Every photograph has a caption.
___ Does my board look neat and attractive? Is it crowded or has any large
empty spaces? Items are glued on straight and there are no globs of
glue on the board.
___ I have not used more than 3 different colors in my board
___ All of the words on my board are spelled correctly.
___ I have used proper grammar and punctuation.
___ I have listed all of my materials used.
___ My procedure is written in clear sequential order.
___ My results explain my graphs, charts and any observations I made.
___ My conclusion answers my question, how accurate my predictions
were, what I learned (supported with data), and how it can be applied.
___ None of my display items can spill or cause a mess.-10-
Some Suggestions for Parents
1. Start with a planning meeting. Review this guide.
2. Help get your child started, but do not do your child’s
project. Monitor your child’s progress and ensure safety.
3. Be enthusiastic and supportive!
4. Don’t wait until the last week to start. Allow more time
than you think you’ll need.
5. Let your child do the measuring, observing and
calculating. Start the notebook day 1.
6. The Scientific Method can be easy for younger children.
Just ask the following questions and write down their
answers in their own words.
1. Problem/Question - What do you want to know/find
out?
2. Hypothesis - What do you think is going to happen and why?
3. Procedure - What did you do (step by step)?
4. Results - What happened?
5. Conclusion - Was your guess right or wrong? Did
you learn something new?
7. Younger children will need help with the written portion of the display, but the words
should be their own.
8. The display board should be able to be put together and glued by the child.-11-
RESOURCES FOR HELP
There is a wealth of information on the Internet. Here are just a
few sites that provide more detailed information about the
scientific method for kids, science fair project suggestions, and
science fairs in general.
http://www.sciencebuddies.org
This is a wonderful site that gives step-by-step instructions for
science projects, has a database of over 1,000 suggestions for
science projects, and even has a survey a student can take to
direct him or her toward a project of interest.
http://school.discoveryeducation.com/sciencefaircentral/Science
-Fair-Projects.html
This is also a wonderful site that helps students to find projects
of interest and as well formulate testable questions for a science
project. It also has science fair presentation suggestions and
helps.
http://www.easy-science-fair-projects.net/primary-science-
fairproject.html
Here is a website that provides project ideas for the younger sets.http://www.buzzle.com/articles/scientific-method-for-kids.html This website that helps distill the scientific method into kidfriendly language. http://nces.ed.gov/nceskids/createagraph/ This website helps kids build data charts, graphs, and tables for the Data and Results sections. It also has tutorials to explain which graphs and charts are best and why. www.ipl.org/div/projectguide/ This on-line guide provides step-by-step instructions on developing a project and provides links to sites that provide ideas for projects.
You can also read